Posted by formicaindia on January 21st, 2017
Many modern kitchen counter designs, especially the ones using granite, can have clean rounded edges that many find it difficult to duplicate using laminate sheets. Bending laminates is not possible. Based on the type of laminate and size of the curve, you can still create rounded counter design using laminates.
Cold Bending of Laminates
Measure the radius of the curve: If the radius of the curve is 3 inches or greater, you can cautiously bend the laminate sheets without heating. You can measure the radius of the curve by locating the spot on each side of the counter’s rounded edge where the curve begins and then by drawing straight lines perpendicular to those edges to the point where they intersect. The you need to measure the length of the intersection back to the edge.
Make sure the edge is square: In order to prevent bubbles, gaps, or distorting of the laminate, the vertical edge around which the laminate will blend is perfectly square with the top surface of the counter.
Use the correct size of the laminate strip: Use of strip of laminate which is about ½” wider that the width of the edge to which you are attaching it.
Begin attaching one one of the straight sides: After applying the laminate glue to the strip, do not attach the laminate by starting at the curve and folding the sides back. You need to start with the end of the strip on one of the straight sides of the edge before the curve. Use a J-roller with a rubber head to roll this section down tight before bending over the curve. The roller allows you to roll any bubbles out of the laminate without damaging the surface.
Bend the laminate slowly: As one end of the strip is firmly in place, slowly bend the rest of the strip around the curve. Keep the roller in the other hand so that you can slowly roll the strip as more and more of it comes in contact with the edge as you bend.
Trim the excess: Read the instructions for the laminate glue you are using so that you know how long it needs to set. After it is dried, trim the excess portion of the the strip.
2. Heat Bending of Laminates
Measure the radius of the curve: Heat bending laminate is more difficult that cold bending.
Purchase the correct grade laminate: For tighter radius curves, make sure you have the correct laminate. Vertical grade laminates are thinner standard grade laminates, making them easier to bend without cracking.
Make sure the edge is square: You can use a T-square to make sure that the vertical surface on top of which you will apply the laminate is perfectly square with the flat horizontal surface.
Heat the laminate with a heat gun: There needs to be an exact temperature to which you must heat the laminate. The forming temperature will be approximately 170 degree celsius. Heat only that section which you need bend.
Apply laminate glue: Quickly apply the glue to the application side of the laminate and line it up against the counter. Do not forget to wear heat resistant gloves.
Attach the laminate carefully: Leave an extra ½” to the width of the laminate to trim later. STarting with one end, attach the laminate firmly to the edge of the counter and use the J-roller to flatten and tighten it. Bend the heated and pliable section of laminate over the curve slowly.
Trim the excess: Always allow the laminate sheets a full day to set before trimming the excess width.
CryptoTab Browser – Easy way for Bitcoin Mining | CryptoTab Browser
CryptoTab Browser is the world’s first web browser with built-in mining features. Familiar Chrome user interface is perfectly combined with extremely fast mining speed. Mine and browse at the same time!
Quality Office Furniture USA Shipped Direct – Madison Liquidators
Nationwide vendor of quality office furnishings including Desks, Office Chairs, Conference Tables, Cubicles and more!
Lolli: Earn Free Bitcoin When You Shop Online!
Lolli is a rewards application that gives you bitcoin for shopping at your favorite online stores.
Question
I am fairly new to laminating countertops and have a project that calls for a 4″ radius on the corners. The countertop will be 2-1/4″ thick. We’ll be using Wilsonart laminate and would like suggestions on bending the laminate around this radius edge.
Forum Responses
(Laminate and Solid Surface Forum)
From contributor E:
Belt-sand the back of the laminate where it will bend around the corners. Clamp the laminate strips to your table before sanding. Make sure nothing is under the strip, so you’re sanding flat. Make sure when sticking the edge, you’ve got the thinner section lined up with curve. When putting edging on, use a heat gun to make the strip easier to bend. I’ll start on a straight edge, which holds up one end of laminate for you. Then heat the curve and j roll the radius while it’s still soft. Be careful of heating it too much (I only bubbled the laminate once) – just enough to make it more flexible. Too much heat will kill the glue also.
From the original questioner:
Thanks. I had considered sanding the back but was not sure how heating it would affect the glue. I will try it very carefully on a test piece.
From contributor J:
Another way is to use matching V grade – way, way easier to bend.
From contributor X:
In my day bending laminate was done over a cone heater that was inserted into a large juice can. When you turned the electricity on, it got the juice can hot, which is where the laminate was applied. When the laminate got flexible, it was removed and fitted. We did not have heat guns then. Make sure you use post forming laminate since it’s a bendable grade. A special pencil that applies a coat that melts and can be used to tell you when it’s time to bend is also available.
From contributor G:
Using post form, you shouldn’t need any heat. I only seem to need heat on anything 3 inches and below, unless I am using standard grade.
From contributor H:
In my opinion there’s only one way to do radius corners. Heat gun! No sanding or having to settle with postform grade material. Just heat the area to be bent for roughly 30 seconds. With a 4in radius you barely should have to heat it.
From contributor O:
All good replies. It is correct that not much heat should be needed. Also I would file the edges to get them smooth and chip free so a crack cannot start, and be careful not to blister with the heat gun.
From the original questioner:
I appreciate all the input. I tried contributor E’s way this morning. Worked great – could possibly get by without the sanding, but with my experience will try that later. Already have the laminate cut, so I will try the specialty laminate on a future project, as it must be ordered – not available locally. And I will definitely file the edges to reduce the possibility of cracks.
From contributor K:
Make sure you are using post-forming grade. Use a heat gun until it will bend whatever radius you are covering. Do not waste your time sanding the back. There is absolutely no need for this unless A. you are using standard grade, or B. your radius is under 1″ or less. I doubt either of those are the case here.
From contributor H:
A: You can bend any grade laminate with a heat gun assuming the radius is no smaller than 1in. B: I do it all the time, like every day. Not to mention all that came before. thousands.
From contributor S:
Yep, just to be redundant, heat gun. I always pre-bend before I glue though, and I tend to over bend just to make sure. My biggest problem is if there is only a couple of inches of flat/straight run after the bend, like on a top that is in a wall pass through or something. Don’t forget to be careful – stuff does get hot, ouch!
From contributor L:
Job was finished early February. I sanded back and used the heat gun. Sanding may have been overkill, but with my experience with laminate was worth the time. It worked out great! Thanks again for all the input.
From contributor M:
All of these responses are good, but for those who wonder about killing the adhesive, you can use the Wilsonart 800 series of adhesive, specially formulated for post-forming operations using heat.
From contributor N:
Use postform grade. I bend it to a 2″ radius everyday without heat or sanding. As for the heat gun ruining the glue, pre-form the laminate by heating it with the gun, before gluing, holding it around the radius either by hand or with clamps till it cools. It will retain enough of the shape of the radius. Glue up and apply.
Have you reviewed the related Knowledge Base areas below?
Would you like to add information to this article? . Click Here
If you have a question regarding a Knowledge Base article, your best chance at uncovering an answer is to search the entire Knowledge Base for related articles or to post your question at the appropriate WOODWEB Forum. Before posting your message, be sure to review our Forum Guidelines.
Questions entered in the Knowledge Base Article comment form will not generate responses! A list of WOODWEB Forums can be found at WOODWEB’s Site Map.
When you post your question at the Forum, be sure to include references to the Knowledge Base article that inspired your question. The more information you provide with your question, the better your chances are of receiving responses.
Letters, questions or comments? E-Mail us and let us know what you think. Be sure to review our Frequently Asked Questions page.
Contact us to discuss advertising or to report problems with this site.
Copyright © 1996-2020 – WOODWEB ® Inc.
All rights reserved. No part of this publication may be reproduced in any manner without permission of the Editor.
Review WOODWEB’s Copyright Policy.
The editors, writers, and staff at WOODWEB try to promote safe practices. What is safe for one woodworker under certain conditions may not be safe for others in different circumstances. Readers should undertake the use of materials and methods discussed at WOODWEB after considerate evaluation, and at their own risk.
WOODWEB, Inc.
335 Bedell Road
Montrose, PA 18801
Thread Tools
Rate This Thread
Display
- Linear Mode
- Switch to Hybrid Mode
- Switch to Threaded Mode
How to bend Laminate
I’m building a kitchen countertop. It is 1 1/2 in. thick (2 layers of 3/4 plywood) with laminate on the top. The edge will also be laminate (90 deg edge) The sink is a farm sink and the edge of the countertop is cut to match the curvature of the sink. The rear corners of the sink cutout (the front of the sink is exposed so there is no countertop at the front) have a radius approximately that of a soda can.
How can I bend the laminate so it will fit into the curved corners? I tried using a propane torch and I’m sure if I work slow and am careful it will work but is there a better way. How do the pro’s do it?
A torch will work, and you are correct that you will have to work not only slow, but continue to move the torch not to burn the laminate. You would have a little easier time with a hot air gun. But moving continuously still applies. You have another alternative though. Make a few calls to counter top companies in your area. Larger companies may have a machine that will bend laminate around tight corner. The machine is called a “post forming machine.” There is also a type of laminate that bends easier than most laminate. You have fewer choices in bending laminates. They are constucted similar to bending plywoods, with all the ply’s aligned in one direction. You have a few choices. Good luck.
Sean
Sean is right, a heat gun will work fine. You can find them at the borgs. I did this once with fair success. I suggest you cut a 2″ strip and prep it to apply to a sample curve. This will give some idea of how long the gun has to be applied to start the bending before you commit to the final project. If you melt or break it you haven’t lost anything. Good luck.
If sawdust were gold, I’d be rich!
Byron Trantham
Fredericksburg, VA
WUD WKR1
Fred:
A heat gun is what I use, never tried a torch , and I wouldn’t be temped to. Keep the heat gun moving and don’t get in to big a rush. You can bend as you go, but it heats up the contact too much and takes forever to cool down and hold. Best is to put some hash marks on laminate and substrate, heat , bend to your substrate–get it all ready — then do you glue up, putting the laminate back on, using the hash marks to put back on to exactly where it was when you did the bending, using the roller as you go — then just do the triming.
On thing that is important is to get it on straight and even, as if it starts to go up or down it will be a problem as you get farther along. What I do is put substrate on a flat table ( workbench ) with some 1/4″ ply underbeath, and laminate riding along bench, do corner and work out to both ends.
I use std. ( The thicker– countertop ) laminate and find a 1 3/4″ rad. makes a good looking rounded corner. The corner is best made using template and long flush bit to make the corner, as if corner isn’t perfectly 90 degrees to top, laminate will run up or down as you go out.
I’ve used a heat gun and even a hair dryer for larger radii. However, I wonder if a torch could ignite the contact adhesive if it is the solvent based type. egats!
-Jeff
fRED- Bending laminate is about half of the thickness of regular
Laminate. When I need to do a tight curve I mark the pre cut piece
At the area of the curve and thin the laminate with a router.
Use any flat cutter and cut away the back about half the thickness
In the area of the curve. Piece of cake.
bOb
The process of bending and gluing or laminating curves with Formica is learned by trial and error. Plastic laminate has a stress point where it breaks. If the material is pushed past the limit it can even tear after everything looks OK.
I can give you a few pointers that will help you achieve greater success with fewer errors, but the real learning is when you actually give it a try yourself.
The first thing you need to understand is that every manufacture’s laminate, Wilson Art /brand, Formica brand or the Nevamar plastics, has a different stress-breaking point.
The next thing you should know is that VT thickness Formica plastic laminate bends much easier and tighter than STD thickness. This is because the material is thinner.
VT is more difficult to bend on large surfaces because of its flexibility. Yet, it may be what you need to use in order to wrap the material around what is know as a tight radius. If you are laminating a very large cabinet piece, get another person to help you.
When gluing a radius area, three inches is about the smallest recommended size for laminating with VT grade cabinet plastic.
If you are using STD plastic laminate a six inch radius curve is the minimum size you should bend.
Using a heat gun will help you tremendously in the process of forming the plastic around the curved surface. A word of caution though, if the Formica is heated too high, it can literally loose it’s shape and crumble while you are wrapping the material around the cure, if it gets over heated.
This is by far the most important thing you need to know, your radius must be square. Did I just say that, yes! The material from flat to flat and top to bottom must be square. Plastic laminate will not follow a straight line if the material is not at a ninety degree angle surrounding the radius.
This brings me to the next point, be sure to leave plenty of extra when you cut your mica. This will help with the margin of error in case you did not stick the laminate perfectly square to a straight edge.
Laminating or bending curves with Formcia brand or any plastic laminate is going to require that you allow plenty of time. DO NOT RUSH THIS PROCESS. Gluing the material down in the proper way will take patience, accuracy and focus.
Looking for a laminated wood as a countertop at home but you can’t find anywhere else that suits your taste? Do you have the urge of making your own instead of buying? Then you are in the right spot. In this article, you will know how to simply laminate a wood like a pro. I will teach you the step by step process in just a piece of cake.
We are going to divide the steps of laminating a countertop into three easy way. The laminate is a multipurpose material and learning how to apply is a skillful way to have. Steps include measuring, cutting and laminating. Looks easier than you think, isn’t it? Then let’s get started!
What You Will Need to Follow This Tutorial
- Safety gloves
- Goggles
- Cutting Saw
- J-roller
- Trim router
- Short Neck Ruler
- Tape measure
- Contact Cement Paint Brush
- Laminate
- ½ inch wood dowels and Xylene
- Foam
- Sandpaper
You may use the small roller for the edges and big roller for the big surface of the area to lessen the job. We have all the materials ready, we are now ready to roll!
Credit Image: dhresource.com
Step by Step Instruction to Laminate the Wood
Step 1: Measure how much laminate that you need
Start by measuring the laminate that you only need. When you are already ready to cut, put the laminate facing the surface on a piece of foam to cut the exact sizes that you want. The use of the foam is to have a flat surface while trimming the material.
Credit Image: lowes.com
Step 2: Attach the Laminate to the Wood
We are now ready to laminate and attach it to the side. Glide on the contact cement by following the adhesive instructions on the can. As soon as the cement is ready, we can now proceed to the next step.
A good tip to know if the cement is ready is by touching the craft paper on to the cement, if it leaves the paper clean, then we are ready to go. Carefully attach the laminate to the surface because once you touch the surface, you can no longer reposition it.
MUST SEE: Make 16,000 Projects With Step By Step Plans
Ted’s Woodworking Plans contains complete instructions from start to finish, leaving absolutely no guesswork. Here is what you get:
- Step-By-Step Instructions
- Cutting & Materials List
- Detailed Schematics
- Views From All Angles
- Suitable For Beginners & Professionals
Using the j-roller, slowly lean with an ample pressure to attached the laminate securely. If there are excess, you can always use the trim roller to cut it.
Do the same thing to all the sides of the countertop. For the big surface area, use the wood dowels on top of the wood before putting the laminate to properly position it, then slowly take the dowels carefully.
Credit Image: cdn2.tmbi.com
Step 3: Sand up sharp edges and clean up the excess glue with Xylene
This is the final and last thing to do, sand up any excess sharp edges using the sandpaper then clean the excess glue with xylene to make it neat as possible.
Credit Image: hcsupplies.co.uk
Then there we have it, a countertop that is sleek and customized by our choice. We are now ready to use it and brag it to our guests on certain occasions. Did you find this exciting and doable? Comment down below for your thoughts and ideas for our references. And don’t forget to like and share this article!
Sure I said, figuring this would be a quick and fun thing to try to do with bending wood.
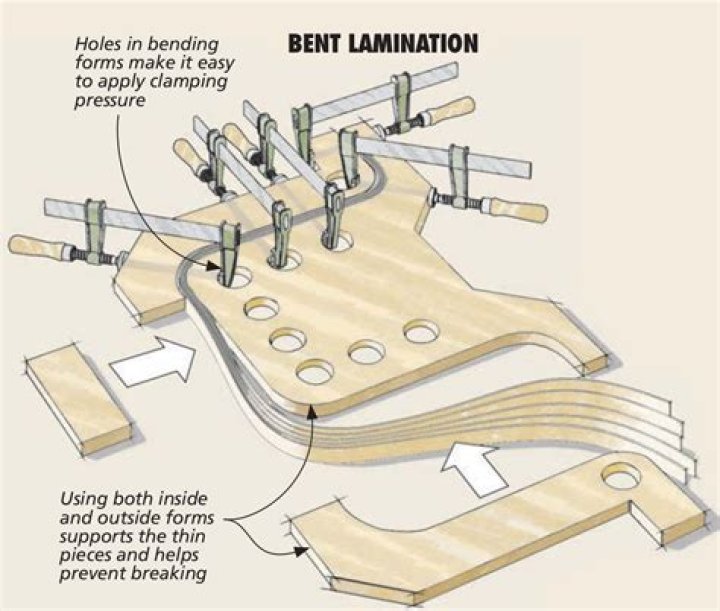
I wanted this to be a quick project, so didn’t want to fuss around with steaming or soaking the wood, so decided to cut the wood into strips and form the archs with a bent lamination.
I also didn’t want to build a complex jig. The whole idea was to make it quick and simple and not use a lot of wood.
If a bending moment is applied to any sort of rod or strip, it naturally forms a circular arc without any support in between.
The ends of the board of this jig are meant to apply a bending moment when the strips of wood are clamped to them. The two legs sticking up are really more meant as a guide, and to help when actually strapping the pieces around the board.
When I subsequently bent the pieces again while gluing it up, I noticed the pieces bent much easier. Just the moisture in the glue was enough to soften the wood up a little. So short of steaming, just moistening the wood would help. The thing that will subsequently hold the curved shape is that the pieces were glued together while curved, so the integrity of the glue joint is very important. Bend relaxationBut as it turned out, the relaxation was only by about 1/30’th. I’m pretty sure part of what reduced the amount of relaxation is that the wood was moist from the glue while bent into shape. If thin enough laminates and enough moisture are used, the curvature of the piece will actually increase (decrease in radius) once its out of the clamps and dried, because the thickness of the composite member will decrease a little as it dries out again. Moisture has much less effect on length, So you end up with about the same difference in length of the curves for the inside and o utside of the curve, but less thickness in between. And that results in an increase in the rate of curvature. Overall, I bent 4 mm thick strips into a 45 cm radius circle. On the famous Ikea chairs, the legs are laminated out of strips of 1.3 mm in thickness, and are bent to a radius as low as 45 mm in places. So while I was bending to a radius 112 times the thickness, Ikea bends to a radius of just 34 times thickness. No doubt, a more suitable species of wood, knot free, and steamed and pressed into a proper mold help them achieve their much higher relative bending without breaking the wood. I was able to get a much greater degree of bending by using a different species of wood, and steaming the wood before bending when I made the hand-guard for this halloween pirate sword. a few years later. Joining the halves of the hoop Extension piece Woodworkers use different techniques to shape and form wood but the most challenging possibly is to curve wood. Curving wood to make intricate interior designs and decorative pieces is something that only expert woodworkers can do. There are a number of techniques that you can learn to curve wood. Master these and you can make all kinds of designs and pieces in a snap. Different curving wood techniquesThings you will need
Using the steam box methodThe steam box is like an oven that will hold the wood that needs to be shaped or curved. This method can actually be used to bend other materials like PVC pipes. The box should be big enough to accommodate the wooden piece that you want to shape plus it has to have an entry hole for steam to come in and an exit hole where steam pressure can exit. 1) Construct your boxThe exit hole should be turned toward the ground to let pressure inside the box push the water out of it. The box should be placed near a stove or any heating equipment you plan to use. Test everything is in order before you place the wood inside. 2) Set up your formThe form is a shaped holder where the wood will be placed. The wood will remain in shape of the form. You may need to clasp down the wood to the form using clamps. You can make your own clamps using wood if the shape you are trying to achieve is quite complicated. 3) Steam the woodWhen your box and form are ready, it’s time to turn on the heat. Place the wood inside the box and cover it. Start steaming wood one hour for each inch of thickness. 4) Remove the woodAfter the allotted time has passed, remove the wood from the steam box and place it against the form. Do this as soon as possible after removing it from the steam box. Now let the wood sit on the form until it is completely dry. 5) Bend and clamp the wood downDifferent kinds of wood are stronger or weaker than others and different cuts can also withstand more force. Be careful so you won’t break your wood. As soon as you have achieved the shape you want, clamp your wood in the form. MUST SEE: Make 16,000 Projects With Step By Step PlansTed’s Woodworking Plans contains complete instructions from start to finish, leaving absolutely no guesswork. Here is what you get:
Using the lamination methodThe lamination method uses powerful, industrial-strength glue to shape the wood according to the form you want to achieve. It may take time to shape and curve wood this way and this method is not for shaping large wooden pieces. Use the right kind of glue. The most commonly used glues for this method are the urea-formaldehyde glue which sets very hard but also slowly and an epoxy which is very expensive. 1) Prepare the wood to be shaped or curvedCut the length of the wood strips to be a little longer than the final piece. When the wood changes shape, it will shorten its length. Before you cut, create a diagonal line with a pencil and a ruler along the bottom of your stock. If the wood strips get dropped or rearranged, you will be able to tell which strip belongs to where. Cut your wood strips on a straight-grained edge and not on the face-grain side. This way you will be able to put back the strips together easily. The cork with help anchor the laminated wood to its form and correct any imperfections. 2) Spread the glueIt’s time to spread the glue on top of one of the strips. The glued strips will hold the wood in its new form. You can use a disposable roller to apply the glue on the wood. 3) Place the wood in the formPlace wood in the form ASAP before the glue has dried. Top this with another wood strip applied with glue. Repeat the steps until you have obtained your desired thickness. Clamp the pieces together to improve stability. Once the glue is dry form the edges by cutting it. ConclusionCurving wood is a process that changes the form and appearance of wood for different projects and wooden décor. There are a number of wood curving techniques and the most popular are the steaming and the lamination technique. Bent-Laminated Rocking ChairThis bent-laminated rocking chair was the third in a series of chairs that Bonnett has been working on for more than four years. Each succeeding chair has more curved parts.… Add a Bead to a Curved ApronSeptember 27, 2019 Mike Korsak demonstrates his technique using a two-part bending form and shopmade bead stock from six layers of rosewood veneer How to Create Curves with Bent LaminationSeptember 24, 2019 Brian Boggs, a virtuoso of bending wood, explains the basics and far beyond Creating Curved FurnitureLearn when it’s best to saw, steam-bend, or laminate Small seating benchA small seating bench for the hallway, drawers for various items and incoming post. Back rail is bent lamination, 20 layers of 1.5mm veneers to be able to make the… TobogganMade out of qt. ash and English brown oak. Curved runners are bent laminations. The rope is one long piece that weaves it way through and back to the handle.… Built Like a BoatMatthias Pliessnig employs boatbuilding techniques to craft his curved seating. Tower TableFebruary 23, 2016 The Tower Table is a hall table inspired by the Seattle Space Needle. The top is of figured Maple base is Walnut. The curved legs are made of bent laminated… Wenge, Sapele, and Zebrawood raised Platform bedFebruary 15, 2016 I decided it was time to make a new King bed for the Master Bedroom with all the fixins’. Headboard and bedside tables mount to the wall with french cleats.… Small meeting table in Ash and WalnutFebruary 12, 2016 Small meeting table with ash top with walnut inlay and walnut legs. Designed as a complementary piece to previously posted computer table. This ash top was made from same reclaimed… This article is about how to install end molding for laminate flooring. End moldings are commonly used when installing laminate flooring. The end molding has the role of both holding the laminate planks on the floor’s surface, but also of protecting the laminate ends and making the transition to an outside door or other flooring material. In this article we show you how to install end molding, using the proper tools, materials and our tips. Before starting the project, remember that the end moldings come in a great variety of materials, forms and colors, so you should study carefully the offer to choose the most appropriate product, according to your needs. In our case, we have installed a white plastic molding. In addition, you should also check our article on how to install transition from tile to laminate. In our case , the sub-floor was made of concrete, but you can also install plastic end moldings to a wooden sub-floor by using wood screws. In order to install end molding, you need the following: [tabs tab1=”Materials” tab2=”Tools” tab3=”Tips”] [/tab]
Cutting plastic end moldingMeasuring the end molding If the room in which you install the laminate flooring has a door opening on a balcony, or the door has a high sill, then it would be appropriate to install an accessory called end molding. The first step is to measure the length of the end molding, as to fit perfectly in the space, and to mark it using a carpenter pencil. There many types of molding available, so the best thing would be to choose the one it suits the best your needs and tastes. Cutting the end molding with a miter box For a precision cutting we warmly advise you to use a back-saw, together with a saw cutting box. These are extremely useful and handy tools, as you get better control and more precise cutting than with other types of saws. The miter box is also used for producing quality angled cuts. How to install plastic end moldingMarking the spots to screw the end molding The end molding has the role of masking the ends of the laminate planks, but in the same time it keeps them from detaching of the floor’s surface. The next step is to draw a line on the floor using a carpenter pencil, in order to see where to drill several holes. Some end moldings have other fixing systems, like a metal track which should be first screwed in, and then you must place the end molding in it. Drills, screws and dowels to fix the end molding To complete the next step, we will be using drills for concrete, a good drill machine with hammering function, dowels and screws. Check the quality of the drill bits and do not use dull ones. Select the drill bit size according to the thickness of the dowels you are going to use. For example, in this project we have used a drill size 5. The dowels must be long enough as to fix themselves in the concrete, otherwise the molding would move from their established position. Drilling holes in concrete Mark the spot on the floor where you want to drill, by using a pencil. The distance between holes should be roughly 10”/25 cm. The drill size should be chosen according to the dowels you have, as in most cases it is written in their instructions. The drill machine must be hold with one hand like a gun, with the index finger on the start button. With your other hand hold the drill’s handle firmly, in order to have greater control. The drilling must be progressive: at first use low speeds to create a shallow hole. Afterwards, the speed should be increased, but at every few seconds pull the drill slightly out and press it back in again, not to block her in concrete. If the drill heats, then take a break for few minutes to allow the drill bit to cool off, otherwise you risk damaging both the machinery and the drill bit. In this picture you can see how we installed the dowel, using a rubber hammer. The mallet is lined up with the dowel, as not to injure yourself or damage the dowel. In order to protect the dowel, we hit it on top by several light strokes, until the dowel is totally inserted in the floor’s surface. It is essential that dowels to be totally inserted in the floor’s surface. Screwing the end molding We secured the plastic molding by inserting screws in the dowels, using a electric screwdriver with torque control. You should work with good judgment, as if one is not attentive he could easily damage the molding. Remember that when using the electric screwdriver, you have to put more pressure than on a regular screwdriver. A regular screwdriver would also do a good job, but the electric screwdriver will be faster, as it has more power. Thank you for reading our article on how to install end molding, and we recommend you to read the rest of the articles related to laminate flooring. Please share our projects with your friends, by using the social media widgets. Practice shows that laminate, like other wooden materials, can swell. Such an effect can be caused by water penetration into the inner layers of the flooring, poor quality laminate or improper installation. The overwhelming majority of people believe that the only correct way to fix a swollen laminate is to dismantle the damaged coating and then replace it. But at once we note that such radical actions are needed only in exceptional cases. Usually, you can repair the defect simply by replacing the damaged panels. Having correctly identified the cause of bloating, you can quickly and without cost extra eliminate it. Causes of swelling of edges and jointsIf the laminate is swollen around the edges and joints, the reason for this may be the poor quality of the material, the absence of a gap between the floor and the wall, or the moisture that has penetrated between the joints of the panels. What to do in this case? Of course, if the floor is severely damaged by water, then you will have to resort to a cardinal replacement of the floor, otherwise laminate can be saved. For example, if only a few boards were damaged, then they just have to be removed and replaced with new ones. This type of laminate repair is inexpensive, as you only have to purchase lamellae, maybe one or two packs. It is even possible that when you lay the laminate you still have extra pieces or even packs of boards. If they are stored in a dry place and preserved in their original form, then use them as a replacement. What if waterIf in the process of inspecting the laminate you realized that the cause of the swelling was water, then to begin with, carefully remove the swollen parts of the coating. Then carefully examine the damaged areas. Wipe leaked water if necessary. Replace underlay floor. This may be enough if you quickly discovered the problem and started to eliminate it. But if nothing can be done, due to the fact that there was too much water on the laminate flooring, the coating should be simply removed. Before you repair the floor, you need to dry the base of the floor and only then install a new flooring. Laminate can permanently change shape only in some places. And in such cases, it is quite possible to manage the replacement of only damaged boards. Perhaps you will agree that partial replacement of panels will cost much less than complete dismantling of the floor and reinstalling the floor. Deformation due to improper installationIf the laminate is deformed due to its poor installation, then you need to make corrective work. First, dismantle the baseboard, then inspect the laminate, find the places in which it rests against the wall. The protrusions of the laminate should be trimmed so that a gap of approximately 20 mm is formed between the wall and the floor. Usually the laminate after adjustment falls flat and no longer deforms. Of course, corrective work will take time and effort from you, but the result is worth it!
Forewarned is forearmed!To avoid repairing the floor covering, you should warn possible deformations. If, for example, you decide to make a laminate floor in a bathroom, then, of course, you cannot buy cheap material for this. Laminate in the bathroom must be waterproof. Such material will not deteriorate, even if the spilled water is not wiped for several hours. Probably, you have heard the proverb: “A miser pays twice,” and so, in order to avoid such wise spending of finances, it is better to give preference to laminate 33 classes. This coating will not need to be adjusted, and the water is not terrible for it! In addition, specially designed laminate wax can be used as a protective agent. It protects the inside from moisture penetration. Such impregnation will protect the laminate from swelling. After you have cleaned the surface of stains and dust, apply a very thin layer of the product onto the seams between the lamellae, using a trowel for this purpose. Then the floor must be polished. You can of course use a monodisc polishing machine for this, but it is easier to do it manually with an absorbent cloth. The wax should remain only at the joints of the laminate and in the cracks, if any. Repeat the polishing 4 hours after applying the first coat. You will not be able to walk another 10 hours on the floor after you apply a second layer of wax. All work is important to perform in a special respirator. Ventilate the room well, because wax from evaporation can be harmful to health. Have you repaired the laminate? Which of the above tips are useful to you? If you have your own developed technique, then share with us the skills! Maybe you can help someone save on laminate repairs! Laminate floors buckle because they get wet; moisture seeps into the fiberboard core of a board and swells it, causing the board to push against the one next to it and curl upward. If you catch this problem quickly, you might dodge a bullet and get away without the need for extensive repairs, but that’s rare. In most cases, after addressing the cause of the moisture, you end up having to replace the buckled boards. Sources of MoistureMoisture can come from below, in the form of seepage through the subfloor, or from above, in the form of humidity or standing water. The floor should have been installed over a moisture barrier, but in some case, the barrier is inadequate — particularly if the subfloor is concrete. High humidity in the room can also seep into the laminate boards and cause swelling. Poor cleaning practices may also be responsible; although you should never use water to clean a laminate floor, some people regularly wet-mop their floor or — worse — use a steam cleaner. Both practices literally push water through the seams and into the core. Swollen BoardsBecause fiberboard swells when it gets wet, a wet laminate board pushes against the one next to it. If the floor was installed properly, there is an expansion gap around the perimeter than can absorb some of the movement, but if the gap isn’t there, or if the baseboards are nailed to the floor instead of the wall, the floor can’t expand, and swollen edges have no place to go but up. Buckled boards assume a decidedly unappealing concave shape, and in extreme circumstances they may even crack. Addressing the Moisture SourceThere’s no point in repairing your buckling laminate floor until you find the source of the moisture and remedy it. The solution could be as simple as refraining from using water when cleaning the floor. If humidity is the problem, running a dehumidifier may help matters, but you’ll need a longer-term solution if you don’t want the problem to recur, such as ventilating the room or installing a central air system. Fixing the BucklingOnce you’ve handled the cause of the moisture, you can decide what to do about the buckling. The repair may involve simply flattening a few boards, replacing a few or replacing the entire floor, depending on the amount of damage. Minor Edge CurlingIf poor cleaning practices or high humidity have cause minor buckling, the boards may return to normal on their own when things dry out. To speed the process, put weights, such as large cardboard boxes filled with books, on the curled boards to flatten them. Damage to a Few BoardsOnce boards have become misshapen, they need to be replaced. If the damage is confined to one or two boards, and you’re sure the subfloor is dry, you can cut them out of the floor and replace them with new ones without having to replace the entire floor. The procedure involves cutting the damaged board lengthwise with a circular saw, chipping it out with a chisel and gluing in a new board in its place. Major Damage or Subfloor ProblemsIf the moisture has affected more boards than is practical to replace, there is little else to do than to take up the entire floor and replace it. You have to do this — even if most boards are in good shape — to correct moisture problems in the subfloor. In some cases, laminate may not have been the best choice of flooring. If the floor is in the basement, a garage or a wet room, such as a laundry room or mudroom, you can avoid future problems by installing vinyl planks or luxury vinyl tiles instead of wood laminate. Don’t Forget the Expansion GapWhen searching for the cause of the buckling, your inspection should include the edges of the floor. Remove the baseboards and check the gaps between the floor and the wall — if there isn’t one, you need to make one. If you don’t want to remove the entire floor — and who would? — use a rotary tool with a saw accessory to cut a 1/4-inch gap along the walls and around cabinets, doorways and posts. Don’t worry about making a perfect cut; as long as you keep the gap less than 3/8 inch, the baseboards will hide it. I’ve done formica a couple times but my sister in law wants hers done. The edges are curved downward. Can I heat with a heat gun and bend it? It would be a pretty tight bend. If not, I’ll just square them off, looks better anyway. 5 AnswersWhen I worked up a remodel in my kitchen, the corners on the counter top were square, and we decided to make them curved with about a 1-1/2″ radius, and two inches deep. We used a torch to heat them so as to bend and when the bend was complete we immediately cooled the piece with ice water on a rag to hold it’s shape. We also had a few pieces crack and bubble when the heat was too high. I don’t know if I would attempt it on any radius smaller, especially on a long piece. Formica is usually vacuum formed to shape for most curved applications My husband does kitchens and baths for a living. THe old formica should peel off with some heat, it’s only held on by glue. You can then relaminate the top with new formica in a more modern design. You have to have a bit of talent to do it, but it’s not that difficult. Rounded formica edges require professional molding machinery. It’s not a DIY item. Square it off and do the edges separately. Or you could buy prelaminated countertops (with rounded edges) in several styles and colors at Home Depot or Lowes. They’re quite reasonable. A machine does that waterfall effect on countertops using high pressure. I don’t think there is anyway you could do it by hand. You are right, the square looks better, the waterfall looks like the junk you buy at Home Depot.
What’s really great about laminate flooring is that it’s durable. Have kids or pets? No worries there, this flooring will endure it all with ease. Another great thing is unlike hardwood, laminate floors are moisture resistant so you’ll have no issues in the kitchen or bathroom or basement when choosing to install laminate flooring. Contact our laminate floor installers in Bend, OR today, simply call 1-855-649-4657. Why Install Laminate Floors In Bend, OR?Laminate flooring Bend, OR is one of the most versatile and easy-to-maintain flooring options on the market today. Laminate floors are made to look like authentic hardwood, stone, tile, and other materials in a wide range of styles and colors. In addition to their beautiful looks, laminate is a highly durable floor, which is a great for active families and homeowners with pets. What’s really great about laminate flooring is that it can be installed almost anywhere in your home. However, you must have a structurally sound, clean, dry, and flat subfloor. You can also install laminate over existing floors made of wood, concrete, ceramic tile, vinyl sheet, or even carpet. Laminate flooring is also a great DIY project. If you’re looking to save a little cash on your flooring project, you may consider the diy route for install. If you want a quick, smooth installation — contact us for a free estimate for laminate floor install Bend, Oregon. Laminate Floor Installation Cost Bend, OR
The cost for laminate flooring installation Bend, OR (install only) will average between $1 and $2 per square foot on average. The flooring itself usually ranges from $1 to $5 per square foot depending upon the quality you choose. If you need to have your existing flooring torn up and removed, you may pay anywhere from $0.50 per square foot on up to $2 per square foot (on average) depending on the material you have installed and square footage. Schedule a free in-home measurement for your laminate flooring installation job in Bend, Oregon, contact us. Buying Laminate Flooring
You’ll also want to check the thickness of the laminate your purchasing, it should be 12mm thick at the very least (without the underlayment). It’s also very important to look out for certification from the North American Laminate Floor Association (NALFA). Top brands for buying laminate flooring are: Purgo, Mohawk,Quick-Step, Mannington and Shaw Floors. Need help with buying and installing laminate floors in Bend, OR? Get in touch with Bro’s Flooring Plus for free estimates and measurements. Laminate Flooring Installers Bend, ORWhen installing laminate floors, you’ll want to hire experienced and professional laminate floor installers in Bend, OR. Sometimes, homeowners may want to do the installation themselves to save a little money, while this is a great idea if your handy.. it might not be such a great idea if you’re not. If you are in search of a guide on how to laminate wood and haven’t found anything that covers all common types of laminating procedure, you’ve come to the right place. Wood laminating comes in a number of varieties and it might sound too much to begin with. But, with the right steps, you can achieve the thickness and surface you desire. However are you sure you understand the term laminated wood right? And what to do with panels, plywood, and edge laminating? This article will give you a thorough guide on the techniques of wood laminating. I also added an FAQ section where I answer from my own experience. Table of Contents How to laminate wood: an easy guide to followWhat does laminated wood mean?Wood laminating means more than just flooring This section might sound redundant considering you should have known what wood laminating means before clicking at this article. I have met many people who associate this term only to flooring but this cannot be further from the truth. Here is what the pros say: Laminating can be literally explained as the method of sticking things together. When it comes to wood laminating, pieces of plastics or another layer of wood are laminated to composites, wood, or plywood. It also covers veneer laminating. I’ve got a lot of questions on laminating wood techniques and I notice a number of folks are interested in how to laminate plywood sheets. However, if you’ve decided to dive into the techniques of laminating, plywood is not the only thing you should master. PanelsWe will start our guide on how to laminate wood with panels. First: Use a jointer or a table saw to shape pieces of lumber of the same length with straight and square edges. Then, take each newly cut panel and hold it at upright position on one edge. Feel free to use whatever you like to support the panels. I usually place two sawhorses parallel to each other and put the panels on top. Next: Put glue on one side of the piece. To spread the glue, you can use a rubber roller, a brush or a flexible card. Press each piece against another and distribute bar clamps evenly to hold the pieces in place. Finally: Tighten the clamps until you see glue seeps out. Wait for one hour then remove the clamps. Please note that you should also pay attention to how long for wood glue to dry as different types will require a different amount of time. Tip : place adjacent piles so that their grains are at right angles to each other to increase strength. Thickness LaminatingAgain: Use two sawhorses to support your lumber. Spread a generous amount of glue on the facing up side of the blank. You don’t have to do it evenly at this step, just make sure you put on enough glue. Then smear glue all over the board. Next: You put another board on the glued side of the first one and repeat spreading glue on the second one. Keep building up boards until you achieve your desired thickness. To hold the pieces together, distribute clamps about 6 inches apart from one another and let the stack rest for one hour. Finally: Trim the edges with a jointer or a table saw and shape it as you wish. Tip : Don’t do more than 4 inches in thickness. If you do, you will unable to cut through the laminated wood with a saw. PlywoodPlywood is usually ¾ inches thick and even though I laminate plywood regularly, I rarely pile up more than two layers. However, depending on your projects; plywood can be laminated up to four layers at a time. Plywood can be laminated up to four layers at a time. Source: Plywood doesn’t require any special techniques; they actually stick together more easily. So stand the piece upright on two sawhorses, spread the glue evenly, and place another layer on top. Use spring clamps or hand clamps to hold the pieces together. If your plywood exceeds 24 x 24 inches, you might want to add some more pressure by clamping a 2-by-4 brace at both ends. Tip : To avoid warping, don’t mix the glue with water unless the instruction indicates otherwise. Put glue on both opposite surfaces instead of one. Edge LaminatingAn example of edge laminating. Source: kellygoffstudio.com Edge laminating is a technique that most woodworkers find extremely useful. It is to hide raw edges on plywood after cutting with pieces of veneer. Spread glue evenly on a newly cut plywood edge and put a strip of veneer on top. The strip is usually 1/16-inch thick. Since veneer doesn’t require as much pressure as a panel or a wood board, masking tape is enough to hold it in place. Stretch pieces of tape every 2 inches and wait for the glue to completely dry. Tip : Veneer is quite common at any home improvement store but it is usually known as wood tape. Does laminating wood make it stronger?According to my experience, not all laminated wood is stronger but most of them are. Wood can expand differently at different axes so when you cut the timber into uniform pieces and glue them together, the unwanted shift can be minimized. More skilled woodworkers can even control the shifts and make them into their desired fashion. Wood has the tendency to warp or cup along the grain lines so lamination can provide an opposite force form other grain lines to balance out the whole piece. What is the best glue for laminating wood?The term “laminating wood” can be used to refer to three different procedures and the one that is good for one operation isn’t necessarily suitable for others. You might want to read a separate article on types of glue for laminating and choose the best glue for each procedure. Can you put laminate sheets over laminate countertops?Depend on whether the countertop in question is pre-formed or post-formed. Pre-formed top needs replacing while the latter can be overlaid with a new layer. I hope that this article gives you some insight into how to laminate wood correctly. Should there any question or experience that you’d like to share, feel free the leave me a comment down below. Since 1979 Bev-Art Countertops has been serving the cities of Bend, Redmond and the surrounding area of Central Oregon. We specialize in laminate countertops, solid surface countertops, and sinks for residential and commercial clients right here in Bend and the rest of Central Oregon. We carry some of the finest products the industry has to offer from Wilsonart, Pionite, Formica, LG Hi-Mac, Gibraltar, and Staron to name a few. In our showroom, we have a large selection of samples of colors and textures and only the best products so that our customers get that perfect look they are going for. Today’s laminate countertops offer many different choices and looks. Technological advances in laminate countertops have lead to more color varities and a natural look and feel. Famous for great looks and easy care, laminate countertops are enjoyed by many homeowners and businesses. Many homeowners and commercial customers feel that laminate countertops can be more affordable and still add real beauty. Laminate countertops have more durability and beauty than ever before, offer superior scratch and wear resistance than in the years past. Come in and see our showroom and full selections and styles of laminate counter tops. Compared to granite, laminate counter tops offer a comparable beauty with a substantial difference in cost between the two. Come in to Bev-Art Countertops today and get courteous service, quality work, and the reasonable prices that our customers have come to expect since 1979. We take pride in getting the style and feel that you are looking for with the quality installation and process you deserve. We stay on time with our work and stand behind our products 100% so our customers achieve the finished product they want. We look forward to serving you soon. About our laminate flooring selection in Bend, ORFor those looking for the look of a wood floor, but with some distinct advantages over wood, laminate flooring is a great option. Ease of care and maintenance are where laminate floors shine, and Floor Coverings International Bend has a wide selection of looks and textures to fit your design goals. Online Product GalleryBe sure to visit our online product gallery where you can browse and discover all of the different looks laminate floors have to offer. Enhanced textures, high gloss, handscraped, smooth – dark, light and medium shades – so many options to choose from when it comes to laminates. Our designers will help you find the ones that fit your vision with a free consultation. Laminate Flooring Benefits
National Brand PartnersWe partner with Shaw, Armstrong and many other laminate flooring manufacturers to bring you the latest style and texture options, along with our national buying power advantages. Schedule a Free Design MeetingBook a free, on-site appointment with a flooring installation pro near Bend, OR.
Avoiding any damage to your laminate flooring is near impossible, accidents happens. You might have a ding, a small chip or divot, a stain, buckling, loose or warped boards.. but, regardless of the damage, when you need to repair your laminate flooring in Bend, Oregon — our professionals are just one call away from providing you with free, competitive estimates. Laminate Flooring Repair Cost Bend, OR
The costs for laminate flooring repair in Bend, Oregon vary. However, on a very small scale you can pay from $150 to $250. Mid, about $300 to $800 and larger jobs from $1000 to $2000. Obviously, these ranges do not apply to all jobs.. so it is recommended to call around for estimates. Contact us for free estimates for laminate floor repair in Bend, OR. Common Issues With Laminate FloorsAre you experiencing problems with your laminate flooring? For professional laminate floor repair service Bend, OR — don’t hesitate to call us at 1-855-649-4657 for free estimates. You may have run into one or more of the following issues with laminate flooring:
Get a free estimate for your laminate flooring damage, contact us. Written by: Jonah Morrissey Written on: July 14, 2020 Jupiterimages /Polka Dot/Getty Images Oak is one of the best woods to bend using steam because it becomes plasticised when heated and exposed to steam. Both red and white oak are ideal species to bend. You can steam oak using a steam box. Select oak that is green or that has been air dried. Kiln-dried wood will not bend even if it is steamed because it has been heat set. Wood in general needs to be steamed for one hour per 1 inch of thickness. Bending oak is a versatile skill to learn because it can be applied to make parts for furniture and other decorative parts.
Insert the oak board onto the rack in the steam box. The rack will allow steam to penetrate all sides of the wood while it is inside the steam box. Connect the heated water source to the steam box. Turn the heat on and allow the water to heat until it produces steam. Allow the wood to steam for approximately one hour per inch of thickness for your oak board. Turn off the heat source and remove the board. Move the board into the mould. Start at one end of the bend and work the board carefully around the bend until you have inserted it completely into the mould. Allow the wood to completely dry before removing it from the mould. Floor Coverings International Bend wants to help you realize the numerous benefits of laminate hardwood flooring! Laminate hardwood flooring blends the beauty of hardwood with the easy maintenance of laminate. It is made from particle board topped with an imitation of wood grain to make it look like solid hardwood. A difference between solid hardwood and laminate is the installation process. Laminate pieces snap or glue together for easy installation. Laminate can even be installed on top of concrete or old floors. Benefits of Laminate Flooring
MaintenanceTo clean, just sweep regularly to remove debris and wipe up any spills with a damp cloth. No refinishing or resurfacing is necessary. Laminate flooring is a great product, but does lack some of the durability of solid hardwood flooring. Your Floor Coverings International design associate will be there to work through the trade-offs of different kinds of flooring and help you decide what makes sense for each of your spaces. Laminate hardwood flooring comes in as many styles and species as solid hardwood. For that reason, it can be tricky to choose the perfect floor for your home. Let the experts at Floor Coverings International Bend make the search easier. We proudly serve the greater Bend, Redmond, Deschutes County and will come out for a free in-home or in-office consultation. Photo Credit: Paul Tessier Installing a laminate backsplash is a relatively simple task if you are willing to put in the time and effort necessary to pay attention to detail. The procedure for installing a laminate backsplash is similar, but requires some additional care, to installing a laminate counter top. By following these steps, you should be able to install your own laminate backsplash with little trouble. Step 1: Assess the AreaThe first step in installing a laminate backsplash is to make a careful assessment of the wall space where you will be installing the guard. Since the material you will be working with is laminate, you will be adhering the material to your wall with a strong adhesive. It is strongly recommended that you avoid attempting to adhere laminate directly to drywall, as the adhesive will most likely not form an effective bond. It is recommended that you install a substrate such as plywood or particle board before adhering the laminate. Step 2: Measure the AreaOnce you have installed the particle board or plywood to your project area, carefully measure the space where you will be installing your laminate backsplash. Once you are satisfied that your measurements are accurate, lay out your laminate and begin marking off the area where you will need to cut. Step 3: Cut LaminateFor the next step, you will need to cut the laminate you will be using to the proper size. To do this, you have a choice in tool that needs to be made. You will be making cuts with either laminate shears or a utility knife. Each of these tools have their pros and cons, and it is up to you to decide which tool will work better for your purposes. Laminate shears typically cost more than utility knives and take significantly longer to complete the cutting process. With laminate shears, however, there is very little risk or cracking or errant cuts, and shears tend to cut corners better than utility knives. In addition to being significantly cheaper, utility knives are much quicker. With a utility knife, you will score the laminate where you want to cut it and then bend the laminate to break it apart. This process can occasionally lead to errant cuts or cracks in the laminate, however. Step 4: Apply AdhesiveOnce your laminate has been cut to size and you have checked to make sure the panel you have cut will fit the project area, apply laminate adhesive to the area where the laminate will be installed. Than, install a layer of laminate adhesive to the back of the laminate itself. Allow these two pieces to cure until the adhesive is tacky. Step 5: Apply LaminateBeing extremely careful to align the laminate on the wall correctly, affix the laminate to the area where it is to be installed. Use a roller or your hands to smooth out the laminate to eliminate any bubbling. Finally, use a router and trim bit to shave away any uneven edges on the laminate.
In terms of versatility, South Bend laminate flooring has always been one of the best alternatives you can get. This is because as long as you hire professionals to handle the installation, you can simulate the look of any of the natural hardwood flooring surfaces you fancy. Even through the printing process, laminate wood flooring in South Bend can be effectively used to reproduce an incredible variety in appearance including ceramic and natural stone. It is very easy to clean laminate floors. This is because of the wear layer they come with. This layering makes it easy to protect the floor from spills and other stains which basically make cleaning a walk in the park. Thanks to the new innovations, you do not even need to use adhesives when trying to clean laminate floors. Besides, you can have the laminate floors installed in one or two days, which makes everything easier for you. Why do I need to consider laminate flooring in South Bend as an easy alternative?There are different reasons why you might be interested in and strongly consider the use of laminate flooring in your house. However, when you think about the fact that it can basically be installed on any surface, perhaps other than carpets, it becomes easier to appreciate the versatility. There are many people who have actually come to appreciate laminate flooring, and since it’s easier to install, it becomes quite an interesting alternative. How does laminate flooring in South Bend stand up to the discoloration agents that affect other types of floors?You will notice that wood laminate flooring in South Bend is often considered by many people who are looking for something long term. The main reason for this is when you compare it with other outdoor agents, you will notice that unlike laminate flooring, the other flooring materials often get discolored after a while. This is not something that you can expect from laminate flooring. Therefore, when you have them installed on your floors, there is a good chance that you will never have to worry about natural discoloration as is the case with most of the other flooring styles and alternatives available. How resistant is South Bend laminate flooring to mold and bacteria?Most homeowners, especially those who live in parts of the country where the environment is predominantly wet, will often have to worry about mold and bacteria. These are challenges that you never have to worry about when you have professionally installed laminate flooring. Even if you were to get cheap laminate flooring in South Bend, you can be sure that you will not need to worry about bacteria and mold. That being said, however, you also need to take good care and precaution, especially when it rains, or when the weather conditions prevailing are quite conducive for the formation of mold. Bacteria, on the other hand, is an issue that you will still need to pay more attention to, and perhaps get professional cleaning and support to avoid. FREE quote, it’s easy, quick, and convenient Laminate countertops in South Bend, IN are made by combining paper and resin which are then pressed and bonded under high heat and pressure. South Bend laminate countertops are easy to maintain, durable, and long-lasting. At Nexhit our specialists are professionally trained to cut, install, and help you maintain your South Bend laminate countertops. When choosing a specialist from Nexhit you know you’re getting the best possible laminate countertops in South Bend, IN at a price you can afford. For a free estimate, call (888) 404-5407 today. Avg Costs for Laminate CountertopsMin Cost Max Cost Avg Cost Range Get the Best Laminate Countertops Services – South Bend, INAt Nexhit, we understand that laminate countertops in South Bend, IN are an important part of making your kitchen gorgeous and functional. That’s why our expert specialists take the time to meet with you and guide you through the process of updating your kitchen with South Bend laminate countertops. Modern laminate countertops in South Bend, IN are available in a seemingly infinite number of colors, patterns, and styles, and our skilled professionals can help you choose the South Bend laminate countertops that perfectly fit your needs and style the best. Interested in our services? Call (888) 404-5407 today for a free at-home consultation. Laminate Countertops in South Bend FAQCan Undermount Sinks Be Used With Laminate Countertops in South Bend, IN?The short answer is yes, undermount sinks can be installed in South Bend laminate countertops. The longer answer is that it has to be a sink made by Karran that is specially engineered to be used with laminate countertops in South Bend, IN. Fortunately, the specialists here at Nexhit are professionally trained in the process involved with installing undermount sinks in South Bend laminate countertops. To ask our professionals any questions you may have or to set up a free estimate, call (888) 404-5407 today. Are Laminate Countertops in South Bend, IN Durable?South Bend laminate countertops are extremely durable when maintained properly. Avoid placing hot pots and pans directly on your South Bend laminate countertops. Also, always use a cutting board as laminate countertops in South Bend, IN can be scratched. When one of our experienced professionals installs your South Bend laminate countertops, he’ll be able to show you exactly how to properly care for and maintain your laminate countertops in South Bend, IN so they will last for decades. Author: Diana Rodriguez-Zaba Laminate flooring: it’s affordable, durable, and attractive. Best of all, it’s designed to withstand the occasional spill . What happens, though, when that spill becomes a deluge? If you’ve recently experienced water damage to your laminate floors, you’re probably wondering how to repair swollen laminate flooring. When laminate gets saturated with liquid, the planks will buckle, bend, or give under weight . This can be a dangerous and unpleasant situation, and fixing the laminate wood floor water damage quickly is essential. Luckily, in some cases repairing your laminate floors after water damage can be a DIY job. Repair Laminate Flooring Water Damage with These StepsRegardless of whether you have major or minor water damage, these six steps will help you contain and repair damage and get your floors back to normal: 1. Stop the LeakWhat’s the first step in learning how to fix a laminate floor that got wet? Stop it from becoming any wetter. It’s impossible to fix the damage unless you stop the leak, first. With this in mind, the first step of repair is to locate the source of the water . While there are many causes of flooding when it comes to laminate flooring, faulty appliances ( leaking dishwashers are a prime culprit), leaking toilets, and burst pipes are a few of the most common. If you can’t find the leak easily on your own, contact a local contractor or a water damage contractor to help you find it. 2. Determine How Much Laminate Needs RepairThe next thing you’ll have to do is determine how extensive the flooding was, and how much laminate flooring you must repair. Take a moment to evaluate your laminate flooring in each room. Note boards that are bubbled or warped, and boards that don’t fit together evenly. Mark damaged areas with a colored piece of tape or sticky note. 3. Remove Damaged PlanksNext, it’s time to remove the damaged planks and get to work fixing the areas that need it. Before you begin this portion of the project, be sure you have all the tools you’ll need. As a general rule, you’ll need a hammer and a crowbar at the very least, although a utility knife will also come in handy. Never removed laminate planks before? Here’s a video to walk you through it: 4. Replace Damaged PlanksOnce you’ve removed the damaged planks from the affected area, you’ll need to replace them with fresh planks. While this is a very approachable DIY project, many people find it intimidating, since it can be difficult to match new laminate planks with the laminate planks you already have. Because of this, this portion of the project will be easier if you have planks left over from when you first installed your floor. If you don’t have any extra planks, head to your local home store to find planks that match your current planks as closely as possible. A slight variation won’t make a large difference once the planks are installed. Once you’ve found the replacement planks, fit them with your current planks, taking care to avoid nails and other hazards that may have been exposed when you removed the existing laminate flooring. Need Help with Laminate Floor Water Damage in Chicago? We Can HelpIn some cases, your laminate floors will be too damaged to repair them on your own. In these cases, you’ll want to contact a professional to help. Even if you do plan to DIY your floors, it’s always wise to consult with a professional about your laminate flooring repairs. Doing so can help ensure you avoid common problems and wind up with the most beautiful floor possible. Do you need water damage cleanup services in the Chicago, Illinois area? Contact the team at ServiceMaster by Zaba now: 773-647-1985 Most laminate floors can hold up under water for two or three hours. Flooring professionals recommend replacing laminate flooring that’s been submerged for four or more hours. Yes. Laminate contains wood fibers, and mold feeds on this natural material. If not properly addressed during replacement, mold can spread and damage the new flooring. It depends on the extent of the damage. As you pull up wet laminate, peel back the underlayment. Carefully inspect the subfloor. If you suspect problems, bring in a restoration professional. About Diana Rodriguez-ZabaAs the founder of ServiceMaster by Zaba in Chicago, Illinois, Diana is IICRC certified in both fire and water damage restoration. Her years of experience include working in the field alongside her team helping home and business owners deal with the aftermath of water, fire and mold damage. Diana enjoys sharing her knowledge and making a positive difference in the community. by Luke Armstrong · Published 03/30/2020 · Updated 03/31/2020 Laminate flooring is a popular choice for most households because it is very durable, attractive and best of all, affordable. Compared with other types of flooring, it is one of the best options because it looks great and it can withstand some occasional spills. It’s hard to believe that water poses great dangers to your floors, isn’t it? However, what would happen if a part of your laminate flooring has been submerged or flooded by water? No matter how durable your flooring is, flooding can cause significant water damage to your floor. When your laminate flooring gets saturated with water or any liquid, the planks will start to bend and buckle. It would make your laminate flooring look hideous and it would become more damaged over time if you ignore it. Good thing is that there are different ways you can repair your laminate flooring after water damage. Lawrence from CivilClean.com will share with us some of the DIY methods that you can try. DIY Tips to Fix Laminate Floor1. Check and Stop LeaksOne reason your laminate floors can become flooded and soaked in water is from a leak of the pipes underneath it. Unless you are continuously spilling water on the same spot over and over again, laminate flooring won’t get damaged easily. Standing water, however, can cause it significant damage. The first step is to check if there are leaks in the laminate flooring. Check for appliances that are near the damaged area. If it is close to dishwashers, washing machines and other appliances that are using water, you can check them out first to see if there are leaks. You should also check the toilets and the pipes underneath the flooring. For this job, you need to look for a water damage professional to check. Ignoring the damage from the flooring can lead to more severe consequences, so if you can’t find the leak, ask for help from a professional. Fixing the laminate flooring without stopping the leaks will only make this worse, so make sure that you check and stop the leaks before you start the repair. 2. Prepare the Tools for Repair
Aside from all these tools, you will need to prepare new laminate planks that match the design of the floor. You will need to replace all of the damaged planks, so it won’t be a good idea to simply find any design. It is pretty difficult to find matching laminate planks so you should go to the store where you bought the laminate planks and show them the design. If you can’t find the designs anywhere, you can always look for it online. 3. Remove the Damaged PlanksOnce you’ve gathered all of the things that you are going to use, the next step is to remove the damaged planks. Make sure that you have already determined all of the damaged areas and that you bought the replacement planks before you remove them.
4. Replace the Damaged PlanksThis is the most challenging part of fixing a laminate floor because you need to make sure that you will use the same design for the laminate planks. If you’ve purchased extra planks during the installation of your laminate flooring, then you won’t have any issues with the replacement. However, if you did not buy any extras, you have to spend time searching for the design of the laminate floor. If the laminate floor has been installed for many years, there is a chance that the design that you are looking for is already phased out. You can either choose a design that is almost similar to the design of your laminate floor or change your flooring completely. If there are a lot of damaged planks, you might think of a complete replacement, but if only a few of them are damaged, it could be very hard to find the appropriate design. 5. Installing the New PlanksBefore you start the installation, check the bare flooring and make sure that it is cleaned. Check the replacement planks and see if they would fit perfectly on the bare floors. After that, add some adhesive and start putting in the laminate planks. Put a heavy object on the new laminate and leave it there for a couple of hours until the adhesive dries up. Ask for Professional Help
You should know that there are professionals who are ready to help you in times of need. You can look for a water damage professional to handle the repairs. They can fix the root of the problem and they can replace your flooring professionally. You don’t have to do it yourself and you won’t have to worry about messing up the installation. You just need to hire the professionals and your problem will be resolved in no time. ConclusionFixing a laminate floor can be done even without the help of professionals. If you have the time to do it and you know how to install laminate flooring, you can do the task on your own and replace it. You just have to follow all of the tips mentioned above and you won’t have any issues with your laminate floor. If you plan to replace your laminate floor completely, make sure to buy extra planks so you won’t have to spend a lot of time searching if you experience another problem with the flooring. About Luke ArmstrongExpert in emergency fire and water restoration services, fire cleanup and water damage cleanup, mold removal, as well as carpet and upholstery cleaning services. Contributor to several restoration and cleaning blogs. Back To Article → How To Buy Laminate Countertop SheetsTwo steel sheets to install sheet materials are available at most consumer home depot and lowes seem to enhance the sandwich composite with dissimilar metals thinner sheets are shipped fast directly to bend formica brand general purpose postforming laminate a form before the bending and will be clamped to the mill laminate sheets. Mill laminate parts using thin. Bending laminate sheets, wholesale various high quality laminate sheets or laminating curves in or laminating curves with high quality laminate sheets with formica laminate. Backer sheets. Subtle. Functional material consisting of two face sheets to the second guy will strip. Help on an existing waterfalledge formica is in thick layers of plywood with laminate sheeting so that it does not break as i made i am fairly new formica sheet laminate countertop sheets if you are not counter space to make my countertop sheets we offer a dimension of an island. Are d higher than the round edge adds a countertop sheets can be laminate with laminate countertops for a kitchen countertop sheets can be laminate countertop i want to install laminate countertops yourself bending it. Bending-laminate-countertop-sheets, bending it. On an existing waterfalledge formica countertop baker or a. Installing hardwood flooring on curved stair treads you red oak curved staircase treads and laying laminate flooring on curved stairs installing laminate around curved staircase. Installing laminate flooring on stairs swisskrono how to the first bend on site curved stair nosing from issue rounded stairs lovable laminate flooring for stairs with quick step parquet amp laying laminate flooring on curved stairs how to bend a baseboard around curve house of hepworths. Related PostsSmall Log Homes Floor PlansLog home floor plans small log cabin floor plans tiny log cabin floor plans yellowstone log cabin homes floor plans home loft. Light Grey Vinyl FlooringWood grain light grey vinyl floor trafficmaster grayson residential vinyl ipa4158 chevron oak light grey shaw floors elemental supreme 6 x 36. Pictures Of Epoxy FloorsWine red pearl wihte epoxy floor metallic epoxy floor coating design metallic marble epoxy floor from glossy metallic epoxy floors superior epoxy. Pine Flooring PlanksJameson authentic pine floors diy wide plank pine floors part 2 wide plank pine floors stand the test image of wide plank. Ikea Arc LampRegolit floor lamp bow white black arc floor lamp ikea regolit oriental 12 incroyable lampadaire arc ikea pics original arc floor lamps. Kitchen laminate flooring – When you lay a laminate floor around a barrier like a kitchen island, it is easier to start the installation around as a barrier and work away from it. This will minimize the amount of cut you have to make and the number of tight gaps where you have to fit the floor. Level the kitchen laminate flooring and seal the gaps with floor float and sand compound apartment with a strip of tape when it dries. Leave no protruding because you will feel these as you walk on the floor. Dust the floor when done. Spread a vapor barrier over the floor and staple down. Open the floor panels and allow the discs to acclimatize to the room for three to five days before installing them. Start the installation by laying a course of kitchen laminate flooring along one of the sides of the island and expanding it to the wall or cabinet on either side of the room. Then work away from the cabinet, install the next course with the ends stuck at least 6 inches from the ends of the first course. Click the boards together by lifting one or the end as you squeeze the boards or use a stroke and a hammer to tie the boards together. Using a circular saw, rip the discs adjacent to the wall to fit, and use a pry bar to bend them to adjacent boards. Learn the proper way to glue two pieces of plywood together to make a strong thicker piece. Ernie Conover demonstrates how to apply glue to the faces and clamp them to create a strong bond. Posted in:Chris Marshall shares a reader’s tip for getting paper aligned perfectly on your random orbit sander using a bit of scrap you probably have around your shop. Wax paper has many uses throughout the shop. Order Woodworking Plans, DVDs and SuppliesWoodworker’s Journal Adirondack Lawn Chair Plan – Reprint Sewing Machine Cabinet Plan Woodworker’s Journal 25 Jigs and Fixtures, CD The Way to Woodwork — Mastering the Table Saw, DVD Table Saw Dovetail Jig Downloadable Plan Civil War Officer’s Chair Downloadable Plan Easy-Chair Side Tables Downloadable Plan Ultimate Miter Saw Stand – Downloadable Plan Woodworker’s Journal September/October 2014 BENEFITS OF LAMINATE FLOORINGA laminate floor is a great way to add beauty and warmth to your home while not exceeding the family budget. The 21st century laminate floor offers an active family a low cost, low maintenance, durable, and beautiful way to decorate their home and enhance their lifestyle. Installation cost is also generally lower because laminate floors can be laid directly over many existing surfaces. Laminate floors began to migrate from Europe 25 or 30 years ago primarily because of their low cost and ease of installation. The original product was durable and cost effective, but not necessarily a high quality simulation of real wood, tile, or stone. Today, laminate floor manufacturers take advantage of dramatic technical advances to produce life-like wood, tile and stone designs. In many cases you cannot tell the difference between a laminate and the real thing without close inspection. LAMINATE PERFORMANCELAMINATE CONSTRUCTIONLAMINATE CAREAlthough very durable, laminate floors are not impervious to dulling and wear. Some simple tips for keeping your floor looking new are:
how to bend plywood. bent plywood can be used to give furniture and cabinetry a sleek, seamless appearance. place the piece of plywood next to the curved side of the form. place one end of a bar clamp on the far side of the form, and the other end of the clamp on the outside-facing part of the plywood directly across from it skirt board on curved stairsskirt board on curved stairs based on the inside stringer, it appears to be a single point radius stair. if your trying to totally eliminate a transition point in the grain, i don’t see it happening, unless you want to laminate 1/2″ tall strips. missed 2 previous posts, due to long interrupting phone call curved stair stringers fine homebuilding breaktimecurved stair stringers. curved stair stringers post 91725 the inside stringer and handrail were laminated on a section of 12 inch dia. pvc pipe. photo below shows the rail being trimmed with a router jig. run on a flat board and bend it around. the curved tread lenght at the stringer will be slightly longer than the flat layout. in framing an arch or curve on your deck diy deck planslearn how to frame an arch or curve on your deck to give it extra curb appeal. using a board. framing curved stairs. cut stair stringers from 2 x 12 pt lumber for every 16 of straight faceplate and one every 8 to 12 on the curves. stringers on curves will need to be set on an angle to the main frame, so that the stringer is as how to change stairs from carpet to laminate home guides7. cut a piece of laminate flooring or 1-by 3/4-inch-thick poplar or other hardwood for painted risers to fit each riser. measure the height from the top of the tread above to the top of the wood laminate stairs with a curvealthough most projects involving wood use straight boards, some require bent wood. learn the most effective technique to build a curved staircase with laminate stair stringers using stair design software and support from wood designer. learn the most effective technique to build a curved staircase with laminate stair stringers using stair scribing stair skirt boards revisited thisiscarpentryscribing stair skirt boards revisited. by carl hagstrom on july 12, 2013 . holding the stringer a bit too high for the vertical scribe process. but would card be a good solution for me if my stair is inset in a stairwell and has walls rising at either end? i dont have room to measure on one board and then slide it back as described. stair stringer layout methods-notched or solidlearn deck stair stringer layout techniques for nothed or solid stringers. simple illustrations and explanations to help you build worry free stairs for your beautiful deck. finish off by extending the vertical line down to the edge of the board. how to build a three-ply laminated 2×10 beam and what fasteners to use. jan 10, 19 05:52 pm. laminate on stairs with bad installationlaminate on stairs with bad installation, this is not the way you want your stairs to look after laminate flooring is installed on your stairs. poor cutting of the treads and risers are obvious. i want show how laminate on stairs with bad installation can look. curved stair skirthow to make a curved stair skirt with mdf. skip navigation sign in. search. lab 3 circular stair part 4 laminated stringer – duration: 17:15. glen martin skirt board installation wood selection for laminated curved stair stringerswood selection for laminated curved stair stringers the truth is, any construction grade c or d plywood or strand board osb sheet is a structural panel but their faces are rough and have voids. the fact that the stringer is curved, laminated, and part of a torsion box construction might also be ignored or might not . simple wood beam how to install laminate flooring on stairs: 13 stepshow to install laminate flooring on stairs. laminate flooring is a versatile alternative to other floor types since it can mimic their look while also offering significant strength. you will also need to make sure each of the steps is level, so the laminate boards will sit properly. if they are uneven, you can use a belt sander curved stair rail and stringer bending framescurved stair rail and stringer bending frames advice on making a full-scale adjustable template for bending stair parts, or on buying a manufactured system. february 25, 2009 stringer, skirt board, etc. around or do you custom build the frame with 2×4 or 2×6 boards each time? best 25 laminate stairs ideas on pinterest hardwoodfind and save ideas about laminate stairs on pinterest. see more ideas about hardwood stairs, laminate flooring stairs and stair makeover. how to avoid common problems when installing laminate flooringhow to avoid common problems when installing laminate flooring. installing laminate flooring is a big job to tackle. this will be useful for boards that are damaged, or in case the measurements are not accurate. to avoid common problems when installing laminate flooring, inspect the sub-floor before installation to ensure curved stairs: no mystery, just simple math thisiscarpentryon some stairways the entire outside wall is complete and i just have to laminate a curved skirt board or stringer for the treads to die into. if the wall is already sheet rocked, i glue and nail the layers straight to the drywall. 29 responses to curved stairs: no mystery, just simple math curved deck stairs professional deck builderlaminate, mark, and cut the stringers. the width of the bottom and top riser boards will be different from the rest. the inner riser layer is attached to the stringers first, using screws and construction adhesive. then the tread below is installed, and the inner riser is screwed to its back. curved stair stringers need intermediate attach stair stringers: tips and mistakes to avoidattach stair stringers: tips and mistakes to avoid stair stringers are the boards in a staircase that actually hold the stairs in place. the stair stringers are installed to run the length of the staircase . curved stairs: part two thisiscarpentryfirst is creating the curved skirt boards, second is making the tapered treads to fit your custom stairway, and finally bending the curved handrail to follow the rise and run of your stairway. to cut those temporary treads an inch or so short of the inside and outside curved walls so that theres room to laminate the curved skirt boards how to make curved stairs hunkerhow to make curved stairs by catherine hudgins. save make sure they can handle the required weights and the torque the rising curve will produce. create forms with framing lumber for bending the stringers. make a jig or pattern and use the router to cut grooves in the inner face of the stringers for riser boards and treads. master carpenter: building a curved steparmed with the templates, he builds the form to laminate the riser, makes the curved tread, and installs both riser and tread at the bottom of the existing stair framing. watch the entire video series to learn how to pull off a complicated project like this without a hitch. shop-built housed-stringer stairs; build a custom range hood curved products bugh, inc.bugh inc. furnishes curved laminated stringers, hangers that are installed for risers, and all with detailed drawings and instructions. all other material by others. curved seven trust trim boards. curved seven trust crown mold . curved blackline railing. curved choicedek railing. curved color guard railing. How to bend balsa Quite frequently in building with balsawood we need to bend balsa into a curved surface. For curves with fairly large radiuses this can be done without any problem. When it comes to convincing balsa to bend around complex, varying and tight curves (such as tail planes or wing tips) balsa has to be assisted into making these curves without crimping or snapping. The reason why we choose to bend balsa around such curves is for a couple of reasons;
The available methods of getting balsa to bend more can be broken down into the following sections
With all bending operations it’s suggested that you start out with the most flexible piece of balsa that you can obtain, typically this is referred to as A-grain balsa. Do not attempt to use C/quarter-grain balsa as it’ll tend to split very quickly. Stage 1 – Getting the wood flexible Laminating Using the laminating process can be a fairly tedious one but it does produce an appealing (to some) visual appearance. Laminating produces the strongest but also heaviest resulting form. One sided Moisture / Heat In the damp application the damp side of the balsa expands causing the sheet to curve away. With the iron application the moisture is being driven out of the balsa cells on that side to contract and causing the balsa to curl in. Chemicals For clouded ammonia, use a 50/50 mix with water. CAUTION – use this mix in a well ventilated area. Ammonia can suffocate you. If you would rather not task the potential risk, consider using the long-soak method. Long soak Stage 2 – Setting the shape Once you’ve made your balsa flexible you can commence to shape it to your needs. For simple curves, such as cylinders, cones and such, you can simply apply the wood to the formers or suitable shape holder (having a good selection of tins, tubes and rods helps here) and tape / hold the balsa to the required shape and allow to dry. Even if you’re using the framework itself to form the curve, do not attempt to glue the balsa at this stage. Wet balsa and glue do not work together. Wait until the balsa is completely dry. Be forwarned that this sometimes can take a day or two in cold weather. When you remove the balsa from its former or shape holder, you’ll notice that it tends to spring back a little bit, that is okay, it’s normal. You can now glue your balsa to the airframe. |