Whether your favorite Disney character is Baby Yoda, Elsa, or even Mickey Mouse, you can change your Disney+ profile picture to match. Here’s how to set a new avatar from your web browser or the mobile app for iPhone, iPad, or Android.
If you haven’t already, make sure you log into Disney+ on your computer or download the mobile app for iOS/iPadOS or Android before going forward. That will be the initial step before you can change your profile picture.
How to Change Your Disney+ Profile Picture From a Browser
After you log into Disney+ on your browser, you’ll be on the main screen that shows all the different movies and TV shows. Once you’re on that screen, you’ll see your profile in the top-right corner. Select your profile to display the other options underneath it.
Once you have that menu open, there will be the other family profiles as well as several settings to choose from. You will want to select “Edit Profile,” which is directly below the “Add Profile” button.
Now, you will see the profiles on your Disney+ account that you are able to edit. There will be an Edit icon that looks like a small pencil. Click on that icon to edit profile’s avatar.
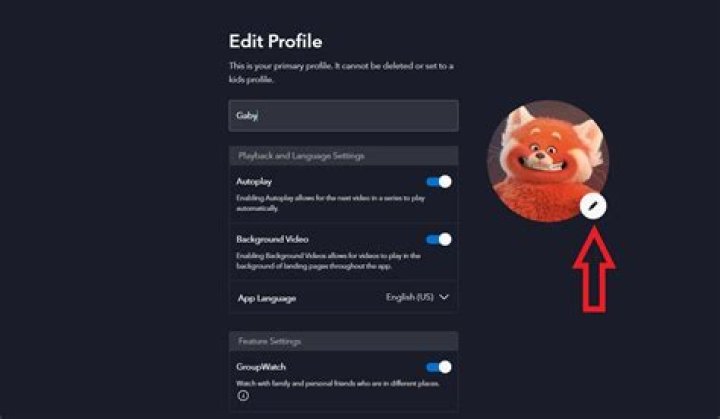
Once you select the profile, there will be several options where you can personalize your settings. To the right of those settings, you will find your current profile picture with another Edit icon. Click on the pencil to change your profile picture.
You will be taken to a page that has all of the various Disney characters you can set as your profile picture. You can scroll through all of the options then and click on the character you want to have as your profile picture.
After selecting the icon, the website will take you back to the Edit Profile page you were previously on. Once you’re on this page, select the “Save” button at the very bottom of the screen, below “App Language.”
Now that you have your icon saved, the site will take you to the “Who’s Watching?” page. You will be able to see your new profile picture. Select your profile with your newly-chosen picture and start watching your favorite Disney shows and movies.
How to Change Your Profile Picture on the App
Editing your profiles on the app is a bit simpler than it is on your browser. When you click on your profile icon in the bottom right corner, it will take you to the screen with all the profiles.
Select the “Edit Profiles” button to take you to the various profiles you can edit.
Starting with the editing profiles, just select the pencil icon that corresponds with the profile you want to edit.
Once you are on your profile screen, select the “Edit” icon next to your profile picture.
You will now see the entire library of pictures to choose from. Pick the icon that best suits yourself as well as your profile.
Once your picture is selected, you will be taken back to the “Edit Profile” settings menu. Click “Save” in the upper right-hand corner to officially change your profile picture.
Now that you have that all saved, you will be taken back to the profile page where the settings are at. You can click the “Home” button to get back to the main screen or select the magnifying glass button to find your next show.
Disney made it so quick and easy to make your profile picture into your favorite character, especially on the app. Now, you can sport whoever your favorite character is, even if that tends to change for you.
You now have your desired Disney pal as your profile picture so you can see them each time you log in. You’ll be able to enjoy every show with a personalized icon for every member of the family.
- Trending Topics :
- Mars
- What to Watch
- WandaVision
- Studio Ghibli
- presidents
- Star Wars
- Cute Animals
facebook Created with Sketch.
Reddit Created with Sketch.
Linkedin Created with Sketch.
Email Created with Sketch.
Pocket Created with Sketch.
Flipboard Created with Sketch.
One of the many perks of Disney+? Unlike other streaming services, which have sought to cut down on content sharing, you can have four different streams going at once as well as seven different profiles under one account. (Since Disney+ is intended largely to be a family-oriented product, given their content, having multiple options for one account makes perfect sense.) Just like Netflix, Disney+ lets you choose a specific icon to represent your personal profile, so don’t worry if your sibling or significant other likes Buzz Lightyear better than Anna or Elsa. But depending on who your favorite Disney family character is, you may not be totally happy with what your options are.
To pick your own profile picture, navigate to the top right corner of your home screen and click on “Add Profile.” You’ll be met with a number of avatar options, broken up into categories such as Featured, Disney (a combination of Disney and Pixar films such as Zootopia, Lilo and Stitch, and Tangled), Star Wars, Marvel, National Geographic, Pixar, Kids, Mickey Mouse & Friends, Disney Classics, Disney Princess, Villains, and Disney Channel.
While it seems like there’s an abundance of choices, don’t expect to see all of your favorite characters on there…especially if they’re not of the animated Disney variety. For example, it’s disappointing that while Marvel’s selection includes Thanos, Baby Groot, and Ant-Man among the heavy hitters, it fails to include any notable female characters such as Black Widow, Captain Marvel, Scarlet Witch, Gamora, or Nebula. (It’s worth noting there is a Wasp icon, the lone female Avenger to make an appearance in the Marvel section. But like Ant-Man, her face is covered by her helmet.) Star Wars fans, on the other hand, have a little more variety when it comes to character options (which are mostly droids, creatures, and Stormtroopers) including great Star Wars: Rebel characters like Ashoka and Sabine. But those who love space’s original princess Leia Organa, or even Han Solo or Luke Skywalker, will be disappointed to find that those characters aren’t available.
Disney+
Given that available characters in both the Marvel and Star Wars sections are either animated, CGI-generated, or ones who use face covers—and given that it seems unlikely both of these properties wouldn’t want to take the time to promote certain characters given upcoming anticipated releases like The Rise of Skywalker and Black Widow—it’s entirely possible that the absence of certain characters stems less from a purposeful lack of inclusion and more from an issue with likenesses, something that other categories obviously don’t have to worry about.
However, it’s worth noting there are multiple options for those who love their Disney Channel content, and should you be so inclined, you can pick your avatar to be the smiling (human) face of Lizzie McGuire or anyone from High School Musical. In the regular Disney category, you can choose Dove Cameron’s Mal from The Descendants.
Whether the issue behind the lack of some of our favorite heroes is beyond the control of Disney+ or not, we can only hope that in the coming weeks or months, Disney will have the opportunity to add more options when it comes to icon selection. If nothing else, to give some much needed representation to some of our favorite franchises.
Whether your favorite Disney character is Baby Yoda, Elsa, or even Mickey Mouse, you can change your Disney+ profile picture to match. Here’s how to set a new avatar from your web browser or the mobile app for iPhone, iPad, or Android.
If you haven’t already, make sure you log into Disney+ on your computer or download the mobile app for iOS/iPadOS or Android before going forward. That will be the initial step before you can change your profile picture.
How to Change Your Disney+ Profile Picture From a Browser
After you log into Disney+ on your browser, you’ll be on the main screen that shows all the different movies and TV shows. Once you’re on that screen, you’ll see your profile in the top-right corner. Select your profile to display the other options underneath it.
Once you have that menu open, there will be the other family profiles as well as several settings to choose from. You will want to select “Edit Profile,” which is directly below the “Add Profile” button.
Now, you will see the profiles on your Disney+ account that you are able to edit. There will be an Edit icon that looks like a small pencil. Click on that icon to edit profile’s avatar.
Once you select the profile, there will be several options where you can personalize your settings. To the right of those settings, you will find your current profile picture with another Edit icon. Click on the pencil to change your profile picture.
You will be taken to a page that has all of the various Disney characters you can set as your profile picture. You can scroll through all of the options then and click on the character you want to have as your profile picture.
After selecting the icon, the website will take you back to the Edit Profile page you were previously on. Once you’re on this page, select the “Save” button at the very bottom of the screen, below “App Language.”
Now that you have your icon saved, the site will take you to the “Who’s Watching?” page. You will be able to see your new profile picture. Select your profile with your newly-chosen picture and start watching your favorite Disney shows and movies.
How to Change Your Profile Picture on the App
Editing your profiles on the app is a bit simpler than it is on your browser. When you click on your profile icon in the bottom right corner, it will take you to the screen with all the profiles.
Select the “Edit Profiles” button to take you to the various profiles you can edit.
Starting with the editing profiles, just select the pencil icon that corresponds with the profile you want to edit.
Once you are on your profile screen, select the “Edit” icon next to your profile picture.
You will now see the entire library of pictures to choose from. Pick the icon that best suits yourself as well as your profile.
Once your picture is selected, you will be taken back to the “Edit Profile” settings menu. Click “Save” in the upper right-hand corner to officially change your profile picture.
Now that you have that all saved, you will be taken back to the profile page where the settings are at. You can click the “Home” button to get back to the main screen or select the magnifying glass button to find your next show.
Disney made it so quick and easy to make your profile picture into your favorite character, especially on the app. Now, you can sport whoever your favorite character is, even if that tends to change for you.
You now have your desired Disney pal as your profile picture so you can see them each time you log in. You’ll be able to enjoy every show with a personalized icon for every member of the family.
Disney+ allows you to create up to seven profiles per subscription. Please see the following sets of instructions for the profile that’s right for you now.
Set up a new profile
- Once logged in, go to your Profile
- On a Connected TV
- Expand the left navigation bar
- On a Mobile Device
- It’s on the bottom right
- On a Web Browser (on a desktop or laptop computer)
- It’s on the top right
- On a Connected TV
- I f on mobile, select Edit Profile to add another profile
- Select ‘Add Profile’
- Select a character icon for your profile
- Enter a profile name
- Select SAVE
Manage your profile
- Once logged in, go to your Profile
- On a Connected TV
- Expand the navigation bar shelf
- On a Mobile Device
- It’s on the bottom right
- On a Web Browser (on a desktop or laptop computer)
- It’s on the top right
- On a Connected TV
- Select Edit Profile
- Select the Profile you want to edit
- Adjust your profile name, as well as settings for:
- Autoplay
- Background video
- App language
- Select SAVE
Add a profile
- Open up your Profile
- On a Connected TV
- Expand the navigation bar shelf
- On a Mobile Device
- It’s on the bottom right
- On a Web Browser (on a desktop or laptop computer)
- It’s on the top right
- On a Connected TV
- Select Add Profile
- Select from Baby Yoda, Simba, Iron Man, and more
- Enter a Profile name
- Select SAVE
Create a Kids’ Profile
- Open up your Profile
- On a Connected TV
- Expand the navigation bar shelf
- On a Mobile Device
- It’s on the bottom right
- On a Web Browser (on a desktop or laptop computer)
- It’s on the top right
- On a Connected TV
- Select Add Profile
- Select a character icon for your profile
- Enter a Profile name
- Toggle the Kids’ Profile setting to On. (You’ll want to toggle to the right.)
- Select SAVE
Note: The primary profile is the subscription holder’s profile. The primary profile cannot be deleted or set to a Kids Profile.
Disney+ is an excellent streaming service to share with those that you love, but sometimes you may need to remove certain people from your account. Here’s how to add and delete profiles from your Disney+ account.
How to Add a Disney+ Profile
After signing into your Disney+ account on your computer, Android device, iPhone, or iPad, select your profile picture. You’ll find your avatar in the top-right corner of your desktop and the bottom right on your mobile device.
Next, select the “Edit Profiles” button.
Once you’ve gotten to the “Edit Profiles” page, tap on the “Add Profile” button to set up a new user.
The first thing you’ll need to do is select a new profile picture.
Once you decide on their avatar, add the new user’s profile name and then select the “Save” button. Make sure you enable the toggle next to “Kids Profile” if you want to limit the number of shows and movies the account has access to.
You’ll be taken back to the “Who’s Watching?” screen.
Creating a new profile allows this new user to have their own watchlist. There will be specialized recommended content as they continue to use the service, and they won’t interrupt what you’re watching on your profile.
How to Delete a Disney+ Profile
Removing a profile from your Disney+ account is just as easy as adding a new one. Once on the Disney+ website or mobile app, you’ll need to select the profile in the upper right-hand corner on the desktop and in the bottom-right corner on the app.
Once the menu or tab opens, click or tap on the “Edit Profiles” button.
On the “Edit Profiles” screen, select the “Edit” button, represented by the pencil icon, found on top of the account you want to delete.
At the very bottom of the next page, select “Delete Profile.”
There will be a confirmation box that pops up. You’ll want to select “Delete” to permanently remove the profile.
This will take you back to the “Edit Profiles” screen. You can delete another profile or select “Done” in the top right-hand corner to go back to the home screen.
The profile has now been permanently deleted. You’ll be able to choose from the other profiles to keep watching.
You can add up to seven different profiles to your Disney+ account so that you can share the wealth with the whole family. Remember that anyone can delete a Disney+ account as well, so only share access with people you truly trust. Each profile has customized recommendations and more meaning that every profile will be personal for each person.
- 24 Mar 2020, 15:30
- Updated : 24 Mar 2020, 15:30
FINALLY signed up to Disney+? We’ve rounded up some tips and tricks to help you get the most out of it.
Disney fans are already fawning over the huge back catalogue of content – so follow our guide to maximise your new binge-watching habit.
How to create watchlists
Creating a watchlist is easy, and a great way to store TV shows and movies you want to view later.
Simply go to the page for any piece of content and then press the plus (+) icon.
This will add it to your watchlist, which you can find in the left-hand menu.
You can add items to (or delete content from) the watchlist at any time.
How to find your favourite franchises
See those big brand logos at the top of the Disney+ app homepage? They’re not there as advertisements.
Instead, they’ll navigate you directly to all of the content within that franchise.
So when you tap on Star Wars, you’ll get a long list of all of the Jedi-related media available on Disney+.
It makes it really easy to find TV shows and movies from your favourite franchises.
How to change your profile picture
You can create different profiles on Disney+, and each one can have its own unique image.
To do this, go into Disney+ and then go to Settings and then Edit Profiles.
Then tap on the profile picture icon and you’ll be able to choose from a long list of images.
You can’t upload your own snaps, but there are plenty of Disney-themed ones to choose from.
Download content
If you’re using the mobile Disney+ app, you can download content to watch offline.
So when you’re on a long flight or camping without good mobile signal or WiFi, you can still watch your Disney+ favourites.
Simply go onto a movie or TV show and then look for the downwards arrow icon.
This will download the content to your device so you can watch it without an internet connection.
However, bear in mind that this will take up space on your phone or tablet – so don’t download too much if you’re always low on storage.
Request new shows
Disney+ is absolutely rammed with amazing and entertaining content.
But if you think something is missing, don’t be afraid to ask.
You can go into the Disney+ Help Centre, then head into Give Feedback and tap Request a Film or Show.
That will file your request with Disney+, and if enough people ask for the same thing, it might just end up on Disney+.
Be mindful, however, that some pieces of content may never end up on Disney+, so don’t be too disappointed if you don’t get your way.
Join the community to find out what other Atlassian users are discussing, debating and creating.
- Community
- Products
- Jira
- Jira Software
- Questions
- How do I add an avatar to my profile?
Another user I work with has an avatar on their profile. How do I add an avatar to my profile? I did ask them but they cannot remember.
4 answers
I usually follow below steps. Hope it helps you too.
1. Click profile icon available right top corner of the header bar
2. Click Profile
3. Click on your profile
4. Choose your preferred avatar and save.
You must be a registered user to add a comment. If you’ve already registered, sign in. Otherwise, register and sign in.
According to your above comment. you are trying to edit the avatar of Atlassian profile.
In this case, follow below steps,
1. Click on Edit profile button. ( you will be navigate in to profile page)
2. Click on avatar
3. Click Edit in Atlassian account link ( you will be redirect in to Atlassian account page)
4. Click Change avatar link
You must be a registered user to add a comment. If you’ve already registered, sign in. Otherwise, register and sign in.
You must be a registered user to add a comment. If you’ve already registered, sign in. Otherwise, register and sign in.
The only option I see is to upload an image but I’ve seen mentions of being able to select an existing avatar, I just cannot find that option.
You must be a registered user to add a comment. If you’ve already registered, sign in. Otherwise, register and sign in.
May I ask you which profile you are referring here?
is it the community profile? JIRA/Confluence or other?
You must be a registered user to add a comment. If you’ve already registered, sign in. Otherwise, register and sign in.
It is the JIRA one.
You must be a registered user to add a comment. If you’ve already registered, sign in. Otherwise, register and sign in.
Thanks for taking the time to answer my query. I do not see the same as you. When I click the profile icon it takes me to the viewprofilepage (see attached). The only buttons I see are Edit Profile and Adjust Notifications. When I click Edit Profile it takes me to my notifications settings.
You must be a registered user to add a comment. If you’ve already registered, sign in. Otherwise, register and sign in.
If you want your account picture to have more of a personal touch and reflect you, you can change your picture in Windows 10.
Change your account picture
You can change the picture for either a local account or a Microsoft account. Here’s how.
Tip: If you use just a username and password to sign in to Windows 10, you’re using a local account. If you use an email address and password to sign in, you’re using a Microsoft account.
Change your local account picture in Windows 10
Select the Start button, then select Settings > Accounts > Your info.
Under Create your picture, select Browse for one. Or, if your device has a camera, select Camera and take a selfie.
Note: Windows remembers the last three pictures you’ve used. Select the picture on the Your info page to switch to that one.
Change your Microsoft account picture in Windows 10
Select Add picture or Change picture, then follow the instructions.
Note: Windows remembers the last three pictures you’ve used, so you can easily switch back to a recent favorite.
Delete an account picture
Windows is designed to let you switch between your three most recent pictures on the Your info page. If you really need to delete one of your account pictures:
Open File explorer from the taskbar. If you don’t see File explorer on the taskbar, select Start , and type File explorer.
Go to C:\Users\ yourname\AppData\Roaming\Microsoft\Windows\AccountPictures.
Replace yourname with your account name.
If you’re unable to find the AppData folder in File Explorer , it might be hidden. Select the View setting and select the checkbox next to Hidden Items to show all items in a folder.
Delete the account picture you no longer want to use.
- Article History
- Subscribe to RSS Feed
- Bookmark
- Subscribe
- Email to a Friend
- Printer Friendly Page
- Report Inappropriate Content
If your institution has enabled profile pictures, you can add and change profile pictures in your account. If you do not see a placeholder picture in your user settings, your institution has not enabled this feature.
There are three ways you can select a profile picture to use throughout Canvas:
- Upload a Picture from your computer
- Take a Picture using your computer’s camera (not supported when using Safari or Internet Explorer)
- Import from an existing Gravatar account (this feature may be restricted by your institution and only G-rated images are supported)
Tips for profile pictures:
- Please choose an appropriate picture to represent yourself. Your institution has the right to remove pictures that are not appropriate for a classroom setting.
- Images should be square in size to prevent your picture from being resized or distorted.
- Files can be any type (.jpg, .png, .gif) or size as long as you have room in your personal files to store the file. Canvas recommends that your profile picture be as small as possible.
- Your personal files quota is enforced when uploading a profile picture. If you do not have enough storage space in your personal files, you will not be able to upload your profile picture. Create more space by removing some files in your personal files.
Open User Settings
In Global Navigation, click the Account link [1], then click the Settings link [2].
Open Profile Picture
Click the profile picture icon.
Note : If you don’t see a placeholder profile picture icon, your institution does not allow you to add or change your profile picture.
Upload a Picture
To upload a new profile picture, click the Upload a Picture tab [1], then click the choose a picture link [2]. You can also drag a picture from your desktop and drop it into the uploader.
Choose Profile Picture
Find the image you want to upload [1] and click the Open or Browse button [2].
Crop or Resize Picture
Use the selection boxes to crop your image [1]. When you are finished, click the Save button [2].
Note: Canvas will automatically store a copy of the saved profile picture in your personal files. When a new picture is saved in your profile, the new picture will override the existing picture file in your personal files.
Take a Picture
To take a picture to use as your profile picture, click the Take a Picture tab [1], then click the Take Picture button [2].
Note : Depending on your browser, you may need to allow Canvas to access your camera. The Take a Picture option is not supported when using Safari or Internet Explorer.
Save Picture
To take another picture, click the Retry button [1]. When you are finished, click the Save button [2].
Import from Gravatar
If your institution allows Gravatars and you have a Gravatar account, you can import an existing Gravatar to use as your profile picture.
Click the From Gravatar tab [1] and enter your Gravatar email address in the field provided [2]. Click the Preview button to view your Gravatar. When you are finished, click the Save button [3].
Note: Before adding a photo in your Gravatar account, you will have to rate the photo. Please note that only G-rated Gravatar photos can be displayed as a Canvas profile picture.
View Profile Picture
The Profile picture you selected will show up instead of the placeholder profile picture.
Delete Profile Picture
Profile pictures are linked to your personal files, so you can easily delete them to remove old profile pictures.
Note: Gravatar images cannot be deleted from your account through your personal files. However, Gravatar images may be replaced with an uploaded image or with a captured image using the Take a Picture option.
Open Files
To delete a profile picture, click the Files link.
Open Profile Pictures
Click the profile pictures folder.
Delete Profile Picture
Next to the file you want to delete [1], click the Options icon [2] then click the Delete link [3].
The process for changing the language settings on the Disney Plus platform is the same regardless of whether you’re watching on a phone, tablet, or desktop.
You can view legacy Disney content in four languages — English, Spanish, French, and Dutch, with more language options for Disney Plus originals. Subtitles are available in up to 16 languages, including German, Italian, Japanese, European Spanish, Latin American Spanish, and Cantonese Chinese. It’s important to note that every language may not be available for each title.
In addition to changing the language on individual movies and TV shows, you can change the app language in your profile settings. This change will only apply to that specific profile, so different members of your household can use the app in their preferred language.
Here’s how to change all of the Disney Plus language features.
Check out the products mentioned in this article:
iPhone 11 (From $699.99 at Apple)
Samsung Galaxy S10 (From $699.99 at Walmart)
Apple Macbook Pro (From $1,299.00 at Apple)
Lenovo IdeaPad 130 (From $469.99 at Walmart)
Disney Plus Monthly Subscription (From $6.99 at Disney Plus)
How to change the language on Disney Plus within the show or movie settings
1. Open the Disney Plus app or navigate to the website on your browser.
2. Tap or click the movie or show you would like to watch.
3. Once your selection is playing, pause it before tapping or clicking the Settings icon in the upper right-hand corner of the screen.
4. A window with two columns will open. In the first, you’ll find audio options. Select the language you desire.
5. In the second column to the right, select your subtitles. If you don’t plan on using subtitles, select “Off.”
6. Close the window by tapping or clicking the “X” or back arrow icon once you’ve made your choices.
How to change the language on Disney Plus in the profile settings
1. Open the Disney Plus app or navigate to the website on your browser.
2. Click the “My Profile” tab in the upper right-hand corner.
3. Select “Edit Profiles.”
4. Click the pencil icon of the profile you’d like to change.
5. Select the dropdown for “App Language.”
6. Choose your language.
7. Tap or click the blue “Save” button at the bottom.
How to change the language on your Disney Plus app
1. Open the Disney Plus app or navigate to the website on your browser.
2. Click the “My Profile” tab at the foremost right in the bottom menu.
3. Tap “Edit Profiles.”
4. Click the pencil icon of the profile you’d like to change.
5. Select the dropdown for “App Language.”
6. Choose your language.
7. Tap or click the blue “Save” button at the bottom.


