If your storage devices; internal or external hard drives, USB flash drives or SD cards are corrupted, formatting it is the most obvious solution. But at times, Windows does not allow you to format the drive. In such cases, a potential solution is to use Diskpart and remove partitions. After which Windows will let you format the drive.
How to use Diskpart?
Let us see how to use Diskpart in the following steps. First, make sure the external storage device you want to clean using Diskpart is connected to the computer.
- Press Windows + X to open the power user’s menu and select Command Prompt(Admin)
- Enter the admin login and password to launch a command prompt
- Type ‘diskpart’ and hit Enter
- Type ‘list disk’ for diskpart to list all the disks associated with the computer and hit Enter
- Once the drives are listed, identify the drive in question by paying attention to the size of the disk. Take extra caution as choosing a wrong drive may cause unintentional deletion.
- Type ‘select disk number’ where the number is the disk number
- Now that the disk is selected, any command you give will be applicable to the selected disk
- Type ‘clean’. This command will wipe the contents of the entire drive, so be sure you’ve selected the right disk in step 5 and data is backed up.
You will see a success message that the disk is cleaned and you’re done. Now that the disk is cleaned using Diskpart, you should be able to format and use it.
How to the format the volume after removing partitions?
Formatting can be done using the built-in tool called Disk Management.
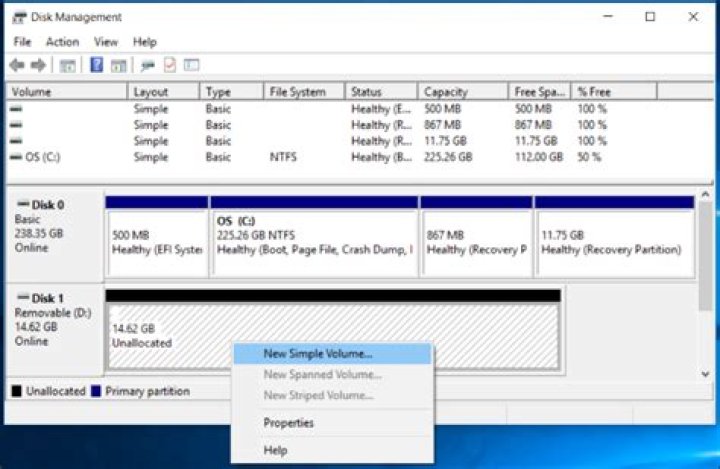
- You can launch Disk Management in the same way as you did Diskpart. Just press Windows + X and click on Disk Management
- You will see that the disk is shown as ‘Unallocated space’ as the partitions are removed
- Right click on Unallocated space and select ‘New Simple Volume’
- Then choose a ‘name for the volume’ and ‘select a file system’
- Click Format and your volume will be formatted and ready for use.
This method of using Diskpart to clean the drive and formatting it later resolves the issue in most cases. If however, the issue still persists, the drive may be physically damaged and may have to be replaced.
With SD cards, you can face other errors such as ‘Blank SD card’, ‘unsupported file system’, ‘SD card shows 0 bytes’ etc. In such cases, formatting is the way to go, but you run the risk of data loss issues. Your best course action instead should be to recover data from the card using recovery programs such as Remo Recover. And then proceed with formatting. If you want more details on the process of recovering data from such cards, refer blank sd card recovery.
Updated April 26, 2017 By Glen Leave a Comment
If the SD Card or hard drive is working slowly or even not working, cleaning drive and delete partitions is one possible solution either. It also could solve the problem that the drive can not be in the format or showing the wrong capacity.
This trick will also remove a partition that can not be removed by normal means such as Disk Management, a built-in disk partition in Windows. This process will completely erase the partition table of the disk to allow you to rearrange.
Warning: This process will completely erase the entire disk, so make sure you have a backup of the files in the disk or make sure no important files. For internal hard drive, make sure you select the correct partition, do not delete the wrong disk or partition.
1. Open Command Prompt (as Administrator)
Open Command Prompt as administrator. In Windows 10 or 8.1 simply right-click the Start button or press the Windows key + X and select Command Prompt (Admin).
In Windows 7 you need to find Commnd PROMT in the Start Menu. Type Command in Start Menu search bar Command Promt then right click and select Run as Administrator.
2. Use diskpart to clean the disk
We will use the diskpart command to do this. Before continuing make sure you connect the USB flash drive, SD Card or whatever drive you want to clean.
To run the diskpart type the following command to the Command Promt window and press ENTER:
Diskpart list displays connected to the computer by typing the following command and press ENTER:
Look carefully output of the command to identify the number of disks to be cleaned. Be careful here! If you choose the wrong disk, you will clean the wrong disk and you will lose important data.
In the image below we can see Disk 0 Disk 1 238GB and 14GB. We certainly know how much capacity of flash that is plugged into the computer. Here Disk 0 is the system drive (hard drive) and Disk 1 is the flash.
Once you know which disk to be cleaned when the following command, replace # with the number of disks that you specify.
Now select the disk that you have defined. Any command that you give now applied on the disk that already. To completely remove a disk partition table that has been type the following command and press ENTER.
Caution: This will erase all data on the selected disk! Make sure you’ve backed up important data before proceeding!
You will see diskpart managed to clean the disc if everything is working properly. Now you’re done. Close the window Command Promt to proceed to the next step.
3. Partition and Formatting Disks
Now you should be able to access, partition and format the disk as usual using the supplied Windows Disk Management. You can also use the diskpart command to do this, but as it will be easier to use a tool that uses the interface.
To start the Disk Management in Windows 10 or 8.1 right-click the Start button and select Disk Management. In Windows 7 press the Windows key + R type diskmgmt.msc in the Run column, and press ENTER.
You will see a disk that has no partitions. Right-click that does not contain a space and select New Simple Volume to create a partition on the disk and format the file system you want. By default Windows will create a single partition spanning the entire drive.
If this does not work, for example, you managed to clean the drive but it does not function normally when creating partitions or if you can not read the disk diskpart possibility that the disk is physically damaged and do not work well. However, cleaning the drive with diskpart is a solution that can make a drive that seemed broken for most people to return to function properly.
Filed Under: Tips & Tricks Tagged With: windows
Reader Interactions
Leave a Reply Cancel reply
This site uses Akismet to reduce spam. Learn how your comment data is processed.
Sometimes, you may encounter the error “The type of the file system is RAW” while running CHKDSK on the storage device. So here we will explain it occurs and how to fix the RAW file system effectively.
By Teresa / Last Updated May 26, 2021
The error: The type of the file system is RAW on SD card
Sometimes, you may encounter the return message when you run CHKDSK on SD card in Command Prompt: The type of the file system is RAW. CHKDSK is not available for RAW drives. And then, the disk checking service will not be started.
The RAW file system error is a common topic discussed by many Windows users. As a matter of fact, the error occurs on USB flash drive, pen drive, and external hard drive as well, not just SD cards. Then, you may wonder what RAW file system is and what the causes are.
About RAW file system and how it comes
In general, Windows operating system supports file systems such as NTFS, FAT32, exFAT, FAT16, etc. And the RAW file system is not included. When a drive shows as RAW, it usually means the drive is not formatted. It shows RAW in Disk Management and will not show up correctly in File Explorer. Therefore, it cannot be recognized or accessed by Windows OS.
If an SD card becomes RAW suddenly and unexpectedly, chances are that its file system is corrupted or damaged. The file system type information could be missing or the system tables are damaged if the SD card does not be removed properly. In addition, computer virus infection and hacker attacks are also possible causes for SD card RAW file system and shows 0 bytes. What counts next is to figure out how to repair RAW SD card in possible ways.
How to fix “The type of file system is RAW” easily in Windows 7/8/10?
In the very first place, you may want to recover crucial data on the SD card. There is a way that may help you recover lost partition in Windows 10/8/7 without a charge. If that way does not help, please turn to professionals. Next, let’s get to know how to make RAW SD card usable again.
1. Repair RAW SD card using CMD
First of all, connect the SD card to your PC and maybe via an SD card reader. Make sure it can be detected by Windows. Take SD card RAW to FAT32 for example.
в–Њ Option A. Format RAW SD card to FAT32 via Diskpart
1. Press Win + R to lift Run. Type diskpart and press Enter.
2. Type commands below successively and press Enter after each typing.
в–¶list volume
в–¶select volume n (where n is the volume number of the RAW SD card)
в–¶format fs=fat32 quick (or format fs=exfat quick)
в–¶exit
3. You’ll see the RAW drive becomes FAT32 in Windows Disk Management. Editing the partition label of SD card is also available there.
It is quite easy to format micro SD card from RAW to FAT32 with the help of Windows built-in tools. Nevertheless, you may encounter diskpart the parameter is incorrect error during the formatting. The formatting process may last for a long time as well. What’s worse, Windows built-in tool does not allow you to format the drive that is larger than 32GB to FAT32, or you’ll receive the error: The volume size is too big.
в–Њ Option B.В RAW to FAT32 on SD card via better tool
To avoid those troubles that may arise, it is not a bad idea to turn to other professional RAW SD card formatting tools. AOMEI Partition Assistant Professional is such a utility that allows you to format SD card from RAW to FAT32, NTFS, exFAT, Ext4, etc. regardless of the partition size. The process will be completed in a short time. You can download the demo version first of all.
1. Install AOMEI Partition Assistant Professional on your PC. It would be better if you take note of the installation path.
2. Open an elevated Command Prompt, and then type cd + the installation path to start AOMEI Partition Assistant in CMD. For example, input cd C: \Program Files (x86) \AOMEI Partition Assistant Pro Edition 6.6 and press Enter.
Tips: You can also find the installation path by right clicking the shortcut of AOMEI Partition Assistant on the desktop and then select Properties.
3. Type partassist.exe /fmt: F /fs: fat32 and press Enter. That means format F drive to FAT32. You can replace F with the correct drive letter.
4. Click Yes when prompts and then the formatting process will execute immediately. Type exit to leave the window directly after the process completes.
в…Descriptions: */fmt: format; followed by partition number or drive letter. */fs: file system; can be followed by fat16, fat32, exfat, ntfs.
AOMEI Partition Assistant Professional also provides graphical user-interface for common users to solve SD card corrupted RAW. It is user friendly and easy-to-use. Just double click the shortcut and you’ll see the neat main interface.
2. Fix CHKDSK RAW on SD card
Before changing RAW file system to another Windows recognized one, you can run disk check on RAW SD card with aforementioned software as well. It will check bad sectors on the disk for you.
1. Open AOMEI Partition Assistant. Find the SD card that shows RAW (it would be showing up as Unformatted here), right-click it and select Surface Test.
2. Tick on Quick Check and then Start.
Tips: for more methods of disk checking, please see check hard drive for errors in Windows 10.
Conclusion
When you receive the message “The type of the file system is RAW” on SD card, it could be the drive is not formatted or is damaged for some reason. Recover your valuable data if possible. Next, find some ways to make the SD card usable. AOMEI Partition Assistant is also a good tool to solve “CONVERT is not available for RAW drives” in Windows 10/8/7.
There are two situations when formatting SD card or USB drive: active or passive. For example, you may just want to free up the space, or Windows forces you to format the card for normal use. In either case, the question now is that Windows was unable to complete the format. There is no doubt that your SD card or USB drive is in trouble. There are many cases when people are unable to format SD card or even get the storage device detected by the computer.
What may cause SD card/USB drive not formatting? Below are some common cases:
- SD card or USB drive is infected by virus, leading to unfinished formatting.
- SD card or USB drive is damaged/corrupted and Windows can’t format corrupted SD card.
- Disk is write protected and you don’t have permission to make any changes to it. (Solution: How to remove write protection from SD card)
It should be noted that passive formatting will cause data loss, and it’s better to try RePicvid Free Photo Recovery to extract and restore important files from SD card/USB drive first. If you have already applied the formatting on an SD card or hard drive, there is still a chance to recover files from formatted hard drive or SD card.
Then what can we do to solve “Windows was unable to complete the format”? Here we list 6 methods to fix this problem.
1. Fix SD Card Not Formatting Using CMD
The full name of chkdsk is check disk. This tool creates and displays a disk status report based on the file system used by the detected partition. It also lists and corrects errors on disk. Try these steps to solve Windows was unable to format SD card.
- Step 1. Insert the SD card to a card reader and connect it to computer USB. When Windows prompts formatting, click “Cancel” and check the “Properties”. Use the tools in the Properties directly – Start checking. You will find it fails to check disk error.
- Step 2. Click “Start” – “Run”, and enter “cmd” – “chkdsk E:/F” (E is the drive of SD card, and /F is the repair parameter).
- Step 3. The DOS window closes automatically when the repair is completed. And the properties of the SD card show normally. (Note: It is not recommended to interrupt the CHKDSK process when using /f switch. The disk integrity after interruption is not guaranteed.)
This way will not lose any data, just repair the corrupted SD card.
2. Update the Driver of Undetected SD Card
In case the computer system fails to detect your SD card in File Explorer, you may need to update the driver to get the device recognized again. The problem usually happens on Windows 10, so we will learn how to fix it in a Windows 10 PC. Nevertheless, you can also find similar steps on Windows 7.
- Step 1. Right-click on the Start menu of your PC and choose “Device Manager”.
- Step 2. Look for your SD card under Disk drives or Universal Serial Bus controllers. You may find the name or brand of your SD card marked with yellow exclamation.
- Step 3. Right-click on it and choose “Update driver”, then Search automatically for updated driver software.
- Step 4. Check your SD card and access it. If necessary, restart your PC.
3. Assign a New Drive Letter to the Unreadable SD Card
When a removable disk, like an SD card or pen drive, is connected to a PC, then system usually assigns a drive letter to the disk automatically. However, if the computer system doesn’t assign a unique drive letter to your SD card, then the memory card will not be readable. In this case, we need to assign a new drive letter to the unreadable SD card to make it visible again.
- Step 1. Right-click on the Start menu of your PC and choose “Disk Management”.
- Step 2. In Disk Management, right-click on the SD card and choose “Change Drive Letter and Paths…”
- Step 3. On the pop-up window, click “Change”, then select a unique letter for the SD card.
- Step 4. Click OK to apply the change.
4. Fix SD Card Not Formatting in Disk Management
“Disk Management” is an important component in the control panel “Computer Management”. Using this tool, you can list all the disk conditions at a glance and manage the individual disk partitions. If Windows fails to format your SD card, follow the steps below to fix it.
- Step 1. Connect SD card to computer with card reader. Right click “My Computer” and select “Management”.
- Step 2. Click on “Disk Management” on the left side of the window, then it displays information about all storage devices in the current system. The “Removable disk” is the SD card to be fixed.
- Step 3. Right click “Removable disk” and select “New volume” – “FAT32”. The system will prompt the partition creation is success. Then format the SD card again.
Through the above steps, the SD card can be repaired. But this way will corrupt the data because it has been formatted.
5. Format SD That Won’t Format with DISKPART Command
Diskpart can be used to manage the partition of hard disks. This command prompt will repair SD card that Windows was unable to format.
- Step 1. After “run”, enter “cmd” to open the command prompt window, and then enter “Diskpart” to start it.
- Step 2. Type “list disk” and press Enter.
- Step 3. Carefully spot the disk that you need to format and type “select disk 2” (replace “2” with the number of the SD card). If you choose the wrong disk, it will erase all data.
- Step 4. Type “clean” to format the selected disk and press Enter.
- Step 5. Type “create partition primary” and “format fs=fat32” to complete the formatting. Then close the window until it is finished.
6. Fix SD Card That Won’t Format Using SD Card Formatter Tool
General SD card repair tools and formatter tools belong to a type, which is forced formatting. This way is likely to repair your SD card, but it can damage the data. If your SD card is certified product, the repair success rate is very high. This sort of software is more, mainly developed by SD card manufacturer, such as the famous Sandisk SD card formatter tool. If it still fails to access your SD card, then you might as well consider a new one.
I have recently bought a very lovely tablet with Windows 8.1. However, the C drive is limited to 32GB, which is not enough space for me. What I would like to do is use a 64GB SD memory card to expand that memory. I have formatted the SD memory card, and it is working just fine – I am able to store and retrieve data from it. I followed the instructions on this site, not including Step 4, which basically uses Disk Management to mount an SD card folder as part of the C drive. So now, I basically have something that is C:\SD_Card, which has 64GB of memory.
However! Windows is still always telling me that I’m low on memory. It sort of makes sense, because it’s not like suddenly, Windows is saving/updating/adding apps to that folder. Does anyone know of a way the Windows can just reinterpret my added 64GB as a part of the C drive, so it sees the C:\ drive as 32GB+64GB = 96GB total, not just a 32GB C drive with an attached 64GB folder? I have no intention of ever removing the SD memory card; I want to just consider it as now part of the computer.
Report abuse
Thanks for posting your query on Microsoft forum. I will certainly help you with this.
I would like to inform you that in Windows operating system C: drive is a default drive which cannot be expanded manually even if you add or mount with an external SD memory card. Since it’s the internal memory it is impossible to merge the C: drive and the SD card memory. Microsoft does not recommend to do the same as it may affect the Operating system files.
Hope this answers your query! Please feel free to post, in case you face any other issues with Windows in future, we’ll be glad to help you.
Written By Sumona Chatterjee
Approved By Rohit Arora
Updated on May 18, 2021
Min Reading 4 Min
Summary: It’s very unsettling when your device doesn’t mount or recognize the SD Card. This post shows how you can fix the ‘SD card unrecognized’ error. Learn how you can restore your data with the help of Stellar Photo Recovery.
Your SD card stores lots of valuable information such as photos, videos, audio, or even a series of your favorite sitcom, etc. As soon as you insert the SD card into your android phone, you are unable to access the content stored on it. Why? Because the android phone does not recognize or the SD card won’t Mount.
To substantiate that your SD card is working fine, you reboot your android phone, keep ejecting and inserting the SD card over and over again, but to no avail. You even connect the SD card to your laptop, and yet it is unable to read the card either.
It might seem that the SD card is damaged but, this can be due to hardware issues as well. Therefore, check whether the card slot/ USB port/card reader is working fine. It could be that:
- The card slot is damaged
- The USB cable is broken; or
- The USB port is not working
Even if the SD card cannot be read using another handset or laptop, then your SD card might be faulty, and you need to replace it with a new one. Problem solved! Right? Actually, the dilemma is how to recover data stored on the SD card.
How to Fix “SD card won’t Mount or Recognized” error on Android Phone?
When you insert the SD card into your android phone, then the phone automatically mounts it; however, your phone might be unable to recognize the SD card. Here’s how you can fix the SD card won’t mount errors on Android Phones.
Fix 1: Mount your SD card on your Device:
You can format your SD card and make it accessible. Follow the below-mentioned steps:
- Go to the Settings menu on your android phone
- Click Storage and then select Format SD card Stellar Data Recovery Professional for Windows
Stellar Data Recovery has the right Windows Recovery tool for all your data recovery..
Stellar Data Recovery for Mac program performs safe..
A comprehensive photo recovery software to restore photos, music & video files..
Powerful video repair tool for repairing corrupt or damaged MOV and other video files..
I had also upgraded my 16 GB micro SD card to a 32 GB Samsung one. Unfortunately, the SD card won’t recognized in my Phone. I restarted my phone and checked but still without success. I also checked SD card to PC, another phone still have the same issue. What should I do next to view my data on unrecognized SD card? Please help if any suggestion!
Hi Ben, If your SD card won’t recognize your PC or Phone, it would be hard to recover your data. In such case, you can contact the manufacturer of the SD card or send the card to our data recovery service lab. Thanks!
I had an issue when I insert a SD card into the USB port of my laptop fails to respond to it, not appear or recognize it. Thanks for given the ways to fix this issue. I really appreciate it!
Hi CJ, Thanks for reading our blog and sharing valuable feedback with us.
My micro SD card is not detected my PC when I connected through a USB. I found your blog on search, now finally I figured out the dang thing on my computer. Thanks a lot!
Hi Robert, Thanks for reading our blog!
I had a same issue with my android phone that won’t mount or read an SD card. I have tried many ways to fix it but all the result are same. I also used making the hidden files on it visible & then formatting the card & still won’t mount them. Any help would be appreciated.
Please try the SD card to another phone, if SD card not visible please contact the manufacturer or replaced the cards.
My PC hasn’t recognized the SD card. When I connect through USB card reader SD card doesn’t appear in Windows. Thanks for providing the right solutions to fix this error!
Hey Monica, Thanks for providing your feedback. Any concern related to SD card corrupted or Windows files recovery. We always provide the right solutions!
Due to nature of my job, I need to very frequently use SD Card on multiple devices. Sometimes it was inserted wrongly in a hurry. May be this is a cause of my data loss in various previous occasions (not only once, but twice). A good lesson to learn from this post.
Thank You so much for sharing your experience with our readers.
This post talks about the best Patriot flash drive format tool, and the most reliable USB, SD card, memory card recovery software. If you are looking for ways to format a Patriot device for free, refer to Part 1. If you lost files, photos, and more from your Patriot SD card, USB drive, or other devices, refer to Part 2.
Part 1. How to Format Patriot Flash Drive with Patriot Formatter
When you try to use your Patriot USB flash drive, you are faced with this error – you need to format the disk in the drive before you can use it. However, when you have followed the system’s guide, you still cannot use your Patriot USB or memory card. Why? You need an effective formatter to format your USB and SD card correctly. Read on and use the best Patriot format tool.
User Stories – How to Format Patriot USB Flash DriveВ
Case 1. “I have bought a new Patriot USB. Yesterday, when I was trying to use it, there pops up a box. It reads – You need to format the disk before you can use it. I followed the Windows guide and formatted my new USB. However, I still can’t use it! So wired!”В
Case 2. “My USB drive is saying it is not recognized and needs to be formatted. The wired thing: I just bought it a month ago, and I did format it before saving photos to the Patriot USB.”
Case 3. “I plugged my USB drive into the port of a PC, right-click the disk icon and select “Format”, but it popped up an error saying ‘Windows was unable to complete the format”. I need a tool to help me!”
What Does Format Mean and What to Do Before Formatting
To format a drive (hard disk, floppy disk, flash drive, etc.) means to prepare the chosen partition on the drive to be used by an operating system by deleting all of the data and setting up a file system. The most popular file system to support Windows is NTFS, but FAT32 is also sometimes used.
Before you start formatting, make sure that you already backed up the data stored on your flash drive. If you haven’t done so and the files stored inside are important to you, try using a USB data recovery software to see if it helps. Just connect your USB drive to the PC, then let a recovery program scan your USB drive to seek any recoverable items.
Download The Best Free USB Formatter for Patriot
EaseUS Partition Master, a partition tool with “Format” feature that allows you to format the disk partition/USB flash drive/SD card. Its powerful formatting capacity and the easy-to-use feature will do you a great favor when you try to format your Patriot USB or convert FAT to NTFS. Let’s see how it works.
Step 1. Select the USB drive to format.
Connect the USB drive or pen drive to your computer. Download and launch EaseUS partition software. Right-click the USB drive you intend to format and choose “Format”.
Step 2. Set the drive letter and file system.
Assign a new partition label, file system (NTFS/FAT32/EXT2/EXT3), and cluster size to the selected partition, then click “OK”.
Step 3. Check the warning box.
Click “OK” if you see the Warning window. If you have important data on it, back up the data in advance.
Step 4. Apply the changes.
Click the “Execute operation” button first, and then click “Apply” to format the USB drive.
Part 2. How to Recover Data from Patriot Memory Card or USB Flash Drive
What are you lost Patriot files after accidental deletion or format? You can restore Patriot Memory card or SD card data with the help of EaseUS data recovery software. It has been devoted to data recovery over a decade and helped users restore their lost files.
- Supports USB, pen drive, memory card, internal/external hard drive, RAID drive, digital camera, video player, and more
- Recovers photos, documents, videos, audio, emails, compressed files, etc.
- Supports FAT(FAT12,FAT16,FAT32), exFAT, NTFS, NTFS5, ext2/ext3, HFS+, ReFS.
Connect the USB flash drive or SD card to your computer and follow the guide to start USB data recovery:
Step 1.В Launch EaseUS Data Recovery Wizard, hover on the partition which you want to recover data from, andВ click “Scan”.
Step 2. Wait for the scan to complete. Then, select theВ files you’d likeВ to recover.
Step 3. After selectingВ the files, clickВ RecoverВ and choose a location to save the recovered files at. Make sure not to pick your storage device that made you lose your files.
Conclusion
The format in this post is a high-level format. A low-level format will erase the whole disk surface. After that, you can’t recover data from the hard drive anymore, even using professional data recovery software. Besides formatting, you can manage your Patriot devices with EaseUS Partition Master by shrinking, extending, and creating a new partition.
Was This Page Helpful?
Brithny is a technology enthusiast, aiming to make readers’ tech life easy and enjoyable. She loves exploring new technologies and writing technical how-to tips. On her spare time, she loves sharing things about her favorite singer – Taylor Swift on her Facebook or Twitter.
I love that the changes you make with EaseUS Partition Master Free aren’t immediately applied to the disks. It makes it way easier to play out what will happen after you’ve made all the changes. I also think the overall look and feel of EaseUS Partition Master Free makes whatever you’re doing with your computer’s partitions easy.
Partition Master Free can Resize, Move, Merge, Migrate, and Copy disks or partitions; convert to local, change label, defragment, check and explore partition; and much more. A premium upgrade adds free tech support and the ability to resize dynamic volumes.
It won’t hot image your drives or align them, but since it’s coupled with a partition manager, it allows you do perform many tasks at once, instead of just cloning drives. You can move partitions around, resize them, defragment, and more, along with the other tools you’d expect from a cloning tool.
Related Articles
Roxanne/2021/06/04
Jean/2021/04/21
Cedric/2021/05/20
Roxanne/2021/04/21
About EaseUS Partition Master
All-round disk & partition management software for personal and commercial use. Let it manage your storage drive: resize, format, delete, clone, convert, etc.
I have recently bought a very lovely tablet with Windows 8.1. However, the C drive is limited to 32GB, which is not enough space for me. What I would like to do is use a 64GB SD memory card to expand that memory. I have formatted the SD memory card, and it is working just fine – I am able to store and retrieve data from it. I followed the instructions on this site, not including Step 4, which basically uses Disk Management to mount an SD card folder as part of the C drive. So now, I basically have something that is C:\SD_Card, which has 64GB of memory.
However! Windows is still always telling me that I’m low on memory. It sort of makes sense, because it’s not like suddenly, Windows is saving/updating/adding apps to that folder. Does anyone know of a way the Windows can just reinterpret my added 64GB as a part of the C drive, so it sees the C:\ drive as 32GB+64GB = 96GB total, not just a 32GB C drive with an attached 64GB folder? I have no intention of ever removing the SD memory card; I want to just consider it as now part of the computer.
Report abuse
Thanks for posting your query on Microsoft forum. I will certainly help you with this.
I would like to inform you that in Windows operating system C: drive is a default drive which cannot be expanded manually even if you add or mount with an external SD memory card. Since it’s the internal memory it is impossible to merge the C: drive and the SD card memory. Microsoft does not recommend to do the same as it may affect the Operating system files.
Hope this answers your query! Please feel free to post, in case you face any other issues with Windows in future, we’ll be glad to help you.
I came across installing ROMs, but I can’t install it because I need to wipe some things .
It told me to wipe / do a factory reset .
Then, when I go to the Wipe Section of the TWRP Recovery, clicked on Advanced Wipe, I noticed that there is Data, and there is Internal Storage.
TWRP told me that Data, Cache, and Dalvik is the only wipe that I need.
Will wiping Data remove my apps, music, photos, videos, and app data?
Data is your user apps (installed from Google Play Store, or with an *.apk) and its app data. It is stored on /data .
- Your user apps is stored on /data/app .
- Your apps’ data is stored on /data/data .
NOTE: You must be rooted to see the contents on /data/ .
Therefore, if you wipe your data, it might also delete your user apps, and its app data, but excluding your music, photos, videos, etc.
Internal Storage
On the other hand, Internal Storage is actually the storage where your other data are saved, such as music, photos, videos, other app data, downloads, etc., and is usually stored on /storage or /sdcard .
NOTE: /sdcard is different from your external SD Card.
- Music is saved on /sdcard/Music .
- Photos are saved on /sdcard/DCIM .
- Videos are saved on /sdcard/Videos .
- Other app data are saved on /sdcard/ (App Folder) .
- Other apps choose to store their app data on /sdcard/ . , such as Minecraft: /sdcard/games .
- Downloads are saved on /sdcard/Downloads , and can be easily found if you have the Downloads app.
2 Answers 2
Two relevant aspects before answering your specific questions :
You are planning to install a new ROM
The device is going to be with you so you are not bothered about wiping all personal traces ( like you would be if you are planning to sell)
See What should I wipe in TWRP? from official TWRP help . That would take care of your needs for installing a new ROM
If you are switching ROMs (changing from one ROM to a completely different one) then you should perform a factory reset. A factory reset wipes data and cache (which includes dalvik cache). A factory reset will also wipe sd-ext and android_secure if your device has those items. 99% of the time, this is all that you need to wipe and you only need to do it once, not three times as some people would lead you to believe.
factory-reset is equivalent to Wipe data,cache, dalvik . It will not remove your pictures . See Firelord’s answer which has other useful references as well
. Factory Reset would remove everything under /data (excluding /data/media which serves as emulated storage available through /sdcard as internal SD card).
What’s the difference between Data and Internal Storage?
Data is what is contained in the / data partition. Internal storage world refer to the entire device directory structure and what is contained in them as well
Also TWRP help explains further
. you may have options for wiping internal storage, external storage, sd-ext, android_secure, and/or an option for formatting data. There’s almost no reason that you would ever need to use these items.


