Glance into the meat cases at any grocery store and you’ll see a whole slew of cured meat products, some of which look raw and some of which look like they could survive a cross-country back packing trip. What does “cured” mean for these different products? Let’s take a look.
Curing is actually a general term referring to any process that helps preserve meat. It can mean salting, brining, aging, drying or canning. The goal of all of these processes is to slow spoilage and prevent the growth of microorganisms.
None of these curing processes is necessarily better or worse, and choosing one over the other often depends on the desired end result. Basic salting and brining is best for short-term preservation, while aging, drying, and canning all result in a product that can be stored for much longer. Products like beef jerky and salt cod can last almost indefinitely!
Salt is a key ingredient to almost all curing processes. Whether it’s applied in a dry-rub or as part of a brining solution, the salt works to draw moisture out of the meat. The less moisture in the meat, the longer it can be saved before being eaten.
Additionally, nitrites can be added to the curing mixture as further insurance against bacterial growth. Smoking the meat also helps prevent spoilage and keep the fats in the meat from going rancid.
All cured meat products have undergone some sort of curing process. However, this shouldn’t be taken as a guarantee that the product won’t eventually spoil or that it can be eaten raw! Be sure to go by the expiration date on the product labeling (or what your butcher tells you) and cook meat thoroughly unless otherwise stated.
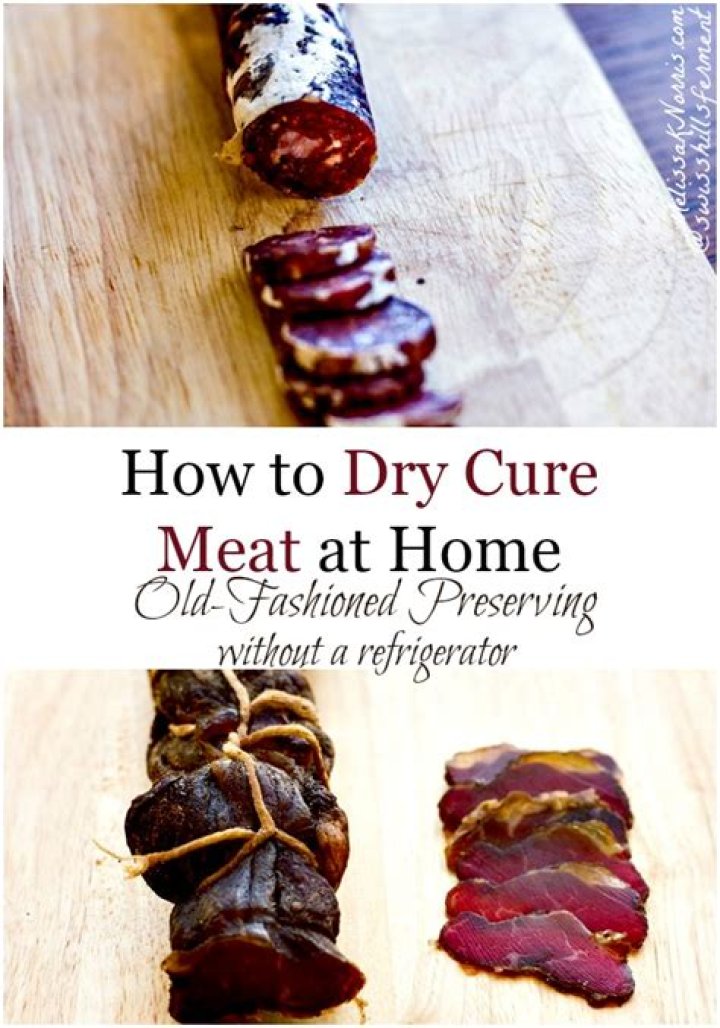
Introduction: How to Cure Any Meat – Beef, Venison, Pork, Goose
Being able to cure your own meat is a must have skill for every hunter. And a nice skill to have for EVERY cook out there!
Corned beef. Pastrami. Ham. Bacon.
Need I say more?
The steps I cover here can be applied to any meat, although I usually go with meat from four legged animals. You CAN cure poultry – corned goose breast is a popular recipe for waterfowl hunters.
Let’s start with WHY we would want to cure meat.
Step 1: Curing Basics
Curing meats started out as a preservation method. Salting and smoking meats has been done for countless generations.
In the modern world, we have amazing appliances, like refrigerators and freezers, so the home cook is less concerned about how long they can keep the meat. We’re more concerned with things like taste and texture.
As a hunter, I eat a lot of venison. Venison is a very lean meat. It can be very tough, especially if it’s overcooked. And on occasion, I get a gamey tasting deer. Venison, when properly handled from the shot through to the butchering, should not be gamey. However, sometimes mistakes happen. Or sometimes you just get an old, tough buck, whose hormones have been raging for weeks, and yeah, he might have some funky flavors. Anyway – the point is: curing can help to tenderize and alter the flavor of meat.
I have found that curing venison virtually ELIMINATES any gamey flavors. If you think about corned beef, does it taste anything like a beef roast or steak?
There are two main methods for curing: wet and dry. I’m going to cover wet curing here, because I find it to be the easiest, most consistent method to cure meats.
Step 2: Things You’ll Need
There are only really a few things you need to cure meat:
- Instacure #1, aka Pink Salt, aka Sodium Nitrite. A little bit goes a LONG way. ALWAYS follow the recommended usage amounts. Besides for use in wet cures like we are doing here, you can use it to make jerky, summer sausage, and other tasty treats.
Sugar, salt (kosher or pickling, not table salt unless it’s non-iodized), and spices. In my last step, I’ll give my basic recipe for corned venison, which I also use on beef, and can make pastrami from. But you can also buy pre-made mixes. They are fairly inexpensive, and they typically contain all the ingredients you need, even the Pink Salt. Another advantage of buying a premix is taking the guesswork out of the flavors. I’ve tried a number of ham recipes that tasted nothing like ham, but the pre-made commercial mix nailed it.
I recommend trying some of the recipes you can find online, but if you want easy, and again, CONSISTENT, pre-made will do it.
A brining bucket. All you need is some type of vessel, big enough to hold the meat you are curing completely submerged in a brine. But small enough to fit in your fridge. You need to keep the meat submerged. Some brining buckets come with a special internal locking systems to do just that. But you can easily use an object like a plate, or even a ziploc bag filled with water. Just put the plate or bag on top of the meat to push it down in the brine.
A place to let it sit for a while. I happen to have a “beverage” mini-fridge I keep in my basement. Super handy. When corning, the pickling spices can get a little fragrant. Not bad, but think: potpourri. If you are keeping it in your main fridge, I like to add a piece of press-n-seal over it, then use the brining bucket’s cap on top of that. Helps keep the odors IN the bucket, and OUT of the fridge!
Step 3: Corned Venison or Beef or Goose Breast
This is my go-to corning recipe. It’s easy, there’s no guesswork, and it’s consistent:
- An up to 5 lb roast. Double the recipe for larger cuts.
- 1/2 gallon distilled water
- 2/3 cup kosher salt
- 1/2 cup brown sugar
- 5 tablespoons pickling spice
- 3 teaspoons Instacure #1
- 1 head of garlic chopped. If it’s small, go with 2
Put everything except the roast in a pot. This is our brine. Bring it to a boil and stir to get the sugar and salt to dissolve.
Remove from heat and let cool to room temperature. Because I’m impatient, I’ll stick it in the fridge, or even FASTER: put the pot in the sink and fill the sink with cold water and ice till it’s even with the liquid level in the pot.
Once it’s cool, put your roast in the brining bucket, and cover with the brine.
Refrigerate for two weeks, stirring (I just swirl the bucket) daily. I have never had a roast under 5 lbs not finish curing throughout within 2 weeks. If you go bigger, you may have to go longer.
After two weeks, remove the roast from the brine, and rinse off under tap water. DISCARD the brine.
You have now cured meat! You have a nice corned roast that you can cook with your favorite corned beef recipe. Here’s mine.
You can also smoke it and make pastrami. Yes, pastrami and corned beef are pretty much the same thing. The main difference is pastrami gets smoked, and corned beef get’s braised. Here’s a pastrami recipe if you are interested.
Be the First to Share
Did you make this project? Share it with us!
Morton Salt can make curing your own meats as enjoyable as eating them. If you’re ready to start curing, here are a few different processes worth considering.
Dry Curing
Best used to cure hams, bacon and smaller cuts of meat, dry curing involves applying the cure mix directly on the meat. After the application, place meat into a plastic food storage bag and tightly seal. From there, put your meat in the refrigerator and let the curing process take place. After curing, remove excess salt by rinsing your meat. The final step is to cook your meat and taste.
Brine Curing
Also called the sweet pickle cure, brine curing is also a favorite for curing meat. This method involves combining curing salt and water to create a sweet pickle solution. To prepare the brine, use a large non-corrosive bowl, such as plastic or glass. To cure, inject the brine solution into the meat using a meat pump or soak the meat over a period of time. If you choose to soak, be sure to fully submerge the meat. A plate can be used as a weight to keep the meat immersed in your brine. Like dry curing, the process takes place in the refrigerator and the cured meat needs to be cooked when finished.
Combination Curing
When you couple the dry rub cure and brine solution injections, the result is combination curing. Used to cure hams, this method shortens the curing time and reduces the risk of spoilage because the process takes place both inside and outside the ham. Again, curing is done in the refrigerator and the ham is cooked thereafter.
Sausage Curing
The sausage curing method, unlike those previously described, is accomplished by mixing curing salts and spices with ground meat. The curing process is then done in the refrigerator. When the curing process is complete, the sausage is cooked before serving.
Tricks of the Trade
When curing meat, be sure to check out these tips:
The amount of time spent curing meat will depend on the thickness and amount of bone and fat. For thicker cuts of meat, you may want to lengthen the time you cure.
Find your curing style by experimenting with different spices. But be sure not to exceed the curing levels in the recipe.
As a reminder, we recommend labeling the date and time the meat should be removed from your refrigerator.
Cure meat at a temperature between 36 degrees – 40 degrees F. Colder temperatures will prevent you from curing properly and warmer temps will encourage spoilage growth.
In the case that meat is too salty, soak or boil it in water to remove the excess salt. In the future, remember to rinse cured meat or reduce curing time.
Cured meat is still raw meat, so always remember to cook your meat and poultry after curing. If you give a home-cure as a gift, remind the recipient that they too will need to cook it before consuming.
Cured meat will turn pink or reddish when cooked. For poultry, use a meat thermometer to determine when it’s finished cooking.
Please view our list of curing recipes if you are interested in putting the methods to use.
- Contact
- Where To Buy
- Privacy Policy
- Terms and Conditions
- Purchase Order Terms
- Code of Business Conduct
- Compliance Hotline
- Careers
Copyright © 1995-2020 Morton Salt, Inc. All rights reserved.
Morton Salt, Inc. is a part of the K+S Group.
Site designed by Code and Theory
Test Your Water Hardness with a Free Test Strip
Did you know three out of four American households experience hard water? Morton will send you a water test strip to help you find out if you have hard water. Let’s begin!
Hot & Spicy, Sweet & Salty. Make Jerky The Way YOU Like It!
Jerky making is deliciously simple! We offer all the tools you’ll need to Make Jerky at Home – whether you’re making muscle meat jerky or ground meat jerky.
Jerky and Snack Sticks are the most popular meat snacks on the market today. Millions of pounds of jerky are purchased in retail outlets each year by eager customers looking for a quick, delicious snack. The average cost of a pound of jerky sold commercially is $24 – $36 a pound. Now, with just a little effort and very little time, you can make delicious jerky right in your oven or dehydrator at home.
We make jerky the easiest way: with the LEM Jerky Cannon or Jerky Gun. Make delicious strips of jerky from any beef, turkey, deer, duck, wild game, or other lean ground meat. Just follow the directions on your Backwoods Jerky Seasoning and you’ll be making jerky in no time!
Cook at low heat in your oven or in a Dehydrator. Don’t worry – the Cure is included with the Jerky Seasoning, makes cooking at low temperatures safe while adding flavor and color.
How To Make Jerky With An LEM Jerky Cannon:
Some Facts About Jerky Making:
MEAT: The ground meat should be as lean as possible. The leaner the meat, the faster it will dry, with much less dripping and a lot less mess.
- The ground meat should be at least 80% lean, but ideally 90% – 95% lean. Ground round or sirloin makes excellent meat for jerky. Have your butcher grind a lean, round roast or sirloin tip – or do it yourself with your Big Bite Grinder.
- Do NOT add fat to your ground venison when you process it, as venison makes excellent jerky because it is naturally lean. Ground turkey, buffalo, and elk are other excellent choices.
- You can thaw ground meat that has already been frozen and use it for jerky. As long as the meat was fresh when it was frozen, there will be no problem.
SEASONING: Backwoods Seasonings have been specially formulated to use with ground meat.
- Each package of Backwoods Jerky Seasoning will season 5 lbs. or 25 lbs. of ground meat. You will notice how well the meat stays together for uniform strips.
CURE: Whenever you make jerky or snack sticks, you should use Cure.
- The Cure should be used to prevent Botulism, which can easily be produced when drying meat at low temperatures.
- Cure should be used at a rate to not exceed 1/4 teaspoon per pound of meat.
- Enhance the flavor of your finished product
STORAGE: Freeze homemade jerky after 2 weeks.
- To store your jerky for longer periods use a vacuum sealer to keep for months without freezer burn.
Cured meats like serrano ham and pepperoni are just continuations of the age-old human tradition of salting meat to preserve it and make it safe for eating. Curing helps to prevent food-borne illness caused by bacteria like Clostridium botulinum. It is also important to recognize that the curing salts used to cure meat can be deadly if they are not handled carefully. Cure meats safely by following these steps.
1. Decide which meat you want to cure.
Ham is the most popular choice, but you can cure any meat. To make things easier, choose meat cuts that consist mostly of the same muscle group.
2. Completely thaw the meat that you plan to cure.
Cure preparations are not able to penetrate frozen meats. After thawing, trim off any fat or tendons.
3. Choose the curing salt.
You can use sea salt or kosher salt, which will draw out moisture and reduce (but not eliminate) the risk of food-borne illness. The moisture will be drawn out of both the meat and any bacteria in the meat. This will intensify the meat’s flavor and hopefully kill bacteria. For a greater degree of safety, you will need to use curing salt. Curing salt goes by several names including Prague powder, Instacure and pink salt. It comes in two forms: 1 and 2. Curing salt 1 (also called Prague powder 1 or Instacure 1) is for meats that will be cooked after being cured and consists of 1 part sodium nitrite and 15 parts salt along with anti-caking agents. This curing salt is used on hams and bacon. Curing salt 2 is for air-dried meats like prosciutto and salami. Curing salt 2 contains 6.25 percent sodium nitrate along with 4 percent sodium nitrite. The rest consists of salt and anti-caking agents.
4. Decide whether you will be using a dry cure or a brine.
Dry curing involves applying the curing salt like a dry rub. Brining involves placing the meat into a solution.
To dry cure, combine the curing salt and any spices that you want to use. Common spices for curing meats include black peppercorns, star anise, and fennel seed. You will also want to add a little sugar, preferably dark brown sugar. Rub the exterior surface of the meat with the curing salt and spice mixture.
Loosely wrap the meat and refrigerate for 7 to 10 days. You will want a loose wrap because you want some exposure to air so that moisture can escape.
To wet cure meat, you will want to complete steps 1 through 3. Instead of making a rub with the curing salt and other ingredients, you will make a brine. Combine the curing salt, your preferred spices and sugar in a plastic or glass bowl then add water that has been boiled and cooled to room temperature. You will need enough water to fully submerge the meat. To get 1 gallon of brine, use 1 1/2 teaspoons of curing salt 1 along with your chosen spices and the preferred amount of sugar. Place the meat into the brine. For thicker cuts, you may want to inject the brine into the meat in addition to soaking it. Place the meat and brine solution into a refrigerator in a brining bag or another nonreactive container. Store in the refrigerator 1 day for every pound of meat.
Do and don’ts of curing meat
Do cook meat after curing with curing salt 1 since it is still raw meat.
Do rinse both dry and wet cured meat after removing it from the refrigerator. Rinsing gets rid of any crystallized salt on the surface.
Don’t apply the curing salt and spice mixture while the meat is on a bare metal surface. The sodium nitrite will react with the metal.
Don’t substitute one curing salt for the other. They are not interchangeable. Curing salt 1 is only for meats that will be cooked and curing salt 2 is only for meats that will not be cooked.
Teaching, Research, Extension and Service
Objectives:
(1) To show the functions of the various ingredients used in curing.
(2) To demonstrate the chemical reactions involved in the curing reaction.
(3) To acquaint the student with the various uses of the curing process in the meat industry.
Reading material: Principles of Meat Science (3rd ed.), Chapter 7, pages 133 to 171.
Curing — the addition of salt , sugar and nitrite or nitrate for the purposes of preservation , flavor and color .
- Flavor
- Antimicrobial
- Enhances cure transport through meat
- Flavor
- Counteracts harshness of salt
- Energy for bacteria that change NO3 —> NO2
Nitrite or nitrate
- Flavor
- Prevents warmed-over flavor
- Retards rancidity
- Cured-pink color
- Anti-botulinal effect
The curing reaction
| heat | |||
| Myoglobin + nitric oxide —> | nitric oxide myoglobin | ——–> | nitrosylhemochromogen |
Generation of nitric oxide (NO)
| NaNO3 | ———–> | NaNO2 | ————–> | HONO | ————–> | NO |
| Sodium nitrate | Micrococcus |
Application of cure ingredients
Dry curing — the oldest way of curing meats. Curing ingredients are rubbed on the surface of the meat to be cured.
Stitch pumping — a long needle with multiple holes around the shaft is used. Needle is inserted into meat and the curing solution (in water) is pumped into the product.
Artery injection — a large needle with only one hole in it is inserted into the brachial or femoral artery and the cure solution is injected into the arterial system.
Needle injection — a machine with multiple needles that injects, automatically, meat cuts with the curing solution. The most common way meat is cured today
Amounts and times
| Cure type | Mixture | Amount | Time period |
|---|---|---|---|
| Dry cure | 10-0-1 | 100 lb | 5 weeks |
| Dry sugar cure | 5-3-3 | 1 oz/lb | 7 days/inch |
| Cover pickle cure | 80° | 9 days/inch | |
| 60° | 12 days/inch | ||
| Injection cure (8 to 15%) | 80° | 7 days/inch | |
| 45° | 9 days/inch | ||
| Combination cure | 80° IC + CPC | 4 days/inch | |
| 80° IC + DSC | 2 days/inch | ||
| Industry cure (10 to 34%) | 70° IC | Smoke immediately |
Alkaline phosphates
Sodium tripolyphosphate —> increase water-holding capacity.
Up to 5% of pickle, no more than 0.5% in finished product.
Protein-Fat Free (PFF) Basis — 1985
| Percent Meat Protein | |
| PFF = | X 100 |
| 100 – Percent Fat |
| Total protein by analysis = | 16.4 |
| Less: Calculated protein added = | -0.2 |
| Meat protein = | 16.2 |
| Total fat by analysis = | 10.0 |
| 16.2 | |||
| PFF = | X 100 | = | 18.0 |
| 100 – 10 |
Review of Material — What the student should know:
(1) The functions of salt, sugar, and saltpeter in meat curing.
Published by MiXStudio on July 28, 2018 July 28, 2018
This article is meant for intermediate to advanced individuals and beginners who haven’t found an answer to their suicidal tendencies…
Curing meat and indulging on them will kill me of high cholesterol, blood pressure or a cardiac arrest. That’s my love for cured meat,Warning: Excess indulgence will bring bad news, slowly but eventually. But I can’t stop writing, thinking and obsessing about cured meat.
Curing meat is an age-old process that uses salt for preserving meat that dries of excess water. Cured meat lends an intense umami flavor; but yes safety standards need met to avoid tainted meat or a sick stomach. The fundamentals of all of this is to slow spoilage by drawing out the water and prevent the growth of microorganisms. The bio chemical reactions of oxygen & water leads to bacteria propagation which is food spoilage.
Examples of cured meat
- bacon
- ham
- pancetta
- prosciutto
- corned beef
- pastrami
- sausages
- pepperoni
- salami
- mortadella
- chorizo
Choices of meats to cure
- Cuts of meats can be the butt venison or the belly briskets or even mutton legs or duck breasts
- Trimming the excess and unwanted fat is necessary to begin this curing process, excess tendons.
- Stabbing the meat for salts to enter is a good way to ensure its well salted, be sure to use them for larger cuts of meat.
Salting meat and fish dates back to ancient times, to ensure food availability. If you don’t use enough salt, the food will spoil prematurely or begin to grow killer organism. Too much salt, means way too salty. (still wiser). Curing agents, such as nitrate and nitrite, are also frequently added to curing mixtures, though these are regarded as unhealthy forms of salt.
Use a ratio of 2 parts to :1000 of sodium nitrite and salt ensure to use a digital scale and maintain ratio of sodium nitrite to salt. For every 2 grams of sodium nitrite, for example, use 1,000 grams of salt. or the weight of your salt, multiply it by .002. And if you cant get this much calculation, quit right away. These exercises can prove to be extremely lethal
Spicing up cured meat
- Peppercorns. Black, green, or white are
- Sugar. A little Demerara sugar adds a touch of caramel warm sweetness to your cure (There are some ready made ham glaze as well
- Coriander and mustard seed. Adds smokiness and age to the meat.
- Star anise. Silky and slightly sweet, a little bit goes a long way. Slightly nutty.
- Fennel seed. Adds a pleasantly green or grassy dimension to the cure.
- Citrus zest. Adds a light, pleasantly acidic element that cuts through fattier pieces of meat.
Functions of each ingredient in curing meat:
- Flavor
- Antimicrobial
- Enhances cure transport through meat
- Flavor
- Counteracts harshness of salt
- Energy for bacteria that change NO3 —> NO2
Nitrite or nitrate
- Flavor
- Prevents warmed-over flavor
- Retards rancidity
- Cured-pink color
- Anti-botulinal effect (anti bacteria to be simple)
Other types of curing meat
Dry Curing Meat
For hams, bacon and smaller cuts of meat (illustrated above & the easiest)
Brine Curing Meat
Like dry curing, the process takes place in the refrigerator and the cured meat needs to be cooked when finished. The meat needs to be entirely submerged (weighed down)
Combination Curing Meat
Combining the two dry rub cure and brine solution injections, the result is combination curing. Far faster & avoids spoilage as a result.
Sausage Curing
This is done by mixing curing salts and spices with ground meat. Few days in the refrigerator after the curing process is complete, the sausage is cooked before serving.
Here is how the process of meat beaks down
Generation of Nitric Oxide (NO):
- Sodium nitrate is reduced to sodium nitrite by microorganisms such as Micrococcus spp. present on meats.
- Sodium nitrite is reduced to nitrous acid in the presence of an acidic environment (e.g., by fermentation or by addition of glucono-δ( delta )-lactone).
- Nitrous acid forms nitric oxide. Nitric oxide reacts with myoglobin (meat pigments) to form a red color. Source
The time required for a cured color to develop may be shortened with the use of cure accelerators, e.g., ascorbic acid, erythorbic acid, or their derivatives. Cure accelerators tend to speed up chemical conversion of nitric acid to nitric oxide. They also serve as oxygen scavengers, which slow the fading of the cured meat color in the presence of sunlight and oxygen. Some studies have indicated that cure accelerators have antimicrobial properties, especially for the newly emerging pathogens like E. coli O157:H7 and Listeria monocytogenes (Doyle 1999). Since cure accelerators are rarely used in home curing, this information needs further review or research to determine what benefits home curing would have by using certain cure accelerators.
When curing meat be sure to:
- Mass of meat size & weight determines the amount of time spent curing . For thicker cuts of meat, you may want to lengthen the time you cure.
- Do not to exceed the curing levels in the recipe. Find your curing perfection by experimenting with different spices and not altering curing levels, former is science and predictable, latter is pure art.
- Label meat start and end date for curing
- Cure meat at a temperature between 2 degrees – 4 degrees Celsius. Colder temperatures will result to freezing and higher temperature to spoilage, don’t mess the two up
- Cured meat is raw remember to cook your meat before consuming.
- Stay in extremeness of care and please please ensure to cook it well using poultry, red meat is a safer choice.
Clean work areas with vinegar and baking soda, depending on type of surface and its reaction to alkaline or acids. Knives have to be extra clean and no contact with any other food products or types other than listed for your recipe. Especially stay away from dairy products to avoid cross contamination.
✓ THIS POST MAY CONTAIN AFFILIATE LINKS*
In today’s world, it has become extremely important to prepare your family for disasters. Even something small like an ice storm could knock out power and close roadways for days at a time.
To prepare for events like this, many people are beginning to realize the importance of having local food sources and keeping stored food on hand. Unfortunately, even if you raise your own animals, preserving meat the modern way involves a large, reliable source of electricity.
Want to save this post for later? Click Here to Pin It on Pinterest!
Thankfully, you don’t have to be a farmer or even an off-grid homesteader to put up meat using reliable methods. There are many ways of preserving meat without electricity that are feasible for those with root cellars in old farmhouses and those living in inner-city apartments.
1. Smoking
Smoking is one of the oldest methods of preserving meat. It was most commonly used in areas that had too much humidity to air dry or dehydrate meat (without the aid of a modern dehydrator of course). It can be really tasty.
However, modern recommendations are to consume smoked meat sparingly as smoke contains carcinogens. That being said, it may still be a good choice for some of your harvest or an emergency situation. Smokers can be purchased or made at home. Obviously, this method is better suited to those with access to a backyard.
2. Curing (salting)
Curing meat is another old preservation method that is still used today. It involves quite a bit of time and effort but it’s how traditional favorites like bacon and pastrami were preserved.
It’s also a cheap and easy process to master perfect for the new homesteader. You will need a cool area and a place where meats can be hung out of the way. Some curing recipes are used in combination with smoking for flavor.
3. Brining
It’s a very simple and is a traditional method of preservation. Brine is typically a simple mixture of water, sugar, and salt. The meat is preserved by being weighed down in a crock completely surrounded by brine. As with curing, you’ll need a cool area, and if you’re doing any large quantities be sure you have room to store your crocks.
4. Pressure Canning
First, it’s important to note that you absolutely cannot water bath can meat! It’s not acidic enough. However, if you have a pressure canner any type of meat can be easily pressure-canned. This is probably one of the most popular methods today as once the meat is canned it requires no further work.
You just reheat it when you’re ready to eat and the jars are portable. Pressure canners are affordable, perfect for even apartment homesteaders, and are great for putting up vegetable harvests too.
5. Dehydrating
This is probably one of the easiest, healthiest methods of storing meat (and vegetables too). Meat can be dried with the help of an electric dehydrator or a solar dehydrator. If you opt for an electric dehydrator, it’s probably best to purchase a larger one.
Even though they’re cheaper, constantly running a small one trying to preserve all your food will take a lot of electricity. Solar dehydrators obviously have the benefit of not requiring electricity, but they are weather dependent. Solar dehydrators can be purchased or there’s a lot of DIY plans available online. With either you’ll need to make sure you’re meat is fully dried. If it’s left too moist it can mold.
6. Storing in Lard
This method may be very practical for those butchering an animal with a lot of fat. Both raw and cooked meat can be layered in a crock with melted lard. The lard prevents the growth of bacteria by keeping air from getting to the meat. It’s a cheap and effective storage method and involves no equipment.
7. Freeze Drying
This method is probably the least practical for a small homestead because you’ll need to purchase a freeze dryer. That being said they do make home models and freeze-dried food comes with a lot of benefits.
It’s lightweight, anything can be freeze-dried including leftovers, and freeze-dried food retains almost all of its nutrition. As it’s so light, freeze-dried food is perfect for backpacking or emergency travels.
8. Keep Heritage Livestock
For those who keep livestock, obviously you may want to consider heritage breeds. Unlike modern livestock, heritage breeds are typically smaller. This was because a family would be able to use most or all of the animal before it went bad without having to preserve it.
With the advent of refrigeration and factory farms, livestock was bred to be bigger and bigger which is not necessarily helpful for the small homestead. Some heritage livestock was also bred to have a higher fat content than their modern counterparts, which can be helpful in preservation.
9. Natural Refrigeration/Freezing
Though this is not the most reliable method, it is worth mentioning. In colder climates, it’s possible to store meat outside in the winter, but you’ll need to keep an eye on the thermometer if the weather warms up. You’ll also need to keep it in a secure building or container.
Leaving meat out, frozen or not, can attract predators. Some people also have used hand-dug wells as refrigerators. Simply put the meat in watertight jars and sink them in the well for short term refrigeration. Again, you’ll need to watch the temperature carefully.
Producing a lot of food is often one of a homesteader’s first goals, but if you rely on electricity to keep your harvest, you risk losing it all to a power outage. Knowing how to keep your food good when the power goes out using a combination of modern and traditional techniques can save you money and keep your family healthy.
No matter what method you choose, the most important part is safety. For our ancestors who preserved food on a near-daily basis during the harvest season, it was no big deal. But until you’re confident, it’s important for the modern homesteader to find and follow credible recipes and preservation methods.
Like this post? Don’t forget to Pin It on Pinterest!
Written by: Esther Food, Off-Grid Foods 69 Comments Print This Article
If you haven’t considered what would happen without power, start by looking in your kitchen. Your refrigerator would no longer work. Meats and perishables would spoil quickly. While we all want to think we won’t ever be without electricity, no one can predict when the next major world war or other catastrophe will occur.
A major catastrophe that shuts down power plants would be devastating—that is, unless you are prepared and know how to survive. You should learn how to preserve meat without refrigeration. Salting and brining are two efficient, simple means of preserving meat for your family’s sustenance.
Before You Start
You are going to need a source of fresh meat. Beef and pork are both good options. If you have gotten into homesteading, you may have your own pigs and cows; however, you can also purchase fresh meat from a butcher or a co-op that sells beef and pork fresh off the hoof.
Next, you should examine your house thoroughly using a thermometer. As you go from one area to the next, record the temperature. Make sure you check the attic, any unheated areas of your house, your storage shed, and any other shelters on your property. You are looking for the coldest areas; this is where you will store your meat.
Salting Pork for Preservation
Many people have forgotten this old method of preserving pork. It is one of the easiest methods available and doesn’t take much time. You will need fresh pork, pickling salt, brown sugar, and crocks or jars for storage.
First, cut the pork into slabs. Generally, four- to six-inch slabs work best. Mix 1/2 pound of pickling salt with 1/4 cup of brown sugar. This is enough to cover twelve pounds of pork. Liberally cover the pork with this mixture. Next, pack the meat into sterilized crocks or jars. You should make sure it is tightly packed. Cover the meat with cheesecloth.
Using the temperature chart of your house, determine where to store your crocks. You need to keep the meat in an area that is about 36°F – no higher than 38°F. You also do not want an area that could see freezing temperatures. Leave the meat in this cool storage for at least one month. After that time, you can wrap the meat in plastic or moisture-proof paper and leave it stored all winter. You now have salt-cured pork for any occasion.
Many older people remember having a smokehouse on their land when they were young. Meat would be salted and hung to cure in these cool, dry areas. You could build a storage room for handing meat without too much work. The room should have excellent air circulation and stay cool without freezing.
Brining Pork
Brining is a reliable method of preserving pork, although it takes a little more time than salt preserving. Start out the same way you do for salt preserving by cutting the fresh pork into slabs. Next, you need to pack the pork into a sterilized container like a crock or jar.
Dissolve 1 pound of pickling salt and 1/2 cup of brown sugar in 3 quarts of water. Pour this brine over the pork and ensure that the meat is completely covered in liquid. If you have a problem covering the meat completely in brine, add a weight to the meat to keep it submerged. A plate with something heavy on top will work nicely. Store the covered pork in one of your rooms that will stay an average temperature of 36°F.
After the first week, remove the pork from the brine. Stir the brine well and repack the meat. Leave in the cool room and repeat this process for the next four weeks. If the brine is thick or stringy on any of the weeks you open it, remove the meat. Empty the brine and sterilize the crocks. Wash each piece of pork well before repacking. Mix a fresh batch of brine for the meat, and put back into storage. At the end of four weeks, your meat is ready to be cooked.
Canned Meat
If you are familiar with canning fruits and vegetables, you should know that you can also can meat. You have to make sure you get the temperature of the meat high enough to kill bacteria before it seals. Chicken and beef are good options for canning, as are fish. You can cook the meat before you can and seal it. For example, you could make beef stew and preserve it in cans. Stewed chicken also cans and preserves well. Raw packing is another option you can try as well.
Dehydration
While most of us tend to think of jerky as a snack food, dried meat is another viable option for preserving meat without using refrigeration. Although you’d probably have trouble rehydrating enough meat to prepare a Sunday roast dinner, you could definitely use jerky that has been broken into small pieces as a welcome addition to soups, stews, and chilis. Beef, pork, venison, and turkey all make excellent jerkies.
Live Animals
If you are trying to get back to the basics of homesteading and want to be prepared for any emergency situation, you may want to consider having some live sources of protein. You can easily raise rabbits and chickens. A small pond can be stocked with fish. If you have room, you can add a dairy cow for milk and a bull to slaughter. However, once you slaughter the bull, you will need to cure some of the meat so that it doesn’t all go bad.
Part of getting back to the basics involves knowing how to hunt animals for food. Venison is an excellent meat, and deer can be found that are small enough to provide you with plenty of meat without the need to preserve large amounts of meat for long periods of time.
No one wants to think about losing electricity and all the luxuries that it brings. However, nothing is promised, and it wouldn’t take much to shut down electricity. You don’t want to be one of the people who are not prepared for basic survival.
Preparing your family for catastrophe doesn’t mean you have to stop living with your refrigerator. However, it does mean knowing what to do in the event you don’t have a refrigerator. Additionally, knowing how to preserve meat can save you money by raising and preserving some of your own meat. Put the tips here to use and ensure you know how to keep meat from spoiling.
In a SHTF event, chances are that you will not be able to rely on your fridge to preserve your food as usual.
People can get overtly reliant on fridges to store their food and this can be a problem.
If you don’t have access to a fridge anymore, what will you do? How will you preserve your meat for later use? People have been using other methods to preserve their food for centuries. This knowledge can come in real useful.
You can start by taking a look in your kitchen. Examine how much food you have and think how much of it would spoil without refrigeration.
Earn Your Food Independence NOW
Meat would be the first one to go once you lose electricity, but spoiling can be prevented using old-fashioned techniques. Methods such as smoking and curing are just two examples used for a long time, and are efficient when it comes to keeping meat from spoiling.
First, you need to decide on a place where you will store your meat. Ideally, you will want to do it in the coldest area available. Good examples are the attic, a storage shed, a shelter etc. Use a thermometer to check the temperature in each place and decide on the best one.
How to Cure Meat
Curing is a technique which basically involves preserving the meat in salt. This was one of the most common ways of keeping meat fresh in the days before refrigeration. Some still use it today, but now it is more about enhancing the flavor of the meat, not about preserving it.
Meat spoils because it is a good place for bacteria to thrive in. Bacteria need water, and there is a lot of water content in the meat, especially the muscle fibers. This is solved by introducing salt. It will expel a lot of the water from the meat, and creates an environment where bacteria cannot develop and multiply.
Besides the meat, you will also need a mixture of curing salt and brown sugar. For example, half a pound of salt mixed with a quarter cup of sugar should be enough for ten to twelve pounds of meat.
The sugar is necessary in order to counterbalance all of the salt, and will also give the meat a distinct flavor. If you like, other sweet products can be used such as honey or maple syrup.
You can also add your favorite herbs and spices if you want, they will also give your meat a unique aroma.
There is another ingredient which, ideally, should be included: sodium nitrite. It is particularly effective at fighting off botulism – a very bad bacterium which you do not want anywhere near your meat. At the same time, high levels of nitrite can also be toxic, and you need to take special care with this step.
There are two safe ways for you to add sodium nitrite.
- Using green leafy vegetables such as celery, spinach and lettuce. They all naturally contain sodium nitrite. You can add juice or extract and you will get the sodium nitrite you need.
- Adding pink salt. Also known as Prague Powder #1, this salt already contains a mixture of regular table salt and sodium nitrite in the appropriate composition.
Once you have the necessary ingredients, start cutting the meat into slabs. Pork is commonly used, but you can also use beef or fish. Take a slab and cover it heavily in the salt mixture. Do this with the rest of the meat. After this place it in jars or crocks for storage. Make sure that the meat slabs are tightly packed together.
Take them to your storage destination of choice. Make sure that the temperature is below 38 degrees Fahrenheit, but that it is well above freezing. 36 degrees Fahrenheit is ideal.
After about a month of storage, take the meat out. Take each slab and wrap it in paper or plastic. Either is fine as long as it is moisture-proof. This meat is now ready to be stored and consumed whenever you need it.
How to Brine Meat
The process described above is referred to as dry curing, but there is also a method for wet curing, also known as brining. This technique involves you keeping the meat submerged in a salty solution.
The steps are similar: the meat needs to be cut the same way and placed in jars or crocks. Wash the meat and sterilize the jars before you do.
Now you need to make the salt water. Adding about a pound of salt and half a cup of sugar to three quarts of water should do. Feel free to mix in other ingredients such as herbs and spices. Repeat this process until you have enough water for all of the jars. Fill each one up.
Make sure that the meat is completely submerged. If you are having problems, place a weight on top. Take the meat to your storage area.
Unlike dry curing, the meat will need your attention on a weekly basis. Each week you will have to take the meat out of the jars, stir the brine well and then place it back. After four weeks of repeating this process, your meat is ready. If you find the brine to be getting too thick, you will need to replace it with a fresh batch.
How to Smoke Meat
Smoke has the same effect as salt of keeping away bacteria from your meat. It also gives it a very tasty flavor which is why it is still used today.
If you know of a smokehouse near you, you can take it there, you will save time. If not, you can do the process yourself, but you will need a smoker. The good news is that they are available in all kinds of shapes and sizes, and use various fuels such as propane or charcoal. You can also modify grills or ovens to work as smokers, but the use of a regular smoker for this purpose is recommended.
This method is similar to grilling the meat and will generate a lot of smoke, so it needs to be done outdoors. However, grilling is a quick cooking process that uses high heat, while smoking takes much longer and uses indirect heat at low temperatures. The temperature should be anywhere between 150 and 225 degrees Fahrenheit.
This process is known as hard smoking and it is a way of cooking your meat in a way that will not require refrigeration. The end product will look similar to jerky.
Cold smoking is also available, and uses much lower temperatures below 100 degrees Fahrenheit. This method is only used for flavoring the meat rather than actually cooking it.
There you have it: three ways to prepare and preserve your meat for long periods of time. You should choose the one which is most accessible to you and meets your needs of survival.
Smoking, like canning and brining, is one of the methods to preserve meat that people used before the refrigerator was invented. Smoking meat for preservation not only provided a way to extend the shelf life of meat, but it also gives it a nice and distinct flavor.
Spanish ham or “Jamon” being sold. Known since Roman times, meat is cured with salt to draw out the moisture and hung to dry to make Spanish ham. While curing is a different method from smoking, it is also used in some smoking methods to help preserve meat better. Original photo by Michal Osmenda
In a situation where you might find yourself with limited resources (power’s out and/or the gas lines are down), available food products could spoil more easily and replenishing supplies will be difficult. Hence, learning at least one method of preserving food is important.
Here are the basic steps for how to smoke cure meat:
- Prepare Everything You Need
To smoke meat, you’ll need to have some wood chips, a smoker, and utensils to cut the meat into size. Depending on the recipe and how long you’ll need to preserve the meat, you may also consider adding salt and spices into the list.
As the name implies, smoking is a method that slowly “cooks” food with smoke instead of intense heat. The method draws out the moisture out of the meat, preserve it, and keep it edible for a longer period of time.
- Make a Smoker
While a pit and some wood will suffice in some instances, there are other kinds of smokers to choose from:
- Water Smoker: allows you to smoke meat for longer periods, with the water allowing for lower but more even air temperature inside the smoker.
- Gas Smoker: They’re easy to use and will usually cook meat faster without having to monitor the temperature constantly, but they provide less flavor compared to traditional smoking.
- Electric Smoker: Electric smokers are the easiest way to smoke meat. Just put the meat inside, turn the smoker on, and get back to it when it’s done. While convenient, electric smokers can be expensive, and often don’t provide the flavor that you’d usually associate with smoked meat. Another caveat to electric smokers is they require electricity, so if the power’s out and you have no way to generate power, they’re useless.
No matter which kind of smoker you choose, you’ll be using wood chips to produce smoke. The type of wood will determine the “flavor”, and some types pair better with certain types of meat. Alder, apple, cedar, cherry, hickory and mesquite are often used, but there are more that you can choose from and you can experiment with mixing together different types of wood. Just stay away from conifers or any wood that’s treated or painted- they contain toxic materials and can contaminate the food you’re trying to preserve.
- Prepare the Meat
While many types of animal meat (beef, pork, poultry and fish) can be smoked, some cuts provide better results than others- like drumsticks, ribs and briskets. You can marinate or rub the meat with salt and spices for more flavor, draw the moisture out, and extend its shelf life by inhibiting the growth of pathogens.
Cut the meat into quarter-inch strips and trim the fat. Aside from cutting them to size, you’ll also have to strip off the skin, gristle and bone. Rub some salt on the surface of the meat then set it aside. If it’s taken from the fridge, you’ll have to set it out until it’s at room temperature before preparing it.
Aside from pork and poultry, fish is another protein source that can be smoked. Photo by Vhorvat.
- De-Hydrate
Skewer the strips of meat and put them a couple of feet above a hot bed of coals. Don’t let them sit for too long– your objective during this step is not to cook them, but to take out the moisture and some of the bacteria in it and help keep it from spoiling too soon.
An advantage to including curing in your smoking method is the extended shelf life for meat. In some cases, smoked meat that has been cured will last for a year or more.
- Smoke It
Depending on the smoker and recipe you’re using, smoking times will vary. However, it’s important to note that you shouldn’t smoke the meat by placing it directly over your heat source or else it will cook too quickly.
Once your smoker is running and it reaches the right temperature, add the meat and smoke until done. You’ll know it’s ready and dry enough when the meat cracks (instead of being supple) when you bend it.
After the meat’s done, you’ll still have to store it properly to make sure it doesn’t get contaminated. While it will last longer than non-smoked meat, it doesn’t mean it will last forever, especially if it’s not cured. Freeze your smoked meat, or at least put it in vacuum-sealed bags. Non-cured smoked meat should last for a couple of hours, while cured meat can last for up to a year with the right preparation, smoking method and storage.
After you have learned how to preserve meat by smoking, you may find you’ll want to do this in more than just survival situations.