We all know Grub2 is the default bootloader for Ubuntu, but it isn’t the prettiest bootloader ever. Since we also know that Ubuntu is highly customizable, I am going to show you how to beautify your bootloader.
To accomplish this, we’re going to utilize an add-on called BURG, which is a Brand-new Universal loadeR based on Grub and is created by Bean. It has much prettier GUI and it supports themes and customizations.
Steps to be followed—-
1. Installing BURG
Open your teminal and paste the command
# sudo add-apt-repository ppa:bean123ch/burg && sudo apt-get update
This is not a necessary step ,if you have already burg package in synaptic manager .This step is just to fill your synaptic with this package,if you don’t have.
2. Once completed, close the terminal window and start Synaptic Package Manager. You’ll find it in System > Administration > Synaptic Package Manager. Use the search box to search for “burg” and mark it for installation then click apply.
3) While installation is in progress you’ll be faced by Burg settings window. For the first window, Just don’t make any changes and click forward.
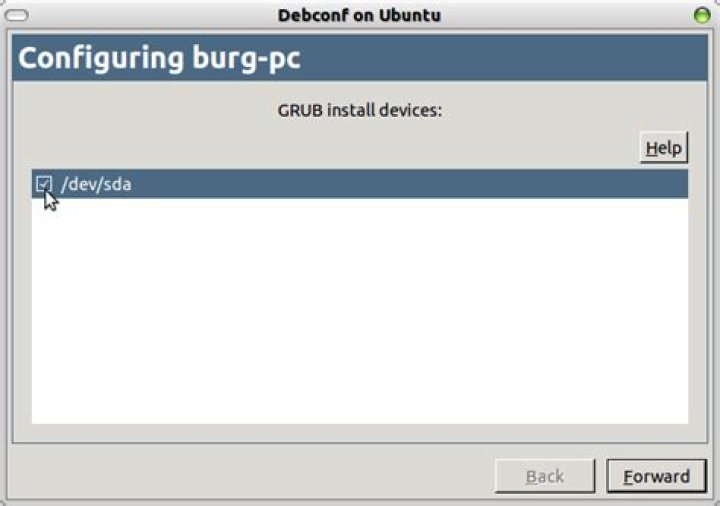
4) In the second window, you’ll have to tell Burg where to be installed. Choose your Ubuntu’s root drive, or if you have a separate /boot partition choose it instead.
5) Last thing to do is make sure Burg will boot up correctly and that’s by entering this command in a terminal window.
6) The installation and configuration is now done. You can now restart and the Grub bootloader screen will be replaced by Burg. While at the boot screen, press F1 for help and other shortcuts, F2 for a list of themes you can use and F3 to change screen resolution.
We all know Grub2 is the default bootloader for Ubuntu, but it isn’t the prettiest bootloader ever. Since we also know that Ubuntu is highly customizable, this week we’re going to show you how to beautify your bootloader.
To accomplish this, we’re going to utilize an add-on called BURG, which is a Brand-new Universal loadeR based on Grub and is created by Bean. It has much prettier GUI and it supports themes and customizations.
Installing BURG
First, start by adding the PPA. Open a terminal window and insert the following command:
sudo add-apt-repository ppa:bean123ch/burg && sudo apt-get update
Once completed, close the terminal window and start Synaptic Package Manager. You’ll find it in System > Administration > Synaptic Package Manager. Use the search box to search for “burg” and mark it for installation then click apply.
Note: Use Synaptic Package Manager to install Burg instead of the terminal as you may face problems.
While installation is in progress you’ll be faced by Burg settings window. For the first window, Just don’t make any changes and click forward.
In the second window, you’ll have to tell Burg where to be installed. Choose your Ubuntu’s root drive, or if you have a separate /boot partition choose it instead.
Last thing to do is make sure Burg will boot up correctly and that’s by entering this command in a terminal window.
The installation and configuration is now done. You can now restart and the Grub bootloader screen will be replaced by Burg. While at the boot screen, press F1 for help and other shortcuts, F2 for a list of themes you can use and F3 to change screen resolution.
Installing Themes
This is the best feature in Burg. You can install themes all the time. Better still, it’s as easy as downloading a file and copying it to /boot/burg/themes. First off, we start by downloading the theme from gnome-look.org. Unfortunately, There is no category yet on the site for Burg so you’ll have to use the search box on the left to find the themes. You can also find themes using Google. Once you download the theme, copy it to /boot/burg/themes using this command:
sudo cp *PathToFile*/Fortune-BURG-v03.tar.gz /boot/burg/themes
Adjust the command according to your download location and file name. After downloading and copying the theme, run the following command so Burg know what you have done.
Now the theme has been added to the list. Now restart and press F2 to use. Now you have a nice colorful theme for your boot menu.
GRUB2 is the default bootloader of Ubuntu. It is the best one out there, but it doesn’t look much appealing, since Ubuntu is highly customizable, we’ll try to customize GRUB and then we can change those annoying black and white text to something more exciting.
An addon called the burg – Brand-new Universal loadeR from GRUB (burg is grub pronounced backwards too) will help us achieve this. let us see how to make this work.
Change the Ubuntu Bootloader screen
1. Open the terminal and enter the following code.
sudo add-apt-repository ppa:bean123ch/burg && sudo apt-get update
2. Then go to System > Administration > Synaptic Package Manager
3. In Synaptic Package manager, search for burg and mark it for installation. (It is better to use Synaptic Package Manager, since working through the terminal had some problems)
4. While the installation is in progress, you’ll be offered to configure burg. Just click Forward in the first window and in the second window choose your Ubuntu’s root drive or the /boot partition if you have one.
5. To close things up, you need to enter this command in the Terminal.
Now everything is set up. Restart your system to see the new burg as the bootloader. While you are at the boot screen, you can press F1 for help and shortcuts, F2 for a list of themes available and F3 to change your screen resolution.
Installing Themes
Now here comes the best part. You can always add new themes to burg.
1. Search in Google and find some awesome burg themes.
3. Enter this command in the Terminal. (*PathToFile*/*filename* are just variables, replace it with your original download path and file name)
sudo cp *PathToFile*/*filename* /boot/burg/themes
4. After completing it, update burg by using the following command.
Now you can restart and press F2 to find your new theme. I hope this guide helped you to customize your Ubuntu bootloader screen. If you have any doubts, comment them below.
Share your experiences on burg with us 🙂
Categories
- Android
- Apple
- iPad
- iPhone
- iPod
- Macintosh
- Browsers
- Google Chrome
- Internet Explorer
- Mozilla Firefox
- Business
- Announcements
- Blogging
- Concepts
- Offers
- Start Ups
- Device Specifications
- Downloads
- Featured
- Gaming
- Games
- Give Away
- Guest Posts
- How To Guides
- Infographic
- Internet
- List Posts
- Leaks
- Linux
- Microsoft
- Office
- Windows
- Windows 7
- Windows 8
- Mobile
- HTC
- Nokia
- Samsung
- Sony Ericsson
- Network
- Offbeat
- Photoshop
- Programming
- Reviews
- Gadgets
- Mobile Apps
- Software
- Web Apps
- Websites
- Security
- Servers
- Social Media
- Google Plus
- Tech News
- Tips and Tricks
- Resources
- Uncategorized
- Video
- Webmasters
- Blogspot
- Tumblr
- WordPress
Google Adwords VS SEO
Google Adwords vs SEO: Why You Should Invest In Adwords Compared To SEO Search Engine Optimization (SEO) and Google Adwords are the two essential elements […]
SEO for eCommerce
Smart SEO Tips for Supercharging E-commerce Sales like Never Before If you are having an e-commerce site, customers and potential customers must be able to […]
Software to boost Your Business
Advice To Relax Your Senses And Brighten Your Personality – and Software to Boost your Business at the same time Personality is a set of […]
Purchase Food Online
Save money as you purchase food online and from restaurants Online shopping has made life convenient and more comfortable than before! People find it relaxing […]
Financial Management Tools
8 Benefits Associated With Financial Management Tools for Every Small Business There is no denying the fact that the business owners have started to become […]
Ever since Ubuntu upgrades its bootloader to use Grub 2, there have been no easy way to customize the Grub screen. While you can still play around with the code and make changes to its appearance, it is no easy task for the beginner. If you are looking to beautify your boot screen, you will be interested in BURG and BURG-Manager.
BURG stands for Brand-new Universal bootloadeR from Grub. As its name implies, it is a bootloader based on Grub and it supports themes and various OSes (Linux, Windows, Mac OS X). BURG-Manager, on the other hand, is a simplified GUI to help you install and manage the BURG bootloader. It allows you to change theme, configure BURG and also boot from ISO.
Installation
To get it going, we need to install BURG-Manager and BUC in our system.
Open the terminal and type the following (one line at a time):
Once installed, go to Applications -> System Tools -> Burg Manager. At first run, it will prompt you to choose your language. Double click on the language you want to use.
Next, you will see the main screen. Click “burg-install“.
It will then pop up a terminal and run the installation script. During the installation, several windows will appear. You can accept the default configuration by pressing “TAB” and “Enter”. At the point where it asks you to choose the “GRUB Install Device”, press “Space” to select the choice, follow by TAB and Enter.
When you see the “Operation done successfully” window, it means that your installation is successfully.
Usage
After installation, the next thing to do is to change the theme of your bootloader. Click on the big “Burg-emu” button. A window of your grub screen will appear.
Press F2 and the whole list of available themes will popup. You can then scroll down the list to select the theme you want.
Once done, close the window. You will see the changes the next time you boot up your computer.
If you feel that the available themes are not to your liking, you can install more themes at the “Themes Installer” tab. Just pick the theme you want and double click on it.
More configuration
Changing of theme is not the only thing that BURG-Manager is capable of doing. In the Parameter tab, you can configure the default OS to boot up (assuming you got more than an OS installed in your system), the screen resolution and the timeout duration.
Another great feature of BURG-Manager is the ability to select an ISO file and have the system boot up from it. This will save you plenty of time and effort to burn the ISO into CD or create an USB boot disk. Next time you download a new distro LiveCD, you can simply boot it up using BURG-Manager without making any changes to your existing system.
Last but not least, if you tried and don’t like BURG, you can remove it and restore GRUB back as the default bootloader.
If you are not concerned with the default look of your Grub (or bootup) screen, then you shouldn’t be bothered about BURG and BURG-Manager. If, however, you wish to customize the look and feel and wish for an easy method to do it, then BURG-Manager is a great choice. It is by far the easiest and most customizable bootloader GUI that I have ever come across.
Have you tried BURG-Manager?
Damien Oh started writing tech articles since 2007 and has over 10 years of experience in the tech industry. He is proficient in Windows, Linux, Mac, Android and iOS, and worked as a part time WordPress Developer. He is currently the owner and Editor-in-Chief of Make Tech Easier.
- Tweet
3 comments
Thanks for this detailed post! 🙂
btw will the theme stay if i uninstall the manager?
I get this error. installations goes well with 64bit debian package but when i run it i get this error the program does load but it it an empty GUI
Last updated August 7, 2019 By Abhishek Prakash
This tutorial shows you how to easily change grub boot order to make Windows as default OS in Windows-Linux dual boot with the help of Grub Customizer.
Many people prefer to install Linux in dual boot mode with Windows. Some of them use Linux as their primary OS while some prefer Windows as their primary OS.
When you install Ubuntu or Linux Mint or elementary OS along with Windows in dual boot mode, Linux becomes the default OS. At the boot time, on the grub screen, if you do not choose Windows for login within 10 seconds (default Grub timeout), it boots up into the Linux.
This grub behavior creates problem if you prefer to have Windows as your primary OS. You have to wait till the computer boots up and stay close to your computer to choose Windows for login.
This is inconvenient, I can understand.
You can change the grub behavior to make Windows your default OS in dual boot by editing the grub configuration file. While this is my preferred way, I can understand that as a regular Windows user you might not want to use the command line and would prefer a tool with graphical user interface.
I was asked by a few readers to provide a tutorial on using a GUI tool to change the boot order to make Windows default OS instead of Linux. And hence, I came up with this article to show you how to change grub boot order in Linux.
Change Grub Boot Order with Grub Customizer
Startup Manager was the best GUI tool to configure grub. However, it has been discontinued. The void of Startup Manager is (somewhat) filled by Grub Customizer. While Startup Manager was just focused on giving you few options to configure the boot menu, Grub Customizer focuses on all the aspects of customizing Grub, and hence it is a little complicated for beginners.
Install Grub Customizer in Ubuntu-based distributions
I have used Ubuntu in this tutorial but you can use any other Linux distribution based on Ubuntu such as Linux Mint, elementary OS, Linux Lite etc. The tutorial should also work on all Ubuntu versions including 14.04, 16.04 and 18.04. All Windows versions including Windows 10, 8 and 7 should work fine.
Install Grub Customizer in Ubuntu using a PPA:
How To Use Grub Customizer:
Once installed, search for Grub Customizer in the menu and open it.
It requires the admin password because you are dealing with an important configuration that requires root privileges. Enter your password.
After that, you’ll see a screen where you can access the configuration. You can see that Windows lies at the bottom after so many Ubuntu options.
All you have to do is to move Windows over the first Ubuntu. You can use the arrow option from the top menu for this task.
Once done, you should have Windows on the top of this list. At this point, you should save this configuration.
This will edit the Grub menu and you can see the changed boot order at the next restart.
Bonus tip: Reduce the grub boot time
If you do not interact with the grub menu at the boot time, it takes 10 seconds to boot into the default operating system. You can use Grub Customizer and reduce this boot time to something of your choice like 3 seconds or 5 seconds.
You can do this from General Settings tab in Grub Customizer.
It’s an optional tip and will help you in reduce boot time (if you don’t manually press the enter key).
You can do some other grub customization as well with this wonderful tool.
I hope the tutorial helped you to change the grub boot order in Ubuntu and other Linux distribution and make Windows the default OS in your dual boot system. Grub Customizer is an amazingly simple tool for this task.
Questions, suggestions, a word of thanks are always welcome.
Like what you read? Please share it with others.
In this article I’ll show you how to restore your bootloader, your grub loader that allows you to switch between Windows and Ubuntu – now the bootloader or the grub loader can disappear for a number of reasons. If you have Ubuntu running on your computer but you decide to install Windows after you install Ubuntu, the Bootloader will be erased. Once you turn off your computer and then turn it back on, you will be landing on Windows !
That’s a serious issue because we want to be able to switch between Ubuntu and Windows.
In order to fix this issue we would need to create a bootable USB flash drive or hard drive of Ubuntu. Visit the Ubuntu website and download your Ubuntu flavor type. It is recommended to download the 64 bit version though. The download will take a while…
In the meantime we’re going to download the program called universal USB installer here . Once you have downloaded the USB installer file, click on it and then press Yes on any prompts.
Now if the Ubuntu file has finished downloading, you can select the Linux distribution from the drop-down. Make sure your USB is plugged in . Specify your USB drive as shown below and check the box “We will format [your USB drive ] as FAT32” :
Make sure beforehand to back up any important files. Click on Create and press Yes. We are creating a USB because we want to get into Ubuntu Bootloader and try to fix it so that we get a boot menu to switch between Windows and Ubuntu.
Wait about 15-20 minutes as it completes the creation of the USB. Now you can restart your computer and make sure to open the boot menu and boot into your USB storage device [make sure it has the priority as shown below] :
You may be interested to read: How to install and uninstall applications on Ubuntu ? A Beginner’s guide
Ubuntu b oot repair
Once you are ready to make your selection, choose ‘try Ubuntu without installing’ and wait until it loads up. This will bring you to a trial of Ubuntu to a version where basically it lives on that USB storage device. Open up a terminal and type in the command :
sudo add-apt-repository ppa:yannubuntu/boot-repair
sudo apt-get update
and finally write :
sudo apt-get install boot-repai r
This latter will simply install boot repair. So go ahead and type in the command :
This will open the boot repair program (see below). You would need to wait a little until it loads up.
Boot repair Ubuntu
Now click on Recommend Repair .This will take a few minutes…
You will get a popup window asking you to boot up your computer. So go ahead and restart your machine. In the boot menu you will hopefully find Ubuntu along with your windows installations.
Customizing GRUB Bootloader
In this section, we are going to customize the grub loader so that we would be able to add our own menu entries and delete duplicates.
So go ahead and log in into Ubuntu. Open up a terminal and type in the command
This will show us all the available partitions on the current device. An example output is shown below:
Now issue the command :
sudo gedit grub.cfg
Which will open up the file grub.cfg. Now we look up for a windows menu entry. One of the partitions should contain the windows files which you can check by displaying its content. Below you can see two windows menu entries :
Here is an example output with a Fedora installed :
You can delete the entry you wish to remove by making a selection as shown above. This will delete the corresponding menu entry. You can also remove other menu entries that you don’t really use . The next time you reboot, you will notice in the boot menu that the entry is gone.
If you like the content, we would appreciate your support by buying us a coffee. Thank you so much for your visit and support.
Let’s admit it. When you boot up your Linux computer, the Grub menu looks ugly. Luckily, if you don’t like how your Grub boot menu looks, you can configure it according to your tastes. The most striking change is using a custom background. We’ll show you here how to easily change the Grub background.
Install Grub Customizer
To install grub customizer on Arch, Manjaro, and compatible distributions, use:
On Fedora, you can try:
On Debian, Ubuntu, and compatible distributions, you can bring it on board with:
Afterward, find it among the rest of your installed applications and run it.
Change the Background
Grub Customizer offers many options that allow you to modify your Grub boot menu, from tweaking its entries to configuring its looks.
Go to “Appearance settings.” You will find the option you need there.
On the left of Grub Customizer’s window, you will find a handful of options that define its appearance. Click on the last one, the “(None)” button under “background image.”
Note that if your Grub already has a background defined, you’ll see that instead of “(None)” in this button.
Choose the image file you want to use as a background for your Grub boot menu from the requester that appears.
You can choose files directly in JPG or PNG format.
Grub Customizer will load the image you selected and present a preview of how your boot menu will look. If your wallpaper’s colors render any text unreadable, you can use the rest of the options on the left to change the color of your font and its background, both when unselected and highlighted.
When you’re happy with how your new wallpaper and menu text combination looks, click the “Save” button on the top left to save your tweaks.
Reboot your computer to see the changes. If the grub menu doesn’t appear, it may be configured to load the default operating system directly. To force Grub to show up, after rebooting and straight after the BIOS/UEFI screen, keep Shift pressed on your keyboard.
If you want, you can dive deeper into Grub and Grub Customizer to make your computer’s boot menu your own. Changing its background and primary colors, though, will probably be more than enough for most users.
If you are wondering what the Linux boot process is and how Grub plays a part, we have a tutorial here for you. Have you customized your Grub boot menu to your liking? What changes and tweaks have your applied? Tell us in the comments section below.
Related:
OK’s real life started at around 10, when he got his first computer – a Commodore 128. Since then, he’s been melting keycaps by typing 24/7, trying to spread The Word Of Tech to anyone interested enough to listen. Or, rather, read.
- Tweet
5 comments
I am trying to use GRUB Customizer in PCLinuxOS and have encountered several problems.
1) Customizer must be run with root privileges.
2) Customizer wants the ‘background.png’ in a specific root directory. It will not recognize an image file in a user directory. Even when the full path to the file is provided, it throws up a “.png file cannot be found”
3) Customizer uses only ‘.png’ files. It will not accept ‘jpg’ files. On system restart it throws up “file is not a .png file”
None of these limitations were mentioned in the article.
I use grub customizer and agree with you, yet I have never seen a tutorial that explains it completely.
I was thoroughly frustrated before I figured it out. And even using .png files I have had ones that just would not be found and work. To fix these problems as sudo under boot>grub I made another folder, named it, and put the custom picture there. If there is a pic that does not work, I have found taking a .png file and pasting the desired picture over it I want and then saving it again as a .png file works.
I have notice all to often in Linux tutorials the author assumes know the unknown because they do. I had the same problem with accessing my cell phone on my laptop. I followed tutorial after tutorial, and they never worked. I stumbles on a USB driver one day while looking through Google play store, and that solved the problem. Yet every tutorial told me to install MTP to my computer, not one told me I needed a USB driver on my phone.
I tryed doing this but when I booted the whole image was screwed it looked like 16 colors…
Does anyone know how to fix this 16 color issue
For me, this doesn’t work at all. I am on Zorin OS.
I start grub-customizer, log in as root and make the changes I want.
Afterwards, I hit the Save button and the configuration is saved.
Then I exit grub-customizer and run ‘sudo grub-update’, just to be sure. I can see that all my changes are saved.
However, when I reboot, the default grub menu shows up: no changes in the menu, no colors, no background image, nothing…
Got bored with default Ubuntu Grub bootloader? Looking for a nice GUI instead of Grub? Then try out Burg.This post is dedticated to all Ubuntu fans who love to customize there dafault Grub bootloader. 🙂 Install Burg, a Brand-new Universal loader based on Grub.BURG has much prettier GUI and it supports themes and customizations. 😉
How to Install BURG?
1. Open a terminal window and type the following command,
sudo add-apt-repository ppa:bean123ch/burg && sudo apt-get update
2. After its completion, close the terminal window.
3. Goto System –> Administration –> Synaptic Package Manager. In search box type “BURG” and hit enter.
4. Right click on Burg mark it for installation then click apply.
5. The installation process will start.During installtion don’t make any change in first Burg settings window.Just click Forward.
6. In the second window, choose your Ubuntu’s root drive, or if you have a separate /boot partition choose it instead.
7. Finally enter the following command in a terminal window and hit enter.
sudo update-burg
8. You can now restart and the Grub bootloader screen will be replaced by Burg. While at the boot screen, use these shortcuts press F1 for help, F2 for a list of themes, and F3 to change screen resolution.
With grub customizer, you can:
- Rearrange, add, remove, rename boot menu entries.
- Hide or show boot menu while starting up.
- Change the default boot entry.
- Edit kernel parameters.
- Change the time delay to boot the default entry.
- Change text colors and screen background image.
- Reinstall Grub boot-loader into Windows MBR.
To install Grub Customizer in Ubuntu:
The software has an official PPA repository contains the packages for all current Ubuntu releases.
1. Open terminal either via Ctrl+Alt+T or by searching for ‘terminal’ from app launcher. When it opens, run command to add the PPA:
sudo add-apt-repository ppa:danielrichter2007/grub-customizer
Input your password (no visual feedback while typing) when it prompts and hit Enter to continue.
2. After added the PPA, run commands one by one to refresh package cache and install Grub Customizer:
sudo apt-get update
sudo apt-get install grub-customizer
Once installed, launch the software from your application launcher and enjoy!
Uninstall:
To remove the software, run command in terminal:
sudo apt-get remove –autoremove grub-customizer
And you can remove PPAs via Software & Updates utility under ‘Other Software’ tab.
AIO Boot > Grub2 > Show the Grub2 menu on Ubuntu and Linux Mint on startup
Introduce
Grub2 is a great bootloader, and most Linux operating systems use Grub2 as default. AIO Boot also uses Grub2 to boot for most operating systems it supports. If you are using Grub2 to boot into Ubuntu, Linux Mint and other operating systems, you can add menus manually without using any tools.
If you have installed Windows or other operating systems on your computer that are detected by grub-probe, these operating systems will be automatically added to the Grub2 menu. In this case, the default Grub2 will show the menu for you to choose to boot the operating system. But you would not search for this problem if the Grub2 menu was displayed.
The problem here is that the Grub2 menu is hidden at startup of Ubuntu, Linux Mint and many other operating systems. We will not see the menu of Ubuntu until its corresponding shortcut key or set to show the Grub2 menu.
This article will guide you on how to display the Grub2 menu on Ubuntu, Linux Mint and other Linux operating systems.
Show the Grub2 menu
Grub2 settings are in /etc/default/grub. We will open this file and edit the settings.
If this file does not exist, you need to reinstall Grub2.
You will see the following line:
Add a “#” at the beginning of the line and save it. We will be as follows:
Now run the following command to update the changes.
Now restart your computer, you will see Grub2’s menu.
Custom menu for Grub2
Grub2 allows you to add your own custom menus by adding a menu to its configuration files. The configuration file for Grub2 is /boot/grub/grub.cfg. However, you should not add menus to this file, because the menus will be lost when using the update-grub command. Ubuntu has a file for you to add custom menus, this file is /boot/grub/custom.cfg. You just created this file and added the menu you want.
First, we will create a new /boot/grub/custom.cfg file. If this file already exists, we will edit and add new menus. The AIO Boot menu is located in /AIO/Menu/Main.cfg.
Now we can add your own menu for Grub2. The menus can be found on Google. And then restart the computer for testing. Good luck!


