There are a lot of transparency effects in macOS these days. You can see it twice in the Finder window above: the colors from the desktop wallpaper show through the left sidebar, and the pictures I’m scrolling past bleed through the top of the window. You can even see this while scrolling.
The effects are kind of neat, but potentially distracting, and in some cases they can slow down your Mac—so if you want to speed up your Mac, you might try turning them off.
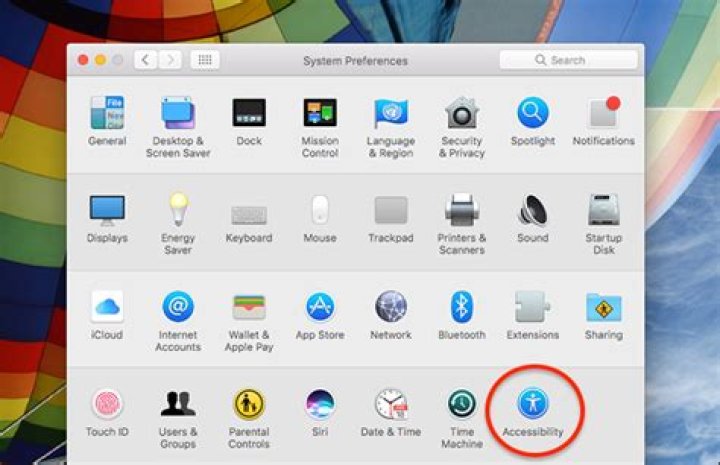
Thankfully, they’re quick to disable, albeit a little buried. First, open the System Preferences and head to the Accessibility panel.
From here, click the “Display” option in the left panel, then click the “Reduce Transparency” option.
The transparency will be gone immediately.
As you can see, the sidebar and the top of the window are now unremarkable. Enjoy not remarking on them.
In macOS, transparency – or more properly, translucency – is a visual effect many apps use to create a sense of depth by hinting at content residing in the background.
An example of transparency is when content behind a window shows through in interface elements like menus and sidebars. It’s evident in the screenshot above, for example, in which the colors of the desktop wallpaper bleed through the sidebar in the Photos app.
A similar effect is sometimes used within app interface elements that are windowed, allowing window content to show through other elements like toolbars. An instance of this can be seen below, where the folders are visible through Finder’s toolbar as if through frosted glass.
/article-new/2018/12/how-to-disable-transparency-in-macos-000.jpg?lossy "How to disable window transparency in macos")
How to Disable Transparency in macOS Mojave
- Launch System Preferences from your Mac’s Dock, from the Applications folder, or from the Apple menu bar ( -> System Preferences. ).
Here is a tutorial on how to disable transparency effects in macOS Big Sur and speed things up on older Macs like the 12-inch MacBook.
Disable Transparency Effects in macOS Big Sur and Gain Some Performance on Older Macs
macOS Big Sur runs like a champ across pretty much all supported Mac hardware. If you are an eagle-eyed user, then you will obviously notice some stutter on some older hardware. That’s very normal, and something you can expect on pretty much any computer.
The stutters can happen for a wide variety of reasons, but mainly the effects the OS maker throws in, just to make things as presentable as possible. This includes fancy animations, transparency effects and whatnot. Turning these off can actually help you regain some performance and even help with battery life in some cases.
In today’s tutorial we will show you how to disable those transparency effects in macOS Big Sur. Just read through and try it yourself on your Mac as well.
Tutorial
Step 1. Click on the Apple logo in the Menu Bar at the top of the display
Step 2. Click on System Preferences
Step 3. Click on Accessibility
Step 4. From the left hand list of options, select Display
Step 5. On the right, you will see more options, just click on Reduce transparency and close the window
Immediately you’ll notice that the fancy blur / transparency effects have disappeared across macOS Big Sur. If you have an older or underpowered Mac like the 12-inch MacBook, you will actually see a performance boost as well.
This will, obviously, make Big Sur look slightly bad in certain places. But if you are all about performance gains then this is the route you should take in order to fix things up. You can also try to enable the Reduce Motion option by the following the steps above to cut down on certain system animations.
Unlike Microsoft, Apple has been successful in keeping macOS as optimized as possible in many key areas. The magic stick Apple has is a very obvious one – the way hardware and software comes together for the ultimate experience. Even though that’s a good thing, but there’s only so much anyone can do to deliver a consistent experience across the board. Ultimately, older hardware will fail to keep up.
Apple’s macOS comes with a redesigned user interface that has added a transparent menu bar and sidebars. If this feature is a bit distracting for you, then this guide is for you, offering a solution on how to disable this feature.
How to disable Transparent Menu in macOS
Step 1: Open the System Preferences app on your Mac device. For this, click on the Apple icon on the top-left corner of the screen and from the drop-down options, click on the “System Preferences” option.
Step 2: Now, find the “Accessibility” options and then click on it to open.
Step 3: From the left-hand side menu, select the “Display” option.
Step 4: On the right pane, tickbox the option for “Reduce transparency.”
Once you enable the option for Reduce transparent, you will notice that all the menus that appear transparent or translucent will be converted to a slide color, disabling the transparency feature.
You can check out our other guides to make your experience even better by customizing the OS and software as per your needs, along with tips and tricks. We have covered quite a few topics, including macOS, Windows, and Chromebook.
Transparent effects have had a prominent place in the user interface of Mac OS X ever since the Mac got a face lift with recent versions of MacOS Mojave, High Sierra, Sierra, OS X El Capitan and Yosemite. Many users like the transparency found throughout the window title bars and sidebars, but some users may not like the feature, and additionally some Macs can gain a performance boost by turning off the eye candy effect of translucent UI elements.
Disabling transparency also has the side effect of making the user interface look slightly different, as the window title bars, buttons, and sidebars will no longer pick up some color cues from items behind the window. Whether or not any of this is desirable to a Mac user likely depends on personal preference, but it’s easy to toggle on and off again so if you decide it’s not for you, there is little effort to switch things up.
How to Reduce Transparency in MacOS and Mac OS X User Interface
The setting is called ‘Reduce Transparency’, but really it disables transparency entirely throughout all interface elements that had a translucent appearance. This setting exists in MacOS 10.14.x, 10.13.x, 10.12+, 10.11.x, OS X 10.10.x and 10.11.x and later, earlier releases do not have the option:
- Pull down the Apple menu and choose “System Preferences”
- Select the “Accessibility” control panel and choose “Display” from the options list
- Look for “Reduce Transparency” and check the alongside this option to disable transparent effects throughout the Mac OS user interface
- Close out of System Preferences as usual
In terms of UI appearance, the effect is subtle.
Here is what a Finder window titlebar looks like without transparency disabled, it follows the typical understated grey appearance that has been part of the Mac UI for decades:
With transparency enabled, the default setting of Mac OS X, the same window titlebar picks up color from UI elements that are behind the screen or going on in the same window, in this case it’s a blue hue:
Aside from the difference in appearance, the settings change can also improve performance quite a bit, particularly on some older hardware, and it notably reduces the CPU usage of the WindowServer process. In fact, this is one of those adjustments that can be made to settings to speed up Yosemite in particular, though the effect carries forward into Mac OS X 10.11 as well albeit less notable.
Users will also find that disabling transparency can boost the frame rate of drawing items on screen in Mac OS X, which is observable on some Macs directly if they had stuttering animations in things like Mission Control, but it can be measured with the FPS FrameMeter gauge of QuartzDebug for users who are more technically inclined as well.
It’s worth mentioning that another option is the Increase Contrast setting in Mac OS X, which disables transparency as well while simultaneously making window and UI elements look a bit more obvious, which can be helpful for those who find the newer Mac OS appearance overbearing.
Sometime the new design concepts are annoying instead of improving the user experience. One of such thing on Windows 10 and macOS is the transparency effect of application windows. Though this may be visually appealing you don’t like this on certain occasions. For example, we need to take plenty of screenshots for articles and this transparency effect will highly impact the quality of the images. So here is how you can remove transparency in Windows 10 and Mac.
Remove Transparency in Mac
Below is the screenshot to show you the effect of transparency in MacBook. Due to transparency, the background app color will affect the screen of the front app.
Transparent App Screen in Mac
Follow the below instructions to remove transparency in Mac.
- Go to “Apple Menu” and click on “System Preferences…”.
- Navigate to ‘Accessibility’ settings.
Accessibility Settings in Mac
- Click “Display” option from the sidebar.
- Enable ‘Reduce transparency” checkbox.
Reduce Transparency Effects in Mac
Now the transparency effect will be removed and you can clearly see the apps without any background color impact. Below is the screenshot after removing the transparency.
App Screen without Transparent Effect in Mac
Remove Transparency in Windows 10
Similar to Mac, Windows 10 also has transparency effects enabled by default. Below is the screenshot in Windows 10 with transparency effects switched on. As you can see the image is showing the background of the desktop which is disturbing the readability of text content.
Transparent App Screen in Windows 10
Follow the below instructions to disable transparency effects in Windows 10:
- Press “Win + I” shortcut keys to open Windows Settings app.
- Go to “Personalization” section.
Open Personalization Settings in Windows 10
- Navigate to “Colors” tab.
- Scroll down on the right pane to “More Options” section and disable “Transparency effects” option.
App Screen without Transparency Effect in Windows 10
Now any screenshots you take will have solid color of that window without showing the background in transparent mode.
If you have the developer tools, you can
open up the file
Library:Preferences:com.apple.Terminal.
plist in your home directory with the
PropertyListEditor. Then do what looks
natural. 🙂
Good news! With the Public Beta, this trick would make the whole window transparent,
including the title bar and scroll bars. With the 4K17 (MacWorld) build, this is fixed so the title
bar and scroll bars are always 100% opaque.
I tried this on my release verion install of OS X.
It was buggy as hell.
160K) shows that yes, I have a pretty transparent terminal window but that it’s also got lots of “ghost” text – when my text scrolled up, it left little shadows behind. I’ve noticed this on several different machines, with different color schemes.
I’d be all over transparent terminals if this didn’t happen.
Very odd – I get nothing like that, even at 50%+ transparency — what video card do you have, and how much transparency?
I cranked it up to 100% transparency, and it’s the ATI Rage Mobility (I think 🙂 that’s in my Powerbook G4. 🙂
I get the same thing in my PowerBook G3 Bronze (ATI Rage) at anything less then about 90%.
I get the ghosted text only if I resize the terminal window – and then whatever text is displayed at that moment leaves a ghost. If I don’t resize, there’s no ghost effect. (nvidia geforce4 mx in a dual 1G with a 22″ cinema).
/Library/Preferences/com.apple.Terminal.plist file. My understanding is that this “defaults” command is a tool for editing the XML configuration files, yes?
Assuming that is the case, I’m poking around the plist file but I don’t see anything useful about opacity. I *do* see how to override your default shell (hmm, I’ve been meaning to learn zsh. ), but that’s for later.
Do you need to have something like the devel tools disc installed to mess around with terminal transparency settings, or am I just not looking in the right places?
Yes, just type the command at the terminal.
Also, you can change the shell in the prefs for the terminal; no mucking about in files required!
Oh well, cool trick, I definitely like this. Thanks!
Try the program Tinkertool.
I find it quite annoying that the scrollbars cannot be “transparent-ized” even if Terminal is set to 100% transparency. It’s pretty ugly to have nothing but a scrollbar and titlebar hanging in mid-air. If this was implemented in the Public Beta, is there a way to get it back?
Specifically, I would like the option to completely hide the scrollbar and titlebar. Xterm on X11 (Linux/UNIX) has this capability and its pretty slick. You can even scroll through text just without the scrollbar. Real nice when you just want to have a term sitting in the background.
Also, I too have experieced the “ghosting” effect. Pretty cool when the text is static, but when something like top is running, it makes it really hard to read.
I attempted to use this hack on the terminal in MacOS 10.2. DON’T DO THIS. (you can change the transparency in the Windows Settings item in the Terminal menu. Select “colors” and set the transparency from there.
The terminal became transparent, but as soon as I tried to open another terminal window, it caused a major screen redraw error: the bottom half of my screen went black, and displayed weird colorful barcode like patterns. When I opened new windows and resized the dock, or did anything that involved screen redrawing, the part of the screen that was redrawn went back to normal.
I couldn’t find anything that would fix it at first, so I reinstalled my whole system using the “archive and reinstall” option on the MacOS 10.2 disks. Reinstalling didn’t do anything!
Finally, my friend found out the trick that worked from a FAQ written by Bob Levitus. Go to your home directory, and from there go to your library/preferences/com.apple.Terminal.plist. Move “com.apple.Terminal.plist” to the trash, log out, log in, and start the Terminal again. It will rebuild the preference list for the terminal, and all will be well again.
i have 10.2.2 (or 10.2.3 devp.) and this does not make it crash. maybe they have fixed it with .2 update.
easiest way to make the terminal windows transparent:
Terminal menu -> Preferences -> Windows Setting. -> Color -> Set Opacity
just remember to select use settings as default in the shell menu
Sometime the new design concepts are annoying instead of improving the user experience. One of such thing on Windows 10 and macOS is the transparency effect of application windows. Though this may be visually appealing you don’t like this on certain occasions. For example, we need to take plenty of screenshots for articles and this transparency effect will highly impact the quality of the images. So here is how you can remove transparency in Windows 10 and Mac.
Remove Transparency in Mac
Below is the screenshot to show you the effect of transparency in MacBook. Due to transparency, the background app color will affect the screen of the front app.
Transparent App Screen in Mac
Follow the below instructions to remove transparency in Mac.
- Go to “Apple Menu” and click on “System Preferences…”.
- Navigate to ‘Accessibility’ settings.
Accessibility Settings in Mac
- Click “Display” option from the sidebar.
- Enable ‘Reduce transparency” checkbox.
Reduce Transparency Effects in Mac
Now the transparency effect will be removed and you can clearly see the apps without any background color impact. Below is the screenshot after removing the transparency.
App Screen without Transparent Effect in Mac
Remove Transparency in Windows 10
Similar to Mac, Windows 10 also has transparency effects enabled by default. Below is the screenshot in Windows 10 with transparency effects switched on. As you can see the image is showing the background of the desktop which is disturbing the readability of text content.
Transparent App Screen in Windows 10
Follow the below instructions to disable transparency effects in Windows 10:
- Press “Win + I” shortcut keys to open Windows Settings app.
- Go to “Personalization” section.
Open Personalization Settings in Windows 10
- Navigate to “Colors” tab.
- Scroll down on the right pane to “More Options” section and disable “Transparency effects” option.
App Screen without Transparency Effect in Windows 10
Now any screenshots you take will have solid color of that window without showing the background in transparent mode.
OS X Yosemite lets parts of windows take on the general color of the background behind it. It’s a translucent effect because details cannot be readily made out. For those who don’t like it, here’s how to turn it off.
In Yosemite, part of an app can, if so enabled, take on the color of the background via translucency. One example is the Safari search bar. Another is the sidebar in the Finder. Notice how, in the screen shot below, the Finder sidebar takes on the hue of the background: beige (at the top) and blue (at the bottom). This is the default.
You can greatly reduce this effect if it bothers you. Here’s what the same shot looks like when translucency is off.
Managing the Translucency
This effect is controlled in System Preferences > Accessibility with a checkbox. The effect takes place immediately. (Why Apple used the term transparency here when distinct images are not visible in the background is arguable.)
System Preferences > Accessibility.
I like this feature. In previous times, the GUI of our OS was blunt, skeuomorphic and saturated in its color scheme. This color inheritance of the background is a pleasing, artistic touch that brings warmth and depth to the technical, almost clinical look of the Mac’s GUI. Even so, Apple respects that some won’t want it, and that it is managed in the Accessibility pane of System Preferences is a proper acknowledgement of some people’s visual needs.