There are so many options for exercise equipment you can use to aid your workout. So why should you consider using an exercise ball?
Exercise balls are excellent for strengthening your core muscles.
See: Exercise Ball Workout for Beginners
The main benefit of the exercise ball is this: It helps you exercise your pelvis, back, and abdomen muscles, often referred to as your core. Core exercises are not just about getting a 6-pack or flat tummy—a strong core is important to strengthen and stabilize your whole body.
These 5 exercises for an exercise ball are ranked from easiest to most challenging. For numbers 4 and 5, it can be helpful to do them for the first time under the supervision of a physical therapist or certified athletic trainer to make sure you’re using proper form.
1. Easiest: 30-minute sit
Surprisingly, just sitting on an exercise ball is exercise. It requires subtle yet constant engagement from core muscles to remain balanced and centered on the ball. When you first use an exercise ball, place your feet flat on the floor and just sit on it for 30 minutes.
Keep in mind that beginners may have an easier time balancing on an exercise ball that’s slightly deflated.
2. Easy: Ball marching
Once you feel comfortable sitting on the ball, you can move on to this simple exercise:
- Sit on the exercise ball with your feet in front of you and flat on the ground.
- Lift one heel while keeping your toes on the ground. (To make the impact of this exercise greater, lift your whole foot off the ground.)
- Hold that position for a few seconds and then put that foot back down. Switch to the other side. Repeat for 10 to 15 minutes.
3. Medium: Ball squat
This exercise can strengthen your core and also help train your body about the proper way to lift an object to avoid back strain or injury:
- Stand in front of a wall with your feet facing forward and the exercise ball pinned between the wall and your lower back.
- Put your hands on your hips and slowly bend your knees to squat down toward the floor. The ball should roll up your back as you move down. Stop your squat before your bent knees extend beyond your toes.
- Hold for a few seconds in the deepest part of the squat, then slowly return to standing.
- Repeat the exercise 5 times. For a more advanced exercise, increase repetitions or time at the deepest part of the squat.
4. More challenging: Ball sit-ups
Sit-ups on the ground are already good for building your core, but the added challenge of doing them on an exercise ball can make them even more impactful.
Remember, this exercise and the next one are best done initially under the supervision of a physical therapist or certified athletic trainer.
- Sit on the ball with your feet flat on the floor and your arms crossed over your chest or on your hips.
- Lean back into a 45-degree angle, bending at your hips and raising up on your toes without moving your feet.
- Use your abdominal muscles to pull yourself back up into a sitting position without lifting your feet. Repeat 5 times.
5. Most challenging: Ball leg lifts
Just as with the previous exercise, this exercise takes a traditional core-building activity (leg lifts) and increases the impact:
- Sit on the floor in front of the exercise ball.
- Roll back so your head and shoulders are resting on the ball but your torso and hips are in the air. Keep your feet on the ground. Raise yourself until your body is in a straight line and your knees are bent at a 90-degree angle.
- Lift one leg off the floor and straighten it until it’s level with the rest of your body. Hold for 10 seconds, then lower the leg.
- Repeat 5 to 10 times for each leg.
As always when exercising, you should stop what you’re doing if any movement or exercise causes sudden or sharp pain. Seek treatment if pain persists.
ABOUT THE AUTHOR
Martin Booe
As almost anybody who goes to a gym knows, adding resistance to an exercise makes it more effective. For abdominal exercises such as sit-ups, this can be done by using decline boards — also called slant or incline boards — and exercise balls — also called Swiss balls — in your workout. There are advantages to both. Each activates muscles that might not be engaged by performing the exercises lying on the floor.
Abs Love Gravity
Abs work harder against gravity and a decline board can be adjusted to give you as much as you want. Sit-ups on a decline board are performed with the feet tucked under the braces at the top of the board and your body at a downward slant. Place your hands behind or to the side of your neck. The legs are bent with knees pointing upward to take stress off the lower back. Raise your torso by bending the back and hips until the elbows touch the knees.
The upper back should make contact with the board at the end of the movement. Otherwise, the abdominal muscles may only be partially engaged during the exercise.
Having a Ball
For sit-ups and other abdominal exercises, an exercise ball creates instability by forcing your limbs outside the range of your base of support. Sit-ups done on a ball are something halfway between a crunch and a sit-up because it’s difficult to find a position on the ball that allows the torso to come up to perpendicular, or sitting position.
To do sit-ups on a stability ball, first sit on the ball with your feet flat on the floor. Slowly walk your feet forward until the middle of your back is supported by the top of the ball. Your feet should be parallel and shoulder width apart and your knees bent to about 90 degrees. Position your back at the top of the ball at 12 o’clock and your hips at 2 o’clock.
With your hands behind your head, slowly curl your torso toward your thighs. Focus on pulling your rib cage and pelvis closer together. Continue to curl up until your upper back is off the ball. Hold this position briefly while maintaining your balance. Now inhale and gradually uncurl, easing your spine downward toward the ball. If you’re having trouble maintaining balance, widen the distance between your feet.
Pros and Cons
So which is better, decline board sit-ups or an exercise ball? It depends on what you’re trying to achieve. Doing trunk exercises such as sit-ups on a Swiss ball has been shown to stimulate greater activation of lower abdominal region than the same exercise done on a stable bench. Exercising on unstable equipment such as the exercise ball improves balance and posture.
Decline boards may increase the resistance necessary to build muscles more than doing the same exercise on an exercise ball because the angle requires you to work against gravity. In a study by the American Council of Exercise, decline board curl-ups were shown to activate the external obliques and the rectus abdominus more than supine curl-ups. On the other hand, decline boards won’t give you the same full activation of muscle fibers throughout the abdominal muscle group as a Swiss ball.
Warning
Full sit-ups should be done with caution because they cause the hip flexors to pull on the lower spine, raising the possibility of injury to the lumbar discs. Be aware that when your torso is raised much past 30 degrees, your help flexors — and not your abs — are doing the work. If you do sit-ups with your hands behind your head, avoid neck strain by taking care not to tug on the back of your neck for extra torque.
ABOUT THE AUTHOR
Andrea Boldt
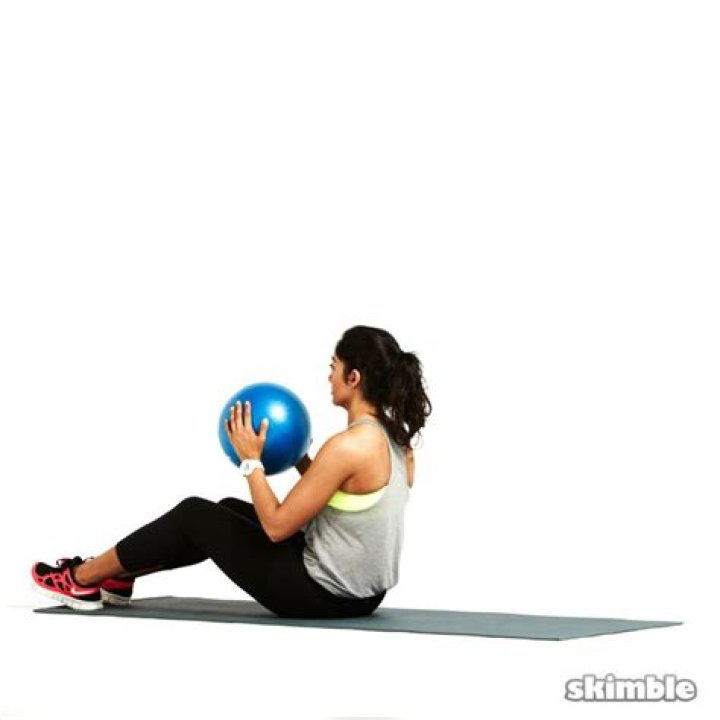
The traditional sit-up gets an upgrade when you use a medicine ball to add extra resistance. You’ll feel more challenged as you build stronger muscles. The shape of these weighted balls makes them perfect for tossing or hugging as you raise and lower your torso.
Medicine balls come in varying weights and sizes; those appropriate for ab workouts are usually between two and 25 pounds and are shaped like a basketball. The weight of the ball you choose should feel challenging and slow your movement down, but shouldn’t cause you to feel out of control or compromise form.
Instead of counting repetitions when you do these exercises, set a timer and perform each for a minute to fire up your core. Take 30 or 60 seconds between them to give your abs a chance to rebound before being worked again.
Classic Sit-Up With the Medicine Ball
Use a medicine ball to augment the classic situp in one of two ways: add resistance to the upper body by hugging the ball or anchor the feet by squeezing the ball between your ankles.
Sit-Up Holding the Ball
Step 1
Lie down on a mat and bend your knees. Plant your feet in the floor. Hold the medicine ball between your hands at your chest.
Step 2
Lift your head, neck and shoulders up off the mat and simultaneously push the medicine ball straight up. Squeeze your abdominal muscles in towards your back and exhale as you rise. Your arms remain extended throughout the movement so that when you reach the top, they’re near your ears and the ball is extended just over the crown of your head.
Step 3
Return to the starting position to complete one repetition.
Use the Ball as an Anchor
Step 1
Sit down on a mat with your knees bent, feet planted in the floor. Select a 10- to 16-pound medicine ball and place it between your feet.
Step 2
Engage your abdominal muscles, hold your arms crossed over your chest and squeeze the ball with your ankles as you slowly lay down on your back.
Step 3
Continue to raise and lower your torso, using the ball to pin your legs down on the floor. Consciously feel your abdominals hug in towards your ribs to activate the muscles.
Medicine Ball Partner Sit-Ups
Why work out alone when you can harness the energy, motivation and fun of a partner? A partner can provide morale support and throw the ball to you as you perform situps. If both of you want a workout, have your partner get down on the floor and do the situps with you.
Partner Toss Sit-Up
Step 1
Lie on the floor with your back in a mat and bend your knees. Hold a medicine ball in your hands just in front of your chest.
Step 2
Have your partner stand facing you. He’ll place his feet on top of yours, gently, to keep you from swinging your legs during the exercise.
Step 3
Engage your abdominal muscles in toward your spine as you raise your torso and toss the ball to your partner who will throw it right back to you while you’re still lifted. Lower your back to the mat and repeat for the desired number of repetitions.
Partner Pass Sit-Ups
Step 1
Sit on the floor and face your partner with your feet about 12 inches apart. Both partners bend their knees. One partner holds the medicine ball.
Step 2
The partner holding the ball lowers down bringing the ball behind his head, tapping it to the floor. As he rises, he tosses it to his partner. The partner catches the ball and immediately lowers herself to the mat, letting the ball tap to the floor over her head. She then rises and throws the ball back to the first partner.
Step 3
Continue to toss the ball back and forth to complete the desired number of repetitions.
Straight-Leg Crunch
This move is a crunch rather than a situp. A crunch uses abdominal muscles only while a situp activates stabilizing muscles of the neck, thighs and hip flexors.
Step 1
Lie on your back on a mat and hold a medicine ball between your hands. Extend your arms so you’re holding the ball above your chest.
Step 2
Lift both legs up toward the ceiling. Keep them pressed together and straight with your feet flexed.
Step 3
Keeping your arms extended and hands gripping the ball, raise and lower your shoulders up off the floor. Let the ball tap your ankles or toes as you lift up.
Step 1
Starting Position: Sit on a properly inflated stability ball (one that compresses approximately 6″ under your body weight) with your feet flat on the floor. Slowly lean backwards while walking yourself out along the ball until your shoulders, back and tailbone make contact on the ball. Adjust your leg position to create a 90 degree bend at the knees with your thighs parallel to the floor and positioned hip-width apart, and feet facing forward with your weight distributed evenly through your feet. Your mid-back should be positioned on the top of the ball (at 12 o’clock) and your hips should be positioned at 2 o’clock.
Step 2
Place your hands behind your head, squeezing your scapulae (shoulder blades) together and pulling your elbows back without arching your low back. This elbow position should be maintained throughout the exercise. Align your head with your spine, but allow it to move into slight flexion (moving the chin towards the chest) during the upward phase of the exercise.
Step 3
Upward Phase: Exhale, contract your abdominal and core muscles, and flex your chin slightly towards your chest while slowly curling your torso towards your thighs. Since the abdominals attach the rib cage to the pelvis, your movement should focus on pulling these two body parts closer together (the neck stays relaxed while the chin is tucked towards the neck and focus on pulling the bottom of the chest towards the top of the pelvis). Your feet should remain firmly planted, and your tailbone and lower back should remain in contact with the ball at all times. Continue curling up until your upper back is lifted off the ball. Hold this position briefly while maintaining your balance.
Step 4
Downward Phase: Gently inhale and slowly uncurl (lower) your torso back towards the ball in a controlled fashion keeping your feet firmly planted, and your tailbone and low back in contact with the ball.
By: Kimberly Caines
Published: 12 April, 2011
IT Stock/Polka Dot/Getty Images
Flattening your stomach requires a full-body approach to lower your body fat. Aside from a healthy diet, cardiovascular exercise and strength training, you have to perform a variety of exercises that target your abdominal muscles. Reverse sit-ups are the opposites of traditional sit-ups. Instead of your upper body, only your lower body moves. The exercise focuses mainly on the lower abdominal muscles and is therefore ideal for toning and tightening that lower belly pooch.
Lie on the floor, on your back. Spread your arms out to the sides of your body and straighten your legs out. Your body should resemble a “T” shape.
Raise your legs off the floor. Bend you knees at a 90-degree angle and pull them into your chest while holding your upper body still. Your hips will slightly lift off the floor as your knees get close to your chest.
Extend you legs back down to the starting position. Keep your legs straight and hovering above the floor. Avoid touching the floor. Repeat the exercise to complete as many repetitions and sets as your fitness level allows.
For an extra challenge, perform a reverse sit-up and lift your legs toward the ceiling after bringing the knees into your chest. Raise your hips off the floor completely. Lower back down to your starting position.
Warnings
Consult your doctor before engaging in an exercise routine.
By Brad Gouthro
How To Do A DECLINE SIT UP WITH MEDICINE BALL TOSS:
DECLINE SIT UP WITH MEDICINE BALL TOSS: Targeted Muscles:
The Decline Sit Up With Medicine Ball Toss is an exercise that primarily targets the abs.
DECLINE SIT UP WITH MEDICINE BALL TOSS:
To perform DECLINE SIT UP WITH MEDICINE BALL TOSS:
1. Hook your feet under the padded bar and lie down on a 45 degree angle decline bench while holding a medicine ball against your chest.
2. Contract your abs to lift your torso while tossing the medicine ball straight up into the air, then catch it while you lower your torso back to the bench.
3. Repeat.
Check The Best Abs Workout Ever
Sculpt your abs, check out our The Best Abs Workout Ever video. Give it a try!
Have You Downloaded our FREE New Ultimate Live Lean Starter Guide Yet?
If not, click here to go download it now. This guide takes away all the confusion with your diet and workouts as it gives you the exact meal plan, video cooking lessons, and grocery lists you need to Live Lean without being a slave in the kitchen. It also includes a FREE 4-week Hot Body Workout program.
This is the type of premium content our inner circle members at TeamLiveLean.com receive every single month.
So many of you have already download the starter guide for free and are loving the results. If you haven’t downloaded it yet, do it here.
Subscribe To My FREE Live Lean TV Health, Fitness, & Nutrition YouTube Channel For More Videos:
If you enjoyed today’s episode, make sure you subscribe to my Live Lean TV YouTube channel as we upload new episodes every Monday and Thursday.
I love you guys and keep Living Lean.
Get Ridiculously Fit Without Living In The Gym Or Slaving In The Kitchen…
JOIN THE TEAM TO GET THESE EXCLUSIVE INNER CIRCLE FEATURES:
CLICK NOW TO GET THE DONE-FOR-YOU PLAN TO LIVE LEAN
Brad Gouthro is the founder of Live Lean TV, a media company focused on helping men and women “Live Lean” 365 days a year. Brad’s programs and content have helped millions of people all over the world learn how to get in shape, and more importantly, sustain it for life.
Learn how to do flat leg medicine ball sits ups. Presented by Real Jock Gay Fitness Health & Life.
Benefits
Medicine ball sit-ups ensure your abs work doubly hard, as they lift not just the weight of your upper body but the weight of the ball. By keeping your legs flat through this exercise, you further isolate your core.
Starting Position
Lie on your back on the floor with your legs extended and a medicine ball held in both hands above you. Extend your arms toward the ceiling so that your arms are perpendicular to the floor and the medicine ball is directly over your upper chest.
Exercise
1. From the starting position, engage your abs by bringing your belly button toward your spine. Do not tip your pelvis upward. From that engaged position, begin lifting your shoulders off the floor in a sit-up, taking your arms forward as your upper body rises. Your legs should remain flat. Do not fling your upper body upward, nor grab through your lower back. Instead, think of peeling your shoulders off the floor from your center, and try to feel that the medicine ball is pulling you from above.
2. Come as close as you can to sitting upright, with your arms extended forward and your legs still flat on the floor.
3. From the top of the motion, reverse direction and lower back to the starting position. Control this downward movement using your abs—but make sure you use your lower abs, not just the area up by your rib cage. Be careful that the bottom part of the motion doesn’t happen more quickly than the top part; you want to lower yourself at a continuous pace.
4. At the bottom of the motion, move immediately into your next sit-up.
Want to master Microsoft Excel and take your work-from-home job prospects to the next level? Jump-start your career with our Premium A-to-Z Microsoft Excel Training Bundle from the new Gadget Hacks Shop and get lifetime access to more than 40 hours of Basic to Advanced instruction on functions, formula, tools, and more.
by: Mary Jo Cameron
Can adding a Balance Ball to your abs workout net you that six-pack with less sweat? A study by researchers at the Department of Kinesiology at Occidental College in Los Angeles says yes.
The study found that crunches performed on a stability ball (a.k.a. fitness ball or Balance Ball) boosted activation, or flexing, of abdominal muscles by 24 to 38 percent over crunches done without a ball. Participants in the study were fitted with electromyographic equipment that registered heightened activity in upper and lower abs as well as in obliques.
The new research may help explain why stability ball workouts continue to rank among the top 10 bestselling fitness DVDs, according to Nielsen VideoScan — and why you’d be hard pressed to find a gym that doesn’t offer them.
But there’s another way a stability ball can help you get strong, sexy abs.
“Abs workouts using a stability ball engage smaller core muscles that more traditional forms of exercise don’t,” says certified yoga and fitness ball trainer Suzanne Deason. “Those smaller muscles help you keep your balance on the ball. You’ll sculpt all the muscle groups in the abdominals — particularly the transverses for a flat stomach; they’re sometimes missed in regular sit-ups — as well as the obliques for a whittled-down, small waist; and the outermost muscle, the rectus.”
If crunches and their ilk still sound about as fun as moving a half-ton of rock with a shovel, give the ball a chance for one other reason, says Deason.
Because of the ball’s soft surface,” she points out, “you don’t feel pain on your spine as you might when doing lying-down exercises. The support gives you the sense that you’re not working as hard as you actually are; you can probably do many more sit-ups on the ball than you’d be able to do on the floor.”
Deason says yoga-based movements on a ball can also help improve digestion and help prevent back pain and injury. Pilates-style exercises use the ball as a counterbalance to help equalize the muscles of the front and back torso for better posture and poise.
Even if you only have time for a quick five- to 10-minute workout, try these three exercises to tone your abs and better define your waist.
1. Abs Crunch
This is one of the most effective ways to strengthen, flatten and tone the abs. Doing the exercise using a Balance Ball or stability ball eliminates the impact of a hard surface on the spine, which helps you perform the movement more precisely.It also helps increase lower back strength, support the spine, promote better posture and prevent lower back injury.
- Begin in Positive Seated Posture; roll out until lower back is resting comfortably on ball.
- Place feet flat on floor, shoulder-width apart.
- Position hands behind head to support its weight, elbows pointing directly out to sides.
- Raise head even with torso and gaze straight up.
- Inhale deeply; on exhale, contract lower abs.
- Hold the flex and inhale; on exhale, slowly curl torso forward, flexing middle and upper abs to raise chest up and toward pelvis. Allow head to follow chest. Do not force or pull head forward. Allow abs to do the work.
- Raise chest until you feel abs completely contracted; hold for 3 to 5 comfortable, deep breaths.
- Release slowly, allowing head and chest to drop back down to torso level. Breathe.
- Repeat 10 to 12 times. Add more repetitions as you become stronger.
2. Donkey Kicks
This exercise can appear more challenging than it really is. Designed to strengthen and tone the entire torso, this movement helps to tone the waistline, flatten the abs, and strengthen the lower back and spine to help prevent injury. This super-efficient exercise packs a lot of punch — it’s really a total-body move that also shapes and defines the muscles in the arms and legs.
- Begin by kneeling in front of ball.
- Lean forward, placing chest on ball and hands out in front of you.
- Push forward with feet and walk hands out until shins and tops of your feet rest on ball.
- Keep body in a flat position, head in line with torso. Focus gaze on floor.
- Flex abs to prevent back from sagging.
- Flex abs and slowly pull knees toward chest.
- Pull forward until hips and knees are aligned vertically. Press firmly through hands and arms for support and balance.
- Hold for 2 to 3 even breaths; release by extending legs back into starting position.
- Repeat 6 to 8 times. Add more repetitions as you gain strength in arms and abs.
3. Pushups
Think pushups are only for arms and pecs? Think again. Using a Balance Ball or stability ball boosts this move’s abs sculpting benefits by activating the core (the abs and torso) to help you maintain balance during the movement.
- Begin by lying over ball on chest, hands on floor in front of you.
- Walk hands forward until knees are resting on top of ball.
- Keep head level; focus on floor.
- Flex abs to stabilize torso.
- Position feet together, hands shoulder-width apart.
- Inhale; on exhale, slowly lower head and chest as far as is comfortable, keeping elbows tight alongside body.
- Hold for one breath and press back up to starting position.
- As a variation, when releasing chest to floor, extend elbows out to sides. This will help work chest more deeply.
just then i did 20 or so crunches on an exercise ball and i could already feel my muscles working, but afterwards my back hurt a bit. is there some kind of way you’re meant to sit on it so you dont stuff up your back/neck or is it just not meant to be done?
3 Answers
I get pain in my lower back so I sit down and then walk my legs out and lay back so the ball is under my lower back instead of under my bum. Then I do a crunch more than a sit up, I don’t roll on the ball so I can’t sit up completely.
This position gives me a good range of motion and allows me to flex my body up into a crunch and back – past the point I could go if I were laying on the floor. This gives me better flexiblity.
I started using the exercise ball because of severe back problems so this really works for me. Perhaps you should start with just 10 crunches, then 15 – increase slowly so you don’t overstress your muscles. I started out very slowly myself.
I find that if I roll forward so that the small of my back is against the ball, my back doesn’t get sore. But I’d suggest that you check with an excercise professional if you continue having a problem.
Iknow what you mean. Using pillows won’t work because they will move and fall out. If you can get a yoga mat, they are fantastic to do sit ups on. If you do them on something to soft, the sit ups don’t do much to ur stomache and if you do it on something 2 hard, it hurts really bad. Good luck finding a yoga mat!
Learn how to do medicine Ball situps on stability ball. Presented by Real Jock Gay Fitness Health & Life.
Benefits
Doing abdominal work on the stability ball is great because it allows your abs to flex and move within the full range of motion. The unstable surface of the stability ball also increases the difficulty of situps because it forces you to continually balance and re-balance throughout the movement. The addition of the medicine ball to the stability ball situp ups the ante further by adding additional weight that your abs need to lift.
Starting Position
Lie back on a stability ball with your feet on the floor in front of you about hip-width apart and a medicine ball held in your hands, arms extended overhead with biceps beside your ears. Your body should supported between the top of your buttocks and the bottom your shoulder blades and your head and shoulders should be hanging off the other side of the ball. Try to stretch back over the top of the stability ball while keeping your abs engaged.
Exercise
1. From the starting position, fully engage your abdominal muscles and lift your upper body and the medicine ball up. Lift until your entire upper body is off the stability ball and vertical and you are holding the medicine ball out in front of your face. Keep your abs engaged throughout the lift, even when you are at the top of the movement.
2. Reverse the motion and, with your abs still engaged, lower yourself back to starting position. Do 20 repetitions for a full set.
Want to master Microsoft Excel and take your work-from-home job prospects to the next level? Jump-start your career with our Premium A-to-Z Microsoft Excel Training Bundle from the new Gadget Hacks Shop and get lifetime access to more than 40 hours of Basic to Advanced instruction on functions, formula, tools, and more.
Exercise Techniques : How to Do Sit-Ups on the Exercise Ball
In order to do sit-ups on an exercise ball, lay on the ball and keep the hips low, making sure to walk the feet forward for balance. Learn about squeezing the abs .
Stomach Exercises For Women: Ball Sit Ups
2012-01-02 Flavia Del Monte
Join my free website at to learn more about how I can help you get a flat, firm midsection with more abdominal exercises.
How to Do Abdominal Crunches or Sit-Ups on an Exercise Ball
How to Do Abdominal Crunches or Sit-Ups on an Exercise Ball. Part of the series: Exercises for Your Abs. An exercise ball makes an effective, comfortable tool .
How To: Ball Crunch
FULL 12 WEEK PUSH,PULL,LEGS PROGRAM!- BUILD MUSCLE & STRENGTH! – FULL 12 WEEK MUSCLE BUILDING 4 DAY SPLIT .
How to Do Sit-Ups with a Stability Ball | Bosu Ball Workout
Like these Workout Lessons . Download our official fitness app Check out these Top Rated Workout Essentials: Shake Weight .
6 Moves for the Abs with an Exercise Ball
2015-09-22 Runtastic Fitness
More bodyweight training for women: Get stylish workout gear! The exercise ball, stability ball, swiss ball – whatever you .
Exercise Tips & Equipment : How to Use a Medicine Ball for Sit-Ups
Using a medicine ball to train and do sit-up exercises is a great way to work on the oblique and core muscles. Simplify exercises for the abs with help from a .
How to Do Abdominal Crunches Using a Balance Ball
Abdominal crunches are great core exercises, often mixed with balance balls for working other muscles as well. Learn how to do abdominal crunch exercises in .
Benefits of Stability Ball Crunches VS Sit-ups – GoTimeTraining
It’s becoming evident that most people need to be training movement patterns instead of parts in isolation, like functional squat vs leg extension machine.
How to Define Your Abs With Sit-Ups Using a Stability Ball : Exercises in the House
Subscribe Now: Watch More: A comfortable and .
Easy Abs Workout With Ball ♦ Beginner Exercise Ball Workout
в™ў Tone & Flatten you Abs.
Why I Swapped My Desk Chair for an Exercise Ball – Plus the Top 5 Ball Exercises to Do at Your Desk
2015-03-03 Better Beyond 50
As I write this .
Bosu Ball Exercises : Bosu Ball Exercises: Basic Crunches
Doing basic crunches with a Bosu Ball is a great way to make the exercise more effective and focused. Work on abdominals with these basic crunch Bosu Ball .
Stability Ball Situps
2016-04-29 Bianca Romeo
How to do Sit-Ups on a Stability Ball Facebook/BiancaRomeoCoaching IG: BiancaRomeo Snapchat: biancaromeo44.
Six Pack Abs – Sit Ups on the Ball
2008-06-27 Kareem Samhouri
How to Do an Exercise Ball Crunch | Back Pain Relief
Watch more How to Treat Back Pain videos: I want to spend a .
Reebok Fitness Online Workout: Medicine Ball – Sit Up With Ball Over Head
2009-09-07 Reebok Fitness
Work your body, have fun and get fit with Reebok Fitness. This online workout video utilises the Medicine Ball fitness accessory within a sit up with ball over .
Decline Stability Ball Situps
2013-11-11 GPP Fitness
To get a little more abdominal work out of your situps, it is best to disengage the hip flexors by elevating the feet and keeping a bend in the knees.
Stability Ball Pilates Exercises : Pilates Ball Exercise: Side Sit Ups
Create a flat, toned stomach with side sit ups. Learn how to do side sit ups with stability balls in this free exercise video from a certified Pilates instructor. Expert: .
How to Use an Exercise Ball : Situps with an Exercise Ball
Demonstrating situps with exercise balls. Learn how to train and exercise with a stability ball in this free video on fitness and health. Expert: Carole Childers Bio: .
You’ve probably noticed we love medicine balls here at 12 Minute Athlete.
A simple medicine ball can help to make your workouts incredibly versatile. Wall balls are one of our favorite exercises you can do with it, but there are so many more!
If you don’t have a medicine ball, we really recommend you get one. They’re not super expensive, are easy to store at home, and once you get one you’ll have it for life. Of course, you can also substitute medicine balls for any ball-like object you have around like a basketball or soccer ball, but make sure to work even faster so that the overall intensity of the workout stays high.
Here are 7 of our favorite exercises you can do with a medicine ball:
Wall Balls
Wall balls get your heart pumping quickly. They’re a full body exercise, where everything from your head to your toes is involved, but be ready to feel the burn in your quads!
How to do them: Stand about two feet from the wall, facing it. Make sure not to stand too far from the wall, because you want to toss the ball up, not forward.
Keeping the ball at your chest, do a full squat. Stand up explosively as you extend the arms and throw the ball high up against the wall. Catch it and repeat immediately. Don’t pause at any point of the movement— try to tie the squat, stand up, and arm extension together into one smooth movement.
Medicine Ball Slams
Medicine ball slams work your arms and shoulders, but also your core—just be sure to engage your abs to add even more power to this movement. Medicine ball slams are also a great way to help you let go of some stress and frustration!
How to do them: Stand with your feet about hip-width apart. Pick up the medicine ball, lift it overhead and slam it on the ground as hard as you possibly can. The louder the better!
Squat Thrusts
Medicine ball squat thrusts are another full body exercise. They’re similar to wall balls, but because they’re quiet, you can do them without worrying about waking up your family or neighbors.
How to do them: Stand with your feet about hip-width apart. Hold the medicine ball at your chest, then do a full squat. Stand up explosively as you extend your arms overhead, then bring the ball back to your chest and repeat. Try not to pause at any point and tie all the movements together into one smooth motion.
Medicine Ball Twists
Medicine ball twists help you to strengthen your core muscles, and more specifically your obliques, the muscles on the sides of your belly.
How to do them: Sit down and hold the medicine ball in your hands. Lift your feet off the ground, then twist your torso to the right and let the medicine ball touch the ground. Immediately twist left and let the ball touch the ground on your left. Make sure to keep your core tight at all times.
To make this exercise a bit easier, try crossing your feet. If that’s too much as well, simply keep your feet on the ground.
Squat Throws
Medicine ball squat throws are similar to wall balls, but you can do them without a wall. You’ll still get a full body workout.
How to do them: Stand with your feet about hip-width apart. Keep the ball at your chest and do a full squat. As you stand up, extend the arms and throw the ball up in the air. Don’t pause at any point of the movement—try to tie the squat, stand up, and arm extension together into one smooth movement.
Sit Up Wall Slams
Sit up wall slams work your arms, shoulders, and core, and also make you feel a bit like a badass.
How to do them: Sit down facing the wall. The distance of the wall will depend on the weight of your ball and how well it bounces back, so adjust as needed.
Hold the medicine ball in your hands, then lie down while keeping the ball at your chest. Do a sit up and as you come up, throw the ball against the wall. Catch it and immediately get back into your starting position and repeat.
Side to Side Slams
Medicine side to side slams help you strengthen your whole body, but especially work your arms, shoulders, and obliques.
How to do them:Stand up tall, pick the medicine ball up, and extend your arms overhead. Engage your core and powerfully throw the ball into the ground right next to your right foot. Catch the ball and toss the ball down right next to your left foot. Keep alternating sides, keeping your core tight the entire time and aiming for speed.
Try these exercises out in your workouts and let us know how you liked them. Happy training!
Master this move to become one tough cookie
Wondering how to do sit-ups can seem slightly silly, especially as the move is pretty much as ‘does-what-it-says-on-the-tin’ as you get. However, there are ways to get this simple move wrong, especially if you’re rushing through without care to positioning or breathing technique.
This step by step guide walks you through the straightforward move that, when done properly, strengthens your core – the muscular foundation that aids almost every other strength and resistance training exercise you can do!
Scroll on for your full how to guide.
The muscles sit-ups works
The sit-up is an abdominals exercise that is designed to strengthen and tone your abdominal muscles. Although its primary function is for your abdominals, it also targets your rectus abdominis, transverse abdominis, and obliques, as well as, your hip flexors, chest, and neck. Plus, they even improve your posture (talking to all you desk folk who spend hours slumped over your computer).
The benefits of sit-ups
Talking of improved posture, a sit-up does much more than just that. The core strengthening exercise has many benefits:
- Improved posture
- Greater core strength
- Improved muscle mass
- Increased athletic performance
- Better balance and stability
- Reduced risk of back pain
- Diaphragm strengthening
Are sit-ups bad for you?
Along with the benefits, it is always important to look at the potential downfalls of an exercise. So, what does that include for the almighty sit-up?
Well, according to Harvard Health Publications, sit-ups can be very hard on the spine and potentially damaging. You know, that feeling when you’re lying on the mat, performing a sit-up and you feel your spine digging into the floor? Yeah that’s what we are talking about.
So, to make sure you’re giving yourself the best chance when it comes to sit-ups – and swerving well clear of said back pain, follow our set by step guide to performing the move correctly.
How to do a sit-up
- Lie down on your back. Bend your legs and place feet firmly on the ground to stabilise your lower body. Cross your hands to opposite shoulders over your chest or place them behind your ears, without pulling on your neck.
- Curl your upper body all the way up toward your knees. Exhale as you lift.
- Slowly, lower yourself down, returning to your starting point. Inhale as you lower.
Do sit-ups help lose belly fat?
It’s impossible to say that one exercise will specifically help with one stubborn area of fat. But, sit-ups do play a role in helping you lose fat in general. Doing sit ups at a moderate intensity for 10 minutes without rest, burns as much as 60 calories.
Number of sit-ups you need to do
This may be different for each person, but according to experts, combining three sets of sit-ups of 25 to 50 repetitions each, is how to build and sculpt your abs.
Like this article? SIGN UP TO OUR NEWSLETTER to receive your weekly dose of features.
ABOUT THE REVIEWER
Aubrey Bailey, PT, DPT, CHT
ABOUT THE AUTHOR
Bojana Galic
The stability ball is a piece of exercise equipment traditionally used for strength, balance and stability training. But you may have also noticed your coworkers replacing their office chairs with this common workout tool.
Although sitting at your desk for long periods of time can wreak havoc on your posture and overall health, you shouldn’t rush to switch to sitting on a stability ball for hours on end either. Before you ditch your desk chair, get familiar with the benefits and drawbacks to sitting on a ball all day — and what you should be doing instead.
Drawbacks of Sitting on a Stability Ball All Day
Sitting for long periods at a time has been linked with some negative long-term health effects, including an increased risk of conditions like diabetes, obesity and cardiovascular disease, according to Harvard Health Publishing.
In the short term, sitting for long periods can also increase muscle tightness, particularly in your hip flexors. This can affect your balance, walking gait and overall posture. But replacing your desk chair with a stability ball isn’t the best solution either, says Samuel Chan, physical therapist at Bespoke Treatments in New York.
Sitting on a stability ball requires active engagement of the core muscles since you don’t have any back support, Chan says. While this position can be good for improving your posture and core stability, as soon as you relax, your posture suffers, which can ultimately lead to aches and pain.
“While you may be mindful enough to keep your core engaged and sit with proper posture on the ball, most individuals inevitably start to slouch over time,” Chan says. “This can potentially lead to neck and low back pain due to poor posture and lack of back support, as well as wrist or shoulder pain due to the lack of arm rests.”
Plus, you’re still in a sitting position, so the risk for issues with hip flexor and hamstring tightness is still there. If mitigating the health risks of sitting all day is your goal, you’ll need to do more than sit on a stability ball for the entire day.
Benefits of Using a Stability Ball
It’s not all bad news, though. Sitting on an exercise ball can improve your stability and balance, as you must constantly engage the core abdominal muscles to stay upright. A stronger core helps protect the lower back and promote better posture.
Sitting on a ball may also increase your daily calorie burn by a small amount, according to the University of New Hampshire.
And when used during a workout, exercise balls can help improve your stability and mobility, according to the American Council on Exercise. These are two fundamentals of fitness, so establishing a strong foundation can improve your movement patterns for future exercises.
What to Do Instead of Sitting on a Stability Ball All Day
If you want to add some core-activating benefits to your work day, Chan suggests sitting on the stability ball in intervals, rather than several hours at a time.
“Start out with shorter intervals than you would expect (something like 5 minutes of sitting to start, with much longer rest periods),” Chan says. “Then, slowly build yourself up as your endurance improves.”
Instead of committing to an eight-hour day of sitting, add some movement into your routine, Chan says. Try setting an alarm or reminder every hour to get up and move, even if it’s just a couple steps to refill your water bottle.
“My favorite cue for posture is a little post-it or sticky note at the corner of your monitor, or just out of your view to the side,” Chan says. “Every time the note catches your eye, you are reminded to re-adjust your posture.”
Or, if you work at home or in a non-traditional office setting, you can also break up your day with exercises to reap the benefits of the ball. Unable to pause midday to exercise? Even just incorporating these exercise into your after-work exercise routine can have long-term benefits to your posture and balance.
Rather than sitting on a ball while you work, try and incorporate 8 to 10 reps and 3 sets of these exercises throughout your day:
1. Stability Ball Prone T
- Lay your belly on top of the stability ball, knees bent and arms resting along the sides of the ball. Your knees and toes should be touching the ground and head should rest in a neutral position, looking toward the ground.
- Squeeze your shoulder blades down and back and lift straight arms into a T position with your thumbs pointing up.
- Once your arms are parallel to the ground, pause for a moment then lower back to the starting position.
2. Stability Ball Prone Y
- Start in the same position as the above exercise with the ball under your belly, knees and toes resting on the ground. Allow your arms to lie at your sides, in line with your shoulders.
- Squeeze your shoulder blades down and back and raise straight arms in front of your body and slightly out, forming a Y position. Again, keep your thumbs pointing out.
- Once your arms are parallel to the ground, pause and lower, returning to the starting position.
3. Stability Ball Dead Bugs
- Begin lying on the ground with your back flat against the floor.
- Raise your arms straight up toward the ceiling and bring your legs up to tabletop position, bending your knees at 90 degrees so that your shins are parallel to the ground.
- Balance the ball between your palms and knees, just above your midsection.
- Extend your right arm straight over your head and simultaneously extend your left leg straight and away from your body.
- Activate your core to keep the ball balanced between your left arm and right leg.
- Return to the starting position and switch sides, extending your left arm and right leg.
As you perform this dead bug variation, keep your core activated and lower back flat against the floor.
4. Stability Ball Mountain Climbers
- Assume a high plank on the stability ball. Place your palms on the ball and extend your legs out behind you, keeping your body in a straight line from head to hips to heels.
- Activate your core to keep your upper body balanced and back flat.
- Bring your right knee up toward your chest, pause and bring it back to the starting position.
- Then, raise your left knee to chest, pause and return to start.
As you become stronger, you can increase the pace of your mountain climbers, alternating legs as quickly as possible while maintaining your balance.
Find the Right Size Stability Ball for You
You want to be sure that you select a stability ball that fits your height. Choosing a ball that’s too big or too small can make the exercises either too difficult or too easy (or in some cases, not possible at all).
Generally, every brand of stability ball will have height and ball size suggestions on their website or directly on the equipment packaging. Or, consider these height/size suggestions from the University of Arkansas.
Get the latest from TODAY
The stability ball is a great tool to incorporate in your exercises, especially when it comes to core work. Adding the stability factor causes your core to contract even more while exercising, making you stronger and your waistline slimmer.
Follow these quick exercises to challenge your core and work on building better stability.
1. Crunches
Start by resting your lower back on the stability ball. Placing your hands behind your head, crunch with your nose pointed toward the ceiling. It’s important to remember to keep your glutes firmly squeezed while performing this exercise. Repeat this motion until your abdominal wall becomes fatigued.
Simple stretches to wake up your body
2. Plank steps
This site is protected by recaptcha Privacy Policy | Terms of Service
This movement is similar to a mountain climber. By placing yourself in a plank position on top of the stability ball, you are forcing your core to stabilize your body weight. One at a time, step one foot up toward the ball keeping your hips parallel with the ground and your core engaged. Be sure not to swivel your hips or shrug your shoulders as you take these steps.
3. V-sit ups
Similar to a regular v-sit up, you are going to start laying on your back with the stability ball in between your feet. As you bring the ball up with your feet, you are going to simultaneously crunch with your hands up to reach for the ball. Transfer the ball from your feet to your hands and lower both at the same time. Repeat this motion by continuously transferring the ball from your feet to your hands.
4. Roll outs
Start off on your knees and place your hands on the ball in front of you. Slowly push the ball away from your body, keeping your knees in the same position. Roll the ball out as far as you can, keeping your core engaged and your chest toward the ground. Then roll it back and repeat. Be careful not to sag your hips during this exercise.
5. Heel touches
This exercise is similar to what is formerly called “suitcases.” Start by placing the ball between your feet. Balance on your tailbone and lean back at a 45-degree angle. As you bend your knees, bring the ball as close to your chest as possible, reaching down to touch your heels with both hands.
Continue this in and out motion and remember to keep your chest up. To get the most out of this workout, repeat at least 20 reps of each exercise. Once all five are complete, repeat the circuit three to four times for a true belly-fat burn.
Chrysten Crockett was chosen as one of TODAY’s Social Stars. Follow her on Instagram or Facebook and check out her website. For daily health and wellness tips, sign up for our One Small Thing newsletter.
Muscles Targeted: Exercise ball abdominal crunches primarily target the rectus abdominis. This muscle group is responsible for flexing the lumbar spine. Also targeted are the transverse abdominis, which are used to compress the rib cage and are important for stabilization of your core. If you twist when performing the crunch then you are also engaging the oblique muscles. These muscles are located on the side of your core.
Exercise Instructions: Using a large exercise ball, lay your back on the ball with your feet placed firmly on the floor. Your lower back should be centered on top of the ball. Place your hands on either side of your head. Crunch your upper body forward and roll your shoulders towards your hips. Be sure to contract your abs at the top of the movement for a one-count. Slowly return to the starting position and repeat. For added muscle building resistance, hold a medicine ball or weight plate in your hands as you perform the exercise.
Why This Exercise is Important: Doing your crunches on an abdominal ball is important for three reasons. First off, it is easy to perform these crunches for people who are out of shape and have a hard time doing a crunch on the ground. Secondly, strengthening your abdominal muscles is critical for balance and posture. Lastly, the ball puts your body in an unstable environment which leads to the strengthening of your stabilizer muscles, which over time improve the coordination of your muscle groups.
Things To Avoid: There are some things that you need to watch out for when you are performing this exercise. Some of these lead to poor performance and results, others put you at risk for injury. Make sure that the ball stays still while you are crunching. You want to put all the emphasis on your muscles contracting. Don’t come all the way up, as this takes off emphasis from the abdominal muscles. Make sure that your legs don’t move either, as this can be a form of cheating just like moving the ball. Don’t put your hands behind your neck as this can lead to neck strain. As always make sure you use proper form in everything you do and if something feels uncomfortable then switch it up and try to find a way to make it work for you.
Reps and Sets: Most fitness experts agree that the abdominals benefit most from higher repetition sets mixed with some lower repetition sets every now and then. Most of the time you will want to stay in the 3-5 set range and the 15-25 rep range for the abdominals. The abs are a muscle used for stability instead of growth and they are constantly contracting which is why they respond best to a higher rep range. Every now and then add in some lower rep work in the 10-15 range to mix things up and keep your muscles confused. Your abs can be trained every other day or you can do them 2-3 times a week to achieve good results. Use this exercise in conjunction with a strength training routine that covers the rest of your body to reap the maximum benefits.
Other Exercises To Use: There are other exercises that can serve as a substitute for exercise ball abdominal crunches. Some of these are a direct substitute and some are a little bit harder. Try them and see how they work for you. You can put your legs on the ball and pull the ball towards you. You can perform the crunches without the ball on the floor. You can raise your legs, either on the floor or suspended from a bar. You can also use a machine with resistance to perform your crunches. View our extensive database of exercise guides for a comprehensive list of all the exercises that target the abs.
Are you tired of holding your breath and pulling your tummy in everytime you try a dress on? Or every time a cute guy passes by (wink)? Then, you’ve got to do sit-ups! Because a flat tummy is always in trend. It also speaks volumes about your health and protects you from various obesity-related diseases. But if you don’t do it correctly, you may injure your spine and neck. So, give this post a read to know how to do sit-ups correctly, and 8 variations to get a toned tummy. Swipe up!
Which Muscles Do Sit-ups Work On?
Sit-ups work the rectus abdominis, obliques, rectus femoris, tensor fascia latae, chest, and neck muscles. These are the muscles that hold your spine and body straight, preventing collapsing or twisting of the spine, and helping in neck and hip movement. Sit-ups are different from crunches in the way they are performed and the muscles they activate. Crunches only work on the ab muscles. But sit-ups work on almost your entire body and are hence quite effective. And knowing the correct technique is the key. So, here’s how to do sit-ups correctly.
How To Do Basic Sit-ups
First and foremost, let me make it easier for you by laying down the three basic guidelines to do sit-ups correctly.
3 Basic Guidelines To Do Sit-ups Correctly
- Never anchor your legs.
- Always maintain a posterior tilt or ensure your lower back is completely on the ground.
- Do not strain your neck by tucking it in.
Now, you are ready to do your first sit-up – slowly and correctly.
Basic Sit-up Steps
- Sit on a mat. Keep your legs hip-width apart, feet flat on the floor, hands placed on the sides of your thighs, and spine straight.
- Roll back down on the mat until your upper back touches the mat, and your knees are pointing toward the ceiling.
- When you lie down, your lower back is curved, which known as anterior tilt. And this is dangerous for your spine while doing sit-ups. Change the anterior tilt to posterior tilt by pushing your pelvic region up so that your lower back is touching the mat completely.
- Engage your core. Keep your neck in line with the spine, look diagonally up at the ceiling, and inhale.
- Exhale and use your core muscles to sit up. As you do so, your hands will slide up from your thighs to your knees. Keep your shoulders relaxed.
- Inhale and slowly roll back down to the starting position. Make sure your lower back is completely flat on the mat.
- Again, exhale and sit up.
Tip: Do it slowly so that you engage your ab muscles and not the hip flexors to push your body up. Always maintain a posterior tilt. Constantly changing from an anterior tilt to a posterior tilt will put a lot of stress on your spine and eventually lead to lower back pain or a slipped disc.
Want to up your sit-up exercise game? Then, check out these 8 effective sit-up variations that will build a strong core and help you say goodbye to tummy flab permanently. Let’s begin!
A decline situp bench positions your upper body at an angle so that it’s lower than your hips and thighs. This positioning causes your body to work harder, since you have to work against gravity and through a wider range of motion.
Decline situps are an effective core exercise to add to your fitness routine. They improve core strength, prevent injury, and help to stabilize your body.
These benefits can have a positive effect on your fitness routine and daily physical activities, making it easier to twist, bend, and extend your body.
Read on to discover how to do decline situps, the specific muscles you’ll strengthen, and alternative abdominal exercises.
You can adjust the angle of the bench to increase or decrease the difficulty of the situp. As the angle of the decline bench increases, so does the difficulty of the exercise.
When doing a decline situp, be sure to tuck your chin into your chest to protect your neck. For comfort, support, and to avoid injury, choose a decline bench with a thick backrest.
Without weights
This video demonstrates the proper form and highlights the targeted muscles:
To do it
- Sit on the bench with bent knees and your feet under the padded bar.
- Cross your arms over your chest, or interlace your fingers around the base of your skull.
- Lift your torso up to bring your chest to your thighs.
- Pause here for a few seconds, then return to the starting position.
- Do 2 to 3 sets of 8 to 18 repetitions.
With weights
For a challenge, hold a weight to increase resistance and engage more muscles. Watch this video for a quick demonstration:
To do it
- Sit on the bench with bent knees and your feet under the padded bar.
- Hold a dumbbell, weight plate, or medicine ball across your chest or above your head.
- Raise your torso up to bring your chest to your thighs.
- Pause here for a few seconds before returning to the starting position.
- Do 2 to 3 sets of 8 to 18 repetitions.
Without a bench
Use a stability ball in place of a decline bench to support the natural curve of your lower back and minimize pressure on your spine.
Take a look at this video to get a feel for the exercise:
To do it
- Position a stability ball against a low wall or step so your feet can rest in a position that’s higher than the floor.
- Cross your arms over your chest, or interlace your fingers at the base of your skull.
- Lift your torso up to bring your chest toward your thighs.
- Hold this position for a few seconds.
- Slowly lower back down to the starting position.
- Do 2 to 3 sets of 8 to 18 repetitions.
Decline situps increase spinal flexion and work the core muscles around the torso, thighs, and pelvis. These include the rectus abdominis, obliques, and rectus femoris.
They also strengthen the back, chest, and hip flexors, which are the inner hip muscles that bring the abdomen toward the thighs as you lift.
The movement allows your hips, low back, and core to work together to improve balance, stability, and posture. All of these benefits help to reduce low back pain, prevent injury, and make all types of movements easier.
Decline situps and decline crunches are both beneficial in building muscle and developing core strength, though they have slightly different benefits.
Decline crunches are beneficial as an isolation exercise if you’re working on building a “six-pack.” One of the main muscles worked during decline crunches is the rectus abdominis, known as the six-pack muscle.
Decline situps work more muscle groups and build overall core stability that helps with many types of movement.
Both types of exercises have the potential to cause pain and injury. You can focus on one exercise if there are specific results you’d like to achieve or if your body responds better to one over the other. Otherwise, adding both to your fitness program will yield the best results.
There are several exercises that work the same muscles as decline situps. You can do these exercises in place of or in addition to the situps.
Plank and side plank
This energizing exercise aligns your body and supports good posture. It works your core, upper body, back, and legs.
To do it
- From tabletop position, lift your hips and heels as you straighten your legs.
- Tuck your chin into your chest to lengthen the back of your neck.
- Press firmly into your hands and engage your entire body.
- Hold for 30 seconds to 1 minute.
To move into a side plank, place your left hand in the center so it’s in line with your left foot.
To do it
- Rotate the right side of your body up toward the ceiling.
- Stack your heels, place your right foot in front of your left, or drop your left knee down for support.
- Place your right hand on your hip, or extend it straight up toward the ceiling with your palm facing away from your body.
- Gaze up toward the ceiling or straight ahead.
- Hold for 30 seconds to 1 minute.
- Then transition back into the plank position before doing the opposite side.
Bridge pose
This classic backbend and inversion targets your abs, back, and glutes. To hold the pose for an extended period, place a block or support under your low back.
To do it
- Lie on your back with your feet flat on the floor and toes pointed toward your hips.
- Press your palms into the floor alongside your body.
- Slowly lift your tailbone up until your hips are as high your knees.
- Tuck your chin into your chest, and keep your neck and spine in one line.
- Hold this position for up to 1 minute.
- Release by rolling your spine back down to the floor, starting with the top vertebra.
- Relax for a few moments.
- Repeat 1 to 2 times.
Decline situps are an effective way to work your core, back, and hip flexors. Since you’ll be working against gravity as you lift, your muscles will have to work harder than during traditional situps.
This movement strengthens your core, which helps you to develop good posture, balance, and stability. You may find that it’s easier and more comfortable to perform all types of activities.
Add these situps to your fitness routine that includes plenty of other strengthening exercises, aerobic activity, and stretching.
Related Articles
Exercise balls, popular polyethylene orbs used in fitness clubs and workout videos, are a valuable tool if you’re seeking a smaller waistline. Exercises that tighten the abdominal muscles are taken up a notch with the ball because it requires your body to balance on the ball. Exercise balls, also referred to as Swiss or stability balls, firm your core muscles: the obliques, transverse abs and rectus abdominis.
Crunches
Step 1
Sit in the center of the ball with fingers interlocked, behind your head, and feet on the floor. Roll your tailbone under and inch your feet forward.
Step 2
Roll down onto the ball as your feet move away from the ball. Keep your legs spread at shoulder-width distance and your toes facing forward. Squeeze your glutes and thrust your pelvis up, keeping your thighs flat and knees bent at a 90-degree angle. End with your torso on the ball.
Step 3
Contract your abs, exhale and lift your chest. Lower your chin slightly to your chest, being careful not to force the head forward with your hands. Use your abs to pull the torso up. Do not let your lower back lift or slide from the ball throughout the exercise.
Step 4
Lower your upper body as you inhale, returning your back to the ball. Control your balance by widening your feet. Do one set of 12 to 15 reps.
Glute Bridges
Step 1
Lie down facing up with your heels resting — slightly apart — on the ball and upper body flat on the floor. Spread your arms out at shoulder level and palms down to brace yourself. Tighten your core and press your lower back down.
Step 2
Contract your abs and raise your hips, exhaling as you do. Lift until your thighs and torso are at a 45-degree angle or are in alignment. Squeezing the glutes can help lift the pelvis and take pressure off the lower back. Keep your torso and thighs aligned and abs tight.
Step 3
Point your toes forward and briefly lift your left leg off the ball. Inhale and lower your leg, slowly dropping your hips toward the floor. Keep your legs straight and heels resting on the ball while lowering your torso. Repeat the exercise alternating legs. Do three sets of 10, resting for 30 seconds in between each set.
Prone Walkout
Step 1
Center the ball beneath your abs and lie atop it, placing your hands and feet on the mat. Stretch your legs back but keep your hands beneath your shoulders.
Step 2
Tighten your core, lift your legs and,using your hands, walk your body forward until the ball is under your knees. Complete a rep by reversing your hand movements until the ball rests beneath your pelvis.
Step 3
Do two sets of 10 reps, resting for 30 seconds between each set.
Medicine Ball / Intermediate
Equipment Needed
- Medicine Ball
My Performance
Sitewide Performance
- All
- Male
- Female
Average Sitewide Medicine Ball Sit-Up Weight
Average Male Medicine Ball Sit-Up Weight
Average Female Medicine Ball Sit-Up Weight
How to do Medicine Ball Sit-Up:
- Step 1: Lie down on your back and place your feet flat on the floor so that your knees are bent at a 90-degree angle.
- Step 2: Hold a medicine ball with both hands against your chest. This is the starting position.
- Step 3: Begin exercise by performing a traditional sit-up.
- Step 4: This is done by contracting your abdominal muscles and raising your torso into a sitting position.
- Step 5: Pause, then slowly lower back down to starting position. Repeat as necessary.
Muscles Worked
Details
medicine ball sit-up is a medicine ball exercise that primarily targets the abs . more
medicine ball sit-up is a medicine ball exercise that primarily targets the abs.
The only medicine ball sit-up equipment that you really need is the following: medicine ball. There are however many different medicine ball sit-up variations that you can try out that may require different types of medicine ball sit-up equipment or may even require no equipment at all.
Learning proper medicine ball sit-up form is easy with the step by step medicine ball sit-up instructions, medicine ball sit-up tips, and the instructional medicine ball sit-up technique video on this page. medicine ball sit-up is a exercise for those with a intermediate level of physical fitness and exercise experience. Watch the medicine ball sit-up video, learn how to do the medicine ball sit-up, and then be sure and browse through the medicine ball sit-up workouts on our workout plans page!
By Brad Gouthro
How To Do PARTNER MEDICINE BALL SIT UPS:
PARTNER MEDICINE BALL SIT UPS: Targeted Muscles:
Partner Medicine Ball Sit Ups are a fun exercise that you can do with your workout buddy to hit your abs hard. The added weight from the medicine ball in addition to the chest press of the medicine ball to your partner adds a whole new stimulus to your abs.
PARTNER MEDICINE BALL SIT UPS:
To perform PARTNER MEDICINE BALL SIT UPS:
1. Sit down on the floor facing your partner with both sets of feet close to each other, feet flat on the floor, and knees bent at a 90 degree angle.
2. One person will hold the medicine ball with both hands and hold it against their chest.
3. At the same time, both people will lie with your back against the floor, then contract your abs to raise your torso, so you end up in a sitting position, then do a chest press pass of the medicine ball to your partner.
4. Under control, reverse the movement, and repeat.Check A Little Bit Of Medicine – Tabata Workout Video
For more total body workouts, check out our A Little Bit Of Medicine – Tabata Workout Video video. Give it a try!
Have You Downloaded our FREE New Ultimate Live Lean Starter Guide Yet?
If not, click here to go download it now. This guide takes away all the confusion with your diet and workouts as it gives you the exact meal plan, video cooking lessons, and grocery lists you need to Live Lean without being a slave in the kitchen. It also includes a FREE 4-week Hot Body Workout program.
This is the type of premium content our inner circle members at TeamLiveLean.com receive every single month.
So many of you have already download the starter guide for free and are loving the results. If you haven’t downloaded it yet, do it here.
Subscribe To My FREE Live Lean TV Health, Fitness, & Nutrition YouTube Channel For More Videos:
If you enjoyed today’s episode, make sure you subscribe to my Live Lean TV YouTube channel as we upload new episodes every Monday and Thursday.
I love you guys and keep Living Lean.
Get Ridiculously Fit Without Living In The Gym Or Slaving In The Kitchen…
JOIN THE TEAM TO GET THESE EXCLUSIVE INNER CIRCLE FEATURES:
CLICK NOW TO GET THE DONE-FOR-YOU PLAN TO LIVE LEAN
Brad Gouthro is the founder of Live Lean TV, a media company focused on helping men and women “Live Lean” 365 days a year. Brad’s programs and content have helped millions of people all over the world learn how to get in shape, and more importantly, sustain it for life.
Learn how to do stability ball center and oblique situps. Presented by Real Jock Gay Fitness Health & Life.
Starting Position
Sit on a stability ball with your feet on the floor in front of you hip-width apart. Lie back on the stability ball so that your body is supported between the top of your buttocks and your shoulder blades, the upper half of your abdominals are resting right at the peak of the ball, and your head is hanging off the other side of the ball. Place your hands behind your head in standard crunch position, with your elbows back and relaxed.Exercise
1. From the starting position, engage your core muscles and crunch your upper body up until your shoulder blades are off stability ball and your upper body just breaks the plane of being flat. Use your hands to gently support your head, but do not pull up with your arms.
2. Reverse the motion and, with your core engaged, lower yourself back to starting position. Do 20 repetitions of the center situps before switching to your obliques.
3. To do oblique situps, begin at the starting position for center situps, then turn your entire body to the right so that your right hip and right side are resting on the stability ball. Again, set up high on the ball so that the center of your obliques are at the peak of the ball, allowing your upper body to lay down across the other side.
4. From the oblique starting position, use your left oblique muscles to crunch your body up until your body comes just past a flat position.
5. At the top of the crunch, reverse the motion and, with your left obliques engaged, lower yourself back to starting position. Do 20 repetitions on your right side before turning over and doing 20 repetitions on your left side.Want to master Microsoft Excel and take your work-from-home job prospects to the next level? Jump-start your career with our Premium A-to-Z Microsoft Excel Training Bundle from the new Gadget Hacks Shop and get lifetime access to more than 40 hours of Basic to Advanced instruction on functions, formula, tools, and more.
ABOUT THE REVIEWER
Aubrey Bailey, PT, DPT, CHT
ABOUT THE AUTHOR
Andrea Boldt
If you get any soreness from sit-ups, it should be in your abs — not your tailbone. But, tailbone shapes and lengths vary, and if yours points in a certain way, it could make the action of lying on your back and crunching up and down from your hips extremely uncomfortable.
You can’t change your anatomy, but you can change the way you do the exercise to keep sit-ups from hurting your tailbone.
Sit-ups Hurt Your Tailbone?
Sometimes, the surface you choose makes a difference in how sit-ups make your tailbone feel. If you do sit-ups on a wood floor, rough carpet or cement, you have no padding protecting a pointy or long coccyx bone.
Always do sit-ups on a gym mat. Keep in mind that not all gym mats are created equal, either. Yoga-style mats can be only 1 to 3 millimeters thick and may not offer enough protection. Look for general fitness mats that are usually 1 to 1.5 centimeters thick, or even a denser Pilates mat that could boast as much as 2-centimeter thickness.
If all you have are thin mats, pile a couple together to create a denser tailbone cushion for sit-ups, or fold a single one in half to double up the thickness.
Sit-ups on a Stability Ball
Sit-ups don’t have to be performed on the floor. Perform them on a stability ball to protect your tailbone and, as a bonus, you’ll also get more activation for your abs.
To use a stability ball:
- Sit on a stability ball. Walk your feet forward until you are leaning on the ball with your low back pressing into it. Cradle your head in your hands.
- Brace your abdominal muscles and curl upward, focusing on squeezing your rib cage to your pelvis.
- Release to place your spine back in contact with the ball to complete one repetition.
Do Crunches Instead
A full sit-up puts more pressure on your tailbone, making you uncomfortable. Sitting up all the way may not be the most effective way to train your abs either — so modify them to both save your tailbone and get a better workout. When you do a sit-up, you’re using significant assistance from your hip flexors rather than just working your abs.
Crunches, however, leave the hip flexors mostly out of the exercise. To do a crunch, lift your head, neck and shoulders off the floor. Your abs work most when you lift up 30 to 45 degrees.
Stand to Work Your Abs
If you just can’t escape tailbone pain or don’t have a tailbone cushion for your sit-ups, consider ditching the floor and flexing your spine from a standing position.
How To Do Butterfly Sit Ups
Butterfly Sit Ups Exercise
Butterfly Sit Ups is a great exercise for developing the abdominals.
It targets the transverse abdominis, rectus abdominis muscles, the serratus and the hip flexors. Sit Ups also engage the lower back muscles.
Butterfly Sit Ups will build core strength, mobility in the hips and flexibility in the abdominals and lower back muscles.
Butterfly Sit Ups Progression & Mobility
- Sit on the floor and assume the butterfly position; legs wide and the sole of one foot in contact with the sole of the other foot.
- Lie back and place your arms behind your head. Keep your arms straight and hands together.
- Contract the hip flexors and pull your upper abdominals toward your ribcage to curl your lower back. Bring your upper body off the floor and extend your arms over and forward.
- Reach forward until you can touch the floor area in front of your feet. Make sure your hips remain in contact with the floor throughout the exercise.
- Return to starting position by extending at the hips, pulling your arms back and lowering your upper body to the floor.
- Repeat the exercise until you have completed the targeted number of reps.
Faults, Form and Technique
One of the most common faults in doing Butterfly Sit Ups is applying the form and technique of the traditional sit up where the legs are closer together.
Given the explosive nature of Butterfly Sit Ups, it will throw you off balance.
Another fault is performing each rep at a very fast pace. Yes, Butterfly Sit Ups is an explosive exercise but you should remain in control of your form.
Performing very fast reps without maintaining good form will keep your hips off the floor.
To do effective sit ups you will first need to put out of your mind everything that you have heard about sit ups, and get with the new program instead. Although in days gone by it was thought that the most effective sit ups were those which you did by lifting your upper body and bringing it in towards your knees, today the outlook is a different one. Instead of lifting and bring in your upper body towards your bent knees, you instead lift only partway off the floor without really trying to come in towards your knees.
To do these very effective sit ups, you will need to get into the normal sit up posture, that is, you will need to lie down on the floor and bend your legs, keeping your feet flat on the floor. Bring in your bent legs as close as possible to your body without straining; place your hands behind your head with your fingers laced together, or keep them lightly on your torso.
To do the sit ups, you will need to use your abdominal muscles to lift your body off the floor about six to eight inches. If this is hard to do, try imagining that there’s an invisible string connecting your belly button with the ceiling, and that every time you lift up, the string is what is lifting you up. You need to keep the string taut and straight, so you cannot bend forward, and you since your belly button is where this invisible string is, you can’t use your neck muscles either to do these sit ups.
After a few reps of these you can begin to appreciate that these are indeed very effective sit ups. If you want more of a challenge however, or you just want to vary your routine somewhat to make the most of your need to do sit ups to get a tight stomach, there are variations on this type of sit up which you can do, and which are just as effective.
And one of the variations of these abdomen-tightening effective sit ups, is to simply include an exercise ball into your routine. Sit on the ball with your feet planted firmly on the ground, your legs about shoulder width apart to help you keep your balance. Maneuver yourself and the ball so that it is now underneath the small of your back, or in other words, you need to be lying on the ball with your torso parallel with the floor, and your legs keeping you balanced.
Place your hands behind the head and using the same muscles as earlier, crunch your ab muscles to pull your entire upper body between six to eight inches above the horizontal. To really feel the burn with these highly effective sit ups, when lowering your upper body back down again into position, go below the horizontal line by a few inches, before raising yourself up once more into the crunch. And Voila! you’re done!
Learn how to do one arm medicine ball push ups. Presented by Real Jock Gay Fitness Health & Life.
Benefits
Push-ups with one hand on a medicine ball work your chest and shoulder muscles especially hard on the lowered side. The effort required to keep you from tilting is a full-body project, engaging your core, legs, chest, shoulders, and back.Starting Position
Take up a plank, or push-up, position on the floor—arms extended with hands directly below your shoulders, and legs, hips, back, shoulders, and head all in a straight line. Take your feet wide for stability. Roll a medicine ball underneath one hand, such that the hand on that side rests on the ball rather than on the floor. In all other ways, however, your plank should be normal—do not tip side to side or droop through your center.Exercise
1. From the starting position, do a push-up with one hand on the ball and the other on the floor. Lower until you can feel tension in both sides of your chest. Do not tilt your shoulders—even though your hands are not level, the rest of your body should be, and your chest should descend parallel to the floor, not at an angle. You must engage your core to keep from drooping through your center. At the bottom of your push-up, the arm over the ball will be sharply bent, with the elbow to the side.
2. From the bottom of your push-up, press back up to the starting position, trying to keep the push even through both sides of your chest and shoulders—do not rely too heavily on the hand on the floor. Hold for one full second at the top of your push-up, so that your rotators have to work to stabilize you over the ball.
3. Repeat for a full set of push-ups on one side before switching the ball to the other hand and repeating another set on the second side.Want to master Microsoft Excel and take your work-from-home job prospects to the next level? Jump-start your career with our Premium A-to-Z Microsoft Excel Training Bundle from the new Gadget Hacks Shop and get lifetime access to more than 40 hours of Basic to Advanced instruction on functions, formula, tools, and more.
By Brad Gouthro
How To Do MEDICINE BALL SIT UPS:
MEDICINE BALL SIT UPS: Targeted Muscles:
Medicine Ball Sit Ups are a weighted exercise where the medicine ball acts as added resistance to target and strengthen the abs.
MEDICINE BALL SIT UPS:
To perform MEDICINE BALL SIT UPS:
1. Sit down on the floor with your feet flat on the floor and your knees bent at a 90 degree angle.
2. Grab a medicine ball with both hands and hold it against your chest.
3. Lie with your back against the floor, then contract your abs to raise your torso so you end up in a sitting position.
4. Under control, reverse the movement, and repeat.
5. If you have problems keeping your feet planted into the floor, you can place your feet under the handles of a pair of dumbbells to keep them in place.Check A Little Bit Of Medicine – Tabata Workout Video
For more total body workouts, check out our A Little Bit Of Medicine – Tabata Workout Video video. Give it a try!
Have You Downloaded our FREE New Ultimate Live Lean Starter Guide Yet?
If not, click here to go download it now. This guide takes away all the confusion with your diet and workouts as it gives you the exact meal plan, video cooking lessons, and grocery lists you need to Live Lean without being a slave in the kitchen. It also includes a FREE 4-week Hot Body Workout program.
This is the type of premium content our inner circle members at TeamLiveLean.com receive every single month.
So many of you have already download the starter guide for free and are loving the results. If you haven’t downloaded it yet, do it here.
Subscribe To My FREE Live Lean TV Health, Fitness, & Nutrition YouTube Channel For More Videos:
If you enjoyed today’s episode, make sure you subscribe to my Live Lean TV YouTube channel as we upload new episodes every Monday and Thursday.
I love you guys and keep Living Lean.
Get Ridiculously Fit Without Living In The Gym Or Slaving In The Kitchen…
JOIN THE TEAM TO GET THESE EXCLUSIVE INNER CIRCLE FEATURES:
CLICK NOW TO GET THE DONE-FOR-YOU PLAN TO LIVE LEAN
Brad Gouthro is the founder of Live Lean TV, a media company focused on helping men and women “Live Lean” 365 days a year. Brad’s programs and content have helped millions of people all over the world learn how to get in shape, and more importantly, sustain it for life.
Why Sit Ups are still recommended as an abdominal exercise
How to do sit ups exercise properly to build toned abdominals. Combine situps with crunches and cardio & get rid of lower belly stomach fat.
Sit ups are a great exercise to target abs. Sit ups have many variations. Lets start with the basic sit ups
ВBasic Sit Ups Exercise Technique
ВStep 1: Lie face-up on an exercise matter or floor with your knees bent and feet on the floor.
You can place your arms on the sides, folded across your chest or raise them to hold them near your ears.
Step 2: Now raise your upper body
and get to a sitting position. Step 3: Lower your torso to the start position.
Lets make Sit Ups better
1. Throughout the exercise maintain a tight abdomen.
2. The move should be smooth and swift. Avoid jerky movements. Do not use movement.
Move in a slow, controlled manner keeping pressure on your abs all along.
3. How to breathe? You should start the exercise by taking a deep breathe, move to the top position and exhale as you reach the top contracted position. Inhale on your way down and repeat.
How Man Sit Ups a Day?
How Many Sit ups You Do Everyday Depends On Your Strength. You can and should do as many as possible just like any other bodyweight exercise to build strength and stamina.
Once you combine situps with clean eating and free weight training, your muscles will begin to show up once your body fat falls.
ВSit ups vs crunches
Crunches are similar to situps except that you do them in short range.
Instead of raising yourself to sit up position, you just move till your shoulders are off the ground. Crunches are mini situps.
They are advised if you have back problem. Situps can be harmful to your back, unlike many claims that they are not harmful to the back. At least they do not protect the back as previously though as they only build front abdominal muscles.
ВHow to add variety to situps exercise
You can add variety by changing the position of your hands –
- you can keep them on your sides
- you can raise them to your ears or
- you can cross them over your chest.
Once situps become easy and you can crank up 40 or 50 try to hold a plate in your crossed arms across the chest.
Or do a decline sit up wherein you get on a sit up bench, support your feet onto the pads and incline your way to situps.
ВHow to Build Six pack abs with Sit Ups
If you want great looking six pack abs, then you need to lower your body fat level.
You do this by sound nutrition as discussed in weight loss diet section, training major muscles with weight training exercises and high intensity cardio training.
If you want to have the best Body Body you want using Bodyweight Exercises then there is no better expert than Eddie Lomax. He describes excellent Bodyweight Exercises and Workouts in his Wonderful new e-book. Click here to find out more Bodyweight Exercises.
Related Articles
In stability ball crunches, you position your back over a stability ball, with your knees bent and feet on the floor. Then, you peel your upper back off the ball, decreasing the distance between your ribs and hips. Once your shoulder blades come off the ball, you slowly roll your spine back to the starting position. This exercise works a variety of muscles throughout the body.
Primary Muscles
Stability ball crunches primarily target the abdominal muscles. They strengthen the rectus abdominis, the long sheets of muscle that lie just under the skin and are responsible for the six-pack look. They also target the transversus abdominis, an abdominal muscle essential to maintaining good posture. Finally, stability ball crunches work the obliques, abdominal muscles that help with twisting and bending movements.
Secondary Muscles
When performing crunches on a stability ball, you use several other muscles to stabilize your body and help the primary muscles perform their actions. These muscles include the erector spinae in the back, the posterior deltoids and rhomboids in the shoulder, and the gluteus minimus, gluteus medius and adductors in the hips and thighs.
Positioning the Ball
According to research published in “Journal of Strength and Conditioning Research,” the placement of the ball can affect stability ball crunches. When the ball is positioned under the lower back, the abdominal muscles work twice as hard as when the ball is positioned at the level of the shoulder blades. Advanced exercisers should position the ball lower on the back, while beginners can position the ball higher up the back.
Differences Between Floor Crunches
Unlike a floor, stability balls are unstable surfaces. Working against this instability requires coordination and balance. In a study published in “Journal of Ergonomics,” researchers investigated the effectiveness of different types of abdominal exercises. They found that when compared with floor crunches, stability ball crunches more effectively recruit the upper and lower fibers of the rectus abdominis as well as the external obliques.
Kat Black is a professional writer currently completing her doctorate in musicology/ She has won several prestigious awards for her research, and has had extensive training in classical music and dance.
In this Article
Being pregnant does not preclude a daily exercise regimen. In fact, various studies have shown that exercising during pregnancy can actually improve both physical and emotional health. If your pregnancy is going as expected and your baby is healthy, there is no need to refrain from some mild workout routine. Exercise can also ease labour pains and delivery due to increased flexibility and muscle strength in your abdomen and pelvic regions. Of these exercises, sit-ups or abdominal crunches are among the most important workouts to strengthen your core muscles. This article will help you understand how to perform sit-ups during pregnancy, its benefits as well as any risk factors.
Can Pregnant Women Do Sit-Ups?
Crunches during the first trimester are very easy and quite safe. In fact, they are recommended in moderate amounts for the first 4 months in your pregnancy. However, it is essential to ensure you perform the exercises with the right precautions. Find a comfortable place to workout, keep an eye out for any physical or mood changes, and stop immediately if you experience any symptoms like pain.
Continuing crunches into your second and third trimesters might produce symptomatic effects like ashen skin, vomiting, fainting, dizziness and so on. This occurs because the increase in the size of the foetus cramps up the internal abdominal space, and might even exert pressure on the vena cava, the large vein which supplies the heart with oxygen-poor blood. As the blood circulation towards the heart slows, you may experience disoriented states. If these occur, lie down on the left side of your body, allowing blood supply to your heart to continue. Alternatively, you can do other yoga exercises for the abdomen.
Should You Check-up with a Doctor Before Starting to Exercise?
It is always a good idea to consult your doctor before doing anything that could put a strain on your pregnancy. If you did regular exercise and your pregnancy has minimal complications, your doctor might permit you to continue. Remember that exercises that strain your body can lead to problems, so stick to light training.
How Can Sit-ups be Done?
Sit-ups, also known as abdominal crunches, require no equipment or gym membership. You can do them in the comfort of your own room.
- Place a mat on the floor and lie on your back flat against it.
- Bend your legs at the knees, keeping your soles firmly against the floor.
- Put your hands behind your head to begin.
- First, breathe out and lift your entire torso towards your knees.
- Breathe in and return back to your starting position. This counts as one rep.
- Perform the exercise in three sets of ten reps each.
- Remember, there is no rest time between each rep, but around two minutes before each set.
- Over time, you can increase the number of sets or reps.
Things to Remember While Doing Sit-ups When Pregnant
Here is a list of things to remember when performing crunches during pregnancy.
- As a rule, drink enough water and have a balanced diet to avoid any physical weakness or muscle cramps.
- Don’t wear any items of clothing that can cut off circulation or breathing.
- Do your workouts indoors and out of the harsh sunlight, if possible.
- Remember that you don’t have to be strict about your workout routine during your pregnancy. It is alright to miss out now and then.
- Keep the exercises light so your body temperature does not get too high, as this could cause complications.
- Don’t exercise if you are ill, tired, or if you experience any unexpected symptoms.
- Workout only when you feel like it; your body is an excellent judge of its own ability, listen to it.
- A twin pregnancy absolutely precludes abdominal crunches, please do not attempt them.
- Avoid doing more than twenty reps in a single set.
Benefits of Doing Sit-ups during the First Trimester of Pregnancy
Crunches make your abs stronger, that is they improve the elasticity and hardness of your rectus abdominis muscles.
- It leads to a stronger core, which improves your overall strength.
- It can lower the risk or intensity of lower back pain, a common pregnancy symptom.
- It improves the support given to the back muscles which endure great strain due to the pressure from your growing uterus.
- It helps with developing and maintaining better balance and posture.
- It is known to ease labour because of the support given to the pelvic muscles.
- It keeps the abdominal region in shape to help you can recover faster after giving birth.
- It makes normal delivery a lot easier.
When to Stop Doing Sit-Ups While Pregnant?
Here are five reasons to stop doing crunches when you are pregnant.
- If you are feeling dizzy or lightheaded.
- If you are experiencing any headaches.
- If you are feeling any strange pain or discomfort in the abdomen.
- If you are finding it difficult to breathe.
- If you are experiencing any bleeding or discharge from the vagina.
Why Should You Avoid Doing Sit-Ups During the Second and Third Trimester?
As mentioned earlier, sit-ups should be avoided during the second and third trimesters. Here are some reasons why:
- The weight of the baby will lower the blood flow towards the foetus, depriving it of nutrients and oxygen.
- There is an increased risk of falling due to a loss of balance when getting into position.
- Crunches during the later months of pregnancy can increase the likelihood of developing a hernia. This is because your abs might get overstretched, that is, they can get thinner.
The standard myth about sit-ups exerting pressure on the baby is false. In fact, it is important to improve core abdominal strength during pregnancy to remain healthy and have a successful delivery. However, crunches are not the only exercises you can do in this regard. Other exercises include planks, exercise ball workouts, breathing exercises and so on. Ensure you add a bit of flavour to your daily routine so you don’t get bored.
Related Articles
Doing your ab exercises on an incline bench makes them more challenging because they force you to lift more of your body weight. Adding a medicine ball into the mix increases the load even further, so only those who have significantly built up their abs should incorporate incline-bench ab exercises into their workouts. Once you’re ready for a new ab challenge, there are specific ab exercises you can do with an incline bench and medicine ball.
Medicine-Ball Sit-Ups
Get into position for the medicine ball sit-up by hooking your feet under the foot brace at the top of the incline bench so that you’re lying on your back with your head positioned below your feet. Hold the medicine ball against your chest with both hands. Raise your torso up from the bench by bending at the waist and come up to a seated position. Control your body back down to the bench until the back of your shoulders make contact with the bench and then go right into the next repetition. These types of sit-ups primarily develop the rectus abdominus, which is the major muscle in your abs, but also recruit your obliques and hip flexors.
Medicine-Ball Twist
The medicine-ball twist exercise places greater emphasis on the obliques — the muscles along the sides of your abs — while also forcing your rectus abdominus to work isometrically. Your abs working isometrically means that they are forced to hold you in a set position. The medicine-ball twist and medicine ball sit-ups share the same starting position. With a medicine ball at your chest, raise your torso up from the bench until you travel halfway up to the top. Hold this angle at your waist as you twist your torso to the left so that your shoulders are facing to the side and then twist back to the right. Continue twisting back and forth until your muscles start to get too tired and then lower your torso back to the bench.
Leg and Hip Raise
The leg and hip raise exercise begins with you flipped around so that you’re on your back but holding the feet hooks at the top of the incline bench with your hands and your legs are positioned below your head. Squeeze a medicine ball between your knees or feet. This is your starting position. Raise your legs by bending your knees and bringing them up to your torso. Keep lifting until you raise your hips up off the bench. Lower your hips back down and then extend your legs to return to starting position. The leg and hip raise is similar to medicine ball sit-ups in that it primarily develops your rectus abdominus, but also requires help from your obliques and hip flexors.
Considerations
During the medicine-ball sit-up exercise, it’s your abs that begin the movement as you curl your spine, but then your hip flexors come in to help you bend your hips so that you can raise up to the sitting position. When your hip flexors contract, they pull on your spine. It is important, therefore, that you engage your abdominals to counteract that stress. Otherwise, your lower back can hyperextend and you can suffer from back pain. This is why it’s important not to add the medicine-ball sit-up exercise into your workout until you have an abdominal-strength base.
Kim Nunley has been screenwriting and working as an online health and fitness writer since 2005. She’s had multiple short screenplays produced and her feature scripts have placed at the Austin Film Festival. Prior to writing full-time, she worked as a strength coach, athletic coach and college instructor. She holds a master’s degree in kinesiology from California State University, Fullerton.
What is a sit up?
See all sit up variations
Introducing sit ups to your workouts is one way to help boost your core strength. It can also help improve your digestion, as the motion strengthens the abdominal muscles that allow the intestines to function correctly. This ab exercise can be performed with using nothing more than your own bodyweight which means you can do it anywhere, whether that in or out the gym.
One of the many reasons sit ups are ever-popular is that they’re easy to modify (e.g. doing them on an incline or while holding weights) so you can continue to challenge yourself as your core strength improves.
To perform the perfect sit up keep your feet, hips and knees aligned with knees bent and feet flat on the floor, and exhale on your way up and inhale as you return to the start position.
To get you started we’ve put together our favourite sit up exercises for you to try.
COMMONLY ASKED QUESTIONS ON SIT UPS
- Do sit ups help you lose belly fat?
Performing sit ups regularly can help to improve core strength but this does not target fat loss to this body part. Fat loss cannot be targeted but it can be achieved through a calorie deficit (ie. expending more energy than you are consuming).
Performing 100 sit ups a day can help to improve your core strength but this won’t guarantee six pack abs if this is your goal.
This will depend on what you are trying to achieve. Is it core strength, core stability, six pack abs?
Common mistakes when performing sit ups is using too much momentum, which means you aren’t isolating the exercise to your abs.
A Full Sit Up is an core body exercise that strengthens both your upper and lower abs. Sit ups have been around for a long time, but in recent years have received somewhat of a bad rap. While planks and other core moves are certainly excellent choices, the traditional Full Sit Up remains a very effective ab strength move. Perhaps one of the reasons the Full Sit Up has gotten negative attention is due to the poor form used by so many people. You’ve seen it before, right? The guy pulling on his head like crazy to sit up? The lady yanking her elbows forward and scrunching her face? All of these things create a sense of momentum and overused upper body muscles instead of initiating the move from the belly as it should be.
If you learn how to do a Full Sit Up you will have a basic ab exercise that helps create a strong core and flatten your abs. The key to getting real results is to use good form. Arms can be behind the head, but keep them relaxed and don’t pull the elbows in. If that proves to be too heavy for you to life up with control, then cross your arms over your chest instead. This will ease up some of the weight you need to lift making the move a little easier. Once you have it down pat, you can even add a dumbbell or medicine ball to the move, holding it at your chest as you sit up.
For more help on performing a proper Sit Up, watch our quick video How To Do A Full Sit Up.
Here are the steps to performing Full Sit Up:
1) Start with knees bent and feet on the mat. Arms are crossed and resting on the chest.
2) Bring chin to chest and flex, the head, neck, and torso off the mat coming to a seated position then return back down with control.
Related Articles
Sit-ups are a challenging exercise to perform. Adding weights to the movement, in addition to your body weight, makes this exercise even more challenging. If you are wondering whether weighted sit-ups are a good workout exercise, even better than bodyweight sit-ups, then the answer is absolutely. But this is only true if you execute the exercise to a tee.
Muscles Used
As you likely know, sit-ups work your abdominal muscles to a large extent. More specifically, they target your rectus abdominis, internal and external obliques and transversus abdominis. What you may not know is that sit-ups work another group of muscles to even larger degree. That muscle group is called your hip flexors, comprising of muscles such as the iliopsoas, sartorius and rectus femoris. This is an oft-neglected muscle group that you should always work out to maintain a healthy and balanced physique. Since you use additional resistance during weighted sit-ups, you provide your hip flexors, along with your abdominals, with a different stimulation. In other words, your muscles are not used to working against such high resistance and will thus need to adapt by becoming stronger.
Execution
So you just learned the importance of doing weighted sit-ups, but what may be more important is preventing injury by executing the exercise correctly. Begin by holding a weight plate or a pair of dumbbells in your hands. Lie face-up on the ground with your knees bent and with the bottom of your feet down on the ground. Straighten your arms and hold the weight over your chest region. Raise your entire back off the ground until your torso is parallel to the ground. Hold the top contraction for a second and then return your back down to the starting position.
To work your abs as much as possible during weighted sit-ups, you must round your back as you raise it off the ground. If you have difficulty with this, then try to beginning each repetition of the sit-up as if you were doing a crunch. So, first raise your upper back off the ground by rounding your back. Then, continue raising your back to complete the sit-up motion. Follow these recommendations and you will take full advantage of the benefits of the weighted sit-up.
How Much Weight to Use
Never use heavy weights when doing sit-ups. You only have a single spine, and you must do your best to preserve its health while exercising. Holding extremely heavy weights over your chest while rounding your back during sit-ups will place a lot of unnecessary stress on your spinal column. Rather, hold a lighter weight, no more than a 45-pound weight plate or a pair of 25-pound dumbbells, while doing sit-ups.
Alternative / Calisthenics / Intermediate
Equipment Needed
- Medicine Ball
My Performance
Sitewide Performance
- All
- Male
- Female
Average Sitewide Medicine Ball Sit-Up Toss Weight
Average Male Medicine Ball Sit-Up Toss Weight
Average Female Medicine Ball Sit-Up Toss Weight
How to do Medicine Ball Sit-Up Toss:
- Step 1: Lay down with your back flat against the floor and your knees bent.
- Step 2: Take the medicine-ball and hold it with both hands over your head so that it touches the floor.
- Step 3: Sit-up using your abs and as you sit-up take the medicine ball over your head and throw it at the wall in front of you.
- Step 4: Catch the ball and return to starting position. This completes one repetition.
Muscles Worked
Details
medicine ball sit-up toss is a alternative and calisthenics exercise that primarily targets the abs . more
medicine ball sit-up toss is a alternative and calisthenics exercise that primarily targets the abs.
The only medicine ball sit-up toss equipment that you really need is the following: medicine ball. There are however many different medicine ball sit-up toss variations that you can try out that may require different types of medicine ball sit-up toss equipment or may even require no equipment at all.
Learning proper medicine ball sit-up toss form is easy with the step by step medicine ball sit-up toss instructions, medicine ball sit-up toss tips, and the instructional medicine ball sit-up toss technique video on this page. medicine ball sit-up toss is a exercise for those with a intermediate level of physical fitness and exercise experience. Watch the medicine ball sit-up toss video, learn how to do the medicine ball sit-up toss, and then be sure and browse through the medicine ball sit-up toss workouts on our workout plans page!


