Did you make the mistake of choosing the wrong drill bit and making your screw hole too large?
If so, don’t worry – there are multiple ways, some easier than others, to fix the mistake and either make your hole smaller or fill the existing one completely to be able to make a new hole of the right size.
In this article, you will learn about eight such methods that work mainly with wood. You will also learn what to do in case your hole is in metal or drywall.
1. Using Matches or Toothpicks
The most common – albeit not professional – way to fill screw holes when you need to make them smaller is by using matches or toothpicks as shims. This method has been used for a long time, but should only be used for holes that won’t hold any great weight. Using this method is really simple.
First, fill the hole with any liquid glue that can be used on wood, such as Elmer’s Wood Glue. Note that the glue is helpful, but not always necessary.
Second, jam in several wood toothpicks or matchsticks until they snugly fill the hole. Allow the glue to set and dry completely, which will ensure the toothpicks are firmly held in place.
Third, snap or cut off the toothpick or matchstick ends so that they are flush with the surface.
Finally, drive your screw into the repaired hole.
2. Using Wooden Dowels
Another way you can make a screw hole that is too large usable again is with wooden dowels. Unlike the previous one, this is the method that is nowadays used in professional settings the most. The process is similar to the previous one.
Milescraft 1309 DowelJigKit
First, drill out the hole with a drill bit that is the exact diameter as or a pinch smaller than the wooden dowel you are planning to use.
Second, dip the dowel into some wood glue and tap it into the hole. Wait for the glue to set.
Third, cut the dowel using a saw in a way for it to be flush with the surface of the wood and drill a small pilot into it before driving the screw. This method results in a strong fixing point that’s almost as good as screwing into the workpiece itself.
3. Using Larger Anchors and Oversize Screws
Perhaps the easiest way – if you have the necessary hardware – to get around the problem of a hole that’s too big for a screw is to just use the existing hole, but use wider anchors and matching screws. Depending on the specific situation, a toggle bolt might be the best choice.
In case the hole needs to be expanded a bit to accommodate the larger screw or anchor, it can be widened slightly using an appropriately sized drill bit. If using a longer screw, make sure it’s not too long or it may pop out of the other side.
4. Using a Rawl Plug
You’ve probably seen a rawl plug – it’s a generally plastic insert that is used to provide grips for screw being driven into concrete walls among other materials. You can also use it if you mistakenly drill too big of a hole into wood or other material.
Simply coat a rawl plug with glue and tap it into the oversized screw hole. After the glue has dried, simply screw the plug into the hole.
5. Use Nylon Cable Ties
If you don’t have a rawl plug handy but happen to have some nylon cable ties, you can use those as well.
To use nylon cable ties to fix an oversized hole, first cut off the length required, then insert it into the hole. More than 1 length of cable ties might be needed, depending on how much support is required.
Once the hole is filled enough (it doesn’t have to be completely filled), you can drive the screw in. You will see the screw cut into the nylon which will provide traction and grip. Don’t use too much nylon to prevent shearing.
Three Alternative Ways to Reduce the Size of a Screw Hole
While you should find a method among the above five that will work for you – both in terms of your use case as well as in terms of materials that you have at home – if you failed to do so for some reason, below are four more alternatives:
- Using steel wool: A method that will only work for light loads. Tightly pack steel wool into the hole using a screwdriver or a similar tool. The compacted steel wool will provide the screw with a tighter grip.
- Using a pinewood shim: For this method, you’ll need some pinewood and a sharp knife to trim it with. Trim the pinewood into a pointed shape, then coat it with wood glue and insert it into the hole. Wait for the glue to dry, then use a chisel or a sharp knife to cut the pine until flush with the wood. Finally, drill a small pilot hole into the fixed spot to guide the screw.
- Using a golf tee: If you have a spare golf tee lying around, it can be useful in fixing a hole that’s too large. First, tap the tee into the hole and mark where it needs to be cut to become flush with the edge, then remove it and cut it to fit. Cover the tee with wood glue, reinsert it into the hole and wait for it to dry. It will then be ready to hold the screw.
How to Make a Screw Hole in Metal Smaller
While some of the ways mentioned above can be used with holes in metal, there’s one more way specific for the material. It’s a cold weld epoxy called JB-Weld.
Last Updated: May 1, 2020 References
This article was co-authored by our trained team of editors and researchers who validated it for accuracy and comprehensiveness. wikiHow’s Content Management Team carefully monitors the work from our editorial staff to ensure that each article is backed by trusted research and meets our high quality standards.
There are 22 references cited in this article, which can be found at the bottom of the page.
This article has been viewed 5,353 times.
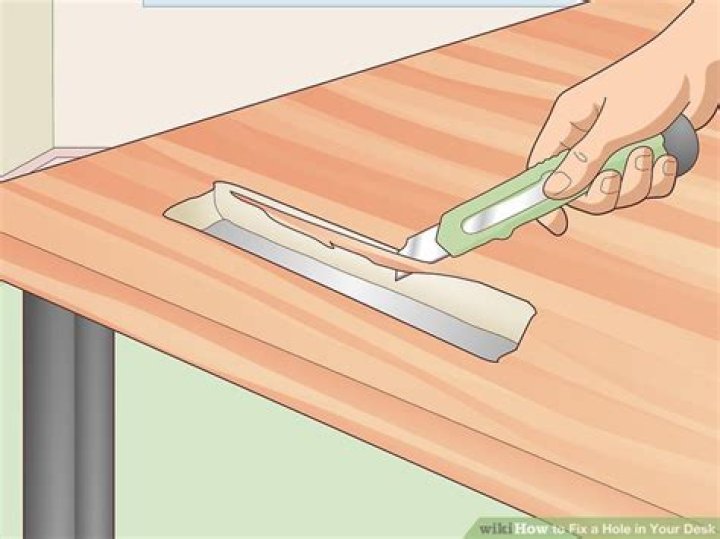
Accidentally drilling or punching a hole through your desk can be a real pain and make it difficult for you to get your work done. While it may seem like you need a new desk, there are many ways that you can patch the hole. You can use wood filler for shallow dents and holes smaller than a coin, but you may need to use a sturdier epoxy for bigger repairs. If your desk is hollow inside, you can also fill in the gap with expanding foam so it’s easier to patch up. When you’re finished, you’ll barely even notice that your desk was damaged!
u00a9 2020 wikiHow, Inc. All rights reserved. wikiHow, Inc. is the copyright holder of this image under U.S. and international copyright laws. This image is not licensed under the Creative Commons license applied to text content and some other images posted to the wikiHow website. This image may not be used by other entities without the express written consent of wikiHow, Inc.
n
Tip:Use wood filler on desks made of solid wood and MDF.
u00a9 2020 wikiHow, Inc. All rights reserved. wikiHow, Inc. is the copyright holder of this image under U.S. and international copyright laws. This image is not licensed under the Creative Commons license applied to text content and some other images posted to the wikiHow website. This image may not be used by other entities without the express written consent of wikiHow, Inc.
n
Warning: Once you mix the wood filler with the hardener, it will begin to set, so work with it as soon as you can so it doesn’t become difficult to apply.
Related Articles
- Installing a Remote Exterior Electrical Outlet
- How to Fix Holes in a Concrete Block Water Retaining Wall
- The Best Way to Dig a Hole in Clay Subsoil
- How to Patch a Basement Floor
- How to Fix a Driveway That Has Puddles
Sinkholes are the result of collapsing underground bedrock, leaving behind a hole. They occur in nature but also can be a result of humans cutting down trees and leaving rotting stumps behind, or because of buried construction debris. Sinkholes come in all sizes, causing safety hazards in your backyard, as people are likely to trip, twist an ankle or, in the case of larger holes, fall in. Because of these dangers, you should repair sinkholes as soon as you notice them. You must also distinguish a do-it-yourself sinkhole repair from a more complex problem, which only a professional can handle.
Inspect the inside of the sinkhole with a flashlight. Do not step directly on the edge of the hole, as the surrounding ground may be unstable. Look for rotting tree stumps or old construction debris. Remove any debris inside the sinkhole, using a shovel and staying a safe distance away from the edge.
Shovel away the outer edges of the sinkhole, opening it up and making the hole larger. This lets you know whether the sod is covering an even larger void beneath the surface. Continue to shovel away the edges of the sinkhole until the ground beneath the sod is solid.
Fill the sinkhole with a few inches of soil. Use an iron bar or the top of a sledgehammer to pack the dirt down firmly into the hole. Continue filling the hole with soil and firmly packing it until you reach the top of the sinkhole. At the surface, use a hand tamper to pack the topsoil in place.
Water the filled-in sinkhole thoroughly. Watering helps the soil to settle and lets you know whether you need more dirt to fill in the hole.
Wait two to three days, and check the filled-in sinkhole. If the soil has settled and a shallower hole is beginning to form, fill the hole in with more soil and pack it down. Repeat this process, as needed, until the soil has completely settled and the hole is filled in.
Introduction: DIY Fill a Hole in Wood
Have a hole in a piece of wood or in a door that needs filling? Here’s the easiest way to fix it!
I am using my front door as an example for this project. I replaced all of the hardware and the locks when we moved in. They were originally brass, but not liking the look, I went with a brushed nickel set. The holes didn’t match up perfectly with the existing ones, so I knew that when I was ready to paint the door, I would have to fill the unused hole.
Step 1: Get some Wood Filler. I used Elmer’s ProBond Wood Filler, and made sure that it could be painted or stained over. Cut off the tip of the applicator, and push some of the putty into the hole.
Step 2: Using a putty knife, smooth it over, but not completely flush to the surface of the door. Since the hole in my door went all the way through to the other side, it was hard to make sure I was keeping as much filler in the hole as possible. Don’t risk using too little, so feel free to over-apply. Let this sit until it is completely dry. If your hole doesn’t go all the way through to the other side of the piece of wood, you don’t have to pack as much on, and you can scrape it off a little so it is more even with the rest of the wood. Leave the filler to sit until it is dry, referring to the instructions on the filler container if you are unsure of how long to wait.
Step 3: Once the filler is completely dry, put a mask on so you don’t breathe in the dust and sand over the filled hole. You should also really use gloves to protect your hands, and so you don’t get splinters. Make sure that when you are sanding down the wood filler, you follow the grain of the wood. Sanding in the opposite direction from the wood grain will leave scratches in the wood, which will be visible, especially after painting or staining.
Step 4: When sanding is complete, use a vacuum to get all of the sanding residue off of the wood. Be more precise than you think, because you don’t want any dust to get into your paint or stain.
Be the First to Share
Did you make this project? Share it with us!
Particleboard is a low-density form of fiberboard that is constructed from scraps of wood, sawdust, and paper products with a binder added. This mixture is then pressed into a form and particleboard is the finished result. Years ago, this material was flimsy and broke easily. However, new manufacturing techniques and added products have made it much stronger, and now it can be used for wall coverings, flooring, or furniture. Despite the particleboard being stronger, it can still chip or break. There is no reason to replace it, as it can be fixed with simple materials and a little time. This article will show you how.
Assess the Damage
The type of damage done to the particleboard will determine the correct route to repairing it. If there is any broken piece still attached due to the veneer, then do not remove it. Leaving the piece hanging will allow you to fit it in place easier than if it is taken apart. If there is a full piece missing, then hold the largest piece up to the spot where it broke off from. Do your best to fit it in place. Gather up any surrounding chunks of particle board as well, but discard anything that is too small.
Affix the Broken Piece
If the piece is still attached to the particle board then dry fit it first to determine how well it will sit. Then, fill the glue injector with the wood glue and apply it where the piece broke off as well as on the piece itself. Wait several minutes for the wood glue to get tacky and press the piece in place. Use tape to secure heavier chunks to the particleboard. This is especially important when trying to fix a desk or other type of furniture but not for fixing floors and walls. Finally, force the pieces together so they get the best fit and so the glue sets quickly.
Secure the Pieces to Dry
Wood glue takes a long time to set. Whatever the label indicates for the drying time, always double it to be safe. You can never control the humidity in the air or moisture in the particle board and this can greatly affect the drying time of the wood glue, so it is best to give the glue ample time. You will also want to wrap the particleboard and the broken piece with plastic wrap. This way, if any excess glue squeezes out of the gaps, it will not stick to anything while it is still wet.
Place the wooden block you have on top of the plastic wrap. Center it over the piece that broke and the main particleboard it broke from, and then clamp them together. This will keep the two pieces together long enough for the wood glue to cure and dry. If you are repairing a floor piece then place a piece of plastic wrap over the floor and brace a heavy block on top of the area instead.
Once your adhesive has sat long enough, unclamp the pieces and test the repair’s strength. If the glue is still wet or the seam still feels weak, reinforce it again and leave it to dry again until you’re satisfied.
Asked by Wiki User
Wiki User
Answered
May 23, 2013 2:15AM
2013-05-23 02:15:16
Related Questions
What is ROBLOX’s password on roblox?
Asked By Wiki User
Does Jerry Seinfeld have Parkinson’s disease?
Asked By Wiki User
If you are 13 years old when were you born?
Asked By Wiki User
What is a hink pink 50 percent giggle?
Asked By Wiki User
What is the hink-pink for blue green moray?
Asked By Wiki User
Who is robloxs 1000000000 user?
Asked By Wiki User
How much does does a 100 dollar roblox gift card get you in robhx?
Asked By Wiki User
Ano ang pinakamaliit na kontinente sa mundo?
Asked By Wiki User
How did chickenpox get its name?
Asked By Wiki User
When did organ music become associated with baseball?
How can you cut an onion without crying?
Why don’t libraries smell like bookstores?
How long will the footprints on the moon last?
Do animals name each other?
Who is the longest reigning WWE Champion of all time?
What was the first TV dinner?
How do you fix a hole in the denture plate?
Asked By Wiki User
Ano ang kasingkahulugan ng marubdob?
Asked By Wiki User
What is the rising action of faith love and dr lazaro?
Asked By Wiki User
Pagkakaiba ng pagsulat ng ulat at sulating pananaliksik?
Asked By Wiki User
Ano ang Imahinasyong guhit na naghahati sa daigdig sa magkaibang araw?
Asked By Wiki User
What was king acrisius personality?
Asked By Wiki User
Ano ang mga kasabihan sa sa aking kababata?
Asked By Wiki User
What is the time signature of the song Atin Cu Pung Singsing?
Asked By Wiki User
Ano ang katangian ng salawikain?
Asked By Wiki User
Copyright © 2020 Multiply Media, LLC. All Rights Reserved. The material on this site can not be reproduced, distributed, transmitted, cached or otherwise used, except with prior written permission of Multiply.
Tip: Fixing a Rolltop Desk Tambour
These instructions will enable you to get your tambour all the way open and unlock the remaining drawers, provided you have the same scenario as I did.
- Remove any drawer, one on both sides. For my drawers there is a small piece of plastic that is shoved through a slot. It is bent over to make it too large to fit through the slot. One is located on each side of the track.
To release it I had to simply unbend the piece of plastic and lift the drawer vertically thus allowing the plastic piece to slide back through the slot.
Once the drawer is removed, take a flashlight and look toward the back of the opening where the drawer had once been housed. Now you can see the locking mechanism behind the drawers.
In my desk, it comprises a vertical wooden shaft with cut-outs to engage the locking hook on the back of each drawer.
Take a long stick or something and put it in the cut-out and lift.
As it is lifted, open the other drawers.
In my particular case, there is a plastic tube that fits in a hole on the underneath side of the desktop. This plastic tube is the mechanism that moves up and down as the tambour is lifted and lowered. This plastic tube is open at one end and has a flat rectangle at the other end. The open end fits in a hole and a flat rectangle is the part that actually moves the pivoting wooden lift.
The rectangle piece got caught on some wood and would not move. This prevented the tambour from completely opening. I simply took a long tool, reached in through opening left by the removed drawer and unjammed it. The tambour was freed up to work properly!
In order to keep the drawers from locking again if the tambour gets jammed, I removed all the drawers and unscrewed the metal hooks. These hooks are actually what is inserted into the wooden shafts cutouts to lock them in place. They are located the back of the drawer and easy to remove with a screwdriver.
Questions
Ask a Question Here are the questions asked by community members. Read on to see the answers provided by the ThriftyFun community or ask a new question.
Question: Repairing a Stiff Roll Top Desk?
How do you make a stiff roll top desk roll up and down easier?
By karen from marion il.
Answers
Just what I was going to say; soap or wax or WD40.
I inherited my Father’s antique rolltop desk and it needed some dust removed from the rolltop to make it open smoothly. I vacuumned the rolltop while closed along every movable part and moved the rolltop up and vacuumed the channels it moved in as much as possible. I also used furniture lemon oil on the channels and rolltop too. It worked for me.
Many of us utilise a wide range of electronic gadgets such as computers, printers, lamps, chargers, home theatre systems, etc. If kept on a desk, these devices can present a messy clutter featuring a tangle of power cords and cables and make the entire area look untidy. Some people try to drill holes on top of their desks for channelling all the wires through it. However, it is important to make use of the right techniques and tools for making a hole in a desk.
Have a look at the steps given below which would help you in drilling a hole on top of your desk the right way:
- The very first thing that you will need to do is hold all the wires and cables in the form of a bundle, put a tape around it and then calculate its diameter. In case you are going to install a desk power grommet, measure its diameter instead.
- Once you are done measuring the diameter, find a core drill bit which is large enough for all the cords. Place the drill bit on that point of the desk where you need the hole to be. Mark around the bit using a pencil. For the grommet, place the product itself on top of the table and trace around it.
- Now connect the bit that you used for marking the hole to the drill. Line up the tip of the equipment with the mark you made using pencil. Press the trigger of the machine and push down slowly.
- Continue drilling until you have broken through right to the bottom of your desk. In case the top of the desk is dense, stop the equipment once have reached a certain depth where top part of the drill bit is in a even position with the desktop. Place a chisel in the hole and chip the wood plug away, and the continue drilling once again. To make a hole for the grommet, drill over the traced location until the cavity has been fully formed.
Having a simple hole would give the wires from devices kept on your desk a professional look, but there are many other advantages of using desk grommets. Besides giving a neat and professional look to your workspace, it would also prevent the wires passing through the hole from getting abraded against the sharp edges.
Repair a cracked window, glass tabletop, or even a mirror with this easy step-by-step guide.
A pebble from the lawnmower tossed against a window. A drink set down too heavily on your glass-topped coffee table. A favorite vase tipped over by your curious cat. These and near-endless other scenarios can lead to a crack in glass. Sadly, glass that has broken into pieces or has cracks larger than an inch, as well as double-paned glass with a hole through both panes, is pretty much beyond repair.
The good news is you can often fix a small crack in glass yourself with little more than a steady hand and a few basic supplies. You’ll need to fix a crack in glass right away, however, as small ones can grow into larger breaks if exposed to moisture, temperature swings, dirt, or rough treatment.
Before you begin, note:
• The following guide on how to repair a crack in glass will do the job for single-pane-glass household items. This includes tabletops, shower doors, vases, and single-pane windows—as well as double-pane windows with a crack in only one of the panes. It’s not intended for repairing a cracked car windshield, which requires a syringe to inject resin into the crack and a plunger to maintain the vacuum between the windshield’s layers of glass.
• While you can fix a cracked mirror with this technique, the reflection is bound to show the repair a bit more than on regular glass. You’ll get best results with a minor crack on the sides of a mirror, out of the direct line of vision.
STEP 1: Clean the glass with dish soap.
Wash the glass around the crack with a drop or two of dishwashing soap on a damp cloth. You’ll want to remove any dust, oil, or fingerprints, and then wipe the spot with a clean damp cloth to remove the soap residue. Let the glass dry completely.
STEP 2: Mix up the two-part epoxy.
In a well-ventilated area, prepare a two-part epoxy on a piece of cardboard or a disposable plate. These adhesives (which can found in many craft stores, home improvement centers, or on Amazon.com) have a separate resin and hardener that are mixed together at the time of use.
Photo: amazon.com via Gorilla Glue
While the mixture is often a 50/50 blend of the resin and the hardener, follow the directions on your specific product. Use a toothpick to mix the epoxy for at least 20 seconds. Once the epoxy is mixed, be ready to use it immediately, as it will quickly thicken and harden. Generally, you’ll have five to ten minutes of working time before the epoxy is too thick to easily seep into the crack.
STEP 3: Apply the epoxy to the crack in the glass using a putty knife.
Press the epoxy over and into the crack with a putty knife. Work the adhesive back and forth across the crack, gently pressing it into the damaged area. Let the epoxy cure for at least five minutes.
STEP 4: Remove excess epoxy with a razor blade and let the rest cure.
Scrape away excess epoxy with a razor blade, and then wipe the area with a clean rag moistened with acetone to further remove epoxy that’s raised above the crack. Let the repaired glass cure for 24 hours.
STEP 5: Spiff up the surface with a glass cleaner.
Polish the glass with a clean rag and glass cleaner, and enjoy your repaired item.
Join the Community
Linoleum tiles and rugs are common in many kitchens and bathrooms. While cost-effective, this type of floor covering is more subject to damage than other options. Fortunately, it is relatively easy to repair linoleum floors, often without leaving signs of any kind of damage.
Flat-head screwdrivers are handy when fixing linoleum.
Before engaging in any linoleum floor repair project, it is important to thoroughly clean the area around the damaged tile or flooring. This will help to prevent any small amounts of grit or dust from mixing in with the repair materials. Taking this precaution helps to minimize any chances of trapping dirt under the repaired area and possibly marring the smooth surface of the linoleum.
Repairing linoleum requires a few simple tools that just about everyone has around the house. For simple jobs, such as taking care of rips or tears caused by moving heavy appliances, you need a flat head screwdriver, a pair of tweezers, and a handheld hair dryer. A tube of household caulk is also required, and you’ll want a bath towel and some sort of flat weight, such as a brick or heavy planter.
A caulk gun, which can be used to fix linoleum.
With thin linoleum flooring, the first step involves heating the area of the rip using the hair dryer. As the material heats up, it will become more pliable. This makes it possible to begin working the two seams of the rip back into close proximity, using the tweezers and both ends of the screwdriver. Don’t rush with this step, as it may be necessary to stop and reheat the area throughout the process.
A utility knife might be needed to repair larger sections of linoleum.
With the edges of the gash now close together, spread caulk over the seam. Work the caulk into the seam, creating a tight bond. As the linoleum cools and the caulk begins to harden, smooth it out using your fingers. Once the caulk is dry, place the towel over the closed seam and secure with the brick, planter, or other heavy object. Over night, the pressure of the weight will combine with the caulking to create a strong seal that will prevent the seam from ripping open again.
This same approach can be used when there is a need to make linoleum repairs involving a larger section. When this is the case, use a utility knife to cut the damaged section out of the main rug. Trim a replacement section to fit into the space, then use the hair dryer, caulk, towel, and weight to close the seams around the replaced section. Assuming the pattern is matched properly, the patch will be barely noticeable or even indistinguishable from the rest of the floor.
Learning how to repair linoleum is a skill that any homeowner should acquire. Being able to handle small repairs can save a great deal of money on replacing tiles and rugs and extend the life of the existing flooring. Best of all, seam repair does not require special equipment, which means that even people who do not consider themselves to be handy with tools can still master the process and fix the linoleum whenever the necessity arises.
Keep an old bath towel handy when repairing linoleum.
After many years in the teleconferencing industry, Michael decided to embrace his passion for trivia, research, and writing by becoming a full-time freelance writer. Since then, he has contributed articles to a variety of print and online publications, including wiseGEEK, and his work has also appeared in poetry collections, devotional anthologies, and several newspapers. Malcolm’s other interests include collecting vinyl records, minor league baseball, and cycling.
Again? Already. If you had told me 10 months ago that I’d be doing deck construction again less than a year later, I would’ve punched you in the face.
Okay, not literally. I’m not the punching type. But I would’ve thrown you a look that said “I would be punching you in the face right now if I were the punching type.”
It’s not that I didn’t enjoy the process of building a deck in the heat of summer… I just wasn’t really looking forward to doing it again so soon. But at least it wasn’t an entire deck this time. It was more of a patch job. Remember this puppy?
That’s the hole leftover from the big tree that we had to remove. The tree guys were nice enough to disassemble the bench that surrounded it (okay, technically they had to demolish it to remove the tree). Only downside is that it left us with this pretty pile of bench scrap.
A pretty pile that was also not very conducive to deck enjoyment. Tetanus, anyone?
Rather than rebuild the bench, we decided it would make the deck more functional to just cover the hole so we could place a table on a centered spot out there (if the hole stayed it would squish the outdoor dining area over in a not-as-centered-and-more-cramped way. My biggest worry was trying to find deck boards that were the same width as the existing who-knows-how-old decking. I even attempted to salvage some full boards from the scrap pile, but I came up three short.
So I headed off to Lowe’s to get my supplies and (with an old scrap piece of board in hand) quickly discovered they were a standard width that I could buy right off the shelf. Score! So into my car I packed:
- Seven 8 foot long deck boards – $42
- One 8 foot long 2 x 8″ board that was cut in half (those pieces would act as my joists) – $9
- Four metal hangers to hold the joists in place – $4.50
- TOTAL: $55.50
First up, I cut my 2 x 8s to the width of the hole and secured them with the hangers, using some decking nails that we had leftover from last summer.
I probably only needed to do one joist (the space was just a little over three feet wide) but the tree guys had cut the stump down at a weird angle so I couldn’t put a joist right across the middle – so this ended up being my weird spacing. As long as it keeps the deck boards from falling, it’s cool by me.
For stability and appearance reasons, I knew I wanted my new boards to extend beyond the hole. That way my patch-job would looked a smidge more natural and the new boards could rest on an existing joist at either end for even more stability. So that decision involved cutting back some of the other planks to lay in my fresh new boards and camouflage the hole.
To do this, I broke out my Dremel Sawmax and cut a deep slice. It wasn’t deep enough to go all the way through, but it was enough to make the board snap right where I wanted it (hence the slightly rough edge you see above).
This process saved me from having to pry up the entire length of each board. Instead, I just had to pry the sections that I wanted to remove.
When it came time to fit the new board, I just laid it across the space and marked it with a pen. No measuring tape needed.
Then using the stairs as a makeshift sawhorse, I cut each board down with my circular saw.
Then it was just a matter of putting my puzzle pieces together as I went.
Well, that and screwing them down. I was thankful that I had kept all of my leftover screws from last summer (maybe the universe knew I’d be doing deck-work sooner than I thought?). It saved me a few bucks and most of all it saved me from doing one of those annoying extra trips to the store because I forgot to grab something.
So here she be. Certainly not the prettiest home improvement “after” but the mismatched boards are at least an improvement over a gaping hole. Oh, and don’t mind that weird long board on the bottom left. One of the old boards cracked while I was prying it up so I had to patch a little more than originally planned.
We’re hoping that once the whole deck gets a good cleaning / stripping / restaining the new boards will blend right in with the old ones. Or maybe I should say that hopefully the old boards will look newer and they’ll all fit right in.
But for now, we’re just enjoying being able to have people over without worrying that someone’s about to fall through the deck. Check out Sherry’s chair bravely sitting right where the old hole used to be (she took this photo, which is why she’s missing).
So next on the deck to-do list is to give the whole thing a deep cleaning/stripping and then stain & seal it to hopefully bring back some like-new glory. And eventually we’d love to open up the back of the deck by adding extra wide stairs that lead down to the backyard. Sort of like this. Maybe from the thick post that’s in front of Sherry’s left elbow to the thick post that’s in front of the pot of herbs in the photo below? But that’ll probably be a “Phase Two” thing for us down the line.
Is anyone else tackling a project they didn’t foresee in their future? Something that was a pleasant (or maybe not so pleasant) surprise? As much as I didn’t enjoy having a deck to-do on my list again, I definitely appreciated the fact that this one only took me one afternoon to complete.


