We have seem some amazing flower girl crowns lately so we decided it was about time we showed you how to make your own! This wedding started it, with these these adorable flower girl crowns and we have been thinking about them ever since. For this tutorial we wanted to keep it basic with a rustic twist but you could add whatever flourishes you wanted to this to fit it in with your wedding theme. To make it more vintage you could ass lace to the bow instead of the burlap rope. To dress them up you could add pearls or rhinestones in with the baby’s breath! Or for a less traditional crown you could opt for something more unusual than baby’s breath like spray roses or simple greenery. This could also be a great idea for the bride! The hard part with making these is resisting the urge to wear them around everywhere you go!
What You’ll Need : Floral Wire / Ribbon / Baby’s Breath / Clippers
First step is to clip a pile of sprigs all about the same length. depending on how full you want the crown you should either clip longer sprigs for a less dense, more wild looking crown. For a low profile, denser crown, clip sprigs about half this length.
Start with one sprig and anchor your wire by securely wrapping it around the stem.
Then, line up the stem of a second and third sprig with the wired stem and gently wrap the stems together. Avoid the sprigs coming off the stem from being wired down to the base so that they can spread of free from the wire.
Try to keep the density of the crown consistent by spacing the sprigs evenly as you add them to the crown. When you use up your wire, start an new piece.
As you near the end of the crown and approach you desired length, allow a few inches of plain stem to stay at one end of the crown.
This way, when you bend the end around to the start, you won’t double up any of the baby’s breath and it will look perfectly continuous like this.
Once you have your wreath securely wired together, you can leave as is or carefully wind ribbon around the wreath. This will pull some of the sprigs in to lower the profile of the crown and make for an appearance that is more dense.
If you are using twine or ribbon, leave extra length to hang behind the crown. Also, if there are any sprigs too long or any bare spots, now is the time to trim or add to the crown where it is needed.
To add to the twine, we tied a white velvet ribbon at the back. We love the combination of velvet and twine together. We also love the idea of leaving the ribbons extra long to flow behind the flower girls like little veils!
Now your crown is finished! The twine will give it a nice rustic style to tie into your venue!
If you have a friend or family member who’s recently had a little boy or girl, or you yourself have had a little one, then you need to get your crochet hook out and makeup one of these super cute baby crowns!
Sharing some of the most adorable crochet crown patterns for newborns, toddlers, kids, and adult. The patterns and tutorials are free to download.
[For More Crochet Projects: Read Here]
Collection of Most Beautiful Crochet Crown Patterns for Babies
Fascinating Crochet Crown DIY
This pretty crown pattern can brighten up the attire instantly with the multi-colored yarns used. The pattern is suitable for intermediate crocheters and beginners, as it requires basic knowledge about crochet techniques including shell, slip, chain and double crochet. Ideal for your little princess for birthdays, holidays and Halloween.
How to Make a Crochet Baby Crown
Your little bundle of happiness deserves the most pretty and comfortable crowns to adorn them. Indulge them with these pretty designs of crochet crowns.
Ensure that you use soft and delicate yarns that don’t cause any irritation to their tender skin. Knitted in elegant designs, they not only make your baby look cute but also keep their tiny heads warm. The linked tutorial has free patterns for newborns (o months) to toddlers.
Crochet Baby Crown
Pretty Crochet Crown Pattern
Just find the size you want to make (child or adult) in this chart and chain the corresponding number of stitches to start in the linked tutorial.
Crocheted crowns look handsome on baby boys too giving them the princely look. You are free to embellish it with button, pearl or colored stones.
Crochet Crown Pattern
Crochet Newborn Baby Crown Pattern
This beautiful pattern is taken from Talesofbutterflies.com. Follow the link for complete step-by-step instructions. Make this royal crown for your little prince/princess. You can add a monogram to give it a special touch.
Crochet Newborn Crown Patterns
Free Crochet Princess Crown Pattern
It’s better to choose some stiff yarn while knitting so that the crown stays prim on the head and the pointed edges don’t fall in.
Crochet Princess Crown
Quick Crochet Crown Instructions
Made from snuggly soft baby yarn, you could make one in any color you like for your little prince or princess. You can add a ribbon to the border to complete the look. The edge of the crown has some beads or jewels added to make it more royal.
Crochet Crown for Baby
Cute Crochet Crown Applique Pattern
Just wondering how cute crochet appliqués look on a dress. They add a royalty feature to a kids’ apparel as well. Try out these rocking patterns and appliqué them with a pin to it on a sweater, blanket or cushion. Make a string of bunting to celebrate or you could even wear it as a pin!
Crochet Crown Applique Pattern
Crochet Crown Tiara Tutorial
Really easy crochet crown, suitable for beginners. Would be a bliss for babies, kids, and even teddies!
Crochet Crown Pattern Free
Basic Crochet Crown Hat Ideas
You can make this pattern like a beanie too. Young girls will look very pretty sporting such unique crown hats and keep them warm.
Crochet Crown Hat Pattern
Gorgeous Crochet Flower Crown for Adults
The colorful floral crocheted design is an apt accessory for your hair and looks so girly and elegant. Women can wear this to their beach parties or other theme parties easily and grab all eyeballs. Slip on this beautiful crochet crown and you are sure to grab eyeballs.
If worn in summer, knit flowers of pink, red, yellow, grey, white, or blue in your crown. For the winter months, enhance the glam quotient with purple, red or fuchsia flowers.
Crochet Floral Crown
Elsa (Frozen) Crochet Crown Pattern
It would be a chic accessory to a child’s dress while making a bold statement.
Elsa Crochet Crown Pattern
Crochet Headband Crown Design
This crocheted headband makes an adorable headgear for boys/girls. You can design it to have pointed ends like a typical crown or make the ends rounded. Add a bow, patch or beads to embellish it further.
Crochet Crown Headband Pattern
DIY Crochet Crown for Toddlers
This crochet crown pattern is such a fun project. The pattern comes in three sizes small, medium and large. You can easily use these as an ear warmer too during those winter days.
King’s Crochet Crown for Infant
Mini Crochet Crown
Statue of Liberty Crochet Crown for Kids
Crochet Crown for Girls
Free Crochet Crown Pattern in PDF
Click on the link above and download free pdf/printable pattern for making beautiful princess crochet crowns in all sizes (in 9 sizes from doll to large adult).
[You May Also Like: How to Crochet Ear Warmers]
Whether you’re planning a glamorous all-white wedding or throwing a rustic, shabby chic reception, there’s one flower that’s fit for every affair: baby’s breath. Baby’s breath bouquets are beautiful, sweet and versatile — and don’t let baby’s breath delicate appearance fool you: it’s a long-lasting and hardy flower that will stay fresh all throughout your wedding day. Regardless of having your celebration indoors or outdoors, you won’t have to worry about these flowers wilting.
Baby’s breath can be used in bouquets, as well as in arrangements throughout your ceremony and reception. It looks gorgeous on its own and also pairs well with hydrangeas , carnations or ranunculus . You can use it to decorate arches, hang it from mason jars on chairs lining the aisle, or even create a stunning flower wall with it.
Since baby’s breath is so hardy, it’s an ideal flower to use when you’re creating DIY bouquets. Here, we’ll teach you how to make a baby’s breath bouquet in 5 simple steps.
1. Gather Your Flowers and Supplies
Here’s what you’ll need:
- 2 bunches of baby’s breath
- Floral tape
- Floral shears
- Ribbon
2. Separate Baby’s Breath and Remove The Lower Stems
Begin by separating the stems of baby’s breath so that the flower is easier to work with. Remove the lower stray floral stems, as well. Removing the bottom stems will allow you to create a circular shape and it will be easier to manage.
3. Arrange the Baby’s Breath
Now comes the fun part: making it look pretty! Start with three stems, and keep adding in additional stems. Work in a circle until you have a size and shape you want. We used two bunches of baby’s breath to create this bouquet, but you can use less or more to create your perfect vision.
4. Wrap It Up with Floral Tape
Use floral tape to wrap up the bouquet. This stretchable tape adheres to itself when you overlap it.
5. Finish It Off with Ribbon and Trim the Ends
Finish the bouquet by wrapping your stems with ribbon and tie in a bow or decorative knot. Make sure to cover the floral tape but leave the ends of the bouquet exposed so you can continue to hydrate the flowers before you walk down the aisle. Cut ribbon to your desired length. Then use floral shears to cut the bottom of the baby’s breath to your desired length, as well.
baby’s breath flower crown
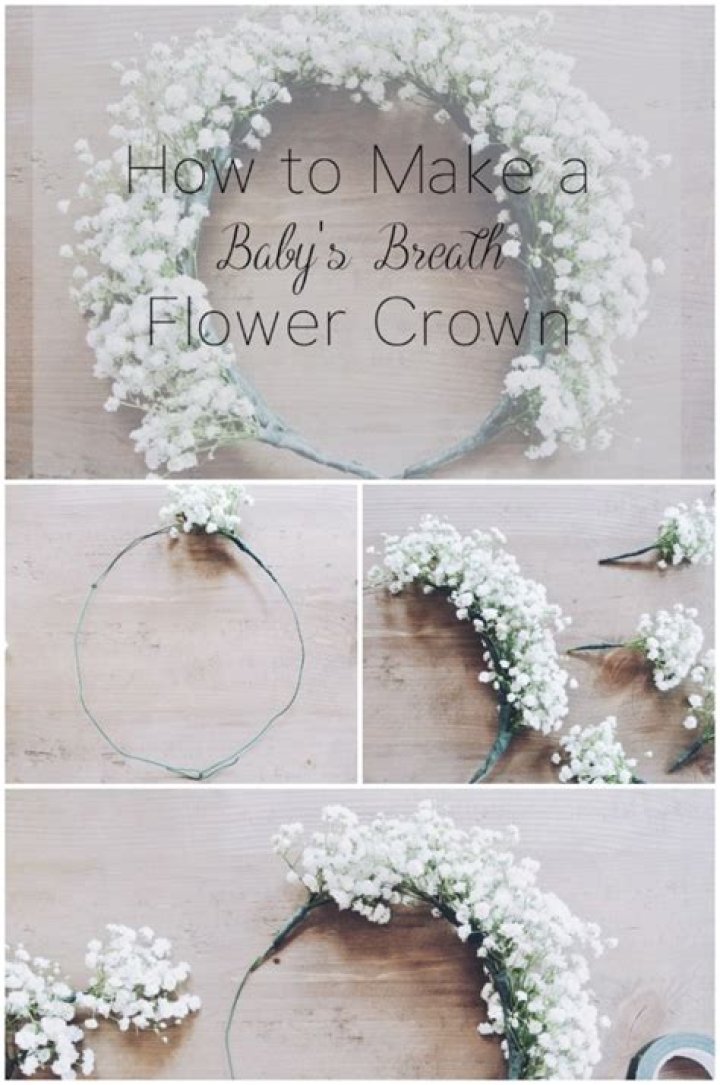
How to Make a Baby’s Breath Flower Crown
Flower crowns are such a pretty way to incorporate flowers into your special event or photoshoot, and by using all the same flowers like baby’s breath, you’ll have a uniform look that is relatively easy to make. If you are using fresh baby’s breath, store the flower crown in your fridge before using it, if possible.
Keep reading to learn how to make a baby’s breath flower crown!
What You’ll Need: Baby’s Breath (About 4-5 stems depending on the size of baby’s breath you use. I used fresh but you could try with faux.), Floral Wire, Floral Tape, Scissors
Start by measuring around your head with floral wire to determine the size for your crown. Cut the wire a little larger than needed in order to fold the ends over to clasp together. Don’t worry if it feels flimsy, the weight of the flowers and tape you attach will make it sturdy!
After you have your wire form done, you’ll need to make some mini bundles with your baby’s breath. Gathering them like this makes the flower crown full since the flowers by themselves are so small by themselves. To make the mini bundles, snip the tops of baby’s breath and gather them together (they are like little boutonnieres), then wrap with floral tape. My flower crown took about 14 of these.
Starting at the top center, securely attach your baby’s breath bundle to the wire form by wrapping with floral tape. Continue down the side, when finished repeat these steps on the other side mirroring what you just did, from top to bottom until finished.
When I made this flower crown I wanted it to be nice and full. If you are looking for a thinner/airier look, simply use less pieces of baby’s breath in your mini bundles and space them out a little bit more.
Looking for more floral DIY’s and ideas? Check these out!
The floral crown trend isn’t going anywhere fast, but a fresh new spin of this trend is quickly gaining steam.
Feast your eyes on the baby’s breath floral crown. This classic flower choice is making a trendy comeback with its fairy tale inspired, woodland look and feel. It’s a hit because it’s easy to arrange, is an affordable flower, and looks effortlessly elegant, rustic, and feminine all at once.
Learn how to easily create your own baby’s breath flower crown with the simple instructions below.
Here’s What You’ll Need:
To begin, gather the following supplies:
- wire
- floral tape
- bunch of baby’s breath
- pliers
- ribbon (elective)
- gold spray paint (elective)
Step 1) Using the wire, carefully measure the circumference of your head. Trim with pliers once measurements have been determined.
PRO TIP: If using thin wire, you may need to wrap wire around 2-3 times ensure a strong base.
Step 2)
Wrap the wire crown base with floral tape for added protection and a polished finish.
PRO TIP: You can wrap the wire base with the floral tape using one continuous loop -OR- work your way around by wrapping the crown with smaller, torn sections. Choose whichever method is easiest for you.
Step 3)
Prepare your baby’s breath by trimming off the buds, but leaving a few inches of stem (the stem is important for step 4).
Step 4 )
Bunch as many buds together as you like (more for a fuller crown, less for a sparser look), lay each bunch horizontally along crown base, and tape the stems as you work your way around the crown.
Step 5)
Continue adding bunches and taping them down until you’ve reached the original starting point. Tie a pretty satin ribbon like this “Happily Ever After…” version to finish the look.
Alternate Option
Another fun option is to spray paint your finished baby’s breath crown for a completely different look and feel. Colors like metallic gold, copper, and silver are some pretty suggestions to play around with.
PRO TIP: If exercising this alternative option, take care to spray evenly and thoroughly to ensure all nooks and crannies of the wreath are evenly coated. Creating a sparser crown will aid in easier spraying.
Sport this updated version of the flower crown for weddings, music festivals, birthdays, whenever! It’s simple to make, easy to wear, and always on-trend.
For even more floral crown tutorials, check out our wedding floral crown tutorial now.
Make a reversible and reusable birthday crown to use year after year for your kids’ birthdays!
A while back I wrote a post about being a Pinterest mom (this was before that was a phrase that people used) and the basic tl;dr summary was that however you choose to celebrate birthdays and holidays is ok.
If you don’t enjoy party planning, that’s totally ok, your kids will have a delightful birthday. And if you find it fun to make hand decorated sugar cookies to go with the birthday theme, that’s ok too. Enjoy it.
Basically, you do you.
But I did have to laugh when I recently put up a picture of Baby V on her birthday wearing a paper crown I had cut out and decorated with sharpie the night before. She was completely happy blowing out her birthday candles, she did not care at all that she was wearing a crown that looked like she might have made it herself.
But I thought it was ironic and kind of funny. I mean, it’s LITERALLY my job. But, you know, life happens. I never have time for anything but paper crowns because my entire family has birthdays all within 3 weeks of each other. It’s a lot.
(Psst! Baby V is definitely not yet 5 or 7 years old. She’s just showing off how you can reuse this cute birthday crown year after year!)
Anyway, even with crappy paper crowns, my kids have come to expect birthday headgear of some sort so I figured it was high time to make a reusable birthday crown so I could stop frantically cutting one out of printer paper the night before.
Same idea as my reusable gift bags, a little bit of time invested once and it’ll save me stress later.
Also, it’s super cute.
And now that I’ve made one, I’m kicking myself for not doing it sooner.
Here’s how I did it.
Make an adorable two-sided reversible birthday crown to use for family birthdays!
It is my final day of sharing my daughter’s adorable 1st birthday outfit with the world 🙂
Over the past two days, I shared how I made her birthday onesie, and her birthday tutu. Now, I get to share the SUPER simple birthday crown!
This little crown was easily my favourite part of her birthday outfit!
How to Make Your Own DIY Birthday Crown
To begin, I used my Cricut Explore to find a flat image of a crown that I liked. I found the one above, and figured that I would need about 8 inches of vinyl to go around my daughter’s head, so I set the piece to 8 inches, and then cut it out on vinyl 🙂 I also cut out a “1” in a font I liked, on the same sheet of vinyl.
Next, I ironed the vinyl crown, and the “1” into the felt, as per the instructions (for more information on how to cut vinyl, read here). Once the shapes were ironed on, I cut them out by hand. I left a purple felt outline around the “1” so that the number would stand out and be readable on the gold crown
I measured the elastic so that it would fit around her head, and attached the two ends. I sewed them together, but you could use the E6000 to attach them as well. Then I got gluing!
I glued the “1” onto the crown and let it set. Then glued the ends of the crown together and let that set. Finally, I glued the elastic onto the bottom of the crown and let that set. TA-DA!
She looked like a little princess on her birthday, and I LOVED every minute of it!
If you missed it, here are some great posts on how to make a 1st birthday onesie, and a 1st birthday tutu.
*This post contains affiliate links. For more information, please read my disclosure policy*
S ure, flower crowns may look lovely, but can they connect you to a higher state of consciousness (minus any mind-altering substances, that is)? Sorry to burst your Bonnaroo bubble, but in my experience the answer’s always been no—which could be why crystal crowns are having a moment.
And it’s about way more than just being supremely photogenic; what makes the super-striking accessory so powerful, says Energy Muse jewelry co-founder Heather Askinosie, is that it rests near your third eye and crown chakra, the energetic centers that are said to govern intuition and enlightenment. (Remember, there’s a growing belief that crystals can shift your entire energetic state.) “This increases your connection to a higher power; to source,” says the holistic healer and co-author of the forthcoming book Crystal Muse: Everyday Rituals to Tune In to the Real You ($20). “These tools have been around for a very long time, and it’s because they’re able to open us up to this unseen world of energy that’s extremely powerful”
While you can score dreamy crowns from designers like Judy&Madeleine, Crowns & Wreaths, and GemsAndBones, going the DIY route is actually easier than you’d think—and no shortage of moments warrant a woo-woo headpiece. “There are so many occasions to wear a crystal crown: a birthday party, a wedding, a new moon circle, while meditating,” says Askinosie. “Really, any instance where you want to feel more tapped in.”
Best of all? You never have to worry about them wilting.
Here’s your step-by-step guide to making your own crystal crown.
Step 1: Choose your stones
The most important part, says Askinosie, is picking the right crystals for your crown. She’s a particularly big fan of selenite, since it’s believed to be aligned with the moon’s energy, but there are lots of others that vibe well with your upper chakras.
“Clear quartz, moonstone, labradorite, lepidolite, aura crystals, fluorite, or amethyst are the most powerful and beneficial,” she says. “Any stones that carry the intention of opening you up to the cosmos and that higher-frequency energy.”
Oh, and you’ll want to get crystal points with holes pre-drilled in them—look for ones designed to be used as necklace pendants. “You can also gather beads and such that you’d like to add,” says Askinosie.
Photo: Instagram/@gemsandbonesjewelry
Step 2: Construct the crown
Next, it’s time to play metaphysical Martha Stewart. Per Askinosie, the simplest way to create a crystal crown at home is to use a metal headband as the base. She recommends using wire—finding a gauge that can fit through the holes of the crystals. String your crystal points and beads onto the wire in the pattern you want for your crown. (You can also wire-wrap crystals without holes—it just takes a little bit more time and patience.)
Then, take that wire and begin wrapping it around your metal headband so that the crystals and beads point upwards on the headband. You may need to get another piece of wire to secure the crystals in place if needed. Feel free to embellish as much or as little as you want.
Photo: Instagram/@crownsandwreaths
Step 3: Charge it up
Each time you wear your crown, Askinosie recommends taking a few steps to prep. “As with any crystal, you want to cleanse the crown—you can use sage or place it out in the sun—give it a job, set your intention, and put your energy into it [by holding it for a bit],” she says.
And you should give it the same love after taking it off at night. “If you’re wearing your crown as a sacred ritual object, wrap it in 100 percent silk so it’s not getting contaminated by other energies,” Askinosie says. “As in anything, the more you hold something in respect and sacredness, the more it’ll hold that space for you.” Consider your DIY project a crowning achievement.
How To Make An Adorable, Personalized Babies 1st Birthday Crown
My sweet baby girl turned one this past weekend and so, of course, I had to make her a crown for her party! This darling crown can be made in any color of felt and the style is gender-neutral. Easily upload my custom designed .SVG file (for sale in our shop for only $1.99!) into Cricut Design space to customize with your little’s name. Assembly is quick and easy so that you can whip this project out and get back to the rest of your major party planning!
Personalization Made Easy
If you’re on the fence about getting a Cricut, or you need a gentle nudge to make the decision to buy one – our projects are it! Seriously, the sky is the limit when it comes to what you can make for your home and your family with the Cricut. From an adorable personalized crown like this to amazing felt flowers and everything in between. It will be your number one crafting tool throughout every season!
SUPPLIES:
- Cricut Maker
- Cricut EasyPress
- Cricut Rotary Wheel
- Cricut Fabric Cutting Mat
- Benzie Wool Felt (9″ x 4″ in three colors; Butter, Blush, Seafoam)
- Iron-on Material (I used silver foil)
- Cut Nylon Headband
- Fabric Glue
- Our exclusive Baby Crown .SVG cut file available in our shop for only $1.99!
Create In Design Space
The first step is to login to Design Space and start designing your baby crown! Upload our exclusive Cricut cut file by using the “upload” button on the left tool bar. Locate the file on your computer and select to add it to your canvas. Ungroup the file to personalize by adding the colors of felt and iron-on you’ll be cutting.
To add the name cut-out: On the smallest grey layer, add text to fit and select both the grey shape layer and the added text. Then hit the “slice” tool and slice the text from the shape. You’ll then need to delete both the text and the cut out text layers creating a see-through effect on your canvas. This will allow the last felt color to show through the iron-on to reveal the babies name!
Let Your Cricut Work It’s Magic
Cut your three felt mats and one iron-on mat. Don’t forget for iron-on designs the backside of the iron-on should be face up and you’ll need to click the “mirror-image” button on the cut screen canvas before cutting, otherwise the name will be backward!
Weed The Designs
Weed, (aka. remove) all the excess iron-on material that isn’t a part of your design, basically just the letters and outer cut portion. Being careful to leave behind any inner letter pieces!
Adhere The Design
One of my favorite aspects of using the EasyPress 2 is that Cricut has already created a spreadsheet of heat times and heat temperatures for all fabrics and types of iron-on. So if you’re using foil iron-on on wool felt like we are here, there is an exact setting for that, which happens to be 280º for 30 seconds, with a cool peel. That’s what I mean by no guesswork. You don’t have to hope that your iron is hot enough or that you’ve held it on the fabric for long enough. Follow this link to find the interactive chart, then simply plug the correct temperature and time per your project into your Easy Press and press away!
Nylon Headband
The best thing to use as a headband in my book is a pair of nylons! For more info you can visit this post. Cut one nylon headband in half to prepare to glue it into the crown.
Glue In Layers
Using your favorite fabric glue (I tried hot glue first and it left the felt bumpy and stiff unfortunately) adhere all three layers together, with the headband inside. Gluing them together slightly cockeyed, like I show them laid out on the Design Space canvas and here on my desk, will allow the layers to wrap together and line up perfectly.
Glue Together
Carefully wrap the felt layers together while the inside glue is still wet, smoothing any interior bumps as you go. Add more glue and secure with binder clips or the like. It only took about 20 minutes to dry and I was able to get rid of the binder clip mark by hitting the crown with a hot blow dryer.
Happy Birthday Baby Girl
She left the crown on just long enough for me to snap a few pictures of her in it and for everyone to sing Happy Birthday, which she was both intrigued and a bit freaked by the attention. She’s now reached the age where all headbands come right off… but it was fun while it lasted!
As with all our DIY tutorials, if you create one of our projects please send us a picture – We Love Seeing Your Creativity! If you use Instagram or Twitter please use the hashtag #SomethingTurquoiseDIY and it will show up on our Get Social page. Happy Crafting!
DIY Tutorial Credits
Photography + DIY Tutorial: Jen Causey of Something Turquoise // Blue Cricut Maker, Iron-on, EasyPress and Supplies: courtesy of Cricut // Benzie Felt in Butter, Blush, and Seafoam: Etsy // Aleene’s Fabric Fusion: Amazon // Nail Polish: OPI – Withstands the Test of Thyme
Shop The Supplies:
Find the supplies you’ll need for this project from our affiliate links below:
I’ve never cared much for baby’s breath when accompanying a bouquet of roses, but I actually have a newfound respect for this particular perennial after I spotted a number of brides using the blossom to accent their wedding hairstyles on Pinterest. When used for beauty’s sake, baby’s breath is quite romantic, elegant, and ethereal. Plus, it makes for one inexpensive bridal accessory that happens to be very versatile, as you’ll see below where I’ve rounded up 10 different—not to mention super beautiful—ways you work the flower into your wedding day mane.
1) Clustered into a colossal wreath.__
2) Abundantly spilling over an oversize side chignon.
3) Woven into a floral crown with pink roses.
4) Tucked into a messy French braid.
5) A sprig slipped into loose beachy waves.
6) In a crescent moon formation outlining an elegant French twist.
7) At the base of a ponytail.
8) Generously placed all over.
9) Lain across the hairline.
10) In place of a barrette.
__So. how much do you love baby’s breath now?! How gorgeous are these looks? Tell me—which one is your favorite?
Knit & Crochet patterns, videos, charts, and ideas.
Pages
- Home
- GIVE-A-WAYS
- CONTACT
Search This Blog and The Web
Crown For Anyone Knitted On Straight Needles – FREE Pattern
When you knit on circular needles you work entire time on the RIGHT SIDE, because you knit around in the circle. When you knit on straight needles you work one row on the RIGHT side and one row on the WRONG side. Therefore, when you work with straight needles, knitting on your wrong side must be handled differently. Yet, it has to match as much as possible the right side. So I sat down and tried to figure it out and below is my closest outcome.
If you want to knit this crown, you need to know how to cast on and bind off. You need to know how to do knit & purl stitches, and you need to know how to do a yarn over and how to slip stitches and pass them over.
If you would rather knit it on circular needles visit my other post HERE, or you can watch my video HERE.
Crocheters can make their crowns too – THIS ONE is a simple crown, and THIS ONE is taller and more elaborate.
Size:
Each repeated section is
2.25″ wide, which can help you decide how many repeats you need to start on. So for example for an American Girl Doll (or Madam Alexander), you need 5 repeats of 18 stitches plus 2 stitches (= one stitch on each end), total 92 sts, which this knitted crown measures 11.25″, and is 3″ tall at the highest point. Therefore, for a newborn you will need 6 repeats of 18 stitches plus 2 stitches (= one stitch on each end), total 110 sts, which would measure
13.5″ (6×2.25″); a child would need about 7 repeats of 18 stitches plus 2 stitches (= one stitch on each end), total 128 sts, which would measure
15.75″ (7×2.25″); and a youth/adult would need at least 8 repeats of 18 stitches plus 2 stitches (= one stitch on each end), total 146 sts, which would measure
Materials (if you shop via affiliated links below you could help fund my future projects, TXS):
1/2 skein of yarn – worsted weight (medium or #4) – You could use THIS COTTON YARN (for the soft, yet firmer look of the crown)
LONG KNITTING NEEDLES size #7 (4.5 mm)
yarn needle or hook for finishing up your project
Abbreviations:
K – knit
P – purl
s2k – slip two stitches knit-wise (one at a time) from your right needle to your left needle
s2p – slip two stitches purl-wise (one at a time) from your right needle to your left needle
p2sso – pass two slipped stitches off your right needle over your knitted stitch (decrease by 2 stitches)
pm – place marker onto your right needle
sm – slip marker from left needle onto your right needle
YO – yarn over
BO – bind off
Step-by-step Instructions:
Work on multiples of 18 sts + 2 sts (one stitch on each end).
Foundation Row – CO your stitches – I cast on 92 sts = 5 repeats total.
Row 1 – K1, *[K8, s2k, K1, p2sso, K7, pm]* – repeat from * to * four more times, K1 (total 5 points)
Row 2 – K1, *[K6, s2p, P1, p2sso, K7, sm]* – repeat from * to * four more times, K1
Row 3 – K1, *[K6, s2k, K1, p2sso, K5, sm]* – repeat from * to * four more times, K1
Row 4 – K1, *[K4, s2p, P1, p2sso, K5, sm]* – repeat from * to * four more times, K1
In the following rows, your number of stitches will be the same
Row 5 – K1, *[K1, YO, K3, s2k, K1, p2sso, K3, YO, sm] – repeat from * to * six more times, K1
Row 6 – P all sts
Row 7 – K1, *[K2, YO, K2, s2k, K1, p2sso, K2, YO, K1, sm] – repeat from * to * six more times, K1
Row 8 – P all sts
Note: for Rows 12 through 18 you can remove all markers.
Sew or crochet the sides together and weave in your ends.


