Why Change Default Audio Track in VLC
If you have 20 video files with 3 different audio tracks you can change default audio track in VLC. Example: you want the second to be default each time you open the file or you will need to switch it manually. There are two possible example cases.
Track naming example 1
The first track is Italian language, the second is English language and the third track is two-voice narrator, while “LP” letters are initials of the main narrator. The default audio track that always will be played is “Italian” (since it is the first one), but you want to watch the video with “English” language track.
Track naming example 2
There are only Track numbers without description, but you know that the first one is Italian, the second one is English and the third is Narrator.
The difference between both examples
The first example has string description of each audio track with the language in the brackets and the second does not. Meaning that VLC will use the default track naming of Track 1, Track 2, etc. for the second case.
Checking Audio Track Naming in VLC
1. Open the video file in VLC.
2. Follow the steps:
Change Default Audio Track in VLC – String Language Track
We will change default audio track in VLC for the first case, when there is a string description for each track including language in brackets. In our case it will be “English”. Take a note of the brackets “[]” – there should be language written, like “[English]”. This is what you will need to write as a string. The words before the brackets are a description of a track and are not needed for the setting.
1. Open VLC
2. Follow the steps:
It does not matter if you write it lower or upper case (english / English) – it will work the same.
Since the second audio track has string description of “Some other studio translation 545 – [English]” of all the 20 video files, it means that each time you play a video like that it will play the audio track with “[English]” in its description. Does not matter which number of a track is it: Could be fourth or seventh. Same will apply if you open any other video file and there will be “[English]” in its audio tracks. For example, the third audio track is: BlaBlaBla – [English]. Will be played as default.
You do not have to write the full “English” string, you can use as little as 2 characters from the beginning of the string, like: en. Writing only “e” will not work. More than 2 characters are also working well: “eng”.
On the other hand, if you want to play the third track that has a string description of “2 voice LP – [Narrator]”, you will need to put the preferred language string of “Narrator” or as little as “na”.
If you have several audio tracks with the same languages, but different voice actors like:
Putting “English” as your preferred language will play the second audio track by default: “Sean – [English]”. If you want to play the third track by default “Alexis – [English]”, you will need to follow the steps in the next section.
Change Default Audio Track in VLC – Track ID Number
If you have Track numbers in VLC instead of language names in brackets or you have several audio tracks of the same language, you will have to change the default audio track ID.
1. Open VLC.
2. Follow the steps:
Description of the “Audio track” setting numbers:
“-1”: VLC default setting – when you open a video file, VLC will play the first audio track.
“0”: VLC will play audio “Track 1” by default.
“1”: VLC will play audio “Track 2” by default.
Etc.
Leave a Comment Cancel Reply
This site uses Akismet to reduce spam. Learn how your comment data is processed.
Lowell is the founder and CEO of How-To Geek. He’s been running the show since creating the site back in 2006. Over the last decade, Lowell has personally written more than 1000 articles which have been viewed by over 250 million people. Prior to starting How-To Geek, Lowell spent 15 years working in IT doing consulting, cybersecurity, database management, and programming work. Read more.
If you’ve used VLC player to play anything that has multiple audio tracks, you’ve probably noticed that it doesn’t stick to the language you want it to—which is especially annoying when watching a series and you have to change language for every episode.
Note: this problem is obviously more present when playing downloaded videos. In this case I own two DVD copies of the video series in the screenshot.
Tweaking VLC to Choose a Language
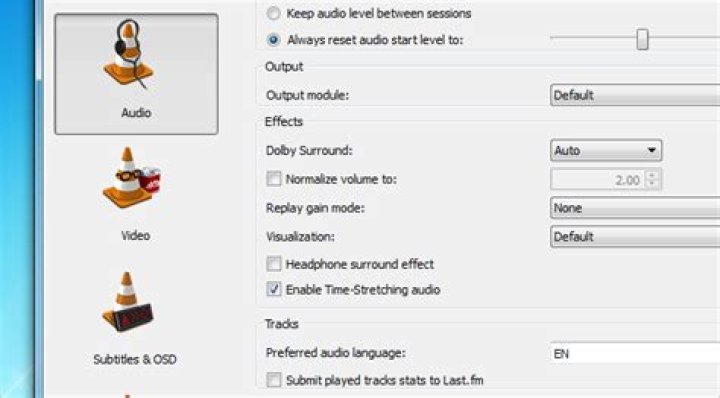
This one is super simple, but not necessarily obvious. Just head into Preferences –> Audio (assuming it’s set to Simple preferences), and then in the “Preferred audio language” box, plug in “EN” without the quotes. As far as we know, you could also use “en”, or “English”, but this is what we tested with. It’s worth noting you could also use this to choose a completely different language as the default—just plug in the two-letter country code.
And thus ended my annoyance with VLC.
On a separate but very related subject, if you want to disable the subtitles completely, here’s how to do that.
VLC Media Player has become quite a popular media player. If no media player will play your file, then VLC will do it seamlessly. The interface is quite simple, appealing and user friendly. However, some things are bound to go wrong and the language preference is usually a culprit.
Users have tried installing and reinstalling VLC Media Player using the English language but when they open the media player, it is in some gibberish they cannot understand. In this article, we will explain why this happens and try to give you options for changing the VLC language to a preferred one.
Why does VLC Media Player have another language even after installing it in English
We first have to understand how VLC installation and language preference works. When installing VLC media player for the first time, it will ask you to choose a language. This language is what the installation procedure will display the process in. if you select English, the installation process will be in English only. This does not affect the interface/menu language that will be used when you open VLC.
There is another language in VLC media player known as the menu language. This is the language displayed when you use VLC. By default, this language is set to ‘Automatic’ such that it will pick the system language (the language you have set on your PC). Some system languages do not change much of the Windows system unless the language definitions have been installed. So what you have is an English interface but your system language has been set to Arabic or Filipino or German.
The VLC Media Player interface will automatically use the system language. If it has been set to Arabic, the interface will be in Arabic.
Another reason might be that the VLC Media Player installation file was customized for a certain language. The interface/menu will therefore display in this language despite your system language.
The methods below will be effective in solving the language preference issue.
Method 1: Change the language from the interface
If you can understand the language used on the VLC Media Player interface, here is a quick guide to change the language.
- Open VLC Media Player
- Go to Tools menu and click on Preferences or Press CTRL + P
- Click on the interface tab/icon on the top left (should be selected by default)
- From the languages option, select the menu/interface language you prefer
- Click save or hit enter
- Close and Restart VLC. The effect should take place.
Method 2: Change the language using shortcuts
If you don’t understand the language being displayed, it might be a little tough. But we have a shortcut guide to help you through.
- Open VLC Media Player
- Hit Ctrl + P to bring up the preferences window
- Click on the left topmost icon (green and orange in colour)
The first dropdown text box that you see is the languages drop down menu.
- Click on the dropdown box and select your preferred language.
- Hit Enter.
- Close and Restart VLC Media Player for effect to take place.
Method 3: Change your system language
Since VLC Media Player Language has been set to ‘Automatic’ by default, it will pick your system language. Change your preferred system language by following these steps:
- Press Windows/Start Key + R
- Type intl.cpl in the run text box and hit enter. The system Region and Language options window comes up.
- In the format/language dropdown box, select your preferred language e.g. English (United Kingdom)
- Restart your PC for effect to take place.
Your VLC should now be able to mimic the system language if the language preference has been set to ‘Automatic’.
How to change language in VLC media player? Here all you need to know to change language and audio setting on your VLC media player software on your device.
VLC media player is amongst the most-trusted media player apps used by numerous people around the globe. The software is known for running videos which other apps cannot run. The VLC media player software comes in 50 languages to choose from. If you are wondering how to change language in VLC media player, here is everything you need to know-
How to change the language in VLC media player?
To change the language on the VLC Media Player interface from English to your preferred language, here is a quick guide on how to change language in VLC-
- Open VLC Media Player
- Go to Tools menu and click on Preferences or Press CTRL + P
- Click on the interface tab/icon on the top left (should be selected by default)
- From the languages option, select the menu/interface language you prefer
- Click save or hit enter
- Close and restart VLC. The effect should take place.
How to change the audio language in VLC media player?
- To change the audio language in VLC, just open the multi-language video in VLC media player.
- Right-click in that video and click “Audio” and choose “Audio Track”.
- Under the Audio Track, you can select any one of the languages like Track 1 – [English], Track 2 – [Hindi], Track 3 – [Tamil], and more.
Use this method to change Language Setting in VLC media player on your device effectively. To change the language back to English, follow the same given steps. If you have mistakenly chosen the wrong language and you are unable to change the VLC Language Setting, try uninstalling and reinstalling the app for it to go back to English as the primary language. Also, if your preferred language is not available on the app currently, wait for VLC to add it in their list of offered languages.
Including sorting, shuffling, and looping for continuous slo-jams
One of my favourite software apps by far is VLC Media Player. I love how it plays anything you throw at it and I particularly like its playlist features too.
If you’re in the flow, work-wise, there’s nothing worse than having to stop all the time to start a new MP3 album or one single new song. It is much nicer to be able to preload several albums into VLC Player all at the same time and let it do its thing.
Today we will look at how to set up and manage those playlists.
Opening Up VLC Player
When you open up VLC Player for the first time, you will see an empty playlist like this.
If you don’t, go to View and either choose Playlist or Docked Playlist. You should now see the playlist view.
As it says in the main window, the first option is to either drag a media file or folder into the window. This will take the media files and load them in sequential order.
Yes I like the Backstreet Boys. Don’t judge me.
Alternatively, you can look at the options on the left to find media to play. Either media on your computer or internet media such as podcasts and radio.
There actually is a third way of loading tracks (but only in Windows). When you install VLC Player, you will get two new options in the right-click menu, as you can see below.
Choose one and the tracks you highlighted will automatically get added to the VLC playlist.
The difference between the two is that “Add to VLC media player’s Playlist” will add the tracks to the end of the playlist and will play when the previous tracks are finished. “Play with VLC media player” on the other hand overwrites the rest of the playlist and plays the highlighted tracks immediately.
Saving Playlists
Sometimes you will want to save playlists if you have a sweet setup going and you don’t want to keep reconstructing the same playlists over and over again.
To save your current playlist, just go to Media–>Save Playlist To File.
By default, VLC Player will try and save playlists as XSPF format. But I would suggest going instead with M3U format instead.
Once you have given a name to your M3U playlist and saved it to your computer, double-click on the playlist and it will automatically load in VLC player and start playing.
But saved playlists also record the location of those media files on your computer, as they are basically text files with the location of each media file. So you can’t move the location of those files on your computer, or expect that saved playlist to work on another computer. Otherwise you will get error messages.
If you MUST move the music to another location, you will need to make a new saved playlist again which points to the new folder.
Shuffling and Looping
Once you have your playlists all set up, there’s nothing to stop you from shaking things up a bit and introducing some randomness into your life.
First, the last three controls at the bottom of the media player are to do with playlists.
From left to right :
- The first is to toggle the playlist on and off.
- The second is to loop the playlist, so when it is finished, it starts again.
- The third is for VLC Player to randomly choose the next song from the playlist.
If you right-click on a song, the context menu will also give you sorting options.
Conclusion
Playlists are actually a rather overlooked feature in many media players. People are content to load one song or one album at a time, when there is absolutely no need to do it piecemeal like that.
Mark O’Neill is a British award-winning fiction author now living in Würzburg, Germany. He is the creator of the acclaimed Department 89 spy thriller series and the Scorpion novels. Read Mark’s Full Bio
Last updated October 29, 2020 By Abhishek Prakash 36 Comments
VLC is my all time favourite video player. I consider it one of the best open source software. Apart from playing almost all kind of media files, it can also do several other things which you will hardly find in other video players for Linux.
For example you can use VLC media player to watch videos from internet with subtitles. You can also synchronize the subtitles manually in VLC.
Talking of VLC and subtitles, I’ll show you how you can make VLC download subtitles automatically and save some effort in going to Google and searching for one.
Use VLsub to download subtitles automatically in VLC
Previously, you had to manually install a plugin. However, now, it’s a matter of a few clicks.
VLC now comes with a plugin called vlsub to enable VLC to download subtitles automatically. The plugin searches for subtitles for the file it is playing on opensubtitles.org based on the name or hash of the file.
I presume that you already have VLC installed.
Step 1:
Open VLC and head over to the “View” option from the menu bar:
Vlc Subtitles Automatic
” data-medium-file=” data-large-file=” width=”800″ height=”545″ src=” alt=”Vlc Subtitles Automatic” data-lazy-srcset=” 800w, 300w, 768w” data-lazy-sizes=”(max-width: 800px) 100vw, 800px” data-lazy-src=” srcset=”data:image/gif;base64,R0lGODlhAQABAIAAAAAAAP///yH5BAEAAAAALAAAAAABAAEAAAIBRAA7″> VLC Subtitles Automatic
Next, hover down the options available and click on “VLsub” as shown in the screenshot above. This will open the VLsub interface where you can add details for searching and downloading subtitles.
” data-medium-file=” data-large-file=” loading=”lazy” width=”541″ height=”422″ src=” alt=”Vlsub Plugin For Downloading Subtitles Automatically” data-lazy-srcset=” 541w, 300w” data-lazy-sizes=”(max-width: 541px) 100vw, 541px” data-lazy-src=” srcset=”data:image/gif;base64,R0lGODlhAQABAIAAAAAAAP///yH5BAEAAAAALAAAAAABAAEAAAIBRAA7″> VLsub Plugin Interface
Step 2:
As you see in the picture above, there are two option of searching the subtitles: Search by name and search by hash.
Search by name searches by the name of the file you are playing while search by hash looks for the subtitles based on the hash of the video and look for the subtitle that matches the hash. The hash search won’t work if you have converted the video file from another format.
When you click on any of the search option, it gives you a list of results. You can download any of them by clicking on the Download selection button.
It’s not that you can search subtitles only in English. You have configuration option here that allows you to search in a language of your choice. No guarantees that you’ll find the subtitles in your language if there are none on opensubtitles.org.
Just click on the Subtitle language and you can choose the language of your choice from the drop down menu (see the previous picture). Alternatively, you can go to configuration option and set your preferences there.
Good thing about VLC is that you can easily synchronise subtitles if they are out of sync a little.
You can download the vlsub plugin from the Github. Its in a zip folder. Extract it and you will find the “vlsub.lua” file in it. All you need is this one file.
You need to add this file to VLC extension. For that you need to create the extension directory first. Use the following command to create the desired directory for vlsub.
Now move or copy the vlsub.lua file in the above mentioned directory. In case you are absolute beginner, try the following command to go to the downloaded directory:
And then copy the file to the extension directory:
Over all this plugin is handy in use. You don’t need to go on web looking for a subtitle, download it, extract it and then add it to VLC. It saves some time for sure.
Drawbacks include lack of subtitles sources. It has just one subtitle source: opensubtitle. This limits the search. Apart from that, plugin is good to use. What say?
Since we are discussing subtitles, you may want to check out Penguin subtitle player. It allows you to watch online videos with subtitles.
How do you use subtitles in media player (if you use it at all)? Do you have a better trick to share? Do let me know in the comment. Ciao 🙂
Like what you read? Please share it with others.
A lot of desktop and laptop users have now upgraded to Windows 10 for free. Almost all apps and software installed in the computer before the upgrade are there. VLC works perfectly with Windows 10. But the thing is, the upgrade changes the default media players from VLC to some other Windows app. All the music files are handled by Groove Music and the default video player is the Movies & TV app.
A lot of us want to switch back to VLC to make it the default media player. It is really good especially for videos. If you want to do it then we can simply set it as the default video and music player app. The option available in the main Settings > System > Default apps gives us the ability to change it back. You do not have to do it on an extension by extension basis while the option is still there. We can make it work for all video and audio files at once. Windows will set back the association to VLC for recognized video and audio files.
Here are the detailed steps to make VLC the default media (video as well as audio) player:
- Click on the Windows Start button, search for and go to Settings.
- Click on Apps.
- Access the Default apps.
- Under Choose Default apps, for the Video player click on Movies & TV and switch to VLC Media Player.
- If you want to do it for music files as well, do the same thing for the choice present as Music player.
The options are saved immediately after the settings are changed. The next time you open video files, VLC will be the program to open it. You will also see the famous traffic cone icon in the thumbnails of the media files.
Choosing Default Apps by File Type
If you want to assign some video file types like .mp4 to open with VLC and other file types to open with the default media player then we use the option Choose default apps by file type. It is available in the same location Settings > System > Default apps, near the bottom of the page.
Once you click on it, different recognized extensions will be listed. Scroll through the list and once you find the desired extension like .3gp or .mp4 click on the default app. Choose VLC media player from the options listed. The changes will be saved immediately.
Changing the Default App while Opening a File
There is one more option that helps you to change the default app to VLC without visiting the settings section. The option is right there when you open a media file.
- Right-click on a media file and select Open with > Choose another app.
- From the list, choose VLC Media Player.
- Check the box that says Always use this app to open .mp4 files.
The media file will open and from now on that extension or file type will be associated with VLC media player. In this example, we chose an MP4 file but it can be done for any type of media file.
How can I make VLC auto-select subtitles in an MKV when it opens?
I would like to select the ‘English Subtitles – [English]’ from this image:
on auto-load (the reason for this is so I queue a list of media for a TV series to watch on a treadmill uninterrupted)
I was told to fiddle with these settings:
but have tried every combination from 0-3 without any luck.
Is this possible in VLC?
5 Answers 5
For me, it worked with the following settings:
Subtitle track = 1
Subtitle Language = English
Hope you’ll find this useful. (If it doesn’t work, click on Tools, Media Information, Codec and look which stream type is Subtitle. That is your subtitle track ID! )
The number you are inputting in Subtitle Track ID within the mkv container. Usually Track ID 0 will be the video stream and ID 1 will be the audio stream. Thus, starting from 2, you might have the embedded subtitle streams. If you have multiple audio tracks, however, those will be pushed back even further. Specifying the number directly like this is thus rarely a good way to do it, as it can vary from file to file unless you specifically encoded them all to be uniform.
I was unable to find out what exactly the “Subtitle track” setting does, but I would advise to leave it at -1, the default and revert the “Subtitle track ID” setting to -1 again as well.
If you want to automatically select English subtitles, then put “English” (not “en”) in the “Subtitle language” field and it should automatically select the English language subtitles from your file if it is available. This likely does not work if the language is not properly tagged in the file, and I don’t think it is possible to select the second English subtitles as you specified automatically.
To use English subtitles by default, try setting your “Subtitle track” to 1 and your “Subtitle track ID” to -1.
I got mine working in the same situation.
AUDIO With the audio on my particular files, “disabled” = 0, first track = 1, second track = 2, so with Japanese as my second language option, for example, in the advanced Inputs/Codecs options I put:
Audio track ID: 2
As an alternative, I could just type in the name of preferred language, which works fine for audio.
SUBTITLES These are different for some reason; I guess it’s as the user above said, and subtitle track IDs begin after the audio track IDs end. My particular subtitle options were “disabled”, “(signs/songs) English” and “English subtitles”. For English subs, this is what worked for me:
Subtitle track ID: 4
So just keep going up by one until you hit the right one. You can test your progress by checking which sub track you’ve landed on each time you raise the number using the manual selection feature: Right click video -> Subtitle -> Sub track -> (check which subtitle option is selected)
That will show you where your automatic selection is landing you in the subtitle list, so you can find the ID you’re looking for by trial and error. If your subs are still showing as “Disabled” keep going (unless you’ve shot too far). If you’ve reached “(signs/songs) English” then you’re on the right track and probably only need to raise by 1 more track ID.
For the record, I left both Audio track and Subtitle track unchanged, with values of -1.
VLC Media Player is one of the best ways to watch videos and listen to music. Not only can it play almost any media formats, from .MP4 to .FLV files, it can also play video and audio CDs and DVDs. VLC even lets you stream online videos. If you don’t want your videos opening in Windows Media Player or QuickTime anymore, here’s how to make VLC your default media player.
If you do not already have VLC on your computer, you can download it for free here.
How to Make VLC the Default Player on a Mac
You can set VLC as your default player while you’re opening a video or song. Here’s how to do it:
- Right-click on the video or audio file you want to open. Right-clicking or control-clicking can be done by tapping the trackpad with two fingers on a laptop.
- Then select Get Info.
- Next, clickOpen with. A bar will appear showing the current default player and other available video players you have installed.
- Change the app to VLC.
- Finally, click Change All…A prompt will appear. Select Continue.
Note: This only sets VLC as the default player for the file format of the specific video or song you chose to open. If the video format is .mp4, other video files such as .mkv and .avi might still open with other players. You can repeat the steps above for other video and audio formats.
How to Make VLC the Default Player in Windows 10
There is more than one way to open your videos automatically on VLC. First, you can do it by going to Settings > Apps > Default Apps. Then click the entry under Video Player and choose VLC. Or, you can also right-click the media file and select Other apps. Then choose VLC and tick the box next to “Always use this app…”
- Click the Start button. The Start button is the Windows logo in the bottom-left corner of your screen.
- Then click Settings. If you can’t find it, type “Settings” in the search bar and then click the result.
- Next, click Apps.
- Then click Default apps. You can find this in the left sidebar.
- Next, click the button under Video player. This might be labeled Movies & TV, or whatever your current default video player is.
- Select VLC from the list. You can also change your default audio player to VLC under Music player. The changes will be saved automatically .
Another way to do this is when opening a video or audio file.
- Right-click on the file you want to open. If you are using a laptop, and right-click is not an option, tap the touchpad with two fingers or hold the Ctrl button while clicking.
- In the drop-down menu, hover your pointer over Open with, and select Choose another app. A list of apps will then appear.
- Choose VLC and tick the “Always use this app to open” box.
Note: This will only set VLC as the default player for the file format of the specific video or song you chose to open. If the video format is .mp4, other video files, such as .mkv and .avi files, will still open with other players. You can repeat the steps above for other video and audio formats.
If you like VLC, be sure to check out our list of the best Windows apps here.
Christine Smith
How can I solve audio delays when watching a movie on my computer?
Try this best video audio sync fixer for Windows/Mac to fix audio out of sync with video permanently.
Why the audio slowly starts going out of sync when watching a movie using VLC media player? You may not only encounter once that video lagging behind audio when watching a movie using VLC or other media player, and may also have a tough time when the audio out of sync in your converted video from VLC.
This article is aimed to fix the issues of VLC audio delay and how to sync audio and video with VLC for Windows/Mac/Android/iPhone and also the best alternative to VLC sync audio and video permanently.
In this article
For Win 7 or later (64-bit)
For macOS 10.11 or later
Part 1. How Fix Audio and Video Synchronization Issues in VLC on Windows
Very much like matching up captions, the VLC media player is likewise extraordinary for fixing sound that isn’t synchronized. At times, while playing video records, you hear the sound before the actual time, or you hear verbally expressed words solely after the lips move. At times, the sound and video are synced naturally after a couple of seconds. But, there are also times when it never sorts out independently. Sounds are by and large off by a couple of milliseconds. However, on occasion, they are even off by a couple of moments or somewhere in the vicinity.
This implies that the sound isn’t in a state of harmony, and you should fix the sound immediately. It eliminates the fun of watching a film, assuming it happens ceaselessly.
If an audio delay in VLC occurs, the following steps can be used to solve the issue.
1. How to fix VLC audio delay when playing
1) Fix Audio Video Delay in VLC by setting Track Synchronization Value
Step 1: Go to Tools > Effect and Filters [CTRL + E]
Step 2: Click on the Synchronization tab
Step 3: Under Audio/Video, enter a numerical value
Step 4: Press Close once done
2) Using Keyboard shortcut keys to Fix Audio Video Delay in VLC
For VLC to adjust audio sync, ensure that your video is playing and the sound adjusting is mistaken.
If your sound needs to be dialed back, hit the ‘K’ hotkey from your keyboard. Hit the ‘J’ hotkey on your console for something contrary to this. For Mac, the easy route keys are ‘G,’ and ‘F.’ Affirmation is shown on the upper right space of the player’s screen. But be quick because It disappears rapidly.
Pressing the hotkeys once will accelerate or dial back the sound by 50 milliseconds. Assuming that you keep pressing it, the number of milliseconds will persistently increase.
Accelerate or dial back the proper timing of the video until you arrive at the ideal state. Ensure that the video is playing and pay attention to the sound cautiously to match it with the video.
2. How to fix audio video sync permanently in VLC on Windows
If you want to fix the issue of audio out of sync in VLC permanently rather temporarily ajust to sync when playing, please follow the below steps.
Step 1: Go to VLC Player > Menu > Tools > Preferences > Advanced Preference.
Step 2: Click the Audio tab from the left list, make sure you have choose the All in the Show settings at the bottom-left corner.
Step 3: Check the settings of Audio desynchronization compensation, you can put a value in seconds to sync audio. If your audio lages, please fill a positive value here. Otherwise, a negative value.
Step 4: Click Save and get your audio-synced video.
Part 2. How to Fix Audio Delay in VLC on Mac
VLC has a sync choice for sound. It’s effectively open and works well, assuming the sound is excessively far ahead or lingering behind. It possibly works if the sound has a similar length as the video. You’ll need to alter it in different cases and change the track length.
Follow the below steps to sync audio in VLC player on Mac:
- Open a video in VLC.
- Click Window then – Track Synchronization.
- Set “Audio track synchronization.”
Also, remember that you can also set it to negative values. It is also helpful if the audio is ahead of the video.
Part 3. How to Adjust Audio Delay in VLC Android
In VLC for Android, if you observe that a specific film or video’s sound is out of sync, you can fix it utilizing the sound defer highlight. You can determine the amount to postpone the sound in milliseconds. If a sound is delayed by 1000 milliseconds, it will play the sound 1 second after the video. If a sound is deferred by – 1000 milliseconds, it will push ahead by 1 second in the video. The choice is accessible on the screen when you tap the three specks from the control’s menu. It is the seventh symbol in the on-screen options.
The thorough guideline to fix VLC android audio delay is given below:
- Open a video in VLC Media Player on the android device.
- If the on-screen control isn’t showing, then click on the screen.
- Click the second button in the interface
- Click the option that says Audio Delay
- Click on the plus ‘+’ or minus ‘-‘ button
When you press the Audio Delay highlight, you can hit the ‘+’ or ‘- ‘ button situated on the screen. Hitting in addition to once will defer the music by 50 ms. you may need to tap the button two or multiple times or keep pressing it to ensure that the sound is in a state of harmony or sync. Pushing on the minus sign will have the opposite impact. The decrease button will accelerate the sound by making it ahead and playing before the video.
Part 4. Best VLC Alternative to Sync Audio and Video Permanently
Compare to the disturbing steps using VLC, you can simply drag to sync audio and video permanently using Wondershare UniConverter, which offers powerful functions in video conversion, video editing, video compression, etc.
Updated on May 24, 2021
I like watching movies and TV series from various regions all over the world. However, I always have to spend a lot of time searching for and downloading the suitable subtitles for watching foreign movies. One day, I found that adding a plugin – VLSub extension to VLC can easily fix subtitle download problems. I want to share this method with all of you that VLC subtitles download is easily available to everyone. The below software is also recommended to add subtitles easily.
However, to watch overseas movies, one always needs to add appropriate subtitles for better understanding and watching. Yet looking for and downloading subtitles is a time-consuming and energy-consuming work. Firstly, you have to search online to find the appropriate subtitles. Secondly, you need to download the subtitles to your hard drive. Thirdly, add the subtitles to your movie.
If you are a loyal user of VLC media player, you may neglect a fact that VLC enables you to download subtitles automatically from opensubtitles.org with the help of a VLC extension – VLSub. Amazing! Keep reading, this article will show you this unbelievable magic trick – how to download subtitles in VLC media player automatically!
Add Subtitles Without Any Hassle
Add subtitles(SRT/ASS) to MP4/AVI/MOV…
Embed subtitle in video in one step
Remove subtitles from video/DVD
Download videos from YouTube, Facebook, etc.
Haven’t downloaded and installed VLC yet? Download the newest version through visiting for making preparation for VLC subtitles download.
How to Download Subtitles in VLC Media Player Automatically
Step1: VLSub Extension Download
Download VLSub (a VLC subtitle downloader) from , click the “Files” option, then right-click vlsub.lua, choose “Save link as” for VLSub download.
Notes: Want a simpler way for VLSub downloading? . Copy and Paste the URL to your browser to download VLSub directly.
Step2: Move the Downloaded vlsub.lua File to the Target Folder
Open the download folder, you can see the downloaded vlsub.lua file right there. Move the downloaded vlsub.lua file to the “extensions” folder under the root directory of VLC. The extension folder for different operating systems are as follows:
Mac OS X: /Applications/
Step3: Run VLC Subtitle Downloader
Launch VLC media player, import your favorite movie or TV episode by clicking “Media” > “Open file” as well as pressing shortcut key “Ctrl + O”, or directly drag the file to VLC media player. Then, click “VLsub” under the drop-down list of “View”.
Step4: Search the Matched Subtitle
After clicking “VLsub”, VLC will pop up a dialogue box. Choose the target subtitles language, input the specific information of movie/TV series title, season, episode(series) on the dialog box. Click the “Search by hash” or “Search by name” option to search and fetch all the related subtitles from OpenSubtitles.org for VLC media player subtitles download.
Step5: VLC Subtitle File Download
Select the suitable and matched subtitles file, click the “Download Section” button for VLC subtitles download.
Step6: Watch Movies/TV Episode with the Downloaded Subtitles
The subtitle file will be downloaded to the default location of the video and added to your currently playing video automatically! Amazing, right?
As you can see, VLC Media Player is not only a basic media player, but also supports downloading subtitles for VLC, convert video formats and helps download YouTube videos, etc. However, you may meet VLC lagging problems occasionally which may affect the viewing experience. In case of of such situations, here recommends a freeware which allows you to simply and permanently embed subtitles to video.
Easily Add Subtitles to Video & DVD
HD Video Converter Factory Pro
Apart from adding subtitles to video easily and efficiently, HD Video Converter Factory Pro enables you to batch convert videos and movies to 500+ formats and devices, compress video size, edit and trim videos, etc.
WonderFox DVD Ripper Pro
Want to find an efficient tool to rip video from DVD discs to digital? Here is one. WonderFox DVD Ripper Pro enables you to quickly rip DVDs, ISO image to MP4, AVI, iTunes, etc. with GPU acceleration.
This guide will give you the detailed tips to sync subtitles with video in VLC and also share you the best VLC alternative to solve the subtitle sync issue, considering VLC delays or speeds up subtitles temporarily.
When I play a movie with subtitles on VLC, the text is often displayed too soon or too late, I wonder if there is a way to fix the VLC player subtitle delay or any software which could do this?
There are loads of chances when the subtitles are either lagging behind or leading ahead a movie in VLC media player, which drives you in a miff in particular you are watching a foreign film. Luckily, this player offers a nifty feature that lets you fix VLC subtitle track delay issue. Use the guide below to fix the issue.
Part 1: How to Sync/Adjust Subtitles Delay in VLC
There are generally 2 ways to adjust/sync VLC subtitle delay on Windows or Mac. Let’s get started with how to fixed subtitles that are not synchronized with movie or video using the player. See how to sync audio with video in VLC >>
[Solution 1]:
1. Open the VLC, click on Tools > Track Synchronization. Here You’ll find the Subtitles/Video section after hitting on the Synchronization tab.
2. Now just sync subtitles in VLC with the video. If you are watching a movie with the subs showing 3 seconds after the scene, it means the subtitles display 3 seconds behind the movie. All you have to do is to put a negative value -3.000 s in Advance of subtitles over video. On the contrary, if the subtitles are appearing 3 seconds before the video, you can input a positive value 3.000 s here, as it indicates the subs are leading ahead the file by 3 seconds.
Note:
You shall be aware of the extract number of seconds they lag behind or lead ahead. And adjustment of tenths does the job in most cases, despite you can adjust the sync time up to a thousandth of a second.
3. Click the Refresh button at the top right corner of the window, which allow you to see the VLC audio delay changes instantly.
Free time to time, users will suffer from DVD rip errors and get messages like DVDRead could not open the disk, you can check the complete DVD ripper guide to ensure a smooth DVD rips on Mac and PC.
[Solution 2]:
There is another easier way to fix the delayed subtitles in VLC easily, by taking advantages of keyboard shortcuts H and G, to adjust subtitle delay during playback.
1. To delay a subtitle: Press G on your keyboard if the subtitle is ahead of the sound. You can delay a subtitle by 50 ms (millisecond) each. So if you want to slow the subtitle down by 0.5 seconds, hit G ten times.
2. To speed up a subtitle: Use the key H to speed up the subtitle by 50 ms for every click. Press repeatedly or long press to advance the subtitle according to your needs.
Note: Generally, the subtitles sync well with the movie. But in rare cases, you run up against the VLC subtitle delay issue. If the subtitles perfect sync with the video in the beginning but go out-of-sync gradually or wrap up faster or slower than the video, the Speed of the subtitles option will be helpful. You can adjust the fps (frames per second) value to increase or decrease the subtitle appearing speed. For instance, for fast subtitles, decrease the fps value to keep pace with the video.
[Solution 3]:
If you still fail to solve the VLC subtitle out of sync error with the above-mentioned solutions, please have a try of other alternatives like 5KPlayer. This is an all-in-one free video player, video downloader and airplay sender, which has been widely acclaimed among users and rated as 5-star by many tech giants.
Part 2: Fix VLC Subtitle Delay Permanently
The VLC feature is a life-saver for video buffs in case the subtitles and videos are out of sync. But remember that the above mentioned changes are temporary. As long as you close the video and restart it, you have to repeat the procedure again to the same video. Thus, to permanently sync the subtitle delay in VLC, you will need an alternative to enjoy the video at the best.
MacX Video Converter Pro is the best VLC assistant, which is able to convert videos to be playable on VLC. With 370 video/audio codec supported, it manages to convert MKV, MP4, AVI, WMV, FLV, MTS, AVCHD, HEVC (H265), 4K 4096p, 8K 7680p and more to 180+ video and 14+ audio formats at world’s No.1 fast video conversion speed. It enables you to free download videos from over 300 online video sites, covering Facebook, Dailymotion, Vimeo, Instagram, etc with subtitles perfectly sync with video when playing in VLC media player. You can also freely remove the wrong subtitles from video and add correct srt to MP4, MKV, AVI, HEVC, etc. after you download subtitles. Thus, you resolve the VLC player subtitle delay issue fundamentally.
Prior to the subtitle adding step, you need to download subtitles of a movie or video you want from the sites such as MovieSubtitles.org, with movie title plus the language you prefer as the search keywords. Make sure the downloaded subs have the same name as the movie file.
1. Free download, install and run the movie subtitle software, import the movie by hitting the Add File button.
2. Choose the output format as you like. For instance, if you want to make the subtitles sync with movie in MKV, just choose the MKV as the output format from the drop down window.
3. Hit Edit > Subtitle button from the pop up window. Press Enable subtitle > External Subtitle File. Hit Add button and move the mouse to Done button to add SRT subtitles to MKV.
4. Hit the RUN button to start sync subtitles with movie on your computer. After a couple of seconds, you can easily finish the VLC subtitle delay problem perfectly.
VLC is the undisputed king of video playback on PC. There simply is no equal, which is helped by the fact that despite VLC almost never changing its interface, it’s constantly being updated in small and thoughtful ways. Integrated subtitle downloading is one example of this.
It used to be the case that you had to download the extension VLSub to download subtitles on VLC, but the handy feature is now fully integrated into the player.
These instructions will show how to use the excellent Download Subtitle feature on VLC.
Download Subtitles on VLC Desktop
1. Open the VLC and load a video. Under the View menu, you should now see a “VLSub” option. (In some versions of VLC, this is called “Download Subtitles.”)
2. In the VLSub window, you can select the subtitle language and add the title of the movie. Click the “Search by name” button to fetch all the related subtitles from OpenSubtitles.org.
If you prefer, you can use the “Search by hash” button where it will calculate the hash for the video and find the subtitle that matches this hash. If you have converted the video from one format to another or modified it, the hash method won’t work well.
3. When you find a match in the result list, highlight it and click “Download selection.” It will then show a blue “Download link,” which you can click to open the “Save As” box. (If your PC asks how you want to open the link, just select your browser.)
In the “Save As” box, choose the location where you want to download the subtitle file. (The default location is the location of the currently playing video.) Once that is done, you will be able to load the subtitle file in VLC.
Download Subtitles on VLC Android App
Other than the desktop app, you can download subtitles with its Android app too. The good thing about the VLC Android app is that you do not require any additional add-ons to download subtitles.
There is a built-in feature in the VLC Android app that lets you download subtitles pretty easily. Here’s how to do that:
1. Open any movie in the VLC Android app.
2. Tap on the screen to show the on-screen buttons.
3. Tap on the subtitle button located on the left corner of the screen .
4. Tap on the drop-down button next to the Subtitles menu and click on the “Download subtitles” button.
5. It will automatically start searching for the subtitle based on the name of the video you are playing.
6. You can also manually search for the subtitle. Further, you can search by a specific season or episode if you want subtitles for a TV series.
Our latest tutorials delivered straight to your inbox
Whether you want to transfer music to a portable device or share your latest masterpiece, you may need to convert audio for the best experience. One of the easiest ways to accomplish the conversion is by using VLC. Short for VideoLAN Client, VLC is a free and open-source software application that can play local and network media, as well a convert media. Follow this simple guide to convert your audio files quickly and easily using VLC on Windows or Mac. Let’s get started!
Convert Audio Using VLC on Windows
From the main VLC window, select Media from the menu bar at the top and choose Convert / Save.
(Figure W1). Alternatively, you can use the keyboard shortcut Control + R.
Next, in the Convert and Save window, Click the Add button to begin selecting the audio files that you want to convert. You may choose one file or multiple files at a time. (see Figure W2)
Once you have added all of your desired audio files to the conversion list, the next step is to move down to the Convert / Save button at the lower-right corner of the window. Don’t click the button just yet – instead, click the downwards arrow to expand the options menu and select Convert. (See Figure W2a below)
The next window that you see will be the Convert window, where you will be presented with your source files and destination options. Be sure that the Convert option is selected in this window, as demonstrated in Figure W3 below.
You will also be able to select the output format for your conversation here as well. By default, VLC has presets for OGG, MP3, FLAC, and CDA (audio CD format) conversions. You can also create your own presets for additional formats by clicking the New Preset button shown in Figure W4.
If you are only converting a single file, you can specify the destination folder and file name using the Destination file field at the bottom of the window. Otherwise, for multiple files, they will be saved in the same location as the source files, using the same names.
Once you have everything set to your liking, click the Start button to begin the conversion process.
Side note for creating a new Profile Preset
If you opted to create a new preset for a non-default format, you will be presented with the New Preset window (not pictured). The specifics of these settings are outside the scope of this guide; however, you can find more information about file encapsulation and encoding formats here. For the purposes of this guide, pay attention to the Audio and Streamable indicators depending on how you intend to use your converted file. Once you have set encapsulation, select the Audio codec tab and set the parameters to your desired values. Refer to the link above if you need help.
After you’re done setting the parameters, click the Create button.
The conversion time will depend on your computer speed, network latency (if files are not locally stored) and the total number of files being converted. You can view the progress in the main VLC window. The file currently being converted will be highlighted in the playlist, and the seek bar will show the progress of that conversion. (See Figure W5)
Please note: There will be no alert or indication when the conversion process is finished. They seek bar will simply reset to the beginning.
Convert Audio Using VLC on Mac OSX
The process for converting audio files using VLC on Mac OSX is similar to Windows, but some user interface areas are different. Follow these steps to convert your audio files on VLC for Mac OSX.
With VLC open and in the foreground, select File from the application bar, and choose Convert / Stream as shown in Figure A1, below. Alternatively, you can use the keyboard shortcut Shift + Command + S.
Next, you will be presented with the Convert & Stream window shown below in Figure A2. From here, you can drag-and-drop your source files into the “Drop media here” area. You may also use the Open media button to select your desired files for conversion.
Next, use the Choose Profile section to select the desired conversion profile. Note that the default profile is a Video format. Be sure to change the format to an audio format type before proceeding. You can also create your own profile by selecting the Customize button, but that is beyond the scope of this article.
Once you have selected your source files, and have chosen your desired conversion format, click the Save as File button. You will then be present with a window allowing you to choose the destination location and name of the converted files, as shown below in Figure A3.
Click the Save button after specifying your destination file location and name. You will then notice that the “Go!” button in the Convert & Stream window has changed to Save. Click the “Save” button to begin the conversion process, as shown in Figure A4.
The conversion time will depend on your computer speed, network latency (if files are not locally stored), and the total number of files you’re converting. You can view the progress in the main VLC window. The file currently being converted will be highlighted in the playlist, and the seek bar will show the progress of that conversion.
Please note: There will be no alert or indication when the conversion process is finished. The seek bar will simply reset to the beginning.
Conclusion
We hope that you have found this guide useful. Additionally, you can also use FormatFactory to convert your audio files if VLC is not available for you to use. Format Factory is a free media processing tool that supports video, audio, and image conversion, as well as ripping CDs, DVDs, and BRs. You can also use it to record your screen, download online audio, and even convert PDF files to other formats.


