Receive notifications that your volume should be turned down when you’ve reached the recommended 7-day audio exposure limit.
Turn headphone notifications on or off
- Open the Settings app on your iPhone or iPod touch.
- Tap Sounds & Haptics, then tap Headphone Safety.
- Turn Headphone Notifications on or off.*
You can also turn on Reduce Loud Sounds to automatically lower your headphone volume when it exceeds your set decibel level.
*Due to regulations and safety standards, headphone notifications can’t be turned off in certain countries or regions.
About headphone notifications and volume
Listening to audio on your headphones too loud for too long can damage your hearing. Headphone Notifications let you know if your audio exposure has been loud enough for long enough to affect your hearing—for example, over 80 decibels (dB) for 40 hours total within the last 7 days.
Your iPhone, iPod touch, or Apple Watch can now alert you when you’ve exceeded 100% of the 7-day exposure limit while wearing headphones.* These notifications give you more awareness around your listening habits to help you protect your hearing. When you receive a notification, you’ll be prompted to turn down your volume. After receiving a notification, the next time you plug in your headphones or connect them via Bluetooth, your volume will be automatically set to a lower level. You can still turn your volume back up if you choose.
*The 7-day exposure limit applies only to media audio. Phone calls do not count towards your headphone audio exposure.
eBook includes PDF, ePub and Kindle version
In order to read or download Disegnare Con La Parte Destra Del Cervello Book Mediafile Free File Sharing ebook, you need to create a FREE account.
Download Now!
eBook includes PDF, ePub and Kindle version
We have made it easy for you to find a PDF Ebooks without any digging. And by having access to our ebooks online or by storing it on your computer, you have convenient answers with Iphone Notifications Manually Or By Time . To get started finding Iphone Notifications Manually Or By Time , you are right to find our website which has a comprehensive collection of manuals listed.
Our library is the biggest of these that have literally hundreds of thousands of different products represented.
Finally I get this ebook, thanks for all these Iphone Notifications Manually Or By Time I can get now!
cooool I am so happy xD
I did not think that this would work, my best friend showed me this website, and it does! I get my most wanted eBook
wtf this great ebook for free?!
My friends are so mad that they do not know how I have all the high quality ebook which they do not!
It’s very easy to get quality ebooks 😉
so many fake sites. this is the first one which worked! Many thanks
wtffff i do not understand this!
Just select your click then download button, and complete an offer to start downloading the ebook. If there is a survey it only takes 5 minutes, try any survey which works for you.
lol it did not even take me 5 minutes at all! XD
Sharing is caring. Tell your friends and help them solve the same problem.
If you’re troubled with no sound, on-screen and vibration notifications on your iPhone or iPad for a specific app, like Messages, Phone, Facebook or WhatsApp, you can find comprehensive solutions to fix it in this article.
iPhone or iPad notifications not working may happen just you’ve updated your operating system to newly released version or worse without any sign, if you happen to encounter no alerts on iOS and need efficient help, here is how you can troubleshoot. В
6 simple tips for notifications not working on iPhone and iPad
1. A Wi-Fi connection or cellular network is the most basic requirement for notifications, please make sure your iPhone or iPad is networked.
2. Check the obviousВ problem, make sure that the Mute switch which is on the side of your iPhone and iPad is not on.
3. Make sure that Do Not Disturb is turned off, as when Do Not Disturb is enabled, calls and alters that arrive while locked will be silenced, and a moon icon will appear in the status bar.В Go to Settings > Do Not Disturb and tap Manual if it’s turned on.В
В
3. Confirm yourВ notificationsВ is supporting the app. Go to Settings > Notifications, select the app, and make sure that Notifications are turned on.
4. If notifications for the app is turned on but you are still not receiving alerts, the Alert Style When Unlocked may be set to None. Settings>Notifications>check the Alert Style is set to Banners or Alerts.
В
5. Go to Settings>Notifications>tap the app without alerts>turn off Allow Notifications.В Then restart your device by pressing and holding the home button and the on/off button together until you see the Apple logo on your screen. Repeat the same operations: Go to Settings>Notifications>tap the app without alerts>turn back on Allow Notifications.
6. If you’ve tried all of the above methods, but the notifications are still no working, then consider updating your iOS to the latest released version 10.3.2, which includes bug fixes that may solve the notifications not working. В В
Related Articles – ALSO ON EaseUS SOFTWARE
Myra – If your iPhone and iPad notifications is not working for a specific app, like Messages, Phone, Facebook or some other ap.
Cedric Grantham – If your iPhone and iPad notifications is not working for a specific app, like Messages, Phone, Facebook or some other ap.
Myra – If your iPhone and iPad notifications is not working for a specific app, like Messages, Phone, Facebook or some other ap.
Myra – If your iPhone and iPad notifications is not working for a specific app, like Messages, Phone, Facebook or some other ap.
Posted on Jan 22, 2018 8:44 PM
Helpful answers
- Helpful answers
- All replies
Hello and welcome to Apple Support Communities jhebert22,
I understand that you’re not receiving notifications on your iPhone when the screen is locked. I know its important to be able to receive those notifications, and I’d be happy to help.
Let’s have you take a look at this article with some settings that you can adjust for notifications:
Use notifications on your iPhone, iPad, and iPod touch
Take a look at the section titled ” Change alert styles and settings for notifications”.
Thank you for using Apple Support Communities.
Have a great day!
Jan 23, 2018 11:54 AM
There’s more to the conversation
Loading page content
Page content loaded
Hello and welcome to Apple Support Communities jhebert22,
I understand that you’re not receiving notifications on your iPhone when the screen is locked. I know its important to be able to receive those notifications, and I’d be happy to help.
Let’s have you take a look at this article with some settings that you can adjust for notifications:
Use notifications on your iPhone, iPad, and iPod touch
Take a look at the section titled ” Change alert styles and settings for notifications”.
Thank you for using Apple Support Communities.
Have a great day!
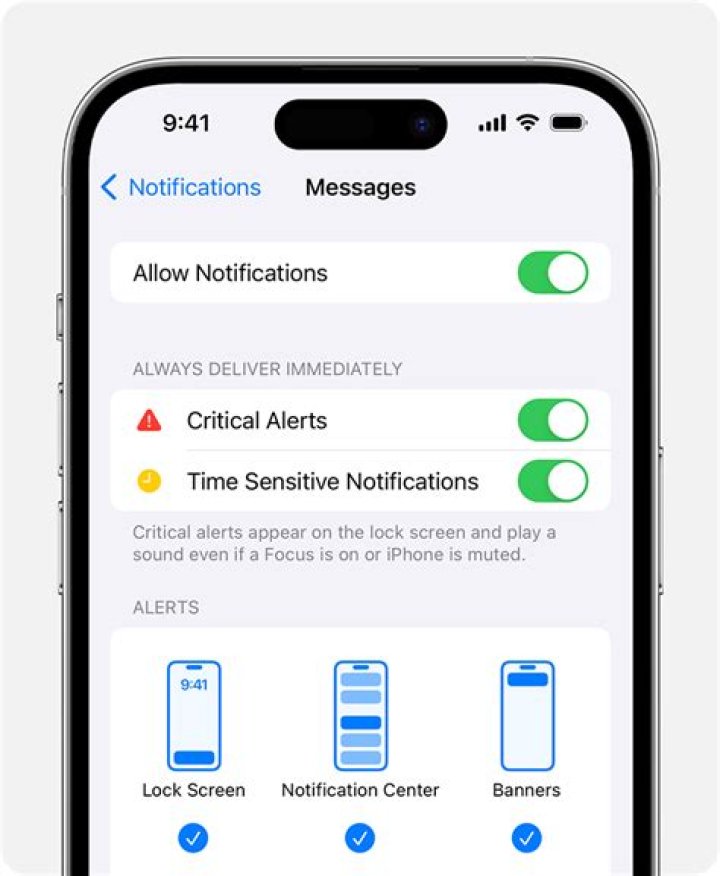
В Настройках можно задать и изменить настройки уведомлений о сообщениях в приложении «Сообщения» и заблокировать сообщения от неизвестных отправителей.
Управление уведомлениями о получении сообщений
Откройте «Настройки» > «Уведомления» > «Сообщения».
Выберите любые из указанных ниже параметров.
Включите или отключите функцию «Допуск уведомлений».
Выберите положение и место отображения уведомлений о сообщениях.
Выберите звук уведомлений о сообщениях.
Выберите способ показа миниатюр сообщения.
Настройка звукового уведомления о сообщениях
Откройте «Настройки» > «Звуки, тактильные сигналы» (на поддерживаемых моделях) или «Звуки» (на остальных моделях).
Откройте «Звук сообщения» и выполните одно из описанных ниже действий.
Коснитесь «Вибрация», затем выберите нужный вариант.
Коснитесь звука в разделе «Звуки предупреждений».
Коснитесь «Магазин звуков», чтобы загрузить звуки предупреждений из iTunes Store.
Назначение другого рингтона для идентификации контакта
Откройте «Контакты», затем выберите контакт.
Коснитесь «Изменить», а затем — «Звук сообщения».
Выберите вариант в разделе «Звуки предупреждений».
Включите параметр «Форсирование при ЧП», чтобы сообщения от этого абонента приходили даже тогда, когда включен режим «Не беспокоить».
Отключение уведомлений для разговора
Смахните влево по разговору в списке «Сообщения».
Notifications are a helpful and important part of the iPhone and iOS, but it’s easy to be bombarded by them. Here’s how to get them under control.
Senior Editor, Macworld |
Today’s Best Tech Deals
Picked by Macworld’s Editors
Top Deals On Great Products
Picked by Techconnect’s Editors
Notifications are a helpful and important part of the iPhone and iOS, but it’s easy to be bombarded by them. You can quickly find yourself with so many Notifications that they aren’t useful anymore. The key is to activate Notifications for only the apps you want, or to group them so they’re easier to manage.
To access your Notifications settings in iOS 12 on you iPhone:
2. Scroll down a little, then tap Notifications.
Let’s go over the ways you can modify Notifications.
The ‘Show Previews’ settings
This lets you determine when the content of a Notification preview appears. Your options are: Always, When Unlocked, or Never.
If you select When Unlocked, you’ll see a Notification for the app, but the content of the Notification won’t show. If you select Never, the content won’t show at all, locked or unlocked. Learn more about how to hide sensitive info in notification previews.
Siri Suggestions
This setting lets Siri suggest actions you may want to perform with an app Notification. For example, if you missed a phone call, Siri will suggest that you call back that number.
You can choose which apps can suggest a Shortcut. If you tap Siri Suggestions, it will take you to a list of apps on your iPhone. Toggle the switch on or off, based on your preference.
Notification Style
Under the Notification Style heading in the Notifications setting is a list of the apps on your iPhone. Tap on an app, and you can adjust how you receive its Notifications. You can turn the Notifications off or on, you can pick how the kind of alert you want to get, sound, badges, and more settings.
It takes time, but go through each app and adjust the settings. It’ll save you time in the long run, and help you get better control of your Notifications. And you can always re-adjust the settings to your liking.
One important setting to adjust is Notification Grouping. Get the details on how to customize grouped notifications.
Government Alerts
At the very bottom of the Notification setting are settings for Amber and Emergency Alerts. You can turn these on or off.
Roman has covered technology since the early 1990s. His career started at MacUser, and he’s worked for MacAddict, Mac|Life, and TechTV.
There are a few different ways you might want to hide messages on iPhone. If you want to keep your messages private, learn how to turn off message preview, which will allow you to still see a text message alert on Lock screen but won’t show any part of what the message says. You also have the option to hide text messages from your Lock screen completely. iPhone message preview is a feature we can easily turn on or off in settings on iPhone. If you’re not trying to hide all of your text messages on iPhone, you can send a text message with invisible ink if you’re using iOS 10. That’s another fairly easy way to keep your text message private while still allowing message previews on Lock screen. Here’s how to hide text messages on iPhone.
* This post is part of iPhone Life‘s Tip of the Day newsletter. Sign Up. *
Sign up to iPhone Life’s Tip of the Day Newsletter and we’ll send you a tip each day to save time and get the most out of your iPhone or iPad.
There are three parts to this article:
Which part you use depends on how you want to hide text messages. If you want to receive message alerts on Lock screen, use part one to simply hide text message preview on iPhone. If you want to hide text message notifications from Lock screen altogether, use part two. And if you simply need to send a single private message now and again, consider using part three to hide your text message in invisible ink. It’s good to note that part three will only work when sending from an iPhone running iOS 10 (or later) and can only be accurately received on an iPhone running iOS 10 or later.
How to Turn Off Message Preview on iPhone
Message preview appears on your iPhone’s Lock screen. When turned on, message preview shows the message’s contents. But some would rather keep their text messages hidden from Lock screen, which is when turning off message preview is a good idea.
- Open the Settings app on iPhone.
- Tap Notifications.
- Tap Messages.
- Scroll down to the bottom and tap Show Previews.
- Here you can select Always to allow iPhone to show message previews from Lock screen.
- Select When Unlocked to allow message previews on an unlocked iPhone.
- Select Off to turn text message previews off on iPhone.
How to Hide Text Messages from Lock Screen
Perhaps simply turning message preview off isn’t enough privacy for you—you can hide text messages from Lock screen completely. This means that you won’t receive text message alerts at all when your iPhone is locked. To do this:
- Open the Settings app.
- Tap Notifications.
- Select Messages.
- Toggle off Show on Lock Screen.
How to Send Private Messages in iOS 10 (with Invisible Ink)
If you want to hide a specific message from potential onlookers, you can send a message covered in “invisible ink” on an iPhone with iOS 10 or later. In order for the message to appear secret, the person receiving the message with invisible ink must also be viewing the message on an iPhone with iOS 10. To do this:
- Open the Messages app.
- Start or continue a conversation thread.
- Type the message you want to cover with invisible ink.
- 3D Touch or tap and hold the send arrow.
- Select Invisible Ink.
- Tap the send arrow.
- Your message will appear, covered by a moving invisibility cloak.
- If you rub your finger over the message bubble, your text will be momentarily revealed. The person receiving the message will read the message in the same way.
- You can see old notifications on your iPhone by opening the Notification Centre.
- It’s easy to access the Notification Centre on your iPhone whether it’s locked or unlocked, and you can view, manage, or clear notifications with just a few swipes.
- Visit Business Insider’s homepage for more stories.
If you’ve been away from your iPhone screen and are eager to catch up with what’s new, the Notification Centre is a great place to start.
Apple makes it a particularly easy menu to access, whether your phone is locked or unlocked. And it’s the best way to view notifications that you may have initially missed.
Here’s how to see and manage your old notifications.
Check out the products mentioned in this article:
iPhone 11 (From $US699.99 at Best Buy)
How to see old notifications on your iPhone
1.Pick up your iPhone to wake it up, or tap the screen (or press home screen button on the bottom for pre-iPhone X models).
2. From the lock screen, swipe up from the middle to see your notifications.
If your iPhone is already unlocked, you can swipe down from the top to see your old notifications.
How to clear old notifications on your iPhone
1. Next to the words Notification Centre is an X in a grey circle. Tap and hold it.
2. “Clear All Notifications” will appear. Tap it to clear all your notifications.
3. If you want to clear individual notifications, you can swipe left over a notification or a group of notifications for the same app. You’ll see options to “Manage,” “View,” or “Clear” the notification. Tap “Clear.”
You can manage your notifications from both a locked and unlocked screen.
embed type product oEmbedUrl html
Related coverage from How To Do Everything: Tech:
How to hide messages and message notifications on your iPhone, so only you can read them
How to turn off notifications on your iPhone for individual apps, or adjust the types of notifications you receive
How to change notification sounds for the built-in apps on your iPhone, or enable notification sounds for third-party apps
How to turn off or limit personalised ad tracking on your iPhone to protect your privacy
Business Insider Emails & Alerts
Site highlights each day to your inbox.
Follow Business Insider Australia on Facebook, Twitter, LinkedIn, and Instagram.
Tagged In
Business Insider Research
Business Insider Emails & Alerts
Business Insider Australia
Business Insider Video
Popular on Facebook
Popular on LinkedIn
Popular
The ‘Shocked’ Melbourne Airport Seccies Explained How TF.
KFC Is Making A Horny Colonel Sanders Biopic And Judging By The.
Holy Shit: There’s A ‘Revolt’ In The Queen’s Staff & Her.
Scott Morrison Has Apologised For Straight-Up Lying About Kevin Rudd.
In About-Face, UK Will Not Allow Huawei To Be Involved In Any Part Of.
Universal Orlando Parks Will Reopen June 5 Despite Risk Of.
Pro-Privacy Lawmakers Secure A Vote To Protect Browsing Data From.
Jurassic World: Dominion Is Definitely Not The Planned End Of The.
White Twitch Talk Show Host Finally Drops ‘Rajj Patel’ Moniker
Is Chris Redfield OK
Everything We Know About The PlayStation 5
Call Of Duty’s Battle Royale Adds Random Event That Resurrects.
The Best Snapchat Games To Play Right Now
Disable UPnP On Your Wireless Router Already
How To Use Water Jugs As Weights
This Android Wallpaper Can Brick Your Phone
People who generally deal with private conversations must control how notifications appear on their smartphone. The notification previews appearing on the lock screen can hinder your privacy and may even leak your personal information. That’s because these notifications show a preview of the content on the lock screen without requiring you to unlock the phone. To hide sensitive notifications from prying eyes on iPhone or Android, you can make your notifications just say notification instead of showing the actual notification content. This way you can hide the text preview for either all or certain apps notification on your lock screen.
For instance, you may want to hide the content of the notification for email, messaging and social media apps. Doing so will stop apps such as Gmail and Twitter from showing the email’s subject and reply to your tweet, respectively. The notification will still prompt on the lock screen, it will just say “Notification” though. That said, you can check the full preview of the notification after unlocking the device.
How to Make your Notifications just say Notification
On iPhone (iOS 11 or later)
Hide Notification Previews for all apps
- Go to Settings on your device.
- Open Notifications.
- Tap “Show Previews”.
- Select “When Unlocked” option.
The notifications will now appear as “Notification” on your iPhone or iPad while it’s locked. Optionally, you can choose the Never option to completely disable previews even when the device is unlocked. Do note that the changes made will be applied for all the apps.
Hide Notification Previews for certain apps
If you wish to turn off notification previews for individual or specific apps, then follow the below steps instead.
Note: The setting you choose for Show Previews will remain the default setting for individual apps unless you configure it manually. You can set Show Previews to “Always” if you simply prefer to explicitly disable notification previews for certain apps like Gmail, iMessage, and Twitter.
- Go to Settings > Notifications.
- Under Notifications Style, tap the desired app.
- Now Tap “Show Previews” under options.
- Choose “When Unlocked” to hide previews on the lock screen.
Now whenever you receive a new notification from the certain app, no one including you will be able to see its content unless you unlock the device.
Hide Notifications entirely from the lock screen
While the preview is disabled, someone sneaking into your phone can still see that you have got a notification from an app. You can avoid this by hiding notifications from the lock screen entirely for specific apps. To do so,
- Open the desired app under Notifications.
- Under Alerts, uncheck the checkbox for “Lock Screen”.
- Notifications for the certain app now won’t appear on the lock screen at all.
Optionally, you can choose to completely disable notifications for an app from the same page. For this, simply toggle the “Allow Notifications” slider to off. You won’t receive any notifications now from that app.
On Android
Similar to iOS, Android users concerned about privacy can hide notification content from their device’s lock screen. However, the settings can vary from device to device. In our case, we’re using a OnePlus device running Android 8.1 Oreo. Here’s how to configure the way notifications should appear when your device is locked.
- Head over to the Settings.
- Tap Apps & notifications > Notifications.
- Tap the gear icon at the top right.
- Open “On the lock screen” option.
- Select “Hide sensitive notification content”.
This will hide the notification content for all apps on the lock screen. Now any notification received will say “Notification” while your device is locked. Tap the notification and unlock the phone to view it. Meanwhile, you can select “Don’t show notifications at all” to hide notifications entirely for all apps from the lock screen.
Turn off Lock Screen Notifications for Individual Apps
Alternatively, you can selectively hide notification previews for specific apps such as Gmail and WhatsApp. To do so,
- Go to Settings > Notifications.
- Tap the desired app.
- Tap “On the lock screen”.
- Now select “Hide sensitive notification content”.
Tip: If you’re running Android 9 or later then this documentation by Google should come handy.
For some, the biggest change in Apple’s new iPhone X isn’t the larger screen, weird notch, or identity-verifying Face ID tech. It’s the disappearance of the Home button, the iconic piece of hardware present on every iOS device since the iPhone’s 2007 debut. With the button gone, Apple’s using the extra real estate to change how you interact with the iPhone, altering the gestures with which you’ve become familiar. Some changes are for the better, while some seem pretty poorly implemented. Here’s how to navigate your new device with the right swipes, taps, and gestures.
Your Divided Display
Think of your iPhone X’s 5.8-inch display as being divided into four sections. The bottom section, where your four pinned apps are; the middle section, where you can search and access widgets; the top left section, where you can find your notifications; and the top right section, where you can find the Control Center.
Your New Home Button
Subscribe for 2 years and get an extra 1-month, 1-year-, or 2-year plan added to your cart at checkout.
The iPhone X’s home button has been replaced with a black home bar at the bottom of the screen. That bar can move depending on the orientation of your display, or the app you’re in. Watching a YouTube video in landscape mode or playing a game like Mini Metro will move your home bar to the bottom of your landscape-oriented display. To unlock your iPhone X, or go back to the home screen from any app you’re in, swipe up an inch or two from that black bar.
Swiping up from the home bar and pausing in the middle of the display will show you your most recently opened apps. Hold your finger on one to access the edit mode, where you can swipe up or hit the “minus” sign to force close the apps.
If you’ve swiped away an app but need to double-check something, or want to revisit an app you were using previously, you don’t need to hunt for the icon again. Just swipe from right to left on the bottom of your screen to revisit the previously opened apps (swiping left to right brings you to the most recent app, but won’t bring you back to the home screen).
Control Center is Harder to Use
Originally, Control Center was easily accessible at the bottom of your iPhone and iPad screen. To access Control Center on the iPhone X, however, you’ll need to swipe down from the top right of the iPhone x’s annoying notch cutout.
Check Notifications Easily
To take a look at whatever notifications you’ve missed, like reminders and unseen texts, swipe down from the top of your screen (anywhere from the middle of the left-most side). If you’re on the lock screen of your phone, you can swipe up from the middle of your screen to see recent notifications (as long as your settings allow you to see notifications when your iPhone X unlocks).
You can force touch the tiny X next to your notifications, and clear them all in one go so you don’t have to deal with them piecemeal.
Searching Your Phone
You can search through your iPhone’s list of contacts, apps, texts, and other messages using the built-in search functionality. Not only does the search functionality make it easy to find just what you’re looking for either in your phone or on the web—you can use it as a way to declutter your home screen and remove distractions while forcing you to be more intentional by searching for the apps you need instead of the ones you absent-mindedly wander toward.
Swipe down from the middle of your display to activate the search function. It’ll show you a list of suggested apps, and let you search through the apps themselves for reminders, attachments, and messages. You can even use it in task manager apps like Omnifocus to see what’s on your schedule.
Organizing Apps
Holding down on apps (without activating the Force Touch options) will let you move apps and rearrange them to your liking. If you’ve got a group of apps you want to move from the last page of your screen to the first, or have a set of related apps you’d like to add to a folder, you can select and move multiple apps at a time and save yourself the trouble of dragging them one by one.
Reachability
The iPhone X has a 5.8-inch display. It’s beautiful, but tall, and if you’ve got the tiny, delicate fingers of a writer, reaching up to access Control Center and other notifications can be a hassle.
You can enable the tiny-hand-friendly Reachability mode to make it easier to get at those topmost apps and services. To enable, hit Settings > General > Accessibility. Scroll down to the Interaction section and toggle on Reachability. To actually use the feature, swipe down from the bottom of screen (just a half-inch above the home bar). It’ll drop your display down withinreach of your fingers. You can access Control Center by swiping down from right above the topmost app on the right side, or, if you’re in an app, swiping down where the battery and Wi-Fi icons are located.
It certainly isn’t perfect, and an option to rearrange where these interactions take place would be a welcome improvement—but for now, the home button is going away, and gestures are here to stay.
Staff Reporter, Gizmodo
Share This Story
Get our newsletter
DISCUSSION
I’ve talked to several different people about how FaceID works out in real world situations versus TouchID, as opposed to the carefully scripted Apple demo world.
The verdict: it doesn’t, at least not very well.
Example: I was talking to someone about using it on the London Underground to pay, and response was “it sucks”. Imagine having to double-click the side button and then try to aim the damn thing at your face as you simultaneously put it on the NFC pad at waist level, all whilst people in a major hurry are queueing up impatiently behind you to get through the turnstile.
So much for the promise of secure NFC payments and efficient biometrics making life just a bit more convenient. But hey, lookee, animated turds!
Really the only gesture I have to learn with Apple ditching a working technology like TouchID and foisting overhyped technology on everyone (at a premium price to boot) is this:


