Optimize your Google Chrome for Maximum Privacy with these settings. You’re not always safe online.
Google Chrome is the most widely used web browser in the world. Its wide popularity is because of its features and simple look. And to serve users further, it send some personal information to Google and it’s not a good idea to have your personal data recorded without users permission. In my previous post we learned searching Google and Internet without Losing Privacy and in this post I’ll show you how to optimize Google Chrome for Privacy.
Also, to achieve maximum Privacy settings we might disable some interesting features of Google Chrome. Read this post carefully and apply settings according to your needs.
Sync
If you’ll connect your Google account with chrome than your data will be automatically synchronize your data and save it to Google Servers. If you don’t want this feature than follow the following steps to disable this option.
- Go to Settings.
- In the “sign in” section, click on Disconnect your Google Account.
- From the dialog box that appears next, Click Disconnect Account.
- Go to chrome menu and than click on Settings.
- Now, in the “Sign in” section click on Advanced Sync Settings.
- Choose “Encrypt Synced with your own Sync Passphrase” and create a new passphrase. After enabling this option, you can sync Chrome data on other Computers only if you’ll provide this passphrase, it can’t be reverted.
#4 When you come with suspicious download or website than Google Chrome may ask you to send this information to Google if you check this option. Disable “reporting details of possible security incidents” option if you don’t want Chrome to automatically send these information to Google Servers.
#5 Google Safe Browsing downloads the list of some potentially dangerous website and if the website you’re visiting is in its list than Chrome displays a warning. If you don’t want to Chrome to send the website details you visit to Google than disable Phishing and malware protection. After disabling the, you’ll not receive warning if you visit potentially dangerous website.
#6 Chrome can check spelling of the text you type in the address bar. Chrome sends the text you type to Google Servers. If you don’t want your typing information being sent to Google than uncheck Resolve Spelling Errors.
#7 Chrome may send information such as your preferences, button click and memory usage if you encounter crash. It may also sent the website you visited if it is related to crash. If you’re suspicious about this option than disable Crash Reports.
#8 You can turn on the Do Not Track request with your browsing traffic. It doesn’t mean that the website will not collect the information. None of the information is tracked with this option.
#9 You can search or any other voice commands on Chrome by saying “OK Google”. When you say “OK Google” while you’re on Google Search page or a new tab page than an audio recording of what you say will be sent. Disable OK Google option if you don’t want the audio being sent to Google.
Cookies
Click on the Content Settings button which is under the Privacy Section. Website you visit stores some data on your Computer to serve you better. But it might be used to track you online.
Enable “Block-Third party cookies and site data” option to disallow Chrome from accepting third party cookies and site. Some website might not work properly. It is better to keep this option disabled. You can also set Chrome to delete browsing data and cookies after you quit browser, you might need to sign in to your Accounts on website if you enable this option.
While you’re browsing website, there are many companies tracking you online. You can install Adblock Plus on your Chrome browser to disable tracking. It is always advised to keep a good anti-virus or Internet Security software to keep yourself safe while you surf Internet.
Google Chrome is the most popular web browser in the world. That is if you don’t count Explorer or Edge, which you shouldn’t. After all, bundling it with Windows is sort of cheating.
Chrome is a great browser. It’s lightweight, fast and supports the very latest in web standards. It’s also pretty secure thanks to its technological status. However, there are some problems with it from a privacy standpoint. For one thing, it’s not an open source software package. Which means that people can’t scrutinize what information it collects and what it does with it independently. That’s one of the big advantages Firefox has.
I’ve already touched on some of the basic Chrome privacy settings in my general browser privacy article, but here we’ll be looking at Chrome-specific settings that you should know about. Decide carefully whether you really need Chrome for sharing information in the various ways it does. Your privacy is usually more valuable than a little bit of convenience.
Don’t Let Chrome Sync You
Most modern browsers provide various syncing features. If you have the browser on your phone, laptop and work computer then Chrome will happily sync things like passwords, browsing history and search history to all three.
Sounds good right? But do you really want to sync your personal browsing history to your work machine? It’s a good habit to only visit sites you don’t want in your history using an incognito tab, but most people can’t be vigilant all the time.
So take control of what exactly Chrome is allowed to sync between browsers. It’s very easy to do. Simply click on the three dots at the top right of the Chrome window to open the menu. Then choose settings.
Under “people” you should see your Google login account name. Click on the sync bar just under that and the “advanced sync settings” should open. It looks like this:
Switch off anything you don’t want this browser to share with the rest. You need to do this for every browser you are logged in to.
Stop Chrome from Chatting with Its Friends
Chrome uses a number of online services to make certain features work. If you’d rather it didn’t talk to web services behind you back, you can switch them off one-by-one. Just as long as you can live without the features they bring.
For example, there’s a web service that helps Chrome predict what URL you’re typing. That’s a neat trick, but if you think about the sorts of information that has to be exchanged to make those predictions you might not feel like it is worth it.
To get to these juicy privacy choices you need to go right to the bottom of the default settings screen and click on “advanced”. Sure enough, this will open up more sophisticated choices for the true privacy connoisseur. You’ll find them right at the top of the advanced settings. It looks like this:
Here you can choose which features you can live without or turn off altruistic settings such as crash data submission to Google.
Taking Control of Web Content
Do you see the “content settings” bar in the above picture? It’s second from the bottom. If you click that you can take control of what websites may or may not do. Click on that little bar and a whole world of options opens up to you.
You can manage block lists for things like location here and fine-tune your cookie settings. The “keep local data until you quit your browser” is a good balance of privacy and will stop sites from building a detailed profile of you on your very own machine.
You may also want to turn off JavaScript as a whole and only whitelist sites you definitely trust. There’s plenty to do here, so take your time and look through all the options.
Other Settings to Consider
You may want to switch off the background app feature of Chrome, where apps will still run even if Chrome is closed. It’s also a good idea to periodically go through Chrome’s built-in password manager to make sure you aren’t storing passwords you don’t use anymore.
If the browser is on a shared machine you’ll want to switch off password management completely.
You should also think twice about browser plugins. The more you add, the more unique your browser fingerprint becomes. I recommend with sticking to the basics, such as the EFF’s Privacy Badger for Chrome
Shiny and New
After you’ve gone through these privacy settings and tuned them to your needs your Chrome browser is now closer to being something that works for your interests rather than against them. Just remember that having a well-tuned browser is only a part of private internet browsing. You should invest in a premium VPN and cover all your bases!
Find out how to curb Chrome’s appetite for CPU, memory and battery resources.
With Chrome 57, Google’s browser is less of a resource hog than it has been in the past. It achieves this efficiency by a new mechanism for throttling background tabs so they consume less power.
Since updating to version 57 of Chrome, I have found I can let my open tabs grow to obscene numbers without it killing my MacBook Pro’s battery life and slowing performance. With past versions of Chrome, such careless opening of new tabs was detrimental to my MacBook Pro’s battery and overall performance. Still, you can improve Chrome 57’s performance further.
But, first, to check to see which version of Chrome you are running, open Chrome’s settings. You can do so by entering chrome://help/ in Chrome’s URL bar or by clicking the Menu button (the icon with the three vertical dots) to the right of Chrome’s URL bar and then clicking Help > About Google Chrome. On a Mac, you can also click Chrome in the menu bar and then click About Google Chrome. If you aren’t using the most recent version of Chrome, you can update Chrome on this page.
With Chrome updated, here are three ways to improve the browser’s performance.
1. Identify and eradicate offending tabs and extensions
The more tabs and extensions you have running in Chrome, the more resources it consumes. Before you start closing tabs all willy-nilly, take a look at Chrome’s built-in task manager to see which tabs are using the most CPU and memory resources. It also shows how much Chrome uses as a whole, as well as as any extensions you have running.
To open Chrome’s Task Manager, click the triple-dot Menu button in the top right and go to More Tools > Task Manager.
The small Task Manager window shows fluctuating percentages for each open tab and extension you have running in terms of CPU and memory usage. Highlight a tab or an extension and click the End Process to kill any egregious resource hog and reclaim some CPU and memory overhead.
2. Experiment with hardware acceleration
Buried in Chrome’s settings is a way to enable hardware acceleration, which may or may not improve Chrome’s performance on your computer. Hardware acceleration allows the CPU to offload some page-rendering and loading tasks to your system’s GPU.
There is some debate on whether hardware acceleration helps or harms performance. I don’t find it does much of anything, but perhaps it’ll help your system run Chrome more effectively. Plus, it’s worth investigating to see if you have hardware acceleration enabled or not.
- To find the setting, click the triple-dot Menu button and choose Settings.
- Scroll down to the bottom of the Settings page and click Show advanced settings.
- Scroll down to the System section and check (or uncheck) the box for Use hardware acceleration when available.
- Restart Chrome.
Again, your mileage may vary with hardware acceleration, but it’s worth checking out to see if you are better of with or without it.
3. Hit the reset button
If all else fails, you can reset Chrome and return the browser to its default settings. Resetting Chrome doesn’t wipe everything out; your bookmarks, browsing history and saved passwords are not reset. What you will lose in resetting Chrome is your start page, new tab page, pinned tabs and default search engine (if it’s not Google).
The Reset button is directly below the hardware acceleration setting on the advanced settings page. Click the Reset settings button and then click Reset to confirm your intention.
Editors’ note: This story was originally published on June 7, 2016, and has since been updated to include new information about Chrome 57.
Google Chrome sends personal data to Google by default, but it doesn’t have to. We’ll show you what information each feature sends to Google and why, so you can get the goodness of the Chrome browser without sacrificing privacy.
Each option provides an advantage, so you’ll lose some of Google Chrome’s features by disabling many of these options. Still, you can make informed decisions if you’re worried about Chrome sending data to the mothership.
Instant
Click the wrench menu at the upper right corner of the Google Chrome window, then click Options to view Chrome’s options page.
Chrome’s instant search works just like Google’s search page; a full Google search results page appears as soon as you start typing in Chrome’s address bar. Chrome sends everything you type into the address bar to Google if this is on, even if you’re typing a website address.
Instant is disabled by default for now, but you can uncheck the Enable Instant check box on the Basics tab if it’s enabled.
Sync
Chrome can synchronize your bookmarks, extensions, passwords and other browser data between your computers, but it does this by storing the data on Google’s servers.
If you’re not comfortable sharing this information with Google, click the Disconnect button on the Personal stuff tab to disable Chrome sync entirely.
Chrome can also encrypt your personal data, so you can store it on Google’s servers in an unreadable form. Click the Advanced button in the Sign In section and select “Encrypt all synced data” to activate Chrome’s encryption.
Use the “Choose my own passphrase” option and set up your own passphrase to ensure Google can’t read your personal data. You’ll need this passphrase on each computer you sync Chrome with.
Privacy Settings
The privacy section on the Under the Hood tab contains five different privacy options.
When Chrome can’t connect to a website, it sends the website’s address to Google. Google sends website and search suggestions in response, and Chrome Chrome displays them on a customized error page. Uncheck the Navigation Errors checkbox if you don’t want Chrome informing Google of website addresses when they won’t load.
Chrome sends everything you type into the address box to your default search engine. Google uses this information to offer similar website addresses and related searches in the menu that appears below the address bar. Disable the Prediction Service check box and Chrome won’t send everything you type into the box to Google.
Chrome automatically looks up the IP addresses of websites linked to from your current page. Sometimes, Chrome automatically loads a new web page in the background when the website you’re visiting instructs it to. The Predict Network Actions check box controls this behavior.
Google’s safe browsing feature has Chrome automatically download a list of potentially dangerous websites. When you visit a website that appears on the list, Chrome sends a portion of that website’s address to Google in an obfuscated form along with your IP address and a cookie, and Google tells Chrome whether the website is actually dangerous. Chrome won’t provide a warning when you access malicious websites if you disable this feature by unchecking the “Enable phishing and malware protection” check box.
The last option is the only one that’s disabled by default. It causes Chrome to send detailed information about crashes, preferences and other general browser information to Google if you enable it. Chrome never sends the address of every website you visit to Google, but it will send the full address of potentially malicious websites if you enable this option.
Cookies
Click the Content Settings button in the Privacy section to view more options.
Enable the “Block third-party cookies” check box to prevent Chrome from accepting third-party cookies, which are often used by advertisers to track you online. Some websites won’t work properly if you enable this option, so you might have to disable it later.
Select the “Allow local data to be set for the current session only” option to have Chrome automatically delete cookies when you close it. This approach isn’t as drastic as disabling cookies entirely; websites that depend on cookies will still work. Websites won’t be able to track you over time with cookies, although you’ll have to log back into all your accounts after reopening Chrome.
Location Tracking
Scroll down to the Location section on the Content Settings pane and ensure the location feature isn’t set to Allow All Sites. Chrome’s geolocation feature allows websites to track your physical location and offer local content such as weather or directions, but Chrome asks you before sharing your location with websites by default. You can also set the option to Do Not Allow to disable the location-sharing feature entirely.
Whether you’ve disabled all the features listed here or left the ones that seem useful enabled, you’re now in control of Chrome’s privacy options.
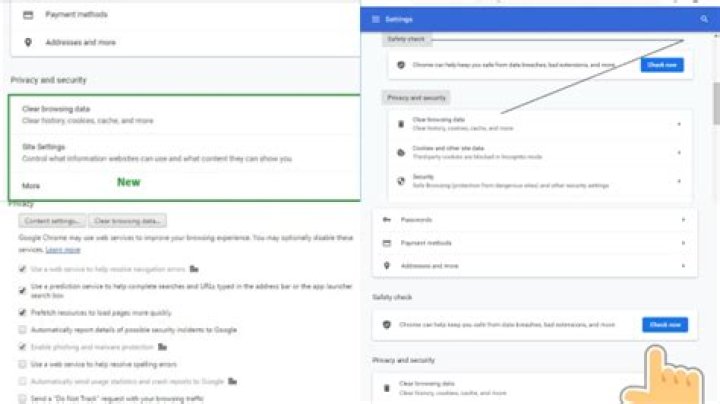
We’re used to running antivirus scans on our computers, but that doesn’t cover your online safety. For that, Google Chrome offers a tool that lets you perform a similar checkup to secure your web browsing. Here’s how to run a safety check on Chrome.
Launch the Google Chrome web browser on your Windows 10, Mac, Chrome OS, or Linux computer and click the three-dot menu button found in the top-right corner.
Head into “Settings” from the drop-down menu.
Scroll down to find the “Safety Check” section and click the blue “Check Now” option.
Google Chrome will kick off the “Safety Check” test. Depending on how much browsing data you have, this can take anywhere from a few seconds to a couple of minutes.
In this process, Google Chrome scans a total of four core modules to look for any malicious code and see if they are up to the mark. It will make sure that the browser app is on the most recent version for protection against the latest internet viruses and that all of your installed third-party extensions are harmless. It will also check whether any of your saved passwords have been compromised in a data breach and that “Safe Browsing,” a setting that warns you against suspicious sites, is enabled.
Once the Safety Check is complete, Chrome will pull up shortcuts for anything that may need your immediate attention, such as reviewing compromised credentials.
After taking the recommended steps, you can also run the Safety Check again to ensure that your new security settings are active.
There’s a lot more you can do to optimize Chrome for maximum privacy, such as switching on “Enhanced Safe Browsing,” an advanced mode that allows Google to assess your browsing for potential threats and suggest privacy-focused improvements. However, do note that when you activate the “Enhanced Safe Browsing” option, you choose to share a copy of your browsing data with Google.
Web browsers have become an essential piece of software in our daily lives. Whether you are using a computer or smartphone, you cannot access the internet without a web browser. Thankfully, there’s a myriad of internet browsers to help you access content on the web. Popular options include Google Chrome, Mozilla Firefox, Opera browser, and Microsoft Edge.
Google’s Chrome browser was launched in 2008 and easily outperformed Microsoft Explorer to become the market leader. Today, Google Chrome remains the most popular web browser with Mozilla Firefox and Microsoft Windows’ Internet Explorer being a distant second and third popular browsers respectively. Google did a wonderful job with Chrome, creating a great browser that continues to improve every day.
Chrome’s Security Risks
While Google Chrome is the most widely used and reliable browser at the moment, it’s not perfect. One of the biggest issues raised by tech experts is privacy. For instance, the Chrome browser allows Google to harvest vast amounts of personal data on users. The search engine giant runs an extensive data collection ecosystem, using this information to build a profile of the user’s interests for targeted advertising.
Security is also an issue when it comes to Google Chrome. The search engine giant recently confirmed a “critical” Chrome security threat that puts its 2 billion users at risk of cyberattacks, which shows that the browser might not be as secure as you expect it to be. Apparently, there’s a bug in Chrome that could allow hackers to avoid the browser’s security checks and gain access to your device.
Chrome Security Tips
A significant number of users have been ditching Chrome for a new version of Mozilla’s Firefox for its default privacy protections. And while that may be a great option for some people, some might want to stick with Google Chrome for a variety of reasons. If you are one of these users, here are some steps you can take to improve privacy and security on your Chrome browser.
Keep Your Browser Up to Date
When it comes to online security, one of the most important things you can do is ensure that your system is up to date. To protect yourself against the aforementioned security bug, ensure that you are running Chrome version 81.0.4044.113 or later. You can always run security patches manually through the browser’s About tab or you can simply activate automatic updates for your device.
Tweak Your Content Settings
Google Chrome comes with several built-in features and services designed to help improve your web browsing experience. The problem is that these services will send data to Google’s servers, which the company adds to your accounts. The company will then analyse the data and use it to sell increasingly personalized ads. Open Chrome settings and go to the Privacy and security page to disable these services. Also, enable ‘Safe Browsing’ and ‘Do Not Track.’
Set Up 2-Step Verification
Using 2-step verification will require you to enter a randomized code every time you log into your account in addition to your password. This security feature will add another layer of privacy to your Google account, which is linked with your Chrome browser. Go to Settings page, select manage your Google account, tap security at the top, and select 2-Step Verification under “Signing in to Google.
Use VPN
A Virtual Private Network (VPN) is one of the smartest ways to protect your online privacy and maintain your data security. Get a VPN extension for Google Chrome to improve privacy and security on your device. A VPN will hide your IP address and encrypt your internet traffic, which makes it difficult for anyone to track your online activity.
An internet browser is an application that finds and displays web pages. Chrome is the most popular web browser at the moment. It’s reliable and lightning-fast, but it’s not perfect. There are some privacy and security issues facing Google Chrome. Use these security tips to secure your Chrome browser when surfing the web.
With online privacy becoming more and more important, there are several excellent and completely free Google Chrome browser privacy extensions that you might not be aware of but that everyone should be using right now.
These five extensions are the top 5 best Chrome privacy extensions for maximum internet privacy while browsing online. I am not associated in any way with any of these extensions; these are just my 5 favorite top privacy extensions that I think everyone should be using in order to maximize your web privacy.
5 Bitwarden
What’s Awesome: Bitwarden privacy extension is a password manager that will let you keep your passwords more secure. Although it is not as full-featured as Lastpass, Lastpass has been degrading fast and bitwarden is more reliable and has a better system for user security.
You can get the Chrome password privacy extension to bitwarden here: Bitwarden.
4 Don’t Track Me Google
What’s Awesome: Every link you click in google is encrypted via a google tracking URL which redirects you quickly through Google so that Google can track every link you click. Most people aren’t even aware this is happening because it happens very quickly. Google even tricked you by showing that URL at the bottom when you hover over it as the destination link, even though that is a lie, really the link is a Google link.
The way to see what I am talking about is to search anything in Google, and the right-click any result instead of clicking it, and copy the link. You will now be able to view the Google tracking URL. Yes, Google has tracked every link you have ever clicked.
Don’t Track Me Google privacy extension for Chrome removes this Google tracking URL, as well as removing tracking from maps and other Google sites. This is excellent for privacy, I recommend to install it and forget about it, right click the button and choose “Hide in Menu” so it doesn’t take any space in your extensions bar.
Now Google can’t track everything you do on Google. Also, make sure to not search Google from the same browser you are logged into, otherwise everything you search is permanently stored in your Google profile, forever. At least with Don’t Track Me Google privacy extension we can bypass the secret link redirects.
Also, since there is no more tracking URL, it will speed up web results, as well as allow you to directly copy links out of Google search.
Check out the Chrome privacy extension to prevent Google from tracking your search history here: Don’t Track Me Google.
3 Block Image
What’s Awesome: Block Image is a different kind of privacy. I have tried lots of image blocking extensions but I like this one the best. It is simple and easy to use. Either it’s on and all images in the whole browser are removed, or it’s off and all images are visible.
Block Image is great for a number of things, like when browsing social media and you don’t want to be distracted by all the images, or to hide images on some unwanted sites. Youtube is a good place to use Block Image as well, because removing the images can remove clickbait and also keep you from staying on youtube for hours when you click on one video thumbnail after another.
Obviously the only place you can’t really use the Block Image extension is on image searches, but other than that it can really increase your productivity when doing work in which images are just a distraction.
The functionality is limited, and there is no ability to whitelist sites; it is either all or none. However, that is fine because there really isn’t any site I would want to blacklist from images, instead I just use it when I want a distraction-free internet experience. It is an easy toggle that makes things very simple.
This excellent Chrome privacy extension for blocking images across the internet is here: Block Image.
2 HTTPS Everywhere
What’s Awesome: The HTTPS Everywhere privacy extension for Chrome basically makes sure you are always using the encrypted, HTTPS version of websites when they are available. HTTPS is the encrypted, SSL version. HTTPS Everywhere is a critical privacy extension to have. It is another one you can set and forget, you could even hide the button in the chrome menu to save space.
This privacy extension for Chrome is officially released by The Tor Project and the Electronic Frontier Foundation, so you know there are strong companies behind protecting you. You should definitely be using the HTTPS Everywhere Chrome extension to protect your privacy online.
You can get the official Chrome privacy extension for enhancing web SSL here: HTTPS Everywhere.
1 Location Guard
What’s Awesome: I was thrilled when I discovered the Location Guard privacy extension. I have been waiting for an extension like this for a long time, and finally there is one. Not only does it work excellently but it does not use any proxies like some of the other location privacy extensions. I find free web proxies to be unreliable at best, as well as slow, so really proxies are not a solution to the location problem.
The problem is that Chrome exposes your IP address to websites, so that even when you hide your location or don’t log in, any website can automatically track where you are. This is because your IP address, wifi connection, and other factors all reveal your location very precisely, sometimes up to a few meters of your physical location. This is very bad, so that is where the Location Guard privacy extension comes in.
The old way to bypass this issue is to always use a high-quality VPN; of course, any VPN worth its salt is not free, and all VPNs by nature will be slower than your regular internet. You sacrifice speed for privacy. While a VPN is great to use for securing your privacy online, it is not a universal solution, because it will only help those who pay for it which means only a few percent of users will ever get this privacy through a VPN.
However, with the Location Guard extension for Google Chrome, finally there is an awesome and fully working privacy extension that allows you to either obfuscate or confuse your location. The fail-safe way to test this is to open up Google Maps and see if it tracked your location. I was so happy when I opened up maps and it was way zoomed out so it couldn’t see precisely where I was.
Location Guard privacy extension also allows you to spoof your location to be anywhere, which is awesome for maximum privacy. You could say you are in the middle of the Pacific ocean if you want, and Google will think you are on a cruise. As a result of the privacy that Location Guard affords, this is my #1 favorite new extension for privacy in 2017.
Here is this awesome Chrome privacy extension for protecting your location: Location Guard.
I hope you liked this list and it helped you be safer on the internet with these five great privacy extensions. What is your favorite privacy extension for Chrome?
Share:
- Click to share on Twitter (Opens in new window)
- Click to share on Facebook (Opens in new window)
- Click to share on Pinterest (Opens in new window)
There are many web browsers out there, but these are the four most popular: Google Chrome, Mozilla Firefox, Microsoft Edge, and Apple’s Safari. They have their differences, but they also have many similarities.
Sadly, one of their similarities is they can all be hacked in various ways. This can lead to your private information getting out and cause personal or financial harm to you. Tap or click here for signs that your device has been hacked.
There are ways you can make your web browsers more secure, though, and prevent hacks and malware from messing with your machine. Read on to see what you can activate in your browsers to lock them down and make them more secure.
Don’t make it easy to get your location, microphone or camera
Many web browsers access your geographic location via your IP address to ensure your web searches give you local results. They also often have direct access to your built-in camera and microphone so you can easily make video calls on certain sites.
This is all very convenient, but also a huge security risk. Hackers and malware can learn your location if your browser knows it at all times, as well as access your camera or mic and record you. Tap or click here to see a hacker accessing a security camera.
Chrome, Firefox, Edge and Safari can all help mitigate this risk through their settings. They each have the ability to turn off access to your location, camera and microphone, and instead ask permission every time before trying to access them.
While in the browser, simply go to your Settings/Preferences page, and look under “Privacy,” or “Privacy and security.” Under Location/Location Services, select “Deny without prompting,” or turn on “Ask before accessing.”
Do the same under Camera and Microphone in your Privacy settings. On a Mac, you may need to go into your computer settings to adjust access, rather than just Safari. But for the other browsers, you should have the ability to require access.
Stop automatic downloads before they start
Like location services and quick access to your camera, it can be convenient for your browser to download something the second you click on it. But it can also get you to download malware or other viruses because you didn’t look over a file first.
Opening downloads can create similar security problems. Keep yourself safer from malware by disabling automatic downloads on your web browser.
In Chrome, head to the “Privacy and security” heading in your Settings, and click on “Content settings.” Click on “Automatic downloads” in there, and toggle the “Ask when a site…” switch to on.
In Safari, open your Preferences, and click on the “File download location” drop-down menu in the General tab. Select “Ask for each download,” so Safari asks for a file name, and a location for each download, instead of just downloading it.
In Firefox, head to Preferences, click on the “General” tab and look for the “Applications” header. With each content type listed, make sure the Action is “Always ask” to prevent any file type from being saved automatically.
In Edge, go to your Settings, then Advanced Settings, and look for the “Downloads” section. Set the “Ask me what to do with each download” toggle there to “On” so your computer doesn’t accidentally save a virus.
Disable pop-ups and redirects
Pop-up windows and redirects in webpages are annoying, but like automatic downloads, they also can give you malware to combat. Have your web browser disable pop-ups and page redirects, and/or need your permission to run them.
In Chrome, you’re still heading to “Privacy and security” under Settings. Click “Site settings,” then “Pop-ups and redirects,” and set that setting to “Blocked.”
In Safari, you’ll want to head to Preferences and the Security tab. Check the “Block pop-up windows” box to disable pop-ups. The steps are the same in Firefox, it’s just called the Privacy and Security tab, instead of just Security.
In Edge, head to your Settings, then click More to get to “Site permissions.” Select “Pop-ups and redirects,” and shift the “Block” toggle to “On.”
Make private browsing your friend
Using private windows, also known as incognito mode in Chrome, doesn’t make you completely secure while browsing. Hackers can still potentially access your IP address and computer data.
Private windows don’t save your browsing history, cookies, site data, or form information though. Tap or click here for more about incognito mode.
That’s all still really great for security, so it’s great to add to your list of things to do with your browser from this article. It’s also really easy to open a private window.
Just right click on your web browser application, and select “New private/incognito window” from the options that appear there. On a Mac, you can access this option from the top application menu bar as well.
Keep your browser up to date
Developers are constantly looking for weak spots in their web browsers. If they find any, they fix them and send that patch out in a software update for the browser. Patches and updates can also contain fixes for issues a web browser is having. Plus, it can include preemptive security against new viruses appearing on the web.
It’s therefore very important to keep your web browser up to date. It’s also easy to do! Simply do a web search for your browser, and download the latest update available on the developer website.
Most browsers will also let you update your browser via their menus. Just know you’ll probably have to re-launch your browser once you update, so make sure you save any pages and work you’re doing before going for it!
Get a VPN
Hiding your IP address can abate many of the security risks you face online. It allows you to conceal your location and most personal information that can be gathered about you on websites too.
Using a VPN lets you hide your IP address as often as you like. Some VPNs are free, but many those can’t be trusted and have been caught selling user’s information. Instead, we recommend our sponsor ExpressVPN.
Google Chrome sends personal data to Google by default, but it doesn’t have to. We’ll show you what information each feature sends to Google and why, so you can get the goodness of the Chrome browser without sacrificing privacy.
Each option provides an advantage, so you’ll lose some of Google Chrome’s features by disabling many of these options. Still, you can make informed decisions if you’re worried about Chrome sending data to the mothership.
Instant
Click the wrench menu at the upper right corner of the Google Chrome window, then click Options to view Chrome’s options page.
Chrome’s instant search works just like Google’s search page; a full Google search results page appears as soon as you start typing in Chrome’s address bar. Chrome sends everything you type into the address bar to Google if this is on, even if you’re typing a website address.
Instant is disabled by default for now, but you can uncheck the Enable Instant check box on the Basics tab if it’s enabled.
Sync
Chrome can synchronize your bookmarks, extensions, passwords and other browser data between your computers, but it does this by storing the data on Google’s servers.
If you’re not comfortable sharing this information with Google, click the Disconnect button on the Personal stuff tab to disable Chrome sync entirely.
Chrome can also encrypt your personal data, so you can store it on Google’s servers in an unreadable form. Click the Advanced button in the Sign In section and select “Encrypt all synced data” to activate Chrome’s encryption.
Use the “Choose my own passphrase” option and set up your own passphrase to ensure Google can’t read your personal data. You’ll need this passphrase on each computer you sync Chrome with.
Privacy Settings
The privacy section on the Under the Hood tab contains five different privacy options.
When Chrome can’t connect to a website, it sends the website’s address to Google. Google sends website and search suggestions in response, and Chrome Chrome displays them on a customized error page. Uncheck the Navigation Errors checkbox if you don’t want Chrome informing Google of website addresses when they won’t load.
Chrome sends everything you type into the address box to your default search engine. Google uses this information to offer similar website addresses and related searches in the menu that appears below the address bar. Disable the Prediction Service check box and Chrome won’t send everything you type into the box to Google.
Chrome automatically looks up the IP addresses of websites linked to from your current page. Sometimes, Chrome automatically loads a new web page in the background when the website you’re visiting instructs it to. The Predict Network Actions check box controls this behavior.
Google’s safe browsing feature has Chrome automatically download a list of potentially dangerous websites. When you visit a website that appears on the list, Chrome sends a portion of that website’s address to Google in an obfuscated form along with your IP address and a cookie, and Google tells Chrome whether the website is actually dangerous. Chrome won’t provide a warning when you access malicious websites if you disable this feature by unchecking the “Enable phishing and malware protection” check box.
The last option is the only one that’s disabled by default. It causes Chrome to send detailed information about crashes, preferences and other general browser information to Google if you enable it. Chrome never sends the address of every website you visit to Google, but it will send the full address of potentially malicious websites if you enable this option.
Cookies
Click the Content Settings button in the Privacy section to view more options.
Enable the “Block third-party cookies” check box to prevent Chrome from accepting third-party cookies, which are often used by advertisers to track you online. Some websites won’t work properly if you enable this option, so you might have to disable it later.
Select the “Allow local data to be set for the current session only” option to have Chrome automatically delete cookies when you close it. This approach isn’t as drastic as disabling cookies entirely; websites that depend on cookies will still work. Websites won’t be able to track you over time with cookies, although you’ll have to log back into all your accounts after reopening Chrome.
Location Tracking
Scroll down to the Location section on the Content Settings pane and ensure the location feature isn’t set to Allow All Sites. Chrome’s geolocation feature allows websites to track your physical location and offer local content such as weather or directions, but Chrome asks you before sharing your location with websites by default. You can also set the option to Do Not Allow to disable the location-sharing feature entirely.
Whether you’ve disabled all the features listed here or left the ones that seem useful enabled, you’re now in control of Chrome’s privacy options.


