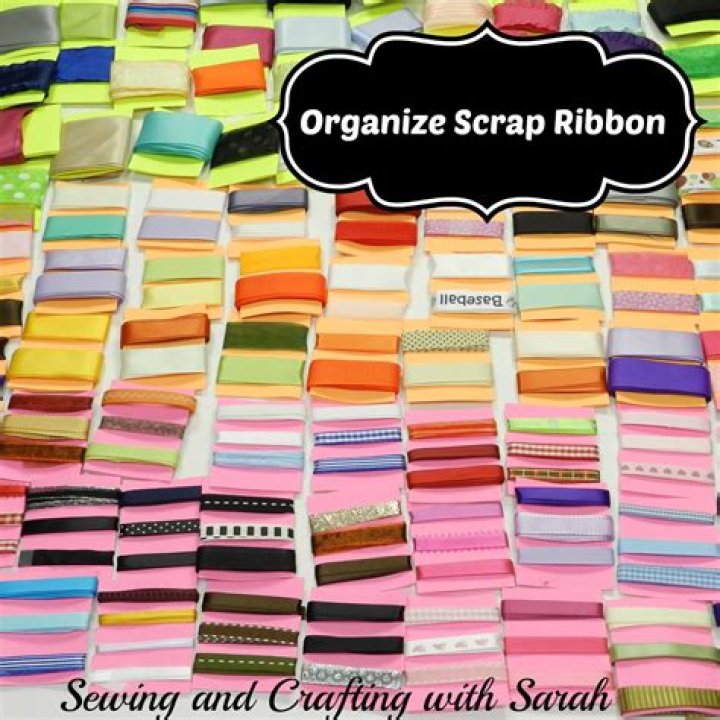
Ribbon can quickly become overwhelming in your scrapbooking space. There are so many beautiful options and colours!
Before you know it you have a nightmare of tangled ribbon to try and sort out. Yikes!
Don’t worry. I have a simple way to organize ribbon.
Follow my tricks and you can get your ribbon under control too. Don’t miss my secret to maintaining it!
Let’s take a peek at the ribbon storage in my scrapbook room. I’ll share some of the best tips that really work to help me keep my ribbon stash under control.
Sort it
Rolls, packages, and loose ribbon. You need a plan to deal with all of it.
As you sort it ditch anything you know you will not use. Your tastes will change over time so don’t feel that just because you used to like it that you must keep it! (If you really hate throwing it out find a good place to donate it; schools, retirement homes, play-schools, etc.)
I use a Clip It Up Ribbon Organizer (from Simply Renee) to hold most of my spools of ribbon. I decided I didn’t like the look of ribbons hanging all over the place, so I don’t hang ribbon out of it. Want something similar? I’ve heard that a piece of plastic eavestrough works for this too!
I sort the ribbon by rainbow colour inside the organizer so it is easy to see my options when I’m creating.
I like that it stores a lot of rolls and I can easily grab a roll and take it to my table.
Contain it
Assign a home to each ribbon. Use containers. Don’t just dump everything into a drawer! Go through your old Tupperware, shoeboxes or baskets to keep things from getting tangled and rolling around inside a drawer when you pull out ribbon to use.
One Tupperware container holds packages of ribbon. They are stacked on the side so it’s easy to peek at what’s in the package and find the perfect ribbon.
This ribbon storage box is the perfect way to sort and store the shorter lengths of ribbons and leftovers from a roll. You wrap the length of ribbon around a small piece of cardstock and then sort them by colour or type. I’ve seen these types of boxes in Walmart and dollar stores.
Maintain it
Now that all of your ribbon has a home you need to maintain the system. Take the time to put things away after you use them. When you purchase new items fit them into your system. This regular maintenance makes all of the difference!
Here’s my secret to maintaining this system! Think I’m perfect, and that my ribbon section always looks this wonderful? I wish! The photo of the messy ribbon is from my own stash. I keep a container where I stash the ribbons that have not yet been incorporated into my system. This is where the pieces I pick up from my shopping trips end up before I finally sort them out. Yes… it’s been a while, so I’m getting on it! 😉
So, are you ready to go and organize the ribbon in your scrapbooking space? I’d love to hear if these ideas work for you, or if you’ve found something even better!
If you have punches that could use some organization check out this blog post: 4 Easy Steps to Organize Punches
Take one smart step in your organization and take a look at all these creative ribbon storage ideas for your organized home!
Proper placement and arrangement is of utmost priority for a large fragment of the population these days. A person is often judged by the way he/she carries himself and maintains his house. No one likes a messy place with things scattered all over. Storing ribbons is a real ordeal. So, today we have brought to you some innovative ideas on how to store your rolls and stacks of favorite ribbons, arranged fashionably
Ribbon Storage Ideas for your Home
Wall ribbon holders
If you own a craft material shop or are into any business which involves keeping huge stocks of a variety of ribbons, then this one is best suitable for you. You can have racks as shown in the picture, built on your walls and can arrange ribbons of various sizes or colors or designs. You can easily differentiate between the ribbons if you keep them in this fashion with a certain basis to distinguish.
This idea will not require any extra space or any cabinet to be built up specially for this purpose. This can be easily done with the help of a carpenter and it is not expensive at all.
Add a new look to your walls and give your ribbons a new place.
Modular Racks for Ribbon Storage
If there are limited rolls of ribbon which you want to be individually distinguishable, then you should use this idea for sure. Using this idea, you can keep various shades of one color in one compartment. This will make it very easy for you to identify the ribbon you require. This will prevent wastage of time in searching for a different shade/ variety. This also gives a fancy look to your walls and does not unnecessarily block space. Regarding the expenses incurred, this idea is very cost effective and does not require much efforts and time to set up also.
Box- it- up
If you have just 14- 15 ribbons which you do not want to place haphazardly in a box, you can use this type of boxes with compartments and partitions to arrange your ribbons the way you want. It will impart a trendy look and make it easy for you to identify also. The ribbons placed like this will not get folded or crumpled and there will be no wastage also. These type of boxes are easy to find and does not cost much also. It is compact and can be easily carried from one place to another.
You can also use various kinds of such boxes and label them according to your requirement.
Hanging kaleidoscope
These are a more fancy and improvised versions of the earlier wall storage compartments ideas. They will give a lavish look to your walls and at the same time keep the ribbons intact and properly arranged. You can arrange the ribbons as it is convenient for you. These cabinets might be more expensive than the previous ones, but certainly these will give a trendy look to your walls and it is very innovative way of arranging ribbons. This is also not difficult to set up. You can easily get these compartments online.
It’s going to be a ribbon- climb
If you have an old ladder and want to bring it to use, what can be a better idea than this? This is a multi- advantageous idea. You can make the best use of the ladder and sort out your ribbons also.
This is not at all expensive and can be easily done with the help of a carpenter or a specialist. You can use fancy ladders to make it look more trendy and fashionable. The ribbons can be arranged in any way that you wish and think will be convenient for you, both for identification and handling.
Try out this unique idea. It will certainly benefit you.
Basket full of ribbons
This is what we call as a compact and perfect management. How to utilize the scarce resources to gain the maximum benefit. If you have a handful of ribbons and want to accommodate it in a small space, this idea fits in best for you. Take a basket like this one in the image above and use it the way you require your ribbons to be. This is a very effective and efficient handling process. It is handy and can be taken from one place to another.
Considering the expenses part, the total expense is the price of the basket. It is completely affordable and will give an elegant look to the place you keep it at.
Elegant Hangers
If it is convenient for you to hang ribbons at their entire length in a manner as shown in the picture, then this is one of the most beautiful and eye- catchy idea that you can come across. And all you need for this idea are fancy hangers which are easily available in the market. It will also be easier for you to differentiate and select the best one for the task in hand.
This would not cost much but requires proper handling. Suspending colorful ribbons in this manner will add a charm of it’s own no matter where you keep it.
Layered Ribbon Jars
Image source/ Tutorial: The cottage mama
Ribbons can also be decorated like in the picture given above. If you plan to keep the ribbons on a desktop or on a table or slab, you can design them in this way. All that you have to do is make hard disks and strong square holders that can bear the weight of the ribbons. You can even make this at your home. This will give a different look to the place and make you feel happy every time you look at it. You can use different designs for this same idea also.
These were a bunch of exciting and innovative ideas for arranging ribbons. You can similarly arrange many other things using these ideas. For any further help, do not hesitate to visit us again. We will be there for you with another set of fresh and enthralling ideas that will be sure fun to try. Thank you! Do try these ideas till we see you again.
It’s cold and snowy here in the Midwest, we’re currently between snowstorms. and I always like to have a project on hand for a rainy day. Perhaps I’m dreaming of warm summer days, or perhaps it’s the fact that I’ve thought about this far too long, but I finally decided to tackle the mountain of swim team ribbons that have accumulated over the past five summers.
Five summers
70+ ribbons
Current residence: An old tin Star Wars lunch box.
I knew that this storage solution wasn’t working. As my son gets older and less excited about earning a ribbon, I’m more apt to find his ribbons wrinkled and wet at the bottom of his swim bag. Not exactly preserved for posterity. And certainly not finding their way to the Star Wars lunch box. I’ve seen ribbons displayed on O-rings, but that solution didn’t solve the wrinkle problem in my brain. I’ve seen ribbons hung on display pegs, but, aside from looking too cluttered for my taste, I pictured them falling and becoming tangled with the slightest breeze or slam of the door (‘tween Moms, I see you).
Then, I found these ribbon album pages on Amazon. BINGO.
I watched the price on Amazon for a long time. I poured over the reviews. And I looked for a comparable product at my local office supply stores and craft stores. I didn’t find anything. So, I placed my order and hoped for the best.
It was worth every penny
I sorted the ribbons by date since we had 5 years worth of ribbons to organize. I suppose a competitive swimmer might further sort by event, but I didn’t think that would be necessary for my son’s neighborhood summer league. Still, I thought it would be fun to look through the ribbons and see his progress over the years. And with transparent sleeves, the times were visible on the back.

Hints
The project didn’t take nearly as long as I expected it might. Overall, I found that the ribbons were easy to insert in the sleeves. Most of the ribbons were starchy enough to maintain their form. But when they were a little softer or wrinkly, I used the tip of a pencil eraser to get traction and slide the ribbon into the sleeve. I also snipped off the strings. I am sure there’s a fancy way to align the strings, but I didn’t have the time or patience for that!
After I filled the sleeves, I placed them in this 2″ D-Ring binder I found at Costco. A 4-pack was on sale for only $8.99. Couldn’t beat it!
I added a photo and a Championship ribbon (that was too big for the sleeve) for the cover and we have ourselves a winner. Bonus? There are plenty of pages left over for this summer. We’re going to need them as my daughter aspires to join her brother on the swim team!
Learn how to organize ribbon spools and ribbon scraps. This is part of the 30 days of organizing your sewing room series.
Ribbon is one of those notions that I have a hard time storing. They come all nice and fancy and organized- but soon after using them a few times, they become a jumbled mess!
For most of my ribbon, I store them in a drawer. It’s not the best option, but after trying a few different things and putting together a new sewing room – there are better options to try!
What I have used in the past is clear ziploc baggies. While that’s ok for short term storage, you’ll find that you’ll get knots (similar to thread) and be super frustrated when trying to pick out what you need. In addition to that you can’t really tell how much is actually left of that type. Many times I have found the perfect ribbon and when it was pulled out it was 2″ long! Argh!
Ribbon usually comes on a spool. The center hole is typically the same size so that does help when you are choosing a dowel to hang them on. After a time though you will have little ribbon scraps all over because there isn’t enough to stay on the spool. There are a few ideas for those as well– it happens to everyone!
Besides ribbon, ric rac, lace and ruffles are rolled onto a spool. So these ideas are great for any kind of those notions.
How to Organize Ribbon Spools
I have two spindles that I use for some ribbon. I need quite a few more- but they are fun to use with the cuter ribbon that can be seen all the time.
Plastic basket with holes to pull the ribbon through
How to Store Ribbon Scraps
Have a suggestion for storing your ribbon spools and ribbon scraps? Share it!
All the details you need to know about Quilting & how to get started!
Quilting doesn’t have to be hard or complicated and overwhelming. It can be fun and a great way to relieve stress! Start with our 13 quilting basics for beginners and end with a fun sewing project. With a variety of projects, tutorials with the hints and tips, videos and more – you’ll find something new every time you visit.
EVA TALENT
4 OCT 2017
CLASS
Military ribbons are awarded to service members for accomplishments during service. Overseas campaign medals, unit citations and awards are worn as ribbons on military dress uniforms; these ribbons are placed on a ribbon rack and worn in a specific order according to each branch’s uniform regulations. Some ribbons, like the Army Commendation Medal ribbon, take precedence over ribbons like the Army Service ribbon. Ribbons are never worn without being placed on a ribbon rack.
Purchase each ribbon you are authorized to wear. Ribbons that meet military specifications are available at Military Clothing and Sales stores on most military installations.
Purchase a ribbon rack that holds the exact number of ribbons you are authorized to wear. Do not purchase a nine-ribbon rack if you are authorized onlyseven ribbons; regardless of branch, empty spaces are never authorized on a ribbon rack.
Visit EZRackBuilder.com. EZRackBuilder adheres to the uniform regulations of each branch and helps service members determine the correct order of precedence for military ribbons.
Select your first ribbon. You do not need to choose your ribbons in any particular order. Watch the right side of your screen as the ribbon appears in the box below the text “Rack Builds Here.”
Select your second ribbon. The ribbon will appear in the appropriate place beside your first ribbon according to your branch’s uniform regulation. For example, if the first ribbon you chose was the Afghanistan Campaign Medal ribbon, and the second was the Iraqi Campaign Medal ribbon, they appear in that order on your ribbon rack from left to right. If you then select the Army Service ribbon, it will appear to the right of both campaign ribbons because ribbons are worn in order of importance.
Select every ribbon you are authorized to wear. When you have finished selecting your ribbons, evaluate their order on the rack displayed.
Place your own ribbons on your ribbon rack according to the online ribbon rack. Ribbons are placed left to right in order of precedence, and as you build your rack make sure it looks identical to the one online. This will ensure each ribbon is in its proper place and is not out of order.
I just found your blog via the photo of the vase on Pinterest! I have boxes & boxes of ribbons that I put away because I stopped hanging them once I got older (now it’s all about winning money) but I love this idea. TJ Maxx is calling my name & I just might have to go shopping soon & do this! Ribbons always bring back lots of good memories & displaying them like this is perfect!
Raquel, I’m glad you found it! I love Pinterest! Have a great time making your vase and enjoy the memories! Good luck at the $hows!!
how did you secure the ribbons on the back of the rosette? Great idea!
Thanks, Kim. We folded them up and just slipped them under the clip that is on the back of the ribbon. That holds them nicely!
Where could I find a vase that big?
Hi Emily, If you have a Marshall’s or Home Goods store nearby you’ll be able to find one there or look online. I hope that helps 🙂 Have a super weekend
Thank you so much for visiting and sharing your thoughts! Comments are moderated, so I don’t miss anything. I like to read each and every one!
When you leave a comment on a blog post, please be aware that the comment is then public and visible to anyone who reads the comment section. Your email address is never shared or disclosed, but your name and comment will be visible to others. You may choose to leave your comment anonymously. It is highly recommended that you avoid leaving detailed personal information in your comments. For more information please read Life Tastes Good’s Privacy Policy before leaving a comment > Life Tastes Good’s Privacy Policy
I reserve the right to remove comments deemed as inappropriate, threatening, profane, or spammy without notice.
By Ask the Experts
Friday, December 6th, 2013 at 5:56pm
Do you use fibers, ribbons, and decorative tape in your crafting? Are your threads tangled, your ribbons mangled and your tape stuck together? Use a peg board to store and find them easily.
Nikki and Elizabeth, her professional organizer, are working to get Nikki’s craft room straightened out so she can concentrate on her crafts and not the mess. Nikki works mostly with paper crafts. She makes scrapbook pages, cards, decorated boxes and many other crafts using paper.
Elizabeth suggested at their last session that Nikki attach a peg board above her crafting table to add more storage area. Nikki painted it to cover the ugly brown color and has installed it.
Nikki uses all kinds of things to create beauty on paper. Ribbons, fibers and decorative tape are some of her favorite embellishments. She has ribbon and threads on spools, in skeins, and loose lengths that need to be organized and stored. The decorative tapes she uses are also on spools.
Elizabeth tells Nikki that storing things on the peg board will not only keep them right at hand, but also serve as a bright spot in the room. They string anything on a spool on wooden dowels. The ends of the dowels are attached to pegs so the spools of color hang like a garland across the peg board.
Nikki strings the spools by color creating a rainbow effect. To get what she wants, Nikki just has to pull it off the spool and cut what she needs, without taking the spool off the dowel. New spools can easily be added, and used ones removed, by unhooking the dowel from the pegs and slipping the new spool on.
Fibers and ribbons in skeins are hung directly on the pegs. Nikki arranges them in the same color order as the spools.
After hanging up all the spools and skeins they are left with various types and lengths of loose ribbons and fibers. Nikki has several small plastic bags with a hole punched in them. Elizabeth shows her that the short lengths can be put in the plastic bags. The bags can then either be hung directly on a peg or threaded on to a metal shower ring and hung on a peg. Nikki once again separates by color and hangs the shower hooks in the same color order as the spools and skeins.
Elizabeth tells Nikki they are not finished using the peg board. Nikki uses some small electric tools as she works. She has been threading the electrical cords between the table and the wall and crawling under the table to plug them into a power strip. Elizabeth proposes Nikki attach the power strip to the peg board. They hang the tools on pegs near the power strip and loop the cords over the pegs. This gets the tools and cords out of the way, and saves Nikki’s knees from carpet burns.
When they have finished with the peg board, Nikki steps back and admires the pattern she has made with the colors. She tells Elizabeth she is amazed that something so practical could also be so beautiful.
Learn along with Nikki as she and Elizabeth, the professional organizer, get the house organized room by room. Start the series here.
Copyright© 2013 Elizabeth Tawney Gross, Organizing For Everyday, LLC
- SMS
Bryan Gardner / Martha Stewart LivingHere’s a great way to put some order into that jumble of ribbons in your drawer or sewing basket.
- SMS
- Save
- SMS
- Save
Q: How can I organize scraps of ribbon?
— Kathy Callos, Media, Pennsylvania
A: Keep them neat by wrapping them around a rectangular piece of cardboard. Group them by color or material, then secure each ribbon with a ball pin. File the cardboard in a box or bin.
Q: I’ve mastered making a simple vinaigrette, but I’d love to expand my options. Any recommendations for other easy dressings?
— Fernanda Autry, Waxhaw, North Carolina
A: Any vinaigrette is, at its most basic, a balance of oil and acid. Experiment with various combinations of each, then adjust the flavor with herbs, spices and other items from your pantry or fridge.
Q: How can I get my dog to take her medicine?
— Lori Lalonde, Toronto
A: It depends on the form the drug comes in and your pet’s diet, says Barry Kellogg, senior veterinary advisor at the Humane Society Veterinary Medical Association. Follow his techniques:
• If the drug is a liquid, pull out the side of your pet’s cheek and, with a syringe or teaspoon, squeeze or pour the medicine into her mouth. Avoid tilting her head back or forceful squirting, which can cause choking. Reward her with praise or a treat.
• If it’s a pill, push it into a piece of hot dog or cheese, a spoonful of peanut butter or any treat you know your pet enjoys. The trick is not to put the pill in the first bite of food but to hide it in a subsequent one. This will prevent your pet from suspecting something is in all her treats and avoiding them altogether.
• As an alternative, you can try pushing the pill into your pet’s mouth — beyond the base of the tongue — and holding her head high until she swallows. Follow up with a reward. This method works best for pets on highly restricted diets that cannot or will not take medication with a treat.
Q: What’s the trick to crisp waffles? Mine always turn out too soggy.
— Julie Servantez, Milton, Wisconsin
A: All it takes is a little patience. First, preheat your waffle iron and start with room-temperature ingredients — a cold batter can lead to undercooking. Next, make sure each waffle is fully cooked before you open the lid of the iron; you’ll know it’s ready when the steam stops billowing out. Remove the waffle and gently toss it back and forth between your hands several times, allowing steam to escape before it hits the plate. Finally, top it with syrup and butter just before you’re ready to eat — and enjoy!
Q: I have a hard time washing the insides of my thin-necked bottles and vases. Any suggestions?
— Mary Ellen Wollam, Oviedo, Florida
A: Enlist the help of a fizzy mix of vinegar and baking soda, following these steps. The bubbles will do the work as they seep into angles and crevices.
Working over a sink, fill the vessel with 2 inches of white vinegar. Add baking soda until it foams. When the foam subsides, scrub off stubborn grime with a narrow bottle brush.
To absorb moisture (and prevent residue), insert a twirled paper towel. Leave a bit of towel sticking out at the top so you can pull it out when the bottle is dry.
- SMS
Bryan Gardner / Martha Stewart LivingHere’s a great way to put some order into that jumble of ribbons in your drawer or sewing basket.
- SMS
- Save
- SMS
- Save
Q: How can I organize scraps of ribbon?
— Kathy Callos, Media, Pennsylvania
A: Keep them neat by wrapping them around a rectangular piece of cardboard. Group them by color or material, then secure each ribbon with a ball pin. File the cardboard in a box or bin.
Q: I’ve mastered making a simple vinaigrette, but I’d love to expand my options. Any recommendations for other easy dressings?
— Fernanda Autry, Waxhaw, North Carolina
A: Any vinaigrette is, at its most basic, a balance of oil and acid. Experiment with various combinations of each, then adjust the flavor with herbs, spices and other items from your pantry or fridge.
Q: How can I get my dog to take her medicine?
— Lori Lalonde, Toronto
A: It depends on the form the drug comes in and your pet’s diet, says Barry Kellogg, senior veterinary advisor at the Humane Society Veterinary Medical Association. Follow his techniques:
• If the drug is a liquid, pull out the side of your pet’s cheek and, with a syringe or teaspoon, squeeze or pour the medicine into her mouth. Avoid tilting her head back or forceful squirting, which can cause choking. Reward her with praise or a treat.
• If it’s a pill, push it into a piece of hot dog or cheese, a spoonful of peanut butter or any treat you know your pet enjoys. The trick is not to put the pill in the first bite of food but to hide it in a subsequent one. This will prevent your pet from suspecting something is in all her treats and avoiding them altogether.
• As an alternative, you can try pushing the pill into your pet’s mouth — beyond the base of the tongue — and holding her head high until she swallows. Follow up with a reward. This method works best for pets on highly restricted diets that cannot or will not take medication with a treat.
Q: What’s the trick to crisp waffles? Mine always turn out too soggy.
— Julie Servantez, Milton, Wisconsin
A: All it takes is a little patience. First, preheat your waffle iron and start with room-temperature ingredients — a cold batter can lead to undercooking. Next, make sure each waffle is fully cooked before you open the lid of the iron; you’ll know it’s ready when the steam stops billowing out. Remove the waffle and gently toss it back and forth between your hands several times, allowing steam to escape before it hits the plate. Finally, top it with syrup and butter just before you’re ready to eat — and enjoy!
Q: I have a hard time washing the insides of my thin-necked bottles and vases. Any suggestions?
— Mary Ellen Wollam, Oviedo, Florida
A: Enlist the help of a fizzy mix of vinegar and baking soda, following these steps. The bubbles will do the work as they seep into angles and crevices.
Working over a sink, fill the vessel with 2 inches of white vinegar. Add baking soda until it foams. When the foam subsides, scrub off stubborn grime with a narrow bottle brush.
To absorb moisture (and prevent residue), insert a twirled paper towel. Leave a bit of towel sticking out at the top so you can pull it out when the bottle is dry.
..All about sewing, embroidery and crafts
- Home
- About
- Find Us
- In Bahasa
How to organize ribbons
>> Wednesday, 10 April 2013
Wow it’s been quite a while since I last wrote anything here in English, and in one go! Time flies really, and this is my 1st English entry for year 2013.
It was raining heavily outside and I had everything switched off except (of course) the refrigerator. With no tv or notebook around, I was idle thinking what to do, then spotted the stacks of 30 x 50 x 20cm plastic containers, which I use to store my satin ribbons. So when the rain stopped, I came across these wonderful and creative, yet simple and affordable ideas of how (should I) organize ribbons (and treat them well)
Clear and transparent jar, easy to spot but may not suitable for types of ribbons that can be easily crumpled.
2. Ribbon organizer
This one is quite common. and is available in any craft’s shop. I have 2 different sizes of this kind, but I use it to store something else. (and they are not related to craft’s work at all)
3. Cassatte deck
Who still keep collections of old cassette these days, like me. I even still have a cassette player in my car. (trust, I am not that old!)
I am sure I own a set of jars similar like this, somewhere I cannot recall where I put it.
5. Use the kitchen basket.
I have this similar basket in my kitchen, which I use to dry my dishes. This sure is handy when craft project is on the go.
6. Something-else-organizer turned dispenser
Wow, I dearly love this one. Great ideas which I should make one on my own ( then sell it online)
7. Simply use the hanger
Great ideas, to organize ribbons and hide it from mom (and lock the wardrobe) whenever she came around and do spot-check. ( she would say why is my daughter get into this craft’s trouble )
This reminds me of my old DVD player which I havent use for more than a year.
9. Use the dress form mannequin
This is a darling idea. Somehow rather, it reminds me of the late Margaret Thatcher who passed away today.
10. Last but not least (drum please)
Use the custom-made cabinet. The schematic way of organizing of course, organized according to the wheel color, then dream 🙂
You will find posts about scrapbooking, cardmaking, Mixed media, altered object, tags. anything about papercrafts and so much more.
Pages
- Home
- Resume
- Layouts
- Cards
- Altered objects
- Tags
- ATC
- Art Journal
- Mini books
- Youtube video
Tuesday, February 27, 2018
How do I organize my ribbons ?
Here is the design and measurements I came up with :
I hope this post will inspire you to get those ribbons organized ! Thank you for stopping by, I hope to see you very soon for another project !
Have a great day.
P.S. : here is the affiliate links to the washi storage box I used :
- We R Memory Keepers – Craft Storage Bin – Washi
- Price: $26.24
8 comments:
Fantastic ribbon storage! So neat and organized and pretty. Good luck on your move. again!
Thank you Jennifer ! So many other things to sort.
What a great idea. Wish there was a die to cut all those spools. I might try this. My ribbons look like the before. Thanks
I think Sizzix had one for a ribbon spool, but with round edges. Anyway, dies cannot cut the foamboard.
Found your post on Scrapbook.com, and came to read your post. I think this is brilliant, using foam core, because they won’t bend, like using cardstock or designer paper does. (That’s how I have my laces, but they’re already getting wonky)
Glad you find me ! Foam board is really inexpensive and you can cut a lot of spool in only one board. I now have three of these boxes. thanks for reading my post !
What yardage does a bobbin hold? Can you get multiple yards from a spool on them, at that size? Very interested in knowing that. thanks again.
It depends on the type of ribbon. Less for laces and larger ribbons, more for twine and thin ribbons. Average can be between 1 and 2 yards. I keep new spool on original packages inside the boxes (there room for them) until I used few feet.
Sale @ Scrapbook.com
Follow me
Featured Post
Thank you cards challenge ?
Hello ! While checking Facebook and other social medias, I did see a lot of dumb challenges. On the other hand, I also saw a lot of pos.
Pyssel, inspiration, DIY, inredning, fotografering
Fina tygband och spetsar är roligt att använda när man pysslar, syr eller slår in paket. Mina band har dock hittills legat huller om buller, hoptrasslade med varandra och i flera olika lådor. Svårt att få någon överblick.
Som så ofta innan hittade jag lösningen via en bild på Pinterest. Bilden ledde mig till en sida som heter Instructables (smart sida för övrigt!) och där fanns en beskrivning på hur man använder TicTac-behållare som praktisk förvaring för tygband. Genialt! Som tur är har jag en make som gillar minttabletter och på Lidl kom jag över ett gäng TicTac’s riktigt billigt.
Beautiful trims, ribbons and lace is fun to use when you’re crafting, sewing or wrapping gifts. My trim stash has been a total mess up to now, all tangled together and no order at all. It’s been hard to get a proper overview.
As so often before I found the solution via an image on Pinterest. The picture led me to the site Instructables (a great source of inspiration, by the way!) and there I found a description on how to use TicTac containers for a smart ribbon storage solution. Ingenious! Luckily I have a husband who likes mints and I was able to lay my hands on a bunch of TicTac’s really cheap at our local grocery store.
TicTac-tabletterna hällde jag över i en större burk som jag piffade till med lite washi tejp (inget får förbli opyntat, det förstår ni va?). 😉 /
I poured the TicTac tablets into a large jar and pimped the jar with some washi tape (nothing may remain unembellished, you get that right?). 😉
Nu är det ju så att TicTac-behållare är ganska smala och några band fick helt enkelt inte rum. Detta löste jag genom att klippa till kartongbitar som jag sedan virade mina breda band runt. Jag fäste ändarna med synålar. Småsnuttar av band lindade jag runt en kinapinne istället. /
It just so happens that TicTac containers are quite narrow and some of my trims simply didn’t fit. I solved this by cutting out pieces of cardboard and wrapped the wider trims around them. I pinned down the ends with sewing needles. I wrapped tiny trim scraps around a chopstick instead.
Resultatet blev både fint och överskådligt, tycker jag. Som bonus för att jag varit så duktig “fick” jag köpa lite nya band (och lite ny washi tejp) på Etsy… Nu väntar jag bara på leveransen. 🙂 /
I’m very happy with the result. And as a reward for doing such a good job, I treated myself to some new trims (and some new washi tape) from Etsy … Now I’m just waiting for the delivery. 🙂
Because, boy, can those colorful bows, headbands, and hair clips get disorderly.
Because, boy, can those colorful bows, headbands, and hair clips get disorderly.
Transparent thread hangs across the middle of this vintage frame, while mini wooden paper clips hold bows in place — so smart. But we’re absolutely smitten with the pieces of wood at the bottom used to hold hair ties.
Forget parakeets! We’re now fully convinced that the wire bars on bird cages are way better suited for bow clips. Aren’t you?
The light pink gingham and lime green ribbon in this decorative frame makes hair accessory storage feel much more like adorable wall art than an organizer — and that’s the entire point.
Swap out your cookies and snacks for hair ties and bows. The transparent exterior means you can see all of the different colors and patterns even before you lift the lid.
Hang ribbons that hold bows from a mirror so everything is in one spot when getting ready in the morning. Where better to admire Mommy’s hairstyling handiwork before heading off to school?
Who knew the container that holds your favorite breakfast could take on a whole new purpose after being consumed? Here, the Quaker Oaks label is covered with a cute grey and white chevron and results in a stylish holder for your headband collection.
Cutesy white ribbons strung across a bright orange board gives clips and bows a colorful, yet organized, home.
Little girls (and their moms) love to match hair accessories to their outfits — so organizing accessories by shades in the rainbow will help speed up the process of getting ready in the morning.
If your kid is a headband-type one day, but a pigtail lover the other, don’t make her pick favorites. The white criss-cross ribbon lets you clip bows onto the board, while hooks hang from the bottom to offer a hanger for headbands.
Instead of putting your latest family photo in your new frame, add some bright and colorful paper and ribbon bows can snap onto. This can also be used to hold necklace and earring collections.
If your kid loves itty bitty braids, you probably have a stockpile of those tiny elastics in your home. Organize ’em by color in a seven-compartment container so you don’t have to waste 10 minutes just trying to find them in the morning.
Even though I haven’t posted this past week, I have been getting some behind the scene steps ready for some upcoming projects…like a ribbon organizer. It takes time to gather all the supplies and to think my ideas through. Once I have a plan, I am set to go. Today I am working on 5 projects. When one is drying, I start on another. When I get in this kind of frenzy – which is usually induced by seeing the wonders of paint – easy and inexpensive transformation. I call these times in my life a “Decorating Marathon”.
If you have been reading my blog for sometime, you may remember this project. It was the first stage of how I created my worktable in my studioffice.
While starting to do Part 2 of my table, I needed the right equipment – I needed this…
And to get it, I had to borrow it from my friend, Karen. Going to Karen’s is always a treat, she is so creative, has the most organized sewing room, and the best ideas. I got the idea for my craft table after seeing hers She is a professional seamstress extraordinaire and makes all kinds of decorator treatments. She has a professional sewing workroom right in her home. Her table is much larger than mine, but the concept to have it in the center of the room so you can move around to all sides while working and a large cutting surface is what I gleaned from her. I ALWAYS leave her house inspired.
I thought I would share the inspiration I left with today – with you. Look how cleverly she organizes her ribbon. No drilling, sawing, or painting required.
supplies needed:
- 2 equal lengths of chain
- Cafe style curtain rods
- 2- S Hooks (2 eye hooks to screw into a ceiling or wood shelf if you don’t have wire grid shelving shown in the photo)
So easy to make and accessible, too.
Isn’t she clever? Her whole house is filled with great ideas like this.
She looks after every detail inside and out. As I was leaving – I saw this.
Is it not the most perfect, cheeriest way to display your house numbers? It is a semi-handmade project. She found the numbers at a local boutique. They are just painted numbers on stretched canvas frames. You can easily make them with the small primed artist canvas frames you can buy at craft stores. Karen screwed green stakes to the back of each frame and put them in the planter. Now you can see why I always drive home from her house inspired. Thanks Karen, you are the best. XO
Laces, trims and ribbons. How to organize them!
Today is all about laces, trims and ribbons.
Those of you who crazy quilt know you can never have enough laces, trims and ribbons. I generally add one of each of these to every crazy quilt block I make. They can bring it to life.
Like all my other storage solutions, my current solution evolved over time.
BUT, before this I tried some ideas.
It all started with ribbon rings. A link is included in resources at the bottom of this page.
I saw them originally in a scrapbook store. Oh, did I mention my scrapbook days – talk about storage! Well, that story is best left for another time.
Ribbon rings are plastic and allow one to thread the ribbon or trim.
All the rings can hang from a book or curtain ring. Well, I did give them a try and I still do keep some on my threads on these rings. BUT, as my collection grew I found it difficult trying to figure out where to hang them all.
**I apologize but I could not find a link for the rings shown on the left above and can’t recall at this time where I picked them up!
Prior to my move I had drawers – my window seat drawers I talked about in a previous post. I purged and ended up reducing my collection to a third of what I had.
I spent a lot of time cutting chipboard rectangles. Then I wrapped them with laces, trims and ribbons. I’m here to tell you
IT TAKES A LOT OF TIME not to mention space.
Well, wait for it, my new system!
Could it be easier. I simply empty the jars to find what I want then put them all back in again. Works great and they sit on a shelf in the studio room closet.
Related Articles
- How to Organize a Cluttered Master Bedroom
- How to Design a Scrapbooking Materials Storage Cabinet
- How to Reorganize a Bedroom
- How to Arrange a Garage
- Men’s Closet Organizing Ideas
A dedicated storage room for seasonal items, tools, crafting supplies and other items that you don’t want cluttering the rest of your home can come in handy. Unfortunately, it’s also easy for the room to become a mess if you’re always dumping items inside without finding a proper place for them. Organization is key to keeping your storage room neat and easy to navigate — and it’s not as difficult to do as you think. With a few simple changes, you can have a tidy, organized storage room where you can always find what you need.
Take an Inventory
The first step in organizing your storage room is taking inventory of its contents. You can’t come up with an organizational plan if you don’t know what items you need to store. Go through the room’s contents and make a list to keep track of the items. Sorting through your belongings also allows you to identify items that you don’t need so that you can throw them away or arrange to donate them. If there are items in the room that require cleaning, such as clothing or linens, take care of that as well.
Group Like Items
Once you know exactly what you need to store in your room, organizing the contents becomes much easier. Start by grouping like items together. Obviously, you’ll want to keep all of your family’s winter jackets or rain boots together, but you should also organize according to theme. You can group all of your holiday decorations together, whether they’re ornaments or string lights. You should break these general categories into more specific groupings, though. For example, once you have all your crafting supplies gathered together, separate them by the craft so you have individual groups of scrap-booking, crocheting and jewelry-making supplies.
Customize Storage
Not all storage is created equal. The best option depends on the type of items that you plan to store and how often you use them. If you’re storing tools that you reach for regularly, a pegboard wall is an ideal solution because you can hang the items in plain sight where they’re easy to grab. For seasonal items like holiday decorations or winter clothing, closed storage containers like plastic bins or garment bags work well. Specially made containers for hard-to-store items like rolls of wrapping paper and ribbons are also available at home goods stores. Make use of your room’s vertical space for storage as well — add wall-mounted shelves above other furniture items in the room and place plastic bins or baskets on them to separate items by category.
Create Labels
The key to an organized storage room is knowing where every item is. No matter how good your memory may be, it’s easy to lose track of where certain items are. Creating labels for all of the storage options in your room makes it easy to locate items fast – and know where to put new items as you acquire them. Invest in a label maker and create easy-to-read labels to stick on the front of drawers, shelves, plastic bins and baskets. Be as specific as possible when creating the labels. Instead of writing “Holiday Decorations,” create labels that say “Christmas Decorations – ornaments and lights” and “Christmas Decorations – garland and candles.” That way, you can always find exactly what you’re looking for without rooting through multiple drawers or boxes.
Keep your piles of ribbons organized, handy and pretty enough to display
Whether you’re a crafter, scrapbooker or just have gift-wrapping ribbons galore, these organizational tips on storing ribbons can keep your home less cluttered. And the best part is they are simple and inexpensive ideas that anyone could handle. You may even be so proud of your new ribbon storage that you’ll want to keep it out on display!
Danielle of the Minimoz blog used a plastic storage basket with holes so she could slip wooden dowels through the sides to hold spools. The holes even acted as a dispenser for the ribbon tails!
Supplies
- Plastic container with holes wide enough to hold two rows of ribbon spools
- Saw
- Wood dowels (measure the holes on your basket to find the correct diameter for your dowels)
Instructions
- Measure the long side of your basket. Cut two dowels at least two inches longer.
- Push the first dowel through a hole in one end of the basket.
- Start threading the ribbons on. When you get the the last one, stick the dowel through a hole on the other end of the basket.
- Pull the ribbons through holes in the wide side.
- Repeat with the second dowel.
How to Make a Mitered Corner With Satin Ribbon
Things You’ll Need
- Fabric
- Thread
- Scissors
- Embroidery thread
- Quilt batting
- Bias tape
- Thin wooden dowel
Award ribbons can be displayed in a variety of ways. They can simply be hung on a wall or displayed in a shadow box or frame. Award ribbons might be kept in a scrapbook, or tucked away and forgotten in a storage box. Or you can display award ribbons in a unique quilt wall hanging. The quilt hanging is sure to get as much attention as the ribbons themselves.
Organize your ribbons. Decide how many ribbons you will incorporate into the quilt and how many you will feature per square. Divide the ribbons according to squares.
Use the largest ribbon to determine the size of the quilt squares. The squares might be 10-inch or 12-inch blocks. If one ribbon is extra large, it can overlap other squares after the squares are assembled.
Determine the number of squares you will have in your quilt. This quilt is designed as a wall hanging, so it does not need to conform to the size of a bed. Choose fabric that is similar in weight and texture. All the squares must be identical in shape and size.
Cut a piece of fabric for the first fabric square. Design one block at a time. Do not approach this quilt as a dozen or so squares that must be completed. The ribbon can be attached with fabric adhesive, safety pin or stitched on, depending on the style of the ribbon. Choose a method that does not damage the appearance of the ribbon.
Design the square to best display the ribbon or ribbons that will be attached. For example, if the ribbon was for a specific horse show, and you happen to have a photograph of the event, consider transferring the photo onto the fabric square using heat transfer paper. Use applique or embroidery to embellish the square.
Document the event with embroidery. For example, you can embroider the date and location connected with winning the ribbon onto the square.
Layer fabrics for added dimension. Frame the ribbon on pieces of fabric that are sewed onto the individual square to add depth and to highlight the ribbon.
Lay out the quilt squares in the desired pattern to create a rectangular shape when all the squares are completed. If you do not have enough ribbon squares to complete a row, make additional squares without ribbons.
Sew the top row of squares together, making 1/4-inch seams. Sew the remaining rows together, making 1/4-inch seams. Sew the rows together, making 1/4-inch seams.
Lay the front of the quilt over a piece of quilt batting and backing. Both the batting and backing fabric should be the same size as the quilt front.
Attach the three layers by knotting along each corner of the squares with embroidery thread. Thread a needle, push it through the three layers, bring it back up again and tie the two ends together. Snip off excess thread.
Sew 1/2-inch bias tape around the edge of the quilt to finish.
Sew a strip of fabric along the upper backside of the quilt. This will be used to insert a wooden dowel, the same width as the quilt. This will keep the quilt from sagging when hanging on the wall.
About the Author
Ann Johnson has been a freelance writer since 1995. She previously served as the editor of a community magazine in Southern California and was also an active real-estate agent, specializing in commercial and residential properties. She has a Bachelor of Arts in communications from California State University, Fullerton.
What you see here is a picture of my craft desk. This is where I create all my jewelries, iPhone cases, and cards. I painted the desk and shelf a pretty cotton candy pink. I turned the shelf into a ribbon holder as well. I used to store my ribbons in a shoe box but I like it this way a lot better. It’s much more easily accessible and does not take up as much space.
RIBBON HOLDER HOW TO:
All you need is the following:
- Wall shelf (I bought mine from IKEA and painted it with two layers of paint. You can always find a good deal on Craigslist. In fact, that’s where I bought my desk which I painted pink).
- Curtain pole (pick the skinniest one available at the hardware store – mine is about 1cm in diameter)
- Electric Drill
- Hammer & Nails
Making it is easy! All you need to do is to drill a hole to the side of both brackets (make sure the drilled hole is big enough for the pole to go through!), mount the shelf, and start putting your ribbon spools onto the curtain pole!! ^___^
Check out my store, I’m always posting new items!!
November 6, 2017 By Amber Pegler | 4 Comments | May contain affiliate links.
An index is one of the first terms you may come across when learning about bullet journaling. A bullet journal index helps you quickly and easily find your entries later. It’s a master collection and a timeline of all your pages. Using a color coding system through your index can help you more efficiently find spreads and help with migrating into a new journal in the future.
This page contains affiliate links. Read my full disclosure.
Setting Up Your Index
Compiling an index is simple, and should be the first spread in a bullet journal. If you have a Leuchtturm 1917, like I do, the first few pages are a template for an index. If you have another brand of journal, leave the first couple of pages blank and fill in the topics of spreads and the corresponding page numbers as you go. Recurring collections or certain types of entries can be grouped together (e.g., Travel 104, 111, 180).
What to Include in Your Bullet Journal Index
Your index should include whatever you think is important to have a record of so you can go back and find it later. Perhaps the only spreads you need to refer back to are collections, therefore your index will be simple and spreads will be easy to find.
I choose to index everything, not so much because I need to refer back to spreads but more so I have an overview of each bullet journal when it’s complete. I can see the months the bujo spans and what I was tracking during that period of my life.
Organizing Your Bullet Journal Index
Some pages in your bullet journal will need to stand out more than others, such as collections or other spreads that are ongoing entries.
Color coding certain spreads is a simple way to filter out unimportant pages while looking for a certain collection.
For example, you could use two different colors to signify home and work, college and internships, etc. Personally, my method is using two highlighters to mean part year (pink) and full year (blue), with non-highlighted pages being spreads I don’t need to refer back to such as monthly logs/dailies.
So for a half-year spread, I’d highlight in pink my semester one university timetable which I only need for four months and use blue for a full-year spread such as my television show tracker.
It may also be useful to have a coding of ongoing collections to see what needs to be migrated over once you move into a new bullet journal–this is what my full-year color-coding works for.
Other Organization Methods
Color coding isn’t the only way to organize your index. Other ideas could include:
- Washi tape: Choose how ever many types of washi you need for organization categories and either place a piece of washi tape beside spread names or write on top of the pieces.
- Extra ribbons: With a quick Youtube or Google search you can find a whole range of tutorials on how to add extra bookmark ribbons to your bullet journal. This won’t allow a lot of pages to be marked but could help you keep track of the most important spreads you refer back to constantly.
- Underlining: You may simple wish to write in your spread titles in different colors or underline the spreads you want to keep track of.
An index is a way to catalog your bullet journal, but that doesn’t mean it can’t help you organize at the same time.
Do you keep an index? What methods do you use to keep track of everything in your index?
Idea to Organize your Decorative Ribbons Scraps
- Post Author:diytutoriales
- Post published: May 5, 2018
- Post Category:DIY
This post is also available in: Español ( Spanish )
I was recently in my craft room looking for a decorative ribbon scraps for a project and I could not find it, since I had them all in a transparent box and although some were rolled up, others were in plastic bags and others had already been unwound and what I had was a huge mess. So I said … this has to be organized right now.
So I had them all mixed with pieces of fabrics, a real disaster.
And this is what I did to organize my ribbons. I looked for some wooden sticks, the ones used for popsicles, and I used them to organize them. I fixed them in place using pins. I know you could just use pins when they are practically new but when you only have scraps it works well. I used those that are natural color, but you can still use the ones that are available in Dollar Tree that are colored and according to the color of the stick you organize your ribbons. (They are thinner but they still work)
I used glass jars to accommodate them and have them accessible. If you do not use your decorative ribbon scraps very often, I recommend a glass jar that has a lid to prevent dust from getting to them. I organized them by colors. I added a black chalkboard label to identify the jars with the word “cintas” which means ribbons.
It is not necessary to organize them by colors, but it is easier to find the color or pattern you need.
I hope this idea helps you to organize yours decorative ribbon scraps. See you soon!!
This post may contain affiliates links. Read my disclosure policy HERE.
MATTHEW BLAKE
4 OCT 2017
CLASS
Military medal racks are a way for soldiers, sailors, airmen and Marines to display the medals and awards they have earned through their military service. Worn on the formal dress uniform, medal racks act as a visual resume for the service member. You can learn how to purchase, set up and protect a military medal rack.
Figure out what awards should be worn. A veteran can consult her DD-214, the standard form given upon discharge, for a record of awards earned during service. For those still on active duty, personal service records will contain each award earned.
Purchase each ribbon you’re authorized to wear. Those still on active duty can go to the military clothing and sales shop at their base exchange. Veterans can shop for medals online at one of the websites below or purchase the ribbons from a civilian Army-Navy surplus store.
Assemble all medals and a medal rack of the correct size, then determine the order of precedence for the awards. The Department of Defense’s Institute of Heraldry is an excellent resource. Or you can go to one of the linked websites below, enter the awards, and they will show the correct order to assemble your rack. The highest award goes on top, then from left to right.
Carefully affix any small devices, such as stars or oak leaf clusters, to the ribbon part of the medal, ensuring they are properly centered before sliding your medal onto the rack. Remember to remove any metal backing from the medal, using needlenose pliers if necessary.
Build your rack using the order of precedence. Gently slide the medals onto the rack backing. If the ribbon does not slide on easily, use needle nose pliers to loosen the metal backing. Once all medals are arranged, tighten the ribbons against the backing.
Idea to Organize your Decorative Ribbons Scraps
- Post Author:diytutoriales
- Post published: May 5, 2018
- Post Category:DIY
This post is also available in: Español ( Spanish )
I was recently in my craft room looking for a decorative ribbon scraps for a project and I could not find it, since I had them all in a transparent box and although some were rolled up, others were in plastic bags and others had already been unwound and what I had was a huge mess. So I said … this has to be organized right now.
So I had them all mixed with pieces of fabrics, a real disaster.
And this is what I did to organize my ribbons. I looked for some wooden sticks, the ones used for popsicles, and I used them to organize them. I fixed them in place using pins. I know you could just use pins when they are practically new but when you only have scraps it works well. I used those that are natural color, but you can still use the ones that are available in Dollar Tree that are colored and according to the color of the stick you organize your ribbons. (They are thinner but they still work)
I used glass jars to accommodate them and have them accessible. If you do not use your decorative ribbon scraps very often, I recommend a glass jar that has a lid to prevent dust from getting to them. I organized them by colors. I added a black chalkboard label to identify the jars with the word “cintas” which means ribbons.
It is not necessary to organize them by colors, but it is easier to find the color or pattern you need.
I hope this idea helps you to organize yours decorative ribbon scraps. See you soon!!
This post may contain affiliates links. Read my disclosure policy HERE.
Promoted actions are actions that are displayed in the ribbon of the RoleTailored client. You can organize promoted actions into different categories, where each category is indicated by a caption in the ribbon. You define up to 10 categories for a page. The following figure illustrates a page that has promoted actions under the following categories:
New
Manage
Process
Report
The following illustration shows the Ribbon with promoted actions under categories.
You assign a promoted action to a category by setting the PromotedCategory property of the action. You can choose among the following categories:
By default, these category names correspond to the captions that are displayed for the category on the page in the Microsoft Dynamics NAV Windows client. You will typically want to change these captions, especially the Category4 through Category10 captions.
You change category captions on a page-by-page basis and for each Microsoft Dynamics NAV Windows client language.
To define promoted action category captions
In the development environment, on the Tools menu, choose Object Designer.
In Object Designer, choose Page, select the page, and then choose Design.
In Page Designer, select a blank row, and then in the View menu, choose Properties.
In the Page – Properties window, locate the PromotedActionsCategoriesML property, choose the Value field, and then choose the AssistButton to open the Multilanguage Editor.
In the Multilanguage Editor, set the Language field to the language version of the categories that you want to define.
In the Value field for the language, type the category captions as follows:
Substitute the italic text with the text that you want for each caption. Separate each caption with a comma. The position of the caption in the list determines its corresponding category setting in the PromotedCategory property for actions, as shown in the following table:
| PromotedActionsCategoriesML caption position | PromotedCategory property value |
|---|---|
| First | New |
| Second | Process |
| Third | Reports |
| Fourth | Category4 |
| Fifth | Category5 |
| Sixth | Category6 |
| Seventh | Category7 |
| Eighth | Category8 |
| Ninth | Category9 |
| Tenth | Category10 |
For example, to define the captions for the figure at the beginning of this topic, you enter the following text:
New,Manage,Process,Report
Then, to assign a promoted action to the caption Tasks, in the Action Designer, set the PromotedCategory property value for the action to Process.
You only need to define captions for the number of categories that you want to use on a page. You do not need to define captions for all 10 categrories.
Close the page properties and save the page.


