Unbeknownst to all, Windows 10 has a built-in screen recording feature which allows you to record a desktop or application video. This feature can come in handy for software demonstrations or recording games from your desktop.
There are a few software packages available for screencasts, and this is how you can record one with the freeware package called VClip.
First, open this page to add VClip to your Windows 10. Then, you should click Download VClip.zip 13.8 MB to save the compressed Zip file. As it’s a compressed Zip, once downloaded, you have to press the Extract All button in File Explorer and then enter a folder path where you want to extract it to. Open the extracted folder, and click VClip to launch the window as shown below.
Then you should move and expand the VClip window so it includes all the area of the window or desktop you’re going to include in the recorded screencast. Move the cursor to the window borders and then hold the left mouse button to drag it.
Once you have resized the window, click the small arrow beside the Rec button. Then, select 15, 25 and 35 FPS options for recording. Press the Rec button to begin the recording.
When you’ve finished recording the screencast, press the Stop button. Then click the small arrow beside the Save button to choose a file format. You can choose to save the recording into MP4, WEBM, OGG, AVI and GIF formats.
Next, press the Save button. Enter a title for the screencast in the File name box and press Save. Then you can click on the saved output to play it back as below. It will play back in your default video player.
Overall, VClip is a fairly simple screencast program to use. It could do with some options to add text to the recorded output. Nevertheless, with a variety of output formats this is still a screencast app worth noting.
How to Record Screen Using the Built-in Recorder in Windows 10
Windows 10 has a built-in screen recording tool called Game Bar. To allow this tool to do recordings, make sure you have enabled it in your computer settings.
- Press the Windows key and I at the same time on your keyboard. This will take you to Settings.
- Select Gaming.
- Press the toggle button to turn on the feature.
- To record your screen activity within an app, move your cursor to it and press the Windows logo and G at the same time on your keyboard.
- Click the Record button to start recording.
- To end the recording, simply press the Stop button.
- To view your recording, click on the notification at the bottom right of your screen.
Yes, you can easily screen capture video in Windows 10
:max_bytes(150000):strip_icc()/Lifewire_Jerri-Ledford_webOG-2e65eb56f97e413284c155dade245eeb.jpg "How to record your desktop and create a screencast on windows")
- Tweet
- Share
- Tweet
- Share
What to Know
- To enable Game Bar, go to Start >Settings >Gaming. Then toggle on Record game clips, screenshots, and broadcast using Game Bar.
- Next, press Windows+G and click the Record button in the Capture widget.
- Another way: Open a PowerPoint presentation, go to Insert >Screen Recording. Select an area on the Windows desktop and select Record.
This article explains how to enable screen recording to record your screen on Windows 10 using the Windows Game Bar or PowerPoint. Instructions cover Windows 10 desktop and laptop computers.
How to Use Game Bar to Screen Record on Windows
Here’s how to record on Windows 10 using the Game bar. You’ll need to set up the Windows Game Bar if you haven’t already. Once you’ve set it up, follow the steps below.
Open the app or program you want to record and then press Windows + G on your keyboard. This opens the Game bar overlay.
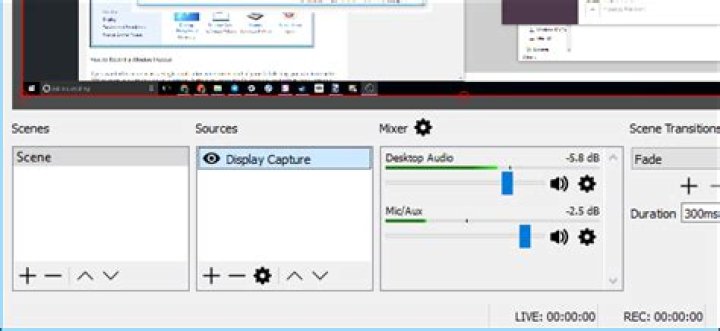
In the Gamebar overlay, you’ll see several widgets, including Capture, Audio, Performance, and maybe Xbox Social. There is also a main toolbar at the top of the screen that corresponds with these widgets, so you can add or remove them at any time.
To capture your screen, click the Record button in the Capture widget.
:max_bytes(150000):strip_icc()/Record_Win10_05-966e6942c6224b15ba76969af48e6b7f.jpg "How to record your desktop and create a screencast on windows")
Once the recording starts, a recorder appears in the upper right corner of the page. Here you can view the recording time, press the Stop button (blue circle with a white square in the center), or control your microphone.
:max_bytes(150000):strip_icc()/Record_Win10_06-2b48afa1b6574298bab7b3ce3f47a253.jpg "How to record your desktop and create a screencast on windows")
When you’re finished, press the Stop button and a message flyout appears on the right side of the screen to let you know that you have created a recording. You can click this message to access the recording or you can navigate to the recording in your Videos file.
Windows 10 Game Bar Limitations
It’s easy to record your screen on Windows 10 with the Game bar, but there are a few caveats.
- Some applications, such as File Manager, cannot be captured with the Game bar.
- You cannot capture your desktop; you must be capturing an app.
- If while you’re capturing, another window appears over the one you are recording, it won’t appear in your recording (but the movement of your cursor will).
- You can use apps from either the Windows Store or apps that you’ve already installed on your computer.
How to Screen Capture in Windows 10 Using PowerPoint
If you need to capture your desktop or capture multiple windows, Microsoft PowerPoint might be a better option for capturing your screen. It’s fast to set up and more versatile than using the Game bar.
Open a new presentation in Powerpoint and go to Insert > Screen Recording.
:max_bytes(150000):strip_icc()/Record_Win10_08-6e9fa2f948b8440bbd452d38fcb19179.jpg "How to record your desktop and create a screencast on windows")
The PowerPoint presentation will minimize, and your desktop will appear. If you don’t get a prompt to select the area you want to record, click Select Area and drag your cursor around the area you want to record. A red, dashed bounding box appears around the area you want to record.
Once you’ve set the area, you can click Audio to turn the audio on or off and Record Pointer to capture (or not) the pointer as you move around the screen. When you’re satisfied with your setting, click Record.
A short countdown will appear, and then your recording will be live. The control panel for your recording may also disappear. If you push your cursor into the top, middle of the screen, the control box will appear again.
When you need to pause or stop your recording, you can choose Pause or Stop from the Recording menu.
Once you stop the recording, you’ll be taken back to PowerPoint, and the recording will insert into the slide you selected. To save it to your computer, right-click the recording and select Save Media as from the menu.
Navigate to where you want to save the file and then click Save.
Screencasting is one of the easiest ways to make and share videos. With Screencast-O-Matic , you can make professional-quality videos, even if you have no experience.
So what is a screencast? It’s a video recording of your device’s screen. Screencasts are a popular communication tool in many industries because they provide an easy way to communicate, educate, and sell ideas.
This handy guide contains all the tips you need to start making top-notch screencasts today.
Create Your Screencast in 3 Easy Steps
1. Record your video
Ready to make your screencast? Start by opening up the Screen Recorder . Then follow these tips to make the best video possible:
Make a quick outline
You’ll save yourself a lot of time if you plan what you’re going to say before hitting record. You could make a simple outline of the points you want to hit, or for a more concise video, try making a script.
Screencast-O-Matic’s Scripted Recordings feature lets you import a script, or type one from scratch. Then you can record your narration section-by-section, following along with your script.
Minimize distractions
If it’s visible on your screen, it will show up in your screencast. Before recording, head into your computer settings and temporarily disable all desktop notifications so they don’t interrupt your video. Also, remove any extra windows, desktop icons, and distracting wallpapers from your screen.
Background noise and clutter are also big distractions, so be careful to record in a clean and quiet area. Try to pick a room with carpet, as hard floors can cause an echo.
Adjust your microphone
Keep your microphone still, and stay the same distance from it throughout your recording. Even moving a few inches from the microphone can affect the volume in your final video.
Be conversational
Screencasts don’t have to be overly formal. Try to relax and speak in a calm and conversational tone. It may help to imagine you’re talking to a friend or colleague face-to-face.
Use the pause button
There’s no need to record your screencast all in one take. Instead, work in sections, recording one chunk at a time. Hit the pause button after every few lines to give yourself time to rehearse the next section. Then continue recording when you’re relaxed and ready.
2. Refine and edit your video
Once you’re done recording, it’s time to edit. The Video Editor enables you to fix any mistakes made during your recording, as well as add elements like music, photos, and animations for a polished flair.
Follow these tips for a smooth editing process:
Plan your edits
Before you actually make any edits, take a minute to watch your whole video, and take note of all the changes you want to make. Note the timecode for each edit, so you can find your place easily.
You’ll also want to make sure you have all your media assets in one folder so you can quickly get to them while you are editing.
Trim and cut your video
Next, trim the beginning and end of your video to remove dead space. Then cut any pauses or awkward silences you notice.
Cover up mistakes
There’s no need to re-record simply because an image failed to load or your video lagged. You can fix these issues with the Overlay Tool . It lets you add pictures, slides, additional video clips, and more to your recordings. Just import your media and place it in your video to cover up mistakes.
Keep it simple
Your videos don’t need to be fancy to be effective. Just stay focused on your message and keep it simple. Pick one or two transitions you like, use one style for your text callouts, and add pictures or extra video clips if they help you make your point. That’s all you need to keep your audience engaged.
3. Save and publish your video
You’re almost there! It’s finally time to share your video with the world. Here’s how:
Save as a video file
We always recommend saving your screencast as a video file, or mp4. That’s because these files are easiest to view on all devices. You can also upload them directly to social media without any hassle.
Connect your social sharing websites
With Screencast-O-Matic, you can instantly share your videos to sites like YouTube, Vimeo, or Google Drive. Just sign in through the account you’d like to share to, and click “share.”
Welcome feedback from your audience
Encourage viewers to comment on your videos and share their feedback with you. Your audience’s insights can help make your future videos more effective.
Plus if you share your video on YouTube, those comments will drive up your engagement. This makes your video more likely to show up in search results.
Get started with Screencast-O-Matic
Now that you know how to make a quality screencast, you’re ready to record. Remember: mistakes will happen, but that’s okay! With this guide, you’re already well on your way to screencasting success. You can create screencasts for training videos, tutorial videos, how-to videos, product demo videos, YouTube videos, and more.
Click here to print the full infographic: How to create a screencast in 3 easy steps
How To Guides & Software Tutorials
Are you looking to create a screencast video for free? You might want screencast video for your YouTube channel or for training purposes. In this article, we show you how to create a screencast video using some open source tools.
We are running a YouTube channel where we posted screencast videos regularly. We are regularly posting technology-based videos on our channel which help users to improve their knowledge.
To create a screencast video, we are not using any paid software or tools. We use open source softwares Camstudio for recording our desktop screen and Voice Recorder (for Android Phone) to record a audio.
Camstudio – An Open Source Software To Record A Desktop
We use Camstudio to record our desktop screen. It is an open source software and works efficiently.
All you need to do is download it and install on your computer.
Below are the configurations we have set for this software.
- Select ‘Full Screen’ Under Region.
- Select ‘Do not record audio’ under Options.
- Select ‘Normal View’ under View.
Record Audio Using Voice Recorder App On Android Phone
Camstudio provides an option to record a audio. We had tried recording audio with Camstudio in past. By doing so, we were not happy with the quality of sound. We had a lot of background noise in recorded audio. To overcome this problem, we decided to use a mobile phone to record an audio. After some back and fourth finally we came to a solution called Voice Recorder app for Android mobile.
It’ not compulsory you have to use only Voice Recorder app. Maybe you are using Apple or Windows phone. If so, you can use another sound recording app as far as their quality is good and that app allows to share the recorded audio file.
Note: Make sure you are using a good quality headphone. We recommend to use Skullcandy headphone.
We have tried some sound recording apps on the android phone and finally decided to use Voice Recorder. We recommend you give a try to multiple sound recording apps and find the better one.
Cute Video Audio Merger
At this stage, you come to know that we are using 2 different software. One for recording a video, another for recording an audio. Now, the question is how to combine both video and audio files?
Download Cute Video Audio Merger software and install it. It is also an open source software. Using this tool, we merge video and audio files together.
Below are the configuration we set while using Cute Video Audio Merger.
- Open the Cute Video Audio Merger
- Set Output Folder to downloads directory. You can choose also different folder.
- Set Output Video Size: Auto – Original
- Set Output Video Format: MOV
To use this software you just need to add video and audio file and click on ‘Merge’. After completing process, this software place a .mov under downloads directory.
Create A Screencast Video
Now, we are ready with the software Camstudio, Voice Recorder and Cute Video Audio Merger.
Let’s see step by step guide how to create a screencast video.
- Open Camstudio and Voice Recorder.
- Start Camstudio and Voice Recorder at the same time.
- Once you finished with your recording, press ‘f9’ to stop Camstudio recording. Stop your audio recording simultaneously.
- Send your audio file via bluetooth, email or any sharing app to your computer.
- Open Cute Video Audio Merger on your computer. Merge your both video and audio files.
We hope you understand how to create a screencast video using an open source software. Which open source tools you are using for your screencast videos? Please share in the comments below.
If you liked this article, then please subscribe to our YouTube Channel for video tutorials.
1 thought on “ How To Create A Screencast Video For Free On Windows ”
CamStudio is reported to be full of malware according to OpenSource users. Beware! I always create screencast with a web-based software calls Acethinker Online Screen Recorder, free and works fairly well. It is an online tool that lets you record your screen right from the browser. You don’t have to install any additional plug-ins or add-ons.