Lori Kaufman is a technology expert with 25 years of experience. She’s been a senior technical writer, worked as a programmer, and has even run her own multi-location business. Read more.
You probably have some text that you type often in your Word documents, such as addresses. Instead of retyping this text every time you need it, you can put this common text into one Word document and reference it in other documents–it’ll even automatically update in all your documents if you change it.
Say you want to put your address in the footer of your documents, but the address changes from time to time. You can store the address in a separate, common Word document and use a field in your report to pull the text from the common document, and update whenever it changes. We’ll show you how to do this.
To begin, create a new Word document that will serve as your repository for the address you want to insert into other Word documents. Save it in a location that will be accessible by other documents. For example, don’t save it on a network drive to which you don’t always have access.
We’re going to use bookmarks to refer to the address in our common document. Type the string of text you want to insert into other documents (in our case, the address). Create a bookmark by highlighting the name and going to Insert > Bookmark and giving it a name, like “Address”. See our guide to bookmarks in Word for information on creating them.
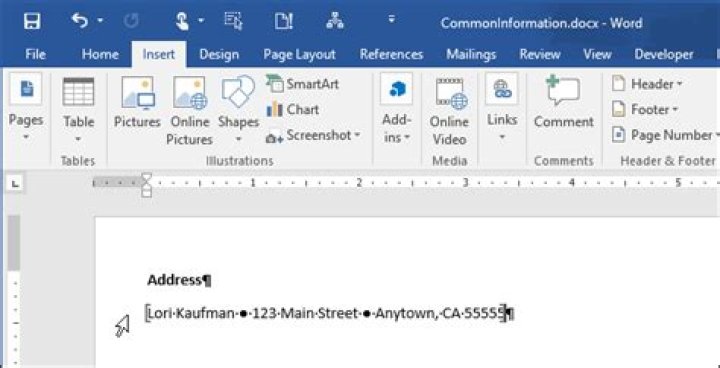
Note that bookmark names cannot have any spaces. We recommend putting the name of the bookmark above each item in your common information file so you easily know which name to use for which item. This is especially useful if you plan to have a lot of reusable items in this common document. In our example, we added our address to the common information document and put the bookmark name, “Address”, above the item.
Once you’ve added the item to your common document, you can save and close. Open the document in which you want to insert the address and position the cursor where you want that text to go. For our example, we’re going to add a footer and insert the address there.
We’re going to use the INCLUDETEXT field code to refer to the bookmark we created in the common document. To do this, press “Ctrl + F9” to insert the brackets for the field code.
NOTE: You cannot just type normal brackets around field codes. You must use “Ctrl + F9” to insert the correct type of brackets.
The cursor is automatically placed in between the brackets. Type the following text between the brackets, replacing the “
” with the absolute full path to your common Word containing the name you want to insert. Replace “ ” with the bookmark name you assigned to the item in the common document.
NOTE: Do not enter the brackets in the field code.
For example, we typed the following in between the field code brackets:
NOTE: You must use double backslashes in the path, like we did. Also, make sure you use straight quotes, not smart quotes, when typing the above code into the field.
To grab the address from the common document and insert it into the field code you just entered, right-click on the field code and select “Update Field” from the popup menu.
The address displays in the document. Brackets still display around the address if you have the “Show bookmarks” option on. Again, see our article about bookmarks to learn how to turn off this option. Also, the field code might be shaded. However, you can also turn this off.
If you want to change the field code, you can display the code again rather than the result. To do this, right-click on the resulting item and select “Toggle Field Codes” from the popup menu. The text you typed into the field code displays again and you can edit it. Simply, update the field to display the new result.
Once you’ve created your common document, you can use it to store other items you often type into your Word documents. Simply use a separate INCLUDETEXT field in your Word documents for each piece of information you want to automatically insert from your common document.
If you work or create many documents, adding references to what is already written is essential. It saves time and ensures nothing gets duplicated. This post will guide you to reference text from other documents in Microsoft Word.
What are Citations and Cross-references?
Citations are links or references to a published or an unpublished source. In simple words, it is an alphanumeric expression embedded in a body of analytical work to acknowledge the relevance of the works of sources.
A cross-reference is a property of text that helps to link the text to other text or Graphic in the same document. Suppose if a chapter of a book asks you to look at a section, say section C, it can be a cross-reference.
Note: Microsoft Word Windows 2010, 2013, 2016, 2019, and 365 are compatible for applying citations and cross-references.
Where Can Citations and Cross-references be used?
The following list shows the utility of Citations and Cross References:
- Citations are helpful when one wants to find out more about one’s ideas and where they come from.
- Citations also help you get a cut above the rest by lending handy outside support.
- Cross-References help build an overall structure, which can be applied in Dictionaries to link various synonyms, antonyms, etc.
- Cross-References can also be used to link up Charts and graphics. Hence, the feature makes it easier for the reader to understand.
How to Reference Text from Other Documents in Microsoft Word
How to Add Citations in Microsoft Word
- Select the text in which the citation needs to be added in Word
- Go to References >Citation and Bibliography and choose your preferred style; MLA and APA are the most used styles.
- After You have selected your desired style, click on the insert Citation Option.
- Fill in the necessary credentials and click on the OK button.
Notice that a default name Placeholder(number) will appear in place if the selected text to which citation has been applied. You may change the name from the insert citation dialogue box.
How to add Cross-references in Microsoft Word
- Open a document in Microsoft Word where you want to use Cross-references.
- Select a text, and then use either of these:
- Go to Insert > Links > Cross-References
- Go to References > Captions > Cross-References
- In the Reference type dropdown, select where the Cross-Reference should be placed
- In the Insert section, click on the Reference drop-down, and select where the Cross-reference.
- Click on Insert.
Quick Tip: To jump directly to the cross-reference source, hold down the Ctrl key while clicking on the link.
Related topic: How to Hyperlink text in Microsoft Word
A hyperlink is a group of text spruced up with the feature of linking to other elements in the same or different document. By default, a hyperlinked text is distinguished as an underlined blue text and is widely used to link to documents that have more information on a specific topic that has been briefly discussed. Here is a guide to how you can hyperlink text to other elements.
To hyperlink to a file:
- Select the text that needs to be hyperlinked and go to Insert > Links.
- Click on the hyperlink dropdown that opens up.
- Click on Search for files: this option hyperlinks files present in your computer storage.
- Click on the Browse files from your machine option. Browse to the location where the file is stored and select the desired file.
- Click on Open.
To hyperlink to an external source:
- Select the text that needs to be hyperlinked. Go to Insert > Links.
- Click on the hyperlink dropdown that opens up.
- Click on Insert Link: This option enables you to insert online links (URLs). They may be a YouTube video, a website, a post, etc.
- The Insert Hyperlink dialogue box opens. In the Address Box, Paste the link of the element that needs to be linked.
I hope you liked this post and you were able to set up citations and cross-references easily.
You probably have some text that you type often in your Word documents, such as addresses. Instead of retyping this text every time you need it, you can put this common text into one Word document and reference it in other documents–it’ll even automatically update in all your documents if you change it.
Say you want to put your address in the footer of your documents, but the address changes from time to time. You can store the address in a separate, common Word document and use a field in your report to pull the text from the common document, and update whenever it changes. We’ll show you how to do this.
RELATED ARTICLESNavigate Long Documents in Word Using Bookmarks
If you work with long documents in Word and prefer not to use Master Documents or separate files, you can… [Read Article]How to Enable and Disable Field Shading in Word
Fields in Word are bits of code that are placeholders for data that changes. For example, when you insert page… [Read Article]
To begin, create a new Word document that will serve as your repository for the address you want to insert into other Word documents. Save it in a location that will be accessible by other documents. For example, don’t save it on a network drive to which you don’t always have access.
We’re going to use bookmarks to refer to the address in our common document. Type the string of text you want to insert into other documents (in our case, the address). Create a bookmark by highlighting the name and going to Insert > Bookmark and giving it a name, like “Address”. See our guide to bookmarks in Word for information on creating them.
Note that bookmark names cannot have any spaces. We recommend putting the name of the bookmark above each item in your common information file so you easily know which name to use for which item. This is especially useful if you plan to have a lot of reusable items in this common document. In our example, we added our address to the common information document and put the bookmark name, “Address”, above the item.
RELATED ARTICLEHow to Add a Header or Footer to a Word Document
Headers and footers are useful for adding things such as page numbers, dates, file names, and disclaimers to documents. Word… [Read Article]
Once you’ve added the item to your common document, you can save and close. Open the document in which you want to insert the address and position the cursor where you want that text to go. For our example, we’re going to add a footer and insert the address there.
We’re going to use the INCLUDETEXT field code to refer to the bookmark we created in the common document. To do this, press “Ctrl + F9” to insert the brackets for the field code.
NOTE: You cannot just type normal brackets around field codes. You must use “Ctrl + F9” to insert the correct type of brackets.
The cursor is automatically placed in between the brackets. Type the following text between the brackets, replacing the “
” with the absolute full path to your common Word containing the name you want to insert. Replace “ ” with the bookmark name you assigned to the item in the common document.
For example, we typed the following in between the field code brackets:
INCLUDETEXT “C:\Users\Lori\Documents\Common Information\CommonInformation.docx” Address
NOTE: You must use double backslashes in the path, like we did. Also, make sure you use straight quotes, not smart quotes, when typing the above code into the field.
To grab the address from the common document and insert it into the field code you just entered, right-click on the field code and select “Update Field” from the popup menu.
The address displays in the document. Brackets still display around the address if you have the “Show bookmarks” option on. Again, see our article about bookmarks to learn how to turn off this option. Also, the field code might be shaded. However, you can also turn this off.
If you want to change the field code, you can display the code again rather than the result. To do this, right-click on the resulting item and select “Toggle Field Codes” from the popup menu. The text you typed into the field code displays again and you can edit it. Simply, update the field to display the new result.
Once you’ve created your common document, you can use it to store other items you often type into your Word documents. Simply use a separate INCLUDETEXT field in your Word documents for each piece of information you want to automatically insert from your common document.
You probably have some text that you type often in your Word documents, like directions. Instead of retyping this text every time you need it, you can put this common text in one Word Document and refer to it in other documents; It will even automatically update on all your documents if you change it.
Suppose you want to put your address in the footer of your documents, but the address changes from time to time. You can store the address in a separate common folder. Word documents and uses a field in your report to extract the text from the common document and update it every time it changes. We will show you how to do this.
To get started, create a new Word document that will serve as a repository for the address you want to insert into other Word documents. Save it in a location where other documents can access. For example, don’t save it to a network drive that you don’t always have access to.
We will use bookmarks to reference the address in our common document. Write the text string that you want to insert in other documents (in our case, the address). Create a bookmark by highlighting the name and going to Insert> Bookmark and giving it a name, such as “Address.” Check out our guide to bookmarks in Word for information on how to create them.
Note that marker names cannot have spaces. We recommend putting the marker name on top of each item in your common info file so that you easily know what name to use for each item. This is especially useful if you plan to have a lot of reusable elements in this common document. In our example, we add our address to the common information document and place the name of the bookmark, “Address,” on top of the item.
Once you’ve added the item to your common document, you can save and close. Open the document in which you want to insert the address and position the cursor where you want that text to go. For our example, we are going to add a footer and insert the address there.
We will use the INCLUDETEXT field code to refer to the bookmark that we created in the common document. To do this, press “Ctrl + F9” to insert the brackets for the field code.
NOTE: You cannot just write normal brackets around field codes. You must use “Ctrl + F9” to insert the correct type of brackets.
The cursor is automatically placed in brackets. Write the following text in brackets, replacing “ “With the absolute full path to your Word that contains the name you want to insert. Replace ” ”With the name of the bookmark you assigned to the item in the common document.
NOTE: Do not enter the brackets in the field code.
For example, we write the following between the field code brackets:
NOTE: You must use double backslashes in the path, like we did. Also, be sure to use straight quotes, not smart quotes, when writing the above code in the field.
To take the common document address and insert it into the field code you just entered, right-click on the field code and select “Update Field” from the pop-up menu.
The address is shown on the document. The brackets still appear around the address if you have the “Show Bookmarks” option turned on. Again, check out our article on bookmarks to learn how to disable this option. Also, the field code may be shaded. However, you can also disable it.
If you want to change the field code, you can redisplay the code instead of the result. To do this, right-click on the resulting element and select “Toggle Field Codes” from the pop-up menu. The text you entered in the field code is displayed again and you can edit it. Just update the field to show the new result.
Once you’ve created your common document, you can use it to store other items that you often type in your Word documents. Just use a separate INCLUDETEXT field in your Word documents for each piece of information that you want to automatically insert from your common document.
I think a lot of folks aren’t aware that if you’re using Microsoft Word to write a paper (or a book!) with references, the program can automagically generate those for you. Yes, really. No more figuring out where those periods and italics go! As someone who occasionally proofreads academic papers, this is kind of a godsend. And you can select which format you’d like your items to be in, too—APA, MLA, or Chicago, for example—and then automatically create a full bibliography when you’re ready. So cool.
Here’s how you get started: First, you’ll open Word (um, yeah), and then place your cursor where you’d like your in-text reference to be. Choose the “References” tab at the top and click the “Citations & Bibliography” button.
We’re going to click “Insert Citation” here (and this is also where you can change the formatting of your references from APA, for example, to MLA), but just so you know, you may see that button all by itself on Word’s Ribbon depending on the size of your window.
Yes, “Ribbon” is Microsoft’s weird and fancy name for the toolbar. Go figure.
In any case, though, once you pick “Insert Citation,” you can fill out a form with all of the details on the reference you’re adding.
The “Type of Source” drop-down at the top is pretty important; that’ll determine what fields you get to type into, depending on whether you’re referencing a journal article or a book, say. Once you pick that, though, you’ll just type in all of the relevant info, like this:
Click “OK,” and Word will add the citation within your text.
You can continue adding as many of these as you need, and if you want to reuse one you’ve already entered, just click the “Citations” button on the Ribbon (which, as I mentioned, may be underneath “Citations & Bibliography”), and you’ll see the ones you’ve previously put in.
You can then double-click any one of those to insert its in-text reference again!
Finally, when you’re ready to create your bibliography, click either the “Citations & Bibliography” button or choose “Bibliography” straight from the Ribbon if you see it there. When you do so, you can click one of the options for how you’d like yours to look.
Pick your favorite style, and away you go! Word will generate the bibliography for you and insert it wherever you’d put your cursor.
And one more thing here: If you then go back and end up adding more citations, you can click on your bibliography section to reveal a header. Click the arrow there, and you’ll find the option to update the bibliography.
That is so freaking awesome. If you’d like even more information about how this works, check out Microsoft’s article on the subject. And in case you’re curious, Pages can do this too, sort of; you’ll need to install a plug-in to get some help, though. Does this mean that I no longer have to check every single punctuation mark in someone’s bibliography? Can it mean that? Pretty please?
Microsoft Word is one of the best programs available for Windows, which does not require an introduction. We all use it for all our documentation requirements and it is one of the most used apps when it comes to official tasks and it also caters to most personal documentation requirements. Microsoft word comes with a ton of features, and there are some pictures, which you will hardly use in your lifetime. But, there is one important feature, that you should know about, and it can come in a handy number of situations. I am talking about compiling multiple Word documents to a single document. This might seem trivial but it can be of immense use in a number of situations, where you need to append all the documents in one single file for easier reference.
For example, if you have sent the number of requests to your company headquarters for something, which isn’t yet addressed, you can compile all the requests in a single document and send it to the company headquarters, so that they consider it seriously. In the same way, there can be a number of situations, when it can be useful to compile multiple documents into one single document.
You can always do that manually by copying and pasting the content of every single document, but that isn’t a smart way of doing that. Just imagine you have hundreds of such documents and you can understand it can take hours or even days to copy and paste the content from every single document to the final document effectively, and call it a day. Thankfully, there is an easy way of doing exactly that on Microsoft Word. I will discuss how you can do that here.
So, without any further delay, let’s get started with how you can append multiple Word documents to one single word document using Microsoft Word.
Appending multiple Word documents to a single file
- Open Microsoft Word on your computer and click on the ‘Insert’ tab.
- Now, click on the small drop-down menu corresponding to ‘Object’ and then click on ‘ Text from File… ’.
- Now, just select the documents in a particular folder or directory, and click on the ‘Insert’ button.
- Now the text from all the documents selected by you will be inserted into the new Microsoft Word document that you are working on.
- Alternatively, you can also click on the small drop-down menu corresponding to insert and click on ‘ Insert as Link ’ to insert the documents as links, which can be useful to certain users in a number of situations.
One thing that you should not, while inserting the text from the individual documents in this way is that you should select the documents sequentially so that they are placed one by one in sequential order as per your selection in the current document.
For example, if you have multiple documents with the name 1, 2, 3, 4 and so on, but you want to put text on document number 4 at first, followed by 2, 1 and 3, you have to select them one after another, in reverse and click on ‘Insert’ to insert the text from the documents in sequential order in the current document.
You can find the order, how the texts will be inserted in the current document by seeing the filenames separated by commas. At the beginning of the document, you can find the text from that document, which is kept first in the file name list followed by the name of the other files in the filename box.
So, that was quite straight forward to append text from multiple documents on to a single document If you are using Microsoft Word. The process is almost the same on all versions of Microsoft Word, starting at least from Microsoft Word 2007. Even if you are using some other word processing program apart from Microsoft Word, like LibreOffice or any other, the method isn’t going to be a lot different. In LibreOffice, there is one limitation, and that is, you will have to select the files individually, which is kind of frustrating.
So, that was all about, how you can append multiple Microsoft Word documents to one single document. Do you have anything to say? Feel free to comment on the same below.
There are many reasons that you may need to compare two Microsoft Word Documents. Maybe you have ended up with two different versions of the same document due to simultaneously editing, or you work in the legal profession and are required to create a legal backline document.
For whatever reason, you have two or more Word Documents and don’t have the time (or the sanity) to manually compare them.
In this post we will walk you through the best way to compare two Microsoft Word Documents, saving you a whole heap of time and frustration. It’s as easy as a click of a button!
Comparing two Word Documents
Microsoft Word does have a built-in document comparison tool called ‘Compare’. The tool allows you to compare two Word Documents at once, highlighting any changes or differences between the two, leaving you to edit, approve and accept the changes.
You may not want to merge the documents together if you are reviewing a contract and simply need to see what was changed between the two versions you can review this by following the first few steps below and not making any further changes.
If you would like to merge the documents, follow the steps below and continue moving your approved changes across into a ‘Master File’. Before saving this as a new version.
Steps to compare two Word Documents using Word Compare
- Open Word
- Open one of the Word Documents you want to compare
- Click Review in the menu
- Find and Click Compare under Tools
- Click Compare Documents
- Under Original Document, select the original word file (or one of the word files)
- Under Revised Document, select the document you wish to compare to the document selected above
- Select a label for the changes (optional)
- Click OK
Microsoft Word will now merge the two documents and highlight all changes on the revised document file. The original Copy will be shown, untouched.
A third version will appear, this is your ‘Master Version’ and the file that will reflect any of the changes you accept or reject from the revised document.
Looking for an easier way to compare Word Documents?
You’re not alone, although Microsoft’s Word Compare is very assessable (already exists in your version of Microsoft Word) it’s clunky and not very user friendly. It’s overwhelming to see three versions of your document on the same screen, referring between the original document and revised document to see what changed.
Because so many of us face this problem every day, there are now some pretty amazing, purpose-built tools out there to make comparing Word Documents a whole lot easier.
Introducing Simul Docs, a tool built with easy document comparison, collaboration and version control in mind. It’s a simple, user-friendly tool that works seamlessly with your current version of Microsoft Word.
Simply drag and drop your two documents into Simul and press ‘compare’ in the click of a button Simul will merge the two files and highlight any difference for you to accept or decline.
Simul will also manage the version control side of things for you because sometimes you do need to refer back to an older version or you are required by law to keep these versions saved. By dropping a document into Simul, Simul will automatically give the document a version number such as 0.0.1. Then saving all future versions, in order without you even asking.
When you compare two files and merge (optional) the together Simul would have not only saved the original and revised documents as separate versions but also give the new file a trackable number so you won’t save over a thing.
If you are a legal professional, or someone that is often required to compare files using a purpose-built tool such as Simul Docs can save you a lot of valuable time. With the bonus of built-in version control and so much more, Simul was built to help you collaborate better.
Comparing two Word documents for differences may be a tedious job especially in two long documents, but, Word provides a powerful feature for us to finish this word quickly and easily. This article, I will introduce this useful function in Word.
If you are familiar with the Word application, the Compare feature in Word can do you a favor, please do with the following step by step:
1. Open a blank document, and then click Review > Compare > Compare, see screenshot:
2. In the popped out Compare Documents dialog box, click button to select the two Word documents that you want to compare from the Original document and Revised document separately, see screenshot:
3. Then, click More button to expand this dialog, and in the expanded dialog box, specify the Comparison settings and Show changes as you need, see screenshot:
4. After finishing the settings, click OK button.
5. Now, you can see a new Compared Document is created for showing and highlighting the differences between the two specific files, and in left pane, all revisions are list, as well the two specified documents are displayed in small panes in right part, see screenshot:
Account Information
Share with Your Friends
Create hyperlinks from one Word document to another
Create hyperlinks from one Word document to another
You can link your documents together—hyperlink, that is. Mary Ann Richardson explains how you can create hyperlinks to refer your readers back to information in different Word documents.
Word makes it easy to hyperlink to information in other
documents. Let’s say you’re preparing a document on the latest trends in
organizational process management. You’ve already written an introductory
article on the subject, and now you want your readers to be able to hyperlink to
the previous article where you defined process management. To hyperlink your
document, follow these steps:
- Open
both documents in Word and go to Window | Arrange All. - Select
the definition of the term process management in your previous document. - Right-click
the selected text, then click and drag selected text to the end of this
sentence in the new document: This article describes the latest trends in
process management. - Release
the mouse button and select Create Hyperlink Here.
When readers come to the term “process management”
in your new document, they can press [Ctrl], and then click to hyperlink to the
term in the previous article.
Note that if you are publishing this article on the Web, you
should save both of the articles’ files to the same folder to avoid getting any
broken links.
Miss a tip?
Check out the Microsoft Word archive, and catch up on our most recent Word tips.
Help users increase productivity by automatically signing up for TechRepublic’s free Microsoft Office Suite newsletter, featuring Word, Excel, and Access tips, delivered each Wednesday.
Create a primary document for ease of access
:max_bytes(150000):strip_icc()/ScottOrgera-f7aca23cc84a4ea9a3f9e2ebd93bd690.jpg "How to reference text from other documents in microsoft word")
- Tweet
- Share
- Tweet
- Share
What to Know
- Open the Word file that is the main document. Position the cursor at the insert location.
- Go to the Insert tab. Select Text >Object >Object >Create from File.
- Select Browse in Windows (From File in macOS) and locate the second file. Select OK (or Insert on macOS).
This article explains how to combine two or more Microsoft Word documents into one document. It also includes information on merging different versions of a document into a single document. This article applies to Word for Microsoft 365, Word 2019, Word 2016, Word 2013, Word 2010, and Word for Mac.
Merge Two or More Word Documents
When you want to combine multiple Microsoft Word documents into one, copying content from each and pasting it into another document isn’t efficient. Here’s the best way to merge Word documents into one primary file.
Open the file you wish to serve as the main document.
Place the cursor at the point of the document where you wish to insert the new content.
Go to the Insert tab, located near the upper-left corner of Word.
In the Text section, select Object.
In the drop-down menu, select Object.
Choose Text from File if you want to insert plain text from a source file and aren’t concerned with maintaining the formatting or retaining the images.
In the Object dialog box, go to the Create from File tab.
Select Browse on Windows, or From File on macOS.
Locate and select the file or files containing the contents you wish to insert into the document.
When the File name is field is populated with the proper path and the source files, select OK on Windows, or Insert on macOS.
The contents from the destination files are inserted into the current Word document at the location you selected. These steps can be repeated for multiple documents if you like.
Merge Different Versions of a Single Document
When several people work on a single document, you have multiple versions of the same document. These versions can also be merged into one primary file without manually copying and pasting. However, the process for doing so is a bit different than detailed above.
Go to the Review tab.
Select Compare.
In the drop-down menu, select Combine or Combine Documents.
In the Combine Documents dialog box, select the main document. Either select the Original document drop-down arrow and choose the file or select the folder icon.
Choose the document to merge with the main document. Select the Revised document drop-down arrow and choose the file containing the changes.
Select the More button in Windows or the down arrow in macOS. This presents several optional settings that dictate how the two files are compared, along with how changes appear in the new document.
Once satisfied with the settings, select OK to merge the documents accordingly. Both files appear side-by-side, along with a record of revisions and the corresponding details.
Not every feature in Microsoft Word is required by every user, but there are some essential ones, every user should know. Here’s a list of 10.
Since Microsoft Word dethroned WordPerfect in the ’90s to become the de facto standard in word processing, it has accumulated quite some features over the years. Not every feature is required by every user, but there are some essential ones, every user should know. If you are new to Word or want to sharpen your skills, here are some of the best things to know, whether you are a student, casual user, or starting that new job.
Essential Tips for Microsoft Word
1 – Paste Text without Formatting
If you reference information from online sources such as Wikipedia, sometimes copying the information directly into Word can affect. Usually, you might not want to keep the original formatting. Also, pasting in without formatting is faster. To do that, copy some text from the source. Launch Microsoft Word, then click the Paste menu.
Click the Paste Unformatted button to insert text without formatting. It doesn’t get any easier than that. You can also set a default, so your text is automatically pasted in that format.
2 – Select Non-Adjacent Text
Introduced in Word 2002, this has been a long-requested feature for many years. If you need to copy non-adjacent selections of text in a document or apply special formatting to headers, for example, this is the best way to do it. Hold down the Control key, then use the mouse to make your selections within the document.
3 – Harvest Images Used in a Document
If you receive a document with numerous images, and you would like to copy all the images from the document without having to do so one by one, here is an easy way to do it. Click File > Save As > click in the File type list box, select “Web Page.”
Browse to where the folder containing the images is stored, then copy the pictures.
4 – Crop a Photo
Microsoft Word includes powerful editing tools that can do more than manage text. If you have to work with pictures, you can access some formatting options. A common task is cropping a photo to the right dimension. Select the photo, which will activate the Picture Tools, Format contextual ribbon tab. Click the Crop button, then use the anchors to adjust and apply the desired dimensions.
Click the Crop button again to apply changes.
5 – Merge and Split Cells in a Table
Working with tables in a Word document can be complicated and tedious, depending on what you do. If you are creating a form, for example, merging cells is a common activity you might need to do. To do so, make a selection of cells within the table, then click the Merge button.
6 – Page Break and Document Layouts
If you want to be agile in preparing and printing your documents, Page Breaks with a mixture of document layouts can save you time and increase your productivity. Page Break lets you stop and start text entry at a particular location in a document. This is often used when creating text columns but is also used for regular documents too. To make a page break, select the Layout tab, click Breaks > Next Page. This will place the cursor on a new page, which permits applications of a different document layout such as landscape or legal. Proceed to modify the page’s design; for example, if you want legal size, click Layout tab > Size, then choose the layout.
7 – Reduce the Size of Images in a Word document
If you create an annual report containing lots of graphics, this can make it difficult to edit and share your document. You can reduce the size of your document for sharing by using the Compress Image Feature; learn more in the following article:
8 – Mail Merge
Mail Merge is one of the classic features of Microsoft Word used to produce mass documents containing unique information. Some examples where it can be helpful include brochures, newsletters, or materials used in mass mailings. If you work in an office, this is an important feature of Microsoft Word; you should know:
9 – Start Word in Safe Mode
Although it’s rare to encounter stability issues with Microsoft Word, they happen occasionally. If Word is not starting properly, just like Windows, you can start it in Safe Mode. To do so, press Windows key + R type: winword /safe then hit Enter. This will open Word without loading any add-ons that might be preventing the application from working. You can then try opening and editing your document.
10 – Recover Files from a corrupt Word document
If you cannot open a Word document, it’s probably a sign the document might be corrupt. To recover the document, launch Microsoft Word, click File > Open > Browse > select the document. Click the Open menu, then click Open and Repair.
If you can open the document successfully, use the opportunity to copy the contents, paste them into a new document, and then save it.
These are just the basics. When you are ready, you can move on to learning other essential features in Microsoft Word, such as creating tabs and track changes. Are there any particular features in Microsoft Word you would encourage fellow users to learn? What are your most used features and functions? Let us know in the comments.
1. Table of Contents- Microsoft Word has a nifty way of allowing writers to make a table of contents fairly easily. Go to Insert, then Reference, and then Tables and Figures, which leads to a variety of options in outlining your contents section. This includes creating hyperlinks from the section titles in the document to the corresponding section title in the table. The best way to approach the table of contents, after setting it up in Word, is to use the same font for each level of content (ex. Times New Roman 12 for primary headings, size 10 for secondary headings, etc.). As well, you should set up the Bullets and Numbering (under the Format tab) so that it automatically numbers each section in your document so that when you set up the table, it is much easier to do.
2. Document Headers/Footers- Just like the call for consistency above, the headers and footers can be frustrating document pieces to look at in hard copy. Margins are sometimes messed up, numbering is confused when you insert a section break instead of a page break, and the document name or any text you add into the headers/footers may get garbled in the limited space you have. To ensure that back-to-back documents have consistent headers and footers, use mirror margins in the Page Setup page to keep the headers and footers (along with borders and margins) the same on one side of the page as the other. As well, remember to disconnect each section from one another so that your page number does not become confused. Instead, restart the page numbering with each section by going to the Microsoft Word View tab and use the Header/Footer tool bar to keep disconnection sections from one another.
3. Section/Chapter Headings- In Microsoft Word, you can develop a scheme for expanding upon chapter or section headings into any number of subheadings for different sections of your document. Going to Format and then Paragraph in Microsoft Word, you can use bullets, numbering, or lettering to divide up your document more effectively. The font for chapters or sections should be noticeable, preferably bold and probably about twice the size of the body font.
4. Margins- Margins are trickier to lump into one general category, because different documents need different spaces between paper edge and text (especially with tables, pictures, and other figures). Just remember that checking each page to ensure that the margins are the same throughout is not a bad idea and to make sure that you set the margins you want from the beginning, so as not to cause disruptions in the document throughout the writing process. Also, checking margins within tables and figures is important, because inserting a table or figure causes some goofy things to happen to Word documents sometimes (especially if it is a figure you did not create). Checking the document throughout for these types of mechanical factors will save you formatting time in the end.
5. Bullets, and Tables, and Captions, Oh My!- When using bullets and tables and captions in Microsoft Word, several things should be noted before proceeding. First, make sure that all bullets look the same, all tables look the same, and all captions look the same, because if one piece does not look like the other, it is very conspicuous. Use the bullet option in Microsoft Word and make sure to double space the lines between the bullets, by going to Format, Paragraph, and changing the line space before and after to something like four or six point. Tables can be looked at and the problems can be determined easily, using the ruler at the top and side of Microsoft Word. Captions are similar to body text in that you can use any number of fonts and sizes in Microsoft Word, as long as it is smaller than the body text.
6. Things to Avoid in Writing- In preparing a document, there are several common mistakes that inexperienced writers or editors may commit to the chagrin of their reader. One is the use of too many lists within text. If there are more than three objects in a list, turn the list into a bulleted list or a small table for easier use by the audience. As well, writers will sometimes reference an acronym or measurement without making an initial attempt at definition. For example, if I saw NAFTA or kHz, I would not necessarily know on sight that those meant North American Free Trade Agreement or kilohertz. In referencing these, use a combination of full spelling and acronym the first time in the document, such as kilohertz (kHz), in order to allow your readers a reference point if they need to refresh their memory.
Word tends to store paths to external files with absolute paths. The fields affected by this include Word’s DATABASE, INCLUDEPICTURE, INCLUDETEXT, LINK, RD and HYPERLINK fields. This means that, should you need to move the files as a group to another folder (eg putting them on a CD or USB stick for portability), all the links will break. What is needed is a means of coercing Word into applying some sort of relative path addressing for fields pointing to other files. Even if you omit the path from the field code, in most Word versions it still gets stored in the file’s metadata. The only version I know of that doesn’t always do this is Word 2010 – and even that seems to vary according to whether the path has ever been stored.
Well, there is a solution (based on an idea originally developed by Peter Jamieson, another MS Word MVP) that works with DATABASE, INCLUDEPICTURE, INCLUDETEXT, RD and HYPERLINK fields, but not with LINK fields. For LINK fields, scroll to the bottom of this thread. The following example employs an INCLUDEPICTURE field, but works equally well with DATABASE, INCLUDETEXT, RD and HYPERLINK fields.
First off, insert a FILENAME field, with the path switch You can create this by pressing Ctrl-F9 (Cmd-F9 on a Mac) to create a pair of field braces anywhere in your document, then typing ‘FILENAME \p’ between them so that you end up with
• PCs see under Insert|Quick Parts|Field>Filename;
• Macs, Insert|Field|Document Information>Filename.
Next, press Alt-F9 to reveal your document’s field codes. The FILENAME field will look like:
Similarly, your INCLUDEPICTURE field will look something like:
or:
Some fields might have other switches after the file’s name, which you might want to keep, but they aren’t relevant to the rest of the discussion below. You can find out what the switches are for from Word’s help file, or via Insert|Quick Parts|Field(PC)/Insert|Field(Mac).
Note 1: Word refuses to display INCLUDEPICTURE field codes in the docx/m formats once the document has been saved – you need to save the document in the older doc format before you can access any INCLUDEPICTURE fields. Go figure.
To make the INCLUDEPICTURE field look in the current folder, cut & paste the FILENAME field into it, replacing the document path and inserting ‘\\..\\’ or ‘/ /’ between that and the hyperlink file’s name, thus:
or
How this works: The FILENAME p field extracts the current file’s name and path. The following ‘\\..\\’ or ‘/../’ tells Word to ignore the filename and get just the path. Then all you need to do is to add the source file’s name & extension.
The same approach can be extended to implement a form of relative addressing. For example:
looks in the child folder named ‘My Pictures’ and:
looks in the parent folder, while:
looks in the parent folder, then its child folder named ‘My Pictures’ (a sibling folder, so to speak).
Note 2: You can go down the file tree by adding however many sets of ‘\\..\\’ you need, but you must give explicit folder names for navigating back up it.
If you’ve got a lot of links to convert, you can use Find/Replace to do the grunt work. For example suppose you’ve got a document in the folder ‘C:\Users\UserName\Documents’ and a series of INCLUDEPICTURE fields coded like ‘
1. Press Alt-F9 to reveal the field codes.
2. Copy ‘INCLUDEPICTURE “C:\\Users\\UserName\\Documents’ and paste it into the ‘Find’ box. Do a ‘Find’ to lock it in.
3. Create a FILENAME field, with the path switch (see above) and insert ‘INCLUDEPICTURE “‘ into the document immediately before it.
4. Cut the ‘INCLUDEPICTURE “‘ and FILENAME field from the document. This puts them in the Windows Clipboard.
5. Insert ‘^c’ in the ‘Replace box.
6. Click on ‘Replace All’.
7. Copy ‘\\Images’ and paste it into the ‘Find’ box.
8. Type ‘\\..^&’ into the ‘Replace’ box.
9. Click on ‘Replace All’.
10. Press Ctrl-A then F9 to update the fields.
11. Press Alt-F9 to hide the field codes.
Note 3: The reason for the ‘INCLUDEPICTURE “‘ copying & cutting is to avoid updating other kinds of links. You can omit that part if you’re working with multiple kinds of links, except for LINK fields.
The above solution works with DATABASE, INCLUDEPICTURE, INCLUDETEXT, RD and HYPERLINK fields, but not with LINK fields – for which, see below. It doesn’t work with LINK fields because they have the nasty habit of converting any embedded fields to plain text immediately they’re updated.
Also attached is a macro I’ve created for automatically updating the field paths for DATABASE, INCLUDEPICTURE, INCLUDETEXT, RD, and HYPERLINK as well as with LINK fields and for other linked objects. To use it, simply extract the file from the zip archive, open up the Word VBE (Alt-F11) and import the file into the document you want to use it with, then save the document.
Your messages of this type — which advertise your product — are just a little too spammy in my opinion.
If you haven’t already, you might want to put your product in the “Product showcase” and then link to it there.
I did all the setting for to open the word file on host machine but File is not opening.
but if I publish this programs (i.e. set the section compilation debug=”false”) this progrmas do not work.
How it is working in VB6.0 without any issues and not working in VB.Net with the same code?
to easily generate DOCX files, you can try this C# Word component.
Here is an ASP.NET export to Word sample that creates and exports Word file stream to a browser:
There is a problem with closing the opened instances of MS Word; if you check the processes in your windows task manager you’ll see that there is plenty of them!
That happens because there’s an ambiguity between two closing methods; make sure that you cast your objects like this:
((DocumentClass)oWordDoc).Close(ref missing, ref missing, ref missing);
((ApplicationClass)oWordApp).Quit(ref missing, ref missing, ref missing);
I do not to use this because it would wield to a new document. what i want is a new template in a new page
oWord.Documents.Add(ref oTemplatePath, ref oMissing, ref oMissing, ref oMissing);
Thanks in advance
General News Suggestion Question Bug Answer Joke Praise Rant Admin
Use Ctrl+Left/Right to switch messages, Ctrl+Up/Down to switch threads, Ctrl+Shift+Left/Right to switch pages.
Make your life easier when preparing manuscripts for publication. These 5 tips will streamline your manuscript preparation process and allow easier editing and document collaboration between authors.
1. Using styles and document maps
Using Styles in MS Word
What is the point of styles? Who cares about that style ribbon and toolbox/taskpane anyway?
Surprisingly, styles in Word can be your best friend when preparing a manuscript for publication. Styles are not there to make your document pretty but act as a means of ‘sectioning’ and navigating your document. If you use Styles, Section headings will be visible in the Document Map meaning that you can navigate to any part of the document with a single click. For instance, imagine you are discussing data or a Figure in one section of the document (say in the Discussion section) and need to quickly check your Figure, Table or text in the Results section. You can jump to the relevant section by clicking the relevant Heading in the Document Map, check and jump back.
Styles also control the way the normal text and caption text is displayed. This is useful since you can create a uniform style for a particular journal following set guidelines (i.e. no justification, double spaced, Times New Roman, Font 12 etc.). You can change a particular Style in the Styles toolbox or by right clicking a particular style and reassigning it to highlighted text in the document. You can also change which Styles are displayed in the quick select ribbon via the toolbox/taskpane.
2. Figures, Tables, Captions and Field codes
Captions & Figures in MS Word
Some journals require figures and tables to be inserted in-line with the text. Others require them to be at the end of the document. You may also need to insert equations or other items in the text that are referred to regularly. If this is the case then captions can help. Captions are effectively imbedded field codes that act as links in a document. When you insert a Figure into your document, you can tag it with a Caption (i.e. Figure 1, Table 1).
You do this by selecting ‘insert Caption’ and choosing Figure, Table or Equation. This then inserts the next sequential Caption (i.e. Figure 1) into the text. Now, whenever you wish to refer to that Figure in the text you can do so by selecting cross-reference from the ‘insert’ menu. This will insert the Figure and number with a link. So by clicking on ‘Figure 1’ in the text will take you directly to Figure 1. Neat eh? That’s not all, Captions are dynamic so if you insert a new ‘Figure 1’ in front of the old one, it will renumber the subsequent Figure numbers and update the links in the text to reflect the change.
3. Reference software, field codes and CWYW
Using reference software with MS Word
One of the most powerful tools for writing manuscripts is third-party referencing software. There are many packages available online (this deserves a separate post in itself), however the majority allow you to organise papers, proceedings, books and other material that you can then automatically reference in your text. Common packages include Endnote™, Reference Manager™ and Papers™. Many of the packages offer ‘cite while you write’ (CWYW) meaning that you can insert references in the text using the packages’ Word plug-in and a bibliography will be created at the end of the document. The greatest thing about these packages is that you can easily define and change the output style.
One tip, when you are about to submit to a Journal create a separate ‘clean’ version of the document and select all (CMD A (Mac) or CTRL A (PC) and remove all field codes by pressing CMD+SHIFT+FN+F9 (Mac) or Ctrl+Shift+F9 (PC). This will remove all hidden field codes in the document and avoid build problems when your document is converted by the Journal. Do not do this to your main copy though as you will not be able to go back!
4. Track changes author comments and traceability
Using Track Changes in MS Word
Working on a manuscript is often a group effort. There may be multiple authors or your manuscript may need to undergo review by your line-manager etc. The easiest way to manage this is via Word’s built in track changes function. By using the track changes feature you can edit and modify a document, while keeping a history of previous changes. You can also add comments, which is useful if you or your colleagues want to highlight or query something. Track changes are a very powerful function as multiple people can work on a document and contribute to different aspects. Another important aspect of manuscript preparation is the location and traceability of your document(s). With Cloud Storage there are multiple ways you can share and work on documents. Microsoft has Skydrive™ for example, allowing multiple authors to work on a document simultaneously. Other options include Dropbox™ where you can save and share whole folders of information relating to your manuscript and view/recover historical snapshots of your folder.
5. Finishing up and setting up a template to make your life easier in future
Lastly, it takes a while to set up a streamlined workflow for manuscript and document preparation. So ensure you don’t have to start afresh! When you have everything the way you like it, save your formatting (styles etc.) as a new template. That way, when you are ready to write a new manuscript you can start from your established template.
Sometimes when you’re collaborating on a word document with co-workers or editors, the number of copies, edits, and changes can quickly grow out of hand. This is why it’s helpful to have the option to combine two separate documents in Word, because a copy and an edited copy will not only merge, but you’ll also have the option to label which changes were made by a specific author and when.
Learn how you can easily merge two documents in Microsoft Word.
Also read: How to Copy and Paste Multiple Text Selections in Microsoft Word
Merge the Two Documents
To start, open the first document you want to act as the primary document. Then, using the top toolbar, click on the “Review” tab, and find the button labeled “Compare.”
From here, click the option to “Combine …” from the drop-down menu.
This will open up a secondary box where you’ll need to select the two documents you want to combine from a drop-down list.
Choose the first document you want to act as the master. In general, you’ll want this to be the original copy, while the second document should be the copy with any edits from other people. Also, make sure you use the “Label unmarked changes” box to identify which users made changes to which aspects of the document.
If you click “More,” you can also control where these changes will be shown, either in the “Original document,” the “Revised document,” or in a “New document.”
Manage the Combined Document
Once the document is merged, you’ll be greeted by the following window.
Here you’ll see three independent sections – the left showing the “Revisions” made to the document, the middle showing the combined document, and the right section which will show both the original document and the revised document simultaneously.
If this amount of information is a bit too overwhelming, you can click the “Compare” button again, and scroll down to find the option labeled “Hide source documents.”
Click on this and bring the three sections down to two.
Also read: How to Place Images in Microsoft Word the Way You Want
Merge in Additional Copies
If you’d like to add in more copies (such as in the example of having multiple edits per document), simply repeat the same process as you did above, but use the “Revised document” as your original copy, and then find the secondary documents you want to add in from the same list you used for the initial import.
Copy and Paste
Of course, if you want to cut down on all the complicated measures listed above, there’s always the trusty process of simply hitting Ctrl + C and Ctrl + V .
To use this option, find the source text that you want to import into your new document, and select anything you want to bring over with your mouse.
Next, either right-click the text and choose “Copy” from the drop-down menu, or simply use the key command mentioned above to cut the text and paste it into the new document you want to edit.
Wrapping Up
The way you choose to merge your two documents will ultimately depend on the amount of control you want to have over what gets imported, as well as how many edits are made available during the revision process. Luckily, Word includes several different options for merging documents, so you can use it however suits your personal case the best!
Our latest tutorials delivered straight to your inbox
The first step is to create documents in Microsoft Word. These documents consist of one style document and multiple component documents, as shown in Figure 18.
The components shown in Figure 18 are only examples. You could have other components, such as a table of contents or a set of collateral, and you could omit the quotes or product descriptions, for example. However, a template must have a style document and one or more component documents.
NOTE: See Release Notes for information about which versions of Microsoft Word are supported.
To create the template documents, you perform the following tasks:
- Planning the template. Decide what components the template should have.
- Creating the style document. Create the document that gives all the template’s components a standard format.
- Creating the component documents. Create a document for each component of the template.
Planning the Template
Before you create the documents in Word, you must determine how the proposal should look and what type of information it should contain.
Begin by looking at previous successful proposals to see what sections they included. For example, did they all have a cover letter, an executive summary, and a quote? Also, look at the documents your company currently has on hand, and the customer questions these pieces answer. Then decide how to organize your information. What topics could be standard across all proposals? What topics are specific to certain proposals? What is the best order for the pieces in the proposal you are creating? Finally, decide what fields to insert to customize their proposals (for example, contact name, account name, and industry). You will use this information to create bookmarks in your Word documents.
As part of your planning, you should look at the sample templates that come with Siebel Proposals, which are described in Sample Data: Field Mappings and Templates.
NOTE: Proposals use fields from only one business object. If you want to include additional fields, you must use Siebel Tools to add the business components that include these fields to the business object that is the basis of the proposal.
Creating a Styles Document
After you plan your templates, you work on the styles document for this template. This Word document will define the layout of your proposal and may include such things as headers, footers, your logo, and special margins.
The layout options you specify will automatically be applied to all the components used in the proposal.
NOTE: Do not type any content into this document. The content will come from the individual component documents that you will create later.
To set up styles for your template
- Create a new document in Microsoft Word.
- Set up margins, headers, footers, fonts, and other layout options for your template.
- When you are finished creating styles, save the file:
- Choose a name that uses only alphanumeric characters.
- Use the .doc extension for Microsoft Word.
- Close the file.
Creating Components
The next step in developing your template is to create components, which are the text pieces that make up the body of your proposal.
A component is a Microsoft Word document that includes standard text and personalized data. For example, a cover letter component includes your standard cover-letter text and personalized data such as the name and address of the contact to whom the letter is addressed.
To create a component, you type the standard text and then create bookmarks, or Microsoft Word placeholders for custom data. When a sales representative generates a proposal, these bookmarks will be replaced with data from the Siebel application.
To create a component with bookmarks in Microsoft Word
NOTE: This procedure may vary slightly, depending on your version of Microsoft Word.
- Create a new blank document in Microsoft Word.
- Type the standard text that belongs in this component.
- Place the cursor where you want to create a bookmark, and choose Insert > Field.
REF appears in the Description box.
In the Comments box, enter the name of your bookmark after REF.
For example, you might type Company for company name, so that the Comments box contains:
The bookmark name cannot begin with a number.
NOTE: If the text inserted into a bookmark contains double quotes (“), the inserted text will automatically be preceded by a backslash (\). If you do not want the backslash to appear in the inserted text, change the double quotes to single quotes in the Siebel software.
In your document, the following message appears:
Error! Reference source not found.
This message is Word’s normal bookmarking convention. The error text will be replaced by appropriate data at the time of draft generation.
Repeat Step 3 through Step 8 to add bookmarks for every field you want to insert in the text.
NOTE: If the same field is being inserted in several places, you can copy its bookmark and paste it into other parts of the document.
Find and Replace is a helpful tool in Microsoft Word that searches your document for a specific word or phrase.
You can use the tool to replace one word with another, which can be helpful in situations where you need to go back to change the spelling of a word or check a document for instances of a repeated word to avoid redundancy. For example, if you’re deep into writing a paper and realize you’ve been misspelling someone’s name (let’s say Mark when it should have been Marc), you can use Find and Replace to easily find all instances of Mark and replace it with Marc with a few clicks.
Below, we’ve outlined how to use Find and Replace in Word on macOS and Windows.
How to use Find and Replace in Word on a Mac
- Open Microsoft Word on your Mac.
- Click or hover over the “Edit” tab found in the top toolbar.
- Click or hover over “Find” from the dropdown menu.
- Click “Replace…” or hold “shift” + “command” + “H” on your keyboard.
This will open a side panel. Enter what you’d like to find in the first entry and what you’d like to replace it with in the second.
Click the “Find” button to locate the matches first, the “Replace” button to replace each individual match (highlight which one you’d like to change by clicking on the list item), or the “Replace All” button to replace all matching words or phrases.
Once you’ve made your changes, a pop-up will appear that reads, “All done. We made ‘ ‘ replacements.” (The number of replacements will vary depending on your document).
How to use advanced Find and Replace in Word on a Mac
- Open Microsoft Word on your Mac.
- Click or hover over the “Edit” tab found in the top toolbar.
- Click or hover over “Find” from the dropdown menu.
- Click “Advanced Find and Replace. “
Open “Advanced Find and Replace…” Marissa Perino/Insider
This will open a pop-up with many options, including the basic options of replace all, replace, and find, along with more specifications, such as matching prefixes and suffixes.
To make stylistic changes to your replacement, click “Format” at the bottom of the pop-up and choose from the list. One of the most helpful options is sometimes “Font…”
Choose an option from the “Format” dropdown. Marissa Perino/Insider
In the font screen, you can specify a new font, style, size, color, and more. Make your adjustments and click “OK” when done.
Whatever alterations you make, the pop-up will list your formatting changes under “Replace with.”
Choose to replace the first match, replace all, or find the next.
June 28, 2012 By Angie Kauffman · Disclosure: This Post May Contain Affiliate Links.
- Share on Facebook
- Share on Twitter
- Save to Pinterest
While I know that this might not be something that you need right at the moment, it was a solution that I really had to dig for. So, just in case you find yourself in the same situation I was in (needing to merge multiple Microsoft Word documents together), you just might remember that you saw the information somewhere before! (Or, you can pin it for future use.)
I wrote each of the sections of my most recently written eBook, Training Your Children in Home Economics, as separate Word documents. For some reasons, I figured, since merging PDF documents is easy, that I would quickly figure out how to merge Microsoft Word documents. That was, however, not the case. So, let me save you the trouble and share how I did it.
How to Merge Word Documents in Microsoft Word 2010
First things first, before the merging process, you’ll need to either open one of the documents or start a brand new document for the merging (depending on how many documents you are merging.)
1. You’ll first go to the “Insert” tab in Microsoft Word. It looks like this:
2.Go to the “Text” area (within the “Insert” tab) and click on the drop down arrow next to “Object.”
3. Select “Text from File” and choose the correct file that you want to add with the already opened document. It will then appear in the existing document!
(If merging multiple Word documents, I found that you can either do it one document at a time or you can highlight multiple documents when the pop-up box appears.)
Steps two and three look like this:
Easy peasy! You have now merge Microsoft Word 2010 documents.
Join 35,000+ Other Awesome People
Subscribe to the Real Life at Home weekly newsletter to get our latest content, exclusive free printables, learning activities, and ideas for celebrating with your kids all year
If multiple users are working on a single Word document, you may wish to compare them, side by side. Here’s how.
There are plenty of reasons why you might wish to compare two Microsoft Word documents side-by-side. You might be a teacher, trying to spot a student plagarising another student’s work. Alternatively, you might be working on a document as part of a team, trying to spot the changes your colleagues have made.
It’s pretty easy to track changes in a Word document, but if you want to compare the documents side-by-side, you’ll need to use Word’s built-in document comparison feature. Here’s how.
Comparing Two Microsoft Word Documents
If you have two similar Microsoft Word documents, you can use the document comparison tool to compare them. This will point out any changes that have been made and merge them together, as well as allow you to view the two documents side-by-side.
To do this, open Microsoft Word and press Review > Compare on the ribbon bar. From the Compare drop-down menu, press the Compare… option.
This will open the Compare Documents window. You’ll need to select the two Microsoft Word documents you wish to compare here.
Select your two documents from the Original document and Revised document drop-down menus. Click Browse in the drop-down menus to select the files on your PC if they aren’t listed already.
With both documents selected, you can determine how you wish to label the changes. This will default to your standard document editing name.
If you prefer, you can change this in the Label changes with box, underneath the Revised document drop-down menu.
Advanced Comparison Document Settings
Word will use default settings to compare your documents. If you wish to change these, click the More button in the bottom-left corner.
This will display various options you can use to compare your documents. These include changes to formatting, additional spaces, additions or deletions to the text, and more.
Click the checkbox next to each comparion search option to enable or disable these criteria. Once you’re ready, press OK to begin the comparison.
Using the Document Comparison Overview
This will open a new window, allowing you to see how both documents compare to one another. A list of revisions will be shown in the left-hand panel, while the right-hand panel will allow you to scroll through and see the changes to each paragraph in both documents at once.
The center document will show either the revised or original document, displaying any changes (with a red marker next to each change). Clicking on any of the changes will show the removed or changed text, with the updated text underneath.
You can switch between these views by selecting an option from the Tracking drop-down menu in the Review tab.
For instance, choosing Original will show the original document in the center. If you choose Simple Markup, you’ll be able to view the changed text with a red marker, but not the deleted text. Choosing All Markup will display both the deleted and updated text, while No Markup will display the revised document in the center with no markers.
Merging Document Changes
If you want to merge the changes between two documents, you can use Word’s tracking features to do so. This allows you to copy the changes from the revised document into the original document.
To do this, press the downwards arrow at the bottom of the Accept button, listed under the Changes section in the Review tab.
You can accept each change individually (going through them one-by-one) or accept all of the changes at once. From the drop-down menu, press the Accept and Move to Next or Accept All Changes option, depending on your preference.
Once the changes have been accepted, you’ll need to save the file. To do this, press File > Save As.
You can save the document as a separate, merged document. Alternatively, you can overwrite the first document to replace the original text, leaving only the combined document.
Better Document Creation in Microsoft Word
The best way to work on a team document together is to use document tracking. If you compare two Microsoft Word documents, however, you’ll be able to spot changes (or similarities) much clearly.
This built-in comparison feature is just one way to create better Word documents. You can make longer documents easier to read by adding a table of contents, for instance. If you want to see how long it’s taking you to finish a document, you can track the editing time in Word in your document properties.
Microsoft Word is one of the most popular word processing programs used by computer users. Word can open text (.txt) files, rich text format (.rtf) files, XML (.xml) files, web page (.htm or .html) files, and all Word (.doc, .docx, .docm, and more) files.
To open any of these files in Microsoft Word, including files created and saved in Word, you can use any of the options below.
Double-click file
In some cases, you can double-click a file to open it in Microsoft Word. However, the file only opens in Microsoft Word if that file type is associated with Microsoft Word. Word documents, like .doc and .docx files, are associated with Microsoft Word by default. However, web page files, text, and rich text format files are often not associated with Word by default, so double-clicking these files may open in another program.
To change the program associated with a file, see: How to associate a file with a program in Windows.
Right-click file and select program
For any file, you can choose the program to open a file with, including Microsoft Word.
- Right-click the file you want to open.
- In the pop-up menu, select the Open with option.
- If available, choose the Microsoft Word program option in the Open with menu. If Microsoft Word is not listed, select the Choose other app or Choose default program option, depending on the version of Windows on your computer.
- In the window that opens, find Microsoft Word in the program list and select that option. Microsoft Word should open and the file opened within Word.
Open within Microsoft Word
Follow the steps below to open a file from within Microsoft Word.
Your Key to Excellence
by Dawn Bjork, MCT, MOSM | The Software Pro
Most of the time, we want text in a Microsoft Word document to automatically wrap, that is, to move to the next line when it is too long to fit on one line. Word wrap is great except when it breaks up text we want to stay together such as dates, names, phone numbers, phrases, formulas, titles or other text that should remain together on the same line. Fortunately, Word has some easy ways to keep text together.
Some examples of text you might want to keep together and not break up on separate lines:
- September 2, 2018
- Christopher A. Jones, Ph.D.
- (555) 123-4567
- state-of-the-art
Your options for keeping text together in Microsoft Word include:
- Non-breaking spaces
- Non-breaking hyphens
- Non-breaking paragraphs & lines
Non-Breaking Spaces & Non-Breaking Hyphens
The common solution: what most people do to keep text together is move to the beginning of the text and press [Enter] to start a new line. This is fine until any of the text changes and causes breaks in the wrong place. And, this doesn’t work well if you have paragraph formatting or styles that adds space between paragraphs.
The right solution: keep text together with special characters. Specifically, replace normal spaces and hyphens with non-breaking spaces or non-breaking hyphens:
- Non-breaking space: [Ctrl] + [Shift] + [Spacebar]
- Non-breaking hyphen: [Ctrl] + [Shift] + [Hyphen]
As the name implies, non-breaking characters connects or “glues” the text together and it will all automatically move to the next line together but only as needed.
To view non-breaking space and hyphen characters in a document, click Show/Hide in the Paragraph group (Home tab). Word represents non-breaking space characters with a degree symbol (°) and non-breaking hyphen characters with a double‑length hyphen (these are a bit harder to distinguish from regular text).
Non-Breaking Paragraphs and Lines
Next, let’s go one step further. When you don’t want a paragraph or even several lines of text to break between two pages, try the following Word tricks:
- Select the paragraph or section of text you want to keep together.
- On the Home tab in Word, click the Paragraph group’s dialog launcher (the small arrow at the bottom-right of the group). Or, right-click on the selected text and then left-click on Paragraph.
- Pick the Line and Page Breaks
- Check the Keep lines together option and click OK.
- If you have multiple paragraphs selected, for instance, a title with following text, also click on Keep with next which will keep the paragraphs together on the same page.
Bonus Word Tricks
To find non-breaking spaces and non-breaking hyphens in your text, use the Find feature as follows:
- On the Home tab, click the Find icon in the Editing group on the right or press the keyboard shortcut [Ctrl] + F.
- In the Navigation Pane to the left, enter one of the following: ^s to find non-breaking space; ^
to find non-breaking hyphens.
Make sure you have the Show/Hide non-printing characters features turned on so you can see the hidden characters for these non-breaking symbols.
Find more Microsoft Word shortcuts, tips, and techniques at
IAAP works with the best trainers in the industry to ensure you have relevant, engaging, practical content at your fingertips. This blog is written by a speaker with a program in the IAAP Approved Programs database. Search by name or keyword to find their contact information and book them for your Branch or Region event.
If you’d like to attend one of these events, you can find one in your area here.
This page contains support links for Office 365, Word 2019, Word 2016, and Word 2013.
If you are not sure which version you are using, click here.
- Creating a table of contents
- Numbering headings
- Shortcut navigation keys
- Compare and merge documents
- Changing the orientation of a single page
- Inserting different page numbers
- Different page numbers for different sections
- Format page numbers
- Starting the page number later in a document
- Printing on both sides of the page
- Create and print a booklet
- Add or remove line numbers
Below are help sheets for Microsoft Word 2003, 2007, and 2010. If you have difficulty loading the help sheets, you may need to install the latest version of the Adobe Acrobat Reader.
| 2003 | 2007 | 2010 | |
|---|---|---|---|
| Creating a table of contents | PDF (405kb) | PDF (386kb) | PDF (345kb) |
| Numbering headings | PDF (568kb) | ||
| Shortcut navigation keys | PDF (142kb) | PDF (141kb) | PDF (117kb) |
| Comparing documents | PDF (193kb) | PDF (505kb) | PDF (279kb) |
| Changing the orientation of a single page | PDF (148kb) | PDF (280kb) | PDF (345kb) |
| Inserting different page numbers | PDF (148kb) | PDF (433kb) | PDF (415kb) |
| Different page numbers for different sections | PDF (393kb) | ||
| Page numbers different on the first page | PDF (74kb) | PDF (98kb) | PDF (110kb) |
| Starting the page number greater than 1 | PDF (78kb) | PDF (96kb) | PDF (131kb) |
| Printing multiple pages per sheet | PDF (115kb) | PDF (119kb) | PDF (134kb) |
| Booklet printing | PDF (451kb) | ||
| Line numbers | PDF (174kb) | PDF (88kb) | PDF (157kb) |
Page authorised by Director – Centre for Learner Success
Last updated on 3 December, 2019
If you’re multitasking, or using one document as a reference, you need to quickly switch between two or more documents. Here are four ways to move back and forth between them.
Ctrl-F6
Press CTRL-F6 on the keyboard to toggle between Word’s open windows.
Alt-Tab/Shift-Tab
Hold down the ALT key on the keyboard and tap the TAB key once (keep ALT down). An overlay appears with icons for all your open windows. Continue to press TAB until the desired document is highlighted. Let go.
Press SHIFT-TAB to go the other way.
If your just type ALT-Tab, ALT-Tab, I toggle between my two most recent windows.
The View Tab
Click on the VIEW TAB, then on SWITCH WINDOWS. Pick your document off the list.
Using Windows
Depending on what version of Windows you’re using, or your individual settings, this behavior may vary.
In earlier versions of Windows, there’s at least one ICON FOR EACH WORD DOCUMENT on the task bar at the bottom of your screen.
Click on the CORRECT DOCUMENT to jump to it.
In more recent versions of Windows, you’ll see ONE WORD STACK ICON with a number of open items.
Click on the STACK, and thumbnails of the open documents appear. Click on the desired file.
Buy the Book
For the complete collection of time-saving tips and tricks, buy my book, Microsoft Word 2010 Tips & Tricks. Available in eBook, iBook, Multi-touch, and paperback versions.
Word: Compare documents not working
I’ve been working with Word for a couple of decades (!) now, but still it surprises me with what it can do. There are some things I rarely use (such as mail merge), so I’m not familiar with how they work, and then there are other things I just didn’t even realize were in Word — like ‘compare documents’ — because I’ve never had any need to use those features.
However, a work colleague uses Word’s compare function quite often and was having trouble when comparing two versions of the same document. She asked me for help, and then I discovered the value and the speed of the ‘compare’ function.
But first, I got the same error as her (“Word was unable to compare the documents”) when I tried to compare these documents on my computer, thus eliminating her PC as the problem, but once I’d changed some settings, everything worked superbly.
Here’s what I did:
- I first tried to compare the two documents without making any changes to them and keeping all the default settings for the comparison. To compare two documents, go to the Review tab, Compare group, click the Compare button, then select the Compare… option.
- I browsed to the two documents, left all the settings as they were, then clicked OK.
- After a minute or two of processing, I got the same error that my colleague got.
- Document A (the original version) had been created in Word 2003 and so was a *.doc document. To eliminate that as the reason for the error, I saved it as a *.docx document. This reduced the file size considerably (a side bonus).
- I also accepted all track changes in Document A, then saved Document A under a different name (just so I didn’t mess up the original!).
- Document B (the revised version, and already a *.docx document) also had Track Changes turned on, so I accepted all those and saved that document with a new name too.
- I then ran the compare again, again with all the default settings selected, but still I got the error.
- I tried again, this time clearing all the check boxes for the things that didn’t need to be reported as a change in the final document. This time it worked!
For this 250p document, the comparison took very little time (maybe a minute or so) and I got a document that showed all the changes I’d selected to report in the new document. I still had to accept the formatting changes for the tables and the cross-reference field changes, but that was all.
If you ever get this error message when trying to compare document versions, turn off some of the default selections for comparison and run it again.
Quicklinks
How to Make an Accessible Document in Microsoft Word
- Discover how a descriptive file name that identifies the document or its purpose helps everyone, including people with disabilities, locate, open, and switch between documents.
- Learn how to add headings and formatting to a document so assistive technology can infer meaning from the document structure and formatted characters using built-in styles.
- Discover how to use lists to organize and structure content so assistive technology can identify that information is contained in a group, and convey the relationship between each item within the list.
- When laying out a document, it’s sometimes necessary to structure content into columns. Learn how to use the built-in columns tool to ensure that content is read in the proper reading order.
- Learn how to use built-in features to create layout tables and both simple and complex data tables so assistive technology can read the information in a meaningful manner.
- Discover how to use the proofing language settings to programmatically set the document language and enable assistive technology to read and correctly pronounce content.
- Learn how to add links to a document so that each link has a unique and descriptive name to allow assistive technology users to determine the destination, function, or purpose of a link.
- Learn how to ensure that vital information, created as a watermark or placed in the header or footer of the slide, can be accessed by assistive technology.
- Assistive technology cannot infer meaning from images and other objects, such as pictures, images of text, images of tables, shapes, and icons with hyperlinks. Discover how to apply “alt text” to objects to ensure equivalent access to the visual information.
- Assistive technology cannot access information in text boxes unless they are placed “in line with text.” Learn how to ensure information within a text box is accessible.
- Discover how color and other visual or sensory characteristics, such as size, shape, and location are used to convey meaning when creating your document.
- When choosing the color palette for your document, ensure there is enough color contrast between the foreground and background. Discover how to download and use a tool to ensure your text meets or exceeds minimum allowable color contrast.
- Learn how to embed audio-only, video-only or multimedia files into your document so individuals with disabilities have comparable access to the information.
Microsoft Word document (prior version 2007)
The most common type of file with doc file extension
doc file extension is commonly used for text documents created in Microsoft Word word processor prior version 2003. Word’s DOC documents can be opened in almost every (if not every) other word processor, such as OpenOffice.org Writer or iWork Pages.
There is one other file type using
the DOC file extension!
.doc – Document file
Bookmark & share this page with others:
DOC file extension – Microsoft Word document (prior version 2007)
What is doc file? How to open doc files?
File type specification:
Document file type
Microsoft Office file type
doc file icon:
The doc file extension is associated with Microsoft Word, a powerful word processor program from Microsoft and part of Microsoft Office.
The doc files was traditionally used by Microsoft Word for its document files prior version 2007. Above versions of MS Word use docx file extension instead.
The doc files are in the word binary file format, which is a collection of records and structures that specify text, tables, fields, pictures, embedded XML markup, and other document content.
The content can be printed on pages of multiple sizes or displayed on a variety of devices. The Word binary file format begins with a master record named the file Information block, which references all other data in the file. By following links from the file information block, an application can locate all text and other objects in the file and compute the properties of those objects.
The latest versions of Microsoft Office use the Open XML file format standard and the Microsoft Word documents are saved with the docx file extension,or if they also have macros enabled, the docm file extension.
DOC file format is obsolete and no longer developed. But still widely used due to popularity of Microsoft Office. Newer documents are created and converted from doc to docx format.
MIME types used by MS Word documents:
application/msword
application/doc
appl/text
application/vnd.msword
application/vnd.ms-word
application/winword
application/word
application/x-msw6
application/x-msword
This doc file type entry was marked as obsolete and no longer supported file format.
This type of file is no longer actively used and is most likely obsolete. This is typically the case for system files in old operating systems, file types from long discontinued software, or previous versions of certain file types (like documents, projects etc.) that were replaced in higher versions of their original programs.
Working with the documents in MS word and want to see the change that has been made in the earlier document version or just want to compare two documents for difference. Then there is no need to use any other external tool, MS Word offers this service offer in the Office. ‘ Compare ’ Feature in Microsoft Word (MS-Word) lets you find a resemblance between the two documents and see changes made to the original document. The feature can be used to relate edited copy with the original document and learn about the alterations made. There are online services also which for Text Comparison Search For Duplicate Content , you can also try them.
How to Compare Two Documents in Microsoft Word
I am using Office 2013 to show the entire process. The Comparison Feature is present in earlier versions of Office also and it may occur that you will find the place to use the Comparison feature in a different place than Office 2013.
1 Open MS – word and navigate to Review -> Compare Menu item
2 Select Original and Revised Document from the respected field and click ok to start comparing the documents. You can select the comparison settings as you like from given some check boxes such as
- Moves
- Comments
- Formatting
- Case changes
- White Space
- Tables
- Headers and Footers
- Footnotes and Endnotes
- Text boxes
- Fields
3 You can now see the comparison results, changes are shown in red text.
About The Author
admin
TKA is owner and passionate blogger of Technokarak from Delhi, INDIA. He is an Engineer and loves to discover and learn new things on Internet. At Technokarak, he writes articles on WordPress, SEO, Mobiles, Tablets and other technical stuff.
Related Posts
How to Fetch Data from Google Spreadsheet with Script – Dynamic Database Tutorial
Best SWF Converter for Mac – iOrgSoft SWF Converter Review
Smart Namo Phablet – New Device named after Narender Modi – Gujarat’s Chief Minister
Check your PC’s Security State – Opswat’s Security Score
2 Comments
Hi, I hopped over to your webpage via StumbleUpon. Not a thing I customarily read, however I appreciate your thoughts none the less. Many thanks for developing something worthy of reading through!
How to compare scanned .jpeg file to word document?


