Geoffrey Carr
A ConnectSense nagyszerű okostelefon, de ha gyári alaphelyzetbe kívánja állítani annak érdekében, hogy távolítsa el – vagy ha csak új Wi-Fi hálózathoz kell csatlakozni – itt van az eszköz alaphelyzetbe állítása és a semmiből történő újraindítás .
A ConnectSense Smart Outlet nem teszi lehetővé a felhasználók számára, hogy egyszerűen megváltoztassák a Wi-Fi hálózatot, amelyhez csatlakozik, és megköveteli, hogy a készülék újrainduljon, hogy ez megtörténjen. Ez a termékkel kapcsolatos néhány bosszantó tulajdonság egyike, de szerencsére nagyon könnyű újraindítani és új WiFi hálózaton alapítani.
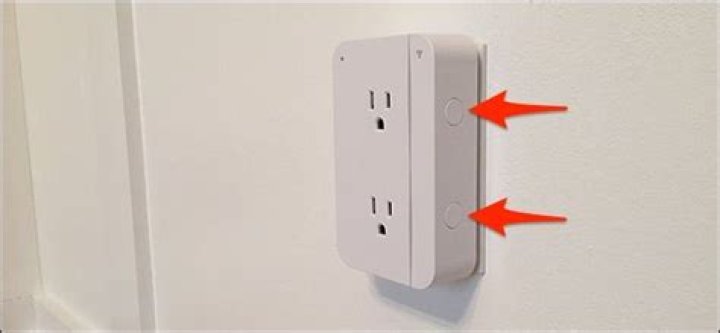
Ha elindul, akkor egyszerűen csak csatlakoztatni fogja a készüléket, ha még nincs. Innen keresse meg a két gombot az oldalon, amely be- és kikapcsolja az egyes edényeket.
Tartsa lenyomva mindkét gombot az oldalán egyszerre mindaddig, amíg két piros LED el nem kezd villogni. Ez körülbelül 10 másodpercet vesz igénybe.
Engedje el a gombokat, és várja meg, amíg a Smart Outlet bal felső sarkában található kis zöld LED világít villogni kezd.
Ha tervezi az eszköz értékesítését vagy másnak való átadását, folytassa és húzza ki a csatlakozót, ha a kis zöld LED világít. Ellenkező esetben elkezdheti a Smart Outlet telepítési folyamatát, és csatlakoztathatja azt egy új WiFi hálózathoz.
Van egy útmutatónk a ConnectSense Smart Outlet beállításáról, ezért győződjön meg róla, hogy ellenőrizze, ha még nem tudja, hogyan kell beállítani az eszközt. Csak a ConnectSense alkalmazás letöltése, a Smart Outlet csatlakoztatása az otthoni Wi-Fi hálózatra, majd a HomeKit beállítása.
Geoffrey Carr
ConnectSense je velika pametna utičnica, ali ako ga želite vratiti na tvorničke postavke kako biste ga odustali – ili ga jednostavno trebate povezati s novom Wi-Fi mrežom – evo kako ponovno postaviti uređaj i početi ispočetka ,
ConnectSense Smart Outlet ne dopušta korisnicima da lako mijenjaju Wi-Fi mrežu s kojom je povezana i zahtijeva da se uređaj poništi kako bi se to dogodilo. To je jedna od rijetkih neugodnih značajki o proizvodu, ali srećom je stvarno lako vratiti se i ponovno postaviti na novu WiFi mrežu.
Za početak, jednostavno ćete priključiti uređaj u utičnicu ako već nije. Odatle, pronađite dva gumba na strani koja se uključuje i isključuje iz svake pojedinačne posude.
Istodobno držite oba gumba na bočnoj strani dok dvije crvene LED svjetiljke ne počne treptati. To će potrajati oko 10 sekundi.
Pustite tipke i pričekajte da mali zeleni LED svjetlo u gornjem lijevom kutu Smart Outleta počne treptati.
Ako namjeravate prodati uređaj ili ga davati nekom drugom, možete ići naprijed i odspojite ga kada se svjetla malih zelenih LED lampica počne treptati. U suprotnom, možete započeti postupak postavljanja Smart Outleta i povezati ga s novom WiFi mrežom.
Imamo vodič o tome kako postaviti ConnectSense Smart Outlet, stoga svakako provjerite to ako već ne znate kako postaviti uređaj. To je samo pitanje preuzimanja aplikacije ConnectSense, povezivanja Smart Outleta s kućnom Wi-Fi mrežom, a zatim postavljanja HomeKita.
- Tips
- Blog
- Hvordan
- Vinduer
- Telefon
- Vigtigste
- Blog
- Sådan Reset Your ConnectSense Smart Outlet
ConnectSense er en fantastisk smart udgang, men hvis du vil fabriksindstille den for at give den væk – eller hvis du bare skal tilslutte den til et nyt Wi-Fi-netværk – her kan du nulstille enheden og starte om fra bunden .
ConnectSense Smart Outlet tillader ikke brugere nemt at ændre det Wi-Fi-netværk, den er tilsluttet til, og kræver, at enheden nulstilles for at få det til at ske. Det er en af de få irriterende egenskaber ved produktet, men heldigvis er det virkelig nemt at få det nulstillet og sat op igen på et nyt WiFi-netværk.
For at starte, vil du simpelthen tilslutte enheden til en stikkontakt, hvis den ikke allerede er i gang. Derefter finder du de to knapper på siden, der tændes og slukkes for hver enkelt beholder.
Hold begge knapper på siden på samme tid, indtil to røde LED-lamper begynder at blinke. Dette vil tage ca. 10 sekunder.
Slap af knapperne og vent på det lille grønne LED-lys i øverste venstre hjørne af Smart Outlet for at begynde at blinke.
Hvis du planlægger at sælge enheden eller give den til en anden, kan du gå videre og tage den ud af stikkontakten, når de små grønne LED-lamper begynder at blinke. Ellers kan du starte installationsprocessen for Smart Outlet og slutte den til et nyt WiFi-netværk.
Vi har en vejledning i, hvordan du konfigurerer ConnectSense Smart Outlet, så sørg for at tjekke det ud, hvis du ikke allerede ved, hvordan du opsætter enheden. Det er bare et spørgsmål om at downloade ConnectSense-appen, forbinde Smart Outlet til dit hjem Wi-Fi-netværk og derefter indstille HomeKit.
@craigelloyd
Jun 3, 2016, 3:00 pm EST | 1 min read
The ConnectSense is a great smart outlet, but if you want to factory reset it in order to give it away–or if you just need to connect it to a new Wi-Fi network–here’s how to reset the device and start over from scratch.
The ConnectSense Smart Outlet doesn’t allow users to easily change the Wi-Fi network that it’s connected to, and requires that the device be reset in order to make it happen. It’s one of the few annoying features about the product, but luckily it’s really easy to get it reset and set up again on a new WiFi network.
To start off, you’re simply going to plug the device into an outlet if it isn’t already. From there, locate the two buttons on the side that turn on and off each individual receptacle.
Hold down both buttons on the side at the same time until two red LED lights start to blink. This will take about 10 seconds.
Let go of the buttons and wait for the small green LED light in the top-left corner of the Smart Outlet to begin blinking.
If you’re planning on selling the device or giving it to someone else, you can go ahead and unplug it when the small green LED lights begins blinking. Otherwise, you can begin the setup process for the Smart Outlet and connect it to a new WiFi network.
We have a guide on how to set up the ConnectSense Smart Outlet, so be sure to check that out if you don’t already know how to set up the device. It’s just a matter of downloading the ConnectSense app, connecting the Smart Outlet to your home Wi-Fi network, and then setting up HomeKit.
ConnectSense er en fantastisk smart udgang, men hvis du vil fabriksindstille den for at give den væk – eller hvis du bare skal forbinde den til et nyt Wi-Fi-netværk. Her kan du nulstille enheden og starte om fra begyndelsen.
RELATED: Sådan konfigurerer du ConnectSense Smart Outlet
ConnectSense Smart Outlet tillader ikke brugere nemt Skift det Wi-Fi-netværk, den er tilsluttet til, og kræver, at enheden nulstilles for at få det til at ske. Det er en af de få irriterende egenskaber ved produktet, men heldigvis er det virkelig nemt at få det nulstillet og sat op igen på et nyt WiFi-netværk.
For at starte, vil du simpelthen tilslutte enheden til en stikkontakt, hvis det er ikke allerede. Derefter finder du de to knapper på siden, der tænder og slukker for hver enkelt beholder.
Hold begge knapper på siden på samme tid, indtil to røde LED-lamper begynder at blinke. Det tager ca. 10 sekunder.
Lad knapperne gå, og vent på det lille grønne LED-lys i øverste venstre hjørne af Smart Outlet for at begynde at blinke.
Hvis du planlægger at sælge enheden eller giver det til en anden, kan du gå videre og tage det ud, når de små grønne LED-lamper begynder at blinke. Ellers kan du starte installationsprocessen for Smart Outlet og slutte den til et nyt WiFi-netværk.
Vi har en guide til, hvordan du konfigurerer ConnectSense Smart Outlet, så sørg for at tjekke det ud, hvis du ikke gør det ved allerede, hvordan man opsætter enheden. Det er bare et spørgsmål om at hente ConnectSense-appen, forbinde Smart Outlet til dit hjem Wi-Fi-netværk og derefter oprette HomeKit.
Det har været lidt siden, da Apple udgav iOS 10 til masserne og generelt ser det ud som en god opdatering. Jeg holdt op med at opdatere indtil for nylig, bare hvis der var nogen større fejl i den oprindelige udgivelse. Nu da jeg bruger det dagligt, troede jeg, jeg ville skrive et par tip om at bruge det nye operativsystem.J
SkyBell HD er en video-dørklokke, der giver dig mulighed for at se en live videovisning af hvem der står ved døren og endda chatte med dem gennem Taleren. Men hvis din internetforbindelse ikke er så stor, er det sådan, hvordan du optimerer videokvaliteten, så strømmen er mere tålelig. RELATERET: Sådan blinker du lysene, når en person ringer din dørklokke Mens din router kan være placeret tæt på SkyBell, betyder det ikke nødvendigvis, at SkyBell får et godt signal.
- เคล็ดลับ
- บล็อก
- ทำอย่างไร
- หน้าต่าง
- โทรศัพท์
- หลัก
- บล็อก
- วิธีรีเซ็ต ConnectSense Smart Outlet ของคุณ
ConnectSense เป็นเต้าเสียบที่ชาญฉลาดมาก แต่ถ้าคุณต้องการรีเซ็ตเป็นค่าเริ่มต้นจากโรงงานเพื่อให้ออกไปหรือหากคุณต้องการเชื่อมต่อกับเครือข่าย Wi-Fi ใหม่นี่คือวิธีตั้งค่าอุปกรณ์และเริ่มต้นใหม่ตั้งแต่เริ่มต้น .
สมาร์ทเอาท์ซอร์ส ConnectSense ไม่อนุญาตให้ผู้ใช้เปลี่ยนเครือข่าย Wi-Fi ที่เชื่อมต่อได้อย่างง่ายดายและกำหนดให้อุปกรณ์ถูกรีเซ็ตเพื่อให้สามารถใช้งานได้ เป็นหนึ่งในคุณสมบัติที่น่ารำคาญน้อยเกี่ยวกับผลิตภัณฑ์ แต่โชคดีที่คุณสามารถรีเซ็ตและตั้งค่าเครือข่าย Wi-Fi ใหม่ได้ง่ายๆ
กดปุ่มทั้งสองด้านที่ด้านข้างพร้อมกันจนกระทั่งไฟ LED สีแดงสองดวงเริ่มกะพริบ ขั้นตอนนี้จะใช้เวลาประมาณ 10 วินาที
ปล่อยปุ่มและรอไฟ LED สีเขียวขนาดเล็กที่มุมบนซ้ายของสมาร์ทเอาท์เล็ตเพื่อเริ่มกะพริบ
หากคุณวางแผนที่จะขายอุปกรณ์หรือมอบให้กับคนอื่นคุณสามารถดำเนินการต่อและถอดปลั๊กออกเมื่อไฟ LED สีเขียวเล็ก ๆ กะพริบ มิฉะนั้นคุณสามารถเริ่มต้นกระบวนการติดตั้ง Smart Outlet และเชื่อมต่อกับเครือข่าย WiFi ใหม่ได้
เรามีคำแนะนำในการติดตั้ง ConnectSense Smart Outlet ดังนั้นโปรดตรวจสอบว่าคุณยังไม่ทราบวิธีตั้งค่าอุปกรณ์ แค่ดาวน์โหลดแอ็พพลิเคชัน ConnectSense เชื่อมต่อ Smart Outlet เข้ากับเครือข่าย Wi-Fi ภายในบ้านของคุณแล้วตั้งค่า HomeKit
Now that you have your Wemo Wi-Fi smart plug up and running, you may be wondering how exactly you can reset your Wemo smart plug? Below, we will walk you through the steps to reset, reboot, and restore your Wemo smart plug.
How To Reset Wemo Smart Plug?
Resetting your Wemo Smart Plug will remove any customizations you have made to the settings. This can be done via the Wemo app or manually via the device button.
Resetting Wemo Smart Plug using Wemo App to change Wi-Fi settings.
- Choose the pencil icon in the upper right of the app
- Choose your Wemo smart plug
- Choose reset options
- Select the type of reset you would like to complete:
- Select “Clear Product Info” (Android devices) or “Reset Name, Rules & Data” (iOS devices) to reset custom icons, stored rules, and custom names. This is especially helpful when troubleshooting issues with rules.
- Select “Reset Wi-Fi” (Android devices) or “Reset Wi-Fi settings” (iOS devices) if you need to change your Wi-Fi router name and password or perform a full restore of your router.
Doing a manually reset of the Wemo Smart Plug using the button.
- While your Wemo is plugged in, press and hold the power button
- Continue to hold the power button down until the status light flashes white rapidly
- Release the power button and the Wi-Fi settings on your Wemo smart plug will be reset
How To Reboot Wemo Smart Plug?
Occasionally your Wemo smart plug may become unresponsive. Typically, these issues can easily be solved via a simple reboot. To reboot your Wemo smart plug, follow these steps:
- Unplug Wemo smart plug from power outlet
- Wait a minimum of 5 seconds
- Plug Wemo smart plug back into power outlet
How To Restore Wemo Smart Plug?
Restoring you Wemo smart plug can be accomplished via the Wemo app (recommended method) or manually via the button.
Using the Wemo app to restore your smart plug:
- Choose the pencil icon in the upper right corner
- Choose your Wemo smart plug
- Choose “Reset Options”
- Select “Erase All Content and Settings”
Completing a factory restore with the Wemo smart plug button:
- While your Wemo is plugged in, press and hold the power button
- Continue to hold the power button down until the status light begins slowly flashing white
- Release the button and your Wemo smart plug will be restored to factory settings
Best Belkin Wemo Smart Plugs
- Control from anywhere. Plug in a WeMo Mini Smart Plug, download the free app, and control your lights and appliances from your phone and your voice through Alexa, Google Assistant and Apple Home Kit. Only needs Wi Fi. No hub or subscription required
- Compact size. WeMo Mini features a sleek new form factor that allows you to stack two Mini Smart Plugs in the same outlet. Minimum System Requirements Wi Fi router, Android 4.1 or higher, iOS 9 or higher
- Schedule automatically. Never come home to a dark house. Schedule the fan to turn on before you arrive. Sync lamps and devices to sunrise, sunset, or pre set times automatically. Note : Refer to the PDF attached below in Technical Specification for Manual and Troubleshooting Steps
- Randomize Lights. The Mini Smart Plug protects your home better than a mechanical timer. “Away Mode” will turn your lights on and off randomly to make it look like you’re home even when you’re not.Electrical Rating: 120V
/15A/60Hz/1800W
Prices pulled from the Amazon Product Advertising API on:
Product prices and availability are accurate as of the date/time indicated and are subject to change. Any price and availability information displayed on [relevant Amazon Site(s), as applicable] at the time of purchase will apply to the purchase of this product.
- Turn things on and off from anywhere – when a light or appliance is plugged into the smart plug, you can turn it off from your phone no matter where you are
- Protect your home with randomized lights – when set to away mode, the smart plug will turn plugged-in lights on and off randomly to give the appearance that you are home, when you are not
- Schedule your light and appliances to automatically turn on or off on any set time. Sync lights to come on at sunset or turn off at sunrise
- Compatibility with amazon alexa and google home for hands-free voice control
- Compact, convenient design – its sleek and compact form makes it easy to stack or plug in another device in the same outlet. Total Outlet: 2
Prices pulled from the Amazon Product Advertising API on:
Product prices and availability are accurate as of the date/time indicated and are subject to change. Any price and availability information displayed on [relevant Amazon Site(s), as applicable] at the time of purchase will apply to the purchase of this product.
Geoffrey Carr
“ConnectSense” yra puikus “išmanusis” lizdas, tačiau jei norite jį iš naujo paleisti iš gamyklos, arba jei norite jį prijungti prie naujo “Wi-Fi” tinklo, norėdami iš naujo nustatyti įrenginį ir pradėti nuo nulio .
“ConnectSense Smart Outlet” neleidžia vartotojams lengvai keisti “Wi-Fi” tinklo, prie kurio jis prijungtas, ir reikalauja iš naujo nustatyti įrenginį, kad tai būtų padaryta. Tai viena iš nedaugelio erzinančių funkcijų apie produktą, bet, laimei, labai lengva ją iš naujo nustatyti ir vėl nustatyti naujame “Wi-Fi” tinkle.
Norėdami pradėti, jūs tiesiog įjunkite įrenginį į lizdą, jei jis dar nėra. Iš ten suraskite du mygtukus ant šono, kuris įjungia ir išjungia kiekvieną atskirą talpyklą.
Vienu metu laikykite nuspaudę abu mygtukus ant šono, kol mirksi du raudoni LED žibintai. Tai užtruks apie 10 sekundžių.
Palikite mygtukus ir palaukite, kol “Smart Outlet” viršutiniame kairiajame kampe pradės mirksėti maža žalia šviesos diodo lemputė.
Jei planuojate parduoti įrenginį ar suteikti jį kam nors kitam, galite eiti į priekį ir atjunkite jį, kai mirksi mažos žaliosios šviesos diodų lemputės. Priešingu atveju galite pradėti “Smart Outlet” sąrankos procesą ir prijungti jį prie naujo “WiFi” tinklo.
Mes turime “ConnectSense Smart Outlet” nustatymo vadovą, todėl įsitikinkite, kad tai patikrinta, jei dar nežinote, kaip nustatyti įrenginį. Tai tik klausimas, kaip atsisiųsti “ConnectSense” programą, “Smart Outlet” jungti prie namų “Wi-Fi” tinklo ir tada nustatyti “HomeKit”.
If your WiFi router or cable modem drops off frequently and only comes back when you power cycle one of them, you might be interested in the WiFi ResetPlug. The device plugs into your outlet and then you plug your router, modem, or combination access point into the ResetPlug. Once you setup the WiFi ResetPlug, it will automatically detect if you have Internet access and WiFi access. If the logical check fails, it will stop the power momentarily and then resume power so that your network equipment is reset. Just be sure to plug your router or AP into a normal outlet if you’re performing a firmware update lest you brick the device.
If you have a password on your WiFi, you can provide it to the WiFi ResetPlug during setup. You plug the ResetPlug in to power and then it will broadcast a wireless network with the SSID as ResetPlugSetup. You then join that network and provide the password. It will then reset and join your wireless network with the password you provided. The button on the front is a reset button that allows you to put it back into setup mode.
Two LEDs on the front of the ResetPlug indicate power and Internet connectivity. It tries to access the developer’s site on Amazon Web Services once per minute. If this fails, it will check other sites like Google, Bing, and others to confirm if Internet access is lost. The ResetPlug is compatible with 802.11N WiFi on the 2.4GHz frequency. If you have devices like security cameras, thermostats, DVRs, and others that rely on your wireless Internet to be working, this can improve the availability of those devices.


