If you’ve ever wondered if you need to safety eject a USB drive before removing it, the short answer is no – you don’t need to, but doing so comes with some risk and ultimately it comes down to how much you respect the data on the drive – and here’s why.
What does ejecting actually do?
When the drive is connected the computer has access to read and write to the device. This includes when you’re accessing the files on the device, as well as other software such as anti-virus software.
What’s important to note here is that as these read/writes occur the data is stored temporarily in the computers RAM. For example, a Microsoft Word document opened from a USB drive is stored in the RAM as your work on it and is only saved to the USB when you click ‘Save’.
Ejecting the drive before removing it does four things:
- Checks for any active files (open files) – ejecting will fail until files are closed
- Ensures the drive is not busy doing read/writes
- Ensures all writes are completed – that nothing is left in the RAM
- And finally, if your USB drive is mechanical allows the drive to stop spinning before it’s disconnected from the computer.
Why should I eject safely?
By ejecting safely you’re ensuring your files aren’t corrupted.
It does this by allowing files to close “gracefully”, preserving the data as well as other file meta data such as pointers and file size indicators.
If the drive is mechanical ejecting will also tell the drive to drop spinning, preventing the head from crashing onto the plate of the hard drive.
What happens if I remove without ejecting first?
Most of the time as long as you’re not currently writing to the drive absolutely no harm is done.
There is however a risk that other software is accessing the files such as anti-virus software, which would result in the files or potentially the whole drive becoming corrupted.
For mechanical drives, the sudden disconnection of power will result in the head crashing onto the plate – damaging the drive which will reduce the life span of the drive and potentially corrupt data.
What do I recommend?
If the drive is mechanical I always recommend ejecting safely – crashing a hard drive head is bound to cause damage and reduce the life of the drive.
If it’s a flash drive I think it comes down to how important the data on the drive is – there is a very small risk that the whole drive will be corrupted if you remove it too soon.
So the answer is – it depends on how much you respect the data.
If you have a shared or public computer that several people use, you might want to restrict access to it’s drives to prevent users from deleting important data. Today we look at restricting access to some or all drives on the machine using Local Group Policy.
Note: This method uses Local Group Policy Editor which is not available on home versions of Windows 7 or Vista
First type gpedit.msc in the search box of the Start Menu and hit Enter.
Now navigate to User Configuration \ Administrative Templates \ Windows Components \ Windows Explorer. Then on the right side under Setting, double click on Prevent access to drives from My Computer.
Select Enable then under Options from the drop down menu you can restrict a certain drive, a combination of drives, or restrict them all. The main drive you would probably want to restrict is the C:\ drive or which ever lettered drive Windows is installed on. Restricting all drives means they can’t access the CD or DVD drive, and cannot use a flash drive if they need to get files from it.
Note: This setting won’t prevent users from using programs that access the local drives.
The restrictions take effect immediately, no restart is required. When a user opens up My Computer they’ll be able to see which drives are listed, but when they try to access a restricted drive, they’ll get the following error message.
For the screenshots in this tutorial we used Windows 7 Ultimate, but this process also works with XP Professional and Vista (not in Home versions) the screens just look different.
Local Group Policy allows you to customize several settings for how you want to administer your machine. Restricting access to certain drives in addition to other security and access measures, can help keep a shared computer stable and secure.
Benj Edwards is an Associate Editor for How-To Geek. For over 15 years, he has written about technology and tech history for sites such as The Atlantic, Fast Company, PCMag, PCWorld, Macworld, Ars Technica, and Wired. In 2005, he created Vintage Computing and Gaming, a blog devoted to tech history. He also created The Culture of Tech podcast and regularly contributes to the Retronauts retrogaming podcast. Read more.
When you’re done using a USB drive on your Windows 10 machine, most people simply unplug it. But depending on the settings of your machine, it’s usually best to tell Windows before removing the drive to minimize any chance of data loss. Here’s how.
When Is It Safe to Just Unplug a USB Drive?
By default, you can often safely remove a USB drive from a Windows 10 machine by simply unplugging it—unless something is actively writing to it, and you don’t necessarily know when that’s happening in the background. It’s a good idea to safely remove drives if you’re concerned about data loss.
If you have enabled write caching on your USB drive (by selecting “Better Performance” in Device Manager), you will always need to use the “Safely Remove Hardware” notification icon to remove the drive safely.
If you’d like to check if write caching is enabled on your removable drive, open the “Start” menu and type “Device Manager,” then hit “Enter.” Under the “Disk Drives” heading, locate the external drive, then right-click and select “Properties.” Under the “Policies” tab, look at the “Removal Policy” section.
If “Quick Removal” is selected, then it’s safe to simply unplug your drive (when it’s not in use) without telling Windows.
If you have “Better Performance” selected, you’ll definitely need to use the “Safely Remove Hardware” notification icon to remove the drive safely. Here’s how.
How to Safely Remove a USB Drive on Windows 10
If you have a USB drive plugged into your Windows 10 machine and you’d like to safely eject, locate the “Safely Remove Hardware” icon (which looks like a USB plug) in your taskbar notifications area, which is usually in the lower-right corner of your screen. If you can’t see it, click the carat-shaped up arrow to see hidden icons.
Once the “Safely Remove Hardware” icon has been revealed, right-click it.
In the menu that pops up, locate the name of the drive you’d like to remove; It will have the word “Eject” in front of it. Click it.
If there are any write operations in progress, Windows will make sure that everything is complete before ejecting the drive. Once the drive is safe to remove, Windows will alert you with a notification pop-up titled “Safe To Remove Hardware.”
It is now safe to unplug the drive from your PC.
To avoid losing data, it’s important to remove external hardware like hard drives and USB drives safely.
Look for the Safely Remove Hardware icon on the taskbar. If you don’t see it, select Show hidden icons . Press and hold (or right-click) the icon and select the hardware you want to remove.
If you can’t find the Safely Remove Hardware icon, press and hold (or right-click) the taskbar and select Taskbar settings .
Select Taskbar corner overflow to expand it. Scroll to Windows Explorer (when you hover over it, the tooltip will read Safely Remove Hardware and Eject Media) and turn it on.
If this doesn’t work, make sure the device has stopped all activity like copying or syncing files. Select Start > Settings > Bluetooth & devices > Devices .
Select More next to the device, and select Remove device.
Finally, check with the hardware manufacturer for new drivers or other updates.
Look for the Safely Remove Hardware icon on the taskbar. If you don’t see it, select Show hidden icons . Press and hold (or right-click) the icon and select the hardware you want to remove.
If you can’t find the Safely Remove Hardware icon, press and hold (or right-click) the taskbar and select Taskbar settings .
Under Notification Area, choose Select which icons appear on the taskbar.
Scroll to Windows Explorer: Safely Remove Hardware and Eject Media and turn it on.
If this doesn’t work, make sure the device has stopped all activity like copying or syncing files. Select Start > Settings > Devices. Select the device, and select Remove device.
Finally, check with the hardware manufacturer for new drivers or other updates.
There is nothing easier than to safely remove the disk, which is also simple and easy in famous MS Windows 11/10!
In order to avoid data loss under Windows, it is advantageous, especially with external hardware components, such as data carriers, USB hard drives and USB sticks, to remove them safely instead of simply pulling!
1.) . Safely remove via the taskbar!
2.) . Command to open / run Safely Remove Hardware!
3.) . Safely remove hardware does not work!
4.) . Is Removing Hardware Safe in Windows 11/10 Important?
5.) . External tools to safely remove data carriers and drives!
1.) Safely remove via the taskbar!
If the search for the symbol Hardware safely remove was inconclusive, just read on point-2!
| (Image-1) Safely Remove Disk via Task-Bar! |
You must have noticed that when disconnecting a device from your Windows computer, the Safely Remove Hardware and Eject Media icon appears in the system tray or in the notification area. You should click the icon to remove or eject the desired device.
2.) Command to open / run Safely Remove Hardware!
rundll32 shell32.dll, Control_RunDLL hotplug.dll
Mark the data / medium, confirm, which devices should be stopped. Click “OK” to continue.
| (Image-2) Safely Remove Disk command! |
However, sometimes you may find that the Safe Remove window does not appear even after you click the icon of the device you want to remove or eject. If you are desperate to try, here’s the solution, what you can do in such situations to safely eject or remove the hardware, or disk!
3.) Safely remove hardware does not work!
and open the Properties box of drives (. see Image-3 Point 4)
Set the Properties to “Quick removal”: (. see Image-4 Point 1 and 2)
| (Image-3) 4 Safely Remove Disk Update disk driver! |
| (Image-4) Enable safely remove disk Polices on Win-10! |
Quick removal (default)
Disables write caching on the device and in Windows, but you can disconnect the device safely without using the Safely Remove Hardware notification icon.
Better performance
Enables write caching in Windows, but you must use the Safely Remove Hardware notification icon to disconnect the device safely.
4.) Is Removing Hardware Safe in Windows 10 Important?
See also: ►►► Check the Disk via Windows-10 Explorer!
5.) . External tools to safely remove data carriers and drives!
The tool ►► OpenCloseDriveEject is comfortable and has other useful functions! Here in the example with zoom factor in the taskbar menu. Simply click the icon in the notification area of the Windows taskbar and eject drive, or Safely Remove.
Directly to the ►► latest version of the free tool to eject all drives
| (Image-5) Open, Close, Drive, Eject DVD, USB, CD, BlueRay |
Obviously, sneakily unplugging a drive that is being written to can corrupt the data. Even if the drive is not actively being written to, data can still be corrupted. By default, most operating systems use something called write caching to get better performance from your computer. If you write a file to another drive, e.g. a flash drive, the operating system waits to actually perform these actions until a series of requests are met, and then performs them all at the same time, this is more common when writing small files.
Updated on: 9 May 2022 04:27 Windows
If you unplug a USB external drive before making sure it’s safe to do so, you’re courting disaster. The sudden, unprepared removal of a storage device can corrupt files. I’ve even heard stories of it bricking flash drives.
Here’s how to remove the drive safely, even when Windows tells you it’s not safe. Try these five steps in order until one of them works.
1: Use Windows’ own tool
Click the Safely Remove Hardware icon in the notification area, then click your device. Wait until a message pops up. If the message says “Safe to Remove Hardware,” remove the hardware.
But if the message that pops up tells you that “This device is currently in use,” you need to go on to step 2.
2: Make an educated guess
Think about what you’re running and what might be holding on. Did you load a portable program from that drive? If so, make sure it’s closed. Same with any document, photo, or other file on the external drive.
If you opened a document in, say, Microsoft Word, and then closed the document, try closing Word. Sometimes an application can hold onto a file even after you closed it. You shouldn’t have to close Windows/File Explorer to remove external storage, but sometimes it helps.
You can also open Task Manager (right-click the taskbar and select Start Task Manager) and examine both the Applications and Processes tab to see if anything is hanging on.
3: Use a third-party utility
I tested a number of free programs that are supposed to help with this problem. None of them did. So I’m going to recommend USB Safely Remove, even though its $20 pricetag (after a 30-day free trial) seems a bit steep.
Once installed, it replaces Windows’ own Remove Hardware tool and behaves very much like it.
But when it can’t safely remove the drive, it tells you what program is causing the problem, and offers to stop the program or even force it to stop.
All of which brings up another issue: Why doesn’t Windows’ own tool offer this capability. I don’t have an answer.
I strongly suspect that if you buy USB Safely Remove, you’ll never have go to step 4 or 5. But if you don’t want to spend the money…
4: Log off and on
Logging off your account will close every file and program you’ve opened, including whatever is holding on to the external drive. But it’s annoying and time consuming. You’ll have to save and close all of your open files.
And after you log back on, you’ll have to open everything up again.
Besides, it might not work. If another user account is running on that machine, it just might be holding onto something on the external drive.
So you may have to go to the one trick that always works:
5: Shut down the PC
This is every bit as much a hassle as logging off and on, and takes even more time. But it will work; no question about it.
Just shut down PC, remove the external drive, then boot your computer. Hopefully, you’ll find another solution before this one.
Most Windows users have become conditioned over time to never unplug a USB flash drive or hard drive without first clicking Safely Remove Hardware in the System Tray.
Why is that necessary? In theory, it’s to ensure that Windows isn’t busy reading from or writing to the drive when you remove it, something that could result in corrupted data or even a damaged drive.
As it turns out, however, you can safely sidestep Safely Remove Hardware with little to no loss of performance. In fact, this option may already be enabled on your system, and you just didn’t know it. Yep, you may have been wasting extra clicks all this time.
1. Plug your USB drive into your PC, then open Device Manager. (Note: These steps are based on Windows 7. Things might look different in previous versions of Windows.)
2. Expand Disk Drives, then find the entry for your removable drive. On my system, for example, it’s called “USB2.0 Flash Disk USB Device.”
3. Right-click that entry, then click Properties.
4. Click the Policies tab; you should see something like this:
5. If the first option, Quick removal, is already selected, you’re good to go. As noted in its description, “you can disconnect the device safely without using the Safely Remove Hardware notification icon.” If Better performance is selected, switch to Quick removal and click OK.
So, what are giving up by disabling write caching? According to the test results posted at 7tutorials, almost nothing. The performance impact was negligible. Your mileage may vary, of course, but I think it’s worth a few milliseconds to avoid the hassles of having to mess with Safely Remove Hardware all the time.
Microsoft seems to be working on to take out many conventional practices which have been followed by Windows users so far. With the latest updates for Windows 10, many old-style options have been replaced with some new features and the latest one in the row is “Safely Remove US Drive.” Microsoft no more needs you to eject the USB Drive safely before pulling it out from the port. There is a new Quick Removal feature in the latest version of Windows Operating System.
Following is a guide to enable the Quick Removal policy for USB Drives on Windows 10.
What is Quick Removal Policy?
Microsoft Windows Operating System versions do have the options to eject the USB Hardware safely, in order to avoid drive corruption. In case the Windows transfers data from or to the USB flash drive in the background, the data may corrupt when you remove the drive. Therefore, Microsoft recommends ejecting or unmounting the drive safely before removing from the port for every version of Windows. Otherwise, it can cause damage to the USB Drive itself.
Being a conventional practice, many users fond it to be boring, so did Microsoft. With the latest version of Microsoft Windows 10 Operating System, developers brought a new policy feature which lets you choose how you want to remove the drive. The flash drive policies include two major options: Quick Removal and Performance.
As the name denotes, the Quick Removal lets you remove your USB Drive from the port whenever the data is not getting transferred. When the feature is enabled, the system will withhold every other background processes when there are no active transfers between the external drive and the system.
Thus, the drive may not perform very well on your system every time. Since the Windows minimizes the background processes and transfers, you might feel a bit laggy while playing or opening data stored within the drive. However, using the Quick Removal feature, you no more need to bother about ejecting manually from the system before removing.
The Better Performance policy acts as in the normal case, where the driver needs to be removed safely using the system option before pulling out. In this mode, the drives can perform well but there is a chance of data corruption if you forget to pull out the drive without removing safely.
How to Get Quick Removal on Windows 10?
The USB Drive removal policies are currently available for the latest version of the Windows 10 OS, says Microsoft. But, you might not have seen the option yet in your system. Also, do not remove the drives thinking the feature is available for your system. The Quick Removal policy is needed to be enabled manually for Windows 10 users.
To get the Quick Removal on your Windows PC, make sure you are on the OS Version 1809. Any older versions do not have the feature so, begin to update your Windows 10 system if you are on an older one. Check for the latest updates even if you are in 1809 to ensure the availability of the feature.
How to Enable Quick Removal for USB Drives?
The default removal policy for the USB drives on Windows 10 was the “Better Performance” until the recent version of the Operating System. If you have just moved to the latest version of the Windows 10 update, your system would probably have set it to the Quick Removal from Better Performance. Here is how you can check and switch between the Quick Removal and Performance policies for your USB Drives. Make sure you are on the latest version of the Windows before proceeding with further steps.
- Connect your USB Drive to your Windows 10 PC.
- Open the File Explorer on the Windows and find the Drive letter for the USB Storage device.
- Right Click on the Start button or (Windows+X) and choose Disk Management. You can also open the Disk Management by searching for “Create and format Hard disk partitions.”
- Scroll down and find the Drive with the Volume letter of the USB Storage.
- Right Click on the drive and choose Properties.
- Switch to Policies tab.
- Choose Quick Removal or Better Performance based on your need.
- Choose “Enable write caching on the device” if you are choosing Better Performance.
- Click OK.
Choosing the Quick Removal option lets you plug out the USB device instantly without ejecting safely from the system. It disables writing cache on the device as well as to the Windows system, which may slow down the file streaming from the drive. This can result in slow write rate. Thus, the maximum capability of a USB drive is not effectively utilized in the Quick Removal method. Many users report slower deletion speed as well.
In case you have chosen the Better Performance mode, the Windows system will try to cache the files towards both sides in order to access files in a faster manner. When you are on the Better Performance mode, it is mandatory to eject the USB Drive safely before pugging out from the USB port.
The continuous cache writing nature of the Better Performance can cause drive corruption or data loss if you remove the device immediately from the system. The Better Performance does not have the speed issues that are faced in the Quick Removal policy.
The older versions of Windows 10 had only the Better Performance option, which was set to default. With the addition of new policies, users can now choose how the USB Drives need to be performed within the system.
Disclosure: Mashtips is supported by its audience. As an Amazon Associate I earn from qualifying purchases.
The module of ‘Safely remove hardware’ has been in Windows for quite some time and allows users to safely stop all communication with a USB device or hard drive for it to be safely plugged out. If you abruptly plug out a USB device, the device might get corrupted or your device might lose the data present inside.
Lately, there have been several reports where users noticed that the safely remove hardware icon has been missing from their taskbars. This usually happens because either the icon is disabled from the taskbar settings or there are some problems with the system files.
How to fix safely remove hardware icon missing
Users have reported that the safely remove hardware icon is missing from the notification area in Windows 10. This not only occurs in Windows 10 but is also present in Windows 7 and XP. There are also issues where the safely remove hardware icon doesn’t show the devices currently connected to the computer. This guide targets to fix all these issues.
Solution 1: Enabling ‘Safely remove hardware’ from the taskbar
The icon and the module will not be shown in your taskbar if it has been disabled from the taskbar settings. It is possible that in the past you might have disabled the option and hence it refuses to be shown. We will open the settings and enable the module once again.
- Right-click anywhere on your taskbar and click Taskbar settings.
- Navigate down to the Notification area and click Select which icons appear on the taskbar.
- Check the option Windows Explorer: Safely remove hardware and eject media.
- After saving changes, exit. Now the icon will appear automatically on your taskbar. If it doesn’t, click on the Up arrow to expand the taskbar and select the icon to safely remove hardware.
Note: You can also enable the taskbar option “Windows host process (Rundll32)” if the above doesn’t solve the issue on its own.
Solution 2: Disabling Quick Removal
USB devices have a technology called ‘Quick removal’ which disables write caching on the device and in Windows so you can plug it out without using the Safely remove hardware icon. This may increase accessibility but may reduce the performance. We can try changing this and see if this does the trick.
- Press Windows + R, type “devmgmt.msc” in the dialogue box and press Enter.
- Once in the device manager, expand Disk drives, right-click on your USB drive and click Properties.
- Once in properties, select the tab Policies and check the option Better performance.
- Now check if the icon is present in the taskbar. If it isn’t, you can navigate back to the device manager and select Quick removal again and check.
Solution 3: Checking ‘Plug and Play’ service
The service “Plug and Play” is responsible for synchronizing the entire procedure of the USB plugging in and out in your computer. This service detects the USB or hard drive connected to your computer and gets it ready for the data transfer to begin. We can check if this service is running properly.
- Press Windows + R, type “services.msc” in the dialogue box and press Enter.
- Once in services, search for the entry “Plug and play”. Right-click on it and select Properties.
- Make sure that the service is running and the startup type is set as Automatic.
- Press Apply to save changes and exit. Restart your computer and see if the icon is visible in the taskbar.
Solution 4: Using the Run command
If all the above methods don’t work, you can try launching the safely remove hardware manually using the Run command on your computer. This may seem like a headache because you have to manually prompt the safely remove hardware. However, we will create a shortcut for it if this method works for you.
- Press Windows + R, type “rundll32 shell32.dll,Control_RunDLL hotplug.dll” in the dialogue box and press Enter.
- From here select the USB device which you want to stop and click on the stop
- You can now remove your drive safely from the computer.
If this method work for you, you can create a shortcut for it anywhere on your Desktop. This will take care of the hassle of running the Run command every time.
- Right-click anywhere on your Desktop and click New > Shortcut.
- In the dialogue box, enter the command “rundll32 shell32.dll,Control_RunDLL hotplug.dll”.
- In the next window, you can name the shortcut as “Safely remove hardware”. Press OK for the shortcut to be made.
- Now whenever you click the shortcut, the window will pop up and you can easily stop all the devices.
Note: If all the method doesn’t work, you can go ahead and run an SFC scan on your computer. This scan will fix all the corrupt registries and if this module is broken, it will fix it.
How to clear recovery drive in Windows 10? This post will give an answer about it.
By Michael / Last Updated March 15, 2022
How to clear the recovery drive in Windows 10?
My laptop shows that I have run out of space in my recovery D drive, but there is no file in it. And my laptop is running with Windows 10. How do I free up space in the drive?”
– Question from Microsoft.com
Content
- Why the recovery drive is full?
- How to clear recovery drive in Windows 11,10, 8, 7 in 3 methods?
- Method 1. Run disk cleanup program
- Method 2. Delete unnecessary files on recovery drive manually
- Method 3. Delete the recovery drive
- Conclusion
Why the recovery drive is full?
The recovery drive is a special drive that keeps system backup image files and system restoration data. Once your PC runs into a problem that can’t be fixed with usual methods, it can help you to restore your PC to the factory default settings. If the drive runs out of space, you may be unable to use this function.
Generally, there are 2 reasons why the recovery drive is getting full in Windows 11, 10, 8, 7.
в—Џ Too many personal files or applications: It can be the main cause of making it full. Usually, a recovery partition is not a physical drive so has a little available storage space for personal data and other software. And you may receive a low disk space on recovery drive warning soon.
в—Џ Windows system update: If you have ever updated your Windows 10, it may automatically store the previous OS in it and taking a large amount of space on the disk. It can be another cause of making the recovery drive full.
How to clear recovery drive in Windows 11, 10, 8, 7 in 3 Methods?
No matter what reason making it full, you can refer to the following part, we will list 3 ways of clearing recovery drive in Windows 11, 10, 8, 7 safely.
Method 1. Run disk cleanup program
When a drive is out of space. you can run the built-in disk cleanup program to scan the drive and delete unnecessary files.
Step 1. Press “Win” + “R” to open Run, and type “cleanmgr” on the Run box, and press Enter to open cleanup program.
Step 2. Select the recovery drive, and click “OK”. Then the program will scan and calculate the amount of space that can be free up.
Step 3. Choose unnecessary files, and click “OK” to free up space on recovery drive in Windows10.
Method 2. Delete unnecessary files manually
Cleanup programs sometimes can only free up a small amount of space. To have more space, you can employ the AOMEI Partition Assistant Standard, which provides 2 options for this issue. It can help you to delete some unwanted files by the “Shred Files” feature. And its “Delete Partition” function is able to delete the whole recovery drive.
More importantly, AOMEI Partition Assistant offers you a way to clone the recovery drive as a backup in case any unexpected situation. If you delete an important file or want to delete the whole drive, once you encounter Windows system corruption one day, you still have a chance to bring back your computer to a normal state.
Next, click the download button and see the detailed steps.
Preparation: clone recovery drive for backup
When we get started, it would be better to clone the recovery drive to another drive for backup. You can insert an external hard drive, or USB flash drive, and install, launch AOMEI Partition Assistant, and right-click on the recovery partition, and choose “Clone Partition”. Then following the prompts to complete the operation.
Shred unnecessary files with AOMEI Partition Assistant
Step 1. On the main interface, click “Tools” on the top corner, and click “Shred Files”.
Step 2. Choose “Add Files” or “Add Folder” to choose unwanted files or folders.
Step 3. Choose “Write Zero” on the Shredding Method box. And you can upgrade to Professional to choose other 3 advanced shredding methods.
Step 4. Click “Shred” and if the selected files include system’s or application’s path, it will prompt a warning dialogue. Read it, and click “Yes” to confirm the operation.
Method 3. Delete the recovery drive
Since the recovery drive is somehow useless if the system works well, lots of people will want to clear the whole recovery drive off their PC. If you also want to perform this, also, please back up the drive firstly, and refer to these steps to delete it.
1. Open AOMEI Partition Assistant, right-click on the recovery partition, and choose “Delete Partition”.
2. Then choose “Delete partition and wipe data on it”. And there are 4 wiping methods listed, select “Fill sectors with Zero”, and click “OK”. Likewise, the professional edition offers the 3 other advanced wiping methods.
3. In the main interface, you can see the recovery partition become unallocated, and click “Apply” in the left top of the window to execute the clearing operation.
Conclusion
Now, you have known how to clear recovery drive in Windows 11, 10, 8, 7 safely. Apart from the methods mentioned above, you can also allocate free space on from one partition to the recovery drive when it is full. And if you accidentally delete the recovery drive, Professional version can help you to restore the deleted partition. In addition, if you want to perform this operation in Server operating system, turn to the Server Edition.
How to Safely Remove USB from Windows 10 Device? How to Remove USB Drive Safely from Windows 1809 changes? Do you think the Safely Remove Hardware and Eject Media is a painful option when you connect an external hard disk and want to unplug/remove it? Can we directly unplug the external HDD? I don’t think you should do that.
How to Safely Remove USB from Windows 10 Device
Windows 10 Technical Preview version also has the same painful “Safely Remove Hardware and Eject Media” way to remove your external hard disks safely. Have you already provided feedback to have some more EASY and user-friendly options to remove the external Hard Disk? If so, vote it up !!
I’ve already created a Feedback item on Windows 10 TP User Voice website, and the following is the link for my feedback item Moreover, Windows 10 technical Preview 9879, Safely Remove Hardware, and Eject Media icon broken !! So my guess is the Microsoft team is already working on this.
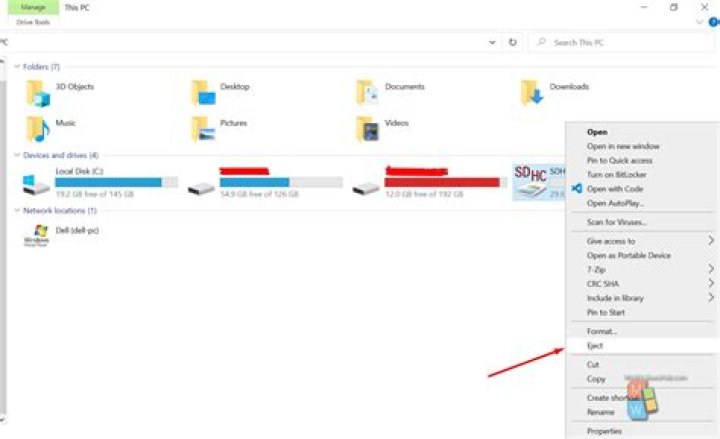
When you go into “This PC” (replacement of My Computer) in Windows 10, you will be able to see the external HDD connected to that machine. However, when you right-click on the external HDD, there won’t be any eject option to unplug/remove the HDD safely (unlike USB).
Rather you need to go to the system tray and click on “Safely Remove Hardware or Eject Media” and select your external HDD, then eject it. How painful. You need to remember the name of the external hard disk 🙁
We already have an EJECT option for USB drives connected to Windows 10 laptops or desktops. However, there is no option available for External Hard Disks. We’ve used the old “Safely Remove Hardware or Eject Media” option. If Microsoft can add these Safely remove or Eject options in the right-click menu, it would be very useful!!
See the below screen capture; there is no EJECT option for External HDD.
Resources
Author
Anoop is Microsoft MVP! He is a Solution Architect in enterprise client management with more than 20 years of experience (calculation done in 2021) in IT. He is a logger, Speaker, and Local User Group HTMD Community leader. His main focus is on Device Management technologies like SCCM 2012, Current Branch, and Intune. He writes about ConfigMgr, Windows 11, Windows 10, Azure AD, Microsoft Intune, Windows 365, AVD, etc…
13 thoughts on “How to Safely Remove USB from Windows 10 Device”
why can’t we just have an eject icon next to the removable device like osx and linux distros have had for over a decade?
Do you always “eject” your USB drives before unplugging them? You can save yourself some clicks—and some time—with these simple tips, because you’ll never have to eject a flash drive again.
Always Make Sure a Drive Isn’t in Use Before Unplugging
Generally, the biggest threat to data when removing a USB drive (like a thumb, hard drive, and so on) is unplugging it while data is being written to it. This interrupts the write operation, and the file that was being written or copied will be incomplete or could remain as a corrupted file.
So, before you ever unplug any USB drive from your PC, make sure all files have finished copying or saving to it.
Of course, sometimes, it’s difficult to know whether your computer is writing to a drive. A background process could be writing to it, or a program could be autosaving to it. If you unplug the drive and interrupt these processes, it could cause a problem.
The only way you can avoid this is by “safely” removing the drive. However, Microsoft insists that as long as the “Quick Removal” system policy is selected, and you aren’t writing data to a drive, you don’t have to eject it.
You’ll also need to make sure write caching isn’t enabled for the drive, but more on that in a moment.
RELATED: Do You Really Need to Safely Remove USB Flash Drives?
Get a Drive with an LED
It’s easy to see when some USB drives are in use because they have a built-in LED that flashes when data is being read or written. As long as the LED isn’t flashing, you can safely unplug the drive.
If your drive doesn’t have an LED, just do your best to make sure a background backup or copy operation isn’t in process before you remove it.
Mandatory: Activate Quick Removal Mode in Device Manager
By default, Windows 10 optimizes USB drives so you can remove them quickly without having to use the “Safely Remove Hardware” notification icon. It does this by disabling write caching.
Write caching can speed up the appearance of USB disk writes, but it might also make you think a write process is complete when it’s really still running in the background. (This became the default policy in Windows 10’s October 2018 update, also known as version 1809.)
Since it’s possible to turn write caching back on in Device Manager, you should ensure it’s disabled if you want to quickly remove your USB drive without ejecting it in the future.
To do this, click the Start button, type “Device Manager” in the Search box, and then press Enter.
Click the arrow next to “Disk Drives,” right-click the external USB drive, and then select “Properties.”
Under the “Policies” tab, select the radio button next to “Quick Removal” (if it’s already selected, just leave it that way), and then click “OK.”
Close “Device Manager” and you’re all set! In the future, you can safely remove that particular USB drive without ejecting it whenever a write operation isn’t in progress.
- › How to Turn Off “Do Not Disturb While Driving” on an iPhone
- › How to Convert PowerPoint Presentations to Keynote
- › How to Sync Fitness Data from Samsung Health to Google Fit
- › What’s New in Chrome 85, Available Now
- › How to Use Live Captions on a Google Pixel Phone
- By Sofia Wyciślik-Wilson
- Published 3 years ago
To safely remove or not to safely remove? That is the question. although another one might reasonably be, “well, what difference does it really make?”. Since the arrival of USB drives, we have been warned that they need to be “safely removed” using the correct method in Windows, rather than just being yanked out — but now this changes.
With Windows 10 1809, Microsoft is changing the default setting that’s applied to USB drives and other removable media. The change means that the default policy applied to removable storage devices is Quick Removal rather than Better Performance — so you can now just pull it out without a second thought.
See also:
The change comes as the October 2018 Update rolls out, and Microsoft explains that: “Windows defines two main policies, Quick removal and Better performance, that control how the system interacts with external storage devices such as USB thumb drives or Thunderbolt-enabled external drives. Beginning in Windows 10 version 1809, the default policy is Quick removal. “.
With “Quick removal” enabled, there is no need to use the Safely Remove Hardware process — but there may be a drop in performance.
If you would rather use the Better Performance option — which can be enabled and disabled on a device by device basis — Microsoft explains how to enable this:
- Connect the device to the computer.
- Right-click Start, and then select File Explorer.
- In File Explorer, identify the letter or label that is associated with the device (for example, USB Drive (D:)).
- Right-click Start, and then select Disk Management.
- In the lower section of the Disk Management window, right-click the label of the device, and then click Properties.
- Select Policies, and then select the policy you want to use.
Microsoft suggests that if you select the “Better performance” option you should also select “Enable write caching on the device”. The company also notes:
If you use the “Better performance” policy, you must use the Safely Remove Hardware process to remove the device. If you remove or disconnect the device without following the safe removal instructions, you risk losing data.
Learn how to remove unwanted/unnecessary files from C drive in Windows 10/8/7 and you can solve C drive full issue easily and quickly.
By Bryce / Last Updated March 10, 2022
Need to remove unnecessary files from C drive
“Recently, I have installed Windows 10 update and there is no little unused space left on my C drive. I don’t put any files on C drive. What is taking up its space? Which files can be deleted without affecting my OS? How to delete unwanted files on C drive?”
How to: remove unwanted files from C drive in Windows 10/11
Even though you don’t add any files to C drive, C drive can be filling up by backup files, page file, temporary files, previous Windows installation, etc. And you may have set the saving path of downloaded files from website and third-party software as C drive without noticing.
Warning: It’s highly recommended to back up C drive to a safe place in advance just in case those folders that contain wanted files are deleted accidentally.
в–¶ Solution 1. Delete/ remove personal files and third-party program files on C drive
It won’t damage your operating system to remove personal files (like photos and music saved in “My Documents” folder) and third-party program files. Detailed steps on how to remove these files or folders are listed as follows:
вњ” To delete personal files
Step 1. Press “Windows” + “E” in Windows 10 to open Windows Explorer.
Step 2. Open C drive, locate the folders or files that you don’t need anymore, right-click them and choose “Delete”.
PS.: If you want to keep those files or folders on other drives, like D drive, you can right-click the files that you want to move from C to D, choose Cut; Open D drive, right-click the blank space and choose Paste.
вњ” To uninstall apps & delete app files
For some extra apps installed on C drive, it’s wise to uninstall them through those steps:
Step 1. Press “Windows” + “R” at the same time, input “control” and press Enter.
Step 2. In the pop-up window, navigate to “Programs” > “Programs and features”.
Step 3. Right-click the program that you don’t want and choose “Uninstall”.
Step 4. After a while, the app will be uninstalled. It’s possible that there are some files belonging to the pogrom left, find out and delete them.
Note: After deletion and uninstallation, you won’t be able to use the app. If you want to use the program in the future, you can choose to transfer program files from C drive to D drive or another drive. But you should realize that some programs only work when they are installed on the root drive (C drive) of hard drive.
в–¶ Solution 2. Run Disk Cleanup in Windows 10/11 to reclaim disk space for C drive
If there are no unwanted personal or program files, you can skip solution 1. And you can run Windows 10/11 built-in tool, Disk Cleanup to remove unnecessary files that you are not allowed in Windows Explorer. Here are the detailed steps:
Step 1. In the Run window, type “cleanmgr.exe” and press Enter to run Disk Cleanup.
Step 2. In the Disk Cleanup window, choose items that you want to delete and click “OK”.
Step 3. To free up more space, click “Clean up system files”.
Step 4. Choose the files that you want to remove and click “OK.
Importance: If you don’t need to downgrade your current system to a previous version, you can delete Windows.old folder. And you shouldn’t delete Windows ESD installation files, which enables you to reset your PC. If you delete it, the Reset this PC option won’t be available.
в–¶ Solution 3. Run Storage Sense in Windows 10/11
If the OS that you are using is after Windows 10 1703 version, you can use Storage Sense to remove unnecessary files from C drive. Let’s see how it works:
Step 1. Click “Start” and navigate to “Settings” > “System”> “Storage”.
Step 2. Here you can see Storage Sense. It is Off by default. Toggle the button to On.
Step 3. The storage condition of your C drive in Windows 10/11 will be listed.
Step 4. Check the files that you don’t need anymore and click “Delete Files”.
Note: You can click Change how we free up space to configure Storage Sense. You can click Clean Now to free up space quickly.
What if C drive still doesn’t have enough space?
Now, you have realized how to remove unwanted files from C drive in Windows 10/11. If the freed space after deleting unnecessary files is not enough, you can try to increase the capacity of C drive, especially when other drives have extra free space on the same hard drive. To enlarge C drive, you can employ AOMEI Partition Assistant Professional. It can allocate free space from a partition with enough space to C drive without losing data and add unallocated space into C drive, whether the unallocated space is contiguously behind C drive or not. Have a look at how it allocates free space to C drive easily.
вњЌ It’s available to download the demo version of AOMEI Partition Assistant Professional!
Step 1. Install and run the partition tool. Right-click the partition that has much-unused space and select “Allocate Free Space (here is partition D).”
Step 2. In the pop-up window, type the size of free space that you want to allocate from partition D and choose partition C as the destination partition.
Step 3. Now, you can preview the operation result before confirmation. Click “Apply” and “Proceed” to execute the operation.
Note: AOMEI Partition Assistant Professional works well under Windows 11/10/8.1/8/7, XP, and Vista. To allocate free space from one partition to another in Windows Server 2019, 2016, 2012 (R2), 2008, 2003, you can employ AOMEI Partition Assistant Server.
You probably haven’t needed to do so for a while
Share this story
- Share this on Facebook
- Share this on Twitter
Share All sharing options for: Microsoft confirms you really, really don’t need to ‘safely remove’ USB flash drives anymore
Photo by Sean Hollister / The Verge
You know how every tech expert in your life told you how crucially important it was to safely eject a flash drive before ripping it out of your PC? Have you been that tech expert yourself?
Well, Microsoft is confirming once and for all that — in Windows 10 — it’s no longer a thing you need to worry about. Windows 10 has a feature called “quick removal” that lets you yank a drive anytime (so long as you’re not actively writing files to it), and it’s now the default setting for each new drive you plug in as of Windows 10 version 1809, according to Microsoft’s own support guidance. Basically, “quick removal” keeps Windows from continuously trying to write to a flash drive, which could help in the event you disconnect it.
Technically, Microsoft flipped this switch back in October when version 1809 first started rolling out, so this won’t be a revelation for every reader. It just so happens to be making the rounds now that the company’s notifying IT professionals that the update is being deployed more broadly. Plus, the company’s had protections to keep your flash drives safe since Windows 7, according to my Microsoft-expert colleague Tom Warren.
But it’s also true that Microsoft has been sending mixed messages about the need to safely remove drives for a while, and the operating system definitely still features a vestigial “Safely Remove Hardware and Eject Media” feature. (I just checked my System Tray, and it’s totally still there.)
So now, the process of safely ejecting a flash drive can be one of those things you tell your kids about, one of those “Do you remember this thing that olds used to do?”, like adjusting the tracking on a VHS tape or screaming at your family not to pick up the telephone while you’re downloading a new webpage.
Update, 6:12 PM ET: Clarified that you probably still don’t want to yank a USB thumb drive if you’re in the middle of writing files to it.
To Safely remove USB drives via a Windows 8 and 10 desktop shortcut, solution is also for MS Server OS!
The solution is simple to safely remove USB drives, and is also suitable for Windows Server 2016/2012, this is the Question of many Window User and hear is the answer for this very important Question for newest Microsoft’s windows operating systems!
Please use the Windows 8 Shortcut [Windows + D] to see the Windows-8 Desktop (see Image-1).
And then, as explained in the FAQ-89: . Windows 8 desktop shortcut create a new desktop shortcut.
Use the command: RunDll32.exe shell32.dll,Control_RunDLL hotplug.dll [see Image-1 Arrow 1]
and as shortcut name for example Remove Hardware [see Image-1 Arrow 3].
You can also add (pin) the command Remove Hardware the Task-Bar [. see image 2 Arrow-1].
Or remove storage via Windows tray icon [. see image 3 Arrow-1,2,3].
This solution is also for Windows-Server 2016 and 2012!
| Image-1 |
Safely remove USB drives via a Windows 8 desktop shortcut! |
| Image-3 |
| remove storage via Windows-8 tray icon |
Safe removal of the USB drive is important!
For some, it is believed that it is important to use the “Safely Remove Device” feature before removing flash drives from the USB port. For older operating systems, this is necessary to avoid damaging the flash memory. In fact, there is nothing wrong with disconnecting a USB drive without using the dialog box. But you should not do this during the data transfer .
When removing a USB drive from the corresponding USB port of a Windows computer, it is important to understand one thing. Safely removing the USB flash drive in Windows or any other system (Linux, MAC, Android) is the standard way to shut down the USB PORT. In this case, all processes connected to the device are stopped and the power supply is interrupted. Thus, the drive can be protected from the occurrence of many problems.
OneDrive comes installed with Windows 10 and is enabled by default if you sign on with a Microsoft account. If you don’t use OneDrive, however, and don’t want it running in the background, there are some hoops you can jump through to Completely Uninstall or Remove OneDrive in Windows 10.
Tips to Completely Uninstall or Remove OneDrive in Windows 10
Uninstall OneDrive In Windows 10:
1: Open “Command Prompt Administrative”.
Right Click on Windows icon at right bottom corner and then click on Command Prompt (Admin).
2. Type in taskkill /f /im OneDrive.exe to terminate any OneDrive processes and hit Enter.
3. Then type in either %SystemRoot%\System32\OneDriveSetup.exe /uninstall if you’re using 32-bit Windows 10
%SystemRoot%\SysWOW64\OneDriveSetup.exe /uninstall if you’re using 64-bit Windows 10 and hit Enter.
You won’t see a confirmation dialog or progress bar when you do this, but if you try searching for OneDrive, the app will no longer be found. Your OneDrive folder and files, however, will still be available. So like this process you get the idea of How to disable OneDrive in windows 10.
Cleaning and Removing OneDrive Remnants
However, as OneDrive is a cloud storage service which is dealing with user data, there are remnants and leftovers from the OneDrive app that are still available on the system as uninstallation does not remove user data, most prominently been the OneDrive folder. Here get the solution of How to completely uninstall OneDrive in windows 10. Run the commands below to clean up those remnants by deleting OneDrive related folders and their contents:
Delete and Remove OneDrive in File Explorer Folder Tree Registry Key
OneDrive has registry keys that add themselves to the Navigation Pane of File Explorer in Windows 10. After uninstalling OneDrive, these registry keys are orphaned and can be Remove OneDrive from Windows 10.
Should you change your mind and want to reinstall OneDrive, head to the “%SystemRoot%\SysWOW64\” folder in File Explorer and run the OneDriveSetup.exe program.
So, this is how you can Completely Uninstall or Remove OneDrive in Windows 10. Hope it helps.
SOME OF OUR MOST TRENDING ARTICLES, YOU SHOULD CONSIDER READING:
Need some help with your Windows 10? You are in right place. Contact our certified technicians by creating a support ticket and get help with your Windows 10 for free.
Live Chat With Us | Call 9088888835 | Book Your Repair Job Here.
Right click on the taskbar>>select properties. Choose customize option>>settings window pops up. Find select which option appear on taskbar option and click on it. Switch off the option safely remove hardware and eject media.
How do I fix Windows 10 internal hard drive is showing as removable in the registry?
Check Control Panel –> Device Manager –> Disks –> double click on the disk drives and make sure that under Policies tab drive ‘write cache’ is enabled and there is no ‘optimize for quick removal’ enabled. This is directly related with how windows considered or not a drive being removable.
How do I change the Safely Remove hardware icon?
Press and hold (or right-click) the icon and select the hardware you want to remove. If you can’t find the Safely Remove Hardware icon, press and hold (or right-click) the taskbar and select Taskbar settings . Under Notification Area, choose Select which icons appear on the taskbar.
How do I remove Safely Remove hardware and Eject Media icon?
Press and hold (or right-click) the taskbar and select Taskbar settings . Under Notification Area , choose Select which icons appear on the taskbar. Scroll to Windows Explorer: Safely Remove Hardware and Eject Media and turn it off.
How can I make my hard drive non removable?
- Launch “regedit”.
- Under HKEY_LOCAL_MACHINESYSTEMCurrentControlSetServicesstorahciParametersDevice , create a new REG_MULTI_SZ . Label it TreatAsInternalPort .
- In the “Values” box, enter the port values which you would like to mark as non-removable, i.e. enter ‘0’ for port ‘0’
Why does Windows say my hard drive removable?
Whether or not a device is considered removable is determined by your system’s BIOS and how it marks the various SATA ports on the motherboard. The inbox driver directly inspects SATA ports and considers devices connected to those ports marked “external” as removable devices.
How do I make my drive removable?
Go to Device Manager > Disk Drives. R/click on the drive in question and go to the Policies tab. Enable Quick Removal and the drive should be listed under Devices with Removable Storage.
Can’t remove this device while it’s in use?
How to Fix “The device is currently in use’ and Safely Remove the USB Mass Storage Device?
- Find the application that is currently using the USB device in Task Manager. Press “Ctrl + Alt + Del” keys to bring up the Task Manager. …
- Eject the USB in Disk Management. …
- Eject the USB in Device Manager.
Is it safe to remove external hard drive without ejecting?
When you remove a flash drive without warning the computer first, it might not have finished writing to the drive.” This means that pulling your external drive out without warning could result in the file you just saved being lost forever – even if you saved it hours ago.
Why does Safely Remove Hardware icon disappeared?
Lately, there have been several reports where users noticed that the safely remove hardware icon has been missing from their taskbars. This usually happens because either the icon is disabled from the taskbar settings or there are some problems with the system files.
Why can’t I eject my external hard drive Windows 10?
Solution 5: Eject the Drive Using Disk Management
Go to the Start Menu, type in Disk Management and hit Enter. Locate the external hard drive that you want to eject. Right-click on your external hard drive and select ‘Eject’. Ejecting External Drive using Disk Management.
How do you safely remove a USB?
You can follow these steps if you want to eject USB drives successfully:
- Click on the Safely Remove Hardware icon on the Windows taskbar. Wait for a message to pop up and then click on “Safely Remove Hardware.” Once a message pops up, you can remove the USB drive. …
- Manually check the device. …
- Log off and then on again.
How do I eject a USB drive when the icon is missing?
Right-click on the Taskbar and select Device Manager. Locate your USB device under Disk drives, right-click on it, and select Properties. Under the Policies tab, Select Quick removal and click OK. If this option was already selected, then you know why the Safely Remove Hardware icon was missing.
Is the disk in the C drive fixed or removable?
Explanation: The C Drive IS a FIXED DISK and a NON REMOVABLE DISK as it contains very important and sensitive information related to your computer operating system.
Why does Windows think my HDD is an SSD?
Windows differentiates a SSD from a HDD only by the read & write speeds, as an SSDs controller “lies” to the operating system and says it’s a HDD(long story), so when it does maintenance on of the things it test is drive speed to see what you have.
Is hard disk removable?
A type of disk drive system in which hard disks are enclosed in plastic or metal cartridges so that they can be removed like floppy disks. Removable disk drives combine the best aspects of hard and floppy disks. They are nearly as capacious and fast as hard disks and have the portability of floppy disks.
Chris Hoffman is Editor-in-Chief of How-To Geek. He’s written about technology for over a decade and was a PCWorld columnist for two years. Chris has written for The New York Times and Reader’s Digest, been interviewed as a technology expert on TV stations like Miami’s NBC 6, and had his work covered by news outlets like the BBC. Since 2011, Chris has written over 2,000 articles that have been read nearly one billion times—and that’s just here at How-To Geek. Read more.
According to Microsoft, Windows 10 no longer optimizes external storage devices for “better performance” as of the October 2018 Update. Instead, it optimizes them for “quick removal.” Here’s what that means—and how to change it if you like.
We don’t think every Windows user has to change this option. Despite how tempting “better performance” sounds, the default “quick removal” policy is fine for most people.
Quick Removal vs. Better Performance
Windows has different “policies” you can select for external storage devices connected via USB or Thunderbolt, whether it’s a USB thumb drive or external hard drive. Each individual storage device has its own specific policy setting so that you can select different policies for different devices.
By default, Windows 10 now uses the “quick removal” policy. Whenever you write to the drive, Windows writes the data to the drive as quickly as possible. This ensures you can remove the USB drive without using the “Safely Remove Hardware” option—in theory. A program may be writing to your USB drive in the background anyway, so we recommend against it. This does dramatically reduce the risk of data corruption if you’re in the habit of safely removing storage devices before unplugging them.
However, this can slow down your applications. For example, when you’re saving a file to the external drive, the program you’re using may stop and wait for the save process to finish before you can continue working.
The “Better performance” option eliminates this slowdown. With this option, Windows will cache write operations to the drive and let applications proceed as if they had already written the data. Windows then performs the write operation in the background. That can make applications snappier.
On the other hand, this can result in data loss in some situations. Users think their files are saved and remove the drive—but the data wasn’t actually saved, and now the files on the drive may be corrupted. That’s why you should use the “Safely Remove Hardware” option before unplugging a drive in Windows. It tells Windows to write all that cached data to disk, ensuring all your data is safe before removing the drive.
It’s unclear how much “better performance” you’ll experience in practice. This will depend on the speed of your external storage device, how the application you’re using handles writing data, and how much data you’re writing at any given time. Microsoft clearly thinks the default “quick removal” is good enough for most people and that avoiding data loss is a priority. After all, many people don’t bother with “safely removing” devices before unplugging them. That makes “quick removal” a superior solution for many people, as it will reduce the risk of data loss when not safely removing a drive.
How to Enable Better Performance
If you’d like to enable “better performance,” you’ll have to do it individually for each external storage device you connect to your computer. However, Windows will remember this setting. So, if you change this option for one USB flash drive, it will be used whenever you plug that same USB drive into your current PC. The option won’t be remembered if you plug a different USB drive into your current PC or if you take the USB drive to another PC.
First, ensure you’ve connected the external storage device to your PC. You can then control this setting from the Disk Management tool. To open it, right-click the Start button on Windows 10 and select “Disk Management.” (If you’re using Windows 7, you can press Windows+R, type ” diskmgmt.msc ” into the window, and press Enter to launch the Disk Management tool.)
Locate the name of the disk at the bottom of the Disk Management window, right-click it, and select “Properties.” You have to right-click the name at the left side of the list.
If you’re not sure which disk is your external storage device, look at the drive letter displayed here. You can check File Explorer to see which drive letter your external storage device is located at, if necessary.
Click the “Policies” tab and select “Better performance” under Removal policy to use this policy. Microsoft recommends you also activate the “Enable write caching on the device” setting under Write-caching policy if you select Better performance.
Do not enable the “Turn off Windows write-cache buffer flushing on the device” option unless the external storage device has a separate power supply. This can cause data loss if your computer experiences a power failure.
Click “OK” to save your changes. This change only applies to this specific USB device, and you’ll have to repeat this process to apply it to additional devices.
Remember to safely remove devices before physically unplugging them from your PC!
If you change your mind, you can return to the device properties window and select “Quick removal (default)” instead.
Microsoft’s statement that this is a new default in the latest version of Windows 10 is a little confusing to us. We noticed “quick removal” was the default on some of our devices even back in Windows 7. Perhaps it was only the default on some devices and is now the default on all devices. Either way, you’ll have to enable “Better performance” manually—if you want it.
To avoid losing data, it’s important to remove external hardware like hard drives and USB drives safely.
Look for the Safely Remove Hardware icon on the taskbar. If you don’t see it, select Show hidden icons . Press and hold (or right-click) the icon and select the hardware you want to remove.
If you can’t find the Safely Remove Hardware icon, press and hold (or right-click) the taskbar and select Taskbar settings .
Select Taskbar corner overflow to expand it. Scroll to Windows Explorer (when you hover over it, the tooltip will read Safely Remove Hardware and Eject Media) and turn it on.
If this doesn’t work, make sure the device has stopped all activity like copying or syncing files. Select Start > Settings > Bluetooth & devices > Devices .
Select More next to the device, and select Remove device.
Finally, check with the hardware manufacturer for new drivers or other updates.
Look for the Safely Remove Hardware icon on the taskbar. If you don’t see it, select Show hidden icons . Press and hold (or right-click) the icon and select the hardware you want to remove.
If you can’t find the Safely Remove Hardware icon, press and hold (or right-click) the taskbar and select Taskbar settings .
Under Notification Area, choose Select which icons appear on the taskbar.
Scroll to Windows Explorer: Safely Remove Hardware and Eject Media and turn it on.
If this doesn’t work, make sure the device has stopped all activity like copying or syncing files. Select Start > Settings > Devices. Select the device, and select Remove device.
Finally, check with the hardware manufacturer for new drivers or other updates.
Windows doesn’t always allow you to safely remove a flash drive or external hard drive. Klaatu asked the Answer Line forum for advice.
If you simply pull an external drive out of a running computer, you’re asking for trouble. You might lose files, crash applications, or even ruin everything on the computer. But removing it safely isn’t always as easy as it should be.
[Email your tech questions to [email protected] or post them on the PCW Answer Line forum.]
Windows’ built-in solution usually works: Click the Safely Remove Hardware icon in the notification area (aka the system tray or the systray) and select the drive. When you get the “Safe To Remove Hardware” message, it’s safe to remove the hardware.
But sometimes, “usually” isn’t good enough, and Windows instead tells you that “This device is currently in use.”
But Windows won’t tell you what’s using the device. Without that information, it’s tough to know how to fix the problem.
Guessing makes a good start. Close all of your Windows Explorer windows, along with any programs that might be holding onto a file from the drive. Then try the Safely Remove Hardware icon again.
If that doesn’t work, you can simply shut down your computer–not hibernate it or put it in sleep mode–but shut it down completely. That always works, but it takes time and interrupts your workflow.
In the original forum discussion, Flashorn offered an improved variation: Log off, log on, and try again. It’s faster than a full shutdown and reboot, and it will probably close whatever process is causing the problem. But it still takes time.
Which is why I prefer Unlocker. Intended to help you free up files that Windows won’t let you delete, it can also help free external drives. Unlocker doesn’t cost anything, although you’re encouraged to make a $5 donation.
Download and install the program. Then, the next time Windows tells you that a “device is currently in use,” right-click the drive and select Unlocker. The program will tell you what process or processes are causing the problem.
It will also offer solutions. It can kill the process(es), but that can make Windows unstable. It can also try to unlock the files from one or all processes without killing them.
My favorite solution isn’t on the Unlocker menu. Once you know what process is causing the problem, you can usually figure out what application you need to close–they generally have the same name. So you just close that program manually, saving all appropriate files, then use the Safely Remove Hardware icon again.
Yank out your flash drive at any time without worrying
In brief: Do you have a devil-may-care attitude when it comes to removing USB sticks and hard drives, preferring to pull them straight out of a PC rather than ‘ejecting’ them? Soon, you won’t have to worry about the possibility of corrupted files, as Windows will allow you to remove storage devices at any time.
We’ve long been warned that failing to use the ‘Safely Remove Hardware’ process before pulling out a USB device such as a flash drive (pendrive), thumb drive, and Thunderbolt-enabled external drive could cause data loss, corruption, or even mechanical damage. But Microsoft has announced that this won’t be the case starting with Windows version 1809.
The default policy for current versions of Windows is to use the ‘Better Performance’ option, where Windows can cache write operations to the external device, increasing the speed of data transfers. Using the Safely Remove Hardware icon makes sure all cached operations finish, thereby protecting your data when removing a drive.
In the Windows 10 update, the default option changes to ‘Quick Removal,’ which, as the name suggests, lets you yank a USB storage device out safely at any time. This is possible as Windows does not cache disk write operations, but that means performance could take a hit.
Users who prefer to prioritize performance and want to stick with the long-used policy can switch back to the current option, though this must be done for every USB device. You can read the full instructions on how to do so here.
Image credit: MrIncredible via Shutterstock
Windows 10 Thinks My Hard Drive is Removable
“My internal drives, one is an SSD and the other is an HDD, are showing up for some reason as removable under ‘Safely Remove Hardware and Eject Media’ in Windows 10. I don’t have a clue why Windows 10 thinks my hard drive is removable. Is it possible to fix this?”
Apart from the event of internal drives showing as removable, there are at times external USB flash drives appearing to be Disk Drive in Windows 10. What’s going on there? Some people would find that simply restarting the computer solves the problem, still, the majority failed and got stuck in changing the drive property on the right track.
Why Does My Hard Drive Show up as Removable
First we’d like to tell you the reason why you see the internal hard drive shown as a removable disk.В Whether the device is considered a removable device depends on the system’s BIOS and how the various SATA ports on the motherboard are marked. The inbox driver directly checksВ SATA port and treats the device connected to the port marked “external” as a removable device. Not all storage drivers do this, which canВ be a potential cause of corruption or data loss.
How to Fix Internal Hard Drive Shows as Removable in Windows 10
Here on this page, we find 2 most applied solutions for you to troubleshoot the problem without a hitch. let’s begin with the simple method, but most of the time, it’s helpful.
Solution 1. Modify in Device Manager
Step 1. Type Control Panel in the search box next to the Windows menu in Windows 10 and open Control Panel.
Step 2. Navigate to “Device Manager”.
Step 3. On the Device Manager window, double-click on the “Disk drives”.
Step 4. Right-click on the internal hard drive (HDD or SSD) and select “Properties”.
Step 5. Under the Policies tab, make sure “write caching on the device” is enabled, there is no “optimize for quick removal” enabled. This is directly related to how Windows considered or not a drive is removable.
Step 6. Update to the latest chipset and AHCI/RAID driver.
Solution 2. Modify in Registry
Since the problem cannot be ideally solved by the simple method, you have to rely on the last resort which ensures a high success rate. Only one noticeable point. This is a Registry fix, so it’s somewhat risky. You should always BACKUP the registry before you make changes.
Backup registry and system in advance
How to backup registry in Windows 10? This can be done in seconds, while with years of experience, we highly suggest not backup the single registry file because you’ll have to reinstall Windows OS as soon as something goes wrong.
Download EaseUS backup software, with a one-click system backup option, you can easily backup the whole system, including the registry files with a few clicks.
Support Windows 11/10/8/7
Step 1. Launch EaseUS Todo Backup on your computer, and click Create Backup on the home screen and then hit the big question mark to select backup contents.
Step 2. To back up your Windows operating system, click “OS” to begin the backup task.
Step 3.В Your Windows operating system information and all system related files and partitions will be automatically selected so you don’t need to do any manual selection at this step.В Next, you’ll need to choose a location to save the system imageВ backup by clicking the illustrated area.
Step 4. The backup location can beВ another local drive on your computer, an external hard drive, network, cloud or NAS. Generally, we recommend you use an external physical drive or cloud to preserve the system backup files.В
Step 5. Customiztion settings like enabling an automatic backup schedule in daily, weekly, monthly, or upon an event, and makingВ a differential and incremental backup are available in the Options button if you’re interested. Click “Backup Now“, and theВ Windows systemВ backup process will begin. The completed backup task will display on the left side in a card style.
Windows system backup (including the registry) will be done in seconds. If anything happens during the registry modification, just restore the system from the backup with EaseUS Todo Backup.
Fix Windows 10 internal hard drive showing as removable in Registry:
Step 1. Right-click the “Start” button in Windows 10. On the Power Users menu, choose “Command Prompt (Admin)” to open a command prompt with administrator privileges.
Step 2. In the command prompt window, type devmgmt.msc and hit “Enter”.
Step 3. Under Disk Drives, identify the SATA device you would like the inbox driver to consider internal and open properties for this device by right-clicking and selecting “Properties”.
Step 4. Note the bus number from the properties overview (“1” in the below example).
Type the following command in the previously opened command prompt and hit “Enter”:
reg.exe add “HKLM\SYSTEM\CurrentControlSet\Services\storahci\Parameters\Device”В /f /v TreatAsInternalPort /t REG_MULTI_SZ /d x
Where x corresponds to the Bus Number you noted in step 4.
Again, modifying the registry to fix the hard drive showing as removable in Windows has some potential danger. Do not ignore the advice at the beginning of this part, which is to back upВ the system and registry beforehand. It’s worth it.
Действия по безопасному отключению внешнего диска от компьютера:
Отключение диска от компьютера:
Отсоединение или «безопасное отключение» внешнего диска от компьютера выполняется программой Windows «Безопасное извлечение устройства». Ниже перечислены действия по безопасному отключению внешнего диска от компьютера с ОС Windows:
Примечание. Несоблюдение этой процедуры может стать причиной потери данных на внешнем диске.
1. Дважды щелкните значок Безопасное извлечение на панели задач Windows. Будет запущена программа безопасного извлечения устройства.
Примечание. В Windows этот значок иногда бывает скрыт. Просто щелкните кнопку «стрелка вверх» и продолжайте выполнение.
2. В окне «Безопасное извлечение» отобразятся обнаруженные устройства USB/FireWire, подключенные к компьютеру с ОС Windows. При
необходимости щелкните / установите флажок в поле Отображать компоненты устройства, чтобы развернуть представление.
3. Щелкните устройство, которое необходимо извлечь (например, внешний диск) и нажмите кнопку Остановить.
4. Отобразится окно подтверждения. Снова выберите устройство, которое необходимо извлечь, и нажмите кнопку ОК.
5. Будет открыто всплывающее окно с уведомлением о том, что можно извлечь устройство. Всплывающее окно можно закрыть или оно
закроется само. Теперь можно выключить питание/отсоединить внешний диск от компьютера.
Примечание. Иногда при безопасном извлечении внешнего диска ОС Windows может отображать предупреждение о том, что внешний диск занят и отключить его невозможно. В этом случае:
Отключение диска на компьютерах Mac:
В Mac OS диск отображается значком на рабочем столе. Прежде чем отсоединить диск, его необходимо отключить, перетащив значок в корзину.
Подождите несколько секунд после помещения диска в корзину; когда световой индикатор выполнения задачи погаснет, можно безопасно извлечь диск. Когда диск отключится, отсоедините интерфейсный кабель.
This is an age-old million dollar question. Do you really need to ‘safely remove‘ usb drive in windows? Tech experts keep suggesting you to do so to prevent data corruption or loss. But you have removed it so many times without clicking on ‘safely remove’ to self declare that it’s not really needed. But what does the maker of Windows has to say about it? Microsoft finally has a response. In short No, You do not really need to safely eject your usb drive but there is a catch. Microsoft had a reason to keep the option active for so long and will continue to do so. Lets look at their response in detail.
To be clear the ‘safely remove’ usb drive option will continue to be a part of the system tray for the foreseeable future. Microsoft has confirmed that though it stays it’s not something you need to worry about. Windows 10 now comes with feature called ‘Quick removal’ that allows you to remove a usb drive when ever needed. Obviously removing a drive when it being used or files being copied will lead to data loss or corruption. Quick removal will now be the default setting in all builds of windows henceforth.
Although the update has been in effect since the October of 2018, only now has Microsoft started instructing IT professionals of this change and widespread implementation. We need to also remember that Microsoft did have protection mechanisms in place as far back as Windows 7.
Conclusion
So assuming you have the latest build of windows and the drive is not in use, remember that you are free to pull out the USB device when and as you wish! make sure to tell everyone you know as this question has remained for ages and its time to close it once and for all.
If at any point you do have a doubt that an application is using the drive in the background you can always go to the trusty ‘safely remove’ option. However for smartphones we still do recommend clicking on eject drive while using OTG usb drives. Smartphones don’t yet have such mechanisms and can result in a bad USB drive.
Windows defines two main policies, Quick removal and Better performance, that control how the system interacts with external storage devices such as USB thumb drives or Thunderbolt-enabled external drives. Beginning in Windows 10 version 1809, the default policy is Quick removal.
In earlier versions of Windows, the default policy was Better performance.
You can change the policy setting for each external device, and the policy that you set remains in effect if you disconnect the device and then connect it again to the same computer port.
More information
You can use the storage device policy setting to change the manner in which Windows manages storage devices to better meet your needs. The policy settings have the following effects:
Quick removal: This policy manages storage operations in a manner that keeps the device ready to remove at any time. You can remove the device without using the Safely Remove Hardware process. However, to do this, Windows cannot cache disk write operations. This may degrade system performance.
Better performance: This policy manages storage operations in a manner that improves system performance. When this policy is in effect, Windows can cache write operations to the external device. However, you must use the Safely Remove Hardware process to remove the external drive. The Safely Remove Hardware process protects the integrity of data on the device by making sure that all cached operations finish.
If you use the Better performance policy, you must use the Safely Remove Hardware process to remove the device. If you remove or disconnect the device without following the safe removal instructions, you risk losing data.
If you select Better performance, we recommend that you also select Enable write caching on the device.
To change the policy for an external storage device:
Connect the device to the computer.
Right-click Start, then select File Explorer.
In File Explorer, identify the letter or label that is associated with the device (for example, USB Drive (D:)).
Right-click Start, then select Disk Management.
In the lower section of the Disk Management window, right-click the label of the device, and then select Properties.
Select Policies.
Some recent versions of Windows may use a different arrangement of tabs in the disk properties dialog box.
If you do not see the Policies tab, select Hardware, select the removable drive from the All disk drives list, and then select Properties. The Policies tab should now be available.
Does it matter whether you ‘Safely Remove’ devices, as Windows requests? Yes. If you pop a memory card out of its reader or pull an external drive out of its USB port while Windows is reading or writing data, you could end up with corrupted files, unreadable media, or both. The problem is, it’s not always easy to tell when Windows or an application is reading or writing data. In fact, all may seem quiet on the read/write front, but a program might be doing something behind the scenes.
That’s why it’s essential to use the Safely Remove Hardware option–hidden and slightly confusing though it may be.
The icon resides in the system tray, which you may have to expand by clicking the arrow. Click the icon, and you’ll see a pop-up menu listing the devices that can be ‘safely removed’. Click the one that corresponds to your memory card, flash drive, or whatever, and wait until you see the ‘Safe to Remove Hardware’ message. Only then can you unplug.
If you don’t see a Safely Remove Hardware icon in your system tray, or if you’re not quite sure which listing corresponds to your card or drive, you have another option. Double-click Computer (or My Computer) to open it, and find the icon for the device. Right-click it, and choose Eject.
(For more solutions to perplexing PC problems, see “The 21 Greatest PC Mysteries–Solved!“)
By Vicky | Follow | Last Updated December 01, 2020
Summary :
Do you know how to configure Windows 10 so that you do not have to use the Safely Remove Hardware notification icon, to disconnect external devices, like a USB? This article will show you how to do that. By the way, MiniTool Partition Wizard is a useful partition manager for Windows 10.
Quick Navigation :
- Microsoft Ends Safely Remove Hardware
- Disable Safely Remove Hardware
- Conclusion
- User Comments
Microsoft Ends Safely Remove Hardware
You may be told never to remove an external storage device, like a USB without clicking on the “safely removable hardware” notification. This is also a common practice you may do before pulling out an external device from Windows devices.
However, it is not something worthy of so much panic these days, because Microsoft has officially called Safely Remove Hardware quits on user’s requirements.
USB drive is very popular nowadays. Do you know how to format USB drive? This article will show you how to format USB flash drive with three free USB formatters.
As part of a new update, the Redmond company has modified the way Windows 10 handles disconnecting USBs or Thunderbolt storage devices. This change applies to USB thumb drives, external hard drives, flash drives, and even data transfer connections between PCs and smartphones.
Until now, the default policy in Windows 10 and all previous versions of the operating system when inserting a USB device was Better Performance. With Windows 10 version 1809, however, Microsoft decided to make Quick removal the default instead.
With Quick removal, Windows 10 puts storage devices in a state where they can be disconnected without following the Safely Remove Hardware protocol.
There are downsides to this, of course, chief of which is speed. Since in this setting Windows will not cache disk writes, moving the data to external device might cost more time. But, to transfer data from your computer to an external hard drive, you can use MiniTool Software. To do that, please read the recommended article below.
How to backup computer to external hard drive in Windows 10/8/7 for the system or disk data protection? Try to use professional computer backup software now.
Disable Safely Remove Hardware
The following content will show you how to disable Safely Remove hardware and eject media in Windows:
Step 1: Connect an external storage device to your Windows 10 computer.
Step 2: Open the Disk Management program by pressing the Windows icon and the R key on the keyword, typing diskmgmt.msc in the Run box and clicking the OK button.
Step 3: Once get Disk Management window, right-click the external device’s name in panel at the bottom, and then select the Properties option. (Here I take partition F for example.)
Step 4: In the Properties window, please go to the Policies tab. Please note that two policies can be configured. But in this situation, you should select the Quick removal policy. This policy might already be selected. If not, select it and click the OK button.
Step 5: Once you have selected this policy, you will have to restart your computer to apply this policy.
Finishing the steps above lets you remove an external storage device without ejecting it.
If you try to eject it though, Windows 10 will stop it and allow you to remove it. In some cases, you may see a message telling you that the device cannot be stopped because it is in use. It is up to you to ignore the message if you want to remove the device anyway.
This article will show you how to make external hard drive recovery with professional data recovery software and list the reasons for external hard drive data loss.
Conclusion
A conclusion can be made based on the results: it is OK to disable the use of the Safely Remove Hardware notification icon.
This removal means disabling write caching for your external devices and using the Quick removal setting instead of Better Performance.
The performance levels are almost identical between the two options, and you can earn the comfort of making fewer clicks to removal an external device.
ABOUT THE AUTHOR
Position: Columnist
Vicky is a website editor who has been writing tech articles since she was graduated from university. Most of her articles talk about Windows PC and hard disk issues. Some of her articles also touch on YouTube usage and issues.
During her spare time, she likes to spend time reading, watching videos, and sitting on her Yoga mat to relax.
Do you want to remove Windows 10? Remove Windows 10 and install Ubuntu? or simply want to remove everything from the hard drive including the operating system and give away the hard drive? You’re in the right place
This page will guide through how to empty and clean a hard drive with Windows 10 installed. We’ll use different methods to empty the disk, methods are listed below:
Tip: The Go back to Windows 7 option is a temporary setting only available for a month after upgrading to Windows 10, after when we’ll have to seek another solution. This option is easy to find if you just upgraded Windows: press the Start button and click the Gear icon and click Update and Security and click the Recovery option and then click the Go back to Windows 7 option to remove Windows 10
We can’t remove Windows with Windows, neither in the Disk Management tool nor the diskpart command prompt tool, neither the delete operation nor the format command, but we can remove the system when it’s not running (actually, we can remove it even when it’s running, will talk about that later)
Remove Windows with the installation media
Windows 10 installation media is not only capable of installing the system, but also came with the format and delete operations, which are good enough to ensure data empty, but not clean, formatted / deleted drive still have residue for data recovery programs, but if all we want is to remove Windows and reinstall another operating system, it’s Fine.
Windows setup window
In the screenshot above you can see there are many options available:
- Refresh
- Delete
- Format
- New
- Load driver
- Extend
The Delete and Format options are grayed out right now, that’s because the disk is now unallocated space, which the status the disk should be after deleting, so if the disk is showing as “Disk 0” and both the format, delete options are active, you can use this method to remove previous installed Windows 10
Alternatively, you can use the diskpart command prompt method to remove C Drive, just press Shift+F10 to bring diskpart up and type
Shift+F10 to bring up the command prompt
- – list volume
- – select volume c
- – delete
Directly Wipe out Windows 10
The delete method requires to shut down the computer and insert the installation media, is useful when the disk would be reinstalled to a new system. Sometimes there are situations that we’d like to replace the old hard drive with a new one, we’d like to upgrade the hard drive, then give away the old one after it’s clean.
Deleted drive can be recovered but wiped drive can’t be, although there’s nothing sensitive info in the system drive and people normally don’t store personal files on system partition, system drive will still have traces left, to prevent data leakage and ensure data safe, Wipe Windows 10, wipe the entire hard drive is essential.
Data Wiper is the program we’re about to use for this task, although we have alternative solutions to remove Windows clean, this is indeed the most convenient one – it can directly wipe system drive without any bootable media, you don’t have to reboot and change the BIOS settings either, here are the steps:
- Run Data Wiper (the installation edition or the portable edition, both are in the same package)
- In the first section (marked as ‘1’) click the Entire drive/disk option
- In the second section (marked as ‘2’) choose a wiping method (from the listed 6 kinds of schemes)
- In the third section (you guessed it, marked as ‘3’) click on the system drive to activate the Wipe Now button
- Then click the Wipe Now and confirm
Data Wiper removes Windows 10
Remove Windows 10 from dual boot
Data Wiper can also be used on dual boot system, say if you have Windows 7 and Windows 10 dual boot on different disks, download Data Wiper to the Windows 7 disk and run the program, we can simply remove the Windows 10 disk with the following steps:
- Click on the option Entire disk / drive option
- Click on the disk (the disk icon) and click Wipe Now
- Confirm and type the keyword wipe to wipe the Windows 10 disk
This time we applied the default Fill will zero method, you can switch it to others, but using one-pass overwriting is enough to make sure data clean if you don’t have data cleaning policy to follow
This method is also used you wipe another disk, the disk you plug out from the computer you’d like to donate or give away, normally Windows won’t allow us to remove itself if we don’t use a bootable CD/DVD, but we can plug out the hard drive and connect it to another computer, using its OS to wipe out another.
Do you really need to remove Windows 10?
Windows 10 now, to be honest, has more features than Windows 7, if you’re a heavy office worker (developers, designers, etc), Windows 10 will speed up the work efficiency and productivity, with the following settings you can:
- Customize your Start menu
- Learn keyboard shortcuts
- Spend time getting to know Cortana
- Automatically free up space (storage sense)
- Make use of virtual desktops
- Easily save and print PDFs
- Snap many APPs
- Use your PC as a tablet
BTW, Windows 10 1809 is now rolling out, you can either click the Check for updates button or use the official update assistant, which has more features and practical functions
Lets discuss how to remove windows OS from another drive without formatting. In another words, steps to Remove and Uninstall Windows 7, Windows 8, or Windows 10 from Dual Boot PC. Windows is the most popular operating system in the globe. Sometimes, you may want to remove Windows OS from another drive due to some issues. In this case, you should follow vital steps before proceeding further for sure. It is possible to remove your Windows operating system from another drive and you do not have to go for formatting. You can even have a back up of your data while removing Windows OS from another drive.
With so many options available on several websites, it becomes difficult to go through the real steps. You should be very careful while considering any steps for removing Windows OS from another drive for sure. Are you looking for the vital steps you need to follow for removing Windows OS without formatting? If yes is your answer, then here you would come to know about all the details.
The first step you need to follow is to remove Windows 10/7/8 boot entry and all its system files. To remove boot entry, you should follow the below steps
- Press Windows +R keys
- Now you need to type msconfig and hit enter
- Now you should select Windows 10/7/8 and select “Delete”
- You should delete all the Windows directory from your drive (C, D, E)
- After deleting all the Windows directory, the drive should get the Windows space without formatting
Also, you can easily follow the given instructions to solve your issue
- First, you should right-click on “My Computer” and choose “ Properties”
- After choosing properties, you need to choose “Advanced System Settings” from the left menu
- Now you should select “Settings” default operating from the Windows “System Properties”
- In “System”, you can choose your Windows 10/7/8 as the default book and un-check “Time” to display lists of OS.
After performing all the above-mentioned steps, the boot entry process will be done and you would be able to format or erase the partition used by the Windows which you want to completely remove from the system. You can even format it if you prefer to plan to reuse that partition to install another OS or delete the entire volume if you want or use that space to extend other partitions. If you are formatting the drive without removing the Windows 10 boot loader files or without assigning other OS boot loader as default, you would not be able to process boot-up for sure.
Finally, you are aware of the vital steps you need to follow for removing Windows OS from another drive without formatting. You just need to remove Windows 10/7/8 boot entry and its system files. It would be better to save your important data and files so that you will never lose them in case anything happens. You should always be on the safer side before trying anything for the first time. Make sure you are following all the above-mentioned steps before proceeding further.
Conclusion
Just try from your end and share your valuable experiences here with us right now!
Best of luck Guys
How to Remove and Uninstall Windows 7, Windows 8, or Windows 10 from Dual Boot PC
Windows 10 now allows you to safely remove USB by just pulling it out, Microsoft confirms
With the release of Windows 10 version 1809, Microsoft is finally addressing the issue of accidentally removing USB drive or shutting down your computer without ejecting it first.
Microsoft is changing the default setting that is applied to USB drives and other removable media. The Redmond-based tech firm is offering two main policies regarding removal of external storage devices: Quick Removal and Better Performance.
Starting with Windows 10 version 1809, ‘Quick removal’ will be the default policy on Microsoft Windows 10, which in earlier versions of Windows was ‘Better performance,’ states the updated Microsoft support page. However, it is still possible to change the policy setting for each external device. The policy continues to remain in effect until you disconnect the device and then connect it again to the same computer port.
Quick Removal, as the name suggests, allows you to safely eject a USB or Thunderbolt-enabled external drive at any time by bypassing Safely Remove Hardware process. However, to do this, Windows cannot cache disk write operations. This may even lower the performance of the system.
On the other hand, Better performance policy manages storage operations in a manner that improves system performance. In this process, Windows can cache write operations to the external device. However, you must use the Safely Remove Hardware process to remove the external drive, or else you risk losing data.
If you select Better performance, it is recommended that you also select Enable to write caching on the device, adds Microsoft support page.
To change the policy for an external storage device, you need to follow the steps below:
1. Connect the device to the computer.
2. Right-click Start, and then select File Explorer.
3. In File Explorer, identify the letter or label that is associated with the device (for example, USB Drive (D:)).
4. Right-click Start, and then select Disk Management.
5. In the lower section of the Disk Management window, right-click the label of the device, and then click Properties.
6. Select Policies, and then select the policy you want to use.
The change in default policy for an external storage device in Windows 10 will definitely be welcomed by many seasoned Windows users who can now simply skip the Safely Remove Hardware process without getting annoyed or fear losing data.


