Harry Guinness is a photography expert and writer with nearly a decade of experience. His work has been published in newspapers like The New York Times and on a variety of other websites, from Lifehacker to Popular Science and Medium’s OneZero. Read more.
Like Facebook, Snapchat can quickly use a lot of data. By default, even when you’re on mobile data, Snapchat will automatically download any Snaps you receive or Stories your friends post. All it takes is one friend to go a little heavy with the video Snaps, and you can burn through a hundred megabytes just by opening the app.
Thankfully, Snapchat includes Travel Mode for just this sort of situation. When it’s enabled, Snaps and Stories won’t load automatically. Instead, you have to tap on each one to download it, and a second time to watch it. Here’s how to enable it.
Open Snapchat and swipe down to get to the Menu screen. Tap the gear icon in the top right to get to Settings.
Under Additional Services tap Manage and then tap the Travel Mode switch to enable it. Now Snapchat will use a lot less mobile data.
One quick thing to note: Travel Mode only works on mobile data. If you’re connected to a Wi-Fi network, Snaps and Stories will automatically download as usual.
A new setting in Snapchat will prevent stories from loading while you’re out and about, potentially saving you from costly overages.
Contributing Writer, ZDNet
Jason Cipriani is based out of beautiful Colorado and has been covering mobile technology news and reviewing the latest gadgets for the last six years. His work can also be found on sister site CNET in the How To section, as well as across several more online publications.
Earlier this week Snapchat updated its mobile apps with a couple of new features, one of which the company calls Travel Mode.
When enabled, this new feature will prevent content from things like Stories from automatically loading in the background when your smartphone is on a cellular connection. Meaning this could potentially save you money by helping avoid overages.
The only problem with the feature is that it’s hidden within Snapchat’s settings screen.
Before you follow the steps below, make sure you have the latest version of Snapchat by launching your respective app store and checking for updates.
Here’s where you can find the Travel Mode setting:
- From the main screen of the app, swipe down to reveal your Snapcode. Tap the Settings icon.
- Scroll down and select Manage just beneath the Additional Services section.
- Tap on the box next to Travel Mode.
The first time I activated this mode on my Android device, the app force closed and I eventually had to delete and reinstall the app; just a warning should you experience the same, odd behavior.
In theory, with this setting enabled Snapchat should take a more conservative approach toward gobbling up your mobile data while traveling.
Snapchat is one of the most popular social apps on iOS, and can be a data hog if you make use of the service on a daily basis. From personal experiences, Snapchat cannot be used if your iPhone is at 20% or lower battery. With Instagram, you can browse through your feed even if your battery percentage is at 10%. But if we apply the same case to Snapchat, your device will take a miserable battery based tumble.
The reason behind this is because Snapchat wants to give their users the best possible experience, updating the app almost immediately in the background when something new pops up. You will instantly get notified of new replies or a newly uploaded Snapchat story. All of these automatic updates are handled by Snapchat’s built-in real-time feature.
Now that we know the real reason why Snapchat can’t run while your iPhone is low on battery or why this app consumes so many data. Let’s take things a little further and improve it by using Snapchat’s recently released feature called ‘Travel Mode.’
The developers behind Snapchat have decided to fix this headache by giving users the opportunity to disable its real-time feature in order to save cellular data usage and battery life as well. We think it is good to have this option enabled while you are traveling across the country or are just on a vacation somewhere awesome, so you don’t have to worry about roaming charges nor battery draining too quickly.
Travel Mode is also a good feature for Snapchat users who aren’t going anywhere either. You don’t want your iPhone to run out of battery faster than normal right? For whatever reasons you have, here is how to turn on the new Travel Mode.
Before we go ahead and get into the tutorial part, we just want you to keep in mind that by enabling Travel Mode, you won’t be able to receive everything in real-time on cellular data. In other words, New Snapchat stories, Discovery sections, and Snaps won’t load automatically when you launch the app.
How To Turn On Travel Mode In Snapchat For iPhone
1. Launch Snapchat from your home screen.
2. Go to Settings > Manage Additional Services.
3. Move the ‘Travel Mode’ toggle to the ON position.
And that is how you use fewer Snapchat data and avoid charges from your carrier and save battery life as well in the process. You can download the latest version of Snapchat or update it via the App Store.
Snapchat is courting teenagers around the world who want to save their data plans with a new travel mode. When enabled, Snaps, Stories and Discovery content will only load if users tap them, rather than loading automatically when they open the app.
Travel Mode comes alongside several other new features for iOS and Android. Now users will be able to add as many emoji to their snaps as they want and place them individually, rather than having to add them as a rigid single string of text. The eye button for jumping from your Story to who watched it is coming back after a short absence.
And you can now export and download your profile GIF as a video rather than just a photo of the first frame. While few have talked about it, the profile GIF is the only piece of content in Snapchat that’s not ephemeral, and the first semblance of a “profile” for users on the app. It comes in handy when trying to decide whether to follow someone back.
How To Use Travel Mode And Placeable Emojis
To activate Travel Mode, users must tap the Snapchat icon at the top of the camera, go into their Settings, open Manage Additional Services, and then toggle it on. While it’s called Travel Mode presumably because it could help people avoid expensive roaming charges while away from their country, it will more likely be a hit with people on small data plans at home.
As for the new emoji option, users will tap the post-it note button in the top right of their screen after they’ve shot a snap. Then they can add as many emojis as they want, and drag and resize them to their liking.
$napchat
The data-saving move mirrors attempts by Facebook and other startups to provide a cheaper way to access their services. Teens around the world, as well as many smartphone users in developing nations where data is expensive relative to buying power, have to aggressively manage their data usage. Otherwise, they could run out and have to stop using the Internet, or pay overage charges they can’t afford.
To avoid this, tech companies are condensing their apps so they are smaller and less expensive to download, and looking for ways to condense their transmissions and improve efficiency so their apps use less data. Facebook released a special data-saving version of its Android app called Facebook Lite.
Now Snapchat users can volunteer to only use data on what they want to see. They might spend more time waiting for Snaps to load because they haven’t been pre-loaded, but it’s a small price in time to pay compared to actually being charged money.
Snapchat recently said it’s reached 100 million daily users, and that 60 percent of young Americans are users. But it’s poised for an uptick in growth around the world thanks to several recent changes. It dropped the thumb-tiring tap-and-hold-to-view mechanic so you can now watch Stories with just a single touch. A quiet but major engineering update has made Snaps and Stories load much faster. And now it has Travel Mode.
When Facebook started to reach saturation in its primary markets, it ramped up its investment in localization and data compression to attract users abroad. Now it’s Snapchat’s international moment.
For a demo of the new features, add me on Snapchat at “JoshConstine” and follow “TechCrunch” for behind-the-scenes tech news
It’s not quite #deleteFacebook , but there’s also a growing movement to wipe Snapchat from smartphones. The company’s poorly received redesign , combined with an offensive ad that recently appeared in the app, have pushed more people to abandon Snapchat entirely—including your favorite celebrities .
But before you deactivate your account, you’ll want to first salvage as much data as you can from Snapchat. The social network doesn’t exactly make it easy to export your photos, videos, and contacts, but it’s not impossible. Here’s what you need to know.
How to Save Your Snapchat Memories
Memories is Snapchat’s cloud storage system that lets you save all your Snaps. However, since you stash your photos on on the company’s servers, deleting the app means losing access, all Eternal Sunshine of the Spotless Mind-style.
Unfortunately, there’s no way to batch-export your Memories to your smartphone’s local camera roll. Instead, you’ll have to go through them one at a time. If you’re up for the challenge, open Memories and tap on a photo or video. Swipe up to reveal a “My Snap” button. Tap on it and select “Save to Camera Roll” to store it locally. Now do this a thousand more times until you’ve archived everything you’ve saved on Snapchat (or you’re too bored to continue).
If you’re not ready to delete Snapchat just yet, but you’re thinking about it, you should start saving all your Snaps to your camera roll automatically. To do that, open Snapchat, swipe down, and tap on the Settings icon in the top-right corner. Select Memories, followed by “Save To…,” and then pick either “Memories & Camera Roll” or “Camera Roll Only.” Now your new Snaps will automatically save to your phone by default.
Hello Travel Mode
Share this story
- Share this on Facebook
- Share this on Twitter
Share All sharing options for: Snapchat has a new feature to stop you from wasting data
Has Snapchat been eating up your mobile data each month? You can finally put a stop to that: in an update being released today for iOS and Android, Snapchat includes an important new feature called Travel Mode: turning it on will prevent snaps (Discover, Live Stories, and friends’ updates) from automatically downloading, saving you from hitting a data cap or receiving that troubling text message from Mom or Dad with a warning that you’ve gone over your monthly allowance. When Travel Mode is enabled, all snaps have to be tapped to load. It’s probably worth turning on — plenty of users have noticed that the app hogs a significant amount of data, particularly since Discover rolled out in January.
A few other new features come with today’s update, too. Snapchat’s allowing you to be even more creative with a feature it calls Sticker Picker: you can now slap an endless number emoji anywhere on your snaps — no longer are they restricted to being on a line of text. There’s now an icon on the top right of the camera screen (after you’ve taken a photo or video) where you pick from the traditional emoji we’re all familiar with — no special Snapchat ones yet. Stick your hearts out, teens.
Get your data back
Today’s update will also let users export their customized Snapcodes (or BooR codes as we like to call them) as a video file — something we wanted to see in the last major update. And since the BooR code exports as a video file, you can share it as such on Twitter, Facebook, Instagram, and any other places you want to let people know you’re on Snapchat. The option to export a single frame still exists, but you can just as easily screenshot the video and choose the specific frame you want to share.
And lastly — this one is for the more data-obsessive — tapping the eye icon next to the number of views on your snap will now bring up the list of viewers. Before today’s update, tapping anywhere on one of your stories started playing the snap, and you had to take an extra step to see who viewed it.
This post is part of Mashable’s Spring Cleaning Week. Just a little something to distract you from the eternal dread of constantly wiping all those fingerprints off your screen.
If you’ve recently upgraded to a new phone, you might have noticed an annoying, not to mention costly, problem.
Yes, if you’ve got a new iPhone X or iPhone 8 Plus, that sucker probably uses a LOT of data, thanks to the jump in screen resolution, the new screen size, and a spiffy new version of iOS. Chances are, it’s more than you’re used to using, especially if you made a leap from using something like an iPhone 6.
You may have noticed this when you got a whopping overage charge on your monthly bill (I certainly did). Luckily, there are a few ways to tinker with your settings and apps to make sure you’re not using all the data in the world on your new phone.
First, check which apps are using the most data
This is really easy to do. Go into your Settings and click on Cellular. Scroll down to the menu that says Cellular Data. Here you can see exactly how much data each of your installed apps has used over time. You may be surprised.
You can also use this menu to gauge how much data you use per month. Just make sure to scroll down to the bottom and hit “Reset Statistics” at the start of your billing cycle. It’ll sync your info with each pay period and give you a way to monitor your data day by day.
Reconfigure all your social media apps
Your social media apps use a ton of data. All those high-quality photos of your friends’ children are eating up your precious data — especially if you’re a heavy Instagram user. Not to mention the autoplay video hounding your phone for its precious megabytes. However, there are ways to cut back.
For Facebook: In Settings, go to Account Settings, then Videos and Photos. Make sure the Autoplay option is turned off or set to do so only when you’re connected to Wi-Fi.
For Twitter: In Settings and Privacy, go to Data usage. Here you can turn off image previews, and turn off autoplay completely. You can also make sure the app only plays high-quality video when you’re connected to Wi-Fi.
For Instagram: In the settings menu, scroll down to Cellular Data Use and turn on “Use Less Data.” It’ll take photos and videos longer to load, but it should cut down on data usage considerably.
For Snapchat: In Settings, go to Additional Services and hit Manage. From there toggle Travel Mode on. This will reduce Snapchat’s data usage when you’re on the go. You can also go to the Memories tab and flip off Smart Backup, so your memories don’t back up using cellular data when Wi-Fi is unavailable.
In fact, kill autoplay on every app
The terrible thing about apps these days is that they all float video in your face, whether you want it or not. Sporting apps like ESPN are prime offenders. And while it may not seem like such a big deal, those videos burn through a ton of data. Make sure to disable autoplay in any apps you frequent.
Kill Wi-Fi assist
Wi-Fi assist was billed as a way to help you power through a spotty Wi-Fi connection, but it can be particularly taxing on your data over time, especially if you don’t have the best Wi-Fi signal at home. Go back into your Settings menu, navigate to Cellular Data, then scroll all the way down to Wi-Fi Assist. Below, it’ll show you just how much data the feature has used. If it’s a lot, turn that sucker off.
Kill background app refresh
This is a pretty simple one. Turn off Background App Refresh, or set it to only refresh when connected to Wi-Fi. To do so, go to Settings, tap General, and click on Background App Refresh. There, you’ll have the option to shut it off entirely, have it use data, or have it use only Wi-Fi.
Use apps like Pocket or Instapaper
For news or reading junkies who are constantly on the go, apps like Pocket or Instapaper are a huge data help. They allow you to save articles or long features onto your phone so you can read them offline. Pocket even integrates into Safari and Chrome and allows you to save articles from your browser. Just tap the Share icon and scroll over to the top row to the Pocket icon. Connect to Wi-Fi, and open your Pocket app to download the article. You’re free to read whenever you please, data free.
Download Google Maps
If you frequently get lost but don’t always want to use data when you’re in need of directions, download your local area on Google Maps. Open Google Maps, tap the menu icon on the left of the search bar, and hit Offline Maps.
Then hit Custom Map and drag the area you’d like to save. Now you can access it whenever you want, without using data. It’ll even still let you search for directions. Just be careful: While you won’t be using a lot of data, this can take up a lot of your phone’s internal storage.
Save those Netflix shows
If you love to stream Netflix on the go, make sure you’re using the app’s offline feature. When you’re searching for a show you like, go to its main page and hit the download button on the far left. Search “Available for Download” in the menu to find out what you can actually download. Then, to find everything you’ve saved on your device, hit the downloads tab at the bottom.
If all else fails, use the ultimate kill-switch: Airplane Mode
This will ensure that you use no data whatsoever until you connect to Wi-Fi. Sometimes dire circumstances call for dire measures.
The Snapchat menu is where you can view your Snapcode, your username, and your score. You can see who recently sent you a friend request, send friend requests, and view your friends list. And you can also keep track of your Snapchat Trophy Case and adjust settings.
How to get your Snapcode
A Snapcode is a lot like a QR code. It’s a unique image that represents your individual Snapchat account. If you’re talking to a friend and they ask to add you on Snapchat:
- Launch Snapchat
- Tap the ghost
- Have your friend scan your code with their Snapchat app.
In theory, it’s faster than just searching for your username in the app.
Note: If you tap on your Snapcode, you can take an animated selfie to replace the ghost in the middle of your Snapcode.
How to see your Snapchat Score
Snap Score is simple: Snapchat does some math based on your use of the app and spits out a number. Think of it this way: The higher the score, the more active the Snapchatter.
How to view and accept Friend requests
- Tap Added Me to see a list of people who recently added you as a friend.
- Tap the Add button (looks like a plus sign) if you want to add them back.
How to add Friends
If you prefer things the old-fashioned way (i.e. Snapcodes aren’t your thing):
- Tap Add Friends to see a list of other ways to add friends.
- Enter the Snapchat username if you have it.
- Tap on a Contact to add existing contacts who already use Snapchat (if you granted Snapchat access to your contacts).
- Tap Add by Snapcode if your friend sent you a screenshot of their Snapcode. (Snapchat will show you your camera roll with images it thinks might be a Snapcode at the top. Just tap the Snapcode screenshot to add your friend.)
- Tap Add Nearby if you and your friend(s) have “Add Nearby” open. You’ll be able to see their username and add them to your friends list. This is a particularly handy feature if you’ve got a big group of friends you’d like to add.
How to see your Friends list
Your Friends list is organized alphabetically, with a section at the top for your most-contacted friends.
- Tap My Friends to view your friends list.
- Tap on a Name to view a friend’s information or send a snap or chat.
You can also use this menu to quickly change a contact’s display name or remove or block them.
Removing a friend: Removing a friend means different things depending on your privacy settings. In general, if you remove a friend they won’t be able to see your Snapchat Stories and you won’t see theirs. If your privacy settings are such that you only get snaps from friends, then you also won’t see any snaps they send.
Blocking a friend or user: A person doesn’t have to be your friend for you to block them. A blocked user won’t be able to find you in search results and — no matter your privacy settings — won’t be able to see your Snapchat Stories.
You may have noticed how some of your friends have emoji(s) next to them. This is Snapchat’s way of giving you a little more information about your friends. For example, an emoji with sunglasses means you and your friend have a friend in common. You can look at Snapchat’s full list of friend emojis for more.
How to see your Trophy Case
Snapchat loves it when you use Snapchat. To encourage you to keep using the app, it recently introduced the Trophy Case. To smile proudly at your trophies, just tap the trophy icon at the top of the menu.
It’s a lot like those achievement badges in video games and in Apple’s Activity app. As you use Snapchat, trying out different features and racking up loads of snaps, you’ll unlock more trophies. I clearly need to work on my Snapchat game.
How to change your settings
You can access the settings menu by tapping the gear icon in the upper right corner of the menu screen. There are quite a few settings you can adjust, so we’ll focus on the less-than-obvious settings.
My account: You can change your name, Snapchat username, phone number, email, and password. You can also set up two-factor authentication, toggle notification sounds and set up Snapcash. Snapcash lets you send money through Snapchat.
Additional services: Use this section to toggle filters (no more moody, black and white photos), enable travel mode (it cuts back on using your mobile data), edit friend emojis, and adjust Snapchat’s permission to access different services (location, microphone, photos, etc.).
Who can…: These are your privacy settings. Tapping either of these settings lets you choose who can send you snaps and who can view your Snapchat Stories.
More information: All the corporate speak you could ever desire. Well, aside from the Support section — Support gives you loads of info on how to use Snapchat. (Hint: You don’t really need to read that section. That’s why you read this, remember?)
Account actions: Use this section to erase conversations (in the Feed screen), manage users you’ve blocked, and log out of the app.
We may earn a commission for purchases using our links. Learn more.
One iPhone 14 model could be in short supply at launch, here’s why
At least one iPhone 14 model is behind its production schedule and could be in short supply at launch, according to a new report from Apple’s supply chain.
Music MiniPlayer brings some 2007 iTunes nostalgia to your modern Mac
Fans of the classic iTunes Mini Player are in for a treat because someone came to our rescue and brought it to the Music app on modern macOS.
Apple begins notifying the winners of its WWDC22 Swift Student Challenge
Apple has begun to email winners of its WWDC22 Swift Student Challenge, with some taking to Twitter to share the news of their success.
Catch up with the latest Apple TV+ shows with the best streaming devices
Binge watch the latest season of Ted Lasso and so much more with the best streaming devices that support the Apple TV app.
Sometimes, the simplest changes can have massive impacts. In a Wall Street Journal column (paywall), Joanna Stern outlined a number of ways that consumers can keep their mobile data usage under control to avoid paying expensive overage fees for additional data. Her tips included making sure to turn off auto-playing videos on Facebook and using different browsers to watch videos.
But one feature struck out a simple fix to save on data that blew my mind: There’s a setting in Snapchat called “Travel Mode” that ensures snaps and stories don’t load in the background before you’re ready to watch them. Stern said she used 2 GB on Snapchat last month alone; my own casual snapping gobbled up 2.4 GB of data last month.
Turn on the Travel Mode setting, which is off by default, and snaps will only load when you tap on them, saving data in the process, as long as you’re fine with having to wait a few moments to check your snaps every time you open the app. To access the setting, you’ll have to make your way through Snapchat’s rather confusing interface.
Here’s how to find it:
- Open the app and pull down on the home screen.
- Tap on the settings gear icon in the top-right corner.
- Scroll down to “Additional Services” and tap on “Manage.”
- Tap the “Travel Mode” button, so the slider turns green.
That’s it. While you’re in that menu, you can also find out what the emoji that randomly appear next to your friends name mean and what permissions you’ve given the Snapchat app. The “Additional Services” menu is a real learning experience.
When you screenshot a Snap, the poster is notified that you took a screenshot. However, if you want to take a screenshot on Snapchat without informing the other party, here are three workarounds to do just that.
1. Use Airplane Mode and then delete the app
For a long time, you could load a Snap, put your iPhone in Airplane Mode, take a screenshot, and turn off Airplane Mode. Doing this didn’t notify the other Snapchat user that you took a screenshot of their Snap.
You could also take a screenshot in Airplane Mode, force close the Snapchat app, turn off Airplane Mode, and the other party was not informed that you took a screenshot.
Yet another hack involved taking a screenshot in Airplane Mode and then going to Snapchat settings and clearing its app cache.
However, all these methods to secretly take a screenshot no longer work in recent versions of Snapchat. So, now your only option is to delete the Snapchat app after taking a screenshot!
Here’s how to take a screenshot on Snapchat without the other person knowing:
1) Open Snapchat and go to the Snap you want to grab a screenshot of.
2) Turn on Airplane Mode on your iPhone.
3) Touch anywhere outside the Control Center to close it and return to Snapchat.
4) Take a screenshot of the Snaps in question.
5) Close Snapchat and return to the Home Screen.
6) Press the Snapchat app icon and tap Remove App > Delete App > Delete.
You have successfully taken a screenshot without informing the other person.
Next, restart your iPhone, turn off Airplane Mode, and re-download Snapchat from the App Store.
This is a really unpractical way of screenshoting a snap, but it works.
2. Take a screenshot of Snapchat on iPhone using your Mac
Your iPhone has a built-in screen recorder. But just like screenshots, when you make a screen recording on iPhone, it will inform the other Snapchat user.
However, if you have a Mac, you can use QuickTime to see the contents on your iPhone screen and then take a screenshot. This is probably the best way to screenshot Snapchat without sending a notification.
We have a tutorial that shows you how to use your Mac to record your iPhone screen. But to make things easier, here’s a summary:
2) Once you’re all set to start the iPhone screen’s recording on Mac, open Snapchat on your iPhone. You’ll see the Snapchat app screen on your Mac.
3) Now, you can start the recording on Mac. This will create a video of everything happening on your iPhone screen, including recording the Snaps inside Snapchat. Or, a better way is that instead of video recording the screen, you can take a screenshot on Mac of this QuickTime Player window (that shows your iPhone’s Snapchat).
3. Use another device to take a picture of the Snap
I’m sure you already knew this, but still, here’s a reminder.
You can open the Snap on your iPhone and then use a different phone or camera to take a picture of this Snap. If you like, here are some of the best iPhone camera and photography tips to help you take a good picture.
Jailbreak tweaks to take Snapchat screenshots without notifying
If you would prefer to avoid the App Store and use a jailbreak tweak instead, you’re in luck. Snapchat Log is a free package on Cydia in the BigBoss repository that records all of your sent and received Snaps on Snapchat. The other person is never notified of this behavior, and you can store as many old Snaps as desired. Snapchat Log is integrated directly into Snapchat with a button to open it, accessible by tapping the settings icon in the top-right corner.
As suggested by our readers, Phantom for Snapchat is also a great jailbreak tweak for gaining fine-tuned control over Snapchat. The tweak integrates directly within Snapchat to provide several features, including the ability to permanently keep Snaps, disable the hold gesture for keeping Snaps open, automatically save sent photos and videos, select multiple contacts at once, type unlimited text for captions, crop images, and more. Phantom is free on Cydia in the BigBoss repo.
There are other jailbreak tweaks that allow you to take screenshots without sending notifications but also offer tons of additional features that remove any limitation from Snapchat. Such jailbreak tweaks include Snap + for Snapchat and GhostPrefs.
Earlier, you could also use iOS apps like Sneakaboo, Snapkeep, SnapBox, SnapSpy, and KeepSnap to save a Snap without informing the other party. However, most of these apps are no longer updated or work.
Since it was created in 2011, Snapchat has remained firmly in the upper echelons of the social media hierarchy, boasting millions of users. While it’s safe to say that the little yellow ghost icon has us well and truly addicted, maintaining that snapstreak or keeping track of who’s who in the zoo on Snapmaps can take its toll on your mobile data. If you’re worried about your snapchatting habits burning a hole in your internet quota, we take a look at Snapchat’s data usage, as well as some tips for keeping on top of it.
How much data does one hour of Snapchat use?
Snapchat has not publicly released any figures relating to the app’s data usage, but online estimates indicate that the app uses around 1MB per single snapchat. However, this is estimated for a simple image without any filters, so snaps with filters and videos are likely to use more data.
How do I reduce my Snapchat data usage?
If you’re looking to reduce the amount of data the app uses, Snapchat recommends turning on Data Saver mode. To enable Data Saver mode, otherwise known as ‘Travel Mode’, you can just tap on the Snap and Stories that you would like to load without the app loading other images and videos in the background. Data Saver can be set for three days, one week or Until Turned Off.
For iOS, you can turn your Data Saver mode on or off by tapping the ‘Settings’ icon in the top right hand of the Snapchat profile screen. Select ‘Manage’ under ‘Additional Services’ and use the toggle to switch Data Saver on or off.
For Android, you can turn Data Saver on and off by tapping the ‘Settings’ icon in the Profile screen of your Snapchat app. Once you’re in Settings, scroll down to select Data Saver where you can toggle it on or off.
How can I check the data usage of Snapchat?
You can check how much mobile data the Snapchat app is using on your iPhone by selecting ‘Mobile’ in the Settings App. When you scroll down, you will see the name of each app and a number underneath, which indicates exactly how much data the app is using. You can turn off Snapchat’s mobile data usage completely by switching the toggle off.
To check the mobile data usage on your Android, select ‘Network & Internet’ then ‘Data Usage’ in the phone’s Settings app. Under ‘Mobile’, you should see the total data you use, while ‘Mobile Data Usage’ gives you a breakdown of how much data each app uses below the graph.
Does Snapchat use mobile data when connected to Wi-Fi?
When you’re connected to Wi-Fi, Snapchat should not use your mobile data. However, if your Wi-Fi connection is not strong enough for what you’re doing, then your phone may use Wi-Fi Assist for iOS or Smart Network Switch if you use an Android device. If Wi-Fi Assist is enabled on your phone, your phone automatically activates your mobile network when your W-Fi connection isn’t strong enough, meaning that Snapchat continues to use mobile data even when you are connected to Wi-Fi.
For iOS, Wi-Fi Assist is on by default, although you can disable it under ‘Mobile Data’ in your Settings app. Scroll down and toggle the Wi-Fi Assist to turn it on or off. For Android, Smart Network Switch is off by default, however you can turn it on or off in your Settings app under ‘Wi-Fi’. Tap ‘More’ and then ‘Smart Network Switch’, and you should be able to select on or off, depending on your preference.
Can you use Snapchat without mobile data?
The Snapchat app requires an internet connection to send and receive Snaps, view Stories and view Snapmaps. However, you can open Snaps without an internet connection, provided they have been previously downloaded on an internet connection beforehand.
What’s the deal with Snapchat and data usage?
Snapchat’s reign in the world of social media shows no signs of slowing down, especially with regular updates and the introduction of maps, shared stories and a range of interactive lenses and geo-filters. These popular additions, while great for the overall Snapchat experience, could be contributing to a larger phone bill. Fortunately, enabling Snapchat’s Data Saver mode helps to minimise the amount of mobile data it uses while you’re not using it, or you can always opt for an unlimited data plan if you’re big on your Snapchat News.
Learn about this battery-saving mode on your iPhone
:max_bytes(150000):strip_icc()/12841361_10209271221163851_7646258224836810742_o-eea383addacb4b23b5275de98e30f761.jpg "How to save data in snapchat with travel mode")
:max_bytes(150000):strip_icc()/WorkBadgePhoto-61c0b98ef5a74e4a85851a8f706dbd65.jpg "How to save data in snapchat with travel mode")
- Tweet
- Share
- Tweet
- Share
What to Know
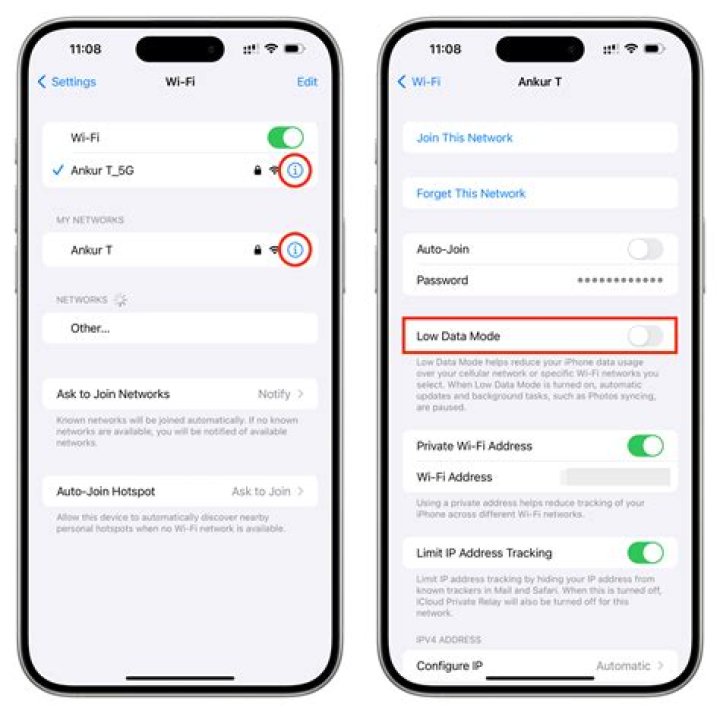
- To enable Smart Data mode: Settings >Cellular >Cellular Data Options >Voice & Data.
- You can also turn 5G off entirely by selecting LTE instead of 5G Auto.
This guide will showcase how to use Smart Data mode and discuss precisely what Smart Data mode is and how it works.
How Do I Turn On Smart Data Mode on My iPhone 13?
Turning on Smart Data can help save battery life and also cut down on the amount of 5G data you’re using if you don’t want to use it all the time. Follow the steps outlined below to turn on Smart Data mode.
Open the Settings application on your iPhone.
Tap Cellular to navigate to the Cellular options menu.
Select Cellular Data Options.
Tap Voice & Data.
Choose 5G Auto to enable Smart Data mode.
What Is Smart Data Mode on iPhone 13?
Smart Data mode was introduced on the iPhone 12 to help with concerns that battery life was shorter when running 5G data connections. Apple created Smart Data mode to help your phone decide when to use 5G data or when LTE data was enough to take care of the things you’re doing.
When Smart Data mode is on, your iPhone 13 will essentially turn 5G off and on as it is needed. For example, if your phone is in sleep mode and you aren’t downloading anything, it would turn 5G off to help conserve battery life. However, if you opened your phone and began downloading a movie, app, or TV show, it might turn 5G on to help speed up the download process. Your iPhone might also use 5G when the display is off, but you’re downloading something in the background.
How to Disable Smart Data Mode
While Smart Data can help save battery, if you live in an area where 5G isn’t readily available just yet—or you just want to use 5G all the time—you can always make use of the other modes that your iPhone has to offer.
Open the Settings application on your iPhone 13.
Navigate to the Cellular settings menu.
Press Cellular Data Options.
Tap Voice & Data.
If you want 5G on all the time, select the option for 5G. If you wish to disable 5G altogether, select LTE.
If you used Lost Mode to prevent someone from using your device but recovered it, you don’t need to connect to the network. You can disable Lost Mode by entering your passcode on the device. Alternatively, you can turn off Find My Phone from any computer. Go to iCloud and select Find My iPhone > All Devices > device in Lost Mode > Lost Mode > Stop Lost Mode > Stop Lost Mode.
You can restore your iPhone from a backup. Confirm that you have a usable backup stored in iCloud. Go to Settings > General > Reset > Erase All Content and Settings > Erase Now > Enter passcode > follow prompts to erase and when the phone restarts, sign in to iCloud, select Restore, and follow the on-screen instructions. To restore an iPhone backup from iTunes on a computer, open iTunes on the computer, connect the iPhone to the computer, select the iPhone icon on iTunes, choose Restore Backup, select the backup, and click Restore.
Mobile data is expensive and it’s also inconvenient to run out halfway through the month. Here are some ideas from Alcatel about how you can use your data more efficiently on your Android device, saving you money without compromising on your experience with your smartphone and your social networking apps:
Data saving tips for Facebook
Stop videos from playing automatically in your news feed: Go into app settings in the Facebook app and change the auto-play settings from On to Wi-Fi only or Off.
Use the Facebook Lite app: Find a WiFi zone, and download Facebook Lite, a streamlined version of the Facebook app that offers a more data-efficient Facebook experience.
Data saving tips for Snapchat
Travel mode: Enable the ‘travel mode’ option in the app’s ‘manage preferences’ menu and Snapchat will use much less mobile data in the background.
Data saving tips for WhatsApp
Enable low data usage: Activate the low data usage option in settings to use less data, but be mindful that the quality of your data calls might be lower.
Don’t download heavy media automatically: In settings, you can configure WhatsApp to download multimedia files automatically only when you’re connected to Wi-Fi. So when you receive a large video or enhanced image, you can wait until you are within a WiFi zone to choose to download it.
Data saving tips for Instagram
Use less data setting: From the settings, open the cellular data use panel and enable the ‘use less data’ toggle switch – this allows you to still enjoy your Instagram experience but for less.
Download areas and navigate offline
You can select and save an area from Google Maps to your phone or tablet when in a WiFi zone and use it when you’re offline. On your Android phone or tablet, open the Google Maps app, use the drop down menu to select Offline Maps, and select your area to download and select save.
Download one of these apps to track your data usage
It’s always handy to be able to keep an eye on your data usage so you know how much data is being used on your smartphone and more specifically, by which app. These Data Usage Monitor Apps below assist you in knowing where your data goes to.
Data Usage Monitor: Helps you measure and manage your data usage, and alerts you when you’re going above your limits. Get it here: Data Usage Monitor
My Data Manager: Track how much data you use and get alerts before you run out of data or get charged unnecessary out of bundle fees. Get it here: My Data Manager
Source: iMore
When Snapchat first started, one of its biggest selling features was that no matter what snaps you sent out — scandalous, saucy, sexy, silly, stupid, or otherwise — recipients would not be able to screenshot or store your snap without your knowledge.
Quite literally since the first day the app launched, there have been people trying to get around Snapchat’s anti-screenshot feature any way they can, and they’re absolutely not alone. It seems like almost everyone is asking the same question: How the hell can I screenshot on Snapchat without being detected (and then looking like a total creep)?
Here are a few ways that you may be able to get away with questionable-quality screenshots in Snapchat without being detected (note the may in that sentence) and one sure-fire way to screenshot in super-secret.
Just use another phone
If you’re really desperate to capture and preserve someone else’s snap, pick up your tablet or your friend’s phone to capture the snap-tastic footage.
Don’t bother taking pictures, but, rather, record a video of the snap. Be sure to start recording before you tap on the snap to open it so you catch the whole thing.
When you “screenshot” Snapchats this way, your quality isn’t going to be great. It all depends on whether you can keep your hands steady enough to capture decent footage, and the quality of the phone’s camera you’re using to record the snap.
Delay the screenshot notification
Simply load up Snapchat, go to the snap you want to open and make sure it loads completely (you can tell a snap is loading if the icon beside a name isn’t a solid square, but more like a little swirl). Turn off your WiFi, your Bluetooth, your cellular data and everything else that keeps your phone connected, and then turn on Airplane Mode. Then, go back to that snap, tap on it, and take your screenshots.
The next part is cucial if you don’t want to be caught screenshotting: immediately after taking your screenshots, you want to reboot your iPhone. Here’s how:
- Quickly click and release the Volume Up button.
- Quickly click and release the Volume Down button.
- Press and hold the Side button (sleep/wake, on/off).
- Keep holding down the Side button, even after the Shut Down screen shows up.
The Snapchat you took screenshots of should have reloaded back to normal as if you had never opened it in the first place.
If you don’t reboot your iPhone and just turn it off instead, this technique just delays the screenshot notification that the other person would receive. The person who’s been screenshotted shouldn’t receive a pop-up notification that someone’s screenshotted their snap, and shouldn’t see Snapchat’s screenshot indicator (a double-arrow icon) for a few minutes.
To be fair, if the person you’re screenshotting is super unobservant, then you could probably get away with screenshotting their snaps! But beware – they may figure out later down the line what you’ve done.
How do you #SecretSnapchatScreenshot?
Is there a technique you’ve used for secret Snapchat screenshots that works like a charm? Let us know your pro tips for creepin’ and we’ll be sure to try them out!
Updated May 2020: These are still the best ways to screenshot snaps without being detected.. Have any suggestions? Comment down below!
Buy the cutest case for the cutest iPhone, the 13 mini!
The iPhone 13 mini is a pretty sweet phone. How about an adorable little case to match?
Nintendo recap: Stock controversy and Zelda port rumors
This week we got some bad news for a game’s collector’s edition and also learned of controversy surrounding a purchase of Nintendo stock. Plus, Zelda rumors continue to fly.
How to use Apple’s Accessibility Assistant shortcut
Apple released new versions of their Accessibility Assistant shortcut for Mac and Apple Watch, joining the iPhone & iPad version. We cover how the shortcut works, plus provide links to the Accessibility shortcuts available in the Gallery.
Catch up with the latest Apple TV+ shows with the best streaming devices
Binge watch the latest season of Ted Lasso and so much more with the best streaming devices that support the Apple TV app.
How much data does Snapchat use on an iPhone is an important question to answer if you have a limited data plan. If you often enjoy using Snapchat filters, posting stories, and sharing snaps with friends, you may find yourself wondering, “Does Snapchat use data? And if it does, how much data does Snapchat use?” Remember, if you’re sending photos, videos, and text messages or sharing your location over Wi-Fi, there’s no reason to be concerned over Snapchat data usage. But if you are doing these things using cellular data, you may be wondering how to limit Snapchat data usage. Let’s jump in: Here’s how to find out the answer to the question how much data does Snapchat use on your iPhone and what to do about it.
We all love Snapchat’s filters. But when it comes to cellular data, Snapchat data usage can be surprisingly high. If you’re a heavy Snapchat user, you’ll want to be aware of just how much Snapchat data usage you’re racking up. You might also want to set limitations on how much data Snapchat uses, which we’ll show you how to implement below.
Table of Contents:
How Much Data Does Snapchat Use?
How much data Snapchat depends on which features you’re using. If you have a limit on your cellular data plan, it’s important to know how much data Snapchat uses. But Snapchat has chosen not to share any data usage information. Anecdotally we know that unless you are very careful to limit your Snapchat data usage, you can inadvertantly use many gigabytes of data in almost no time. For example:
- I recently downloaded Snapchat, exchanged about 10 text messages and about 3 images in the course of an hour over Wi-Fi and never used the app again. Two weeks later when I checked my data usage, I saw Snapchat had used over half a gigabyte of data!
- Another team member’s child went on vacation and used Snapchat with abandon. By the time their parents had caught on at the end of the week, the child had used over 10 GB of data!
How to Check Your YouTube Data Usage
As you can see, keeping an eye on Snapchat data usage is important. You might be using way more data using Snapchat than you realize. Luckily, you can check how much data the Snapchat app is using. On your iPhone:
- Open the Settings app.
- Tap Cellular.
- Scroll down and locate Snapchat.
- Just below the word Snapchat, you’ll see a number. The screenshot example below shows Snapchat has used 663 MB of data on my iPhone.
- If you want to make sure Snapchat never uses Cellular data, toggle it off.
How to Limit Snapchat Data Usage
Not everyone wants to limit their Snapchat use to Wi-Fi. Fortunately, here are iPhone and Snapchat settings that when used will allow you to limit the amount of data Snapchat uses when you’re not using Wi-Fi.
To limit Snapchat data usage in your iPhone Settings app, you can disable Snapchats ability to use data by constantly updating in the background:
- Open the iPhone Settings app.
- Tap > General > Background App Refresh.
- Now you have two choices: You can toggle Background App Refresh off for just the Snapchat app or you can tap Background App Refresh again and select Off if you don’t want any apps to refresh in the background or Wi-Fi if you want all your apps to refresh only over Wi-Fi.
You can also limit Snapchat data usage by enabling Travel Mode to limit app refresh in the Snapchat app’s own settings:
Snapchat recently updated their Android and iPhone apps with a new feature called Snap Map which lets you share your current location with other Snapchatters, as well as see their current locations. It may sound like an interesting new feature, but sharing your exact location with all of your Snapchat followers is dangerous, to say the least. Luckily, it’s easy to turn this feature off.
If you’re still not sure what Snap Map is, you can watch Snap’s video below to see how it works or check out our article on the subject. Basically, if your Snapchat friends are sharing their locations with you, their “Actionmojis” will show up on the Map.
The good thing about this is that an Actionmoji won’t update a friend’s location on the Map unless that user has the Snapchat app actually open, so you can’t follow Snapchatters around when they’re not Snapchatting.
However, if you’ve given Snap Map access to your location, just opening the Snapchat app will allow your exact spot on the map to appear. If you use Snapchat frequently, this is a great way for your Snapchat followers with stalker tendencies to follow you around in the real world.
Even worse, think about how this affects children that Snapchat and don’t know any better. Would you want random strangers knowing where your kids are at all times? I didn’t think so.
That’s why Snapchat included something called “Ghost Mode” in Snap Map. By enabling Ghost Mode, you’re limiting your location on the map to be seen by only you and nobody else. You’ll still be able to access the Snap Map and see the location of your Snapchat friends if they have Ghost Mode turned off.
Method 1: Turn Ghost Mode On During the Initial Prompt
After updating to the newest version of Snapchat (version 10.11.0.0) that includes the Snap Map feature, just pinch generously on the camera screen to access the Snap Map. Since this is your first time accessing it, you’ll be prompted to choose your preferences. If you haven’t already given Snapchat access to your location data, you’ll be prompted to do so before continuing.
Just hit “Next” until you see the choice for who can see your location on the Snap Map. Select “Only Me (Ghost Mode)” and hit “Next,” then “Finish” to finalize it.
If you don’t want to share your location with all of your friends, but don’t mind if your very best friends or family members know your location, you can instead choose “Select Friends” to pick and choose exactly which friends can see where you are. If you decide to turn on Ghost Mode again later, this list will remain intact for later.
Method 2: Turn Ghost Mode On in the Snap Map
If you opted into location sharing on the initial options page after updating, but don’t want to anymore, you can still change your preferences. Just pinch the camera screen to enter the Snap Map. From there, hit the cog icon in the top right and toggle on “Ghost Mode” so friends can’t see your location. It will remove your last known location on the map and prevent it from showing up at all anymore.
Again, if you don’t want to share your location with all of your friends, but would like a few to have access, you can toggle off “Ghost Mode” and instead choose “Select Friends” to pick and choose exactly which friends can see where you are. This list will remain available if you decide to turn on Ghost Mode, so you won’t have to start from scratch later.
Method 3: Turn Ghost Mode On in Snapchat’s Settings
The final way to edit your Snap Map preferences is by heading to the settings inside of Snapchat. Hit the Ghostface Chillah icon in the top left (or your personalized Bitmoji icon), then tap on the cog icon in the top right on your information page. From there, scroll down to “See My Location” and tap on that. On the next page, simply toggle “Ghost Mode” on.
And yet again, you can toggle off “Ghost Mode” and choose “Select Friends” instead to give only a few of your Snapchat followers access to your exact location, should you want to. For the last time, this list will remain filled out if you toggle Ghost Mode on again, so you won’t have to pick your friends again next time.
Method 4: Just Turn Off Location Access Period
If you don’t want Snapchat to have access to your location data at all, you can simply turn it off. However, this will also prevent you from using geo filters, discover stories around you, and other content. You also won’t be able to view the Snap Map at all. So we recommend using one of the above options if you’re only worried about your location on Snap Map.
To turn off location sharing for Snapchat on an iPhone, go to Settings –> Snapchat –> Location and switch it from “While Using the App” to “Never.”
On an Android device, find the “Apps” menu in your Settings, then select Snapchat from the list. On the app’s info page, select “Permissions” and toggle off “Location.”
Keep Your Connection Secure Without a Monthly Bill. Get a lifetime subscription to VPN Unlimited for all your devices with a one-time purchase from the new Gadget Hacks Shop, and watch Hulu or Netflix without regional restrictions, increase security when browsing on public networks, and more.
Everyone loves sharing pictures and quick video clips with Snapchat, but while the service itself is tons of fun, the Android app is one of the worst on the market. For one, Snapchat takes terrible photos even on high-end Android phones. And to make matters worse, the app is a notorious data-sucking battery drainer.
Since Snapchat bans folks for using third-party apps like Casper, you might think you’re just stuck with the battery drain and excessive mobile data usage. Luckily, though, there’s a couple of hidden settings you can use to drastically reduce Snapchat’s battery usage and mobile data consumption.
Step 1: Enable Data Saver
To make Snapchat stop using so much mobile data, open the app, then swipe down to access the main menu. From here, tap the gear icon, then scroll down a bit and select “Manage” under Additional Services. Finally, enable the “Data Saver” option and choose whether you want the feature to stay enabled for three days, a week, or until you turn it off. For best results, we recommend choosing “Until turned off” here.
Enabling Data Saver ensures that Snapchat won’t continuously preload Snaps and Stories in the background. In other words, before you enabled this setting, the Snapchat app was eating through your mobile data when you weren’t even using it.
Step 2: Disable Location Permission to Save Battery
The main reason that Snapchat is such a battery hog is that the app constantly checks for location updates in the background, which keeps your phone awake more often than it should be. You can remedy this issue rather easily, but in order to do so, you’ll need to be running Android Marshmallow or higher.
If you meet that requirement, head to the Apps menu in Android’s Settings. From here, scroll through the list and select Snapchat, then choose “Permissions” on the following screen. Finally, disable the “Location” option, then confirm your choice on the popup. From now on, Snapchat won’t be able to scan for your location, so your phone’s processor (and battery) should finally get the rest it needs.
This battery-saving setting has the side effect of disabling geofilters in Snapchat, so that’s something worth considering. However, if you absolutely must use geofilters, you can temporarily reenable the location permission, then turn it back off when you’re ready to start saving battery again.
Keep Your Connection Secure Without a Monthly Bill. Get a lifetime subscription to VPN Unlimited for all your devices with a one-time purchase from the new Gadget Hacks Shop, and watch Hulu or Netflix without regional restrictions, increase security when browsing on public networks, and more.
It’s summertime and wanderlust is coming for us all. It’s important that you get out there and see the world, but it’s equally important that your phone is as ready for your travels as you are. After you’ve thrown a dart on the map and purchased your plane ticket, try these tips to make sure yo u’re not burning through your smartphone’s battery—or data plan— while away.
Minimize battery-draining features in advance
What good is a phone you can’t use? Making sure your handset is always charged up is the name of the game, especially when traveling. By now you probably know that portable battery chargers are great for giving your device extra juice on the go, but there are other ways to prevent your phone from depleting its energy in the first place.
PSA: Quitting Apps on Your iPhone Will Not Improve Battery Life
For whatever reason, people love to quit apps on their iPhone in hopes of improving battery life.…
Don’t wait until your phone pops up a warning to turn on low power mode. Instead, flip it on from the start . On iPhone , open the Settings app and navigate to the Battery section. Switch on the second option to put your phone in its energy conservation mode. On Android , you can swipe down from the top of your screen and tap Battery Saver for the same effect.
Microsoft Office Professional 2021 Lifetime License + Finance Courses From Chris Haroun
Dollars and business sense
This invaluable combo will net you Word, Excel, Powerpoint, Teams, OneNote, Access, access to finance courses, and more.
Take things a step further by tweaking which apps can download data even when they’re not active . On an iOS device, open up the Settings app and head to General > Background App Refresh . Here is where you can see which apps fetch information when you’re not actively using them . Switch off the apps that you barely use, or apps that you don’t mind updating only when you actually open them.
On Android, make sure you’re running Android 8.0 Oreo, at minimum, which places more limitations on what apps can do in the background .
Both iOS and Android let you control your notifications to a granular degree. Remove certain notifications from the lock screen and change them to sound only so your phone won’t feel the need to unnecessarily turn on the screen when someone goes live on Instagram, for example.
Use less data on the go
Free wifi is your friend. But if there aren’t any nearby networks, t here’s a good chance your favorite apps have a travel mode that eats up less data when you’re using your data plan . Futz with these settings before you head out and you’ll get to reap the savings of low data usage even after your trip.
For e xa mple, n ot every video in your Facebook News Feed deserves your data. In the app, t ap the hamburger menu in the bottom- right corner, and then scroll down to “Settings & Privacy.” Tap “Settings, ” scroll down to “Videos and Photos, ” and tap “Autoplay” to address when Facebook automatically downloads and plays videos. Select “On Wi-Fi Connections Only” to prevent autoplay videos from eating up your cellular data.
Instagram, Twitter and Snapchat also have similar options to prevent videos from auto-downloading while you’re on cellular data. In Instagram, tap the bottom- right profile icon, then the gear icon next to “Edit Profile.” Tap on “Cellular Data Use” and then switch “Use Less Data” to the on position.
In the Twitter app, head to settings by tapping your profile icon and then Settings and privacy. Hit Data Usage and make sure Video autoplay is set to “Only on Wi-Fi.”
In Snapchat, tap the top left Bitmoji icon and the hit the gear in the top right. Under “Additional Services” hit “Manage” and then set “Travel Mode” to “On.”
Along with social media, regular media apps like Netflix and Spotify offer options to download videos and playlists in advance to save even more of your data. But you already knew that.
Save data (and battery) without sacrificing navigation
Not all who wander are lost, but you might be. Get ahead of any accidental detours by making use of Google Maps’ offline mode. Open Google Maps and click the top- left hamburger menu, then “Offline Maps” and then “Local” or “Custom map” to get started. You’ll be able to either download the area around you or choose how big a map you want to save on your device.
In addition to Google’s offering, keep apps like Moovit and Transit close by, as they’ll help you get around unfamiliar cities. Or use an app like Topo Maps when you’re away from the city on a hike. Wherever you’re passing through, make sure you also don’t get lost navigating the language, too — Google’s Translate app will keep you conversing and, you guessed it, has offline mode .
:max_bytes(150000):strip_icc()/JillianDaraheadshot-21861f1c59dc4c73ae670d442b12b705.JPG "How to save data in snapchat with travel mode")
- Share
- Pin
Afraid to let your family members use their cell phones overseas? Anytime you leave the country on a family vacation or a cruise, your next cell phone bill has the potential to be astronomical. An international trip doesn’t have to break your budget when it comes to your cell phone.
Before You Go, Talk to Your Provider
First things first. Depending on where you’re traveling, your wireless provider may offer an international plan that is affordable for your destination. If you’re only spending a few days in Canada or Mexico, for example, it may only cost you a handful of dollars to switch to a different plan temporarily. On the other hand, if you do nothing and simply cross the border, you could end up spending hundreds or thousands of dollars.
For example, Verizon’s TravelPass and AT&T’s Passport plans both let you use your phone as you would at home for a small surcharge when traveling to Canada, Mexico, and hundreds of other regions.
If your cell phone company does not provide an international plan, consider upgrading temporarily to a plan that gives you more data. You can verify coverage in your destination country and estimate how much data you will need by using tools such as Verizon’s International Trip Planner or AT&T’s International Travel Guide.
Aside from choosing an alternative plan, there are a number of steps you can take to stop or cut back on how much cellular data you use when you are out of the country. Avoiding massive data overages is the key to keeping costs under control.
Turn off Roaming
In order to stop cellular data use, you should turn off roaming. To do this, go to your settings, and look for roaming options. Set it to “Roaming Off.” This is essentially the nuclear option and shuts off your cellular data entirely when you’re out of the country. If you choose this option, you’ll still be able to get phone calls and texts whenever you’re logged into a Wi-Fi network or hotspot. But your phone will not send or receive data on networks such as 3G, 4G, or LTE.
If you have kids who are old enough for a phone but young enough that you can’t trust them to stay off YouTube and Instagram while you’re away, this may be the best bet.
Set Email to Fetch
This feature is only on iPhones. It turns off automatic downloads of new emails and lets you manually download your email when connected to a Wi-Fi network or hotspot, which is much cheaper. The best scenario is if you can live without email altogether, then turn off both “Push” and “Fetch.” On an iPhone, in “Settings,” go to “Mail, Contacts, Calendars” and toggle off your settings for “Push” and “Fetch New Data.”
Shut Down Non-Vital Apps
This lets your phone download data only for the apps you want to use without having all your other apps also using up data. The fewer apps you leave turned on, the less risk of racking up hundreds of dollars in roaming charges. On an iPhone, in “Settings,” go to “Cellular,” then toggle off any individual apps you will not need on your trip. On an Android phone, go to “Apps,” pick your app and tap “Disable.”
Deactivate Texting
By deactivating texting, this stops texts from being billed as data when you’re away. When you’re outside the country, iMessage and other calling and messaging apps are treated as pricey data rather than as text messages.
If you have an iPhone, go to “Settings,” go to “Messages” and deactivate your messaging app (such as iMessage), along with MMS Messaging, and Group Messaging. If you have an Android phone, turn the phone on airplane mode and leave it that way for the entirety of your trip.
Before you leave for your trip, if there are some people that you need to stay connected to, then agree to download an app like FireChat, which allows for live communication within a group even without an Internet connection or cellular network. When you get back home, simply reactivate your texting settings.
Check Your Usage
You should track your usage within the current billing period. As you leave the country, on an iPhone, click on “Reset Statistics” to reset your data usage tracker so you can see your usage for that specific trip. As your usage approaches your max for the month, consider turning off roaming. On an Android, you can set an alert to notify you if your data reaches a certain level.
Do Not Stream
Let family members know that streaming video and movies are banned on your trip. Instead, have everyone download content before leaving the U.S. This allows you to avoid streaming content, which is extremely data intensive and will make your bill exorbitant.
Get a Temporary International Phone
Signing up for international roaming plans and data plans aren’t the only options. If you think you will need to make a lot of calls and will use the phone extensively, then you may want to consider purchasing a specialized international phone for traveling. These international cell phones often come with reduced data and international roaming rates.
Updated on December 17, 2021
Do you ever wonder if someone checks on Snapchat and gets to know about your location.? Privacy is always questionable when it comes to social media. It’s understandable people who know you or are in your contact/friends list knowing about your daily updates. However, the problem arises when undesirable elements stalk you down. Someone checking out your profile for once is fine. But if the same person checks upon you now and then, it indicates that the person is a stalker. We do read about numerous accounts of social media stalkers.
Though in recent times social media platforms are taking the privacy concerns of their users seriously. Speaking of which notable app Snapchat has this feature Snap Map. Enabling this feature shares your location with your Snapchat friends. If someone is too concerned about privacy, they may entirely keep this feature disabled. However, those who have this feature running may wonder if they can detect who views their Snap Map location. In this guide, we will talk in detail about this. Let’s get started.
Can You Know If Someone Checked Your Location On Snapchat?
The answer to this question is no. You won’t know who checked your location on Snap Map. The app updates your location only when you use the app. You have to set this manually during installing the app. Your location info will automatically remove once you close the app. This is what is ideal and I follow it as well.
Otherwise, you can allow the app to track you all the time which I find a bit undesirable. So, I set the location info to be accessible to Snapchat’s server only when I’m actively using the app.
Along with this, on Snap Map set the Location Sharing only with your Snapchat friends. If anyone in your friend list in Snapchat searches for your location if you have opened Snapchat within the last six hours, they will know about your location. They won’t know anything about your current location if the Snap map is disabled.
Understanding Snap Map
This feature provides the user with enough scope of privacy control. It is up to the users how they set the location information control.
By default, the Ghost Mode is enabled on Snapchat. This means apart from you no one will know about your location.
If you turn this mode off, then you will get the options I have mentioned below for location visibility.
My Friends: Folks in your friend list get to access your location
My Friends Except: You select only a handful of friends who can access your Snap map location. The rest of the people on the list won’t get to know your location.
Snap Story Acts As A Caveat
Even though you may be reclusive about sharing your location, your Snap story may give it up. The snaps you add to any latest story, the location of the snaps can be seen by those who view your story.
The Travel feature Gives Away Snapchat Location
This feature tracks your movement from one location to another. People can again get to see this. However, you do get to know who has seen your latest travel location information.
My Suggestion to Keep your Location on Snapchat Private
It’s just that very simple thing I keep saying to everyone. If you are a privacy concerned person, then tweak the settings accordingly. For example, I am a bit privacy-oriented and I have Ghost Mode enabled on my Snapchat.
Besides, I barely add anyone that I do not know. The same applies to you. If you don’t want unnecessary stalking or breach of privacy, then add only those people whom you know in person in the real life. If you happen to see some potential undesirable elements, block them straight away, no questions asked.
While you can also choose to spoof your location, that according to me is unnecessary. You may use a VPN for that. Otherwise, you can access your Snapchat account from another phone and keep it in one place citing a location. However, at the same time, you can go to some other place using another phone. I know, this sounds haywire and too much of work. So, the best option is to use Ghost Mode if you have too much concern for privacy.
That’s all about if someone could know the location history of a Snapchat user. The answer depends entirely upon what is your privacy requirements and how you have set it on the app. I hope that this guide was informative.
Snapchat has been the most popular multimedia messaging apps in the world. Because all your conversations and files will disappear after a short time in Snapchat app automatically. Recently, Snap released Snap Camera for PC and Mac users. You can use Snapchat desktop camera to add magical lenses and filters to your live streams and video chats in clicks.
More and more people want to get Snapchat on desktop. However, it is still unavailable to download Snapchat for desktop app on your computer. If you really want to use desktop Snapchat, you can follow steps below to achieve the goal.
- Part 1: How to Use Snapchat on Windows and Mac Desktop
- Part 2: Secret and Safe Way to Screen Record on Snapchat without Them Knowing
Part 1: How to Use Snapchat on Windows and Mac Desktop
It is true that there is no desktop Snapchat website. Even though you visit the official snapchat.com website, you cannot get the target result. During this time, you need to emulate Android and run Android apps on your computer. Consequently, you can use Snapchat app on desktop successfully.
Section 1: Download Snapchat to Desktop with Bluestacks
If you really want to use Snapchat on your desktop, you need to install an Android emulator first. Here you can try Bluestacks apk. It allows users to download and use Snapchat desktop filters on Mac and PC.
Step 1 Run Bluestacks emulator app for Android and desktop
Download and install Bluestacks on your Android and computer. During the Bluestacks setup process, you need to link and sync the Bluestacks app to your Google account.
Step 2 Download Snapchat on desktop
Later, you can locate the “My Apps” section. Choose “Install APK” and search for Snapchat apk. You can install Snapchat apk on PC or Mac via Bluestacks directly. After the Snapchat desktop installation, you can see “Snapchat” in the “My Apps” section on your phone as well.
Section 2: Use Snapchat on Desktop Computers
After accessing Snapchat on desktop, you need to log into Snapchat account. You can create a new Snapchat account or enter into the existing Snapchat username based on your need. Be aware that your Windows or Mac computer should have an internal or external camera equipped. Otherwise, you cannot see Snapchat stories on desktop.
Step 1 Add phone contacts to Snapchat
Log into Snapchat desktop account. Snapchat will request to scan your contacts. You can choose “Continue” to locate the “Find your friends” screen. Turn on “Contacts” and choose “Go to Settings” to get all searchable Snapchat friends. Well, you can also choose “Skip” on the top right corner of the window to bypass this step. It is supported to add Snapchat friends via Snapcode or username manually too.
Step 2 View a Snap on desktop
If your friend sends Snaps to you, you can open the message directly. There will be an icon next to the Snaps message. The blue icon means a message of chats. The red icon indicates a Snap without audio. Well, the purple icon shows Snaps with audios. Later, you can click your friend’s name and hold the Snap to view. Remember that you have only one chance to view Snaps on desktop. Once you want to recover snapchat messages or photos, you need third-party tools to help you.
Step 3 Create and send Snaps
Then how to use Snapchat desktop to take a picture or video? Well, you can click the circle “Capture” icon near the bottom to take a picture. If you want to take a video, you can hold the “Capture” button to record a video up to 10 seconds. Moreover, you can choose the “Camera” icon on the top right corner to take a selfie with Snapchat on desktop. Later, you can add caption, doodle, stickers, scissors, paperclip and timer to your Snap. There are also many Snapchat filters you can use. After that, choose “Send to” to send your Snap.
Part 2: Secret and Safe Way to Screen Record on Snapchat without Them Knowing
When you try to save or capture Snaps on your phone, your friend will be notified. If you really want to save a Snapchat video from someone else secretly, you can use Aiseesoft Screen Recorder. The screen recording software can save Snapchats on desktop without getting caught. You can record on Snapchat desktop with drawing tools freely.
- Record Snapchats videos and webcam videos your Windows or Mac computer.
- Record online, streaming and microphone audio from Snapchats desktop.
- Capture Snapchats and save as a picture.
- Edit the recorded video and snapshot.
- Use shortcuts to start or stop Snapchat desktop recording.
By using Snapchat on desktop, you can get larger screen and more programs. Almost all Snapchat features are available. What’s more, it is easier to record Snapchat video on PC and Mac secretly. If you still have any problem about Snapchat desktop, you can feel free to contact us.
What do you think of this post?
- 1
- 2
- 3
- 4
- 5
Rating: 4.5 / 5 (based on 140 ratings)
February 27, 2019 18:41 / Posted by Andrew Miller to App
How to delete Snapchat history easily and permanently? This article gives you the best way to clear all Snapchat history.
How to screenshot on Snapchat? How to screenshot Snapchat without notification?
This article will introduce parents 3 useful Snapchat monitoring apps for iPhone.
How To Make Your Mobile Data Subscription Last Longer – Technology Market – Nairaland
In this post I’ll be showing you how to make your data subscription last longer We all dread getting that notification from our ISP or telco that our data subscription is about to finish and it can be annoying and really disappointing.
Although, I’m pretty sure we can always blame our ISP’s for coming up with different data zapping techniques, especially MTN. Nevertheless here’s a way to keep your data from running out too quickly.
There are 2 ways to do this – Turn off background data or set a data limit within your social media apps.
How To Turn Off Background Data
Go to Settings > Network And Internet > Data Usage >Mobile Data Usage then click on the apps that are using too much data then turn it off
Setting Data Limit On Apps
1.Turn off Facebook Video Auto-play:
Go to your Facebook option icon (the three horizontal bars at the top right corner)
Click on App Settings (Under help & settings)
Click on AutoPlay
Select Never autoplay Videos.
In addition, you can activate the “Data Saver” option
Navigate to the option icon
Then go to settings & Privacy
Select Data Saver,
Toggle the data saver on.
2. WhatsApp – Deactivate Media Auto Download :
Go to the “settings” section in your WhatsApp APP
Click on “Data and Storage Usage”
Select Media Auto Download option
Deselect all options under “When Using Mobile Data”
You can also enable low data usage for WhatsApp Calls
3. Instagram – Reduce Data Usage :
Open Instagram options
Go to Settings
Select Cellular Data Use
Then tick Use Less Data.
4. Twitter – Deactivate Auto Play:
Go to your Twitter Profile icon.
Click on Settings and Privacy
Select Data Usage
Set Video Autoplay to Never
5. Snapchat:
Go to Snapchat Settings
Click on “Manage” under “Additional Services”
Tick the “Travel Mode” box
6. YouTube – Limit mobile data usage:
Open the YouTube App
Tap on the profile icon at the top right corner
Select Settings
Click on General
Turn on “Limit Mobile Data Usage”
7. Playstore – Update Apps on Wi-fi Only:
Go to the Google Play store
Click on Menu & go to Settings
Click on Auto-update apps.
Select “Auto-update apps over Wi-Fi only”.
You also have the .option to choose “Do not auto-update apps
so you use it to see this pictures Anita Joseph Breaks IG With her seductive display
Me I think my own is spiritual. I can’t believe I exhaust 3 gig in 1 week. Whenever I calculate how much I spend on data in a month I’ll begin to wonder if “financial devourer” is not pursuing me according to my pastor.
Money I’m supposed to be chopping and enjoying life I’m donating to Airtel et al
Na instagram twerking videos de finish my data (and vaseline)
Cutezt:
Rubbish, do all these things and still, e go finish.
Most people don’t know this, if they can’t find their data, the next thing is calling customer care,.
Uyi168:
Any #200 for 1/1.2/1.5gb data plan for any network
15 Likes 2 Shares
Uyi168:
Any #200 for 1/1.2/1.5gb data plan for any network
Another thing. download ‘lite’ versions of some apps.
eg. instead of youtube., use Youtube Go. Uses far less data
Look, the surest way to save data is to disable background data and also switch to EDGE from 3G/4G whenever u aint browsing or just want to use whatsapp only. Take note that this will reduce your browsing speeds though. But u’ll be suprised that it saves data soo much.
I also sell cheap network data. Check my siggy.
Reduce mobile data in Android and save money
Understanding and taking control of the way your phone uses mobile data is the best way to save a few bucks on our phone bills. When we’re using our phones away from Wi-Fi, scrolling through our various media feeds, getting directions, streaming music etc, we understand that we’re using mobile data. How our phones use mobile data when we’re not actively looking at the screen, though, can be a bit of a mystery. Taking control and restricting background data in Android is a great way to take the power back and take control of how much mobile data your phone uses.
It’s worth knowing that despite your best efforts, some apps continue to use data in the background even while you don’t have them open. There are many Android apps that, without your knowledge, will go ahead and connect to your cellular network even when the app is closed.
Background data usage can burn through a fair bit of mobile data. The good news is, you can reduce data usage. All you have to do is turn off background data. We’ll show you how to restrict background data on your Android phone and cut any lingering data usage.
When you control your data usage, you’re free to stop overpaying and choose a plan that gives you the data you need. If that’s your goal, Ting Mobile is the perfect carrier.
What is background data?
Basically, background data means that an app is using data even when you’re not actively using the app. Sometimes called background syncing, background data can keep your apps updated with the latest notifications like status updates, Snapchat stories and Tweets.
What uses data on my phone?
Here’s the deal: pretty much any time you’re online and you’re not using Wi-Fi, you’re using mobile data.
Mobile data is different from Wi-Fi. While Wi-Fi is a limited range network and data you use while connected to it won’t count towards your phone bill, mobile data uses the same network as the cell towers that let you make calls. You can use mobile data as long as you have cellular coverage and it counts towards your phone plan’s data use.
Mobile data is reserved for the stuff of the Internet: surfing, social media, email, watching video and more. Check out our complete guide on mobile data to learn more.
What about foreground data?
There are two main types of data usage. Background data and foreground data. Foreground data means you’re actively using data in an app, you’re sending a tweet, you’re watching a Snapchat or you’re streaming a video.
Background data, on the other hand, refers to data that the app uses when you’re not actively doing anything with the app.
Does background app refresh use data?
Apps refresh in the background to regularly check for notifications. This means, when you get an email, message or Tweet, it’s delivered right to your device, whether you’re on Wi-Fi or mobile data. So yes, if you’re not on Wi-Fi, it will use mobile data.
What does restrict background data mean?
It’s pretty simple. Restricting background data means reducing your background data to a bare minimum. When you turn off an app’s ability to run in the background, you get one step closer to cutting your data use altogether and controlling your phone bill.
How to stop apps from running in the background
Now that we’ve answered the question “what is background data,” let’s learn how to use less of it. The Data usage section in Android Settings lets you view the amount of data used by each specific app. If you notice an app using more background mobile data than you’d like it to (Snapchat comes to mind), you can restrict it from accessing the Internet till you’re back in a Wi-Fi covered area. If you’re looking to conserve your bandwidth and lower that monthly phone bill, this feature is definitely worth checking out. Remember, since this will prevent background refreshes, you’ll need to open the app to receive notifications.
Step 1
Open Settings, tap Network and internet, Data usage then App data usage. In Android 11, open Settings, tap Network and internet, Mobile network, Data usage (on some phones) then App data usage.
Step 2
Scroll down to view a list of your Android apps sorted by data usage. Keep an eye out for the heaviest data users.
Step 3
When you see an app whose background data you want to restrict, tap on it and then turn the Background data toggle to the off position.
The usual suspects
Most popular apps will default to running in the background. Background data can be used even when your device is in standby mode (with the screen turned off), as these apps are constantly checking their servers through the Internet for all sorts of updates and notifications.
Make sure to take a look at Spotify, Facebook, Twitter, YouTube, and Snapchat. All these apps can run in the background if you don’t disable their ability to do so.
For more info, check out Google’s Optimize data usage help article and our own article on how to reduce mobile data usage. Looking to save data on your iPhone? Here’s how to control which apps use your cellular data.
Find this tip useful? Have anything to add? Share what you think in the comments below.
Snapchat Update 2021: Snapchat now lets users know who views their explore activity. Here’s more information on the latest updates on the app.
Snapchat update 2021 (Image Source: Shutterstock)
In 2018, Snapchat had introduced a new feature called Map Explore that is essentially an extension or update to the already existing Snap Map. The company stated in their statement that they introduced this tool after noticing that many people like to explore their surroundings on the Snap Map but aren’t sure where to start their journeys. Snap Map has been given various updates since then. Here’s everything you need to know about the latest Snapchat update on Map Explore.
Snapchat Update: What is Explore Activity on Snapchat?
Snapchat Explore Activity is a relatively new feature that makes it easier for users to explore content via Map. For instance, if an event is being held near the user’s location, it will be updated by Snapchat. Similarly, if a user is open to sharing their location and does so, their travel and location updates will also appear on the Snap Map. Various improvements have been initiated ever since, which includes Ghost Mode, My Friends, My Friends except, etc, all of which have been very rewarding till now.
But the newest Snapchat Explore Activity update may just win an accolade for the best or the worst Snapchat update. Word is out that the latest update lets you know when someone checks your explore activity on the Snap Map. Earlier, the app would even notify users when someone tapped on their Bitmoji. But this feature was removed almost as soon as it launched after facing a backlash. That is because users had complained of having something as sensitive as their image tarnished for accidentally tapping on someone’s Bitmoji.
As for the location, users need not worry as their locations will only appear if and when they choose to use the map themselves. But since location is sensitive data, users have voiced their opinions on making it more general than specific. Other April 2021 updates include creating, sending and viewing snaps while still making a Snapchat call, which was previously not possible and had received complaints about it. And saving snaps and videos in your chat and camera roll by simply pressing and holding the snap in the chat.
Want to see a friend’s Snap without them knowing you’ve viewed it? Check out our simple guide to half opening a snap, here.
Snapchat is an awesome way to keep in touch with friends all day every day. But sometimes, being connected can get a bit overwhelming. Plus we all have that friend that doesn’t seem to understand that just because you viewed their Snap, doesn’t mean you have time to reply. If you’ve been looking for a way to relieve the pressure of instantly responding to every Snap you get, you can, of course, turn off your phone, but there is another nifty little trick that will allow you to view a snap without your friend receiving a notification that you’ve seen it. The method works on both iOS and Android phones, but you have to make sure to follow all the steps exactly as we’ve outlined them. Check it out below.
How to Half Open a Snap and on Snapchat: Keep Sender From Knowing You’ve Seen Their Snap With This Simple Trick
So half opening a snap isn’t really half opening at all. In fact, you’ll be fully opening the Snap and viewing it. The main difference between half opening and truly opening it lies in working around the Snapchat system. The trick works on every kind of Snap from text to photo to video. Here’s how to do it.
Half Snap Notification: Will Snapchat Tell You If A Snap Is Half-Opened?
The beauty of the half-opened Snap hack is that, if you’ve done it right, your friends won’t know you’ve opened their Snap. A popular meme website called Me.me recently featured a photo that looked like a notification from Snapchat to let people know their Snaps had been half-opened. This is not a real Snapchat feature, so don’t worry. Your friends won’t be notified about your half-opened Snap shenanigans.
What do you think of the half-opened Snap hack? Will you use this trick yourself? Share your thoughts in the comments below.
Over the past few years, Snapchat has become a massively popular social media app. This app can be found on every child’s app as it is more popular among children and teenagers. Available on both Android and iOS devices, this social media app allows users an instant connection to the entire world.
While this fun and frolic app offers way more than just a quirky camera and filters, it is also surrounded by several online threats. Most parents feel that their children are entirely safe on Snapchat but it’s not like that. Snapchat parental control must be enabled to ensure your child’s online safety.
Snapchat allows children to take pictures using several fun photo filters and record short videos. The main appeal of this social media app was its disappearing content. As soon as a user sends a picture or video to their friends, it would only display for a few seconds and then completely disappear.
Since its introduction, the app has undergone several updates and now it is possible to save pictures and videos received from others. The app is constantly evolving so it’s better if you keep up with its latest updates and instructions for enabling parental controls for your kid’s safety.
What Parents Need to Know About Snapchat
Children and teenagers alike are obsessed with Snapchat these days. There is a high chance that your kid has already installed the app on their mobile phone and is using it. Parents need to keep in mind a few things about Snapchat. All the content shared on this app is referred to as “snaps”. The snaps are displayed to users in three different ways on the app with all of them having different expirations.
The snaps sent to friends are disappeared as soon as they are viewed. On the other hand, the snaps shared in groups can be seen twice. Last but not least, the snaps shared on stories are public and are viewable only for 24 hours.
Children and teenagers use Snapchat for fun. They like spending time on this app because it allows them to have a private conversation in a way that their messages disappear as soon as they are read. However, it’s important that parents have a conversation with their children about how this app can impact their future.
Being parents, you should tell them that any person can take screenshots of their snaps and share it with others. Nothing is private on the internet. If your children are not happy seeing their photos on the internet, then you shouldn’t probably share them on Snapchat.
How to Enable Snapchat Parental Control
To keep your children safe from online dangers lurking in the Snapchat app, you must enable parental controls on the app. Snapchat offers built-in parental control features that give your child control over who can get to see what they share on the app and who can contact them.
Your child can also report offensive content that they see from other users on the app. Besides using the built-in parental control features offered by Snapchat, you can also install a third-party app, a parental control app like SecureTeen to monitor their online and social media activity.
Besides Snapchat, you can also enable Instagram parental control on your child’s device. Below, you can take a look at the built-in parental control features provided by Snapchat and how you can enable them to keep your children safe on the app:
Step 1:
First of all, you need to make sure that only your child’s friends can contact them on Snapchat. To apply this setting, you need to open the profile page of your child, tap on the gear icon, tap on Contact me and then make sure that My Friends is selected from the other options.
Similarly, in the Who Can section, you need to tap on View My Story and choose My Friends so you’re your child’s friends can see the snaps they share on Snapchat.
Step 2:
Snapchat provides with a built-in feature that suggests your child as a friend to other users on the app. The app will also suggest your child to subscribe to various channels. Therefore, it is best if you can turn off this feature on your child’s Snapchat account.
You can make the changes by heading to your child’s profile page, tapping on the gear icon, tapping on See Me in Quick Add, and then unchecking that option. By unchecking that option, your child’s profile won’t be shown as a suggestion to other users on the app. Their profile page will most likely stay private.
Step 3:
You can also prevent your child’s friends from being able to see your child’s current location on the app. It’s important to stop anyone from seeing your child’s location because nobody should know the exact whereabouts of your child. You may never know who is keeping an eye on your kid’s location.
To prevent anyone from seeing your child’s location, you need to open you’re their profile page, then tap on the gear icon once again, tap on See My Location and then make sure the Ghost Mode on this setting has been checked.
Step 4:
You can also prevent people from finding or coming across your child’s Snapchat profile using their cell phone number. Usually what happens is, people who have your child’s cell phone number can add them up on the Snapchat app using their number.
To stop people from finding your child’s Snapchat profile by their cell phone number, you need to open your child’s Snapchat profile page, tap on the gear icon, tap on Mobile Number and then uncheck Lets other find me using my mobile number option. Now, nobody can add your child on Snapchat even if they have their cell phone number.
Step 5:
Your child can also report any sort of offensive or inappropriate content they see on Snapchat. If any of their friends have shared inappropriate content with your child, then they can simply report it on the app.
To do that, you need to tap and hold on the Snapchat post you want to report. Then, you will see a flag icon appear on your screen. Just tap on that and then you will come across the options for reporting that particular post.
Step 6:
Last but not least, it is important for every person to have control over their data shared on the internet and how it is being used. Your child always has the option to delete their Snapchat account if they do not want to use it.
Once the account has been deleted, the Snapchat team will deactivate the account for 30 days first in case your child changes their mind. To delete an account on Snapchat, go to the accounts portal, type in your child’s username and password. After 30 days, your child’s account will be permanently deleted.
by Anna Sherry Updated on 2022-03-09 / Update for iPhone Tips
Did you ever feel like spoofing current location and letting applications installed in your app use fake location services? The location service in the phone is useful for guiding Maps, restaurants, and nearby grocery shops; however, some third-party applications may use the location service as false deeds. Here, we are going to cover the most useful tips on how to change your current location on iphone as there are many to consider.
- Part 1. Why Do You Want to Fake Current Location?
- Part 2. The Easiest Way to Change Current Location on iPhone without Any Tool
- Part 3. Change Current Location on iPhone with Some Spoof Location Softwares
Part 1. Why Do You Want to Fake Current Location?
There are several reasons you would want to fake your current location on the iPhone. The reasons can be for fun purposes and others for anonymity with specific third-party applications. GPS spoofing is highly accessible with VPN services available freely on the App store. However, all of them are not that secure to use. Here we have listed a couple of reasons for the benefits of faking current location.
- If you are planning to visit some parts of the world unknown and want to know details about the street and restaurant, it’s perfect to use fake location generator applications and view them.
- If you are a Pokemon Go player, you might need to fake your current location to arrive somewhere you can’t get there in reality.
- Similarly, you would want to keep company with people on the place you are visiting next month; you can use VPN service to bounce to the IP address and start searching for a company in dating applications.
- You can make fun of the family social chat group by faking the location.
- Changing location can provide a huge opportunity to try out new applications and software unavailable at your original territory.
- With the substantial security flaws in the world, any third-party application installed in your phone can capture the location and sell to other personal site seeking vendors.
Part 2. The Easiest Way to Change Current Location on iPhone without Any Tool
- Lit up your iPhone and go to “Settings.”
- On the settings, scroll down to find “iTunes and App Store.”
- Once you are through iTunes and App store, you can find a top bar to “Apple ID,” tap on it.
On the generated view-card, tap on “View Apple ID.”
Part 3. Change Current Location on iPhone with Some Spoof Location Softwares
Faking location with Jailbreak required lots of fuss with installation and setup; however, you can use other free tools. These applications will fake the location like you are on vacation somewhere in the world, although you are at home working. If you want to simulate the app on your iPhone with a random location, here is how you can use the Spoof Location application to do so.
Tenorshare iAnyGo(No Jailbreak)
Tenorshare iAnyGo is an absolute tool cable to spoof location to anywhere within a single click. It is a virtual GPS locator available for iOS devices. With iAnyGo, you can easily route between two and multi-spot mode to keep you anonymous. It’s flexible to use the tool as well; it’s cost-effective. If you would like to play games restricted in your area, you can connect to the specific location with iAnyGo and play them in favorable ping.
- The location can be spoofed easily and quickly without having to wait longer to switch.
- The UI design is friendly for anyone using it.
- It’s capable of planning a route location for iPhone to switch between timely.
- The price is cheap enough
- Currently, the program is not compatible with Mac. (It is now in development)
After you download and install the application in your PC, open it up. Connect your iPhone to PC and allow “trust the device.”
The application will start loading map location, point your location to any specific area, and click on “Start to Modify”
Video Guide: How to Use iAnyGo to Spoof Location iPhone
Conclusion
Keeping yourself hidden from your permanent location has many advantages. There is a massive chance that you get to learn and try different kinds of stuff restricted at your site. The applications discussed in the above section allows automatic and manual location change feature. If there is something problem with iPhone, you can try Tenorshare ReiBoot to fix.
People Also Ask Questions about Fake Current Location
1. Is there a fake GPS App for iPhone?
Yes, there are many applications available ready to fake GPS for iPhone. The apps like Hola, Fake GPS Run, and others can be used easily to hide your current location.
2. Can you fake your current location on the iPhone?
Faking location on iPhone requires more effort and tweaks to be performed; however, PC applications can do the job done.
- 1-Click to change current location on iPhone
- Plan a route by selecting two or multiple spots on the map
- Easy to simulate GPS movement based on customized route
- GPS joystick to take better control
- Import GPX file to start a designed route
- Change up to 15 iOS devices’ location on 1 PC/Mac
Updated on 2022-03-09 / Update for iPhone Tips


