Around 6 out of 10 internet users nowadays use cloud-based storage services to keep their data and essential files on the internet safely. However, most of the users download the files they find on the web to their PC for mobile devices, and then they upload them to the cloud server. There is no way to save web files directly to cloud storage without downloading them.
It takes a lot of time and consumes a considerable amount of bandwidth. Most importantly, this process wastes your local storage space as well. It’s 2019, and you don’t have to follow those old-school practices for simple things. Here we have a simple and effective solution to fix that problem. This guide removes the hassle of downloading large files to your local storage device. It helps you directly save web files directly to cloud storage, like Google Drive, Dropbox, OneDrive, etc .automatically. So, you can save a lot of data and storage space.
How to save web files directly to cloud storage
- MultCloud
- Save to Drive
- OffCloud
1] MultCloud
As the name indicates, MultCloud is a multiple cloud service handler. It lets you manage multiple cloud storage services in one place. You can also use this to move large files from one cloud storage to another (Eg: Google Drive to Dropbox). MultCloud is available for free up to 2TB of the file transfer. Beyond that, you need to purchase the premium version. But 2TB is more than enough for most of the users, so give it a try.
MultCloud supports saving files from URLs to cloud storages such as Google Drive. You can sign up for a free account, but the transfer speed for the free account is slightly slower, you may have to wait sometime to transfer large files to your cloud storage service.
2] Save to Drive
Save to Drive is a free cloud platform to copy files from URL to cloud storage instantly. However, this service is limited to a selected number of cloud services only – Google Drive, DropBox, and Box.com. The best thing about this service is that it doesn’t require you to create an account to copy files. It offers unlimited data transferring and good upload speed.
To use this service, follow the steps below:
- Open the Savetodrive.net website.
- Authenticate with your cloud storage account (Google Drive, DropBox or Box.com).
- Then enter the file URL to save and then click the upload button.
Check out Save to Drive
3] OffCloud
It is one of the widely used cloud saving platforms. It offers excellent upload speed and a simple user interface. OffCloud is a premium service, but it provides a free trial for all users. In the free version, you can upload files up to 10GB. It is really faster as compared to other cloud moving platforms. It supports many services including Google Drive, OneDrive, Dropbox, Amazon Cloud, Mega, etc.
You can choose any of these tools to save web files directly to cloud storage. However, be aware of the privacy issues associated with this. We never recommend you to transfer ultra-confidential files through these platforms.
About Akhil G
Skilled technology writer and widely-read journalist. Social media Influencer, FB India Media Partner. Managing multiple news portals and writing for many. Google Hall Of Fame award winner. Youth Icon of the year – Government of Kerala 2018.
Running out of hard drive space on your PC used to be a problem. It usually meant you had to get a new PC, or offload some files onto an external hard disk, or upgrade your internal drive. All three options were pretty much a pain.
Cloud storage services haven’t solved these hassles completely, but they are making it easier to clear up some space on your hard drive.
Google Drive and Microsoft’s OneDrive drive are offering ever increasing amounts of free (and free-ish) storage. New Google Drive users start off with 15GB, as do OneDrive users. If you happen to be an Office 365 subscriber you get unlimited storage on OneDrive as part of your subscription.
Dropbox is still comparatively stingy with 2GB of free space, but most users quickly bump that up to 5GB or more with various giveaways and incentives from the company, which leaps all the way to 1TB with a $10 per month or $100 per year subscription.
All three services let you get selective about which files you bring down from the cloud to your desktop. That means you can leave some stuff in your cloud drive and only download it when necessary. Let’s explain how to do that, and considerations to keep in mind before you start stashing your valuable files on third-party servers alone.
OneDrive
Keeping stuff in OneDrive and not on your Windows 8.1 desktop is as simple as a right-click.
For Windows 8.1 users, keeping stuff up in the cloud with OneDrive is fairly easy. Open OneDrive in Windows Explorer. Anything under the category heading Availability (in Details View) that says Available offline is stored on your hard drive. If it says Online-only it’s in the cloud, which is the default.
To switch anything that’s on your hard drive to online-only, just right-click it and select Make available online-only. The file will disappear from your hard drive, but remain available for downloading from the cloud via Windows Explorer any time you need it.
Online-only files will still appear when you open the OneDrive folder in Windows Explorer, but the icons are just small ‘pointers’ to let you know they’re available in your cloud storage space. Opening an online-only file will download a local copy of the file and open it.
Google Drive
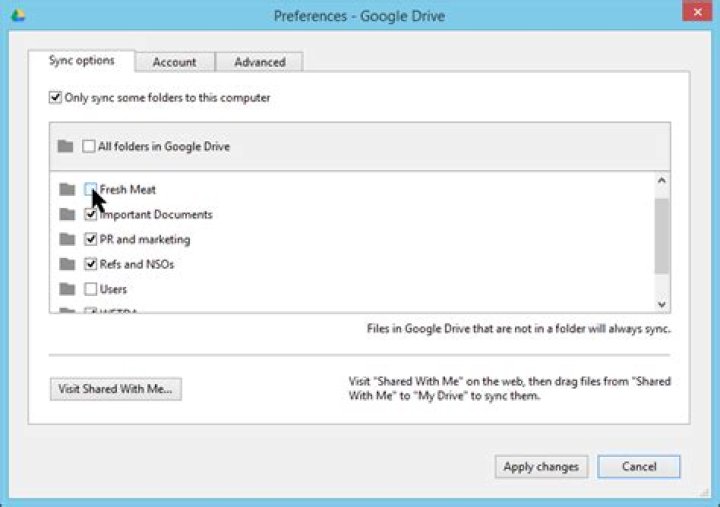
Google Drive lets you selectively sync folders.
To do the same in Google Drive, click the upward facing arrow in the lower right corner of the taskbar. Find the Google Drive icon, right-click it, and select Preferences… Under the Sync options tab check the box that says Only sync some folders to this computer. Then click the folders you want to keep on your hard drive and click Apply changes. The rest will again be gone from your hard drive, but still available in the cloud.
Dropbox
Click Dropbox’s Selective Sync… button to move folders off your hard drive.
Finally, Dropbox. Go to the same spot in the taskbar as in the Google Drive example, only click the Dropbox icon this time. (On some PCs, the Dropbox icon may appear next to the upward facing arrow on the taskbar.)
Click the settings cog in the upper right corner of the pop-up window that opens and select Preferences…
Another window will open. There click on the Account tab and choose Selective Sync…
Yet another window opens with a list of folders on your PC. Just de-select the folders that you don’t want to keep on your hard drive and click Update, then OK.
In the case of both Dropbox and Google Drive you can always access files not on your hard drive by visiting the website for each service.
What to put in the cloud
Now that you know how to leave your files up in the cloud, the question is what should you leave up there?
If you have a large amount of cloud storage the easiest option is to offload large files that aren’t used very often, such as videos or pictures. Those with less storage may have to be more selective, possibly even choosing a mix of documents, photos, and videos.
Other considerations
It’s unlikely that your files will disappear from the servers of Dropbox, Google, Microsoft, or any other well known cloud storage provider. Nevertheless, it’s still wise to make your own backup of cloud-stored files on an external drive in your own home or, at the very least, with another cloud storage or cloud back-up provider.
Also, keep in mind that once you start depending on the cloud to be your primary storage for personal photos and documents, it pays to maintain the best security you can. Dropbox, Google, and Microsoft all offer two-factor authentication. Make sure you use it. Your password should also be at least 10-12 characters long and completely random. Use a password manager like KeePass or LastPass to store your passwords if you’re worried you’ll forget it.
Other than that there are also the privacy implications of storing personal data in the cloud. But you’ve probably already considered that since you’re using cloud storage to begin with.
Syncing files with Google Drive for Windows and Apple Mac users no longer means storing everything from the cloud on a computer.
Liam Tung is a full-time freelance technology journalist who writes for several Australian publications.
You can now select which folders you want to sync to a computer with Google Drive.
Google has rolled out a new syncing feature in Google Drive that can help free up space on a computer.
Until now, syncing on Google Drive meant duplicating everything in the cloud on your computer, taxing precious local storage. Even if you’re using a chunk of Google’s lower-tier 1TB storage, syncing everything isn’t ideal for many computers.
An update for Google Drive for Mac and Windows changes that situation by allowing users to pick and choose which folders and subfolders are to be synced and the ones that shouldn’t be.
This change makes sense given it would be impossible for the vast majority of computers to sync everything from Google’s 30TB Drive plan.
To select which folders are available for syncing, click the Google Drive icon and open Preferences and then go to Sync Options. There’s now one option to, ‘Sync everything from My Drive’ and another to ‘Sync only these folders’.
Each folder displays the amount of storage it uses, so the individual knows how much is being freed up or consumed when deselecting or selecting a folder for syncing. Once a folder has been deselected, it will be removed from the hard drive but remain stored in Drive.
Google has also created a new alert in Drive to warn users when they move or delete shared files. Google wants to make it easier to move and delete files from a computer, but now flags up when deleting or moving a shared file will cause others to lose access.
The new features have already arrived for some regions and will continue being rolled out this week.
Google has made a number of file-management, search and access improvements to Drive in recent months, including the ability to find files by file-type, as well as drag and drop files into folders from search results.
By Charlie Sorrel • 11:00 am, March 6, 2018
- How-To
- Top stories
Clouds. Perfect for the storage of information.
Photo: Charlie Sorrel/Cult of Mac
Is your Mac stuffed fit to burst? Do you look at the Finder’s Status Bar, see “1GB available,” and then give up what you were doing and go check Twitter instead? What if I told you that you could offload much of the junk/important data on your Mac to iCloud, just like you do with your iCloud Photo Library? Well, you can, and it’s easy. It’s called Optimized Storage.
Optimized Storage
Ever since macOS Sierra, you have been able to shift storage to iCloud. Combined with Apple’s very reasonable iCloud storage prices, which gets you 2TB for $10 per month. What’s more, you can share that storage with family members.
To get started with Optimized Storage, click on the Apple icon at the far left of your Mac’s menubar, and choose About This Mac. Then, click on the Storage tab in the window that appear, and then click on the Manage… button.
The Optimize Storage panel.
This brings you to Apple’s Optimized Storage panel. Take a look around — it tells you all kinds of stuff about how you’re wasting your disk space — but the part we’re interested in today is the Recommendations section. This has four tools to help trim the space used on your Mac. Today, we only want the first one, Store in iCloud, but the others are worth a look. You can have your Mac automatically empty your trash if you forget to do it yourself. You can have the mail app only download and store attachments from recent messages, and you can perform a storage audit using the Reduce Clutter tool (like DaisyDisk, only not as fancy).
For now, go ahead and click on Store in iCloud.
Store in iCloud
Using Store in iCloud, you can choose to have your Mac keep your Documents and Desktop folders on your iCloud Drive. Then, when your Mac gets too full, it will delete the local copies. If you need that file in future, it will be downloaded on demand. This works exactly like the iCloud Photo Library’s optimized storage, where the Mac (or iPhone) stores your photos in iCloud, and only keeps thumbnails locally, downloading the full-sized versions as you need them.
The other advantage of storing your Desktop and Documents folders in iCloud is that you can access them from your iPhone or iPad, using the Files app. They’ll show up as regular folders, just like any other.
Speaking of regular iCloud Drive folders, you can optimize those too. Go to System Preferences>iCloud and click on Options next to iCloud Drive. You’ll see this window:
Check this box to make all your iCloud folders behave as optimized folders. That is, their full contents will be stored on your Mac until the Mac gets too full, and then macOS will start deleting them from your Mac, leaving the copies in the cloud.
Be careful
Make sure you think this through before going ahead. Any time you store a copy of your data in the cloud, it is less secure. Also, make sure you still have a good local backup of all this data before you let your Mac start deleting things.
And finally, make sure your internet connection is up to the task. The last thing you want is to be abalone to access an important work file because it’s taking too long to download.
Cloud storage services like Dropbox, Google Drive and OneDrive provide a desktop client app to make it easy for you to access your cloud files. However, installing an official client of a cloud storage service is not too good idea if you have a laptop with a low storage capacity.
The official desktop client of a cloud storage service works by syncing your cloud files to desktop. It brings the actual cloud files to local storage, which also means take your local storage space. The official desktop client app of a cloud storage tends to ideal for a backup need.
Is there a way to access cloud files without downloading the actual files to local storage? Of course. There are some tools out there which you can use to mount cloud drive account as local drive. We have just reviewed CloudMounter, one of the tools that allows you access cloud files via file manager without downloading the actual files. In addition to CloudMounter, there are several other tools with the similar functionality.
Following are 4 tools to allow you access cloud files without downloading them to local storage.
1. CloudMounter
As mentioned, one of the tools that allows you to access cloud files without downloading the actual files to local storage is CloudMounter. This tool supports popular cloud storage services like Google Drive, OneDrive and Dropbox. It even also supports Amazon S3 and Wasabi. You can use CloudMounter to mount multiple cloud drive accounts of the same storage service. For instance, you can mount two or three Dropbox accounts. CloudMounter itself is available for Mac, Windows and Linux. Once you have connected and mounted your cloud drive accounts, they will be able on the file manager app of your operating system as new local drives. ClouMounter itself is a premium app, but you can try it for free for 15 days.
2. RaiDrive
RaiDrive also has the same functionality as CloudMounter. It allows you to mount your drive accounts as local drives so you can access your cloud files directly via file manager without needing to back and forth to web browser. RaiDrive also only give you a remote access to your cloud files. It doesn’t download the cloud files to your local storage. RaiDrive supports a wide range of cloud storage services like Google Drive, Dropbox and OneDrive. It also allows you to mount multiple accounts of the same cloud storage service. The best thing about RaiDrive is that it is available for free. Unfortunately, RaiDrive is only available for Windows.
3. ExpanDrive
ExpanDrive supports more cloud storage services than two first tools above. You can use it to mount your cloud accounts on Dropbox, Google Drive, OneDrive, Amazon S3 to less popular cloud storage services like box and hubiC. This tool also supports multiple accounts for the same cloud storage service. ExpanDrive is available for Windows and Mac. Linux version is also available, but it (at the time of writing) still in the beta phase. You need to email ExpanDrive to test the Linux version of ExpanDrive. ExpanDrive itself is a paid tool. Trial version is available in case you want to test it first before buying.
4. WebDrive
Same as tools above, WebDrive also provides a remote access to your cloud files. With this tool installed on your computer, you can mount your cloud drive accounts as local drives to access your cloud files via file manager of your operating system. WebDrive itself supports popular cloud storage services like Google Drive, Dropbox, OneDrive, to Amazon S3. Less popular cloud storage service like box is also supported by WebDrive. WebDrive itself is a premium app for Mac and Windows. Trial version is also available.
This feature is only available to users on Dropbox Plus, Family, Professional, or Business plans.
Smart Sync is a feature of the Dropbox desktop app that allows you to make files online-only so you can save hard drive space on your computer. You can choose which files to make online-only or let automatic Smart Sync choose for you.
Note: The Smart Sync preferences you choose are unique to each computer and don’t affect other computers you use with Dropbox.
Set a file or folder to online-only or local
To set a file or folder to online-only manually, using Smart Sync:
- Open File Explorer (Windows) or Finder (Mac).
- Open the Dropbox folder.
- Right-click the file or folder you’d like to set to online-only.
- Hover over Smart Sync.
- Click Online Only. If you’d like to save your file back to your computer’s hard drive again, click Local.
Online-only explained
If you’ve never turned on Smart Sync or set a file or folder to online-only, then all of the files and folders in the Dropbox folder on your computer are “local”. This means that they take up space both on your computer’s hard drive and in your Dropbox account and are available whether you’re online or offline.
If you set a file or folder to online-only, you’ll still see the file or folder in the Dropbox folder on your computer, but it’s just a placeholder. You can only open it if you’re connected to internet. Dropbox removes it from your computer’s hard drive, so that it only takes up space in your Dropbox account online.
Anytime you open an online-only file, Dropbox automatically changes it to be “local” again, but you can change it back to online-only at any time.
Smart Sync vs. selective sync
Selective sync also helps you save hard drive space by removing files from your hard drive so that they’re online-only. However, those files will no longer appear in the Dropbox folder on your computer.
Automatic Smart Sync
You can turn on automatic Smart Sync so that files that you don’t open from your computer for a few months become online-only automatically and new files you add online become online-only by default. That way, the files that you don’t regularly use won’t take up space on your computer.
To turn on automatic Smart Sync:
- Open your Dropbox desktop app preferences.
- Click the Sync tab.
- Under Save hard drive space automatically, select On.
- If you’re on a Dropbox Business team, and you prefer your admin manage this setting for youLet my admin manage this setting.
Note: If an application on your computer needs a file to be local to function properly, automatic Smart Sync will set it to local temporarily and return it to online-only later.
Set files you add to web to online-only by default
To make all files that you add to dropbox.com online-only by default:
- Open your Dropbox desktop app preferences.
- Click the Sync tab.
- Click the dropdown next to Files added on web default and click Online-only.
- If automatic Smart Sync is on, you can’t choose this option because your files already default to online-only.
Why do online-only files still appear to take up space?
Online-only files take up a small amount of space on your hard drive because the placeholder requires space to store the file name and the shortcut to dropbox.com, but it takes up much less space than the file itself would.
If you’re using Smart Sync with macOS High Sierra 10.13 and up, you may notice that online-only files appear to take up space when you try to manage storage space in your Mac settings.
The reason for this is that file size is calculated based on something called “logical size” rather than “physical size”.
To see which files are really taking up your storage space, adjust your Dropbox settings so that online-only files have both logical and physical size set to zero. To do so:
- Sign in to dropbox.com.
- Click your avatar (profile picture or initials) in the top-right corner.
- Click Settings.
- Toggle Smart Sync update for Mac on.
- Note: This setting may take some time to update. If you don’t see the update reflected after a few minutes, close the Dropbox desktop app, then reopen it.
System requirements for Smart Sync
Mac: OS X Mavericks (10.9)
Windows: 8 and up
Note: You can’t use Smart Sync on a mobile device, but you can set your Dropbox files to be available offline on a mobile device.
Note: This Quick Start is for OneDrive for home and personal accounts. For work and school accounts, see OneDrive for work or school Quick Start.
Use OneDrive in your browser
Sign in to and select OneDrive.
Select the app launcher icon , and then select OneDrive.
Pick a file or folder by selecting the circle in the upper corner of the item, and then select a command at the top of the page.
Upload files or folders to OneDrive
You can store over 300 types of files on OneDrive. With Microsoft Edge or Google Chrome:
Select Upload > Files or Upload > Folder.
Select the files or folder you want to upload.
Select Open or Select Folder.
With other browsers:
Select Upload, select the files you want to upload, and select Open.
If you don’t see Upload > Folder, create a folder, and then upload the files to that folder.
Note: If you have the OneDrive sync app installed, you can also upload with File Explorer. Select the files you want to upload, and drag them to OneDrive in the File Explorer Navigation pane.
Save a file to OneDrive
Select File > Save a Copy > OneDrive – Personal.
Select Enter file name here and type a name.
If you want to save to another folder, select Browse, and select the folder you want.
The next time you open the Office app, you’ll see your saved file in the Recent list.
Note: Requires Microsoft 365, Office 2019, or Office 2016.
If you don’t see OneDrive – Personal in the list:
Select Add a Place
Select OneDrive and sign into your Microsoft account.
Use OneDrive on your desktop
If you use Windows 10, OneDrive may have already asked you to sign in to sync your files.
In File Explorer, select OneDrive – Personal.
If OneDrive isn’t setup, see:
Need more help?
Contact Support
For help with your Microsoft account and subscriptions, visit Account & Billing Help.
For technical support, go to Contact Microsoft Support, enter your problem and select Get Help. If you still need help, select Contact Support to be routed to the best support option.
NetApp has launched an early access program for its Astra Data Store, cloud-native software providing shared NFS file and block storage to new and old applications, meaning containers and virtual machines.
Astra Data Store (ADS) is part of a portfolio of Astra services for Kubernetes-orchestrated applications providing data connectivity and management to help deliver and deploy cloud-native apps. ADS is NetApp providing software-defined storage within the Kubernetes environment, like Pure’s Portworx, and it complements NetApp’s CloudOps portfolio of products which help customers deploy containerized applications within cloud environments.
A blog by NetApp’s Gunna Marripudi, senior director of Astra Product Management, said: “You need a data foundation that serves your legacy apps while paving a way to the future with microservice-based cloud-native apps … if you’re like most users, you will start by running Kubernetes in your existing virtualized infrastructure. Almost all popular Kubernetes distributions support this deployment model of running Kubernetes inside a VM. Again, your existing VM farm isn’t going anywhere, so let’s take advantage of it and leverage your VM expertise for a bit longer.”
ADS features include:
- Native shared NFS v3 file service (NFS v4 coming)
- Self-service provisioning of shared file volumes for K8s apps and full support for VMware virtual machine storage
- vVols enabled, VM granular storage provisioning with full VASA and SPBM integration
- Deployable on bare metal or in virtualized environments
- Support for upstream Kubernetes, Anthos, Red Hat OpenShift, and vSphere environments
- Integration with Astra Trident and Astra Control Center for end-to-end Kubernetes data management
- vCenter plug-ins for vSphere native management
Another NetApp blog explains that ADS is built on a service-based composable architecture integrated natively with the Kubernetes control plane. It automatically initializes loosely coupled services as needed. Its design decouples data management services (application data management and data lifecycle functions) from storage management services (data and metadata block management, data reduction techniques, redundancy, fault tolerance and device management).
The data management services can scale with applications as part of the application fault domain, while the storage management functions remain part of the storage fault domain and scale accordingly.
The software has a data protection scheme with replication, erasure coding and instant clones, as the blog explains: “Every block of your data is replicated within the cluster based on fully customizable protection domains (availability zones). Your system is protected against node, rack, or entire availability zone failure. To enable automatic recovery, your system proactively monitors and auto heals at node, rack, and availability zone granularity. To complement the replication, each replicated block is further redundancy-encoded within the node. This approach enables protection and recovery from local drive failures or from bad blocks reported by the drive firmware. Astra Data Store can locally repair such data or data blocks within the node, thereby avoiding large internode data transfers to rebuild your data.”
All this means Astra Data Store provides linear scaling of the file system with compute and storage resources. NetApp says ADS offers Kubernetes-native multiple parallel file systems on the same resource pool to achieve cloud-like scale and utilization. And customers can bring their own hardware.
Integration with NetApp Cloud Insights delivers observability, analytics, and monitoring for workload and infrastructure optimization.
The no-charge Astra Data Store Early Access Program is available to customers running cloud-native applications in Kubernetes bare-metal and vSphere environments. Sign up here on a first-come-first-served basis. Download a Solution Brief here and access preview documentation here.
Save drive space with OneDrive Files On-Demand
Microsoft OneDrive online storage works great with the Apple Mac and it enables you to access work and personal files. Here’s how to use Files On-Demand with the OneDrive app on macOS.
Here is the problem: You can have up to 1 TB of online storage with OneDrive for your work or personal files and even if you don’t have the top of the range subscription, you could still have tens of gigabytes of online files. Some Apple MacBooks have as little as 128 GB drives. Clearly you cannot sync the OneDrive folder on the Mac with your OneDrive folder online if the drive is not big enough.
Hopefully, you have a bigger drive in your Mac, but there still may not be sufficient free space to sync all your online files and have local copies on the Mac’s drive. Another problem is that syncing so many files can use a lot of internet data.
There are two solutions to this problem and one is to sync only some of the folders on OneDrive online with the OneDrive folder on the Mac’s drive instead of all of them. This works, but is inconvenient when you need to access files in folders that are not synced. A better solution is to use the Files On-Demand feature.
What is Files On-Demand?
This is a feature of Microsoft OneDrive that replaces local files in the computer’s OneDrive folder with links to the online files. Opening a local file (link) automatically downloads it first.
Basically, it looks like the file is on the Mac’s drive, but really it is a link to the inline version. Any attempt to access it, such as by opening it in an application, triggers a download. The file then opens as a local file on the Mac’s drive.
The file remains on the Mac in case it is needed again and is automatically synced with the online version, but there is an option to replace it with a link again.
Does OneDrive use up drive space?
It is possible to sync all the files on OneDrive and keep a mirror copy on the Mac’s drive. The drive space on the computer is then the same as the space used on OneDrive online.
By enabling Files On-Demand, all the files on the computer can be replaced with links to the online files, and this uses almost no drive space on the computer, while still providing access to all the files. If you are familiar with making an alias for an app on the Mac, it’s like that. Each file icon is basically an alias.
You can choose to have some files online and some offline, so it is up to you how much drive space is used.
OneDrive Files On-Demand on macOS
This step-by-step guide assumes OneDrive is already installed on the Mac. If you are downloading and installing OneDrive for the first time, you will see all these screens, but possibly in a different order. If you are having problems with OneDrive Files On-Demand, work through these steps.
1 Show the OneDrive menu
Click the OneDrive icon in the menu bar on the Mac and then click the More button at the bottom to show the menu. Click Preferences to go to OneDrive settings.
2 Enable Files On-Demand
The Preferences window appears and the Preferences tab opens by default. Down at the bottom of the window, click the button, Turn On Files On-Demand. It may take several minutes for this to complete, so be patient.
3 OneDrive account settings
Select the Account tab and at the bottom, click the Choose Folders button. This enables you to select the folders in OneDrive online to sync with OneDrive on the Mac.
4 Sync all folders and files
No matter how many gigabytes of files you have online in OneDrive, sync them all. Files On-Demand is enabled, so this will take hardly any drive space on the Mac and there is no reason not to sync everything. Tick the checkbox Make all files available.
5 Free up space with Files On-Demand
Ctrl+click any folder on OneDrive or even the whole OneDrive folder itself, and select Free up space. This replaces each file on the Mac’s drive with a link to the real file online. It can take several minutes to do this, so wait before continuing.
6 Check OneDrive space usage
In the previous step, the Work folder was selected and the Free up space option selected. When the folder is now selected and Cmd+I pressed to open the folder info panel, you can see that there are 9.01 GB of files, but only 762 KB of disk space is used for 5,441 items. That is a huge space saving thanks to Files On-Demand.
7 Open a file in OneDrive
Here are some images in the OneDrive folder on the Mac’s drive. Notice the icons on the right are cloud icons, showing they are online. Double clicking one of the .tif files to open it in Preview downloads it and changes the icon to a circle with a tick. That means it is on the drive.
That Downloading… notification can be enabled or disabled in OneDrive preferences. It is useful to show it, but it can be hidden. As soon as downloading is complete, the file that was double clicked opens in Preview as normal.
8 Advanced Files On-Demand features
Return to OneDrive preferences and now there is a new button at the bottom of the Preferences tab. Click Manage Apps.
9 Block apps using Files On-Demand
Files On-Demand makes it look file files are on the Mac’s drive even though they are really online. It is possible to prevent apps from automatically downloading files by clicking the plus button and adding them to the list here. It probably isn’t a feature you need, but it is there if you do.
10 Enable OneDrive Finder extensions
If you are having problems with enabling OneDrive Files On-Demand or any of the steps above, open System Preferences, click Extensions and make sure that OneDrive extensions are enabled. It probably won’t work if they aren’t.
CleanMyMac X is the Apple Mac maintenance tool you need: Uninstall apps and leftovers, block and remove malware, free up disk space, optimize your Mac. Learn more (affiliate link)
The OneDrive for Android app can remove local copies of the photos on your device to free up some space on your phone for things like apps and music.
Clean Up Space will run automatically once you have at least 1 GB of photos or videos to upload on your device (either by already having them on the device or by taking new ones). A notification will appear on your device offering to Clean up space on your device. Tap Yes under the notification to free up the space on your device.
To set up OneDrive to clean up space automatically
In the OneDrive for Android app, tap the Me icon then tap Settings .
Tap Camera upload.
Select the account you want to use with Camera Upload.
Set Camera upload to On.
To run Clean Up Space manually:
Tap the Me icon then Settings
Tap Clean up space on your device.
Note: The option to run Clean Up Space manually is not currently available for iOS or Windows Phone devices.
Need more help?
Contact Support
For help with your Microsoft account and subscriptions, visit Account & Billing Help.
For technical support, go to Contact Microsoft Support, enter your problem and select Get Help. If you still need help, select Contact Support to be routed to the best support option.
I have uploaded around 100GB of data to OneDrive and it’s not until recently that I realised that was the reason my free hard drive space was shrinking! *duh*
OneDrive is integrated into my File Explorer and I thought once I moved something to there it just went to the cloud. I now realise this isn’t the case and don’t have very much hard disk space left. I have mapped OneDrive to a Network Drive so that I can access that and changed my registry editor so that the OneDrive folder is no longer in my explorer but it is still taking up the space. How can I delete the local copies of the data without deleting them from OneDrive as they are now only in the OneDrive folder??
I know it’s Christmas but please help if you can this is so annoying.
Thank you and Merry Christmas!!
Ok, when I disable this, I can still acess my files using the onedrive app right? also, can I then delete these off my surface?
I guess I select unlink? I still want to save all my files from this device to one drive, but I do not want to save my one drive to this devices hard drive.
Ok, when I disable this, I can still acess my files using the onedrive app right? also, can I then delete these off my surface?
I guess I select unlink? I still want to save all my files from this device to one drive, but I do not want to save my one drive to this devices hard drive.
No. Once you stop syncing the files you’ll need to go to the web (onedrive.live.com) to either upload more files to a non synced folder or download a file you are looking for.
This is because someone at Microsoft got kicked in the head by a horse or something and decided to rid Windows 10 of placeholders. Because of this I pay for cloud service somewhere else to upload my images rather than get the free space offered by onedrive. I also went back to the old fashion external hard drive route. Its sad 80s technology (external hard drives) works better than Microsoft’s 2016 cloud service.
Sent from my Surface 3
- Share
- Share this post on
- Digg
- Del.icio.us
- Technorati
Yes in windows 10 now. Not like this in 8.1. but I thought I read that placeholders might be coming back or at least bring reconsidered.
I hope it comes back. Like I like how photos app accesses online pictures to show them to you, but you don’t have to download them in full. I like photos app for that, all my devices pictures visible in any device
- Share
- Share this post on
- Digg
- Del.icio.us
- Technorati
Sync the folders you need and not everything. I have 350GB in my onedrive account but I have only synced one folder of 20MB on my surface 3. Whenever I need a particular file I head over to the website and get it, simple.
placeholders was confusing for a lot of people hence the decision to remove it.
When the doorknob was introduced I’m sure there were some that found it confusing. However, they eventually got it and now you can find doorknobs everywhere. It was stupid of MS to rid Windows 10 of placeholders. It makes their OWN Surface line of products useless because of the tiny hard drives.
Sent from my Surface 3
- Share
- Share this post on
- Digg
- Del.icio.us
- Technorati
Hey dzinger, this drove me nuts for a long time. What is the point of cloud storage if it takes up your hard drive? Not to mention that OneDrive is constantly “syncing” and using up precious disk space and computing power. Luckily after literal days spent on this problem. I managed to put together a somewhat reasonable solution.
1. Using Internet Explorer (actually), go to enter your user name and password and select keep me signed in.
2. Click on the square in the upper left hand corner and select OneDrive from the drop down menu.
3. Once in OneDrive, select internet options from the upper left hand corner. Under the Security tab add the URL to the trusted sites list. If there is an option to choose a security level (depending on which version of explorer you are using) set it to lowest for trusted sites.
5. Click return to classic OneDrive in the lower left hand corner.
6. Click into the folder that you wish to have available on your PC (or tablet, or whatever).
7. In the OneDrive settings menu make sure that the ribbon is turned to on.
8. On the ribbon, under the Library heading click on open with explorer. Leave the resulting window open.
9. Open a new explorer window and right click on This PC on the left hand side. Select Map Network Drive.
10. Select the option (should be at the bottom of the pop-up box): Connect to a Website that you can use to store your documents and pictures. When given the option, select: Choose a custom network location. When you are asked to enter the network address use the address contained in the window you opened from OneDrive.
11. Bada Bing! You can now use OneDrive as an actual cloud service. The files are not located on your computer; you can cut and paste files from your computer onto OneDrive and visa versa and they will be located on one or the other, not both. If you delete a file from the OneDrive folder it deletes the file stored online. There will be no syncing and no storage use on your device.
The folder will be a network path, but I like to create a shortcut to my desktop. This can be a bit tetchy. If your folder is not opening: try logging in to office 365 and navigating to the folder in OneDrive. It should ask you to verify that you trust this site. If not, do the security process described above again.
People on their iPhones keep almost everything: family photos, movies, music libraries, you name it. That is why it is critical to ensure that you do not run out of space.
In 2021, Apple made it a little easier by increasing the iPhone 13’s default storage option from 64GB to 128GB. However, if you require more space or have a lower-capacity model, you should make the most of your iPhone’s storage space.
Investing in a cloud storage service such as Apple’s iCloud, Google Drive, Box, or Dropbox to offload some of your files is the best way to save local storage. However, there are a few settings you can change to ensure you’re making the best use of your iPhone’s storage capacity.
First, see what’s taking up the most space on your iPhone
To optimise the storage on your iPhone, you must first understand what is taking up space on your device. Examine what’s eating up your storage space so you know where to begin. Go to Settings, General, and then iPhone Storage.
Select this option to see a breakdown of the different types of files and media that are taking up space on your iPhone. Apple may also make suggestions about how to free up space, such as reviewing videos stored on your device, as shown below.
Optimizing photo storage
When it comes to taking up space on your iPhone, photos are on the top of the list. However, the iPhone’s settings menu includes an option that allows your device to save smaller photo files locally instead of the original versions if your device is running low on space. These high-resolution photos and videos, on the other hand, are stored in iCloud and can be downloaded as needed. Begin by opening the Settings app to ensure that this feature is enabled. Then, scroll down to Photos and make sure the Optimize iPhone Storage option has a blue checkmark next to it.
Saving Photos to a 3rd party Cloud service
The best way to free up space on your iPhone is to delete files that you don’t need to keep. However, this does not imply that you must reduce the size of your photo library. Instead of storing them on your device, try storing them in a third-party cloud storage service like Google Photos. It’s a quick way to free up a lot of storage space without having to give up old memories.
But, before you delete anything, make sure the photos you want to save have been backed up or transferred to Google Photos. If you do not back up your photos and videos to another service such as Google Photos, Dropbox, Box, or OneDrive before deleting them, they will be permanently deleted. This guide will walk you through the process of transferring your entire iCloud photo library to Google Photos, but keep in mind that the unlimited free storage option is no longer available.
You may be curious why you need to use a different cloud service when your photos are already stored in iCloud. That’s because deleting photos from your iPhone also delete them from iCloud, so if you want to delete images from your device, you’ll need to use another service.
Delete unused apps
Getting rid of apps you no longer use is another great way to clean up your iPhone. If you’re not sure where to begin, consider which apps you haven’t used in a long time. Open the Settings app on your iPhone, select General, and then iPhone Storage.
You’ll see a list of your apps, as well as how much space each app takes up and when you last used it. Scroll through the list and delete any apps you haven’t used in a long time.
Offloading apps
You can offload an app instead of completely deleting it if you don’t want to delete it. Offloading it allows you to keep the documents and data associated with that app, allowing you to reinstall it at any time and quickly resume where you left off. Return to the preceding list by opening Settings, selecting General, and then select iPhone Storage. Select Offload App from any app in the list. You can also set your iPhone to do this automatically by going to Settings, selecting App Store, and turning on the Offload Unused Apps switch.
Auto deleting old messages
It’s possible that your iPhone’s storage is being clogged by more than just photos, videos, and apps. Getting rid of old text messages can also be beneficial. You can configure your iPhone to delete your message history automatically by going to Settings, selecting Messages, and then tapping the Keep Messages option under Message History. Choose whether you want your iPhone to keep text messages for 30 days, a year, or forever.
Delete Downloaded offline content
You most likely have videos and music stored offline in multiple apps on your phone, and thankfully, there’s an easy way to find and delete those files. Go to Settings, General, and then iPhone Storage. Look for an app from which you’ve downloaded offline content, such as Netflix. The app’s storage information, such as its size, will then be displayed, along with buttons for deleting or offloading it.
For more tech-related news subscribe to our Youtube Channel if you haven’t done it yet.
Storage Sense and OneDrive team up.
Matt Elliott, a technology writer for more than a decade, is a PC tester and Mac user based in New Hampshire.
Last year, Windows 10 ($137 at Amazon) added the space-saving ability to send local files to OneDrive with the Files On-Demand feature. With it, you can right-click on a file you have stored on your PC and move it to OneDrive. The file gets uploaded but leaves behind a placeholder in File Explorer, which you can click to download and open it.
It’s a useful feature, especially for Windows 10 users with laptops that are short on storage, but it requires you to initiate the upload. With Windows 10 October 2018 Update , you can automate this process.
Storage Sense and OneDrive
Storage Sense isn’t a new feature, but it has a new OneDrive option that can keep recent files on your PC and older files in the cloud. Storage Sense’s original mission was automatically deleting unused temporary files and files that have been in the recycle bin for more than 30 days. Useful, to be sure, but with Windows 10 October 2018 Update, Storage Sense broadens its scope beyond temp files and the recycle bin. It can now be set to scan your PC’s entire hard drive and upload files you haven’t touched in a day or two months.
Go to Settings > System > Storage and toggle on Storage Sense.
Next, click Change how we free up space automatically, scroll down to the OneDrive section and, for Content will become online-only if not opened for more than, choose a choose a time period: 1 day, 14 days, 30 days or 60 days.
Screenshot by Matt Elliott/CNET
Local vs. cloud
When files are uploaded to OneDrive, placeholders are left behind inFile Explorer so you can still easily access them. You’ll see three different icons for OneDrive files in the Status column:
- Blue cloud: Online-only file
- Green checkmark in white circle: Locally stored file that might revert back to online when you run short on space
- White checkmark in green circle: Locally stored file that will stay put, no matter how short on space you get
AppleInsider is supported by its audience and may earn commission as an Amazon Associate and affiliate partner on qualifying purchases. These affiliate partnerships do not influence our editorial content.
It’s great that iCloud will free up storage space for you by moving documents you don’t need — but you sometimes have to convince it you need them back.
They must have some pretty great Wi-Fi at Apple Park, because sometimes macOS looks as if it assumes we are all online, all the time, and with brilliant connection speeds. If you’re not for any reason, then iCloud’s automatic offloading of your lesser-used documents is aggravating.
If you’ve ever tried to open a document you know exists and Pages has said no, it doesn’t, you’ve hit this snag. Similarly, if half your Final Cut Pro timeline has just changed to the red Missing File message, blame iCloud.
There can be other reasons, such as you simply getting it wrong, but it’s commonly iCloud’s fault for one specific reason. Apple’s iCloud is really good at talking to the Finder and your Mac’s drive, but it does not check in with apps.
So in the Finder, you’ll see a listing for that document, and you can click on it. Maybe it’ll take a moment or three, but then the document will open.
Whereas in Pages, for instance, choosing File, Open takes you to the folder where you can see the filename. But clicking on it will not tell iCloud to pull its finger out.
Similarly, if iCloud decides you haven’t used this large file in a while, it doesn’t matter that it’s key to 17 different Final Cut Pro projects. It will be squirrelled away and you’d better hope you have a good internet connection when you notice and need it back.
How to force iCloud to bring back a file
- Leave the app and go back to the Finder
- Navigate to the file
- Click to select it
- Right click and choose Download Now
Now you can double-click on that document to open it. Or you can go back to your app and open it from there like you wanted to.
Notice that you can do this with files and folders, in any number and any combination.
How to stop iCloud moving files off your storage
You can’t. Not really, not effectively. There is no way to say that these five documents, say, must never be moved.
What you could do is move key documents out of the way. It’s not a very satisfactory idea, since to do it you have to remove them from iCloud drive. You may not want iCloud to remove the files, but you do want it to back them up in case of other problems.
It’s also not very practical trying to maintain copies of documents, just to be sure that the ones you want are definitely available locally.
But if you are hitting this issue in Final Cut Pro, you can look to that app’s different storage options. If you’re seeing Missing Clip errors, the odds are that when you import your video files, you’ve chosen the option to leave them in place.
You could instead elect to bring them into the library.
That does mean your Final Cut Pro library may balloon up, but iCloud is not going to remove it because the overall library is always going to be in more use than any one of its video clips.
Keep up with everything Apple in the weekly AppleInsider Podcast — and get a fast news update from AppleInsider Daily. Just say, “Hey, Siri,” to your HomePod mini and ask for these podcasts, and our latest HomeKit Insider episode too.
If you want an ad-free main AppleInsider Podcast experience, you can support the AppleInsider podcast by subscribing for $5 per month through Apple’s Podcasts app, or via Patreon if you prefer any other podcast player.
AppleInsider is also bringing you the best Apple-related deals for Amazon Prime Day 2021. There are bargains before, during, and even after Prime Day on June 21 and 22 — with every deal at your fingertips throughout the event.
Google Drive is a great tool for cloud storage that allows users to backup files and easily share content and collaborate.
But if you have too many files in your Google Drive, you might run out of storage.
Here’s how much free storage you get, tips to clear out storage space, and how to upgrade if you need more.
How much free Google Drive storage is available
Google Drive allows users to store up to 15GB of files for free, which is fairly generous by industry standards. In fact, 15GB will last most people quite a while, especially if you just use Gmail or Google Docs.
Note: As of June 2021, photos, videos, Google Docs, Sheets, Slides, Drawings, Boards, and Jamboard files will count towards the 15GB limit; previously, these files were exempt.
However, if you are uploading large numbers of pictures, videos, or other large files, you might need to clear out space or buy more storage.
Tips to save Google Drive storage
- Clean out space. Review files stored on your Google Drive account and remove any that you don’t need and can safely delete. To display your Google Drive contents sorted by file size from largest to smallest, go to
- Delete photos and videos. Delete unwanted photos from photos.google.com and videos from Google Drive. Videos tend to take up a lot of space and are most likely among the largest consumers of your space quota.
- Get rid of email attachments. If you have a Gmail address, permanently delete emails with large attachments. You may wish to back them up locally to your computer before doing so.
- Clear trash. Wipe your Google Drive trash to permanently delete files you previously removed.
- Check for duplicates. Look for duplicate files in your Google Drive and remove them.
Upgrade to Google One for more storage
Google One is a paid service from Google that, among other features, adds additional storage capacity to your Google Drive account.
It comes in three different tiered options:
- Basic. 100GB of storage space, plus the option to add up to five family members to your plan who can also benefit from the space.
- Standard. 200GB of storage space, plus the benefits of Basic and 3% back in store credit on Google Store purchases.
- Premium. 2TB of storage space, plus the benefits of Basic and 10% back in store credit on Google Store purchases.
Quick tip: Google One can also offer benefits like Google Play credits, special hotel pricing, VPN access, and more. Read our Google One guide to learn more.
File Management in the cloud is always an hot topic when using SaaS services like Dynamics 365 Business Central.
A common request that I always see popping up on forums or from partners and customers is if it’s possible to automatically save a file on a local drive from Dynamics 365 Business Central (or more in general, from SaaS applications). As you can imagine, from a SaaS tenant you don’t have access to the local file system (so you cannot directly save a file into your C: drive or on your local network share folder). I’ve talked in the past about this topic (our Mastering Dynamics 365 Business Central book provides a full solution for this task) and I’ve also shared with you a solution on this blog that permits you to save a file from Dynamics 365 Business Central to a cloud storage (like Azure Blob Storage) and then also to an SFTP server.
I know that many of you are using the solution provided in our book, but a question that sometimes I receive is: can I map this cloud storage to a local drive, so that my users can manage files transparently by working exactly as they are used to do with the files on their local machine?
As standard, you cannot map an Azure Blob Storage container as a local drive. For this scope, you can use Azure Files that has support for mapping drives to both local and azure hosted systems. Usage is exactly the same as I’ve described in my book or in my blog post linked above.
Azure Files and Azure Blob storage both offer ways to store large amounts of data in the cloud, but they are useful for slightly different purposes.
Azure Blob storage is useful for massive-scale, cloud-native applications that need to store unstructured data. To maximize performance and scale, Azure Blob storage is a simpler storage abstraction than a true file system. You can access Azure Blob storage only through REST-based client libraries (or directly through the REST-based protocol).
Azure Files is specifically a file system in the cloud. Azure Files has all the file abstracts that you know and love from years of working with on-premises operating systems. Like Azure Blob storage, Azure Files offers a REST interface and REST-based client libraries. Unlike Azure Blob storage, Azure Files offers SMB access to Azure file shares. By using SMB, you can mount an Azure file share directly on Windows, Linux, or macOS, either on-premises or in cloud VMs, without writing any code or attaching any special drivers to the file system. You also can cache Azure file shares on on-premises file servers by using Azure File Sync for quick access, close to where the data is used.
So, what’s the full solution that normally I use to satisfy this requirement? To upload a file to an Azure File Share, simply modify the UploadFile Azure Function from the previous post in order to call a new UploadBlobAsyncToFileShare function instead of the previous UploadBlobAsync. The new UploadBlobAsyncToFileShare function is defined as follow (it works with a CloudFileShare object instead of a CloudBlobContainer object, please not that to reduce the code lines here I’ve not handled logging and exceptions):
Then, you need to map the file share as a local drive. You can do this task directly from the Azure Portal or you can use Azure Powershell for that. I normally prefer the Powershell way, and the script that creates the Azure File Share and them map it as a network drive is explained here.
Creating the Azure File Share instance is obviously a one-time operation. First you need to create a storage account, then you can create a file share instance on that storage account and then you can map those instance to a local drive. The Powershell script that performs all this for you is as follows:
When the file share is created, you have an endpoint like the following:
You can map this endpoint to a local drive letter by using the New-PSDrive cmdlet:
The New-PSDrive cmdlet creates temporary and persistent drives that are mapped to or associated with a location in a data store. Here I’m using the -Persist option in order o create a persistent drive. A persistent drive will remain active also when you close the Powershell session (otherwise temporary drives exist only in the current PowerShell session and in sessions that you create in the current session and you can’t access them by using File Explorer).
When mounted, you can see a new local disk (here mapped to the X: letter) and now you can use it as a normal drive:
Your users can now work with files in your SaaS tenant exactly like in a local drive.
The complete Powershell script that I’m using is available here.
Is there some kind of a file system or cloud service that would allow me to offload things from my local hard drive (to a NAS or cloud), and still makes it seem that all my files are still available locally? Then when I try to access one of these files, it would stream them to me. If I save, then it would stream those changes back, keeping them sync. But: it would manage space efficiently, meaning files I access often would stay cached locally and things that I haven’t touched for many months will be cleaned from the local cache. And maybe I could also specify how much I allot for local cache, e.g. 10..100 GB.
I’m mainly looking for (free and) open source software, but I’d like to know if such commercial and/or closed source software exists as well — especially if no (F)OSS versions are available.
I am mainly looking for web-based or linux-compatible apps, but I’d like to know if such software exists for other platforms as well — especially if no web/linux versions are available.
I know about Dropbox and Google Drive and alike, but AFAIK they don’t have any kind of smart caching or file streaming mechanism. The best I can do with these is manually select some folders to be synced or not to be synced. And after that I have to wait to open files after it starts downloading.
I’ve heard about this tool: torrent-mount, which mounts a virtual file system of a torrent, immediately letting you look around it. And when you open up any file it starts streaming that file to you. What’s really cool about this is that this process is all transparent to local applications: they just think that your hard drive is seeking and slow at reading, they have no idea the data comes from the web. All the network communication is abstracted away.
Downsides: AFAIK this is a one-way streaming solution, and the torrent protocol is read-only and can’t really support streaming modifications upstream. Also, AFAIK, it doesn’t keep track of how how many times you open a file, and you can’t set a cache limit either. It’s more of a cool tech demo showing: “Hey, look, it’s possible to mount torrent files as virtual file systems.” But the reading and streaming user experience is quite similar to what I am looking for.
Is there any software that you’ve used, tried or just know about that might fit for what I am looking for?
Or if you haven’t heard about a tool like that and you also would like something similar, I would be glad if you told me — maybe as a comment — so at least I know I am not alone in wishing for something like this.
In a previous tip, you mentioned that it is not recommended to store pst-files within Cloud based storage folders like OneDrive or DropBox.
I still have lots of space left in my OneDrive and DropBox accounts but not a lot of space left in my mailbox.
Is there really no way I can use all this space to archive my emails to the Cloud?
As mentioned in the previous tip, due to the size of and the file lock on a pst-file when Outlook is running, synchronizing a pst-file with cloud based storage will result in pretty much a never-ending synchronization cycle and could result in data corruption and even data loss.
That said, this doesn’t mean that you cannot use OneDrive (DropBox or any other Cloud based storage provider) at all for archiving, albeit a bit impractical.
The cloud solutions from Microsoft for email are Outlook.com (free) and Exchange Online (paid and part of Office 365 for Business).
Best thing to keep in mind; OneDrive is the cloud solution for files, not emails.
Archiving individual messages to OneDrive or DropBox
When you only want to archive a few emails to OneDrive or Dropbox, you can do so by simply dragging the messages out of Outlook and into the OneDrive or DropBox folder on your computer. You can then remove them from Outlook to free up space.
As these messages will be stored as individual msg-files, there is no problem with synchronization whatsoever.
However, since these messages are now located outside of Outlook, searching through them or sorting them as flexible as you could in Outlook is no longer possible.
You can drag and drop messages out of Outlook and into your OneDrive folder.
Archiving mail to Outlook.com or another online mail archive
When you talk about Cloud storage for emails, you are actually talking about a mail server. This is the most efficient location to store your emails in and make sure it is available to you everywhere.
If you have a large enough mailbox, you can connect to it via IMAP so that all your emails remain online and Outlook syncs all mail folders with the mail server so they are also available offline. When you currently connect to your mailbox via POP3, you can switch to an IMAP account as described in: Convert from an IMAP account to POP3.
Zip, protect, share and manage files anywhere with the world’s #1 zip utility.
- Zip and unzip instantly
- Manage all your files in one place
- Share directly to cloud, social media and IM
- Convert to PDF, add watermarks and resize photos
- Connect and share on the go with ZipShare
WinZip XP Standard
Unzip all major formats
With just a click, open all major compression formats, including Zip, Zipx, RAR, 7z, TAR, GZIP, VHD, XZ and more.
Complete file management
Easily find, open, edit, move and share your files, whether they are on your computer, network or cloud service.
Protect your privacy
Easily encrypt files as you zip to secure information and data. Create read-only PDFs and add watermarks to deter copying.
Share anywhere
Easily share large files by email, cloud services, social media and instant messaging. Quickly share links to your cloud files.
Features
ENHANCED! Zip files from any location
Easily find your most-used files and folders on your PC, network and clouds in Frequent Folders, which updates dynamically.
NEW! Easier unzipping
Use the super picker to to easily unzip locally or to the cloud.
Zip from other applications
WinZip Express lets you use popular WinZip features even when you’re working in other applications. Use it with Explorer, Microsoft Office, your scanner (Pro only), your photos (Pro only) and Microsoft Outlook to zip, encrypt, share and more.* WinZip Express tools now support Office 2016.
Device-friendly interface
Touch support puts the power of WinZip at your fingertips on any touch-enabled device or computer. WinZip is optimized for 2-in-1 computers, switching its layout automatically depending on whether you are using your system in tablet or notebook mode. Auto-hide scroll bars maximize display space on devices.
Unzip anything
Extract content from the industry’s widest selection of compressed file types, including Zip, Zipx, RAR, 7Zip, BZ2, LHA/LZH, VHD/VDMK, XZ and many more. When extracting encrypted files, WinZip auto-wipes all temporarily extracted copies to prevent misuse.
*WinZip Express is not compatible with Windows XP.
What’s New
ENHANCED! Zip files from any location
Easily find your most-used files and folders on your PC, network and clouds in Frequent Folders, which updates dynamically.
NEW! More sharing options
WinZip XP expands its sharing options, so you can share directly to YouTube, along with Facebook, Twitter and LinkedIn. Expanded instant message support means you can share via Twitter IM, and Office 365 groups, in addition to Google Talk/Google+ Hangouts, Yahoo! Messenger and Jabber. Combining WinZip’s legendary compression and encryption with the ease of instant messaging gives you high-speed sharing without compromising security.
NEW! Scan and Share
Quickly turn a photo or document into a share-ready image or PDF with the new WinZip Scan and Share feature. Start your scan right from WinZip. Then WinZip can zip it and save it locally, on the network or on a cloud service. Or share it by email, social media or instant message—encrypt if you wish to protect your scanned information when sharing. Easily share photos, documents, receipts and more. New support for flatbed scanners means you can scan multiple images into a single PDF without using a document feeder.
Pro and Enterprise only
NEW! Snap and Share
Streamline photo sharing by quickly getting photos directly from your camera to share via WinZip.
Pro and Enterprise only
NEW! More robust file management
WinZip XP takes file management further with several new features available via the new WinZip File Management ribbon.
- Create new folders on your PC, network or cloud service
- Securely delete files and folders with the new Wipe feature
- Restore accidentally deleted, copied, moved or renamed files
- Open a file from the cloud in the correct application, make changes and WinZip will update it on the cloud for you
- Open and edit a file with the default application—or open a file in an alternate application
- View property information for files and folders
- Map a folder or network location to a drive
- Copy, move, delete and multi-rename files wherever they are
- Copy a path to the clipboard; copy a cloud link to the clipboard
NEW! Previewer
The Actions Pane now displays thumbnail previews of a selected file in your zip, on the computer or the network—and for any of your cloud services that support thumbnails. Click on the expand icon in the thumbnail to see a larger image in the new Preview Pane. Preview the contents of images and documents, rotate and resize images, save images as your computer background, and share the previewed file by email, IM or social media. (Requires Windows Explorer Preview technology). Now you can scroll through files in the Previewer with the flick of a finger on touch displays.
Pro and Enterprise only
NEW! Job Wizard Super Picker
Now your backups can include files from almost anywhere and now you can simply drag and drop them from Explorer or the WinZip File pane into the Job Wizard for backup. Combine files from your computer folders, the network and cloud services in one backup. Save the resulting zip to the cloud if you wish. Automate back up and distribution by creating a job that gathers files from various cloud services, zips them and distributes the zip via email according to your schedule.
Learn how to create or convert files to cloud documents.
You can create new cloud documents in Adobe Fresco, Adobe Aero, Adobe XD, Photoshop, and Illustrator.
Adobe XD | Adobe Fresco | Adobe Aero
Cloud documents are the native file format for Adobe XD, Adobe Fresco, and Adobe Aero—all files in these apps are saved as cloud documents.
In Adobe XD, documents can also be saved as local documents. (To save as a non-cloud document, select File > Save As Local Document .)
Photoshop | Illustrator
- Photoshop: See Create a cloud document and save.
- Illustrator: See Create and save Illustrator cloud documents.
You can easily save an existing Adobe XD, Photoshop, or Illustrator file as a cloud document from the respective Creative Cloud app. You can also convert single or multiple Photoshop, Illustrator, or XD files to cloud documents from the Creative Cloud desktop app.
Convert Photoshop, Illustrator, or XD files to cloud documents
Open the file in your Creative Cloud app.
Select File > Save As .
Save your document as a cloud document. The dialog box you see depends on your app and how you saved your previous document.
In Photoshop and Illustrator, if you selected Don’t show again earlier, you see a different dialog box.
Your document doesn’t overwrite the existing file. It is saved as a cloud document and gets a new extension.
Microsoft is improving OneDrive by allowing you to make certain files stay online-only so you can free up some more drive space.
Microsoft’s OneDrive is the company’s cloud storage solution that’s built into Windows 10. It allows you to sync stored data across all your Windows 10 devices. And it continues to improve with each new feature update. Most notable was the return of “placeholders” with Files On-Demand feature for OneDrive, starting the Fall Creators Update.
We have shown you how to enable and use Files On-Demand in OneDrive in Windows 10 before. And starting with 1809 Windows 10 Build 17692 and above, you can make downloaded files from OneDrive On-Demand online-only after a set time of inactivity. This will allow you to keep files you haven’t used in a certain number of days in the cloud and free up drive space.
OneDrive Files On-Demand Online-Only
To get started, head to Settings > System > Storage and click the “Change how we free up space automatically” link beneath the Storage Sense section.
Next, scroll down a bit and under the Files On-Demand section, choose the number of days for a file you aren’t going to use to be moved to the cloud. You can set it from 1 to 60 days. You can also set it to Never if you want to make sure a file is always available to you via local storage.
That’s all there is to it. If you haven’t used a particular file for a set number of days, OneDrive will remove the local copy, which in turn frees up space on your local drive. For example, maybe you have large photos, PDFs, or video files you rarely access. You can have OneDrive move it to the cloud if you’re already done with it and doubt you’ll need it again. Do keep in mind, though, that if you won’t be able to access that file if you’re without an internet connection. So you probably don’t want to do that with important files. However, setting this up can save you a good chunk of drive space for the files that aren’t as important or even necessary.
It’s a welcome new feature and provides a solution to keep track of files and free up space in Windows 10 at the same time. For more tips, make sure to check out our guide to reclaiming drive space on Windows 10. And for troubleshooting advice on other issues, don’t forget about our Windows 10 Forums.
published 14 October 21
Should you stick with local storage, or trust data backups to the cloud?
Backing up important files and data remains vitally important, especially with all manner of security and hardware issues, ranging from hard disk failures to malware attacks.
While copying data to an external hard disk drive had long been less time-consuming and more cost-effective, the landscape has changed as the best cloud storage services have proven their safety and utility. As a result, it’s now cheaper and more secure to back up to dedicated cloud servers than keeping physical hard drives.
These leading providers also now offer seamless backups, as well as file syncing solutions, so you can make sure you always have access to recent copies of your files. Having said that: is it now time to stop buying and filling external hard disk drives and fully switch to the cloud for data backups? And is cloud storage secure?
We compared cloud storage vs external hard disk drives in order to see how both options stack up against one another.
Cloud storage vs external: Universal access
If setting up a file backup is difficult, the chances that you’ll do it frequently and regularly are low. That’s why it’s essential that you choose a backup method that works seamlessly from any device.
Cloud storage and backup technology wins handily when it comes to accessibility. To transfer files to and from the cloud, all you need is an internet connection. Want to transfer files like photos from your smartphone or tablet? You can do it from anywhere, even without Wi-Fi if you have a generous mobile data plan.
Now, try to make the same transfer from your mobile device to an external hard drive. At the very least, you need to connect your phone to your computer and your computer to your hard drive. That’s a lot of wires, and it’s not a backup you can easily set up on the go.
Cloud storage vs external: Security
Security used to be a major flaw with cloud storage, with some cloud providers losing users’ data to hacks. But, cloud storage security has come a long way in a short time.
Many secure cloud systems now use virtually uncrackable 256-bit AES (Advanced Encryption Standard) encryption to protect your data before it even leaves your devices. Some services go even further by offering zero-knowledge encryption—meaning that only you know your encryption key. This in turn means that even if a hacker got their hands on your data, they wouldn’t be able to unlock it.
To be fair, data security on an external hard disk drive is pretty strong. Hackers can’t access your hard disk unless it’s connected to your computer. However, if you broaden security to include reliability, hard disks start to look a lot less attractive.
More than one-quarter of all modern hard disk drives fail before the end of their warranty period. When that happens, it can be expensive or impossible to recover your data.
Cloud storage vs external: Sync technology
One of the biggest advantages to cloud storage is that you can keep your files backed up all the time. That’s thanks to sync technology, which runs in the background on your devices and automatically uploads any new or modified files to your storage space. There’s no need to worry about forgetting to back up your files for weeks on end.
You can also run automatic backup software with a hard disk drive. But for that to work, your hard disk needs to be connected all the time. That’s not feasible for mobile devices, and it only increases the likelihood that your drive will fail.
Cloud storage vs external: Cost per quality
For many people, the goal is simply to get the cheapest backup solution. That may make hard drives seem like the more attractive option, since you can get terabytes of storage for well under $100. Meanwhile, cloud storage often requires a monthly subscription.
However, consider what you’re getting in return for the pricing difference. If an external drive fails, the warranty may pay the cost of the drive itself. But the manufacturer won’t help you recover your files, which can cost $1,000 or more and isn’t guaranteed to work.
With cloud storage, on the other hand, there’s virtually no chance that your files could disappear. Most services create redundant copies of your files on multiple servers around the world. Plus, you get file versioning and advanced recovery options to save your data in case you accidentally delete a file.
Cloud storage vs external: Conclusion
For us, there’s little question that cloud storage is the best way to back up your data. You get much more peace of mind, and the ability to back up your data continuously from any device. In fact, it might not be too long before physical hard drives become another casualty of digital progress.
Further reading on cloud storage
Make sure to read our feature comparing on-prem vs cloud storage, and our article asking how secure is cloud storage?, which also highlights the most secure providers. It’s also worth looking at our feature explaining why cloud services should be a priority for any small business. And if you’re using an external or internal HDD, then take a look at our guide on how to check your hard drive’s health.
If there’s one good thing about the world today, it’s about options and how we get to have quite a few of them. And when it comes to freeing up disk space, there are a few things you can do.
Storage space, particularly in your disk (hard drive), is especially important for your computer to perform its tasks with the utmost efficiency. Imagine having stacks of paper works on your desk at your office. You have to go through a lot just to find the one thing you need that happened to be located beneath all the piles. Wouldn’t it be better if your desk only has one short pile? The same goes for computers. The more files the storage has, the slower and less efficient the turnover of work is. So, what can you do to free up space in yours?
Other than deleting files and uninstalling apps manually, you can also do other things. For one, you can ask for help from Windows’ Disk Cleaner for automatic file deletion.
Windows includes its own Disk Cleaner utility that will do some spring cleaning on your hard drive (in spring or any other season). It targets the temporary files and unneeded junk data that naturally builds up while you’re using your OS.
From File Explorer, select ‘This PC’ and then right-click on the hard drive you want to tidy up. Choose ‘Properties’, then under the General tab click on the ‘Disk Clean-up’ button. After a few minutes of scanning, you should see a list of file types together with how much space can be saved – choose all the ones you’d like to clean up, then click ‘OK’ to confirm.
Or you can use One Drive.
Thanks to the magic of OneDrive – Windows’ built-in cloud syncing service – you can offload some of your files to the cloud and free up space on your local machine.
From Storage (under System in Settings), click your hard drive, then ‘OneDrive’, then choose ‘Manage OneDrive’. Right-click on any file or folder, and select ‘Choose OneDrive folders to sync’.
Untick any folders on the next dialog box and these files will be stored in the cloud only, with the local copies erased (you’ll need to download them again if you need them). For important files we’d recommend making a backup on an external disk drive as well, just to be safe
Need more cloud storage? How about Dropbox or Google Drive?
The same trick we just described on OneDrive works on other cloud storage services like Dropbox and Google Drive as well – once your files have been synced to the cloud, you can delete the local copies. Make sure you don’t just delete the local copies and the cloud copies at the same time, though.
On Dropbox, right-click on the notification area icon, click the cog icon, and then select Preferences. Under the Account heading, click ‘Selective Sync’, and untick the folders you don’t want to keep saved on disk.
In the case of Google Drive, right-click on the notification area icon, then click the menu button (three dots) and choose ‘Preferences’. Under Sync options, select ‘Sync these folders only’, and again you can make your choice.
You can also use third-party tools such as CCleaner.
There are plenty of third-party utilities eager to help you free up some disk space on Windows too, with CCleaner being one of the best and most well-established. It’s available in free and paid-for versions, but even if you don’t want to spend any cash, the free edition is well worth installing.
The application targets temporary files and data that you don’t really need – cached thumbnails, browsing history, Windows log files and so on. Make your choices from the list on the left of the main Cleaner window, then click the Analyse button to see what can be cleaned up. If you’re happy to proceed, click on the ‘Run Cleaner’ button.
These tips can do so much for your disk space and overall storage space. However, if your hard drive encounters problems such as data loss that affects your work process, laptop data recovery can help you out. You can also find more help here.
An Online Hard Drive That Goes Wherever You Go
Egnyte Cloud File Server offers greater features for businesses than traditional physical hard drive solutions. Whereas physical hard drives are prone to theft, loss, crashes, disk surface defects, data loss and corruption, Egnyte’s online file server solution provides superior redundancy, scalability, reliability and enterprise-class security.
Features
Whether used as an online file server or as an online hard drive, Egnyte is easy to use, cost effective, and secure. Moreover, Egnyte provides features unavailable to physical standalone hard drives:
- File sharing – Share files and collaborate with co-workers and business partners
- File backup – Back up your files reliably into the cloud
- Large file transfer – Send large files without using e-mail or FTP servers
- Security – World class security, data protection and performance that you can trust
- File versioning – Archive previous versions of each file
- Centralized administration – Manage file and folder access from anywhere
Much more than an online hard drive
Hard disk consumer products, in of themselves, are unscalable and limited in storage space. Unless put in a RAID configuration and operated in conjunction with a tape backup unit, standalone hard drives have no disaster recovery capability, fault tolerance or data protection.
Due to physical limitations, physical hard drives cannot be shared simultaneously with others. In a business environment, an external hard drive makes for an unreliable file storage repository or computer backup system. Without file versioning, hard drives have no way to share files and transfer them safely, as there is always the danger that files can be saved over with outdated information. There is no access logging or means to manage access rights to files and folders.
Whether used as an online file server or as an online hard drive, Egnyte is easy to use, cost effective, and secure.
Share your online hard drive contents securely with co-workers and clients
Egnyte provides the capability for you to define users and groups to your online hard drive’s files and folders. For instance, you can create a client folder, and enable not only the client but specific departments within your company to have read-only access versus read-write access.
With Egnyte as an online hard drive providing you with file sharing and file versioning capabilities, you are no longer an island of information with outdated information. Road-warriors will directly benefit form your company’s administrative support updating the same information within the same file repository. Further, Egnyte supports large file transfers so that large file sizes will not cause e-mails to bounce or for standard methods to time out.
Work locally, Work globally
Egnyte provides a hybrid cloud solution which combines all the advantages of a cloud file server with the benefits of local cloud technology – an always-available local copy of your files – thereby providing wire-speed access of your business information that is automatically synchronized with cloud-based copies. This seamless integration enables you and your team to access and edit files from anywhere – with the ability to easily share information with business partners.
Вы можете удалить файлы, фотографии и видео, загруженные из iCloud для Windows, чтобы освободить место на компьютере.
Примечание. Эта функция не поддерживается в iCloud для Windows версии 7.
На компьютере с Windows откройте Проводник, затем нажмите iCloud Drive или «Фото iCloud» на панели навигации.
Нажмите файл, который необходимо удалить, правой кнопкой мыши. В iCloud Drive можно также выбрать папку, содержащую загруженный контент.
Можно просмотреть состояние загрузки файла или папки в iCloud Drive или фотографии или видеозаписи в «Фото iCloud» рядом с именем файла в Проводнике.
В контекстном меню выберите «Освободить место».
После удаления объекта Вы увидите рядом с его именем в Проводнике. Объект все еще хранится в iCloud, однако он больше не загружен на Ваш компьютер.
Примечание. Закрепленные объекты будут откреплены.
Можно также разрешить Windows автоматически управлять хранилищем файлов. См. статью службы поддержки Windows Управление местом на диске с помощью sense хранилища.
Вы также можете удалять объекты из iCloud, чтобы освободить место в хранилище iCloud. После удаления из iCloud объект будет удален со всех Ваших устройств. См. статью Службы поддержки Apple Управление хранилищем iCloud.
Published August 27, 2018
27 Aug Cloud Storage vs Local Storage: Which Is Better for File Security?
When it comes to creating a secure backup of your files, you have two options: local or cloud storage. But which is better in this cloud storage vs local storage showdown? Click here to find out.
Loss of data is every business’ nightmare. Did you know, for example, that in 2016, security breaches affected 60% of companies?
That’s quite a significant number. With that comes the worry that data may be at risk.
But you need to have storage of some sort.
We save a lot of information on our computers and devices. In fact, the files from an average 1TB disk drive would be enough to fill an airplane.
These days, companies have more choices. While a lot of people are still happy to have local hard drives, more businesses are turning to cloud storage as a convenient alternative.
Today I’m going to be looking at cloud storage vs. local storage. With this information, you’ll be able to decide for yourself which is the best for you and your business.
Advantages of Cloud Storage
One of the main benefits of using cloud storage is convenience.
Because we’re all connected to the internet (many of us 24/7), people are finding that they need access to data from anywhere in the world at any time. This is where cloud storage wins out over local storage.
If you have a cloud account, you don’t need to worry about how you’re going to gain access to your files. Wherever you log in (and from whichever device), your data will be there waiting for you.
Some websites will even give you up to 15GB for free, which means you can potentially cut down on storage costs.
Don’t think that sounds like a lot? When you consider that just 1GB of storage is equal to around 75,000 pages of documents, it forms an idea of just how generous 15GB is (you do the math).
One of the other advantages of cloud storage is the ability to recover data.
I’ve already mentioned the benefit of being able to access your files from anywhere with an internet connection. But it goes beyond mere convenience.
How many times has a laptop or tablet become corrupted and unusable? What happens to all that data that’s stored on there?
Chances are it’s lost forever. But with cloud storage, your files will still be there ready for you to access from another computer.
Pro tip: Now is probably a good time to say that even if you use cloud storage, it’s still highly recommended that you implement some sort of backup plan in case of any mishaps. It’s always best to be safe than sorry.
Disadvantages of Cloud Storage
No storage type is going to be completely perfect. Cloud storage will still have some drawbacks which businesses need to be aware of.
One of the major pitfalls is speed. Because your files are being stored online, you need a way to connect to it.
If your bandwidth is not up to par, or is having a bit of a bad day, gaining access to your cloud account can be a little sluggish.
It’s also worth pointing out that while cloud storage is safe, you are still sending your data over the internet. Security measures are being implemented and improved upon all the time, but you still run a minor risk whenever you login.
Advantages of Local Storage
Of course you can always stick with local storage if you prefer. Many people do and there are reasons why.
While a lot of businesses are now happy to use cloud storage, having a physical storage device can still prove useful.
One of the major advantages to using local storage is the range of sizes you can get. While 15GB is definitely a good amount for cloud storage, some people prefer the enormity of, say, a 2TB hard drive.
This usually means that you can use less hard drives for many more files. However, hard drive storage doesn’t last forever (more on that shortly).
Local storage is also not dependent on internet technology. Once you save something locally and you need access to it, boom, you’re right there.
If everything is saved offline, then no amount of internet downtime can stop you from gaining access to your data.
Disadvantages of Local Storage
It goes without saying that if you’re reading this, you can probably guess one of the biggest disadvantages to offline storage: accessibility.
Yes, you can always purchase external hard drives, but when it comes to having access to your data, this is where local storage falls down.
If you’re in a meeting, but you’ve brought a different laptop or you’re using a third party computer, how will you get a hold of your files if they’re stored elsewhere?
One of the disadvantages is that you can easily forget a hard drive, whereas you can’t forget to bring your cloud account to a meeting, unless there is no internet available.
There’s also the question of cost. Hard drives can run into the hundreds (if not thousands) of dollars the more you acquire.
Depending on your business needs, you might not even need multiple 3TB hard drives. That’s money that might be going to waste.
But let’s say you’re happy to pay for extra storage. You still have the inconvenience of having to upgrade your hard drives from time to time.
The costs will add up, not to mention the physical space you need to store them (especially if you have a server).
Cloud websites can easily arrange for additional storage for a fee without you having to lug a lot of hardware around.
Cloud Storage vs. Local Storage: The Fight for Supremacy
Now that we’ve looked at the advantages and disadvantages, it’s easy to see why cloud storage vs. local storage is such a hot topic.
I personally lean more towards cloud storage. The reasons listed above being why.
If you run any type of company, you need to have internet access. If a lot of business is conducted online, then it makes sense that having important documents that are safely stored and accessible from anywhere in the world would be the better option.
If you would like to know more about cloud storage and other IT solutions that we here at Pegasus Technologies provide, Contact us or visit our Home Page.
Don’t wait for spring cleaning to tidy up your Google Drive.
Sarah Jacobsson Purewal
Sarah is a freelance writer and CNET How To blogger. Her main focus is Windows, but she also covers everything from mobile tech to video games to DIY hardware projects. She likes to press buttons and see what happens, so don’t let her near any control panels.
Google gives you 15GB of free space in Google Drive, which seems like a pretty good deal compared to Dropbox’s 2GB and Box’s 10GB. But there’s a catch — that 15GB limit includes your Gmail account (messages and attachments) and Google Photos.
Those emails and photos add up quickly, and you might find yourself bumping up against that 15GB limit sooner than you expected.
Fortunately, it’s easy to hunt down the files, messages, attachments, and media that’s taking up valuable gigabytes and reclaim that Google Drive space for yourself.
More Tech Tips
- How to delete apps on Android: 4 ways to uninstall them and free up space
- iPhone ‘Other’ storage: Yes, you should be clearing it out
- This browser stops websites from tracking you better than Chrome does
Step 1: Find the problem
To find out what’s taking up so much space on your Google Drive, go to Google’s Drive storage page. Here, you’ll see a pie chart that shows you how much space you’re taking up; roll over the chart to see a breakdown by platform.
Sarah Jacobsson Purewal/CNET
As you can see, the majority of my Google Drive space is being occupied by Gmail messages and attachments, although I also seem to have about 4GB tied up in Google Photos.
On this page, you can also see how much total storage you have (including any bonuses you may have earned), and you can upgrade your Google One plan if you feel like you need more space. Google One plans start at $2 per month for 100GB or $20 per year and go up to $10 per month for 2TB.
Step 2: What counts toward your limit?
Not everything in your Google Drive counts toward your storage limit, so don’t go around indiscriminately deleting files. Anything you create with Google Docs, Google Sheets, or Google Slides does not count toward your limit (neither does any Google Doc, Sheet, or Slide shared with you). Pretty much everything in Gmail counts, but only photos larger than 2,048×2,048 pixels and videos longer than 15 minutes in your Google Photos count toward your Drive storage limit.
Step 3: Clean up Drive
Open up Google Drive and take a look at My Drive. If you see a grid of thumbnails instead of a list, click the List view button in the upper-right corner of the screen.
Sarah Jacobsson Purewal/CNET
You should now see your Google Drive files listed and sorted by name. Google used to let you sort your Drive files easily by file size, but if you click the Sort button in the upper right corner, you’ll see that your only sort options are Name, Last modified, Last modified by me, and Last opened by me.
Sarah Jacobsson Purewal/CNET
But you can still sort your files by file size: In the lower-left corner of the screen, you should see the amount of storage space you’re using and a link that says Buy more storage. Hover over this area until a box with a breakdown of your Drive storage pops up. At the top of the list, you’ll see Drive – click here.
Sarah Jacobsson Purewal/CNET
Your Drive folder will now be sorted by “Quota used” or file size, and you can start deleting the larger files to free up space.
Sarah Jacobsson Purewal/CNET
If you have PDF files that you’d rather not delete, you can save them and free up space by converting them to Google Docs (or Sheets or Slides, depending on the file). To do this, right-click on the PDF file, hover over Open with, and choose Google Docs from the drop-down menu.
Sarah Jacobsson Purewal/CNET
A new Google Doc with the same name as your PDF file will open, and you can delete the old PDF file.
Once you’ve deleted the files from your Drive, you’ll need to empty your Trash folder. Click Trash, select the files you want to delete forever, right-click and then click Delete forever. Until a file has been deleted forever, it will continue to take up space on your Drive.
Step 4: Tackle your Google Photos
I hardly use Google — so why do I have 4GB of photos in Google Photos? Because I take advantage of Android’s automatic photo backup service, which uploads all the photos I take on my Android phone to my Google Photos account at full size.
Unfortunately, you can’t really search Google Photos by file size, so going through and getting rid of storage hogs is going to take some extra work. First, go to the Google Photos page and click Photos to see all of your photos.
To delete photos, hover over them until a little check box appears in the upper left corner. Click the check box, and all of your photos will gain check boxes. Check all the photos you want to delete and then click Delete to delete them.
Sarah Jacobsson Purewal/CNET
To stop your Android phone from automatically uploading full-size photos, open the menu icon on the top left and go to Settings > and select High Quality. High Quality photos will be smaller than the original resolution taken by your phone, and therefore will take up no space in Drive.
Step 5: Purge your Gmail
If you’ve made it this far, well, let’s face it — your Gmail account is probably taking up the majority of space on Google Drive. To rid your Gmail of large attachments and unwanted newsletters, check out our article on scrubbing out your Gmail. If you need help organizing your inbox so you can find the old messages you no longer need to hang onto, check out these 10 tips for organizing your Gmail .
Local Recording saves the recorded file on your computer’s hard drive.
Local recordings can not be uploaded to Zoom Cloud. You need to use cloud recording cloud recording to
save videos in Zoom’s cloud . Paid users can do cloud recording.
However, you can share your local recording with others by uploading to a third party cloud storage like Dropbox or Box, a content / learning management system or a video sharing site like Youtube or Vimeo.
How to upload to the cloud
- Find a recording on your computer.
The easiest way to do this is to open the Zoom client. - Click [ Meeting ].
- Click [ Recorded ].
- Place the cursor on the meeting for which you want to view recordings and click Open .
Or, recording data is stored in the following folder by default. C:Users admin Documents ZoomYYYY-MM-DD HH.MM.SS Meeting Title Meeting ID - The folder where the recording file is saved opens.
mp4 files are video files. - Then go to Dropbox , Box , Google Drive , Youtube , Vimeo , or another platform to upload MP4 files.
Related article
Local record
Cloud record
Which is better recording quality, cloud recording or local recording?
What happens if I use all my cloud usage? Will recording stop?
When recording a meeting, about the time that can be recorded in the cloud 1GB
| KB ID: | 2236 |
| Product: | Veeam Backup & Replication |
| Version: | 9.x |
| Published: | 2017-02-09 |
| Last Modified: | 2022-04-02 |
| Languages: | FR |
Cheers for trusting us with the spot in your mailbox!
Now you’re less likely to miss what’s been brewing in our knowledge base with this weekly digest
Oops! Something went wrong.
Purpose
You have backup files on a standard repository that you wish to move to a Scale-Out Backup Repository (SOBR).
Cause
Scale-Out Backup Repositories have special considerations for how backup files and metadata are distributed. Thus, simply copying files to one extent may be insufficient for a rescan of the repository to detect them properly and import them.
Solution
IMPORTANT: This process does not apply to Cloud Connect, and should not be used by providers. If you are a provider attempting to migrate tenant data to SOBR, please contact support for assistance.
If you have not yet created a SOBR:
- Create simple repositories, and at least one of them should be a path where backup files to be imported are stored (e.g., if backup files are in D:\Backups\Backup_Job_1\ then create a repository referencing the path D:\Backups).
- Re-scan the simple repository or repositories, and ensure all backups are imported.
- Create the SOBR and add the relevant repositories as extents.
- During the creation process Veeam will inform via confirmation prompt that “Jobs and backups using this extent will be automatically updated to point to the scale-out backup repository.”
- If any jobs are not mapped to the backup files now within the SOBR, map them per the standard process.
If you have a SOBR and need to introduce new backups:
- Place the backup files to be imported in a temporary path. (e.g., if backup files are in D:\Backups, either copy or move them to D:\Backups-temp. A move is usually much faster.)
- Create a new simple backup repository that references this path (in our example, D:\Backups-temp).
- Re-scan the repository, and ensure all backups are imported.
- You can map the pre-existing job to the backup files’ new location now, or at the end.
- Edit your existing SOBR and add the new temporary repository to its list of extents.
- Place the new temporary repository extent in Maintenance Mode.
- Evacuate the extent. Veeam will redistribute the backup files to other extents in the SOBR.
- If you did not map the original job in step 4, do so now.
If redistribution of files is not desired or necessary, you can simply copy the folder containing VBM and backup files to an existing extent. Rename both path and VBM to ensure import, and re-scan.
If you need to move a backup from SOBR to a simple backup repository:
- If you haven’t done so yet, create a new simple backup repository.
- In the root folder of the new simple backup repository, create a folder with the name of the job folder on SOBR.
- (Optional) To avoid automatic rescans of SOBR finding the files during the move again, place the extents with the job files in Maintenance Mode.
- Remove the backups on the SOBR from the Backups > Disk section using the option Remove from configuration.
(Do not click Delete from disk) - Check the job folders on each Extent and move any VRB/VBK/VIB files you find to the newly created folder on the simple backup repository.
- Move one of VBM files from any of the job’s job folders on SOBR to the newly created job folder on the simple backup repository.
- Remove the leftover folders with the job name and VBM files from all extents of SOBR.
- Rescan the simple backup repository. It will import the backup into configuration.
- Map the job which you want to use for this backup to the newly imported Backup.
More information
- Please review Limitations for Scale-Out Backup Repositories.
- To let Veeam Backup & Replication automatically import backups during rescan of a scale-out backup repository, names of VBM files and paths to VBM files (starting from the backup repository root to VBM files, not including the root itself) must contain only allowed characters:
- Alphanumeric characters: a-zA-Z0-9
- Special characters: [email protected]^
The name of the VBM file and path to VBM files must not contain spaces.