To help manage your laptop’s battery power use, Windows 10 1809 includes a couple of new monitors that help monitor energy use on a per-app basis.
When you are always on the go and working on your laptop, power management is crucial. And you’re always looking for ways to get the most battery life possible as possible. Windows 10 continues to evolve and is constantly providing new and better power management tools. There are more power options in the Settings app, a one-click button to enable the Battery Saver feature, and the October 2018 Update (build 1809); it also includes a new way to monitor app power usage in Task Manager.
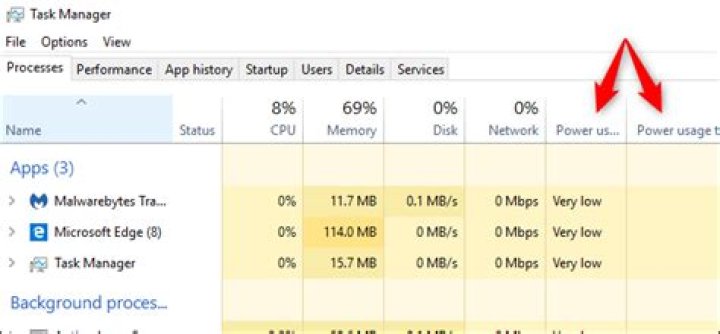
Power Usage Windows 10 Task Manager
The new feature will allow you to view the current power usage on a per-app basis. As well as monitor the system resources an app takes up over time. For example, it uses the disk, processor, and graphics usage on each app and processes to calculate the overall energy impact on your system.
To monitor the power usage of apps, open task manager. Either right-click the taskbar and choose Task Manager or hit the Windows key type: type: task manager and hit Enter. After it launches, click the Processes tab, and you should see a couple of new columns labeled “Power usage” and “Power usage trend.”
The Power usage column displays how much power the app or service is drawing in real-time. The Power usage trend column shows the amount of power an app or process uses over two-minute increments.
If you don’t see the two new columns, you need to add them. To do that, right-click on any column header and choose the “Power usage” and “Power usage trend” options. Of course, you can then move the columns in any order you prefer them to appear when you launch task manager. And like the other columns, you need to click on them to sort from low to high or high to low.
Now, remember that this keeps track of processes and apps and some processes you can’t disable. Typically, you will find that the apps taking up the most power are the usual graphics-intensive suspects like games and photo processing apps. However, it’s an excellent tool to have as you might find something you didn’t expect to be using so much energy. Then you can kill the offending app or use it sparingly throughout the day.
So, in addition to some significant noticeable new features in Windows 10 1809, this simple power monitoring ability will help you manage overall battery performance to help you get your PC through the day.
Chris Hoffman is Editor-in-Chief of How-To Geek. He’s written about technology for over a decade and was a PCWorld columnist for two years. Chris has written for The New York Times, been interviewed as a technology expert on TV stations like Miami’s NBC 6, and had his work covered by news outlets like the BBC. Since 2011, Chris has written over 2,000 articles that have been read nearly one billion times—and that’s just here at How-To Geek. Read more.
Windows 10’s Task Manager now shows you the power usage of each process on your system. This feature is new in the October 2018 Update.
How to See a Process’s Power Usage Details
First, open the Task Manager by right-clicking your taskbar and selecting “Task Manager,” or by pressing Ctrl+Shift+Esc. If you don’t see the full Task Manager pane, click “More Details” at the bottom.
This information appears on the Processes pane but is hidden by the small size of the window. Enlarge the window by clicking and dragging at the corner until you see the Power Usage and Power Usage Trend columns, or scroll to the right. You can also drag and drop the headings to reorder the list of columns.
If you don’t see these columns, right-click the headings here and enable the “Power Usage” and “Power Usage Trend” columns.
If these options don’t appear in the list, you haven’t upgraded to the October 2018 Update yet.
What Do “Power Usage” and “Power Usage Trend” Mean?
Each process has a value under these columns. The Power Usage column tells you how much power the process is using at this exact moment, while the Power Usage Trend column shows you the longer-term trend. You can click the columns to sort by either type power usage.
For example, a process might currently not be using much power at this very moment, but might be using a lot of power in general. Or, a process might be using a lot of power right now, but it tends to use very little power. Focus on the trend for a better idea of how much power a process uses.
Unfortunately, Windows doesn’t give you precise numbers here. It just gives you a rough idea of power usage, which should be “Very Low” for most processes on your system. If a process is using more power than that—especially if it’s running in the background—you may want to quit that process to save battery power on your laptop or tablet.
Microsoft hasn’t explained exactly what the various words here mean. We don’t know the precise difference between “Very low” and “Low,” for example.
How to See Which Apps Have Used the Most Power
To see which apps have used the most battery power on your PC, head to Settings > System > Battery. Click the “See which apps are affecting your battery life” option here.
The Battery section is only available when you’re using a laptop, tablet, or another device with a battery. You shouldn’t need to see which apps are using the most power on a desktop PC without a battery, anyway.
This screen shows a list of which apps have affected your battery life the most. You can choose to see power usage over the last one week, 24 hours, or 6 hours.
Even if an app is near the top of the list, it might not use a lot of power for what it does. It might just mean you use the app a lot. For example, whatever web browser you use will probably be near the top of the list just because you use it so much. It’s used a large amount of battery power, even if it’s used that battery power efficiently over a long period.
These new columns continue a welcome trend of adding information to the Task Manager. In the Fall Creators Update, Microsoft added GPU usage data to the Task Manager.
A lot of processes on your Windows are shown running in the Task Manager, you can see which processes are consuming CPU, memory, and disk, but did you know that you can also view power usage of a particular process?
The Task Manager shows you specified columns which include the name of the process, its status, CPU, Memory, Disk, and Network usage. After the October 2018 Windows update, you can now add two new columns in the Task Manager – Power usage and Power usage trend.
How To View Power Usage In Task Manager [Windows 10]
To view the power usage of processes in the Task Manager, follow these steps.
- Open Task Manager by CTRL + Shift + Delete keyboard shortcut or use the taskbar by right-clicking on it and selecting Task Manager.
- Once you open the Task Manager, click on More Details at the bottom.
- Under the Processes tab, right-click on any columns and check the Power usage and Power usage trend .
If you already see these columns, no need to add them. In case if it’s not shown, enlarge the Task Manager window or resize the columns to accommodate the added ones. If you don’t see the two options in the list, that means your Windows isn’t updated yet, make sure you update it to the latest version to get this feature.
Now, what do the Power usage and Power usage trend do? The Power usage shows you the current power consumption of a particular process while Power usage trend shows you the long term trend of the power usage of the process. Depending upon the usage of the, it shows Very Low, Low, High, and Very High.
Let’s say you are using Microsoft Edge and it shows Very Low usage means the Microsoft Edge won’t affect the battery performance significantly whereas a high-end game like PUBG that you are playing shows High usage means it drains the battery power drastically. For games, you can also add the GPU usage column in the Task Manager.
You can check which apps have used the most power and which apps have used the least. This is similar to the battery usage on most Android smartphones.
- Go to Settings -> System -> Battery and click on ‘ See which apps are affecting your battery life ‘.
That’s was it. I f you like this quick guide, make sure you also check out more tutorials, guides, tips, and tricks related to Windows as well as Mac. To get updates on the latest smartphones and tech, follow us on our social media profiles.
Closing every possible program can help you eke out more endurance when your laptop is running low on battery. But not every program fully closes when you exit its window, and sometimes background processes can suck up a surprising amount of computing power. Fortunately, the Windows 10 Task Manager includes tools that let you quickly identify the power hogs on your computer, though the information isn’t the most straightforward to locate.
Start by pressing Ctrl + Shift + Esc to summon Windows 10’s Task Manager. By default, it will open to a tab showing all the processes running on your system.
Brad Chacos/IDG
Task Manager’s default view. (Your processes and programs will vary.)
The information you need to sniff out power hogs is right here, but you probably can’t see it yet. Task Manager opens in a minimized window rather than full screen, and as you can see above, the layout of the Processes tab make it looks like that “GPU engine” listing is the end of the information. It’s not, though—notice the scroll bar at the bottom of the window?
Brad Chacos/IDG
The expanded view shows the power tracking options. What are you doing, Chrome?!
If you scroll to the right—or better yet, resize your window to show a wider horizontal view with all columns in view—you’ll find “Power usage” and “Power usage trend” columns at the end of the row for each process. The “power usage” information details how much energy the process is using currently, while the “power usage trend” column shows power usage over the last two minutes. Clicking the name of each column sorts all the processes from worst to best, or vice-versa if you click it again, so you can find troublesome programs lickety-split.
If you don’t see those columns for whatever reason, right-click any column in the Task Manager’s process tab and make sure “power usage” and “power usage trend” are selected in the menu that appears, as shown above.
Simply right-click a process and select End Task if it’s sucking down power.
Note that accidentally shutting down a critical system process can require you to restart your computer, and this isn’t a method you’ll want to perform regularly aside from spot checks for power-hungry rogue software. But if your laptop is on its last legs and you’re trying to squeeze every last ounce of juice from it—like I am now, during a prolonged power outage—this Task Manager trick can help out.
Don’t forget to turn down your screen brightness too! You’ll find it in Windows 10’s display settings options.
How to See Power Usage in Task Manager. One of the cool features of Windows 10 that can be useful is the display of the amount of energy consumed by each of the operating system processes through the Task Manager.
Windows 10’s Task Manager now shows you the power usage of each process on your system. This feature is new in the October 2018 Update.
Tutorial Process’s Power Usage Details
– Open the Task Manager by right-clicking your taskbar .
– Select Task Manager or press Ctrl+Shift+Esc .
Note: If you don’t see the full Task Manager pane, click More Details at the bottom.
This information appears on the Processes pane but is hidden by the small size of the window.
Enlarge the window by clicking and dragging at the corner until you see the Power Usage and Power Usage Trend columns, or scroll to the right. You can also drag and drop the headings to reorder the list of columns.
If you don’t see these columns, right-click the headings here and enable the Power Usage and Power Usage Trend columns.
Power Usage and Power Usage Trend
The Power Usage column tells you how much power the process is using at this exact moment, while the Power Usage Trend column shows you the longer-term trend .
Note: You can click the columns to sort by either type power usage .
A process might currently not be using much power at this very moment, but might be using a lot of power in general. Or, a process might be using a lot of power right now, but it tends to use very little power.
Focus on the trend for a better idea of how much power a process uses.
Unfortunately, Windows doesn’t give you precise numbers here. It just gives you a rough idea of power usage, which should be Very Low for most processes on your system.
If a process is using more power than that—especially if it’s running in the background—you may want to quit that process to save battery power on your laptop or tablet.
Microsoft hasn’t explained exactly what the various words here mean.
How to See Which Apps Have Used the Most Power
To see which apps have used the most battery power on your PC, head to Settings >> System >> Battery .
Click the See which apps are affecting your battery life option here.
The Battery section is only available when you’re using a laptop, tablet, or another device with a battery.
You shouldn’t need to see which apps are using the most power on a desktop PC without a battery, anyway.
This screen shows a list of which apps have affected your battery life the most. You can choose to see power usage over the last one week , 24 hours , or 6 hours .
Even if an app is near the top of the list, it might not use a lot of power for what it does. It might just mean you use the app a lot.
For example , whatever web browser you use will probably be near the top of the list just because you use it so much.
It’s used a large amount of battery power, even if it’s used that battery power efficiently over a long period.
These new columns continue a welcome trend of adding information to the Task Manager.
Note: In the Fall Creators Update, Microsoft added GPU usage data to the Task Manager .
Also, see:
Dear user, we hope you would enjoy this tutorial, you can ask questions about this training in the comments section, or to solve other problems in the field of Eldernode training, refer to the Ask page section and raise your problem in it as soon as possible. Make time for other users and experts to answer your questions.
Alongside the slew of improvements and new features, the Windows 10 October 2018 Update (version 1809) also ships with an improved version of Task Manager, which adds two additional columns to the “Processes” tab that you can use to analyze the power usage for apps and services running on your device.
The new feature uses the processor, graphics, and disk power information to calculate the energy impact, and it’ll help you to understand which apps and services use the most power versus those that use the least power. So, if you use a laptop or tablet on the go, you know which apps to avoid to optimize the battery life. Or if you’re noticing that your battery is draining faster than usual, this information can give you an idea of which app is causing the problem.
In this Windows 10 guide, we’ll walk you through the easy steps to get an understanding of the energy impact of running apps and services on your computer.
How to view power usage for apps on Task Manager
To quickly view power usage information for apps and services, use these steps:
- Right-click the taskbar.
- Select the Task Manager option.
- Click on the Processes tab.
While in the Processes tab, you’ll notice two new columns, including “Power usage” and “Power usage trend.”
Using the “Power usage” column, you can see the power an app or service is drawing in real-time.
Then using the “Power usage trend” column, you can also see the power usage of apps and services, but as a trend over two minutes. (When you first start the app, it’ll take two minutes to populate the information.)
How to add power usage views for apps to Task Manager
If you don’t see the two new power usage columns, use these steps:
- Right-click the taskbar.
- Select the Task Manager option.
- Click on the Processes tab.
Right-click any of the available column headers, and select the Power usage option.
In the case that the options are not available, then you’re probably not running the latest version of Windows 10. This feature is available starting with the October 2018 Update and later.
More Windows 10 resources
For more helpful articles, coverage, and answers to common questions about Windows 10, visit the following resources:
FFXIV director Naoki Yoshida wants to work on the MMO for another 10 years
The director and producer of Final Fantasy XIV, Naoki Yoshida, has just made a few announcements concerning future content for the Endwalker expansion and his own future involvement with the game. Read on to learn more about what Yoshida has to say.
5 reasons why Microsoft canceling ‘Project Andromeda’ was the right choice
Microsoft’s Project Andromeda got a full unveiling thanks to our reporting. While many fans of Microsoft lament the decision to cancel the project, there are very few reasons to believe it would have worked out. Here are five justifications for why killing the OS was a good idea.
Join us LIVE for the Windows Central Video Podcast today at 2:30PM ET
We’re LIVE with the Windows Central Video Podcast today at 2:30pm ET, make sure you’re there!
These 10 apps are must-haves apps for any new Windows PC
You just purchased a new PC and set it up, and now you’re looking for some great apps. Look no further. These are the best apps for your new Windows 10 PC.
The recent Windows 10 October update has taken the geeks by storm as it has some serious issues like data loss. Despite many negative feedbacks, there’s always a lot to look on the other side of a coin. Right from improving the search option from the start menu to the dark theme for file explorer, the design & display looks staggering! Besides that, Windows 10 update now shows power usage & power usage trend in the task manager. We’ll look into these two options in detail later on. Let’s first discuss about power usage in Windows 10.
If you’re wondering where your laptop’s battery power is used or where the maximum memory space, CPU & GPU is used, you need to understand the power usage displayed in Windows 10’s task manager.
Raise your hands if your task manager was always open when you were using Windows XP or Windows 7 on your PC. And the reason for that was obvious; the hanging of a few apps and you close them right away with the task manager just with a click. Isn’t it? But have you ever tried to know why the apps crash/hang? It’s basically due to more usage of CPU & Memory (RAM) used. Let’s dig in detail starting with how to access task manager in Windows 10.
How to Open & Access Task Manager in Windows 10?
1.Right click on Taskbar & tap on Task Manager to open it or simply use CTRL + Shift + Esc to open directly or press CTRL + Alt + Del and select task manager.
2. Once you open the task manager, you see the list of apps which are already open. But to dig deeper and know the detail of the app, tap on More Details as shown above.
3.It now opens up the task manager displaying complete details including CPU, Memory, GPU etc used by these apps along with background processes too which are important too. You can clearly see that Google Chrome is taking up more memory (1.5GB almost) to run the app.
4. If you feel that the apps running currently are freezing or are of no use, you can simply do a
right click on that particular app in task manager and choose end task to close that particular
app.
5. To know how the system works in depth, you need to choose the performance option.
tab in task manager. You can also select Open Resource Monitor option to know more about
CPU, Disk, Memory, GPU etc in detail.
6. One can explore more options like App History, Startup, Users, Details & Services to know more about the functionalities of task manager in Windows 10.
Let’s now discuss the startup option of task manager which can improve your system startup speed if done in a right way!
How to Speed Up Start Time using Task Manager in Windows 10!
1. Open task manager by following above given procedure.
2. Tap on Startup option as shown in below screenshot.
3. As you can see that the startup impact of 3 of the apps in task manager has a high impact on startup time. This slows down the startup speed in your laptop and desktops too.
4. To make sure your system starts quickly, you need to disable these apps. To disable them, you need to right click on particular app & select disable option.
5. Once you disable them, restart your system to see the difference. We’re sure you will see a change in the startup speed of your Windows 10 laptop/desktop.
So this is how you can speed up start time in Windows 10 using task manager.
Updated Features of Task Manager after Windows 10 Update
As we said earlier we will discuss the latest features in detail, let’s see what are the newly added features in Task Manager after Windows 10 October update; power usage & power usage trends. Although not all have got this feature, it has rolled out in a Windows 10 update to many users.
1. Power Usage!
Power usage option shows the power used by a particular app in live; power used by a particular app at present! For most of the process, it shows very low. It’s still not clear that what’s the difference between very low & low which shows up in power usage tab.
2. Power Usage Trend!
Power usage trend is a similar option to power usage but it doesn’t show live power used by the process. Instead, it shows the overall trend or you can say the power history of a particular app.
How Power Usage & Power Usage Trend Work in Task Manager?
If you see that the power used is high in power usage tab don’t worry. Just have a look into trend option as well, if it shows low, then you must be okay and need not do anything. The reason is, for the time being the app, it might use high power but the overall trend could be low. If you get the overall trend power usage high, then you certainly need to close that process if it’s not important.
Note: While closing any particular process or task, make sure that there isn’t any “Windows” word included in the description. If it’s a process or task related to Windows, the system might end up being unstable if you stop, disable or end the task.
How to Check Power Usage of Battery from System Settings
If you’re on Laptop and want to see which apps are using the most power, then you need to head over to Settings > System > Battery > See which apps are affecting battery life. This option doesn’t come on the desktop as it doesn’t use battery; it’s just for laptop users.
Once you tap on “see which apps are affecting your battery life” option, you will see a list of apps which use the most power in your laptop.
Wrapping Up!
So this is how the task manager is useful to understand the power usage in Windows 10. Do let us know in comments if you have any queries regarding the same.
The new option in the task manager lets you see the current and overall power usage of a process or application. Here are the steps to see power usage in task manager.
Every application in Windows, whether it is running in the foreground or background, uses some amount of power. Depending on what the application is doing, the power usage will be very high, high, medium, or low. For example, if you are encoding a video, the power usage of the encoder application will be high compared to other processes like your browser. On laptops, the higher the power usage is, the lower will be the battery life. So, it is important to monitor the application power usage on Windows 10. If a certain application’s power usage is high, timely monitoring will help you stop it from draining the battery.
Thankfully, the Task Manager on Windows 10 has a neat little feature that displays the Power Usage and Power Usage Tread of every running process or application. Using that, you can easily determine if an application’s power usage is low, medium, high, or very high and take steps accordingly.
Without further ado, let me show you the steps to see power usage in the task manager on Windows.
Steps to See Power Usage in Task Manager on Windows 10
To see the power usage details of a process in the task manager, follow the steps below.
- Open the task manager.
- Go to the “Processes” tab.
- Right-click on any section heading.
- Select the “Power usage” checkbox.
- Select the “Power usage trend” checkbox.
- You will see the new Power Usage and Power Usage Trend coloums to the right.
Detailed Steps
1. First, we need to open the Task Manager. So, right-click on the taskbar and select the “Task Manager” option. This will open the Task Manager. You can also open it with the “Ctrl + Shift + Esc” shortcut.
2. After open the Task Manager, select the “Processes” tab. This is where you will find all the running processes and applications.
3. Since the Power Usage and Power Usage Trend are new options, they might not be visible on your machine. So, we need to make those columns visible. To do that, right-click on any section heading.
4. From the right-click options, select both “Power Usage” and “Power Usage Trend” options.
5. After enabling the options, you will see the Power Usage and Power Usage Trend coloums to the right side of the Processes tab.
Depending on the power usage of the process, the power usage and power usage trend columns are updated in realtime. By monitoring these columns, you can easily identify the power hungry processes right away.
Difference Between Power Usage and Power Usage Trend
Though both Power Usage and Power Usage Trend sounds and looks the same, they both represent different things.
Power Usage shows the current or real-time power usage by the target process or application. Depending on what the application is doing right now, the power usage will be anywhere between low, medium, high, or very high.
Power Usage Trend shows the long term power usage of the target process or application. For example, if the process is running for 30 minutes, the Power Usage Trend will show the average power usage trend in that amount of time. If the power usage trend is high or very high, it means that target process is using a lot of power for a long time. Generally, resource intensive applications like video editors, image editors, 3D applications, recording applications, etc., will have overall medium to very high power usage trends.
That is all. I hope that helps. If you are stuck or need some help, comment below and I will try to help as much as possible. If you like this article, check out how to force quit programs in Windows 10.
The task manager can now show power usage by each program or process. Follow these steps to show power usage in task manager on Windows 10.
Every program or process running in your system, be it in foreground or background, will consume some amount of power. Generally, the power usage is directly proportional to what the program is doing and how heavy of a task it is performing. For example, if you are playing the latest AAA title or rendering a video, that particular program’s power usage will be very high. Conversely, a simple taskbar widget program will consume very little almost insignificant power.
For the most part, most Windows 10 users never need to worry about the power usage or monitor it. However, If you are curious to know which processes are consuming a lot of power then you can do that by enabling the Power Usage column in the Task Manager. Once you do that, the task manager will show the current power usage of every running process or program. In addition to that, you can also see the overall power usage tread in the “Power Usage Trend” column.
In this simple and straightforward Windows 10 guide, let me show you the steps to show power usage in task manager for any program or process.
Note: The steps shown below are only applicable to Windows 10. Also, make sure you are running Windows 10 v1903 or higher. Otherwise, you will not be able to see the power usage. Check Windows 10 version.
Show Power Usage in the Task Manager
To show the Power Usage, you have to enable the Power Usage column in the Task Manager. Here is how to do it.
- Right-click on the taskbar.
- Select “Task Manager.”
- Go to the “Processes” tab.
- Right-click on any column heading.
- Select the “Power usage” option.
- You will now see the power usage column in the task manager.
- Each process’s or program’s power usage will be in this new column.
First, you need to open the Task Manager. To do that, right-click on empty space on the taskbar. Next, select the “Task Manager” option from the list. As an alternative, you can also press the “Ctrl + Shift + Esc” shortcut or search for Task Manager in the Start menu.
After opening the Task Manager application, go to the “Processes” tab. Now, right-click on any column heading and select the “Power Usage” option.
This action will show the Power Usage column in the Task Manager. From now on, you can see the current power usage of any running program or process under the Power Usage column.
If you want to, you can also enable the “Power Usage Trend” option in the same manner. This column will show the overall average power usage of an application or process since the application is started.
That is all. It is that simple to show power usage in the Task Manager. If you don’t want to see these columns, simply follow the same steps but uncheck the Power Usage and Power Usage Trends options.
I hope that helps. If you are stuck or need some help, comment below and I will try to help as much as possible.
Windows 107; s Task Manager currently reveals you the power use of each procedure on your system.
This attribute is brand-new in the October 2018 Update. Just how to See a Process7; s
Power Usage Details Initially, open up the Task Manager by right-clicking your taskbar and also choose; Task Manager,; or by pushing Ctrl+Shift+Esc. If you don7; t see the complete Task Manager pane, click; More Details; near the bottom.
This info shows up on the Processes pane yet is concealed by the tiny dimension of the home window. Increase the size of the home window by clicking and also dragging at the edge up until you see the Power Usage as well as Power Usage Trend columns, or scroll to the right. You can likewise drag as well as go down the headings to reorder the checklist of columns.
If you don7; t see these columns, right-click the headings right here and also make it possible for the; Power Usage; and also
; Power Usage Trend; columns. If these alternatives don7; t show up in the checklist, you haven7; t updated to the October 2018 Update yet.
What Do; Power Usage; as well as; Power Usage Trend; Mean?Each procedure has a worth under these columns. The Power Usage column informs you just how much power the procedure is utilizing at this specific minute, while the Power Usage Trend column reveals you the longer-term pattern. You can click the columns to type by either kind power use.
For instance, a procedure may presently not be making use of much power at this actual minute, yet may be making use of a great deal of power generally. Or, a procedure may be making use of a great deal of power now, yet it has a tendency to make use of extremely little power. Concentrate on the pattern for a far better concept of just how much power a procedure utilizes.
Regrettably, Windows doesn7; t offer you accurate numbers below. It simply provides you an approximation of power use, which must be; Very Low; for many procedures on your system. If a procedure is making use of even more power than that2; specifically if it7; s running in the background2; you might wish to stop that procedure to conserve battery power on your laptop computer or tablet computer.
Microsoft hasn7; t clarified specifically what the numerous words right here imply. We don7; t recognize the specific distinction in between; Very reduced; and also; Low,; for instance.
How to See Which Apps Have Used one of the most Power To see which applications have actually made use of one of the most battery power on your COMPUTER, head to Settings > > System > Battery. Click the; See which applications are impacting your battery life; alternative below.
The Battery area is just offered when you7; re utilizing a laptop computer, tablet computer, or one more tool with a battery. You shouldn7; t demand to see which applications are utilizing one of the most power on a desktop computer COMPUTER without a battery, anyhow.
This display reveals a checklist of which applications have actually influenced your battery life one of the most. You can select to see power use over the last one week, 24 hrs, or 6 hrs.
Also if an application is near the first, it may not utilize a great deal of power wherefore it does. It may simply suggest you make use of the application a whole lot. As an example, whatever internet browser you utilize will most likely be near the first even if you utilize it a lot. It7; s utilized a big quantity of battery power, also if it7; s utilized that battery power successfully over an extended period.
Once the October 2018 Update is installed on your Windows 10 computer, you can easily find out how much power each app and process is using. Here is how to access this information.
Windows 10’s Task Manager has many useful features and capabilities that let you monitor the apps and processes running on your computer. Once the October 2018 Update is installed, it is even more useful. The update adds two new columns to Task Manager’s “Processes” tab:
- “Power Usage”. This column lets you see how much power each app and process is currently using.
- “Power Usage Trend”. This column tells you how much power each app and process has used in the past two minutes.
In both columns, the possible values range from “Very low” to “Very high”, letting you know an app’s or process’s power-usage level at a glance. While the values in both columns are useful, the ones in the “Power Usage Trend” column can give you a better idea of how much power an app or process typically uses. Knowing this can be helpful, for example, if your computer’s battery is running low and you won’t have access to a power outlet anytime soon. By closing apps that typically use a lot of power, you can increase your battery’s life.
In addition, the power usage columns might flag when a cryptojacking script is siphoning a computer’s processing power. In this type of attack, cybercriminals steal computers’ processing power to mine cryptocurrencies.
To see the power-usage levels for your apps and processes, follow these steps:
- Right-click the Windows button and select “Task Manager”.
- If you see the “More details” option in the lower left corner of the Task Manager window, click it.
- Maximize the size of the window by clicking the square box in the upper right corner.
- Find the “Power Usage” and “Power Usage Trend” columns. They will be to the right of the “GPU Engine” column.
- If you do not see these columns, right-click any other column heading. In the box that appears, check the boxes next to “Power Usage” and “Power Usage Trend”.
- If you want to sort the apps and processes by the amount of power they are consuming, click the “Power Usage” or “Power Usage Trend” column heading. (By default, the apps and processes are sorted by name.)
If the “Power Usage Trend” column is blank for a particular app or process, don’t worry. When an app or process is launched, its entry in this column will be blank. The entry will populate after two minutes and then keep updating every two minutes.
How to Change The Windows 10 & 11 Clock to 12 or 24 Hour Format
How to Change Automatic Maintenance Times
How to Change the Windows 10 Notification Display Time
Show Your Support for MajorGeeks a Donation
How to Remove the Shortcut Arrow Icon in Windows 10 & 11
How to Reset and Renew Your Internet Connection With a Batch File
How to Enable or Disable Memory Compression in Windows 10 & 11
How to Create a “Guest Account” on Windows 10 & 11
How to Add or Remove a Language in Windows 11
How to Fix Richtx32.ocx Errors
Published by Timothy Tibbetts on 03/16/2020
The Windows 10 Task Manager has added options to view Power usage and Power usage trends. You can use this feature to find out what apps have the most impact on power consumption.
TIP : Hard to fix Windows Problems? Repair/Restore Missing Windows OS Files Damaged by Malware with a few clicks
Power usage looks at the impact of power usage on your processor (CPU), graphics (GPU), and hard drive (HDD) resources.
One problem is many people are unaware of this option. While it’s right there, you won’t see it unless you maximize Task Manager or slide the arrow.
Video tutorial:
Press the Windows Key + X click on Task Manager.
Slide or maximize the Task Manager Window now.
On the far right, you will find two rows – Power usage and Power usage trends.
Power usage shows live statistics while Power usage trends shows power usage from the past two minutes.
Check out our Similar links below for other cool Task Manager tips and tricks.
The Task Manager in Windows 10 has evolved into a very useful utility. Over the years, Microsoft has added new features that improve upon its available feature list. Sometimes, Microsoft gets it right. One of the new additions, since the October 2018 update, offers the ability to keep track of which programs are using the most power on your Windows 10 computer. This Quick Tips article will show you how.
Task Manager
- Use the Windows key + X to open the WinX menu
- From this menu, choose Task Manager
That should bring you here:
Note: You can click on any of the images in this article to enlarge them for easier reading.
In the above example, you can see the two columns labeled Power usage and Power usage trend.
Note: If Task Manager is not showing you columns, then click on More details in the lower-left corner of the window.
If you are not seeing those two Power columns, then right-click on any heading, and in the Context menu that opens, check the boxes next to those headings:
You will note that you can add/remove any of the columns displayed in Task Manager by using this method.
Clicking on any of the headers (ie, Name, CPU, Memory, etc) will sort alphabetically based on the chosen column. Click it again to reverse the sort order.
What You Should See
The Task Manager only displays a generalized view of the Power usage. Very low is a good thing, especially where background processes are concerned. The Power usage column shows you what the current status is. The Power usage trend is more enlightening in that it shows you an overall trend for a particular program and/or process. For example, if you see that a background process is trending toward Moderate, you might not want it running at all if you aren’t using it. This would be particularly true on a laptop computer where everyone is justifiably focused on battery life.
As always, if you have any helpful suggestions, comments or questions, please share them with us,
If you are following Winaero, you may be already aware that two new columns have been added to the Windows 10 Task Manager. They are “Power usage” and “Power usage trend”, both available on the Processes tab.
Windows 8 and Windows 10 have a new Task Manager app. It looks completely different compared to Windows 7’s Task Manager and has different features. It can analyze the performance of various hardware components and also shows you all the processes running in your user session, grouped by app or process type.
Windows 10’s Task Manager has some nice features, like a performance graph and startup impact calculation. It is able to control which apps launch during startup. There is a special tab “Startup” which is designed to manage startup apps.
Tip: You can save your time by creating a special shortcut to open the Task Manager directly on the Startup tab.
Also, it is possible to make Task Manager show the command line of apps on the Processes, Details and Startup tabs. When enabled, it will allow you to quickly see which folder an app is launched from, and what its command line arguments are. For reference, see the article
In addition to these great features, Task Manager is now able to show power consumption for processes. This will allow you to quickly identify a process that drains your device battery. This feature is available in Windows 10 version 1809 “October 2018 Update” starting with build 17677.
See the following screenshot:
So, if you are running Windows 10 version 1809 on a laptop, tablet, or convertible, check out the new columns. They may give you an insight about saving your device battery.
Winaero greatly relies on your support. You can help the site keep bringing you interesting and useful content and software by using these options:
If you like this article, please share it using the buttons below. It won’t take a lot from you, but it will help us grow. Thanks for your support!
Author: Sergey Tkachenko
Sergey Tkachenko is a software developer from Russia who started Winaero back in 2011. On this blog, Sergey is writing about everything connected to Microsoft, Windows and popular software. Follow him on Telegram, Twitter, and YouTube. View all posts by Sergey Tkachenko
3 thoughts on “Power Usage in Task Manager in Windows 10 Version 1809”
It looks like the new Task Manager finally matches the old one. I used your installer 2 years ago to replace TM. How can I uninstall and use the modern version?
Control Panel – Apps and Features – Uninstall a program.
Select Task Manager there and uninstall it.
You are kidding! It cannot even remember the last used or user-preferred tab. That apart, it is very slow and has major design changes that reduce user-friendliness or usability for me which the classic one had.
Leave a Reply Cancel reply
Connect with us
We discontinued Facebook to deliver our post updates.
While working with Windows 10, one may realize that every once in a while that our system responds a little late especially when we are using a battery-operated system like a laptop. There are times when there is a particular task that ends up fetching all the resources of your system which includes power supply, memory, disk space, etc., just like a game or editing software. In this article, we will learn how to find these power hogs in your Windows 10 system using Task Manager.
How to Find power hogs with Task Manager
There are ways in which you can fix common resource usage problems. But you may also want to find such resource-hogging processes on your system that consumes high Power. To track power usage of apps and know which of the processes are fetching more power and becoming a power hogger of your system, follow the steps below:
Press Ctrl+Shift+Esc, the Windows 10 Task Manager will open up.
Enlarge the Task Manager window by clicking on More details.
In the normal-sized window, scroll horizontally or maximize the window.
Look for two columns namely Power usage and Power usage trend.
If these columns are not available then right-click on any of the columns and select the options of Power usage and Power usage trend.
Now you can check which of the tasks is sucking more power and choose whether you want to end the task or not.
Before you end the task, understand the difference between the two columns.
- The Power Usage column tells about the energy currently being used by a process.
- The Power usage trend column tells about the power usage of any process over the period of the last two minutes.
Once you choose from the list of processes that shall be terminated, select the task and then click on End Task.
If you have accidentally terminated an important system background process and your system starts to behave abnormally, save all your incomplete tasks and restart the system. It will start working fine as it was before.
Keep in mind that this method of checking power hoggers is especially for those who are nowhere near a charging station and there is a task that needs all the juice from the battery. After all, we all love to see our system work just fine when we are in a hurry and especially in a hurry.
TIP: You can fix power problems using the Power Troubleshooter.
Date: April 17, 2021 Tags: Power, Task Manager
Windows 10 To Add New Power Consumption Tab To Task Manager
It’s hard to believe, but next month marks the 3rd birthday of Windows 10. Yes, despite it landing like a wrecking ball and practically forcing us all at gunpoint to upgrade, Windows 10 is nearly 3 years old. With Microsoft having no operating system (that we are aware of) in the works, it seems that like it or not, Windows 10 is here to stay.
Like It Or Not…
Despite your opinions on it, that doesn’t mean to say that Microsoft is lazy with it. If anything, since it’s launch we have seen a number of very impressive updates and patches providing users with more and more functions and features. A new planned addition though is certainly going to be interesting.
In a report via TechPowerUp, an upcoming update will add a ‘power usage trend’ to the task manager bar. This will effectively tell users which programs/applications are using the most power on their system.
Sounds Good, But Whats The Point?
In terms of a desktop PC, this information isn’t really going to be any more than an interesting fact. For laptop users, however, this could be invaluable in trying to identify the best way to get the most out of their change. More so, to identify which seemingly innocuous program or application might secretly be an absolute thief of power!
When Is It Out?
The update is currently available for those part of the Windows Insider program. For the rest of us though, we know its planned, but we do not currently have an exact release date. As above, for the vast majority of us this is going to be no more than an interesting curiousity. For some though, this could be really invaluable and fascinating.
What do you think? – Let us know in the comments!
Support eTeknix.com
By supporting eTeknix, you help us grow and continue to bring you the latest news, reviews, and competitions. Follow us on Facebook, Twitter and Instagram to keep up with the latest technology news, reviews and more. Share your favourite articles, chat with the team and more. Also check out eTeknix YouTube, where you’ll find our latest video reviews, event coverage and features in 4K!
Looking for more exciting features on the latest technology? Check out our What We Know So Far section or our Fun Reads for some interesting original features.
Related News
- Tags:
- CPU
- Disk
- GPU
- Power Consumption
- Task Manager
- Windows
- Windows 10
- Oct 10th 2021 Windows 11 TPM Requirement? Bypass it in 5 Minutes (229)
- Jun 25th 2021 Thanks to Windows 11, Scalpers Buy Out Add-on TPM 2.0 Modules (263)
- Dec 3rd 2021 Windows 11 a Flop, Survey Claims Less Than 1% Upgraded, Microsoft Improves Start Menu (282)
- Jun 15th 2021 Windows 11 ISO Leaks to the Web, New Start Screen, Mac-like Centered Dock, Rounded Edges (243)
- Jan 18th 2022 Microsoft to Acquire Activision Blizzard to Bring the Joy and Community of Gaming to Everyone, Across Every Device (166)
- Jun 24th 2021 Microsoft Launches Windows 11 Operating System (127)
- Aug 30th 2021 Microsoft to Ban Unsupported Machines from Windows 11 Updates (125)
- Jun 14th 2021 Microsoft Clears Way for Windows 11: Windows 10 Support to End October 14th, 2025 (172)
- Oct 22nd 2021 Windows 11 Performance Issues on Ryzen Fixed by Updates from Microsoft and AMD (85)
- Oct 18th 2021 Apple Introduces M1 Pro and M1 Max: the Most Powerful Chips Apple Has Ever Built (156)
Add your own comment
11 Comments on Upcoming Windows 10 Task Manager Update to Show Power Usage, Power Usage Trend per Process
“Very Low” That’s not very handy or informative.
It rather see some numbers.
nickbaldwin86why it would be as accurate as loading or Windows update screen. 100% complete, yet took 2 seconds to get to that point and have watched the screen for that passed 20 minutes with no change, while to most people 100% means done, or I missed something in math class?
Диспетчер задач Windows 10 теперь показывает энергопотребление каждого процесса в вашей системе. Эта функция является новой в Обновление за октябрь 2018 г. .
Как просмотреть сведения об использовании энергии процессом
Первый, откройте диспетчер задач щелкнув правой кнопкой мыши панель задач и выбрав «Диспетчер задач» или нажав Ctrl + Shift + Esc. Если вы не видите всю панель диспетчера задач, нажмите «Подробнее» внизу.
Эта информация отображается на панели «Процессы», но скрыта из-за небольшого размера окна. Увеличьте окно, щелкнув и потянув за угол, пока не увидите столбцы «Энергопотребление» и «Тенденция использования энергии», или прокрутите вправо. Вы также можете перетащить заголовки, чтобы изменить порядок списка столбцов.
Если вы не видите этих столбцов, щелкните здесь заголовки правой кнопкой мыши и включите столбцы «Энергопотребление» и «Тенденция использования энергии».
Если этих параметров нет в списке, вы еще не выполнили обновление до October 2018 Update.
Что означают «потребление энергии» и «тренд использования энергии»?
В этих столбцах у каждого процесса есть значение. В столбце Power Usage указано, сколько энергии процесс потребляет в данный момент, а в столбце Power Usage Trend отображается долгосрочная тенденция. Вы можете щелкнуть столбцы для сортировки по любому типу энергопотребления.
Например, в данный момент процесс может не потреблять много энергии, но в целом может потреблять много энергии. Или процесс может сейчас использовать много энергии, но, как правило, использует очень мало энергии. Сосредоточьтесь на тенденции, чтобы лучше понять, сколько энергии потребляет процесс.
К сожалению, Windows не дает здесь точных цифр. Это просто дает вам приблизительное представление об энергопотреблении, которое должно быть «очень низким» для большинства процессов в вашей системе. Если процесс потребляет больше энергии, чем это, особенно если он выполняется в фоновом режиме, вы можете прекратить этот процесс, чтобы сэкономить заряд батареи на вашем ноутбуке или планшете.
Microsoft не объяснила, что означают эти слова. Например, мы не знаем точной разницы между “очень низким” и “низким”.
Как узнать, какие приложения потребляют больше всего энергии
Чтобы посмотреть, какие приложения потребляют больше всего заряда батареи на вашем ПК перейдите в Настройки> Система> Батарея. Нажмите здесь «Посмотреть, какие приложения влияют на время работы аккумулятора».
Раздел “Аккумулятор” доступен только при использовании ноутбука, планшета или другого устройства с аккумулятором. В любом случае вам не нужно видеть, какие приложения потребляют больше всего энергии на настольном ПК без батареи.
На этом экране отображается список приложений, которые больше всего повлияли на время автономной работы. Вы можете просмотреть потребление энергии за последнюю неделю, 24 часа или 6 часов.
Даже если приложение находится в верхней части списка, оно может не использовать много энергии для того, что делает. Это может означать, что вы часто пользуетесь приложением. Например, какой бы веб-браузер вы ни использовали, он, вероятно, будет в верхней части списка только потому, что вы его так часто используете. Он потребляет большой заряд батареи, даже если он эффективно использует эту энергию в течение длительного периода.
Эти новые столбцы продолжают долгожданную тенденцию добавления информации в диспетчер задач. В обновлении Fall Creators Update Microsoft добавила данные об использовании графического процессора в диспетчер задач .
Power Usage Through Task Manager At Windows 10
Way to Disable Power Throttling Using Task Manager on Windows 10 with Steps. – Recently we have written about How to Turn On or Off Power Throttling for App in Windows 10. Windows 10 allows you to reduce the work app does when in the background to boost the battery life of your device. An option in Battery usage by apps in setting helps you can power throttle all the applications at a time. But now you can use task manager to power throttle each application separately.
So you will follow here how to Disable Enable Power Throttling Using Task Manager in Windows 10. Once you will disable the application from the task manager the background movement of the application will stop. In this way, they couldn’t put an adverse effect on battery power. This tip is very useful to boost Windows 10 laptop battery life. The best part of this feature is you can Disable Power Throttling for each processing app individually. See the method
Disable Power Throttling Using Task Manager in Windows 10
Step 1 – Launch the task manager with either of the ways given in the guide – How to Open Task Manager in Windows 10. You can follow the way of right clicking on the taskbar and selecting the option Task manager.
Step 2 – After the task manager appears, switch to the Details tab. You find a list of all the applications in process on your computer in the first column. In the right column, you will see Power throttling status of each application either Enabled or Disabled.
You can follow a very alike type of article – Customize Battery Usage by App in Windows 10.
Step 3 – Simply double-click on a process and select Disabled to on the list of options.
Power Throttling settings are presently exercisable to processors with Intel Speed Shift technology, found in the 6th generation and not in the Core processors.
Conclusion
So this is the way to Disable Power Throttling Using Task Manager in Windows 10. For battery saving, you follow various initiatives such as Adjust Brightness level of your computer, customize battery saver, optimize Sleep and display settings, disconnect Bluetooth, and many others. But after turning off Power throttling, you can increase your battery life to an extent. So enable the process and enjoy.
Here are the 6 most effective methods to open the Task Manager in Windows 10/11:
- Press the Ctrl + Alt + Delete keys to open the Task Manager.
- Press Windows key + X and select the Task Manager.
- Right-click on the taskbar below and select the Task Manager.
- Press Ctrl + Shift + Esc shortcut and launch the Task Manager.
- Go to the Start menu search bar, type ‘taskmgr.exe,” and select the Best match.
- Launch the Control Panel, type ‘task manager’ in the top-right corner and select the Best match.
If you’ve been a Windows user for a while, I’m sure you would’ve come across the Windows Task Manager at least once by now.
The last line of defense for every Windows user, the Task Manager is usually called upon when all your programs stop responding and your PC is stuck still and simply won’t budge from inactivity.
While the Task Manager can be used for much more than clearing non-responsive tasks and errors, here we’ll focus in on how to open it so as not to digress from our topic. Moreover, there’s not just one, but multiple ways that you can open the Windows Task Manager in your Windows. Let’s start with the simplest one.
1. Open the Task Manger with Ctrl + Alt + Delete
One of my personal favorites and probably the simplest one on this list, you can launch the Task Manager simply by pressing Ctrl + All + Delete together. When you press the shortcut keys, you’ll see the Windows Security screen pop open on your screen.
From there, click on Task Manager, and the Task Manager windows will open up. From here, you’re free to use Task Manager however you’d like.
2. Use the Power user menu
You can also open the Task Manager from the Power User menu in your Windows computer. Put briefly, the Power User menu is a central place to access some of the most widely used Windows features.
To get started, press the Windows key + X option to open the Windows power menu. From there, select the Task Manager option, and you’ll have the Task Manager window in front of you.
3. Launch Task Manager from taskbar
Navigate and right-click on the taskbar of your Windows 10 PC, or on the Windows icon in the taskbar on a Windows 11 PC and select the Task Manager from the diverse set of options available on your screen.
4. Use the Ctrl + Shift + Esc shortcut
Another shortcut on our list, the Ctrl + Shift + Esc shortcut, is slightly different from the Ctrl + Alt + Delete shortcut we’ve used above.
Pressing Ctrl + Shift + Esc will launch the Task Manager in just a few seconds on your screens, as opposed to Ctrl + Alt + Delete, where you’ll have to first go through the Windows Security menu. Use this one if you’re rushing and want to quickly launch the Task Manager.
5. Use the “taskmgr” from Start menu search bar
To open the Task Manager in Windows 10/11 from the taskmgr EXE file, do the following:
- Go to Start menu search bar, type “taskmgr.exe,” and select the Best match.
The Task Manger will be launched on your screen. Alternatively, you can also enter “taskmgr.exe” in the Run dialog box and hit Enter to launch the application.
6. Use the Control Panel
This is a rather long-winded way, but you can also make use of the Control Panel for opening the Task Manager.
To get started, go to the Start menu search bar, type in “control panel,” and select the best match.
In the Control Panel, go to the search option in the top-right corner, type in ‘task manager’ in the search bar, and select the Task Manager option when it comes up.
Opening Task Manager in Windows 10/11
The Task Manger is another one of free utilities from Windows that makes our day-to-day Windows workflow hassle-free.
Apart from helping you fix random hang-ups of Windows that pop-up from time to time, it can also help you see and fix the processes that are running behind your PC, while at the same time, show the app history, user and services details of your Windows.
Share this:
Windows 10 Task Manager Now shows Apps power usage that are currently running in your OS. Microsoft team integrates this new feature with the roll out of Windows 10 October 2018 update i.e. of version 1809. This new update brings two new columns in Windows 10 task manager. Both of these columns are present in the processes tab of task Manager.
The first one is Power Usage and the second one is Power Usage Trend. Defining technically, the Power Usage tab shows you How the CPU, GPU and Disk impact on Power Consumption. Moreover, the Power Usage Trend columns shows the exact data over time.
Note that this feature is very useful as it helps you to detect which app sucks your notebook battery the most. Previously, when this feature was not present advance users take the help from additional apps to know about this data. Now, Microsoft natively adds it in Windows 10 Task Manager.
How to access Windows 10 Task Manager?
- Right Click on your Task Bar and then click on the task manager option.
- Once you click on the Task Manger, it opens and then at the right most column of Processes tab you find these two columns.
Note that you can also hide or add some more columns in the task manager but right clicking on any of the columns. There you the list of all options that are enabled and whereas some are not. I show it in the feature image.
Windows 10’s Task Manager sekarang menunjukkan kepada Anda penggunaan daya dari setiap proses pada sistem Anda. Fitur ini baru di Pembaruan Oktober 2018.
Cara Melihat Rincian Penggunaan Daya Proses
Pertama, buka Task Manager dengan mengklik kanan taskbar Anda dan pilih “Task Manager,” atau dengan menekan Ctrl + Shift + Esc. Jika Anda tidak melihat panel Task Manager lengkap, klik “More Details” di bagian bawah.
Informasi ini muncul di panel Proses tetapi disembunyikan oleh ukuran jendela yang kecil. Perbesar jendela dengan mengeklik dan seret di sudut hingga Anda melihat kolom Penggunaan Daya dan Tren Penggunaan Daya, atau gulir ke kanan. Anda juga dapat menyeret dan menjatuhkan judul untuk menyusun ulang daftar kolom.
Jika Anda tidak melihat kolom ini, klik kanan tajuk di sini dan aktifkan kolom “Power Usage” dan “Power Usage Trend”.
Jika opsi ini tidak muncul dalam daftar, Anda belum memperbarui ke Pembaruan Oktober 2018.
Apa yang dimaksud dengan “Power Usage” dan “Power Usage Trend” Mean?
Setiap proses memiliki nilai di bawah kolom ini. Kolom Penggunaan Daya memberi tahu Anda berapa banyak daya yang digunakan proses pada saat yang tepat ini, sementara kolom Tren Penggunaan Daya menunjukkan kepada Anda tren jangka panjang. Anda dapat mengklik kolom untuk mengurutkan berdasarkan salah satu jenis penggunaan daya.
Misalnya, suatu proses saat ini mungkin tidak menggunakan banyak daya pada saat ini, tetapi mungkin menggunakan banyak daya secara umum. Atau, suatu proses mungkin menggunakan banyak kekuatan sekarang, tetapi cenderung menggunakan kekuatan yang sangat kecil. Fokus pada tren untuk gagasan yang lebih baik tentang seberapa banyak kekuatan yang digunakan suatu proses.
Sayangnya, Windows tidak memberi Anda angka yang tepat di sini. Itu hanya memberi Anda gambaran kasar tentang penggunaan daya, yang seharusnya “Sangat Rendah” untuk sebagian besar proses di sistem Anda. Jika suatu proses menggunakan lebih banyak daya daripada itu-terutama jika berjalan di latar belakang-Anda mungkin ingin berhenti dari proses itu untuk menghemat daya baterai di laptop atau tablet Anda.
Microsoft tidak menjelaskan dengan tepat apa arti berbagai kata di sini. Kami tidak tahu perbedaan yang tepat antara “Sangat rendah” dan “Rendah,” misalnya.
Cara Melihat Aplikasi mana yang Telah Menggunakan Daya Terbanyak
Untuk melihat aplikasi mana yang menggunakan daya baterai paling banyak pada PC Anda, buka Pengaturan> Sistem> Baterai. Klik opsi “Lihat aplikasi mana yang memengaruhi masa pakai baterai Anda” di sini.
Bagian Baterai hanya tersedia ketika Anda menggunakan laptop, tablet, atau perangkat lain dengan baterai. Anda tidak perlu melihat aplikasi mana yang menggunakan daya paling besar pada PC desktop tanpa baterai.
Layar ini menampilkan daftar aplikasi mana yang paling memengaruhi masa pakai baterai Anda. Anda dapat memilih untuk melihat penggunaan daya selama satu minggu terakhir, 24 jam, atau 6 jam.
Bahkan jika aplikasi mendekati bagian atas daftar, mungkin tidak menggunakan banyak daya untuk apa yang dilakukannya. Itu mungkin berarti Anda menggunakan aplikasi ini banyak. Misalnya, browser web apa pun yang Anda gunakan mungkin akan berada di dekat bagian atas daftar hanya karena Anda menggunakannya begitu banyak. Ini menggunakan sejumlah besar daya baterai, bahkan jika itu menggunakan daya baterai secara efisien dalam waktu lama.
Kolom baru ini melanjutkan tren selamat datang dengan menambahkan informasi ke Pengelola Tugas. Dalam Fall Creators Update, Microsoft menambahkan data penggunaan GPU ke Task Manager.
- 14 shares
- Gmail
With the October update, which was delayed due to a documents folder related bug and then released a few days ago, Microsoft is adding the functionality to see power usage for each app in the Windows task manager application.
Windows task manager has always been one of the most important applications in the operating system. It becomes useful any time an app misbehaves and refuses to shut down properly. It is an essential tool for anyone who is looking to use Windows on a regular basis.
With the newest October update, Microsoft has added yet another feature to the task manager, making it more useful for those who are running the operating system on notebooks and other mobile devices. In addition to CPU, hard drive, network, and GPU usage, the task manager can now also show power usage for each application and process currently running.
To view the new power usage option, simply open the processes tab on the task manager and scroll to the right side, or make the task manager window full screen. You can also rearrange the tabs to show power usage at front and center.
There are two new options here: power usage and power usage trend. Power usage shows the current power being drained by the application, while power usage trend shows the power usage over a longer period of time. It currently categorizes the values as very low, low, moderate, high, and very high. There’s currently no way to show the actual power being drawn, however, that might change in a future update.
If you don’t see this option in your task manager application, it is possible that you are running an older version of windows and you need to install the latest October update for Windows 10. So go into the Windows Update menu in the settings app and click on Check for Updates to get the latest version of Windows along with this new functionality.
While using Windows 10, it gets very important for us to monitor the power usage of different applications regularly. This enables us to know which applications are consuming most of the power and we can prevent them from doing so by taking certain appropriate measures. In this article, we will explain to you the method through which you can see the power usage in Windows 10.
Check Power Usage in Windows 10
In order to see the power usage in Windows 10, you will need to perform the following steps:
Type settings in the search section of your taskbar and click on the search result to launch the settings window. The newly opened Settings window is shown in the following image:
Click on the System tab as highlighted in the image shown above.
Now click on the Battery tab as shown in the image below:
Click on the link saying, “See which apps are affecting your battery life” as highlighted in the following image:
As soon as you will click on it, all the applications along with their power usage will appear on your screen as shown in the image below:
Having a look at this information, you can easily analyze which applications are consuming most of your battery.
Conclusion
In this way, you can monitor the power usage of all your applications in Windows 10 using a very simple set of steps. This will not only inform you to plug in your charger before your computer system runs out of battery but will also prevent any useless applications from draining your battery.
novaburst
Senior Member
So have you ever played back your DAW and noticed a little crackle, your first thoughts probably would be buffer, or soundcard issue.
If you open Task Manager you should keep an eye on Antimalewar Service Executable
This program will randomly use very high power on your machine some times up to 10 to 20 seconds long and this program can not be stopped or removed even if you decide to get your own software protection.
The annoying thing about this is it runs in the background and can really mess things up and have your searching for other issues that have nothing to do with the high power usage
I searched on google how to get rid of this but only found some dodgy software you can download that may make matters worse.
There is a way to bring the program under control or to keep the power usage up to moderate.
You can go into Task Scheduler and open Windows defender
Double click on the 4 titles under Name and uncheck high privilege, then go into conditions and uncheck anything there too
Since i have done this i have been monitoring the Antimaleware service for some time and have not seen any high power usage not even moderate
It does show that OS developers are not living in the real world and all they want is to get their programs running at any inconvenience regardless of any interruptions or issues the program can course and once more you cant even remove it, or need to go to 3rd party software to control OS software .


