If you’re running a Professional (or higher) version of Windows, then you may have run into the Group Policy Editor before. Basically, it is a hidden control panel that lets you set computer-level or user-level settings. If you’re a Systems Administrator, then you can set group policies at your domain level, then push them out to the clients on your network.
If you ever wanted to know what group policies are enabled on your computer, you have a few ways of finding out.
Using a GUI
The easiest way to see which Group Policy settings have been applied to your machine or user account is to use the Resultant Set of Policy Management Console. To open it, press the Win + R keyboard combination to bring up a run box.
Type rsop.msc into the run box and then hit enter.
You will see a pop-up dialog for the small period of time it take Windows to query your system.
Once the console opens you will be able to see which settings have been applied to your PC.
Note: Only settings that have been applied to your machine and user account will show up.
Using The Command Line
You could also use the command line if you prefer it. When using the command line, it should be noted that you have to specify the scope of the results. To find all the policies that are applied to your user account, you would use the following command:
gpresult /Scope User /v
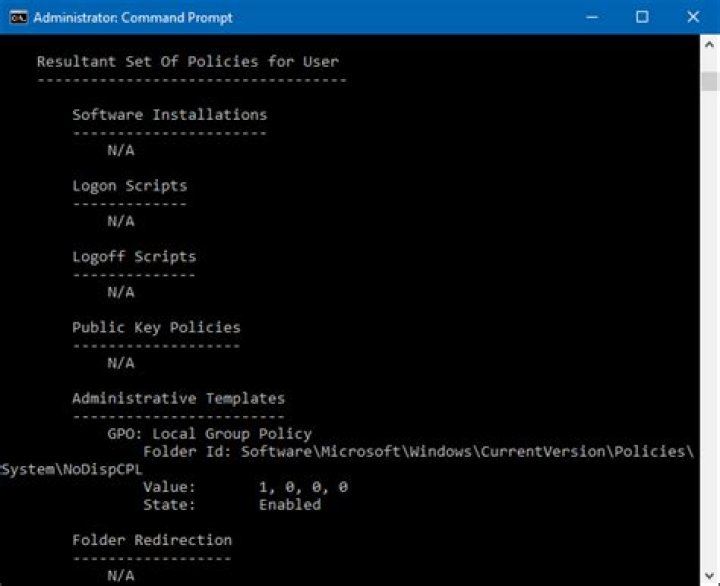
Then if you scroll down, you will see the the Resultant Set Of Policies for User section.
If you are looking for all policies applied to your Computer, all you need to do is change the scope:
Walter Glenn is a former Editorial Director for How-To Geek and its sister sites. He has more than 30 years of experience in the computer industry and over 20 years as a technical writer and editor. He’s written hundreds of articles for How-To Geek and edited thousands. He’s authored or co-authored over 30 computer-related books in more than a dozen languages for publishers like Microsoft Press, O’Reilly, and Osborne/McGraw-Hill. He’s also written hundreds of white papers, articles, user manuals, and courseware over the years. Read more.
We have shown you a lot of tips and tricks over the years that involve modifying Local Group Policy. If you would ever like to see all the Group Policy settings in effect on your PC, here’s how to do it.
In the Windows world, Group Policy provides a way for network administrators to assign specific settings to groups of users or computers. Those settings then get applied whenever a user in the group logs in to a networked PC or whenever a PC in the group is started. Local Group Policy is a slightly more limited version that applies settings only to a local computer or users—or even a group of local users. We’ve featured a number of tricks here in the past that use Local Group Policy to change settings that you can’t change anywhere else—except by editing the Windows Registry. If you’re in the habit of changing Local Group Policy settings, you might find it useful to see all the changes you’ve made in one place, rather than digging through the Local Group Policy Editor.
Note: Local Group Policy is only available in the Professional and Enterprise versions of Windows. If you’re using a Home edition, you won’t have access to the Local Group Policy Editor.
View Applied Policies with the Resultant Set of Policy Tool
The easiest way to see all the Group Policy settings you’ve applied to your PC or user account is by using the Resultant Set of Policy tool. It doesn’t show every last policy applied to your PC—for that you’ll need to use the Command Prompt, as we describe in the next section. However, it does show pretty much all the policies you will have set for regular use. And it provides a simple, graphical interface for browsing through the Group Policy settings currently in effect on your PC—whether those settings come from Group Policy or Local Group Policy.
To open the tool, hit Start, type “rsop.msc,” and then click the resulting entry.
The Resultant Set of Policy tool starts by scanning your system for applied Group Policy settings.
After it’s done scanning, the tool shows you a management console that looks very much like the Local Group Policy Editor—except that it only displays enabled settings along with a few unconfigured security settings.
This makes it easy to browse through and see what policies are in effect. Note that you can’t use the Resultant Set of Policy tool to change any of these settings. You can double-click a setting to view details, but if you want to disable or make changes to a setting, you’ll have to use the Local Group Policy Editor.
View Applied Policies with the Command Prompt
If you’re comfortable using the Command Prompt, it does provide a couple of advantages over using the Resultant Set of Policy tool. First, it can show every last policy in effect on your PC. Second, it will show some additional security information—like what security groups a user is part of or what privileges they have.
To do this, we’ll be using the gpresult command. You must specify a scope for the results, and valid scopes include “user” and “computer.” This means that to see all the policies in effect for the user and the PC, you’ll have to run the command twice.
To view all the policies applied to the user account you’re currently logged in with, you would use the following command:
The /v parameter in that command specifies verbose results, so you’ll see everything. Scroll down a bit and you’ll see a section named “Resultant Set Of Policies for User,” which contains the information you’re after.
If you’re looking for all policies applied to your Computer, all you need to do is change the scope:
If you scroll down, you’ll see that there is now a Resultant Set Of Policies for Computer section.
And there are other things you can do with the gpresult command. For example, if you’d like to save the report instead of viewing it at the Command Prompt, you could switch out the /v parameter in either of those commands and instead use /x (for XML format) or /h (for HTML format). Of course, you could also just use the /v version of the command and pipe it to a text file, if you prefer.
When you try to make some system changes on your computer, you may get the following or similar error message basically stating that your operation is being blocked by group policy.
“The command prompt has been disabled by your administrator”
“Some settings are managed by your organization”
“This program is blocked by group policy. For more information, contact your system administrator.”
Sometimes it can be really difficult to figure out which group policy prevents you from making system changes, since most group policies available in Local Group Policy Editor are not applied by default. In this tutorial we’ll show you 2 quick ways to view local group policies applied to your user account in Windows 10.
Method 1: View Applied Group Policies Using the Resultant Set of Policy tool
- Press the Windows key + R to open the Run box. Type rsop.msc and press Enter.
The Resultant Set of Policy tool will start scanning your system for applied group policies.
After scanning, the tool will show you a management console that lists out all group policies applied to your currently logged-on account.
Note: The Resultant Set of Policy tool allows you to see what policies are in effect, and you’re unable to change any policy settings from there.
Method 2: View Applied Group Policies Using Command Prompt or PowerShell
- Press the WIN + X key combination to open the WinX menu, and then choose “Command Prompt (Admin)” or “Windows PowerShell (Admin)“.
To view all the policies applied to a specific account on your computer, run the following command and press Enter.
gpresult /user your_account_name /h c:\gpo.html /f
It will generate a report of the applied group policy settings and saves it in HTML format as a file named gpo.html. Open the HTML file using your web browser and you can view applied policies under both Computer Configuration (Computer Details) and User Configuration (User Details).
In this guide, you will learn how to use the GPResult command line tool to verify what group policy objects are applied to a user or computer.
GPResult is a command line tool that shows the Resultant Set of Policy (RsoP) information for a user and computer. In other words, it creates a report that displays what group policies objects are applied to a user and computer.
If you are using group policy in your environment then you definitely should know how to use this tool.
GPResult Video Tutorial
If you don’t like video tutorials or want more details, then continue reading the instructions below.
Group Policy is an effective way for administrators to control policy settings, deploy software, apply permissions, and so on across the entire domain.
When you have multiple Group Policy Objects you need a way to verify those objects are getting applied to a user or computer.
This is exactly what GPresult was built to do.
Let’s look at the example below, I have 4 group policy objects applied at different levels of the domain. One at the root, two at ADPro Computers, and one at the ADPRo users OU.
How do I know if they are working?
How can I check if these GPOs are getting applied correctly?
In the next section, I’ll show you exactly how I can use gpresult to verify these GPOs are getting applied.
The GPResult command is included with Windows Server versions 2008 and higher. It is also included in client version Windows 7 and higher.
GPResult Examples
Tip: Run the command prompt as administrator or you may run into issues with the command returning computer settings.
Display All Applied GPOs applied to (User and Computer)
This is the most common usage of the gpresult command, it is a quick way to display all group policy objects to a user and computer.
It will display the GPO order, displays details such as last time group policy was applied, which domain controller it run from, which security groups the user and computer is a member of.
From the screenshot of my group policy management console, there should be 3 GPOs that get applied to the computer and one to the user. Let’s look at the results of the command to verify that is happening.
I can see under applied group policy objects that all three GPOs are getting applied.
Now let’s check the user GPOs. Yes, I can see the Users – Browser Settings GPO is getting applied.
Display GPOs applied to a specific user
If you don’t want to see both User and Computer GPOs then you can use the scope option to specify user or computer
Display GPOs applied to a specific computer
Display GPOs applied on a remote computer
Generate HTML Report
This generates an html report of the applied group policy objects. If you don’t specify a path it will save it to the system32 folder.
Export to a text file
You can redirect the output to a text file with the command below. This is helpful if the results are producing lots of information.
Group policy can be a pain, even when best practices are followed group policy can still be challenging. Knowing how to use these built in tools will help you to verify and troubleshoot group policy’s in your environment. Go give it a try and let me know if you have any questions.
Recommended Tool: Permissions Analyzer for Active Directory
This FREE tool lets you get instant visibility into user and group permissions. Quickly check user or group permissions for files, network, and folder shares.
Analyze user permissions based on an individual user or group membership.
Sometimes, you need to check on a targeted computer or user account which Group Policies are applied at the logon. It exists several mean to do that.
Fist, thanks to the command line prompt.
You can use the following commands depending what settings you want to check.
To get, the Group Policies applied to your computer:
To get, the Group Policies applied to your user account:
In these examples, you can see that I have configured several examples of policies. I allowed the PING request on my lab on all computers and I desactivated the display of the Server Manager on the logon. You can scroll up and down to see details.
With the same command, you can also generate an HTML file to get the whole configuration of user account and computer. Use the following command :
According to the location of the prompt, an HTML file called Extract.html will be generated. You will be able to see all the GPO configures on your user account and your computer. Both applied GPOs and denied GPOs.
You can display detailed configuration by playing with the « Show » and « Hide » links on the right part.
You can also use rsop.msc
You can also use the Resultant Set of Policy Management Console by simply running the following command in a prompt command or in Windows 8 Star Menu or in the « Run » windows (press WIN + R to display it) :
The advantage of this method is the result is easier to read and understand thanks to the GUI. Obviously, we find back the same settings of applied GPO.
microsoft confirms some pcs freeze after windows 10
Group Policy (GP) is a Windows management feature that allows you to control multiple users’ and computers’ configurations within an Active Directory environment. With GP, all Organizational Units, sites, or domains can be configured from a single and central place. If you ever wanted to know what group policies are enabled on your computer, here are a few ways of finding them out. You may want to see the following articles as well. Why use RSAT? How to Install RSAT on Windows 10, Remote Server Administration Tools: To install RSAT on Windows Server, and what is Group Policy Object and how can it be launched in Windows.
screenshot 2020 02 09 at 19.07.28
When this is run, this will analyze and process the policies applied to you.
screenshot 2020 02 09 at 19.07.09
After its analysis, it will display the resultant set of Policies applied to you.
screenshot 2020 02 09 at 19.15.16
Now click on each folder, empty folders imply there are no policies applied to you. These are currently the only policies applied to my device via the computer configuration.
screenshot 2020 02 09 at 19.17.12
Via the Command line: It should be noted that you have to specify the scope of the results. To find all the policies that are applied to your user account, you would use the following command:
screenshot 2020 02 09 at 19.26.04
This will process and display the results as shown below.
screenshot 2020 02 09 at 19.27.17
Then if you scroll down, you will see the the Resultant Set Of Policies for User section.
screenshot 2020 02 09 at 19.27.40
If you are looking for all policies applied to your Computer, all you need to do is change the scope:
screenshot 2020 02 09 at 19.29.58
screenshot 2020 02 09 at 19.30.43
More output – Administrative template
screenshot 2020 02 09 at 19.31.08
Alternatively, there is a shortcut command that can be applied to get the desired result.
User Side Policies
To get all the policies applied to your user account, simply run the command below from the command prompt.
This will give only the user-side of group policies applied.
Computer Side Policies
To get this policy, simply run the command prompt with administrative privilege, this will output policies relating to the computer.
Note: The command prompt has to be run with administrators rights
GPRrport Command (Output HTML)
It is usually not feasible to read the group policies objects summary data from the command prompt every time in detail. Thus to get it in an easily readable form, we can export the data into the HTML format. Open a Command Prompt and type the following:
Specify the GPresult Path
The /H command with the location and filename specifies where the file will be saved. To do this, please run the command below.
Group Policy For Specific User
This command is used to display the group policies for the specific user or system which lies in the network domain. To display the specific user policy summary you must be aware of the user’s credentials. The command is as follows:
I hope you found this blog post helpful. If you have any questions, please let me know in the comment session.
Policy is applied when the computer starts and when the user logs on. When a user turns on the computer, the system applies computer policy. When a user logs on interactively, the system loads the user profile, then applies user policy.
This is an overview topic for developers who are writing code that interact with Group Policy. For more information about group policies and how to apply them as an administrator, see Group Policy for Beginners.
Policy can be optionally reapplied on a periodic basis. By default, policy is reapplied every 90 minutes. To set the interval at which policy will be reapplied, use the Group Policy Object Editor. Policy can also be reapplied on demand. To refresh the current policy settings immediately, applications can call the RefreshPolicy function; administrators can call the Gpupdate.exe command-line utility.
When applying policy, the system queries the directory service for a list of GPOs to process. Each GPO is linked to an Active Directory container in which the computer or user belongs. By default, the system processes the GPOs in the following order: local, site, domain, then organizational unit. Therefore, the computer or user receives the policy settings of the last Active Directory container processed.
When processing the GPO, the system checks the access-control list (ACL) associated with the GPO. If an access-control entry (ACE) denies the computer or user access to the GPO, the system does not apply the policy settings specified by the GPO. If the ACE allows access to the GPO, the system applies the policy settings specified by the GPO.
Be aware that application deployment occurs only during system start or interactive user logon, not on a periodic basis. This prevents undesirable results, such as uninstalling or upgrading an application that is in use. However, registry-based policy settings and security policy settings are applied periodically.
For more information, see Policy Processing. For more information on how to programmatically interact with group policy settings using this provider, see the Using Group Policy API topics.
Over the years, we’ve shown you many tips and tricks that involve changing local group policy. If you ever want to see all of the Group Policy settings in effect on your PC, here’s how.
In the Windows world, Group Policy allows network administrators to assign specific settings to groups of users or computers. These settings are then applied each time a group user logs on to a networked PC or each time a group PC is started. Local Group Policy is a slightly more limited version that applies settings only to a local computer or users, or even to a local user group. We’ve featured a number of tips here in the past that use Local Group Policy to change settings that you can’t change anywhere else except by editing the Windows registry. If you’re used to modifying Local Group Policy settings, you might find it useful to see all the changes you’ve made in one place, rather than delving into the Local Group Policy Editor.
RELATED: What is “Group Policy” in Windows?
To note: Local Group Policy is only available in Professional and Enterprise versions of Windows. If you are using a Home Edition, you will not have access to the Local Group Policy Editor.
View the policies applied with the resulting set of policies from the tool
The easiest way to see all of the Group Policy settings that you have applied to your PC or user account is to use the Resultant Policy Set tool. It does not display all of the latest policies applied to your PC. For this you will need to use the command prompt, as we describe in the next section. However, it displays pretty much any policies you have set for regular use. And it provides a simple graphical interface for browsing the Group Policy settings currently in effect on your PC, whether those settings come from Group Policy or Local Group Policy.
To open the tool, press Start, type “rsop.msc” and then click on the resulting entry.
The Resultant Policy Set tool begins by scanning your system for applied Group Policy settings.
Once the scan is complete, the tool shows you a management console that looks a lot like the Local Group Policy Editor, except that it only shows the enabled settings as well as a few unconfigured security settings.
This makes it easier to navigate and view the policies in effect. Note that you cannot use the Resultant Policy Set tool to change any of these settings. You can double-click a setting to view the details, but if you want to disable or change a setting, you’ll need to use the Local Group Policy Editor.
View applied policies with the command prompt
If you are comfortable with the Command Prompt, it has a few advantages over the resulting Policy Set tool. Firstly, it can display all the latest policies in effect on your PC. Second, it will display additional security information, such as which security groups a user is a part of or what privileges they have.
To do this, we will use the gpresult order. You must specify a scope for the results, and valid scopes include “user” and “computer”. This means that in order to see all the policies in effect for the user and the PC, you will have to run the command twice.
To view all policies applied to the user account you are currently logged in with, you must use the following command:
The /v The parameter to this command specifies detailed results, so you’ll see everything. Scroll down a bit and you’ll see a section called “Resulting Policy Set for User,” which has the information you’re looking for.
If you are looking for all the policies applied to your computer, you just need to change the scope:
If you scroll down, you will see that there is now a Resulting Policy Set section for the computer.
RELATED: How to save command prompt output to a text file in Windows
And there are other things you can do with the gpresult command. For example, if you want to save the report instead of viewing it at the command prompt, you can turn off the /v parameter in one of these commands and use instead /x (for XML format) or /h (for HTML format). Of course, you can also just use the /v version of the command and direct it to a text file, if you prefer.
Group Policy Objects are a set of rules that define the behavior of certain actions. They apply to both the user and the team. The term GPO is often associated with Windows Server. However, it is also very useful regarding Windows 10. With the use of GPOs we can restrict certain actions to a user. For example, accessing the control panel, installing programs, opening folders, etc. Similarly, it allows you to configure the computer to configure its behavior. Therefore, we can configure it to not display the lock screen, disable USB ports and more. As you can see, these are very useful options. Continue reading to learn how to view all GPO applied in Windows 10.
What is GPO in Windows 10.
A GPO is a Group Policy Object. Therefore, it comprises a set of group policies. In addition, it sets a particular configuration to the object to which it is bound. GPOs define a set of settings that will determine how a system looks and acts. GPOs are located within four different types of objects:
- Active Directory locations
- Local computers
- Active Directory Domains
- Active Directory Organizational Units.
It may sometimes be necessary to know what group policy a specific user or computer has. In such a case, it would be complex to enter the group policy editor and verify which ones are enabled. Indeed, while one user may have 3 group policies enabled, another may have 50. In this tutorial, we will show you some practical methods to view group policies applied in Windows 10.
How to view Policies applied to a Windows 10 computer with RSOP
The Resulting Set Of Policies is an integrated tool in Windows. When run, it will display a list of all active policies for the specific user account from which it was generated. That is, we will see all the policies applied to a user account. On the contrary, it cannot show the policies applied to the whole computer. To access it, press Win+R and run the command rsop.msc.
The tool will scan the policies. It will also display all active policies for the current user account. It is also possible to get additional information about each policy by browsing the folder and double-clicking on it. In this aspect, it works just like the GPO editor in Windows 10.
Viewing group policies in RSOP
How to view Policies applied to a Windows 10 computer with CMD
We can also use CMD to see all the policies applied to Windows 10. Obviously, the main difference is the absence of graphical interface. However, we will also be able to see the active policies on the whole system and not only on a particular user. With this intention, launch a command prompt as administrator. To accomplish this, enter CMD in the search box and select the corresponding option.
Launching a CMD as administrator
Next, run this command:
The tool will search and display all active policies for the current user. When active policies are detected, it will display Folder ID, Value and Status of the policies.
Active policies for the current user
We can also visualize all active policies on the computer. Just run the following command:
Active policies on the entire computer
How to view Policies applied to a user in Windows 10
We can also see the group policy objects associated to a user and computer. As a result, we will see specific information such as the application date, domain controller or security group to which both the user and the PC belong. To view applied GPO objects, use this command:
Let’s see some other uses of this command. View GPO objects applied to a user.
Display GPO objects applied to a computer.
View GPO objects applied to a remote computer:
Create an HTML report
We can create an HTML file that includes all those GPOs that are applied. Additionally, if you do not specify a route, it will be saved by default in the system32 folder.
Exporting the file in text format
You can also create an output text file. This can be very helpful if the output produces a lot of information:
This is how simple we can see all GPO applied in Windows 10. We can also find out which policies apply to a team. This way, we will know which policies are applied to a computer. In addition to the restrictions and permissions applied. See you soon!
GPOs are assigned to containers (sites, domains, or OUs). They are then applied to computers and users in those containers. GPOs can contain both computer and user sets of policies. The Computer section of a GPO is applied during boot. The User section of a GPO is applied at user login. User GPO processing can be configured three different ways, as documented below. Which processing order to use is determined by the GPO which is applied to the computer.
Example:
Normal mode
Loopback: Merge mode
Loopback: Replace mode
Detailed Computer Configuration Application Order: Windows NT System Policies, if the computer is a member of a Windows NT 4.0 Domain that uses them, are applied first. Then Windows 2000 GPOs are applied, starting with Local GPO – This is the only one if the computer is in a Windows NT 4.0 Domain.
Detailed User Configuration Application Order: Mandatory/Roaming Profile, if present, is applied first. Then Windows NT ntuser.pol is applied if the user is from a Windows NT 4.0 Domain that uses System Policy. Then Windows 2000 GPOs are applied, starting with Local GPO.
Group Policy Loopback Support as described in MS whitepaper:
Group Policy is applied to the user or computer, based upon where the user or computer object is located in the Active Directory. However, in some cases, users may need policy applied to them, based upon the location of the computer object, not the location of the user object. The Group Policy loopback feature gives the administrator the ability to apply Group Policy, based upon the computer that the user is logging onto.
To describe the loopback feature, we’ll use an example. In this scenario, you have full control over the computers and users in this domain because you have been granted domain administrator rights.
The following illustration shows the Streetmarket domain, which is used to work through this example.
Figure 8. The Streetmarket domain
When users work in their own workstations, they should have Group Policy applied to them according to the policy settings defined, based on the location of the user object. However, when users log on to a computer whose computer object is in the in the Servers OU, they should get user policy settings based on the computer object location, rather than the user object location.
Normal user Group Policy processing specifies that computers located in the Servers OU have the GPOs A3, A1, A2, A4, A6 applied (in that order) during computer startup. Users of the Marketing OU have GPOs A3, A1, A2, A5 applied (in that order), regardless of which computer they log on to.
In some cases this processing order may not be appropriate, for example, when you do not want applications that have been assigned or published to the users of the Marketing OU to be installed while they are logged on to the computers in the Servers OU. With the Group Policy loopback support feature, you can specify two other ways to retrieve the list of GPOs for any user of the computers in the Servers OU:
- Merge mode. In this mode, during logon the user’s list of GPOs is gathered normally by using the GetGPOList function, and then GetGPOList is called again using the computer’s location in the Active Directory. Next, the list of GPOs for the computer is added to the end of the GPOs for the user. This causes the computer’s GPOs to have higher precedence than the user’s GPOs. In this example, the list of GPOs for the computer is A3, A1, A2, A4, A6, which is added to the user’s list of A3, A1, A2, A5 which results in A3, A1, A2, A5, A3, A1, A2, A4, and A6 (listed in lowest to highest priority).
- Replace mode. In this mode, the user’s list of GPOs is not gathered. Only the list of GPOs based upon the computer object is used. In this example, the list is A3, A1, A2, A4, and A6.
The loopback feature was implemented in the Group Policy engine[1], not in the GetGPOList function. When the Group Policy engine is about to apply user policy, it looks in the registry for a computer policy, which specifies which mode user policy should be applied in. Then, based upon this policy, it calls GetGPOList, as appropriate.
[1] The Group Policy engine is the part of Group Policy that runs in the Winlogon process.
In Windows, more often than not, we need to set Group Policies to change advanced settings and configure them to meet your needs. Once set and configured, you can generally forget about the policy. This is not a problem for the most part. However, if you want to know what policies are enabled, then it can be a bit tedious to manually skim through all the policies listed in the Group Policy Editor. Of course, if you are just concerned about one or two policies, you can search for those Group Policies using a few keywords. But to know all the active policies, you need a better way to do it. Here’s how you can see active policies in Windows.
Note: the following procedure can be used on Windows 7 and 8, too.
Using the Resultant Set of Policy Tool
To view the active policies, you can use the built-in tool called “Resultant Set of Policy” utility. When executed, this tool will list all the active policies for the specific user account from which it was invoked. Simply put, this tool can show policies applied to a user account. It cannot show policies applied to your entire PC.
To open the Resultant Set of Policy tool, press Win + R , type rsop.msc and press the Enter button. Alternatively, you can also search for it in the Start menu.
As soon as you press the Enter button, the tool will scan the policies and show all the active policies for your user account. Just like with the regular Group Policy editor, you can find out more about each policy by navigating through the folder and double-clicking on the policy.
Using the Command Line
Alternatively, you can also use the command line tool to view all the applied policies. The good thing about this approach is that it allows you to see the active policies on your computer.
First, to see what policies are applied to a user account, search for “Command Prompt” in the Start menu, right-click on it and select the option “Run as Administrator.”
In the command prompt window, execute the below command:
As soon as you execute the command, the tool will search and show all the active policies for the current user. Of course, since I’m running this command on a newly installed Windows system, I don’t have any active policies for my user account. When there are active policies, the command prompt window will display Folder ID, Value, and State.
To see all the active policies on your PC, all you have to do is replace “User” in the above command with “Computer.” This is what the command looks like:
Just like before, the command prompt will list all the active policies under their respective folder names.
Do comment below sharing your thoughts and experiences using the above methods to see all active group policies in Windows.
Never Miss Out
Receive updates of our latest tutorials.
Vamsi is a tech and WordPress geek who enjoys writing how-to guides and messing with his computer and software in general. When not writing for MTE, he writes for he shares tips, tricks, and lifehacks on his own blog Stugon.
We have shown you a lot of tips and tricks here at How-To Geek that require the modification of a Group Policy Object. Over time you may have wondered which Group Policy settings you have edited–so here’s how to figure that out.
Note: This will work on Windows 7 Professional and higher, Windows 8 Professional, or Windows 10 Professional.
Through a GUI
The easiest way to see which Group Policy settings have been applied to your machine or user account is to use the Resultant Set of Policy Management Console. To open it, press the Win + R keyboard combination to bring up a run box.
Type rsop.msc into the run box and then hit enter.
You will see a pop-up dialog for the small period of time it take Windows to query your system.
Once the console opens you will be able to see which settings have been applied to your PC.
Note: Only settings that have been applied to your machine and user account will show up.
Through the Command Line
You could also use the command line if you prefer it. When using the command line, it should be noted that you have to specify the scope of the results. To find all the policies that are applied to your user account, you would use the following command:
Then if you scroll down, you will see the the Resultant Set Of Policies for User section.
If you are looking for all policies applied to your Computer, all you need to do is change the scope:
If you scroll down, now you will now see that there is a Resultant Set Of Policies for Computer section.
If you would like to see which registry settings were modified by these policies, be sure to check out our article explaining group policy registry keys.
More stories
From the Tips Box: DIY Styluses, Recycling Old Discs Into a Game, and Searching Flickr for Kindle Screensavers
This week we’re taking a look at how to make your own stylus, turning your old CDs or DVDs into a game, and digging up Kindle screensavers on Flickr.
Here’s How to Download Windows 8 Release Preview Right Now
Want to get the latest version of Windows 8 right now? This one is called the Release Preview, and it’s available for download right now. There’s a lot of little bugs resolved, the multi-monitor support has improved, and you should download it now.
Disable Add-Ons to Speed Up Browsing in Internet Explorer 9
We’ve shown you how to enhance Internet Explorer with add-ons, similar to Firefox and Chrome. However, too many add-ons can slow down Internet Explorer and even cause it to crash. However, you can easily disable some or all add-ons.
Geek Trivia: Protest Over Which Video Game, Counterintuitively, Led To More Violent Games?
Think you know the answer? Click through to see if you’re right!
Ask the Readers: How Do You Browse Securely Away From Home?
When you’re browsing away from home, be it on your smartphone, tablet, or laptop, how do you keep your browsing sessions secure? This week we’re interested in hearing all about your mobile security tips and tricks.
Enhance Internet Explorer 9 with Add-Ons
If you’re one of those who still use that “other” browser (Internet Explorer or IE), you’ll be glad to know that there are ways to extend the functionality of IE just like you can in Firefox or Chrome.
Geek Trivia: Which Real-Life Royalty Made A Star Trek Guest Appearance and Funded a Star Trek Theme Park?
Think you know the answer? Click through to see if you’re right!
Booby Traps and Locked-in Kids: An Interview with a Safecracker
While most of our articles focus on security of the digital sort, this interview with a professional safecracker is an interesting look the physical side of securing your goods.
Which Free Online Antivirus Scanner is the Best? [Comparison Test and Results]
There are times when an online or supplementary scanner can be very useful when cleaning up an infected computer or just to get a second opinion on the security of your system. With this purpose in mind, the good folks over a.
How to Convert News Feeds to Ebooks with Calibre
Setting up your ebook reader to receive bundles of articles from web sites that interest you is a great way to add functionality and great content. Read on as we show you how to turn the RSS feeds from your favorite sites into ebooks.
By Hillary Ramirez on December 8, 2021
According to Nasdaq, so far in 2021 “nearly 281.5 million people have been affected by some sort of data breach”. At Datalink Networks we have repeatedly advised our clients to enhance their group policies to increase the amount of security within their organization. When used correctly group policies can enable you to increase the security of users’ computers and help defend against both insider threats and external attacks. In this blog, we will walk you through group policies and how your organization can benefit by implementing them.
What is a Group Policy Object (GPO)?
In simple terms, a Group Policy Object, or GPO, is a group of settings that are created using the Microsoft Management Console (MMC) Group Policy Editor. The MCC enables IT admins to create GPO’s that set registry-based policies, security options, software installations, and more.
Group Policy settings are held in a GPO that represents policy settings in the file system and in the Active Directory. GPOs can be associated with either a single or numerous Active Directory containers, including domains, sites, or organizational units (OUs).
Type of Group Policy Objects (GPOs)
When learning about GPOs, there are three main types that you should be aware of:
Local Group Policy Objects
Local group policy objects exist by default on all Windows computers and are utilized when IT admins need to apply policy settings to a single Windows computer or user. These types of GPO’s only apply to local computers and to the users that log on to that computer on-site.
Non-local Group Policy Objects
Unlike local GPO’s, non-local group policy objects require your Windows computers and users to be linked to Active Directory objects, sites, domains, or organizational units. This means that non-local GPO’s can apply to one or more Windows computers and users.
Starter Group Policy Objects
Starter GPO’s are templates for group policy settings. These templates enable IT, administrators, to pre-configure a group of settings that represent a baseline for any future policy to be created.
Examples of a Group Policy Object (GPO)
GPO’s can be used in numerous ways to enhance security within your organization. Below we have outlined some examples of how your organization can use GPO’s:
IT Admins can use GPO’s to define which network-connected printers or devices appear available on a user settings if that used if log into a specific Active Directory OU logs onto the domain
IT Admins can use GPO’s to determine the home screen a user will see once that user logs on to their device or internet browser.
IT Admins can use GPO’s to improve security within your organization by enforcing CTRL+ALT+ DELETE to be executed every time a user logs in. This is to prevent hackers from logging into the domain remotely.
Group Policy vs. Azure Policy
The main difference between group policy and Azure policy is the architecture that it is based on.
Traditional Group Policy is based on an architecture that is for users and computers within an Active Directory, however, within the cloud and Azure policy user accounts are managed under the Azure Active Directory.
This connection into the Azure AD allows for:
Device-based conditional access policies to be applied based on whether the device is known to Azure AD
Supporting single sign-on and access to Microsoft Cloud resources by logging in to Azure AD
Some other notable key differences between group policy and Azure policy is that the latter includes settings for Azure subscriptions, settings for Azure resources, and settings for “in-guest configuration”.
How do Group Policy Objects (GPOs) work?
The order that a GPO is processed is referred to as LSDOU, or Local Site Domain Organizational Unit. The processing order of group policies affects what settings are applied to an end-user of a computer.
The first item processed is the computer policy, followed by Active Directory policies from site to domain, then organization units. As a general rule, if there are any conflicts, the last applied policy will take effect.
What are the benefits of Group Policy Objects (GPOs)?
Implementing Group Policy Objects (GPO) within your organization can come with several benefits including:
Provides centralized management of computer and user settings
Enables IT administrators to enforce strict security policies like password policies, to regularly rotate passwords that are simple and at risk of being compromised.
Enable users to access files, even when network connectivity is poor by using folder redirection and offline files
Enable users to work with a consistent computing environment regardless of which workstation location they use to log on
User files redirected to a server location can be backed up regularly, saving users from data loss due to workstation failure.
Applications that require updates can be maintained automatically or reinstalled easily.
What are the limitations of Group Policy Objects (GPOs)?
Although the benefits of group policies far outweigh the limitations. Outlined below are some of the cons regarding GPOs:
There are limited triggers and flexibility with GPOs. Since GPO’s can only be applied to users or computers they are limited when it comes to applying settings. GPO’s also lack the ability to react to environmental changes such as a network disconnection.
GPO’s can be incredibly beneficial for your organization, they are difficult to maintain. Since there is no built-in filter option to find a specific setting, it is difficult to find or fix issues with existing settings.
As explained in a previous section, GPOs run sequentially which can be an issue for users to log on to their computers if the configurations take too long.
Through GPO’s are great for setting security policies for end-users, there is, unfortunately, no audit system in place to let IT admins know when a change was made or who made it.
Next Steps? Contact Datalink Networks
If your in-house team requires assistance, Datalink Networks is always available to help guide your team on how to implement GPO’s into your MCC and how to better secure your organization. Get connected to our team today by submitting the form below.
The GPOs, Group Policy Object – are basically a set of rules that allow us to define the behavior of certain actions for both the user and the team. The term GPO is widely heard when we use Windows Server 2016 but they also play a vital role when using Windows 10 locally.
With the use of GPOs we can restrict a user from performing various actions on the equipment, such as opening the control panel, installing programs, opening folders, etc., but it also allows us to configure the behavior of the equipment with actions such as not showing the screen of Lock, disable USB ports and much more.
What is GPO?
A GPO is a group policy object and comprises a set of group policies and each of them sets a particular configuration to the object to which it is linked. GPOs define a set of configurations that will determine the appearance of a system and its way of acting.
GPOs can be located within four different types of objects: Local computers, Active Directory lugates, Active Directory domains and Active Directory Organizational Units.
For administrative issues, such as audits or internal control, it is possible that at some point it will be requested to know in detail what group policies, or GPO, have a specific user or team and it would be a complex issue to access the group policy editor and verify which are enabled, since while one user can have 3 policies enabled, another can have 50 which complicates the results.
In this tutorial we will teach some practical methods to know which group policies are applied in Windows 10.
1. View all group policies using the RSOP tool
When we run this tool, she will show a list of all active policies for the specific user account from which it was generated. That is, this tool has the ability to display the policies applied to a user account. You cannot display the policies applied to the entire team.
Step 1
To access it we will use the following key combination and in the displayed window we will execute the rsop.msc command:
Step 2
Click on OK or press Enter and the first time we execute this tool the following window will be displayed.
Step 3
The tool will scan the policies and display all active policies for the current user account. As with the already known group policy editor, it will be possible to obtain more information about each policy by browsing the folder and double clicking on it.
2. View all group policies using the command line
Step 1
For this we must access the command prompt as administrators by right clicking on the application and selecting the option “Run as administrator”. Once we access the console, we will execute the following command:
Step 2
When the command is executed, the tool will search and display all active policies for the current user. When active policies are detected, the command prompt window will show Folder ID, Value and Policy Status:
$config[ads_text5] not found
Step 3
To display all active policies on the computer, simply replace “User” in the previous command with “Computer” as follows:
3. How to view all GPOs applied to a user and computer in Windows 10
View applied GPO objects
View GPO objects applied to a user
View GPO objects applied to a computer
View GPO objects applied to a remote computer
Create HTML report
We can create an html file that includes all those GPOs that are applied and that will be stored by default in the system32 folder.
Create HTML report
You can also create an output text file and change the destination path as follows:
$config[ads_text6] not found
It’s that simple we have the opportunity to check all active policies in Windows 10.
In many organizations, administrators who have both Windows and Mac computers in their organization want to manage settings for their Windows and Macintosh computers and users using a standard set of tools. In a Windows environment, the standard method for managing computer and user configuration settings is through Group Policy Objects applied to the appropriate site, domain, or organizational unit (OU) for different sets of computer and user accounts.
Centrify provides this capability for Mac computers and users through a group policy extension. The Centrify administrative template for Mac OS X ( centrify _mac_settings.xml or centrify _mac_settings.adm ) provides group policies that can be applied from a Windows server to control Mac OS X settings and behavior. These group policies can be applied to Mac OS X computers and to users who log on to those computers.
Through the Centrify administrative template for Mac OS X, Windows administrators using the Group Policy Management Editor can centrally access and control native Mac system preferences.
In the current Centrify administrative template for Mac OS X, Centrify group policies control settings for Personal, Hardware, Internet & Network, and System preferences, including:
- Accounts, (General) Appearance, Desktop & Screen Saver, Dock, Energy Saver, Network, Security & Privacy, Sharing, Software Update, and so on.
When you enable a group policy in a Windows Group Policy Object, you effectively set a corresponding system preference on the local Mac computer where the group policy is applied. For example, if you enable the group policy Computer Configuration > Centrify Settings > Mac OS X Settings > Security > Require password to unlock each secure system preference, it is the same as selecting the General tab of the Security & Privacy system preference, then clicking the Require an administrator password to access system preferences with lock icons option on a local Mac OS X computer. Once the group policy is enabled in the Windows Group Policy Object and updated on the local Mac computer, the corresponding option is checked:
In addition to the system preferences that are typically set on individual computers, there are many Mac configuration settings that are typically set from a Mac OS X server using the Workgroup Manager. These workgroup policies control application or media access, synchronization rules for mobile user accounts, the look and operation of the Dock, and other settings. The Centrify administrative template for Mac provides centralized access to many of these Workgroup Manager settings, including Applications, Dock, Media Access, Mobility, Software Update. and System Preferences.
Note: Not all group policies apply to all versions of the Mac operating environment or all computer models. If a particular system preference does not exist, is not applicable to the installed operating system, or is implemented differently on some computers, the group policy setting may be ignored or overridden by a local setting.
Group policies are available after you install the Centrify administrative template for Mac as described in Installing the administrative template. After you install the administrative template, the Windows administrator can use Active Directory MMC snap-ins or the Group Policy Management Console to create and link Group Policy Objects to sites, domains, or organizational units that include Mac computers that are joined to an Active Directory domain. Administrators can then use the Group Policy Management Editor to enable and configure the specific policies they want to enforce on Mac computers that are joined to the Active Directory domain.
For more information about using Active Directory Users and Computers or the Group Policy Management Console to create and link Group Policy Objects to sites, domains, or OUs, see the Group Policy Guide . You can also refer to the Group Policy Guide for more information about how to add other Centrify administrative templates to a Group Policy Object.
First things first, what is Group Policy? Group Policy is a feature of Windows that facilitates a wide variety of advanced settings that network administrators can use to control the working environment of users and computer accounts in Active Directory. It essentially provides a centralized place for administrators to manage and configure operating systems, applications and users’ settings.
Group Policies, when used correctly, can enable you to increase the security of user’s computers and help defend against both insider threats and external attacks.
In this blog, we will go through a detailed explanation of what Group Policies and GPOs are, and how system administrators can use them to help prevent data breaches.
Get the Free Guide for Keeping Active Directory Secure
Thanks for Downloading.
Please check your email (including spam folder) for a link to the whitepaper!
What is a Group Policy Object (GPO)?
A Group Policy Object (GPO) is a group of settings that are created using the Microsoft Management Console (MMC) Group Policy Editor. GPOs can be associated with a single or numerous Active Directory containers, including sites, domains, or organizational units (OUs). The MMC allows users to create GPOs that define registry-based policies, security options, software installation and much more.
Active Directory applies GPOs in the same, logical order; local policies, site policies, domain policies and OU policies.
Note: GPOs that are in nested OUs work from the OU closest to the root first and outwards from there.
Examples of GPOs
Group Policy Objects can be used in a number of ways that benefit security, many of which will be mentioned throughout this article. Below are a few more specific examples:
- A Group Policy Object could be used to determine the home page that a user sees when they launch their internet browser after logging onto the domain.
- Administrators can use GPOs to define which network connected printers appear on the list of available printers after a user in a specific Active Directory OU logs onto the domain.
- Admins can also use GPOs to tweak a number of security protocols and practices, such as restricting internet connection options, programs and even screen time.
How Are Group Policy Objects Processed?
The order at which GPOs are processed affects what settings are applied to the computer and user. The order that GPOs are processed is known as LSDOU, which stands for local, site, domain, organizational unit. The local computer policy is the first to be processed, followed by the site level to domain AD policies, then finally into organization units. If there happen to be conflicting policies in LSDOU, the last applied policies wins out.
Should You Use Group Policy?
The short answer is yes. If you want to ensure that your data and your core IT infrastructure is set up in a secure way, then you probably need to understand how to properly use Group Policy.
It might surprise you to learn that Windows straight out-of-the-box isn’t exactly secure. There are numerous gaps in security, most of which can be addressed using GPOs. Without plugging these gaps, you leave yourself exposed to a plethora of security threats.
GPOs, for example, can help you implement a policy of least privilege where your users only have the permissions they require to do their job. They can do this through disabling Local Administrator rights globally in your network and grant admin privileges to individuals or groups based on their roles.
Group Policies can be used in numerous ways to bolster security, including disabling outdated protocols, preventing users from making certain changes and more. Let’s take a look at some of the benefits of Group Policy.
The Benefits of Group Policy for Data Security
The benefits of Group Policy are not limited solely to security, there are a number of other advantages that are worth mentioning.
- Password Policy: Many organizations are operating with relaxed password policies, with many users often having passwords set to never expire. Passwords that aren’t regularly rotated, are too simple or use common passphrases are at risk of being hacked through brute force. GPOs can be used to establish password length, complexity and other requirements.
- Systems Management: GPOs can be used to simplify tasks that are at best mundane and at worst critically time consuming. You can save yourself hours and hours of time configuring the environment of new users and computers joining your domain by using GPOs to apply a standardized, universal one.
- Health Checking: GPOs can be used to deploy software updates and system patches to ensure your environment is healthy and up to date against the latest security threats.
If you like this, you’ll love this:
The Limitations of Group Policy
I’d be lying if I said to you that GPOs were the magic bullet to keeping your data secure. There are a number of limitations that you need to be aware of before you start implementing them.
Firstly, the GPO editor isn’t the most user-friendly console that you’re likely to come across. A deep understanding of PowerShell will help make it easier to do all the GPO updates.
Speaking of GPO updates, they are undertaken randomly every 90 to 120 minutes whenever the computer gets rebooted. You can be specific with an update rate from 0 minutes up to 45 days. However, if you do specify 0 minutes, then by default the GPOs will attempt to update every 7 seconds, which is likely to choke your network with traffic.
GPOs are also not immune to cyberattacks. If an attacker wanted to change local GPOs on a computer in order to move laterally across the network, it would be very difficult to detect this without a Group Policy auditing and monitoring solution in place.
How Lepide Helps
The Lepide’s Group Policy Auditing solution (part of Lepide Data Security Platform) will help you to get more visibility over the changes being made to your Group Policy Objects. Every time a critical change is made, Lepide will send the admin a real time alert and provide the option to roll back unwanted changes to their previous state; allowing admins to maintain a policy of least privilege and ensure the security policies of the organization remain intact.
Want to see how Lepide can help you to audit changes being made to GPOs and automatically disable the stolen account to stop the attack? Schedule a demo with one of engineer or download 15-Day free trial to see the principle in action.
Monitor all GPO changes to Group Policy objects like – creation, deletion, modification
and GPO link changes
Get Your Free Trial Free, fully functional 30-day trial
The Who, Where and When information is very important for an administrator to have complete knowledge of all activities that occur on his Active Directory. This helps him identify any desired / undesired activity happening. ADAudit Plus assists an administrator with this information in the form of reports. In real-time, ensure critical resources in the network like the Domain Controllers are audited, monitored and reported with the entire information on AD objects – Users, Groups, GPO, Computer, OU, DNS, AD Schema and Configuration changes with 200+ detailed event specific GUI reports and email alerts.
- Live Demo
- Free Edition
- Download Now
Monitor all GPO changes to Group Policy objects like – creation, deletion, modification
and GPO link changes
How to change Group Policy Settings?
Group Policy is an easy way to configure computer and user settings on computers that are part of the domain. Windows offers a Group Policy management Console (GPMC) to manage and configure Group Policy settings.
Step 1- Log in to the domain controller as administrator
A standard domain user account is not in the local Administrators group and will not have the proper permissions to configure Group Policies.
Steps as follows:
Step 2 – Launch the Group Policy Management Tool
Choose Start → All Programs →Administrative Tools → Group Policy Management
Step 3 – Navigate to the desired OU
Group policy can be applied at domain level, OU level or at a site level. Navigate the forest to the default domain policies.
Step 4 – Edit the Group Policy
Right click on the desired GPO to edit the group policy settings. The group policy management console opens. Every GPO has two basic configurations :
- Computer configuration (applies to computers)
- User configuration (applies to user accounts)
Under each of these configurations are:
- Policies
- Preferences
Choose the configurations you wish to modify, and save them.
Finally, link your GPO to an OU. The group policy settings you have configured will take effect only if you link them to the appropriate container. It could be a domain, site or an organizational unit.
AEG: How to Create and Link a GPO in Active Directory
AEG: How to Create and Link a GPO in Active Directory
Introduction
This article will walk you through on how to create and link a Group Policy in Active Directory. If this is not the solution you are looking for, please search for the solution in the search bar above.
Guidelines
Creating a GPO is a fairly simple task, so long as you know what settings you need to change, and how to apply it to the endpoints you are trying to affect. These instructions will need to be done by a user who is a member of the Group Policy Creator Owners group, on a domain controller with Group Policy Management.
Open Group Policy Management by navigating to the Start menu > Windows Administrative Tools, then select Group Policy Management.
Right-click Group Policy Objects, then select New to create a new GPO.
Enter a name for the new GPO that you can identify what it is for easily, then click OK.
Select the GPO from Group Policy Objects list, then in the Security Filtering section, Add and Remove users, groups, and computers that the GPO should apply to.
Right-Click the GPO, and select Edit. Change any of the policies you want to apply in the Computer and\or User Configuration. Close the GPO Editor when you are done.
Note: Check the Public Key Policies section for how to configure policies for AEG.
Now, the GPO is created, but you still need to link it. Locate the OU or Domain you want to apply the GPO to, then right-click it, and select Link an Existing GPO. then select your GPO from the list, and click OK.
Note: Inheritance defines what GPO will override the settings of another. From lowest to highest priority, the levels that GPOs can be applied to are:
- Local – These are policies applied locally to the system and user.
- Site – Policies applied to anything that is a member of a site, will override settings that are configured on the Local level.
- Domain – Settings in GPOs linked to the domain, will override settings configured in a GPO that is linked at the Local and Site level.
- Organizational Unit – GPOs linked here will override any other GPOs, except those linked to a Sub-OU, or a GPO that is marked as Enforced.
- Enforced – An Enforced GPO will override the settings of all other GPOs, unless blocked by Block Inheritance.
Related Articles
AEG: How to Enable Advanced Logging for AEG Server
Feb 29, 2020, 5:07 AM
This article will guide you through enabling AEG’s advanced logging feature. If this is not the solution you are looking for, please search for the solution in the search bar above. Note: This support article applies to AEG version 5.x and below. Also, when facing issues to enroll for Certificates, our support staff may require more information to determine the root cause of the problem.
AEG: How to Create Custom Certificate Templates
Mar 2, 2020, 1:56 AM
This article will go over how to create templates from duplicates of default templates for both User and Machine Authentication. Depending on the use case that you implement, you will need to duplicate one of the default Certificate templates. Duplication is not required but is strongly recommended to avoid changing the properties of default templates and to better control the changes applied to templates that work with the AEG.
AEG: How to Edit a GPO for Certificate Enrollment
Mar 2, 2020, 3:03 AM
This article will walk you through editing a GPO for Certificate Enrollment. Certificate Services Client – Certificate Enrollment Policy – These are the settings that define the URL for the policy servers which users and computers will contact. By default (in a newly created GPO), these setting will be set to “Not Configured”, and will need to be changed to “Enabled”. When you enable it, it will have a default Certificate Enrollment Policy (CEP) in the list called Active Directory Enrollment Policy, and it will be set as the default.
This tutorial explains how to check which Group Policies are applied to your Windows 10 PC as well as current user account. You might have applied multiple local group policies and might want to know which Group policies are currently active. There are 2 methods to find that out. You can see which group policies are set for the whole PC and which policies are set for the currently logged in user account.
The first method covered in this tutorial provides Group Policy like interface, but shows only those folders and policies that are applied to your PC and user account. The second method helps to check group policies using commands, but that is also very easy to use. Before starting, do note that Group Policy is available in Enterprise and Pro versions of Windows 10 only. It is not available in Home Edition (unless you have used some third-party software to install Group Policy in Home Edition).
Let’s begin with the first method.
Method 1: Check Which Group Policies Are Applied To Windows 10 PC and User Account Using Resultant Set of Policy
Resultant Set of Policy window is similar to Group Policy window. The difference is that it shows only those group policies (including some security settings) that are currently active on your Windows 10 PC and for the current user account. Also, you won’t be able to change the status of any policy. It is just a viewer. Let’s see how to find which group policies are applied to Windows 10 using this window.
Step 1: Use Search box and write rsop.msc. Hit ‘Enter’ key and then Resultant Set of Policy window will open.
Step 2: It has the interface similar to Group Policy. On the left side, you will see Computer Configuration and User Configuration menus. Use Computer Configuration menu to view applied group policies in the whole PC and use User Configuration menu to see which group policies are applied to currently logged in user. Just expand the menu, then folder, and you will be able to see which policies are applied.
Step 3: You can also double-click on a policy and see its current status (enabled or disabled) along with information.
Method 2: Find Which Group Policies Are Applied To Windows 10 Using Command Prompt
This Command Prompt method also shows group policies applied to whole Windows 10 PC as well as the current user account, but only one task can be done at a time. Command Prompt method doesn’t show applied group policies for both options together because there are separate commands for both. Also, you won’t be able to change the status of any group policy using Command Prompt. You have to use Group Policy window and manually change the status of desired group policy. Now let’s see the steps:
Step 1: Run Command Prompt with Administrative rights. You can do this by typing cmd in Search area, right-clicking on Command Prompt option, and selecting Run as administrator option.
Step 2: To view applied group policies for current user, your command is: gpresult /Scope User /v . Enter the command and execute it.
Step 3: A long list of information will be visible. Information is related to user settings, type of security privileges available for user, etc. You can look at that information and scroll down to find Resultant Set of Policies for User section. This is the section that shows applied group policies for that user. You will be able to see folder name (like Administrative Templates) and path for a particular group policy. You can also check if that group policy is enabled or disabled.
Step 4: In this step, we will see if there are some group policies that are applied to the whole Windows 10 PC. For this, you need to type and execute the following command: “ gpresult /Scope Computer /v” . As you can see, the command to view applied group policies for the whole PC is similar to view group policies for current user. The only difference is that in this command we have used Computer in place of User.
Step 5: After executing the command, you will see detailed information related to OS, Computer Settings, type of security groups for which your PC is a part of, etc. Scroll down the list and you will see “Resultant Set Of Policies for Computer” section. If there is some group policy applied to your computer, you will be able to see those policies.
You can see the policy folder, path of that particular group policy, and status of that particular policy which is applied to your PC.
Check this video that also covers how to check which Group Policies are applied to your Windows 10 PC:
The Verdict:
These are two very simple methods using which you can check which group policies are applied to your Windows 10 PC and/or current user. Instead of manually finding which group policies are applied using Local Group Policy window, these two methods are much better. I find method 1 easier and better than method 2 because Resultant Set of Policy window has the interface like that of Group Policy window and finding the applied policies is quite easy in this method.
The Group Policy Results Tool or GPResult.exe is a command-line tool for IT administrators that allows them to verify all the group policy settings in effect for a specific user or the whole system.
To find out which Group Policy restrictions or settings exist on your computer, open the Run box, type rsop.msc and hit Enter to open the RSoP Microsoft Management Console snap-in.
But this Resultant Set of Policies Report will not show all the Microsoft Group Policy settings.
Group Policy Result Tool (GPResult.exe)
To see the full set of Microsoft Group Policy settings, however, you will have to use the Group Policy Results Tool. Open a command prompt window, type gpresult , and hit Enter to see the parameter list.
Now from the available parameters, if you use the command gpresult /Scope Computer /v you will be able to see all the policies that have been applied to your computer.
To see the policies applied to only your User Account, use gpresult /Scope User /v instead.
Since the tool throws up a lot of information you may want to export the data to a Notepad and then open it.
To do so, in the CMD window, first, type gpresult /z >settings.txt and hit Enter. Then type notepad settings.txt and hit Enter to open the Notepad.
If you wish, you can read more about this on TechNet.
RSoP, Resultant Set of Policy, and GPResult are two of those tools you absolutely have to know about if you’re using Group Policy in your environment or you’ll wish you had known about it sooner. Through the Group Policy Management Console you can see all the settings that a specific GPO will apply to machines and users in that OU but because the Active Directory is hierarchical you have to drill down into further Organizational Units in order to find if a more specific GPO might be affecting the target machines. If only we could see from the computer’s perspectives what group policies were being applied to it… We can! Using RSoP and GPResult, we can get exactly that kind of information.
The Resultant Set of Policy MMC snap-in has a nice interface and is easily used. Just go to Start, Run and enter rsop.msc. This will flash up a quick screen with a summary of the environment it’s processing.
When the progress reaches 100%, it will pull up a report for the policies upon which the computer and the user are having applied. You can browse the list, which mirrors the Group Policy Management Console, and see which policies the machine is seeing, which might not quite match what you’ve set in the Active Directory server.
You can also use this to diagnose any errors. For example, if a software deployment isn’t coming through for some reason, you can verify that it has access to the policy and has received the command. You can also see any related errors to help your troubleshooting.
GPResult
Starting with Vista SP1, RSoP no longer shows all of the group policies that a computer might have being applied to it. Instead, Microsoft recommends that you use the command line tool GPResult.
Just open the Command Prompt and type:
Being a command line tool, it opens up the possibilities to include it in scripting. There are a large number of options you can use with GPResult to get exactly what you want. You can use it to create a nicely formatted HTML or XML report and you can also use it to run remotely on another system and as a different user (provided you know the password).
The report will look something like this:
From the command line help file, GPResult has these options:
GPRESULT [/S system [/U username [/P [password]]]] [/SCOPE scope]
[/USER targetusername] [/R | /V | /Z] [(/X | /H) [/F]]
Description:
This command line tool displays the Resultant Set of Policy (RSoP)
information for a target user and computer.
Parameter List:
/S system Specifies the remote system to connect to.
/U [domain]user Specifies the user context under which the
command should execute.
Can not be used with /X, /H.
/P [password] Specifies the password for the given user
context. Prompts for input if omitted.
Can not be used with /X, /H.
/SCOPE scope Specifies whether the user or the
computer settings needs to be displayed.
Valid values: “USER”, “COMPUTER”.
/USER [domain]user Specifies the user name for which the
RSOP data is to be displayed.
/X Saves the report in XML format at the
location and with the file name specified
by the parameter. (valid in
Windows Vista SP1 and Windows Server 2008)
/H Saves the report in HTML format at the
location and with the file name specified by
the parameter. (valid in Windows
Vista SP1 and Windows Server 2008)
/F Forces gpresult to overwrite the file name
specified in the /X or /H command.
/R Displays RSoP summary data.
/V Specifies that verbose information should
be displayed. Verbose information provides
additional detailed settings that have
been applied with a precedence of 1.
/Z Specifies that the super-verbose
information should be displayed. Super-
verbose information provides additional
detailed settings that have been applied
with a precedence of 1 and higher. This
allows you to see if a setting was set in
multiple places. See the Group Policy
online help topic for more information.
/? Displays this help message.
Examples:
GPRESULT /R
GPRESULT /H GPReport.html
GPRESULT /USER targetusername /V
GPRESULT /S system /USER targetusername /SCOPE COMPUTER /Z
GPRESULT /S system /U username /P password /SCOPE USER /V
Are there any other tools out there that fall into that category ‘I wish I knew about that earlier‘ that you’d recommend? Let me hear them in the comments.
It is possible to find which Local Group Policies are applied in Windows 10 using the GUI. If you are running an edition of Windows 10 which comes the Local Group Policy Editor app, you can use it to see them quickly. Here is how it can be done.
Group Policy is a way to configure computer and user settings for devices which are joined to Active Directory Domain Services (AD) as well as local user accounts. It controls a wide range of options and can be used to enforce settings and change the defaults for applicable users. Local Group Policy is a basic version of Group Policy for computers not included in a domain. The Local Group Policy settings are stored in the following folders:
C:\Windows\System32\GroupPolicy
C:\Windows\System32\GroupPolicyUsers.
If you are running Windows 10 Pro, Enterprise, or Education edition, you can use the Local Group Policy Editor app to configure the options mentioned above with a GUI.
To see applied Group Policies in Windows 10, do the following.
- Press Win + R keys together on your keyboard and type:
Press Enter.
You are done. Alternatively, you can use Resultant Set of Policy (rsop.msc)
See Applied Group Policies in Windows 10 using RSOP
To find all applied Group Policies using the Resultant Set of Policy tool, do the following.
- Press Win + R keys together on your keyboard and type:
Press Enter.
Winaero greatly relies on your support. You can help the site keep bringing you interesting and useful content and software by using these options:
If you like this article, please share it using the buttons below. It won’t take a lot from you, but it will help us grow. Thanks for your support!
Author: Sergey Tkachenko
Sergey Tkachenko is a software developer from Russia who started Winaero back in 2011. On this blog, Sergey is writing about everything connected to Microsoft, Windows and popular software. Follow him on Telegram, Twitter, and YouTube. View all posts by Sergey Tkachenko
4 thoughts on “How To See Applied Group Policies in Windows 10”
I didn’t know about the command line tool gpresult prior to this article, thanks
gpresult /v for a quick summary if anyones interested.
If you’ve worked with Group Policy within Active Directory for more than a day, chances are you’ve needed to know what group policy objects were actually being applied to a machine.
I say “actually” because what is meant to be applied and what gets applied are sometimes two different things. When you throw in overlapping policies, nested OUs, permissions, group policy order, etc… you can often get unexpected results.
This is precisely why Microsoft created tools like GPResult and RSoP, so that you can take an accurate reading of what group policy objects (GPOs) and group policy settings are being applied.
How to Use the GPResult Command
GPResult is a command line tool that has shipped with Windows since at least Windows Server 2008 and Windows 7. You can run it in either Command Prompt or PowerShell.
To see all the possible command line switches that you can use enter the command:
Let’s step through a few gpresult examples from the most common use cases.
Show RSoP Summary to View Applied Group Policy Objects
To output the summary data about what Group Policy Objects have (and have not) been applied to your user or computer use the following commands:
This command will give you a snapshot of the most important data when troubleshooting group policy such as applied group policy objects for both the computer and user accounts, OU info, security groups, domain controllers serving the policies, last time policy was applied, etc…
A typical output for the above command looks like this:
Like I mentioned earlier this command can be used to pull a command prompt or PowerShell group policy report.
View Group Policy Summary for only Computer or User
If you want to narrow down the down scope of the output from the first command I showed you all you need to do is append it with /scope:user or /scope:computer for whichever account type you’re after.
Show Group Policy Summary for Specific User
If you want to see the group policy information for a specific user on a specific machine you can use the /user switch. Keep in mind, you must know the user’s credentials for this to work.
If you do not know the user’s password you’ll want to make use of the Group Policy Results Wizard within the Group Policy Management Console which will allow you to generate a summary report from any computer and user within your domain.
Show GPResult Remote Computer
Another useful trick is to use GPResult to pull the RSoP information from a remote computer. To do that we’ll use the /s switch.
You can also use PSExec from Microsoft PSTools to open a remote command line and just use the regular gpresult command.
Export GPResult to HTML
If you want a more readable output of your GPO summary data then you can use the /H switch to export group policy results to HTML. When you view the HTML file it will be formatted similarly to the GPMC so it should be easy for you to navigate.
You can also swap out the /H for /X if you prefer an XML output. This could be handy if you have a remote monitoring tool that can watch an XML file for changes. You can set up a task to periodically dump gpresult on a high priority machine to XML and then monitor that file for any changes and alert you if it finds anything.
Export GPResult to Text File
Similar to above, you can also dump your GPResults to a text file using the following command:
Dumping the results to a text file can be particularly helpful when you’re using the /V command for verbose output and want to be able to search the output using something like CTRL+F within notepad or notepad++.
I cannot stress how useful GPResult and RSoP.msc are for troubleshooting group policy. Someday it will pay for you to be familiar with these commands. I highly recommend playing around with them and committing them to memory. Good luck!
Recommended for You: Solarwinds Server & Application Monitor (SAM)
Know which applications are having issues in your environment before users complain? Know which systems are causing those problems? How about which servers are about to have problems like running out of space or memory?
Automate collection of data and alerting on your applications and servers with Solarwinds Server & Application Monitor so you have these answers.
Get insight into Active Directory, DNS, DHCP, and your Virtual and Applications environments without needing to mess with complex templates or knowing a single line of code.
Major vulnerability in log4j – Immediate action required by all systems & web administrators and others
*See below for updates as of 1/3/2022, 3:00 pm A critical vulnerability has been discovered in log4j that is actively being exploited. This is an issue both for systems and web administrators on campus, including those who support products with a web interface, as well as requiring the attention of those that manage relationships with… [read more]
- How can I deny a user from logging into my workstations and deny them from accessing any of my file shares?
- How can I map a network drive and/or printer share using group policy?
- Why isn’t my group policy being applied?
How can I deny a user from logging into my workstations and deny them from accessing any of my file shares?
Users in the AD domain are dynamically created and deleted based on official data received from Personnel and the Registrar. This data is fed into AD from PH. There maybe certain situations that require you to “lock out” a user from your environment even though the user still has an active account. To do this you can use the deny logon locally and deny access from the network policies.
- Create a new security group in your OU called TLA-Denied Users.
- Create a group policy on an OU where you want to enforce the logon restrictions.
- Navigate to “Computer Configuration-> Windows Settings->Security Settings->Local Policies->User Rights Assignment”. Double click “Deny Log on locally”.
- In the Deny Log on locally Properties window, check the box “Define these policy settings”
- Click the “Add User or Group. ” button.
- Add the name of the security group you created in step 1. Either use the browse button to select the user/group from the object picker or manually type in the name of the group using AD\groupname for a domain group and groupname for a local group. It is also a good idea to add Guest and ASPNET as these accounts are part of XP and should be blocked.
- When you have finished specifying the list of groups and users, click the “OK” button to save your changes.
- Follow steps 2-6 on the security right for “Deny Access to this computer from the network”.
- The restrictions will take effect on the next reboot or during the next group policy refresh. To apply the change immediately you can run gpupdate.exe on XP or 2K3.
- When ever you want to lockout a user in your environment just add the user to the denied security group. This will effectively deny the user access to any of your resources. It is recommended that this policy be put into place on your top-level OU. This will ensure your complete protection.
Why isn’t my group policy being applied?
The application of group policy is based on machine accounts — not user accounts. To ensure that a GPO (Group Policy Object) you have created is applied to anyone who logs on to a machine in the OU where the GPO is being applied you must turn on loopback policy processing. To enable loopback policy mode, load the GPO and navigate to the group policy folder of the Computer Configuration section. Enable User Group Policy loopback processing mode.
What Is Gp update? What Is Gpresult? What Is Group Policy Reporting? How to Use Group Policy Reporting What Is Group Policy Modeling? Haw to Use Group Policy Modeling What la Group Policy Results? How to Use Group Policy Results
Introduction Group Policy is the primary administrative tool for defining and controlling how programs, network resources, and the operating system operate for users and computers in an organization. In an Active Directory environment, Group Policy is applied to users or computers on the basis of their membership in sites, domains, or organizational units.
Lesson objectives After completing this lesson, you will be able to:
■ Explain what gpupdate is.
■ Explain what gpresult is.
Explain what is group policy reporting.
■ Use group policy reporting.
■ Explain what is group policy modeling.
■ Use group policy modeling.
■ Explain what is group policy results.
■ Use group policy results.
Syntax of gpupdate gpupdate [/Targ-et: -iConqpuTer I User>] [/Force] [/’Wait: Value] [/Logoff] [/fcdot] [/Sync]
Introduction Gpupdate is a command-line tool that refreshes local Group Policy settings and Group Policy settings that are stored in Active Directory, including security settings. By default, security settings are refreshed every 90 minutes on a workstation or server and every five minutes on a domain controller. You can run gpupdate to test a Group Policy setting or to force a Group Policy setting.
Examples of gpupdate The following examples show how you can use the gpupdate command:
■ C:\gpupdate /force /wait: 100 C:\gpupdate /boot
Parameters of gpupdate Gpupdate has the following parameters.
Specifies that only user or only computer policy settings are refreshed. By default, both user and computer policy settings are refreshed.
Reapplies all policy settings. By default, only policy settings that have changed are reapplied.
Sets the number of seconds to wait for policy processing to finish. The default is 600 seconds. The value ‘0’ means not to wait. The value ‘-1’ means to wait indefinitely.
Causes a logoff after the Group Policy settings are refreshed. This is required for those Group Policy clientside extensions that do not process policy settings during a background refresh cycle but do process policy settings when a user logs on. Examples include user-targeted Software Installation and Folder Redirection. This option has no effect if there are no extensions called that require a logoff.
Causes the computer to restart after the Group Policy settings are refreshed. This is required for those Group Policy client-side extensions that do not process policy during a background refresh cycle but do process policy when the computer starts. Examples include computer-targeted Software Installation. This option has no effect if there are no extensions called that require the computer to restart.
Causes the next foreground policy setting to be applied synchronously. Foreground policy settings are applied when the computer starts and when the user logs on. You can specify this for the user, computer, or both by using the /Target parameter. The /Force and /Wait parameters are ignored.
What Is Gpresult?
Syntax of gpresult gpresult [/s Computer [/it /p Passwrii]]
[/user TargetUserName) [/scopc
Introduction Because you can apply overlapping levels of policy settings to any computer or user, Group Policy generates a resulting set of policies at logon. Gpresult displays the resulting set of policies that are enforced on the computer for the specified user at logon.
The gpresult command displays Group Policy settings and Resultant Set of Policy (RSoP) data for a user or a computer. You can use gpresult to see what policy setting is in effect and to troubleshoot problems.
Examples of gpresult The following examples show how you can use the gpresult command:
■ C:\gpresult /user targetusername /scope computer
■ C:\gpresult /s srvmain /u maindom/hiropln /p [email protected] /user targetusername /scope USER
■ C:\gpresult /s srvmain /u maindom/hiropln /p [email protected] /user targetusername /z >policy.txt
■ C:\gpresult /s srvmain /u maindom/hiropln /p [email protected]
Parameters of gpresult Gpresult has the following parameters.
/s Computer Specifies the name or IP address of a remote computer. Do not use backslashes. The default is the local computer.
/u Domain/User Runs the command with the account permissions of the user that is specified by User or Domain/User. The default is the permissions of the user who is currently logged on to the computer that issues the command.
/p Password Specifies the password of the user account that is specified in the /u parameter.
/user TargetUserName Specifies the user name of the user whose RSoP data is to be displayed.
/scope
/v Specifies that the output will display verbose policy information.
/z Specifies that the output will display all available information about Group Policy. Because this parameter produces more information than the /v parameter, redirect output to a text file when you use this parameter (for example, you can type gpresult /z >policy.txt).
/? Displays help in the command prompt window.
Practice: Using Gpupdate and Gpresult
in this practice, you will use gpupdate and gpresult to test Group Policy settings on your local computer


