When I’m working in Excel, I frequently need to adjust the height and width of a cell. I can do it with a mouse, but that means I have to shift my hand from the keyboard to the mouse. I’m beginning to realize I can be more efficient if I keep both hands on the keyboard. So, is there a keyboard sequence for that?
I like the way you think. While the mouse is handy, keystrokes are far more efficient. Here’s how to adjust the size of cells using the keyboard:
For pre-2007 Excel, press Alt+O (that’s the letter, not a zero) and the regular formatting screen will appear (see screenshot below).
Then click on just the letter R (for the Row option) and the Row submenu appears. Press E and the Height option opens. Enter your choices and press Enter.
To change the column width, press Alt+O and then press C (for Column) and then W (for width). Type your values and press Enter.
In Excel 2007, press Alt, which puts Excel into a shortcut key mode (see the January 2009 column, page 74, for more on the use of KeyTips) and press H for the Home tab of the Ribbon. Press O (capital letter O) to open the Format tool in the Cells group with a dropdown list. Press H for Row Height. For Width, press W.
Another way to adjust the height of an entire row in any version of Excel is topress Shift+Spacebar, and then press Shift+F10, which displays the Context menu (see screenshot at right).
To change the Row Height, press R. To reset a Column Width, press Ctrl+Spacebar, then Shift+F10, then press C twice to choose Column Width, which is the second command that starts with the letter C (see screenshot at left).
If you’d rather not use the mouse
These days people are moving over to touch interfaces at a rapid pace, but for certain types of work a keyboard is absolutely essential. If you are using Microsoft Excel to do some heavy number crunching, there’s no question that a good keyboard is not an optional extra.
However, it’s not just the perfect device for data entry. Your keyboard can actually turn you into a master of Excel Kung Fu, making you faster and more efficient. How? By using keyboard shortcuts.
The real pros for an application have always been those who have memorized the most important keyboard shortcuts, so they can work that application like a seasoned musician. Excel is no different and once you know the most common shortcuts for your typical use case, you can expect to get things done much more quickly.
Adjusting row height and column width is something every Excel user has to do. Which means if you’re going to start down the road of Excel keyboard warrior, using a keyboard shortcut for row height or column width in Excel is the perfect place to start.
The Magic Of The ALT Key
The main reason most users don’t bother learning keyboard shortcuts is because traditionally you have to learn a whole bunch of them by heart. That’s probably why watching an experienced keyboard shortcut user attack a spreadsheet with gusto can feel like Voodoo.
Microsoft have taken this problem completely out of the equation with just one little button – ALT.
We’re using Excel 365 and as you can see, hitting the ALT button makes numerous little tooltips pop up. Each of these represents the next letter you can press to access the corresponding function. So you don’t have to worry about perfectly memorizing these shortcuts at all. Once you’ve practiced them a few times, these shortcut prompts will always help remind you of what to do next.
All you have to know right now is that every keyboard shortcut for Excel starts with a simple tap of the ALT key.
Autofit Column Width
The classic way to automatically fit column width with the mouse, is to double-click the column header border, but you can actually do it using the keyboard, which is generally faster.
Obviously, you need to have the cell selected for which you want to automatically adjust the column width. Once you’ve done that, here’s the fastest way to adjust the column width. The problem is there is too much text for the column width. Let’s fix that!
- First, press ALT to put Excel into shortcut mode. Then hit the H key to switch to the Home tab.
- Finally, press O and then I.
Pretty easy right? We can do something similar for row height as well!
Autofit Row Height
The method to automatically adjust row height with the keyboard is practically identical. In fact, the keyboard shortcut for row height in Excel differs by just a single keystroke.
- First, press ALT to put Excel into shortcut mode. Then hit the H key to switch to the Home tab.
- Finally, press O and then A.
This will adjust the row height to match the tallest cell in the row. Job done!
Manual Row Height & Column Width Adjustment Shortcuts
While the shortcuts for automatic cell adjustment is incredibly useful, sometimes you’ll want to fine-tune the exact dimensions of the cells in your spreadsheet.
As you might expect, you can use keyboard shortcuts to access the settings that expose the numbers in question.
- To manually adjust row height, press ALT to put Excel into shortcut mode. Then hit the O key to access Excel 365’s legacy menu options.
- Now, press R and then E.
- You’ll see this dialogue box pop up with the current height value. Change it to whatever you like and hit Enter to lock it in.
- To manually adjust column width, press ALT to put Excel into shortcut mode. Then hit the O key to access Excel 365’s legacy menu options.
- Now, press C and then W.
- Again, you’ll get this little window that lets you put in the exact column width you desire. Choose whichever number makes you feel warm and fuzzy inside.
That’s it! Now you are a true master of the height and width of your cells. Without the need for a mouse, armed with nothing but a keyboard as your weapon.
The Fastest Excel Gun In The West
After trying out these keyboard shortcuts yourself, you’ll probably agree that using the mouse is both a literal and figurative drag. Sure, it seems easier, but with a little muscle memory you can tweak your row heights and column widths to your exact requirements at a moment’s notice. Once you walk the keyboard path, it’s hard to ever turn back.
Be sure to check our other Excel tutorials to learn about other useful keyboard shortcuts and amazing Excel tips and tricks you won’t know how you lived without.
Sydney Butler is a social scientist and technology fanatic who tries to understand how people and technology coexist. He has two decades of experience as a freelance computer technician and more than a decade as a technologies researcher and instructor. Sydney has been a professional technology writer for more than five years and covers topics such as VR, Gaming, Cyber security and Transhumanism. Read Sydney’s Full Bio
Lori Kaufman is a technology expert with 25 years of experience. She’s been a senior technical writer, worked as a programmer, and has even run her own multi-location business. Read more.
Setting the row height and column width in Excel is easy, but if you’d rather use the keyboard to do this, it’s not very intuitive. We’ll show you a couple of different ways to set the row height and column width without using your mouse.
To begin, use the arrow keys on your keyboard to move the cell selection to the row or column you want to change, then press the Alt key to go into shortcut key mode. Press “H” to access the Home tab.
Shortcut keys display for all the commands on the Home menu. Press “O” to open the Format menu in the Cells section.
To change the row height for the row corresponding to the selected cell, press “H” for Row Height.
Enter a value on the Row height dialog box and press Enter.
Changing the column width is similar to changing the row height. Press Alt, then H, then O (one key after the other, like we mentioned above) and then press “W” for Column Width.
Enter a value on the Column Width dialog box and press Enter.
We changed the height for row 2 to 20 and the width for column B to 15, as shown below.
Another option for changing the row height is to press Shift+Spacebar to select the entire row containing the selected cell. Then, press Shift+F10 to bring up the context menu and press “R” to open the Row Height dialog box. Enter a new row height on the dialog box and press Enter.
You can do the same thing with the Column Width, except you would press Ctrl+Spacebar to select the entire column and then press “W” to open the Column Width dialog box.
If you like using the keyboard rather than the mouse, a lot of the commands on the ribbon have shortcut keys assigned to them. You can display those shortcut keys in the Screentips so you can easily learn what they are and start using them.
by Allen Wyatt
(last updated March 25, 2021)
Sawan wonders if there is a way to adjust the height and width of a cell by using the keyboard, without using the mouse. (Some people are really averse to using the mouse.) The answer is yes, there is a way. The problem, however, is that it isn’t a terribly intuitive way.
Here’s how you set the row height:
- Press Alt. This kicks Excel into a “shortcut key mode” and you should see the shortcut keys appear above each tab of the ribbon.
- Press H to indicate you want to use the Home tab. New shortcut keys appear above each tool in the tab.
- Press O to indicate you want to use the Format tool in the Cells group. Excel displays a drop-down list of options.
- Press H to choose the Row Height option. Excel displays the Row Height dialog box.
- Type the value you want for the row height.
- Press Enter.
The only difference in these steps when you want to specify the column width is that you should press W in step 4.
Here’s a different method of changing the row height:
- Press Shift+Spacebar. Excel selects the entire row.
- Press Shift+F10 to display a Context menu. (This is the same menu you see if you were to right-click on the selection.)
- Press R to indicate you want to change the row height. Excel displays the Row Height dialog box.
- Type the value you want for the row height.
- Press Enter.
A similar sequence will work for setting the column width:
- Press Ctrl+Spacebar. Excel selects the entire column.
- Press Shift+F10 to display a Context menu. (This is the same menu you see if you were to right-click on the selection.)
- Press C twice to choose the second “C” command in the Context menu (Column Width).
- Press Enter. Excel displays the Column Width dialog box.
- Type the value you want for the column width.
- Press Enter.
ExcelTips is your source for cost-effective Microsoft Excel training. This tip (6242) applies to Microsoft Excel 2007, 2010, 2013, and 2016. You can find a version of this tip for the older menu interface of Excel here: Setting Cell Width and Height Using the Keyboard.
Author Bio
With more than 50 non-fiction books and numerous magazine articles to his credit, Allen Wyatt is an internationally recognized author. He is president of Sharon Parq Associates, a computer and publishing services company. Learn more about Allen.
by Allen Wyatt
(last updated June 28, 2021)
Andy hates to use the mouse any more than he needs to, as he finds it much more productive when he relies only on keyboard shortcuts. He wonders if there is a keyboard shortcut for sizing columns or rows in a worksheet.
If you are using the mouse, there are quite a few ways you can adjust row height and column width. Andy, however, wants to use only the keyboard, which involves displaying the Row Height dialog box (to set the row height) or the Column Width dialog box (to set column width). There are actually three approaches you can use to display these dialog boxes relying solely on the keyboard.
Using the Ribbon Commands
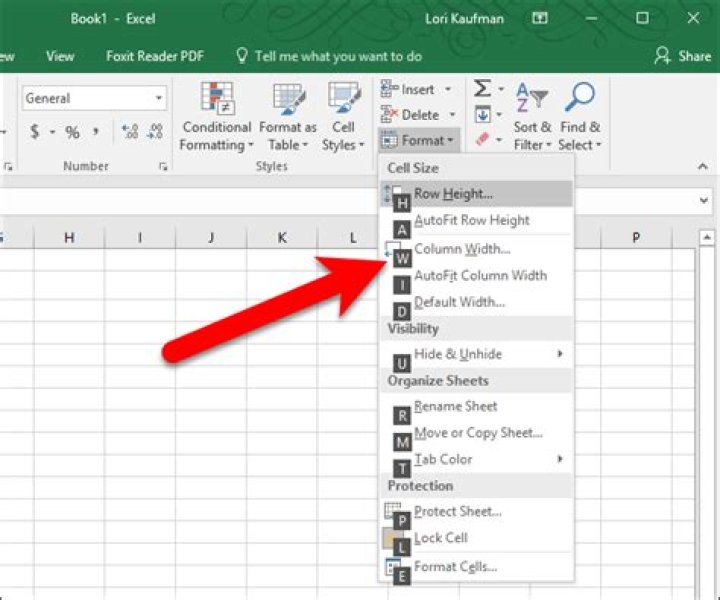
The first method is to depend on the tool-access keyboard method built into Excel. You can see this spring into action if you simply press the Alt key. Note that when you do, Excel places small letters near each of the areas of the ribbon. (See Figure 1.)
Figure 1. The keyboard shortcuts for accessing the ribbon areas.
At this point you can release the Alt key and just start pressing whatever keys will get you to the commands you want to use. For the commands to size columns and rows, then, the entire sequence to get to the right area of the ribbon is Alt, H, O. You can then see what keys you can press to display the desired dialog boxes. (See Figure 2.)
Figure 2. Keyboard shortcuts for formatting cells.
You can, at this point, press whatever key that will accomplish what you want. So, the full sequence of keys for sizing columns and rows are as follow:
- Set column width: Alt, H, O, W
- Autofit columns: Alt, H, O, I
- Set row height: Alt, H, O, H
- Autofit rows: Alt, H, O, A
Using the Legacy Shortcut Keys
Those who have been using Excel for some time know that you can often use the shortcut keys that worked in earlier versions of the program. You can initiate this approach by pressing Alt+O and Excel displays the Office Access Key dialog box. (See Figure 3.)
Figure 3. The Office Access Key dialog box.
At this point you can press C and then W to display the Column Width dialog box or press R and then E to display the Row Height dialog box.
Using the Context Menu
A third way to use the keyboard to set the row height and column width is to use the keyboard to access the Context menu. Here’s how you would get to the Row Height dialog box:
- Press Shift+Spacebar. Excel selects the entire row.
- Press the Context key on the keyboard. (This key is just to the right of the Win key at the right side of the Spacebar.) Excel displays the Context menu. In some versions of Excel you can also press Shift+F10 to display the Context menu.
- Press R.
Getting to the Column Width dialog box is just as easy:
- Press Ctrl+Spacebar. Excel selects the entire column.
- Press the Context key on the keyboard. Excel displays the Context menu.
- Press W (Excel 2013 and Excel 2016) or press C twice (Excel 2007 and Excel 2010).
ExcelTips is your source for cost-effective Microsoft Excel training. This tip (4635) applies to Microsoft Excel 2007, 2010, 2013, and 2016.
Author Bio
With more than 50 non-fiction books and numerous magazine articles to his credit, Allen Wyatt is an internationally recognized author. He is president of Sharon Parq Associates, a computer and publishing services company. Learn more about Allen.
MORE FROM ALLEN
Updating Fields in Locked Forms
Updating form fields in Word can be confusing, especially when the fields are locked in a form. This tips explains why .
One of the small graphical features provided with Word is the ability to apply artistic treatment to words or phrases. .
Deleting an Old Document Version
Word allows you to maintain different versions of the same document all within a single document file. Here’s how to .
Create Custom Apps with VBA! Discover how to extend the capabilities of Office 2013 (Word, Excel, PowerPoint, Outlook, and Access) with VBA programming, using it for writing macros, automating Office applications, and creating custom applications. Check out Mastering VBA for Office 2013 today!
More ExcelTips (ribbon)
Hiding and Unhiding Columns
Want to hide a column so it doesn’t appear in the worksheet? It’s easy to do using the formatting capabilities of Excel.
Unhiding Columns that are Persistently Hidden
If you were trying to format a worksheet and nothing you did could make the first two columns appear, would you be .
Setting Minimums and Maximums when AutoFitting Column Widths
Using AutoFit can help you maximize your use of screen space. In certain situations, though, it can make your data harder .
Subscribe
FREE SERVICE: Get tips like this every week in ExcelTips, a free productivity newsletter. Enter your address and click “Subscribe.”
You can change the width of selected columns and the height of selected rows in a table, or you can resize all rows or columns at the same time.
Note: You can’t change the width or height of individual cells.
Resize rows or columns manually
Click the table.
Do one of the following:
Resize a row or column: Move the pointer below the row number or to the right of the column letter until you see , then drag to resize.
Resize multiple rows or columns: Select the rows or columns, then move the pointer below the bottommost row number or to the right of the rightmost column letter until you see , then drag to resize. They’re resized proportionally.
Resize all rows or columns in a table: Click in the top-left corner of the table, then drag the white square at the bottom edge of the table to resize rows, drag the square on the right edge of the table to resize columns, or drag the square in the bottom-right corner to resize both.
As you drag, yellow alignment guides may appear when a table’s rows or columns align with rows or columns in another table on the canvas.
Note: If the content of cells doesn’t fit after resizing, you can adjust rows or columns so that it does. See the task below to learn how.
Resize a row or column precisely
Click a cell in the row or column you want to resize.
In the Format sidebar, click the Table tab.
In Row & Column Size, click the Height and Width arrows to set the size you want.
The entire row or column is resized. Selecting cells from more than one row or column resizes all the rows or columns included in the selection.
Size a row or column to fit its contents
Click the table.
Do any of the following:
Move the pointer to the right of the row number or column letter, click the arrow, then choose Fit Height to Content or Fit Width to Content from the menu that appears.
Move the pointer below the row number or to the right of the column letter until you see , then double-click.
Make rows or columns the same size
To make some rows or columns the same size, select the rows or columns; to make all the rows or columns the same size, click the table, then click in its top-left corner.
Choose Table > Distribute Rows Evenly or Distribute Columns Evenly (from the Table menu at the top of your screen).
You can set the row height or column width as a specified number of pixels. Each sheet uses and lets you set a default size, making all rows or columns in the sheet the same size. You can override that setting by setting the value for individual rows or columns.
Users can change the row height or column width by dragging the header lines between rows or columns.
For more details refer to the Column.Width method or Row.Height method.
Using the Properties Window
- At design time, in the Properties window, select the Spread component.
- Select the Sheets property.
- Click the button to display the SheetView Collection Editor .
- In the Members list, select the sheet for which to set the column width for a column.
- In the properties list, set the Columns property (or Row property) and then click the button to display the Cell, Column, and Row Editor .
- Click the column heading of the column for which you want to set the width (or row for the height).
- In the properties list, set the Width property ( Height property for the row).
- Click OK to close the Cell, Column, and Row Editor .
- Click OK to close the SheetView Collection Editor .
Using a Shortcut
Set the Columns shortcut object Width property. You can use -1 for all columns (Columns[-1]).
Example
This example code sets the second column’s width to 100 pixels.
How to copy cells data with row height and column width in Excel?
In Excel, the row height and column width cannot be copied together with the cells data when you copying normally. Actually copy cells data with row height and column width to other cells will save your time from adjusting the cell size again. In this article, we will show you methods of copying cells data with row height and column width in Excel.
With the build-in function of Excel, you can’t copy data with row height and column width at the same time. They need to be done separately. Please do as follows.
1. Firstly we will show you how to copy data with column width. Please select the cells you want to copy to other cells with the column width, and then press the Ctrl + C keys simultaneously.
2. Click on a blank cell for locating the copied cells data.
3. Click Home > Paste > Keep Source Column Widths. See screenshot:
Now the selected cells data are copied and pasted with the column widths.
Note: If you just want to copy the column width but ignore the source data, click Home > Paste > Paste Special to open the Paste Special dialog box, then check the Column widths option, and click the OK button.
4. For keeping the original row height, please select the entire rows of the original cells that you want to copy their row height and then click Home > Format Painter. See screenshot:
5. When a little brush display, select the entire rows of the cells you have pasted above. Release the mouse, you will see the original row heights are copied to these cells.
T he Copy Ranges utility of Kutools for Excel can help you easily copy a range of cell data with row height and column width in Excel.
Before applying Kutools for Excel, please download and install it firstly.
1. Select the cells you want to copy the data along with the row height and column width, and then click Kutools > Copy Ranges.
Tips: You can select multiple ranges with holding the Ctrl key and then apply the feature.
2. In the Copy Multiple Ranges dialog box, you need to:
3. In the following dialog box, select a blank cell to output the copied cells, and then click the OK button.
Now the row height and column width is pasted with the data successfully in to the destination cells.
If you want to have a free trial ( 30-day) of this utility, please click to download it, and then go to apply the operation according above steps.
Autofit Excel Column Widths using the Keyboard
In the previous post we discussed how Excel provides a neat way to autofit the width of a column using either the mouse double-click trick or using the built-in Excel menus.
In this post I will show you how to use a keyboard shortcut to accomplish the same task. If you want to learn more keyboard shortcuts you can download my free PDF with over 100 popular Excel keyboard shortcuts by clicking here.
Here is the scenario. You have a table of contacts that lists names, e-mails and birthdays. You have either imported this list from your e-mail program or perhaps just typed the list into Excel. But as it stands there are two problems:
The list of contacts in the screenshot above has two problems
(1) we can’t read all the text, (2) we can’t see any of the dates
- Problem 1: You can’t read the values in columns “Company” and “Email” as they are cut off by the values in the cells on their right.
- Problem 2: You can’t see any of the date values in the birthday column because that column is not wide enough – instead all you see is a row of #########
In the previous post we looked at the mouse double-click trick, where you select the columns you want to resize then double click on a column border to automatically resize the columns to fit the widest contents of that column. Then we looked at the autofit column width feature, accessed via clicking on the built in menus.
Now we are now going to use keyboard shortcuts.
As in the previous post we will use the built in menus and use the autofit column width feature, this time using keyboard shortcuts to access Excel’s cool autofit feature.
First select the cells you want to autofit. Here we don’t want Excel to resize column B to fit the text in row 2 and row 3, because we only want the column to be just wide enough for the first names in our contact list. So we first select the current region of cell B5 by pressing (Control + Shift + 8).
Next type the keyboard shortcut ALT + H + O + I to automatically resize the columns. If you want to learn more keyboard shortcuts I recommend you download my free PDF with over 100 Excel keyboard shortcuts by clicking here.
Autofit columns using keyboard shortcuts in Excel 2007 & 2010
Step by step instructions:
- Select cell B5
- Expand the selection to the current region (using Ctrl + Shift + 8)
- Type Alt + H to select the Home tab on the Excel ribbon
- Type O to select the Format menu in the Cells sub-area
- Type I to select “autofit column width”
The keyboard shortcut ALT + H + O + I is my favorite method for automatically resizing column widths. I find this method is most useful when I am already using the keyboard to enter data, and don’t want to move my hand to the mouse.
The good thing about memorising this keyboard shortcut is that you don’t need to hunt for each menu item, as these might look different on different computers or if you have resized the Excel window they might not even appear where you expect. Whereas the keyboard combination is fixed and does not depend on who’s computer you use (as long as you have a standard keyboard layout!) or whether you have a resized window.
To illustrate this, have a look at the screenshot below. The window has been reduced in size, and the Format Cells button is not visible. You need to click on the “Cells” dropdown first, then this will show you the Format button. In fullscreen mode, Excel normally displays the Format button so that it is clickable in the Cells sub-area, rather than being hidden in a dropdown. If you use the ALT + H + O + I shortcut then you won’t need to go hunting for the Format cells button.
Screenshot showing that Format Cells button is hidden (normally visible on the Home ribbon when Excel is full screen)
For those of you who use Excel 2003 or earlier, the process is similar but the keys are different. You use ALT + O + C + A.
- Select cell B5
- Expand the selection to the current region (using Ctrl + Shift + 8)
- Type Alt + O to select the Format menu
- Type C to select Column
- Type A to select Autofit
If you want our popular reference guide with over 100 Handy Excel Keyboard Shortcuts, please check out our Excel Shortcuts PDF page
Click on one of the following post links to read more on this topic.
Uploaded time: September 27, 2021 Difficulty: Primary
Quickly adjust the row height and column width
Tips: you can turn on the volume by clicking
Quickly adjust the row height and column width
Select areas that need to improve
Fields marked * are required please
Please leave your suggestions below
Select areas that need to improve
Fields marked * are required please
Please leave your suggestions below
Graphic skills
Adjusting the row height and column width is a necessary skill for the layout of the table content. So, how can we adjust the row height and column width?
The easiest way to adjust the row height and column width is to position the mouse on the dividing line of the row number and column label and drag the dividing line to adjust the row height and column width. We will find that using this method is difficult to completely unify the row height and column width in the table, and the operation is complicated.
So how can we quickly adjust the same row height and column width?
First , we click the triangle symbol in the upper left corner of the table to select all the table. At this time, when we drag any one row height and column width, the row height and column width of the entire table will be adjusted in the same way.
We can also quickly set the most appropriate row height and column width. Move the mouse to the dividing line of the row or column, and double-click to complete the automatic adjustment of the row height and column width.
What if we need to set the row height or column width precisely? Take this table as an example. In the Rows and Columns drop-down menu, click Row Height , then we can see that the height of the row is 19.8. Select the table area we want to adjust, click the Rows and Columns drop-down menu, choose the Row Height option, enter 19.8, and finally click OK.
Make your work easier with WPS Spreadsheet like Microsoft Excel. Did you get it?
In a Microsoft Excel spreadsheet, you can adjust the column width or the row height by following the steps provided on this page.
Many of the suggestions below also work in other spreadsheet programs, like Google Docs and OpenOffice Calc.
- Adjust the width of a spreadsheet column.
- Adjust the height of a spreadsheet row.
- How do I resize a single cell in a spreadsheet?
- How can I adjust a cell size using a keyboard shortcut?
Adjust the width of a spreadsheet column
To adjust the width of a spreadsheet column, move the mouse cursor between the column headers until the cursor changes to a horizontal double-sided arrow. Once the arrow is visible, click-and-drag the mouse to the right or left to increase or decrease the column width.
For example, to increase column A’s width, move the mouse pointer over the line separating the “A” and “B” column, then click-and-drag it to the right. Once the column is wide enough, let go of the mouse button, as shown in the picture.
Also, you can double-click the line between columns to automatically resize the column to the longest cell in the column, as shown in the picture.
You can also change the width of one or more columns by following the steps below.
- Highlight one or more columns in the spreadsheet.
- Right-click with your mouse on a highlighted column and select Column Width in the pop-up menu.
- In the Column Width window, enter the desired width and click OK.
Using the steps above, you can set the width of multiple columns to be the same.
Adjust the height of a spreadsheet row
To adjust the height of a spreadsheet row, move the mouse cursor between the row headers until the cursor changes to a vertical double-sided arrow. Once the arrow is visible, click-and-drag the mouse down or up to increase or decrease the row height.
For example, to increase the height of row “1,” move the mouse pointer to the line separating row “1” and “2,” then click-and-drag it down or up. Once the row is tall enough, let go of the mouse button.
Also, you can double-click the line between rows to automatically resize the row to the tallest cell in the row.
You can also change the height of one or more rows by following the steps below.
- Highlight one or more rows in the spreadsheet.
- Right-click with your mouse on a highlighted row and select Row Height in the pop-up menu.
- In the Row Height window, enter the desired height and click OK.
Using the steps above, you can set the height of multiple rows to be the same.
How do I resize a single cell in a spreadsheet?
It is important to realize that you cannot increase the width of only one cell in a spreadsheet. If you have only one cell with a lot of text, you can wrap text that text by right-clicking the cell, clicking Format Cell, click the Alignment tab, and checking the box for Wrap text.
If Wrap text is not enabled, any text that is larger than the cell overflows into empty cells. If the cell to the right is not empty, the text appears to be cut off.
How can I adjust a cell size using a keyboard shortcut?
Unfortunately, there are no single key Excel or other spreadsheet keyboard shortcuts for adjusting the width or height of a cell. However, you can do the following steps to adjust the cell size using only your keyboard and not the mouse.
Select the cell
Move to the cell you want to adjust the width or height of using your keyboard arrow keys.
Access Home tab format option
Once the cell is selected, access the Home tab by pressing the keyboard shortcut Alt + H . Once this keyboard shortcut is pressed all options in the Home tab will be highlighted. Press O (the letter o) to access the format options.
As seen in the picture, the Format section gives you the option to adjust the Row Height (H), AutoFit Row Height (A), Column Width (W), AutoFit Column Width (I), and Default Width (D).
For example, to adjust the width of B10, press the right arrow to move to column B and then the down arrow nine times to get to cell B10. Once in this cell, you would press the Alt and H at the same time to get the Home tab keyboard options. Next, you would press O (the letter o) to get the Format options.
Finally, you would press the W key to adjust the cell column width. If successful, a Column Width box displays the numerical value of the cell width, and increasing or decreasing this value increases or decreases the size of the column.
Excel can be a lot easier to use once you get comfortable using keyboard shortcuts to perform common actions. Copying and pasting, for example, is one action that can be made much quicker by using a keyboard instead of a mouse.
But there are keyboard shortcuts for many more Excel functions, including the AutoFit Column Width and AutoFit Column Height commands. Our guide below will show you how to get to them without needing to use your mouse.
Autofitting Rows and Columns in Excel 2013 Without Using Your Mouse
The steps in this article are going to show you a series of keyboard shortcuts that will allow you to use the AutoFit commands to automatically resize all of the columns and rows in your worksheet. The result of following these steps will be a worksheet where all of the row heights and column widths have been adjusted to fit the largest piece of data in that row or column.
Here is how to use keyboard shortcuts to AutoFit rows and columns in Excel 2013 –
- Open the worksheet in Excel 2013.
- Press Ctrl + a to select the entire worksheet.
- Press Alt + h to specify the Home tab.
- Press Alt + o to open the Format menu.
- Press Alt + i to use the AutoFit Column Width command.
- Repeat steps 2, 3, and 4 to get back to the Format menu, then press Alt + a to use the AutoFit Row Height command.
These steps are also shown below with pictures –
Step 1: Open your worksheet in Excel 2013.
Step 2: Press Ctrl + A on your keyboard to select the entire worksheet.
Step 3: Press Alt + h to select the Home tab.
Step 4: Press Alt + o to open the Format menu.
Step 5: Press Alt + i to use the AutoFit Column Width function.
Step 6: Repeat steps 2 – 4, then press Alt + a to use the AutoFit Row Height function.
If your Excel spreadsheet is difficult to print, then consider adjusting the scale. Learn how to fit a worksheet to one page in Excel 2013 without needing to manually adjust the size of your rows or columns at all.
Matthew Burleigh has been writing tech tutorials since 2008. His writing has appeared on dozens of different websites and been read over 50 million times.
After receiving his Bachelor’s and Master’s degrees in Computer Science he spent several years working in IT management for small businesses. However, he now works full time writing content online and creating websites.
His main writing topics include iPhones, Microsoft Office, Google Apps, Android, and Photoshop, but he has also written about many other tech topics as well.