Linksys routers have a File Server feature by which you can plug in a US style=”text-align: justify;”B drive and access its files from anywhere. It ensures that you can access your library of favorite music, movies, and pictures from anywhere in the world. Generally, questions arise about how to access external storage on Linksys router. Many wireless router models are designed with Linksys router USB storage. They are developed with a minimum of one USB port that you can use to attach a USB drive, through which you can then use a media server for networked media devices, an FTP server, i.e., File Transfer protocol or a mapped network storage drive. The newer Linksys USB router comes with a File Server feature that enables you to access WiFi USB storage.
There might be some situations in which you can’t access the Linksys router. This article will help you in Linksys router USB storage set up and share your Linksys smart WiFi external storage through a wireless router.
How to Access external storage on Linksys router?
Once you are done with the set up successfully, you can easily access the USB drive and share files through the WiFi router. How to access USB storage on Linksys router? This can be done through 2 different methods, including formatting your USB drive and the access Linksys USB router storage. For using these methods, you must know how to log into Linksys Router.
1 st Method: Formatting the USB Drive
To share a Linksys external storage on your router smoothly or to learn how to access external storage on Linksys Router, you have to format it to FAT32 or NTFS file system first. As the Linksys routers with storage are only compatible with external drives formatted either FAT32 or NTFS. You can also utilize a free formatting tool i.e., MiniTool Partition Wizard Free Edition. It is a professional partition management tool that allows you to format the USB drive as well. If your USB drive is not formatted as FAT32 or NTFS, follow the steps given below.
- Firstly, connect your Linksys USB drive to the computer.
- Then, launch the MiniTool Partition Wizard to open its main interface. Select the USB drive and click on Format Partition feature appearing on the left side of screen.
- Click OK after selecting the File System (FAT32 or NTFS) from the drop-down menu.
- Click on Apply from the upper left corner.
2 nd Method: How to Access USB Storage on Linksys Router?
Once you have formatted the USB drive, you can easily share a USB drive from WiFi router. Given below are the steps by which you can easily access Linksys external storage.
- Plug your USB storage at the back of Linksys router, and then sign in your account to access the dashboard of the WiFi router.
- Click on the Manage External Storage button if the USB drive is recognized to open the overview screen
- You can then see the status of your external storage drive and access the files on the Network through folder sharing. For example, you can easily access the IP address of your router. And, if you can’t access Linksys Router, read on this blog to know how to do it.
- Open the File Explorer, and then search for the IP address in the address bar in order to find the shared files or folders of your USB drive.
- When the shared folders appear on the screen, you can open them and check all the files stored inside it, just like the usual folders.
If you can’t access Linksys router with WiFi USB storage, follow the above steps. If you still can’t access the router’s setup page or forgot the router’s password, you have to reset Linksys Router to its default factory settings. For this, press and hold the Reset button for about 10-15 seconds.
Linksys Smart WiFi external storage
The Linksys Smart WiFi external storage/USB tool allows you to manage an external storage device connected to it quickly. A Network Attached Storage (NAS), also known as an external storage device, will enable you to store and share content across your network. If you want to know your router’s supported file systems, check the product specifications through the user guide. If your Linksys external storage not working properly or any message related to Linksys unsupported storage is displayed, click on the Refresh button at the bottom-right corner of the page. If you still can’t access the Linksys router, change your USB disk. If none of your WiFi USB storage devices are detected, update the firmware of your router storage. After which, you will receive a confirmation message on your screen.
How to Map a Linksys USB Routers with Storage?
The Linksys wireless router offers fast speed and reliable range by which you can create a robust wireless home network. These routers allow you to connect computers, wireless printers, and other WiFi devices at a very high speed of about 300Mbps.
- Visit
- Enter your username and password to log in to your Linksys router storage configuration menu.
- Click the “USB Storage” link from the Apps section of the configuration menu. Insert the USB drive in the USB port located at the back of your Linksys router. Wait for a moment or two for the router to recognize it, and then click the “Refresh” button. All the details related to routers with WiFi USB storage will appear on the Linksys USB Storage window.
- Check the address appearing next to “PC access” in the Folder Access section. This address will help you to map the USB drive to network computers.
- Log out of the Linksys configuration menu and close your Web browser.
Many people are searching for how to access external storage on Linksys router as it allows every network-connected computer to map it as a network drive. So, if you can’t access Linksys Router, this blog is a must-read for you as it will help you to access it hassle-freely. Once the mapping process is done, you can write and read files to and from the drive, and it seems like you are working with standard routers with storage.
June 27, 2012 1349 views_count –>
Related Media
New router delivers approximately three times faster wireless speeds and the compatible universal media connector brings that power to Smart TVs and game consoles
SAN JOSE, CA June 27, 2012 – Cisco today announced its first Linksys® Smart Wi-Fi Router and Universal Media Connector both powered by the industry’s next-generation wireless technology, 802.11ac. The new technology is designed to deliver wireless speeds approximately three times faster than the current wireless 802.11n standard[i]. The new Linksys Smart Wi-Fi Router EA6500 uniquely blends the highest performance 802.11ac technology with Cisco’s intelligent Cisco Connect™ Cloud software platform for an experience that is both powerful and intuitive, simplifying how consumers connect, control and interact with their home devices and appliances.
Timing of this announcement comes as laptop and smart phone manufacturers are expected to start introducing 802.11ac products towards the end of 2012. Consumers can also take advantage of the new technology by connecting their smart TVs, game consoles and other devices to the new Linksys Smart Wi-Fi Router via the new Linksys Universal Media Connector.
“The power of 802.11ac technology coupled with Linksys Smart Wi-Fi Routers, our game-changing new software platform and mobile capabilities enables all new experiences in and out of the home that consumers can’t get with any other solution,” said Brett Wingo, vice president and general manager, Cisco Home Networking. “As consumers begin the transition to the new Wi-Fi technology, Linksys is introducing a solution that not only includes a powerful product, but has new innovation that enables them to stay connected to their devices and home wireless networks from anywhere, anytime. We deliver the most complete solution, from performance to usability to customer satisfaction.”
Next Generation Wireless Performance
The new Linksys Smart Wi-Fi Router with AC technology is backwards compatible with prior wireless networks and devices using 802.11a/b/g/n. This assures consumers can upgrade to the new Linksys 802.11ac products and still have full interoperability with legacy Wi-Fi devices. As new 802.11ac devices such as smartphones and tablets enter the market, consumers will be able to take full advantage of the new capabilities and power with their Linksys Smart Wi-Fi Router that offers 802.11ac performance.
The Linksys Smart Wi-Fi Router EA6500 contains six internal 3D antennae that are designed to insure the same performance whether placed on a desktop or mounted against the wall. Additionally, it features an elegant new design that was inspired by the award-winning Linksys E4200 model to complement any home décor.
Ideal for video and mobile devices
The new 802.11ac technology is optimized to meet the explosive increase in video consumption and the proliferation of wireless devices in the home. Cisco expects[ii] that in 2016 there will be 19 billion connected devices globally and that 1.2 million minutes of video will be viewed online every second. The new wireless technology has been designed to improve speed, range and reliability and also helps to improve power consumption for mobile devices. This is becoming increasingly important to provide good connectivity for the growing amount of mobile devices that enter the home and will also help provide the type of quality connectivity required for a range of activities including watching live TV or on demand video in the living room, study or bedroom.
Universal Media Connector
The new Linksys Universal Media Connector enables consumers to connect wired devices such as Smart TVs and game consoles to their Wi-Fi network and stream HD or even 3D HD video content wirelessly –and has been optimized to work with the Linksys Smart Wi-FI Router EA6500. The connector operates in the 5Ghz band that offers less interference for a clearer signal. Additionally, with four gigabit ports users can connect a variety of entertainment devices in the living room to the Internet at incredibly fast speeds.
Smart Wi-Fi: Fast, Easy and Flexible – Anywhere
As with all Linksys Smart Wi-Fi Routers, the EA6500 comes with Cisco Connect Cloud, the cloud platform that has been designed to provide convenient anytime, anywhere access to the home network and its connected devices – from a web browser or mobile device. Consumers can now enjoy new mobile apps and experiences on their Android and iOS mobile devices from Cisco and third party developers that are part of the Linksys Developer Community. To help simplify connectivity further, Cisco has integrated SimpleTapä into the new Cisco Connect Cloud mobile app. With SimpleTapä, consumers can connect devices with as little as one tap of a button and in the future even by swiping their NFC-enabled smart phone over an NFC tag to connect to the network powered by a Linksys Smart Wi-Fi Router EA6500. Cisco is currently working with consumer electronics and home appliance brands to include SimpleTap technology into a variety of products. For more information on Linksys Smart Wi-Fi Routers with Cisco Connect Cloud, new mobile capabilities and SimpleTap, please see today’s press release that can be found here.
Product Specifications
Linksys Smart Wi-Fi Router with AC – Specifications
By Ariel | Follow | Last Updated December 01, 2020
Summary :
As you know, the newer Linksys routers come with a File Server feature that enables you to access USB storage. How to access USB storage on Linksys router? Many people are searching for a guide online. Now, MiniTool will walk you through detailed steps to share a USB drive on Linksys router.
Quick Navigation :
- Part 1. Format the USB Drive
- Part 2. Access USB Storage on Linksys Router
- User Comments
If you want to share a USB drive or other external storage drives with your computer and devices in your home, you can take a look at your router. With a relatively modern router like Linksys router, it has a chance to do these works.
Once you set up successfully, you are able to access the USB drive and share files through the Wi-Fi router. How to access USB storage on Linksys router? There are 2 major parts to do this including format your USB drive and the access USB drive on Linksys router.
Most people use a network to access the Internet every day. However, most of them have no idea about modem vs router. Now, you can get the answer from the post.
Part 1. Format the USB Drive
To share a USB drive on Linksys router smoothly, you need to format it to FAT32 or NTFS file system first. This is because Linksys routers can be only compatible with external drives formatted either FAT32 or NTFS. If your USB drive isn’t formatted as FAT32 or NTFS, please continue the following steps.
Here you can utilize a free formatter – MiniTool Partition Wizard Free Edition. It’s a professional partition management tool that can not only help you format USB drive but upgrade hard drive, convert MBR to GPT, and so on.
Step 1. Connect your USB drive to the computer.
Step 2. Launch MiniTool Partition Wizard to open its main interface, and then select the USB drive and click on Format Partition feature from the left pane.
Step 3. Select the File System (FAT32 or NTFS) from the drop-down menu and click on the OK button.
Step 4. Click on Apply on the upper left corner.
Next, let’s see how to access USB storage on Linksys router.
Part 2. Access USB Storage on Linksys Router
After you format the USB drive, you can share a USB drive from Wi-Fi router. Here’s how to access external storage on Linksys router.
Step 1. Plug your USB storage into the back of Linksys router, and then click here to sign you’re your account to access the dashboard of the Wi-Fi router.
Step 2. Once the USB drive is been recognized, click on the Manage External Storage button to open the overview screen.
–images from
Step 3. Then you will see the status of your external storage drive and you can access the files on the Network through folder sharing. For example, you can find the IP address of your router.
Step 4. Open the File Explorer, and then you can search for the IP address in the address bar to find the shared files or folders of your USB drive.
Step 5. When you see the shared folders, you can open them just like the normal folders and view the files inside of them.
How to access USB storage on Linksys router? Now, you can follow the above guide to have a try.
ABOUT THE AUTHOR
Position: Columnist
Ariel is an enthusiastic IT columnist focusing on partition management, data recovery, and Windows issues. She has helped users fix various problems like PS4 corrupted disk, unexpected store exception error, the green screen of death error, etc. If you are searching for methods to optimize your storage device and restore lost data from different storage devices, then Ariel can provide reliable solutions for these issues.
The Bottom Line
The Linksys EA6350 is a dual-band router that offers blazing 5GHz throughput speeds, four Gigabit LAN ports, and a fast USB port. And it rings up for less than $90, making it our top pick for budget Wi-Fi routers.
- Nice price.
- Blazing 5GHz throughput in testing.
- Easy to install and manage.
- Middling file-transfer speeds.
- Non-removable antennas.
If you have a small home and run a modest network consisting of a handful of wired and wireless clients, you probably don’t need to spend hundreds of dollars for a router with the latest Wi-Fi technologies. For only $89.99, the Linksys EA6350 AC1200+ Dual-Band Smart Wi-Fi Wireless Router gets you lightning-fast 5GHz throughput, as well as a nice assortment of management settings and I/O ports. It’s $30 more than the D-Link AC1200 Wi-Fi Router (DIR-842) ($130.00 at Amazon) , but it’s faster and has a USB port, so it’s our latest Editors’ Choice budget Wi-Fi router.
Design and Features
The EA6350 ($130.00 at Amazon) looks similar to the Linksys EA6100 AC1200 Dual-Band Smart Wi-Fi Router ($130.00 at Amazon) . Both use a black enclosure and have two non-removable antennas, which means you can’t trade up to a high-gain antenna. The EA6350 measures 1.1 by 8.9 by 7 inches (HWD), and there’s a strip of gray trim containing a single status light that dissects the top of the enclosure. The light blinks green during setup, and remains solid green while the router is powered up.
This dual-band 802.11ac router is powered by a single-core 800MHz CPU. It can achieve (theoretical) throughput speeds of up to 300Mbps on the 2.4GHz band and up to 867Mbps on the 5GHz band. The EA6350 supports beamforming, which sends wireless signals directly to each client rather than over a broad spectrum, but not Multi-User Multiple Input, Multiple Output (MU-MIMO) data streaming. The back of the router holds four Gigabit LAN ports, a WAN port, a single USB 3.0 port, a WPS button, and a Reset button.
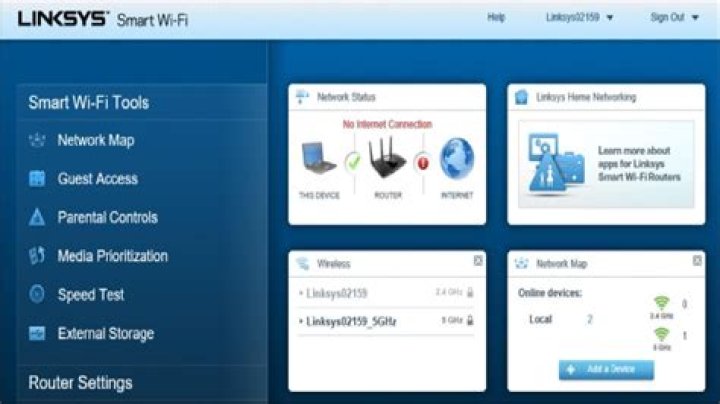
The Smart Wi-Fi Web console opens to a Home screen that has a list of Smart Wi-Fi Tools and Router Settings on the left and widgets for frequently used settings on the right. The Device List page displays all connected devices and their current status, and the Guest Access page is where you go to enable guest networking and set up passwords. Oddly, guest networking is only available for 2.4GHz clients. As with other Linksys routers that use this console, including the Linksys EA6100 and the Linksys EA7500 Max-Stream AC1900 MU-MIMO Gigabit Router ($130.00 at Amazon) , you get Parental Controls, a Speed Test that measures Internet upload and download speeds, and Media Prioritization settings that allow you to give network priority to gaming consoles and specific applications. External Storage settings let you determine folder access for attached USB drives and configure FTP and Media Server settings.
Similar Products
D-Link AC1200 Wi-Fi Router (DIR-842)
Netgear AC1200 Smart Wi-Fi Router (R6220)
Linksys EA6100 AC1200 Dual-Band Smart Wi-Fi Router
Asus RT-AC88U Dual-Band Router
Tenda F3 N300 Wireless Router
Linksys EA7500 Max-Stream AC1900 MU-MIMO Gigabit Router
TP-Link Talon AD7200 Multi-Band Wi-Fi Router
Linksys EA9500 Max-Stream AC5400 MU-MIMO Gigabit Router
D-Link AC5300 Ultra Wi-Fi Router (DIR-895L/R)
Asus RT-AC5300 Wireless AC5300 Tri-Band Gigabit Router
Trendnet AC2600 StreamBoost MU-MIMO WiFi Router (TEW-827DRU)
Linksys EA6350 AC1200+ Dual-Band Smart Wi-Fi Wireless Router
Router Settings include a Connectivity page, where you can change things like DHCP settings, enable Dynamic Routing, update the firmware, and change the router’s password. There’s also a Wireless Settings page, where you can create Wi-Fi passwords, choose a security mode, rename the SSID, and select a channel-width setting. This is also where you go to enable and configure MAC Address Filtering and enable/disable Wi-Fi Protected Setup for the router. The Troubleshooting page lets you view system logs, check the status of each client, and run network diagnostics, and the Security page allows you to configure Firewall, VPN Passthrough, and Port Forwarding settings.
Installation and Performance
With the Linksys Smart Wi-Fi Web console, installing and configuring the EA6350 is quick and easy. Once the router is plugged in and connected to the Internet and your host PC, simply open a browser and type linksyssmartwifi.com in the address bar. This launches the Setup Wizard, which walks you through the basic Internet and wireless settings.
The EA6350’s scores in our 5GHz throughput tests are the fastest we’ve seen from a budget router. Its score of 427Mbps in the close-proximity (same-room) test was much faster than the Netgear AC1200 Smart Wi-Fi Router (R6220) ($130.00 at Amazon) (331Mbps), the Linksys EA6100 (95.1Mbps), and the D-Link DIR-842 (332Mbps). At a distance of 30 feet, the EA6350’s score of 199Mbps once again led the pack; the Netgear R6220 scored 104Mbps, the Linksys EA6100 gained 86.6Mbps, and the D-Link DIR-842 showed a throughput of 111Mbps.
The EA6350’s scores in our 2.4GHz throughput tests were more in line with the other budget routers. It gained 72.5Mbps in the close-proximity test and 39.3Mbps in the 30-foot test. The Netgear R6220 had a throughput of 74.1Mbps (close proximity) and 48.3Mbps (30 feet), the Linksys EA6100 scored 77.4Mbps and 40.2Mbps, respectively, and the D-Link DIR-842 had a throughput of 75Mbps and 41.5Mbps.
To test file-transfer speeds, we connect a USB drive to the router’s fastest USB port and move a 1.5GB folder containing a mix of photo, music, video, and document files between the drive and a desktop wired to the router. The EA6350’s write score of 21.5MBps was a bit faster than the Netgear R6220 (17.6MBps), but not quite as fast as the Linksys EA6100 (27.4MBps). In the read test, the EA6350 scored 28MBps to the Linksys EA6100’s 28.3MBps and the Netgear R6220’s 25.6MBps. The D-Link DIR-842 was not included in these tests, as it does not have a USB port.
Conclusion
The Linksys EA6350 AC1200+ Dual-Band Smart Wi-Fi Wireless Router is an excellent choice if you don’t require an advanced router. Ideal for smaller homes and apartments, it delivered very fast 5GHz throughput in our tests, and while its 2.4GHz performance didn’t set any records, it was more than adequate for a router in this price range. As with most Linksys routers, the EA6350 is very easy to install and manage, thanks to the Linksys Smart Wi-Fi Web console and mobile app. You’ll pay around $30 more for this router than you would for the D-Link AC1200 Wi-Fi Router (DIR-842), but the extra money gets you much faster throughput and a USB 3.0 port.
If you want an easy way to share a drive with all of the computers and devices in your home network, take a look at your router and use a USB drive.
If you want an easy way to share a drive with all of the computers and devices in your home, take a look at your router. If you have a relatively modern router, chances are it has a USB port built into it. Here’s a look at how to set it up and share content across your home network.
Share USB Drive from Wi-Fi Router
Pick the hard drive or flash drive you want to use – you can use external or portable hard drives, too – anything with a USB connection. For this, I am using a Linksys E4200 Dual-Band Wi-Fi router and a 64GB flash drive.
Pop it into the USB port on the back of your Wi-Fi router, and then you’ll need admin access to your router. From a computer on your network, open the browser, enter your router’s IP into a browser and enter your password; these will be the IP and password you used when initially setting up your Wi-Fi router.
Router Settings
Then in the router’s settings, look for drive storage, file sharing, or something similar. You can see in my example below that the drive is recognized, and there are different options for the drive available, including creating a share.
You can use your Wi-Fi router to create a network share of the folder if that function is available, but I prefer to use Windows. The steps in this article will work for everyone, no matter what brand of router or computer experience level.
Open the Network folder and clear the path in File Explorer and replace it with “\\routerip” For example, I would type in: \\192.168.1.1 and hit Enter.
After hitting Enter, your drive will show up in the File Explorer as a shared folder with the name you gave it earlier. From here, you might want to pin it to Start in Windows 8.x or just create a shortcut to it on the desktop.
If you want to access that drive from other computers on your network, you’ll want to map it as a network drive. That’s what I am doing with the shot below – mapping it as a drive on a Windows 7 system.
You can use the drive connected to your Wi-Fi router just like you would any drive. This process is a good solution if you have a family situation and want to share music, videos, and photos with everyone else.
Do keep in mind that this drive will be open to everyone in your household, so you don’t want to store any confidential or otherwise sensitive files on it.
Summing Up
The performance will vary based on several factors: your router, network traffic, file size, etc. If you have a new router with a USB 3.0 port, you’ll want to use a USB 3.0 compatible as well for best performance.
If you’re looking for a new Gigabit router that has USB 3.0 capability, here are a couple of affordable ones you might want to consider:
- ASUS RT-AC87U Wireless-AC2400 Dual-Band Gigabit Router, which has 2.0 and 3.0 ports built-in and includes the latest 802.11ac standard as well as b/g/n.
- NETGEAR AC1600 Dual Band Wi-Fi Gigabit Router, which contains a USB 3.0 port.
Or, if you’re comfortable with USB 2.0 speeds, check out the ASUS RT-N66U Dual-Band Wireless-N900 Gigabit Router, which is more affordable at around $100.
There are several makes and models to choose from, but when purchasing a new router, make sure to have at least a USB 2.0 port onboard to make sharing files at home easy.
Let’s say you got your brand new Linksys router, you plug in the power and the Internet cables, connect the device to a computer (via an Ethernet cable) and … nothing seems to work. Before sending the router to the tech heaven (or back to the retailer), here are some of the most common Linksys router login problems and how to solve them:
1. What’s the default IP address of a Linksys router?
All Linksys routers have an info label attached to the case – depending on the model, it can be on the side, but most commonly, you’ll find it on the bottom area – and, while on some other routers, you’d get detailed information, including the default IP address, the hardware version, the default user name / password and some setup instructions, the label on a Linksys router (I’m using the WRT3200ACM as a reference) will only contain the Serial Number, the MAC Address, the WPS PIN and the SSID username and password.
So, if you perform the hardware installation properly and, after you open a web browser, nothing happens, you’re not automatically redirected the Linksys quick installation page then you need to manually get into the UI. This is where you have to enter linksyssmartwifi.com in the URL section and, if you see the Sign In prompt, then you can continue with the installation process, otherwise, you may need to insert the default router IP address in the URL area.
Most Linksys routers have set 192.168.1.1 as the default IP address (with the exception of some models, such as the BEFCMUH4, WCG200, WRTP54G which have reached EOL status). If you still can’t gain access to the user interface, you may need to Clear the Browsing Cache on the particular browser that you’re using: for example, on Google Chrome, press the three horizontal dots on the top right corner, select History on the small window and, on the History page, click Clear browsing data; doing so will take you to the Settings area with a small window in the middle, divided into Basic and Advanced: on Basic, select only the Cached images and files, select the Time range and click Clear Data.
Now, you can once again try going to 192.168.1.1 and access the Linksys UI – if the issue still persists, you could try and power cycle the router (remove the power cable, wait a few seconds and reconnect it) and, if that doesn’t solve it, you may have to check if your computer isn’t using a static IP address.
Usually, the computer gets the IP address automatically from the router, so this type of conflict would not occur, but, if the PC does not have dynamic IP set, there are a couple of ways to find out which is the correct IP address (using the Microsoft Windows 10 OS):
- first, by using the Command Prompt: on Windows 10, click on the Start button (on the bottom left corner) and write cmd; press on Command Prompt and a small black window will appear – here, insert ipconfig and press Enter; this will display various info, but you’ll have to identify the Default Gateway which is going to be the IP address that you’ll have to enter in the browser URL;
- the second method involves right clicking on the Network Connection icon from the lower right corner, selecting Open Network & Internet settings and, from the newly opened window selecting ‘View your network properties’ – here, you should easily identify the Default Gateway.
In case you want to configure the computer to automatically receive an IP address from the router and not having to deal with these types of issues in the future, these are the steps that you need to follow: right click on the Internet connection icon (from the lower right corner), select ‘Open Network and Internet settings’, click on Ethernet (on the menu from the left) and, from the right side, select ‘Change adapter options’.
This will summon a new window where you’ll be able to see all the Network Connections: right click your current Ethernet connection (the one that’s active) and select Properties; this will display a small Ethernet Properties window with a list towards the center. Click on the Internet protocol Version 4 (TCP/IPv4) and select Properties: on the new window, tick the ‘Obtain an IP address automatically’ and ‘Obtain DNS server address automatically’; click OK and your PC should now receive an IP address automatically.
2. What if I forgot the password?
During the initial configuration process (Smart Wi-Fi Setup), after you configure the SSIDs, you’ll be asked to ‘Create a router password’ and ‘Add a password hint’ which will be used to give you access to the Linksys UI. If you forget this password and if the hint doesn’t help you remember it, then resetting the router is the only option.
To prevent this for happening again, it is advisable to create a Linksys account – you will be asked at the beginning of the Setup Wizard, but you can also create it after the configuration process is concluded on the initial page: under the Language, there’s a small area where it is written ‘To login with your Linksys Smart WiFi account, click here’. This way, you can associate the Linksys router to the account (you’ll need to insert the admin password to complete the pairing) and, in case you forget the credentials, you can easily recover the password (the instructions will be sent to your email account – be aware that it may go into the Junk folder).
3. What if nothing works?
If you tried everything to gain access to your Linksys router, but it still refuses let you enter the user interface and if a power cycle doesn’t seem to have any effect, then the last thing that you can do is to reset the router to its factory default settings – unfortunately, this will erase all the settings and you will have to completely redo your configuration. To do so, press and hold the Reset button from the rear side of the device for about 10 seconds, until the power LED starts blinking.
- ‘)” data-event=”social share” data-info=”Pinterest” aria-label=”Share on Pinterest”>
- ‘)” data-event=”social share” data-info=”Reddit” aria-label=”Share on Reddit”>
- ‘)” data-event=”social share” data-info=”Flipboard” aria-label=”Share on Flipboard”>
Related
- How to Disable Security on Your Netgear Router
- What Is LAN Used For?
- How to Connect an HP Printer to a BT Hub
- How to Install a Netgear Wireless-N Router
- How to Make the Printer Wireless Using a Wireless-G Broadband Router
Personal network-based media streaming can be extremely useful if you have files on a computer, mobile device or external drive that you’d like to access from all of your devices. The SharePort feature on many D-Link routers is a simple, built-in solution, but it’s not much help if you have a Linksys router instead. Fortunately, you can get very similar results with Linksys’ Storage Link functionality, and third-party personal file server options such as DLNA.
D-Link SharePort
D-Link’s SharePort feature is designed to allow network connectivity and media sharing of devices without wireless capabilities. SharePort-equipped routers offer a USB port that can turn external drives into media servers and enable wireless print sharing for printers that lack native Wi-Fi access points. This can be an extremely handy feature for networks that lack a dedicated PC, or when a direct connection between the devices and a central PC is undesired or problematic. Additionally, D-Link offers apps for iOS and Android that give mobile users direct and streamlined access to the SharePort devices on their network.
Linksys Storage Link
The Storage Link feature can be found on several Linksys E series and WRT series routers, as well as standalone devices such as the NSLU Network Storage Link. With these products, USB drives and printers may be connected to and accessed by any wired or wireless devices on the network. While broadly similar to D-Link’s SharePort, Linksys supports more USB connections and also remote file access over the Internet. However, instead of the plug-and-play ease of SharePort, USB devices must be specifically located and enabled in the Linksys Storage Link router settings, using a “create share” and “account access” method that power users may recognize from Windows User Access Controls.
No matter which manufacturer’s router you may have, you can enable wireless media sharing using DLNA, the wireless specification developed by the Digital Living Network Alliance. DLNA can be installed on nearly any computer, smartphone or tablet, and comes standard on many televisions, set-top boxes (including DVRs and game consoles), Blu-Ray players, printers and external storage devices such as USB and NAS drives. DLNA provides file-serving functionality for your personal network, but not the access point functionality of SharePort or Storage Link. However, any device with Wi-Fi should be able to share the wireless router’s Internet connection.
Portable Routers
D-Link also uses the “SharePort” branding for a line of portable devices such as the SharePort Go and SharePort DIR-505. These SharePort products feature a range of connectivity options such as 3G/4G support, wireless Internet connection sharing and access to USB bulk storage devices. Linksys offers a number of comparable mobile products, such as the Valet M10 Wireless Hotspot and various WRT54G router models. Either company’s products allow the mobile user to create a wireless network that offers most if not all of the access point and media-sharing capabilities of personal home networks.
We explain what a guest Wi-Fi network is, how to set one up, and what video game consoles and other IoT devices have to do with it.
September 17, 2018
The modern world is so hooked up to online services that when guests come around, “How ya doing?” will probably be followed by “What’s your Wi-Fi password?” But the hospitable host probably doesn’t realize that revealing this information could pose a network security risk.
For example, guests might accidentally download a malicious program or connect an already infected phone or laptop to the network. Many pieces of malware are able to spread themselves over a local network, and if an infected device is connected to your Wi-Fi, it will try to contaminate everything in its range.
Why set up a guest Wi-Fi network?
It’s possible to be both hospitable and safe — by setting up guest Wi-Fi. A guest Wi-Fi network is essentially a separate access point on your router. All of your home devices are connected to one point and joined as a network, and the guest network is a different point that provides access to the Internet, but not to your home network. As the name suggests, it’s for guests to connect to.
A guest network is a win-win: Friends and acquaintances don’t lose touch with the outside world and your data isn’t compromised. Malware that somehow ended up on a guest’s smartphone will not be able to get into your family photo archive or other important files.
How to set up guest Wi-Fi
Configuring a separate guest network is easier than it sounds. For a start, there’s no need to lay an extra cable or pay your ISP twice. It’s more than likely that your Wi-Fi router will let you set up an additional network for guests — you just need to go into the settings and activate it. To do this, enter your router’s IP address in the URL bar of your browser (usually it’s 192.168.1.1 or 192.168.0.1, but not always). The address should be in the router’s user manual.
In the dialog box that opens, enter the administrator user name and password. If you never got around to changing them, they might be there in your ISP contract or again in the manual. To improve security, we recommend changing them, and so as not to forget them, use a password manager.
In the router settings, find Allow guest access or Guest network. It’s usually hidden away in the Wi-Fi section. If you have trouble finding it, check out the guide again or Google, using the model name of your router. If you have an old or low-end router model, the option to set up a guest network might not exist. But most reasonably modern routers have it.
Having selected the relevant check box, add the name of the guest network (called SSID in the control panel of some routers) — this is the name that your friends will see in the list of available connections.
In some routers, guest Wi-Fi access will immediately kick in; others might need extra tweaking. But in any event, even if the guest network is already active, we recommend that you make sure it’s correctly configured:
- Set a password for the new network. This can usually be done right away, under the network name. Now only those who know the password can access your guest connection.
- Set the encryption type so that information transmitted over Wi-Fi cannot be intercepted. From the available options, select WPA2 (WPA2-PSK or WPA2-Personal in some settings) — a reliable algorithm supported by all modern wireless devices.
- Make sure that the Allow guests to access local network resources (or similar) check box is cleared. There may be no such setting, but if there is, uncheck it so that guests won’t be able to see your files and other information stored on computers, which is essentially the whole point of a guest network. Some routers take the opposite tack, with a check box marked Isolate, which isolates the guest network from your local network. If you have that option, select it.
- Uncheck Allow access to settings (or similar), if such an option exists. If selected, this check box would let guest network users access router settings and reconfigure something there, including their own access permissions. That’s not what you need.
All set! You have now configured a guest Wi-Fi network that both provides secure Internet access and protects your local devices.
Why it’s better to connect IoT devices to a guest network
Incidentally, a guest Wi-Fi network is a good idea not only if you have lots of friends, but also if you have lots of home smart devices. Smart TVs, smart teapots, video game consoles, and the like also need an Internet connection. But they tend to be far more vulnerable than computers with the latest updates installed. That means that if they are connected to the main network and hacked, intruders can get into your other devices.
At the mention of smart devices, many experts say that it’s not that there’s a possibility they’ll be hacked — they’ll be hacked for sure. And whereas a smart light bulb becoming part of a botnet is manageable, a computer turning into a zombie isn’t. Among other things, botnets are used to spread various malware, and if your computer has been turned into a zombie, this malicious code basically has an open pass to its memory.
Connecting all IoT devices to a correctly configured guest network instead of the main network provides additional protection against such attacks. Even if cybercriminals hack one of the IoT devices, they will not be able to penetrate your main network and compromise the computers and smartphones in it.
Sure, a smart washing machine connected to the guest network could still become a member of a botnet and take part in DDoS attacks or cryptocurrency mining (that’s pretty much a standard risk of buying smart things). But in that case, your computer containing bank data and other sensitive information will remain safe.
One last tip before we sign off: Routers are in fact a typical target for botnet creators, so don’t forget to periodically update the firmware of your home router. The latest versions usually patch hackable vulnerabilities.
สำหรับ Linksys Smart Wi-Fi Router ทุกรุ่นที่มี USB Port เราสามารถนำ External HDD มาเชื่อมต่อเพื่อทำการแชร์ไฟล์จาก Router ผ่านระบบเน็ตเวิร์คภายในบ้านหรือองค์กรของเราได้ และสามารถให้บริการสตรีมมิ่งวิดีโอไปยังอุปกรณ์ต่างๆ เช่น คอมพิวเตอร์ สมาร์ทโฟน แท็บเล็ต และ Media Player ซึ่งรองรับทั้ง Windows, Linux, OS X, iOS และ Android ซึ่งทั้งหมดจะทำงานโดยใช้โปรโตคอล SAMBA (SMB)
1.ตรวจสอบ IP Address ของ Router ว่าเป็นหมายเลขใด (ค่า default คือ 192.168.1.1)
2.เชื่อมต่อ External HDD เข้ากับพอร์ต USB ของ Router
4.ไปที่เมนู External Storage หากเชื่อมต่อสำเร็จจะแสดงความจุของ External HDD
5.เราสามารถเข้าถึงไฟล์ที่แชร์อยู่ได้ ตาม path ที่แสดงด้านขวามือของหน้าจอ
6.พิมพ์ \192.168.1.1 ในช่อง Address ของ Windows File Explorer
7.เมื่อเข้าถึงจะแสดงชื่อของ Partition ของ External HDD และสามารถเข้าถึงไฟล์ที่อยู่ข้างในได้
Note ในบางกรณีอาจมีหน้าต่างแสดง Login ขึ้นมา ให้ทำการ Login ด้วย Username และ Password ของ Router (ค่า Default คือ Username: admin และ Password: admin )
Dear Lifehacker,
My router sucks. My connection goes wonky once every few days, and I have to unplug the router and reboot it (I believe this is called a hard reset) to fix the problem. Obviously, this is incredibly annoying. What can I do to just make the darn thing work properly?
Sincerely,
Infernal Internet
Dear Infernal,
This is a very common ailment, but there’s no one universal cause (which, sadly, means there’s also not one simple solution). It could be that your internet provider changes your IP address often, and your router doesn’t catch on. Maybe it’s overheating, or maybe it’s getting bogged down by too many connections at once (which can happen if you download a lot). There isn’t an easy way to figure out what the problem is, but there are a few common solutions that could help you fix the problem and prevent it from happening in the future.
First: Verify That Your Router Is the Source of the Problem
Before you start messing with your router, you should make sure the problem doesn’t lie with your modem or your internet service provider. To do this, plug your computer directly into your modem and see if you get any dropped connections or other problems. If not, the problem is more likely related to your router. If your modem is a modem/router combo, you won’t be able to perform this step (we recommend having a separate modem and router for just this reason). If your modem is the problem, contact either your internet service provider or the modem manufacturer to get support, since it’s probably not something you can fix at home.
Filtrete Smart Air Purifier
Covers 150 sq. ft.
Filter dust, allergens, pollen, pet dander, and viruses all day, every day with this smart purifier. The HEPA filter takes care of 99.97% of air particles to keep your oxygen as clean as possible.
Option 1: Make Sure Your Router Isn’t Overheating
This is about the easiest solution to the problem, so it should be your first go-to step. Get your router out of hot, enclosed spaces, raise it up using wooden blocks, or even stick it in front of your fan. A lot of times, a router that keeps dying can be fixed with just a bit of extra airflow.
Option 2: Update Your Router’s Firmware
If the internet works fine when directly connected to the modem, it’s probably an issue with your router, and the first thing you should do is check for firmware updates. To do this, just:
- Head to your router’s config page (usually available by typing into your browser, but you’ll have to check your router’s manual) and check its current firmware version. Write it down or keep that tab open so you don’t forget.
- Next, go to your router’s manufacturer’s web site (e.g., ) and head to their support page. Find your router and go to its download page.
- If the latest firmware on the downloads page matches the one your router is using, then you have the latest firmware. If not, then you should download the latest firmware and update your router according to the manufacturer’s instructions.
If you’re lucky, the latest firmware will fix whatever problem your router was having that made it thirst for regular reboots. If not, though, continue on to the next step.
Option 3: Flash a Third Party Firmware Like DD-WRT
Sometimes, your manufacturer’s firmware just isn’t very good. In those cases, flashing a third-party firmware—like the free, powerful DD-WRT —can potentially fix all your problems. It isn’t for the faint of heart, but can seriously boost the usefulness and customizability of your router, so we think it’s a worthwhile project. It can also reboot your router on a schedule, which may not solve the problem itself, but will keep you from having to do it manually.
Check out DD-WRT’s compatibility page to see if your router is supported, and check out our guide on how to set it up , and to turn on scheduled reboots, just head to DD-WRT’s configuration page and go to Just head to Administration > Keep Alive > Scheduled Reboot.
Turn your $60 router into a $600 router
Of all the great DIY projects at this year’s Maker Faire, the one project that really caught my eye
Option 4: Limit Connections to File Sharing Services
Oftentimes, your router can just get bogged down by too much traffic coming through. This is especially common with things like BitTorrent and Usenet, which achieve high download speeds by making multiple connections at one time. If you make too many, your router will stop working and need a reboot.
If you’re a heavy downloader, head into your BitTorrent or Usenet client of choice and go to its settings dialog. You should find a place where you can limit the download speed. Try limiting the speed, and see if that solves your problems (or just shut off your client for a few days). You can also try tweaking the number of connections, if your client allows it. If you find that your router woes disappear after changing these settings, you’ve found the problem and you’ll just have to settle for slightly slower download speeds.
You as a sysadmin know that for sure – Connection Errors, IP Errors, Network Problems, and other Error Codes.
Here you’ll find a list of the most common Linksys errors and proven quick fix solutions:
And you’ll find the solution to get rid of ALL Linksys errors – forever: Test PRTG as your new monitoring tool and get stared within minutes!
1. Linksys error
“Error 2026”
Quick fix
The WMI error 5858 is a common issue occurring while using the Windows server with applications that use IWbemServices:ExecQuery. The error message pops up in the Event Viewer and shows the Event ID 5858 resulting in different ResultCodes, for example “Result Code = 0x80041032 (WBEM_E_CALL_CANCELLED)”.
To solve the problem, you need to modify the WMI client application to issue calls to IEnumWbemClassObject::Next to retrieve full result sets prior to the release of the IWbemContext object. Also ensure that the timeout value is set to greater than 0 (ITimeout).
Proper fix
Switch to PRTG: PRTG Linksys monitoring makes sure that your network infrastructure runs properly by monitoring all your Linksys devices.
2. Linksys error
“Error 2112”
Quick fix
Error code 2112 is a common error occurring when using the Linksys wireless router. When you come across this error, it is most definitely accompanied by problems with your internet connection. However, it may in fact be the other way around: A poor internet connection can result in Linksys error 2112.
To get rid of Linksys error code 2112, there are two options for troubleshooting. The first solution is a reboot of your Linksys router. In order to do this, open your web browser and enter either the default IP address of the Linksys router “192.168.1.1”, or “myrouter.Local” to access the navigation page. In the settings of the router, select the troubleshooting icon, then select the diagnostics tab. Here, simply select the Reboot link button to start the reboot of your Linksys router.
The second solution is to reset the Linksys router to factory settings. In the diagnostics settings of the router, click on the Reset link instead of the Reboot link button. After resetting the router, you will need to reconfigure all settings and check if error 2112 has been solved.
Proper fix
Switch to PRTG: PRTG Linksys monitoring makes sure that your network infrastructure runs properly by monitoring all your Linksys devices.
3. Linksys error
“Error 2117”
Quick fix
Linksys error code 2117 indicates that your Linksys router is unable to find the current network form the cable connection. This error may also be caused by corrupted files on your computer.
To solve the problem and to reestablish the connection, try these quick fix solutions:
- Make sure your Linksys router is set up properly by adjusting the router’s security settings.
- Fix any damaged files by using the System File Checker (SFC), as damaged files may cause Linksys error 2117 to occur.
- Ensure that your network is properly connected by checking the status of your internet connection in the Linksys Smart Wi-Fi account.
- In your Linksys Smart Wi-Fi account, verify the login interface by entering your user ID and password.
- Delete any junk files from your system, as corrupted files and junk files can lead to errors such as Linksys error code 2117.
Proper fix
Switch to PRTG: PRTG Linksys monitoring makes sure that your network infrastructure runs properly by monitoring all your Linksys devices.
4. Linksys error
“Error 2118”
Quick fix
Linksys error code 2118 is another common error related to network problems. It is often caused by wrong configurations, or a poor internet connection.
Depending on the cause of Linksys error 2118, try these steps to fix the problem.
- Ensure that you have a proper internet connection, as a bad connection is the most common cause of error code 2118. To set up the network of your Router, access the settings and adjust the settings accordingly.
- Error code 2118 may be caused by your firewall and antivirus software. To check whether this is the case, disable your firewall or antivirus software and check if Linksys error code 2118 is resolved or not.
- If caused by faulty settings, configure your router’s security settings step by step and ensure everything is set up properly.
- In the Linksys cloud account, access the router settings option and adjust the internet settings. By disabling IPV6 and restarting the system, you may quickly get rid of error 2118.
- Another way to solve the problem is to alter your router encryption from WPS2 to WPA-PSK in the wireless options.
Proper fix
Switch to PRTG: PRTG Linksys monitoring makes sure that your network infrastructure runs properly by monitoring all your Linksys devices.
Router idle time. Towards that end, let’s call the time when the CNC Machine is busy making a part “Cycle Time”. 1 Battery Life: 24-Hour battery life is achieved by the following worst case: Stream YouTube for 1 hour followed by 30 minutes idle time and then repeat for over 24 hours. Router 1 – Remote Office. Until today, this was 15 minutes for all users. Make sure the router you choose is compatible with Wi-Fi 5 or Wi-Fi 6. i just want to change the idle time for my router before it disconnects from a server. Hi, It looks like this is a bug in v3. User Guide PDF. Idle Disconnect Time in seconds: Disconnect after time of inactivity (in seconds): This field is optional and allows you to configure to terminate your ISP connection after a specified period of time. For example, the overall theoretical transmission rate of a router that supports the IEEE 11ac 4×4 MU-MIMO is up to 1733 Mbps. * Idle-Timeout. com. Once connected, the second layer nodes become intermediate parent nodes (assuming maximum permitted layers > 2) hence the next layer to form. For instance a TTL of 10, or 10 hops, would pass through 10 different gateways to reach the target IP, which is typical for international traffic. Now Click on Connect to create the SaferVPN connection. 4g 5. The duration of time a device is in an idle state, which means that it is operational, but not being used. In addition, Standby Mode can be used to protect power sources by dropping power consumption to … idle-timeout 10; permissions all;> Notes: 1. « Reply #1 on: July 19, 2012, 11:26:34 AM ». Though most router manufacturers don’t provide a power button, here is a list of some that do: Zen Internet Warns Consumers to Disable Idle Time-Out on Broadband Routers. Router(config-crypto-map)# set security-association idle-time 600 Specifies the maximum amount of time for which the current peer can be idle before the default peer is used. Synology Router RT2600ac is a powerful wireless router for homes and small offices seeking to understand, control, and secure their network. rdisp/max_wprun_time is totally not related to this topic. In the case of RIP, the router will advertise the pseudonetwork 0. GPO – Auto logoff users from computer after idle time. Displays info about Flash memory. Apparently that’s not true as I can sleep by pressing the power button. Not with HDD nor the SSD. 9 days, 14 hours, 12mins, 18 seconds. Jan 04, 2021 · After setting up the installation and the database, run the IDLE and click file and then new file. This automation reduces the amount of time that the machine spends idle, thereby increasing productivity. Displays the IPv4 routing table of the router . youtube. Make sure DHCP Lease Time is also set to a high value. Last updated: Jun 16, 2021 by Travis LaDuke. inactive for a specified period of time (Max Idle Time). In my laptop (HP 15s FR1002TU), the wifi disconnects after some idle time. While there are scenarios where you might want to keep an idle logged-in session, remaining logged in makes it possible for a malicious hacker to use that session by tricking the Internet connection drops after leaving computer idle for