This article is for users who want to be able to play most PC video games with a controller instead of having to use a keyboard and/or mouse.
Most videogames on the PC are designed to be played using a keyboard (usually, WASD controls) and a mouse. However, not everyone is used to using a keyboard to control a game and might even be more comfortable using a console contoller to play. Thankfully, Steam’s PC gaming features have a solution for this.
For this tutorial, you will need to have the Steam application downloaded onto your PC and have a either USB-compatable controller or a wireless bluetooth controller.
1. Open Steam and go to the Settings section under the Steam tab.
2. Click on the Controller tab and click the General Controller Configuration button.
3. In the Controller Settings window, check the boxes to activate the configuration support for whichever types of controllers you will be using. For example, if you are using an Xbox series controller, check the Xbox Configuration Support box. This will ensure that Steam applies the correct configuration whenever the computer detects the controller.
Also, for users that want to set up a Nintendo Switch controller, there is an option to use the Nintendo button layout as to not confuse yourself when reconfiguring the controls.
4. Finally, you can use this window to make sure that the computer is detecting your connected controllers properly. You can also change the specific settings for each controller and recallibrate them if needed.
Now that Steam recognizes your controller, it’s time to start editing your games’ controls.
Changing the Key Binds
1. Go to your Steam Library and open the game you wish to play. Locate the in-game control settings and take as many screenshots as necessary of the keyboard controls.
2. Open the Controller Configuration for the game you wish to play.
3. At the bottom of the configurator window, press the Browse Configs button. From here, you will be able to import controller mappings that were already made by several different sources. You can use configurations that you’ve created for other games, you could experiment with configurations created boy others in the Steam community, or if the game has it available, you could used the recommended configuration created by the developers of the game.
For this tutorial, click on the Templates tab and open the one the template for keyboard and mouse controls. An the bottom of the preview screen, click the Apply Configuration button.
4. Now that we have the right template, we can change the controller settings however we please. For each button on the controller that you want to change, click the symbol corresponding to it to change the key bind. This will allow you to set any button on your controller to be inputted as if you are pressing a certain key on the heyboard. To help stay organized, you can also leave labels that explain what each input will control in-game.
Adjusting the Sensitivity
For games that require some more precise control, you can also adjust the overall sensitivity of your controllers analog sticks. For example, when not using a keyboard and mouse, most games of the first-person shooter genre have the player move around with the left stick and aim with the right stick. Steam refers to this type of input as “Joystick Mouse.” To make sure that the analog sticks are as responsive as they need to be, there are plenty of additional settings that can be adjusted when using the “Joystick Mouse” configuration.
Feel free to experiment with these settings to make your gameplay experience as comfortable as possible.
In case anything was unclear, here is a short video demonstrating the customization process.
As you can see, this tutorial only covers the basics of what is offered from Steam’s controller settings. Everything explained here is all you will need to know to start playing with your preferred controller, but there are still plenty of options and settings that will allow dedicated players to fine tune their controls and have a better gameplay experience.
Posted by Write Meow · August 18, 2020
How do I enable Steam Controller Configuration?
- Open the Steam application, and click the Steam in the menu tab.
Once you’ve clicked Steam , select Settings .
In the pop-up box, click Controller .
Once you’ve clicked the Controller , select General Controller Settings below the Controller Configuration .
Place a checkmark in the box for your controller type.
In the upper right-hand corner, open Big Picture Mode by clicking the icon.
Once it’s open, click the Library button.
Select Bite the Bullet .
Select Manage Game .
Click the Controller Configuration .
Click the Browse Configs button.
Select the available standard controls config in the Recommended section.
Click the Apply Configuration button.
How do I disable Steam Controller Configuration?
- At the upper right corner of Steam, click on the Big Picture Mode button.
This will open Steam Big Picture Mode, in full screen.
Click on the Library button.
Select Bite the Bullet .
In the left-hand column, click on the Manage Game button.
Click the Controller Options button.
Click the Steam Input Per-Game drop-down box .
Select Forced Off .
Launch Bite the Bullet to confirm that your controller is recognized.
Note: If your input is still not being recognized, you may need to relaunch Bite the Bullet.
Again, the same reply.
Steam Client has updated now to fully support user-side customization for DS4/360/XBO Controllers within BigPictureMode; regardless of the games initial support for Controller. To ensure proper support, go into your Steam Client > Settings and opt-into the Beta.
Again, the same reply.
Steam Client has updated now to fully support user-side customization for DS4/360/XBO Controllers within BigPictureMode; regardless of the games initial support for Controller. To ensure proper support, go into your Steam Client > Settings and opt-into the Beta.
Again, the same reply.
Steam Client has updated now to fully support user-side customization for DS4/360/XBO Controllers within BigPictureMode; regardless of the games initial support for Controller. To ensure proper support, go into your Steam Client > Settings and opt-into the Beta.
So where do I find the option to assing keys to buttons?
So where do I find the option to assing keys to buttons?
So where do I find the option to assing keys to buttons?
- Boards
- PC
- Anyway to use the Steam Controller WITHOUT big picture mode?
I just recently changed my gaming setup to a desk style setup, I still prefer gaming with a controller though. I find it easier (and it’s one less thing to run with the game) and one less step to just launch a steam game from the desktop mode. However it seems the steam controller only wants to work in Big Picture Mode.
Anyone know of a patch or workaround for this?
DevilDriver: I Could Care Less
Has anyone had a problem where their steam controller doesn’t want to save custom layouts for games? It used to save whatever changes I made when I exited and now it seems the only option to MAKE SURE it remembers the custom layout is to export it. I’m not sure if this was just something they changed in a firmware update.
Has anyone had a problem where their steam controller doesn’t want to save custom layouts for games? It used to save whatever changes I made when I exited and now it seems the only option to MAKE SURE it remembers the custom layout is to export it. I’m not sure if this was just something they changed in a firmware update.
DevilDriver: I Could Care Less
Has anyone had a problem where their steam controller doesn’t want to save custom layouts for games? It used to save whatever changes I made when I exited and now it seems the only option to MAKE SURE it remembers the custom layout is to export it. I’m not sure if this was just something they changed in a firmware update.
That part has been weirdly broken and glitchy for awhile. Your exports will randomly disappear, randomly not save, etc.
Kind of just have to wait for valve to fix.
Yup, I’ve had this issue. I noticed it was particularly wonky ever since them introducing the ‘play for an hour’ requirement before uploading templates.
Gone are the days of dubious controller support and workarounds, with some games supporting some controllers and some functionality and others not. Today, through Steam, you can use basically use any controller with any Steam game, and you can customize your controller’s layout to your heart’s content, as well as browse through and download many custom controller configurations built by developers and fellow gamers alike. Here’s how you can use any external game controller to play Steam games.
Also read: Steam Games Not Launching? Try These Fixes
What controllers can you use with Steam?
The entire list of supported controllers is rather long, but all the major players are covered:
- Xbox 360 controllers (Wired/USB dongle)
- Xbox One controllers (Wired/Bluetooth)
- Xbox One Elite controllers (Wired/USB dongle)
- Xbox Series X controllers (Wired/Bluetooth)
- PS4 controllers (Wired/Bluetooth)
- Switch Pro controllers (Wired/Bluetooth)
- Variety of Logitech and HORI controllers
Chances are whatever controller you have will end up working with Steam, but if you do happen to have something especially old or cheap (or both), your mileage may vary.
Also read: 7 Best Third-Party Xbox One Controllers
How to use your controller with Steam
Your first step will be to connect your controller to your PC. For some controllers, like the Xbox One Elite controller, this is done wirelessly by way of a USB dongle, but with many others you can use Bluetooth just fine (see our list above).
Next, open Steam, click “Steam” at the top-left corner, and then click the “Settings” option.
Within the “Controller” tab, click the “General Controller Settings” button, which will open another window. From the “Controller” tab, you can also adjust controller functionality in certain situations, like within Steam’s Big Picture mode or on the desktop.
In the Controller Settings window, you can enable support for whichever type of controller you have connected. Note that pretty much every single game that has controller support will support the Xbox 360/One/Series X controller off the bat, so you don’t need to check the “Xbox Configuration Support” box for those. In fact, if you’re hooking non-Steam games into Steam, you’re probably better off without it as it’s known to cause problems.
Far fewer games support native PlayStation controller input, and even fewer support Switch Pro, so you’ll want to enable Configuration Support for those if you use those controllers. Essentially, Configuration Support maps those controllers as Xinput/Xbox controllers, so when you play with them you’ll see Xbox buttons displayed in the game on-screen… which can be a little confusing!
Any controller not made by PlayStation or Xbox that isn’t the Switch Pro controller is considered a generic gamepad.
How to choose what games to play with a controller
Once you have your controller connected and Steam’s controller support enabled, all you have left to do is pick which game you want to play with a controller and choose your layout.
Start up Steam in Big Picture mode (which can be accessed by clicking the icon directly to the right of your username at the top right of the Steam client) and navigate to whichever game you’d like to play. It’s important to remember that you can enable Steam controller support for any game and not just games that have partial or full controller support built in.
This goes for all games, including real-time strategy games and entire genres of games you wouldn’t necessarily think to play with on a controller.
From the game’s menu in Steam’s Big Picture mode, simply click “Manage Game,” and then in “Controller Options,” make sure it’s set to the “Forced On” option. Once enabled, click the “Controller Configuration” button to customize your controller’s layout to your heart’s content. Anything and everything about your controller is tweakable.
Also read: How to Stream Your Desktop and Non-Steam Games with Steam Link
Within the Controller Configuration window is also a list of controller layouts for the particular game in question as an option. Some layouts are made by the developers themselves, and some are just popular fan-made control schemes.
Using your controller with Steam is one thing, but calibrating your controller correctly in the first place is a whole other ballgame. If you’re on Windows, though, the process is easy. You might also want to learn how to check your controller for deadzones.
Never Miss Out
Receive updates of our latest tutorials.
Content Manager at Make Tech Easier. Enjoys Android, Windows, and tinkering with retro console emulation to breaking point.
Double up on what your controller can do for you
- Tweet
- Share
What to Know
- To connect, go to View >Settings >Controller >General Controller Settings >PS4 Configuration Support.
- To navigate, press PS and go to Settings >Base Configurations >Big Picture Mode Configuration.
This article explains how to connect and configure a PS4 controller with Steam and navigate Steam with the controller.
How to Use a PS4 Controller on Steam
Playing games on Steam with a PS4 controller is remarkably easy: Plug the controller into your PC, and you’re good to go. With a little extra work, you can even play wirelessly and change the button mapping to your liking. Let’s learn how to configure your PS4 controller with Steam properly.
This article specifically focuses on using the PS4 controller with the Steam platform, but you can use a PS4 controller on your PC or Mac without Steam.
How to Connect PS4 Controller to Steam
Before you start using your PS4 controller with Steam, there are some preliminary actions you should take, including making sure you have the latest version of the Steam client. Follow these steps:
Make sure any nearby PlayStation 4 consoles are unplugged. Otherwise, the controller might try to sync with the console instead of your computer.
Launch Steam on your PC.
Select Steam in the top-left corner of the window to open a dropdown menu, then select Check for Steam Client Updates.
Download and install any available updates. Once finished, Steam will restart.
When Steam relaunches, plug your PS4 controller into a USB port on your PC.
In the Steam client window, select View > Settings > Controller > General Controller Settings.
You should see your controller under Detected Controllers. Select the box beside PS4 Configuration Support. From this screen, you can give your controller a name, change the light’s color atop the controller, and toggle the rumble feature on or off.
If Steam isn’t detecting your controller, double-check the USB cable connection. Unplugging the controller and plugging it back in sometimes fixes the problem.
Select Submit to save your changes.
How to Use a PS4 Controller on Steam Using a Steam Link
If you’re using the Steam Link hardware to play games on your TV, the set up is basically the same, except you must plug the PS4 controller into the Steam Link rather than your PC. The Steam Link will even take care of some configuration steps automatically.
How to Wireless Connect a PS4 Controller to Steam
If you hold down the PS and Share buttons simultaneously on your controller, your PC might automatically detect it via Bluetooth. If it doesn’t, you might need a PS4 DualShock 4 wireless dongle to play wirelessly. Official ones can be purchased from Sony, or you can find one made by another manufacturer.
To wirelessly pair the PS4 controller with Steam:
Launch Steam.
Plug the PS4 Bluetooth dongle into your computer’s USB port.
Simultaneously hold the PS and Share buttons on the controller until the light on top starts flashing.
When the controller appears in the device list, press the X button on the controller to activate it.
Press the button on the end of the dongle. It should also start flashing.
How to Configure In-Game Controls
You should now be able to play most Steam games with your PS4 controller, but you can further customize how your controller works for specific games. Indeed, this step may be necessary for games that primarily rely on keyboard inputs.
To edit in-game controller settings, press the PS button on the center of the controller. From the resulting screen, you can map specific keyboard actions to your controller buttons. Most modern games should display the appropriate PlayStation button configuration, but some older games may display an Xbox controller instead. Nonetheless, you should be able to figure out the button mapping and use your PS4 controller with no issues.
When you’re finished playing, you should manually power down the controller. Simply hold down the PS button for 7-10 seconds.
How to Navigate Steam With a PS4 Controller
In addition to playing games, you can use your PS4 controller to navigate the Steam platform. For example, you can use the joysticks as a mouse and even enable the controller’s trackpad.
Open Steam in Big Picture Mode. You can select the Big Picture icon in the top right corner of the Steam client, or you can simply press the PS button.
Select the settings icon in the top right corner.
Select Base Configurations > Big Picture Mode Configuration.
From here, you can configure the control for navigating Steam in both Desktop and Big Picture mode.
Enjoy navigating Steam using your wireless PS4 controller.
Open Steam and go to Settings > In-Game > place a check next to Use the Big Picture Overlay when using a Steam Input enabled controller from the desktop > OK. In the game, press Shift+Tab, then in Controller Configuration go to Browse Configs. Go to Community > Like PS4 and select it.
If you are within 14 days, open a Steam Support ticket to request a refund. Otherwise, in Steam, go to the Support Tab > select the title in recent purchases. Select I would like a refund or It’s not what I expected > I’d like to request a refund.
Firstly make sure that your controller is plugged in and functioning correctly in Windows and that you have downloaded and installed the latest drivers for the device from the manufacturer’s website.
You should also ensure that no schemes or profiles are running for your controller. If you are using a steering wheel, we recommend that you use the ‘separate’ axis options for your pedals, rather than the ‘combined’ option. See your wheel documentation for further information on this.
Can you also check Steam’s controller settings (Steam > Settings > Controller > General Controller settings) and make sure all boxes are unticked.
If you are using a controller which is not officially supported then you will receive a message: “No Preset Control Scheme for Device(s)” upon starting the game. If you proceed to the next screen then you will be able to configure the device using a Custom Control Scheme (go to
section E below).
If your controller is recognised but you wish to change the controls or the device used, please do as follows…
A) From the game’s main menu select the “Game Options” menu. Then select “Settings” > “Controls, Vibration & Force Feedback” > “Control & Calibration Schemes”
B) Now use the arrow (cursor) keys on your keyboard to select the controller you wish to use from the list (the selected controller(s) will be ticked). If you have one of the officially supported controllers (listed in the readme found at C:/Program Files (x86)/Steam/steamapps/common/F12020/readme/readme.html) then it should be automatically recognised and selected. You will be able to choose a different preset control layout by highlighting the Preset and then choosing “Enable” (press F8 on your keyboard).
C) If your controller is not recognised or you wish to use a different control layout select the Preset you wish to change, then choose “Edit”.
D) You can tab between “Control Scheme”, “Calibration”, “Vibration and Force Feedback” and “MFD Shortcuts” (Multi Function Display) by pressing the F5 and F6 keys.
E) To configure your controller in the “Control Scheme” and “MFD Shortcuts” screens do as follows:1) Press Enter on the game action that you want to configure, and “Waiting for input” will appear. This shows that the game is waiting for you to input the controller action that you want.
2) Perform the appropriate controller action (e.g. press the accelerator) and it will appear in place of “Waiting”.
3) Repeat the above steps for all the actions you want to set up.
4) When you’re finished back out (with Escape)
5) You will be asked if you want to save your changes. If you want to save them choose “Save as new Control Scheme” and you will be prompted to name this new profile. Your profile should be saved and your controller should now work in the game.
F) To configure your wheel or controller to give the feel you would like, please adjust the Calibration Settings and the Vibration & Force Feedback options. For an explanation of these settings, please see the readme and the advice given on screen.
Whether you’ve just recently purchased a new PC or simply want to start to hooking up your computer to the big screen, we’ve got you covered on how to quickly set up a controller on Steam. Valve has iterated on its Big Picture Mode over the last few years, and it is finally in a state that is easy and intuitive to use.
So, even if you’ve only ever played on a console before, it isn’t that difficult to get your game on with your controller of choice. Whether it’s for playing the latest AAA title or diving into some of the most recent indie darlings, here’s how to set up a controller on Steam.
Big Picture Mode
Your first stop should be Valve’s Big Picture Mode after you’ve hooked up your favorite controller via USB or Bluetooth. You can find this in the top right corner of Steam. Its icon is a tiny controller, so it’s easy to find. Navigating the Big Picture Mode dashboard can be accomplished with either your controller or mouse.
Every single aspect of Steam from the store to chat to mods and even an integrated browser (which we don’t recommend using) is available. You can purchase games, install mods, and chat with your friends like usual. The very first thing you need to do, however, is go to the settings, then controller settings, and then check PS4, Xbox One, or Generic controller configurations depending on which you are using.
When you’re ready to jump into a game, you will want to go to your installed games under the library. Here, you’ll find every game that you’ve installed already. In the bottom right corner of each game’s icon, you will see either a controller or keyboard icon. This will tell you if the game is completely controller-ready or not. For those with the controller icon like Fable Anniversary, you simply boot up the game and it will be no different than playing a game on PS4 or Xbox One.
Configuring Your Controller
Unfortunately, not every game will have the controller icon. Some will have the keyboard icon, noting that it either has partial controller support or none at all. This is fine, though, as you can play literally any game with a controller in Steam’s Big Picture Mode by manually configuring controls.
It’s important to research ahead of time whether or not a game has some controller support, as manually configuring the controls will clash with the existing support and cause major issues. One example is PlayerUnknown’s Battlegrounds. Its most recent update has added not only first-person mode, but controller support as well. In this case, you simply launch the game and ignore the warning that you need to configure your controller.
In some cases like Garry’s Mod, though, controller support isn’t really offered at all. To get it to work, select the desired game and then go down to manage game. From there, pick controller configuration. You can browse various configurations for that game, including ones recommended from the developer.
If there isn’t a recommended one, your best bet is checking the community configurations. You can see which were voted the best by other Steam users. However, there are times that neither the developer nor the community has created a configuration. Your best option, then, is to create your own. Start with the template “Keyboard (WASD) and Mouse”. This one applies the most commonly used PC buttons to your controller, and if necessary, you can switch anything around to perfect it for that game.
/. About Demul Xinput . #2 Keyboard – Rock Band Xbox 360 keyboard connected through the Microsoft Xbox 360 wireless adapter works in game as Xinput guitar, but none of the keys work tested that side button 8 still worked for push-to-talk in Mumble while not interfering with Firefox. Pokopom XInput Pad Plugin. Click Guide Button Chord Configuration. takebigScreen: Take big screenshot (takes a few seconds) 大画幅截图: ui. 5) Select “Default” preset. DroidJoy Gamepad Joystick Lite. Sotwe. An INI file with tons of options – including toggleable vibration, selecting controls setup, Invert Look option from console versions, axis inversion options from San Andreas and more! 2. It is not necessary to install the included software CD unless you will be using the gamepad in DirectInput mode. Click on the OK. ) input. When 2. You can change the name of your profile by double clicking the profile name. ; Where should be 6 sub-keys in it (index 0 to 5). A specific game on Steam only recognizes DInput, meaning later Xbox controllers won’t work with it. Left Dpad Left Dpad Left Right Dpad Right Dpad Right Up Dpad Up Dpad Up Down Dpad Down Dpad Down Download World of Joysticks XInput Emulator for Windows to control varied PC games supporting XInput with your DirectInput gamepad, flight-stick, or wheel. The alternative is to use a program like x360ce and configure the controller not with the controller settings but with the keyboard key binding settings of the corresponding actions. 1 (Xinput) Perfect emulation, no slowdowns or glitches of any kind. It also makes remapping which keys are mapped to the behavior easy, both at a project level if you change your mind about default settings, and for a user in a key binding UI. # xset m default. Product information Key Function Mode and LED Indicator Xinput: Directinput: 2. This feature began with the Steam controller and the PlayStation 4 controller, but a recent update allows you to remap buttons on … GameMaker Studio 2 has a number of dedicated functions that can be used to detect both analogue and digital controls from multiple connected game pads. 0 -K -R. FrameRate = 120Hz//Left Stick NavigationKey. Check Enable Gamepad. work Pastebin. 4. It’s a basic generic PC controller. gz tar. When pressing a button, the applied signal is pulled to ground (Active_LOW). Here is a short list of popular controllers that support XInput: Stadium Packs 1, 2, and 3. As a special bonus, you’ll also get Capcom Arcade Version 3. Choose the needed controller (or a group of devices that includes gamepad) you want to remap in the lower-left corner. 1 systems. Just run the app, press a button on your Pressing and holding 1player start enables shift mode with access to the following keys (when “MAME” setting is used): 2 player start=Esc – for jumping back to the menu. Downloads nullDC Dev Builds nullDCe alpha Android build nullDC-360 build Dreamcast BIOS Setup Guide nullDC doesn’t … SPU2-X 2. 1 Dead Zone Handling 2. dll in my scripts listing to make it work. Any value can be used to drive the controller’s element values. Version: 1. DroidJoy – versión Lite Nota: no funciona en consolas * El servidor admite ahora la emulación XInput y DInput * * DroidJoy server 2. Check XInput. (See the example in the Rewired/Examples folder. XML I see the following: G GEAR_TOGGLE I suspect that indicates pressing and releasing the “G” Button toggles Joystick-To-Mouse 2. Press a button or move a slider on the controller. $ xinput –set-prop ‘RAPOO Rapoo 2. If you want to get a single key at a time this looks a bit cleaner. 2) Backup the xinputdll. You can read more about NVRAM from Apple: XInput is now available for game development. Select “TrackPoint” and check “Use wheel emulation”, select “button: 2”, and check “Enable vertical scroll” and “Enable horizontal scroll”. Commands for the 3. Settings editor includes quick set templates and export to XML. 3. About Keys Working Xinput Not 2 . Using xinput on … Here’s the only thing I can find about xinput and 3dscontroller. Since the keyboard gets disabled no key release event will be even entering the event processing. 08-27-2012, 11:49 AM. gamepad thumbstick axes which have a range of [-1,1]) as components of Pro 2 Bluetooth controller USB Adapter Arcade Stick SN30 Pro+ SN30 Pro for Android Upgrade tool. 4, Chankast 0. Finally, using input mappings allows you to interpret input keys that aren’t an axis input (e. Key in〖 cd /home/pi/xinput_calibrator-0. breakflip. Téléchargez le logiciel Input driver version is 1. opened Startup Applications (which, in Linux Mint 19 Cinnamon, is found under Menu -> Preferences -> Startup Applications) and added a Custom Command with the full ‘xinput set-button-map’ command as shown in step 3 above. Each of the buttons/axes for the simulated controller will be listed, alongside the corresponding key/button on your device that it is currently bound to. There is a limitation with using this command. Xbox type controller support (XInput) and keyboard controls. The directory Memory Cards are stored, default is saved as the same name of the game title. dll to the game’s folder. It comes with a ms-windows program to show the data and export to CSV and ms-excel. (only an old version of Demul would work, the others are way too hard to configure, and they give a bunch of errors after configuration) nullDC emulator: It runs a lot faster 5. Supports up to 4 emulated controllers. Roughly speaking, various functions are realized by interrupting between the input state of the official driver and the game, processing the input state and passing it to the game. For this reason too the Xinput Reroute Nucleus option mentioned in the master script that reroutes directinput back to xinput to track more than 4 gamepads on xinput at once, allowing you to play with more than 4 xinput gamepads, will not work with Xbox One controllers even with fake focus because of the driver background input issue. 1 – 03. Go to the Settings. XOutput is a software that can convert DirectInput into XInput. It was pretty much dropped by its author for awhile until he dumped the source code, a few other internet heroes came in to work on it and then he jumped back in as well. More. Controller input is supported through DInput, XInput, and SDL backends and can be changed through Settings -> General Settings. dll) into your Street Fighter IV directory next to the executable for the game. 4), so use the above method. You can create as many new Profiles as you require and activate them as and when needed. After an NVRAM reset, some system settings may return to default values and may need to be reconfigured. 5 KrossX. Method 2. Download Reshade, select the game, and then click on the Direct3D 10+ option. It don’t required administrator rights. So I have to figure out the data format of the ed3 files. 2 Optimize Stick Value Capture 2. Default Xorg behavior supports click and point. Here’s how to set mouse’s speed. Xinput button and Xinput trigger Xinput allows the Azeron keypad button to act as an Xbox controller button or trigger. Virtual-key code of the key, button, or stick movement. Launch Steam. Then click; apply, and you should now have a new entry listed as disabled. I’ve also tried
It seems that you’re using an outdated browser. Some things may not work as they should (or don’t work at all).
We suggest you upgrade newer and better browser like: Chrome, Firefox, Internet Explorer or Opera
I like to use the Steam Controller for certain games. To use a steam controller, afaik, you have to run the game through steam (otherwise it won’t load the right config on game boot, doesn’t let you edit controls, that kind of thing).
One of those games is The Witcher 3. Which I own through GoG, not Steam.
So, before I used Galaxy 2.0 for everything, I solved this conundrum by adding TW3 to Steam, and running it through that. My TW3 shortcut on my desktop executes “steam://rungameid/10667905903744778240”, which after Steam boots executes the game, with the context needed for the controller to work: Desktop Shortcut -> Steam -> GoG Game executable.
Now though, I am trying to use Galaxy 2.0 for all games. No more desktop shortcuts. However, I cannot work out how to hook this up properly. I see two options:
One: work out how to manage a steam controller without running a game through steam. I haven’t been able to find anything about this, I feel like it’s probably not possible.
Two: still invoke steam, i.e. go Galaxy Shortcut -> Steam -> GoG Game executable. But because TW3 isn’t a “native” Steam game, Galaxy 2.0 doesn’t pick it up in its integration. I also can’t just create a steam shortcut (like the one on my desktop) and add that as an alternative game or alternative executable, because Galaxy is “smart” and intentionally removes the layer of indirection the steam URI provides when you try to add it, and so ends up just referencing the GoG game executable instead.
I’m about to write a batch script that executes the steam URL, but this seems extreme. I wonder if anyone has any idea how I’m supposed to do this properly.
Using the Bethesda launcher means that you need to add a non-steam shortcut to use the Steam Controller for Fallout 76. This process in itself can cause some issues, the biggest one is how it tests your patience.
Adding Fallout 76 as a Steam Shortcut
Find and assign your Fallout76.exe shortcut within your Bethesda install directory (assuming you installed there). The shortcut will eventually launch but you will be taken back to Big Picture mode whilst it’s starting up. Rest easy as it will start, but as you’re doing this outside the Bethesda launcher, you will have to manually login.
It’s a pain doing this through the controller, but you can configure an auto-login process by modifying (or creating it, if it doesn’t exist) this .ini file;
[Documents Folder]\My Games\Fallout 76 \ Fallout76Custom.ini
Include these lines; (I’ll leave you to work out which parts to change)
Getting Started
I started out using a basic Steam Controller template for Fallout 76 will only exclusively use keyboard or gamepad mode, not both at the same time. This is a slight pain as the controller works very well in this mixed mode for most games.
Keyboard & Mouse Template
Using this mode provides the best response, both on the trackpad and gyro movement. From experience, this is the golden standard for most games, however it takes a lot of setup. Getting keyboard controls configured to each button can be tedious. Remembering what you set is also extremely difficult. You need to add additional “activators” to enable menu controls. For example, escape can be added as the start button, but you need to map Z to then enable access to the main menu.
Whilst this mode was as smooth as melting butter during gameplay, I just couldn’t remember what button combination allowed me to get to the main menu, switch PIP Boy modes or even enable photo mode. Hence, I abandoned this template, with some shame I might add. If your memory is any better than a goldfish, you may fare better than\n I did choosing this route.
Gamepad Template
The gamepad template worked really well for my poor memory skills and what I lost in the smooth buttery-ness of mouse-mode, it was more than made up for with ease of knowing what to press. First off, this is the first time in a long while that I’ve used the exclusive gamepad mode and it does take some adjusting (yes, more adjusting to the SC!).
Typically, the right track pad in this mode forces you to change sensitivity in game, but Fallout 76 doesnt have this option, so you’re forced to change min x and y values in minimal input settings to accomplish the same outcome. Its somewhat scientific as I’ve seen profiles with massive increases that just didnt work for my style, but the ones I settled on seemed to suit me.
Main Settings
These settings were pretty much straight out of the box except I changed left paddle for the right stick click. Personal preference in that I struggle to use the click on the trackpad. in Fallout 76, this is enabling sneak.
Right Trackpad
Having this set to mouse joystick is the only option that works in gamepad mode. You’ll see you can’t change sensitivity here nor could I see it in game so there’s more tweaks in advanced settings to accomplish a higher sensitivity output.
Trackpad Advanced
This is where the tinkering to get increased sensitivity pays off. Increased minimum X and Y output and slightly reduced dampening.
Pretty standard stuff here, haptics set to my medium preference.
Gyro Advanced
With the other settings enabled, this is left at default settings which worked well for my precision gyro aiming. You can experiment with dampening here if it’s too much / little for your liking.
The Steam Controller is an interesting gamepad. In my review, I noted how different it was and how it would certainly take some time getting used to. Now that I’ve toyed with the controller for a few months, I feel confident in taking it into new titles, like Star Citizen. I looked into HOTAS systems for some time now and want to try new things out with the space sim before forking out the big bucks. I was surprised how good the Steam Controller works with this game.
I’ll be referencing and featuring Nacionale’s Alpha Steam Controller configuration. You’ll be able to map your own config file, should you wish to personalize the experience to your own play style, but I’ve personally found this config to be among the best out there. As a bonus, Nacionale updates this particular map for the Steam Controller often. A number of features are present, including the ability to access combat emotes.
The controller works with Star Citizen thanks to the plethora of different inputs and combinations that can be mapped out. You’ve got an analog stick, two dual-stage triggers, gyroscope and accelerometer sensors, two trackpads, and a further 10 buttons. That’s not including the analog stick press down, as well as combinations. This opens up a world of input whether you’re in-flight, on foot or EVA.
I’d recommend you give it a go if you haven’t already done so.
How to apply a new config
In order to make Star Citizen work with Steam’s controller, we’re going to have to carry out a few steps and add the title to your Steam library. This will allow us to download and apply a config file and have all buttons and means of input mapped out and ready to go. Luckily, this is a fairly easy task.
- Open Steam.
- Choose “Games” from the menu.
- Select “Add a non-Steam game to my library”.
- Locate the installation folder for Star Citizen if not listed.
Select the main .exe file.
Select “Configure controller”.
Rocking the Steam Controller in Star Citizen? Sound off in the comments with your experiences and configurations! Also, let us know what you’re using, be it mouse and keyboard, gamepad or HOTAS setup.
5 reasons why Microsoft canceling ‘Project Andromeda’ was the right choice
Microsoft’s Project Andromeda got a full unveiling thanks to our reporting. While many fans of Microsoft lament the decision to cancel the project, there are very few reasons to believe it would have worked out. Here are five justifications for why killing the OS was a good idea.
Join us LIVE for the Windows Central Video Podcast today at 2:30PM ET
We’re LIVE with the Windows Central Video Podcast today at 2:30pm ET, make sure you’re there!
We take a look at Microsoft’s canceled Andromeda OS project
Ever wondered what Microsoft’s canceled version of Windows for the Surface Duo was going to be like? Well wonder no more, as we’ve got a very first hands-on look at a pre-release build from mid-2018 running on a Lumia 950. We’ve already shown you what Andromeda OS looked like in recreated mockups, so now it’s time to see the real thing running on video.
Our top picks for the best Xbox One webcams
Whether you’re jumping into a Skype video call or broadcasting to thousands across the world, these are our top picks for Xbox One webcams. Nearly every USB webcam works, but some are much better than others.
Whether or not Valve’s Steam Machine changes the way we play PC games, the box is more or less a traditional PC that’s about the size of a large game console. The Steam Controller, however, is anything but traditional, as it removes analog sticks in place of circular touchpads and adds a Wii U-style touch screen in the center for good measure. All of the prototypes Valve created on the way to the Steam Controller are even weirder than the final product itself.
During the Steam Machine’s development, Valve stated numerous times that it isn’t taking the controller lightly — the company wasn’t just going to give us a traditional gamepad with a Valve logo stamped on it. In fact, Valve was looking into utilizing players’ biometric data somehow, perhaps measuring sweat or a heartbeat. Whether or not you approve of the final touchpad-heavy design, you’ll be happy to know that Valve was diligent in its prototyping and testing phase, having created oodles of different controllers or varying designs.
For the most part, the prototype Steam Controllers never lost their traditional gamepad shape. The less traditional features are what were put into that geometry. Rather than a right analog stick, for example, a few versions of the prototypes had a big trackball, presumably to more easily replicate the precision of a mouse. In order to make up for the massive amount of keys a traditional keyboard would provide, one prototype (seen below) attempted to give each finger its own button set on the backside of the controller.
Another prototype experimented with motion controls. Rather than a freestanding wand, however, Valve made a two-piece controller that was attached by magnets so it could break away to allow for gesture-based freedom. Interestingly, as Valve prototyped trackball-based controllers, the trackball got bigger with each iteration until one version had the trackball sinking through to the back of the controller. This way, you’d be able to access the controller with your thumb, but also with whatever fingers you happen to have supporting the controller from behind.
Valve produced many of the prototypes through 3D printing — an ideal technique for quickly seeing how the shape of something feels in your hand.
The trackpad actually replaced the trackball, rather than trackball originating from a separate genealogy. Valve felt that the trackpad offered more freedom. Of course, just slapping a trackpad or two onto a gamepad didn’t solve every problem. If the trackpad is flat, the angle at which your thumb hits the controller makes it so the majority of your thumb is hitting the almost the entire pad, which means the pad can’t precisely read your input. So, the trackpad had to be made convex, and the grips were also made with a curve in order to further pinpoint your thumbs.
The finalized Steam Controller
Finally, Valve settled on the Steam Controller it presented as part of the Steam Machine package. We don’t yet know how using the controller will actually feel, but a video demonstration of the gamepad in use does worry us. The beta units will be going out to the public before the end of this year — and Valve has confirmed it will be announcing hardware partners at CES in January — so expect an influx of hands-on impressions soon enough.
Steam Link lets you stream your favorite PC games to any Android device. Here’s how to set it up.
If you’ve ever dreamed of playing a big AAA gaming title on your phone, now you can. Sort of.
Valve’s Steam Link ($110 at Amazon) system originally required a physical box to be plugged into a television and connected to the same network as your gaming computer. You would then use the processing power of your dedicated gaming rig to stream your favorite titles to your TV so you could play PC games from the comfort of your couch.
Last week, however, Steam expanded Steam Link to work with Android devices. (Sorry, iOS users, Valve says Apple rejected the Steam Link app due to “business conflicts.”) Here’s how the Steam Link app works and how to set it up.
Hardware requirements
For Steam Link to work, you’re going to need a host computer running SteamOS or Steam Big Picture Mode on Windows (Vista or newer), MacOS (Yosemite or newer) or Ubuntu (12.04 or newer). If you already game from your computer, it should work with the Android Steam Link app without much issue.
You’ll also need a fast wireless network. Steam recommends setting everything up on a 5GHz network, if possible, and lists the minimum speed requirements at 15Mbps (30Mbps is optimal). Obviously, the closer you are to the access point, the better.
Finally, you need an Android device — either a phone or a tablet. And while you can play some games without a controller, it’s not recommended. You’ll want to pair a Bluetooth controller (or a keyboard and mouse). Just don’t be surprised if input lag ruins the experience for some games. (I tried playing Rocket League and while the game played fine, the input lag made competitive play unbearable.)
Setting up Steam Link for Android
The configuration of Steam Link starts on the host computer. You’ll need to enable streaming over your network. To do this, open Steam on your host computer, then:
You can also set client options in this menu. Select either Fast, Balanced or Beautiful for the performance on the Android device. And under Advanced Client Options, you can set a bandwidth or resolution limit, enable hardware decoding, configure the speakers and display performance information. (These settings can also be customized later within the Steam Link app.)
Next, install the Steam Link beta from Google Play and open it. Make sure your Android device is on the same wireless network (and the same router — network bridges and wireless extenders may prevent your phone from discovering your computer) as your host computer.
Screenshot by Lori Grunin/CNET
When you open the app for the first time, you will be walked through the initial setup. Tap Get Started and select whether you want to pair your own controller or a Steam Controller. On the next screen, your host computer should be visible. If it isn’t, double-check you’re on the right wireless network or tap Rescan.
Once you select a host computer, you will be given a four-digit PIN. Enter the PIN on the host computer and click OK. The app will test the connection with your computer and tell you how well Steam Link will perform.
Playing a PC game on your Android device
After you’ve finished setting up the connection, open the Steam Link app on your phone and select your host computer. Make sure your controller is detected and tap Start Playing. This will launch Steam Big Picture Mode on your host computer. Your Android phone will be in control of your computer until you exit the Steam Link connection.
To begin playing, scroll through the menu using the left directional pad or joystick. (Controls may differ depending on the controller you’re using, so you may want to go to Settings > Controller Settings to adjust controller preferences.) Select Library to view games and other media available on your computer. To see all the games installed, hover over Installed in the left menu. Select a game to start playing.
You can also install other games by going to Games in the left menu and selecting one that isn’t currently installed. If it’s a game that typically requires a keyboard, you will have to configure the controller settings before you can play it.
The thing to remember here is that not all games translate well to such a small screen. But while most people would most likely rather play a game while sitting at a computer or on the big screen of their television, it is nice to take your gaming anywhere within range of your wireless network.
For a more in-depth take on how well PC gaming translates to the small screen, CNET’s own Lori Grunin took the Steam Link app for a spin.
Valve’s Steam Controller is certainly one of the more divisive controllers in modern gaming.
The touchpad was a move away from the dual joystick approach of other systems.
However configuring the Steam Controller touchpad is not always straightforward.
Here we will look at how to change the sensitivity of the touchpad on the Steam controller.
Changing Steam Controller Trackpad Sensitivity
Step 1 – Ensure You Are In Big Picture Mode
Ensure you are on the main menu screen in big picture mode, where you can see the settings icon in the top right of the screen.
Step 2 – Enter The Settings Menu
Once you have clicked on the settings icon you should see the following menu.
From here look for the ‘Controller‘ sub-menu on the left.
Under this sub-menu you an option for ‘Base Configurations‘
This will take you to another screen where you have three options. Select the top option ‘Desktop Configuration‘.
The Desktop Configuration screen will give you the option to configure various settings with the Steam Controller.
Scroll over to the furthest right option, which gives you further options for the touchpad.
Step 3 – Adjust Sensitivity
Within the touchpad sub-menu look for the option for sensitivity. Next simply drag the slider to your desired sensitivity setting.
Be mindful that a little change can make a big difference to the sensitivity of the gamepad.
When you have updated your settings simply navigate back through the menus until you reach the Big Picture main menu again. You can then use your controller as normal, but with the updated settings.
Thanks for checking out this article on how to change sensitivity on Steam Controller on aeonreviews.com and you can check out other gaming articles here.
2 thoughts on “How To Change Sensitivity On Steam Controller [Step By Step Guide]”
Great step by step guide, thanks! It’s not the most straightforward of settings to find and change!
Definitely not the easiest setting to find. I’m glad it was useful for you Ellis.
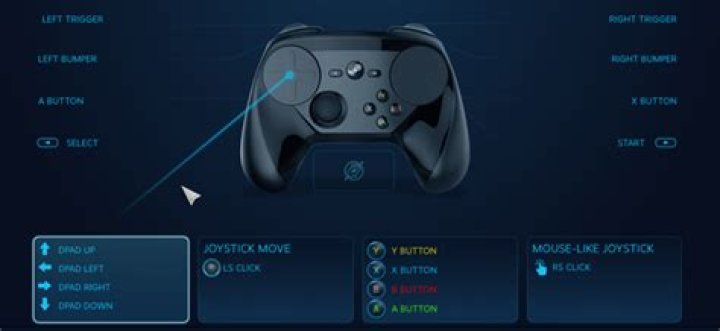
Controls provided are in order by [Steam/Xbox/PS4] controllers
Launching Maplestory and getting to the Steam Controller Configuration page.
1.) First you’ll need to install Steam, then install Maplestory through Steam.
2.) Once they’re installed you’ll need to Run Steam as an administrator, simply Right Click on the Steam shortcut and choose Run as administrator.
Or if you want it to be permanent Right Click on the Steam shortcut, choose Properties, click on the Compatibility tab, and check the ‘Run this program as an administrator’ check box.
3.) Once that’s set launch Steam and go into Big Picture Mode (click on the controller icon in the top right hand corner or hold down your controller’s Guide button).
4.) Go into your Library using your controller and launch Maplestory.
5.) Once Maplestory has been launched you can press the Guide button, the button that turns on your controller, for the Steam overlay menu.
6.) On the overlay menu choose ‘Controller Configuration’.
7.) From here you can Browse Configs by pressing X/Square or create your own configuration.
8.) If you decide to create your own remember to choose Export Config to save your configuration, you can do this by pressing Y/Triangle, you can create multiple configurations for different classes and switch them out through the ‘Browse Configs’ option.
Configuration Tips.
Getting More Buttons.
This method is similar to Final Fantasy 14, you can hold down the left or right trigger to apply different skills/items.
1.) Click on ‘Add Action Layer’ at the top of the page.
2.) Click on your Default action set.
3.) Go to the Left Trigger/L2 or Right Trigger/R2
4.) Go to Binding on the left hand side.
5.) At the top there will be an icon that has 3 circles in a column, click on that.
6.) From the drop down menu you’re provided choose ‘Hold Action Layer’
7.) Then choose the new action layer you created earlier.
8.) Once this is set click on your new ‘Action Layer’.
9.) From here you can now set your dpad buttons and face buttons to whichever skills/items you’d like.
Adding rapid fire.
This option will be helpful for skills you generally need/want to hold down to activate instead of having to manually press it each time.
1.) Choose the button you would like to have rapid fire.
2.) Press the Back/Option button to go into Activators.
3.) On the far right you can turn on ‘Hold to Repeat’ option and use the slider beneath it to determine how quickly it repeats.
Creating a Macro
Creating a Macro is a quick and easy process in Steam.
1.) Choose which button you would like to perform the macro.
2.) Click on ‘Binding’ to enter the keys you would like.
3.) Once you’re on the binding page press Y/Triangle on your controller to ‘Toggle Multi-Button On’.
4.) From here choose the keys in the order you would like them performed.
If you have any questions or tips of your own feel free to leave a comment below.
Right now, there’s a room in Buffalo Grove, Illinois that’s as quiet as a grave. The power is off, the robotic limbs are becalmed, and the once thumping presses are depressed. The Steam Controller assembly room is assembling no more, and with the recent Steam sale clearing out all the stock, the grand experiment is over.
It’s the final part of Valve’s great Steam Machines undertaking to be shut down. They’d hoped to convince you to have a PC in the living room, or a small box for you to stream your library from your main PC. The Steam Machines never took off, the Steam Link box was discontinued a year ago, and now the Steam Controller will no longer be made. Gone, but not forgotten.
The Steam Controller made a fan out of me. It freed me from my PC a little, and made me enjoy joypads again. All of them, not just Valve’s. I now own three Steam Controllers, and a pair of official Xbox One and PS4 pads, and it’s all down to Gabe’s big-eyed, owlish experiment.
It had an impossible task. It was meant to be a bridge between Steam’s huge library of keyboard and mouse focused games and the slouchy comfort of the living room. That’s like fitting 30,000 square pegs into one round hole. And Valve tried. They really did. If you set their pad down beside any other piece of gaming hardware, it stands out as an attempt to redefine gaming’s wheel. The scoop-shaped controller is the inverse of everything that’s come before.
Trackpads where you’d expect sticks. A cross of buttons instead of a D-pad. Paddle triggers on the back. Valve only stuck a thumbstick on there because people were lost without it. It’s a jack-of-all-games, meant to let you comfortably smash out some Brawlhalla before thoughtfully tending to your space-empire in Stellaris. It was my go-to controller for any driving game, and it saw me through a lot of Fallout 4 and The Witcher 3. I even managed to get Arma 3 working with it.
Really, it’s the trackpads that will get you. If you’re too used to thumbsticks you might never be ready for the trackpads, but I fell a little bit in love with them. The first time I picked up the Steam Controller was the first time I could use a joypad to play FPS games. Tweaking the thumbpad gave an amount of precision I’d never had with a controller, and though I’ve never played anything competitively with it, with this I could play the Long Dark from my sofa.
Initially, the left pad is a D-pad and the right pad is set-up as a virtual trackball, so you can flick your view around as if you were spinning a ball with your thumb. But from there it doesn’t take a lot to make either pad work like a mouse, or a joystick, or to augment the joypad’s gyro for precision aiming. You can assign very specific sections on it to in-game menu items, or sprint zones. You can string button presses together into a tap on the pad, or shift the whole thing into an entirely different set-up for vehicle control. You can build interactions beyond what the mouse, keyboard, and in-game options would allow.
On the other hand, anyone that has spent time tuning and tweaking a Steam Controller profile automatically has my respect. The back-end may be amazing, but the UI tries to smother it with a pillow. It isn’t secret sauce; it’s a secret menu of exotic, squelchy treats with too many eyes. The ugly/deliciousness ratio is off the charts, and it’s further mired in Steam’s Big Picture UI. Even basic things like clear labelling suffer in this mode. Valve leaned heavily on the community, providing sharing options that enable people to snatch heavily tweaked profiles from each other on Steam. I learned a lot from those, even if it was often like being handed the software equivalent of your friend’s second controller – the one with the transparent case, buttons with five different modes, and a strangely sticky surface.
I wish that Valve had tried a bit harder to help people get to grips with Steam Controller. Only a couple of months ago they added specific configurations for the top 100 games people play on Steam Remote Play. Conversely, if developers didn’t craft a profile for joypads, people were left with generic templates to use, which meant having to eventually roll their own. It seems unfair, but I guess everyone has a phone in their pocket.
Valve continually looked for ways to improve Steam’s general joypad support via the Steam Controller software, and while it undercut Steam Controller itself, it was was to everyone’s benefit. Steam Input is the legacy that the experiment leaves behind. The API enables Valve to natively support all kinds of official and unofficial controllers, and the PS4 and Xbox controllers are better on Steam than they’ve ever been. You can go to Steam right now, plug in a PS4 pad and add Overwatch to the library via the “Add a non-Steam game to my library” menu, and find a community config for it. That’s two proprietary elements working together in Steam, which is sort of amazing.
So, the hardware may be gone, but it made an impact that really can’t be overstated. Without the Steam Controller, I doubt Valve would have put the effort into Steam Input that they did. My hope is that the rumoured Steam Controller 2 appears, though I suspect that’s a hope I should give up on. A more reasonable one is that Valve’s spirit of experimentation leads them to enable Steam Input on mouse and keyboard, joysticks, and whatever people are shoving into their USB slots for pleasure these days. Until then, I’ll cherish my Steam Controllers.
We don’t talk about the Nintendo Switch ($300 on Amazon) much because, well, this is PCWorld, but its pick-up-and-go portability and deep library of exclusive games make it a delightful companion console for PC gamers (if you can stomach 30 frames per second). And it just became an ever better complement thanks to newfound Nintendo Switch Pro controller support in Steam.
Switch Pro controllers ($70 on Amazon) could be used on Windows PCs via Bluetooth for a while now, but coaxing them to work with third-party software was complex burden. Native Steam support streamlines the experience.
How to use a Nintendo Switch Pro controller in Steam
The feature’s only available in the beta version of the client for now as it prepares for full release. You can join the beta by opening Steam’s settings, then clicking the Change button in the “beta participation” portion of the Account tab. Steam will prompt you to restart. After downloading some data, the client opens back up and you’re ready to go.
The Steam controller settings now include support for Nintendo Switch Pro controllers.
To set up your Nintendo Switch Pro controller in Steam, open the settings again, select the Controller tab and click General controller settings. A Steam Big Picture Mode window opens, and you’ll see a “Switch Pro configuration support” option. Checking it allows you to create, browse, and share controller configurations on a per-game basis.
Mentioned in this article
Nintendo Switch – Neon Blue and Red Joy-Con
Underneath that, you’ll see an option to use Nintendo’s button layout. Nintendo reverses the X/Y and A/B buttons compared to other major controllers. The Steam Input Configurator software is powerful and versatile, letting you create and use all sorts of button configurations; the Nintendo button layout option automatically reverses the inputs to match your hardware if you select a configuration other than the Nintendo Switch Pro template.
Plug in your controller and register it to your Steam account if you’d like. You typically don’t need to run the calibration function for controllers you’re using with Steam, but Valve recommends it in this case to ensure the Switch Pro’s gyrometer is running correctly. Do so by clicking on the controller in the “Detected controllers” section, then clicking Calibrate and following the on-screen directions.
From there, you’re ready to rock. If you don’t want to use the stock control scheme in a given game, you can create custom configurations (or use templates created by others) by booting into Steam Big Picture mode by clicking on the controller icon in the upper-right corner of Steam’s title bar, browsing to the game in your library, and selecting Manage game > Controller configuration. Alternatively, you can press the Home button on your controller while in-game to summon the Steam overlay, where you can change your controller configuration on the fly.
In 2015, the Valve Corporation released Steam Link, which allows users to stream Steam content through their computer wirelessly to a television. Since its release, although the device has been discontinued as of 2018, Steam Link has been a valuable tool for gamers who prefer playing on their living room TV.
Before you set up your Steam Link, make sure you have one HDMI cable, and the Steam Link power adapter. Additionally, if you have an ethernet cable, you should consider connecting your Steam Link directly to your router to increase your connection strength. However, this isn’t required.
Note that there is a software version of Steam Link, available as an app for iOS, Android, and other platforms. This app lets you play Steam games on your phone and some smart TVs. This guide will focus on the hardware version of Steam Link, which lets you connect to a TV.
Check out the products mentioned in this article:
Steam Link (From $64.30 at Amazon)
Steam Gift Card (From $20 at Best Buy)
MacBook Pro (From $1,299.99 at Best Buy)
Lenovo IdeaPad 130 (From $299.99 at Best Buy)
How to set up a Steam Link
1. Launch Steam on your computer and select “Steam” in the top-left corner of the screen. In the dropdown menu, select “Settings” if you’re on PC, or “Preferences” if you’re on a Mac.
2. Once you’re in Settings, click on “Remote Play” and check the box that says “Enable Remote Play.”
3. Unbox your Steam Link. Each Steam Link package includes a power cable, ethernet cable, and an HDMI cable. Connect the HDMI cable to your TV. Make sure you have a mouse and keyboard or controller, as you’ll need it for the rest of the installation process.
4. Once the Steam Link is powered on, you’ll see a couple of screens appear. These are basic settings to help set up the Steam Link on your TV. You’ll have the option to adjust your screen display, as well as select your refresh rate and resolution.
5. Next, connect to your host computer. Your Steam Link will automatically detect available computers that are currently running Steam. If you search for a device, you will need to enter your computer’s hostname — one of its names associated with its network connection — or its IP address . If you need to find your IP address, check out our articles on how to find your IP address on a Windows computer, or how to find it on a Mac computer.
6. After you’ve connected to your host computer, your Steam Link will display a four-digit PIN number. On your host PC, head to “Settings,” then click “Remote Play,” enter the PIN, and click “Pair Steam Link,” and you’ll be set to begin using your Steam Link.
After you finish setting up your Steam Link, you can begin installing and playing games on your Steam Link. If you want to install games remotely through your Steam Link, click on “Library” and chose the game you wish to download.
I’ve been using one with Dynasty Warriors 9, and it’s great, as is the software platform backing it up.
Mar 3, 2018 · 4 min read
I bought a Steam controller yesterday, and it’s actually a better controller solution for the PC version of Dynasty Warriors 9 than the DualShock 4 I’d been using previously.
Koei created dedicated configurations for the DualShock 4, Xbox One controller, and Steam controller inside Steam’s amazing controller configuration system.
If you’ve never used this tool, it launched alongside the Steam controller back in 2015, and recently expanded to fully support the PS4 and Xbox controllers. You can access the controller configuration tool through the Steam overlay, or from the options menu in the client.
Once i n side, you’ll find a whole bevy of options. Users can create, customize, and share controller layouts through an easy-to-use interface. You can assign any button on your gamepad to do just about anything you want. You can mimic mouse movements, you can set up multiple toggles, and you can change the behavior of the analogue sticks, among many other options.
Using a DualShock 4 in Dynasty Warriors 9 with the official configuration was broken for a few days when the game originally launched. Essentially, the right stick wasn’t functioning at all. But they patched that. I still noticed that moving the right stick felt a bit fiddly and janky compared to that same motion on the Xbox One version of the game.
None of those problems exist with the Steam controller. The default configuration has nice, smooth camera movement (once you get over the learning curve of using a big haptic touch surface instead of an analog stick), and the in-game buttons more or less line up with those on the controller.
The whole thing got me thinking about so many questions.
Why do developers often only implement the Xbox button icons into PC games? For multiplatform releases, they’ve usually already done the work to create PS4 button icons, so it’s weird not to at least include those on PC. Or keyboard and mouse icons for that matter.
Why isn’t the Steam controller more of a standard on the PC? I know several PC gamers, but outside of myself, I don’t personally know any other Steam controller owners. Maybe the initial launch put people off? I owned one right after launch, and even though it was cool…it had more potential than it had worth. Now, several updates later, it’s quite robust and even after a day I already prefer it to any other solution.
Is the Steam Hardware initiative more or less dead? Steam still promotes the controller and the Steam Link through their storefront, especially when they’re on sale…but both pieces of hardware are still their initial designs. A new iteration, even if it were just to add some new colors, could make a big impact.
And what about those desktops? Does anyone remember Steam Machines? Yeah, I don’t blame you for saying “no.” It was so bizarre when Valve essentially launched that program, then backpedaled at the last minute, leaving big partners like Dell to sell their boxes without the Steam branding for several months. And then they launched it again and no one seemed to care.
Gabe Newell used to talk very openly and publicly about how he thought Linux and Steam OS would be the future of gaming…but now he’s probably just rolling in Dota dollars and other Steam royalty/fee money.
The expansion of the Steam Controller configuration tool to the PS4 and Xbox One controllers was both a cool new thing and, a little more depressingly, a strangely reluctant admission of defeat. “Okay, we know all you guys are just using these other controllers…at least we didn’t build this software for nothing!”
I’m probably the only person who’s actually bummed out about that at all.
I actually thought the original design of the Steam controller, which didn’t have any analogue sticks and focused almost exclusively on re-programmable touch surfaces, was a really cool idea. It doesn’t get any more “flexible PC gaming platform” than having an entire controller surface you can tweak to your heart’s content. The stick and buttons on the current iteration are very useful…but they also make it feel like Valve was hedging their bets on this thing before they even released it.
Posted at: 2019-12-06 09:47:13
Tags: geforcenow, steamcontroller, windows
Last week I bought the Steam Controller during the black friday sales on Steam. A few days later I was one of the lucky few that didn’t have their order cancelled and had gotten the controller in the mail.
Nowadays I primarily use Nvidia’s Geforce Now (GFN) for PC gaming because I don’t have a PC anymore. Naturally I tried to use my new controller with GFN, but it didn’t work as easily as I had hoped. The controller itself worked flawlessly, but unfortunately I could not use community controller layouts with games on GFN.
In this article I will show you how to use Steam Controller community layouts using Geforce Now.
Setup
This tutorial is made for Windows, and I don’t know if it works on other operating systems (probably not). The applications you need on your own computer are the following:
- Geforce Now with access to a game
- GloSC to create game specific Steam Overlay with Geforce Now games
- Steam itself to set the controller layouts
The idea is to create a GloSC entry for each Geforce Now game and add those to Steam. Then inside Steam you can set the controller layouts for each game.
GloSC configuration
First, fire up GloSC and hit the “Create New” button to add a new entry. My configuration for the game Divinity: Original Sin 2 is, for example, this:
The executable should just be the GFN application, and no specific shortcut for a game. Otherwise the GloSC overlay will crash the game. The location for this executable was at “C:\Users\ \AppData\Local\NVIDIA Corporation\GeForceNOW\CEF\GeForceNOW.exe” , but it’s also easy to choose the desktop shortcut instead.
Now that we have a game in GloSC, we can add it to Steam. Open up Steam and go to your game library. First you have to add the actual GloSC application to Steam. To do this, press “Add a game” and then “Add a Non-Steam Game” and select the GloSC executable. For me it was located at C:\Program Files (x86)\GloSC\GloSC.exe .
Lastly, press the “Add all to Steam” button inside GloSC. This adds your new entry to your Steam library. If all went well, you should see something like the following in your Steam library:
Steam Controller layout configuration
Now that we have the game in Steam, time to setup the controller layout. Steam keeps a list of controller layouts users can upload for each game. We would like to use those, because figuring out a good layout ourselves will take a lot of time. To do this, we first have to choose a layout for the actual Steam game, so not the GloSC game we just added.
Connect your Steam controller (otherwise the button won’t appear) and follow the following buttons: Controller Configuration -> BROWSE CONFIGS -> Community . Remember to do this for the original game as explained earlier! Now choose a layout and apply it. Then press EXPORT CONFIG -> Personal -> Save new personal binding and give it a nice name. Now exit the controller configuration.
With a layout chosen for the original game, we can use it for the GloSC game too! Edit the configuration of the GloSC game we added earlier and browse the configs. Press “Your Other Games” and voilà, you can choose your config here.
Play the game
Now we just have to play the game! When you open the GloSC game you added to Steam it will launch GFN. You will then have to start the game (this is because GFN would crash with the overlay otherwise). Test your controller, it should have the community config loaded!
– Jul. 8th 2019 5:22 am PT
The Steam Link app allows you to stream games from your Steam library on your PC to your iPhone, iPad, or Apple TV. You can use touch controls or connect a compatible controller. The newest update to the Steam Link app makes that experience even better.
Using the Steam Link app, gamers can connect their iOS device to an MFi controller like the SteelSeries Stratus or the official Steam Controller. The Steam Controller is not MFi-compatible so it can’t typically be used in any iOS game, but can be used with games played in the Steam Link app only, connecting over Bluetooth.
With app version 1.1.36, players can now rebind the button inputs from MFi controllers. This means you can configure your setup to be more appropriate for a given PC title. If a default button mapping is unnatural, you can now customize the control scheme to something that you like better.
The on-device touchscreen “Trackpad” control option has also been improved to be more accurate with higher sensitivity. These enhancements mean that Trackpad movement is now the default mouse mode.
With iOS 13, Apple is dramatically increasing the appeal of MFi gaming. Apple users will be able to pair standard wireless console controllers; you can connect your Xbox controller or PlayStation 4 controller for the first time. Console controller support will work across iOS, iPadOS, tvOS, and macOS when all the new software updates ship in the fall.
Apple is obviously hoping that expanding controller compatibility will encourage greater adoption of its Apple Arcade service, but the functionality benefits the entire ecosystem.
Download Steam Link for free for iPhone, iPad, and Apple TV. (Obviously, you have to own or purchase the games you stream over the network.)
FTC: We use income earning auto affiliate links. More.
So I’m not sure whats out there for Steam controller configs, so this might already be available. (I got my copy from the Epic Store when they had it for free, so I can’t see what configs are uploaded for the game in steam.) But I figured I’d throw it out there in case there isn’t a config like this out there.
Here’s the direct link to the config; if that doesn’t work you can add me as a friend on steam @ deepfriedeyeballs and it should pop up under the “Your Friends” tab when you hit “Browse Configs” in the controller configuration in Steam.
The bindings are set up as follows:
*Analog Stick – WASD, Click for Sprint
*Left Touchpad – Scroll Wheel, bound to Mouse Wheel Up/Down, click to activate touch menu
*Right Touchpad – Mouse, click to activate touch menu (hold down & drag to selection, release to select)
*R Trigger – L Mouse Click, set up w/ a hair trigger on the soft pull
*L Trigger – R Mouse Click, Full Pull only
*R Bumper – E/Exit Vehicle, Holster Tool
*L Bumper – Tab/PDA
*ABXY Pad – F/Alt Tool, E/Exit, R/Battery, Q/Deconstruct (Respectively)
*Rear L/R Paddles – Decend, Ascend
*Select – Show Keyboard
What might separate this from other configs (again, not sure what’s already out there) is that I have both touchpads set to bring up a 7-button touch menu when the pad is clicked down. The menu has numbers 1-5 for the quick select spots, R to change batteries, and E to holster the tool. With the menu, whatever you set up on space #4 is effectively quick-selected just by clicking either touchpad.
I also have the right trigger set up with a soft pull and hair trigger setting so you can quickly spam the trigger when catching fish or breaking rock deposits, in addition to the normal full pull trigger. I originally had this set up with a turbo on the full pull, but it makes drilling with the prawn suit only possible by holding the soft pull so I took it off.
And if you’re like me and have the game in the Epic Launcher, I found a workaround to steam not opening the game. To launch from Steam, go into the directory where you have the game installed, right click on the Subnautica.exe file, and Create a Shortcut in the same directory. Add the shortcut as a non-steam game to your library, and under “Set Launch Options”, use the command “-EpicPortal”. Run the game from Big Picture mode and you should be good to go.
Hope this helps, I certainly prefer this over the keyboard and mouse when playing from my couch.
Edit: Formatting and clarity with the list of bidings
Game from the comfort of your couch.
Valve’s Steam Link is a powerful tool that allows users to stream Steam games to their wireless TVs, other PCs, or mobile devices. But using a mouse and keyboard can be inconvenient when gaming comfortably on a couch or using Steam Link on a phone. Thankfully, many gaming controllers are compatible with the Steam Link. Below are the best controllers for the Steam Link and why they made the shortlist.
Best overall Steam Link Controller
Sony DualShock 4 V2
Sony’s fourth iteration of the DualShock brings a balance of comfort and performance many controllers can’t compete with. In addition, the DualShock 4 comes in a wide range of colors to choose from. The DualShock is easy to use, working right out of the box without requiring any extra adapters. Instead, gamers connect the controller to their devices via Bluetooth or a USB cable.
Those accustomed to previous iterations of the DualShock will find the DualShock 4 familiar to use. Additionally, the DualShock 4 brings subtle performance improvements while also adding valuable new features. One of the notable innovations of the DualShock 4 is its touchpad. A touchpad makes the DualShock 4 a perfect fit for Steam Link because not only can the touchpad be used in supported games, but the touchpad also functions as a mouse in the Steam Link menus. This feature is great for gamers who find navigating Steam Link’s menus using a controller to be unintuitive.
However, the DualShock 4 isn’t without its cons. One of the downsides of this controller is the battery life. It’s powered by one AA battery, and battery life can be anywhere from five hours to 10. However, you can charge the controller using the USB cable that comes with it and play while it charges. For gamers who hate having to plug in their controller frequently, the DualShock 4 might not be the right choice.
Best customizable Steam Link controller
SteelSeries Stratus Bluetooth Mobile Gaming Controller
The SteelSeries Stratus is a controller explicitly designed for PC and android. Because of this, the Steelseries Stratus comes with solid driver support. Most importantly, the Stratus is compatible with SteelSeries Engine 3. SteelSeries’s gaming software lets users customize the sensitivity of their thumbsticks, manipulate dead zones, and remap buttons. Customizing a controller’s performance using dedicated gaming software is essential in giving competitive gamers a precisely tuned controller.
Another standout feature of the SteelSeries Stratus is its battery life. It has over 40 hours of battery life powered by 2 AA batteries. Unlike the DualShock controller, you won’t be able to connect to your device via USB to experience a wired connection or charge the device. Another thing to keep in mind is the SteelSeries Stratus won’t work on Macbooks. However, it will work on iPhones and iPads.
Best budget Steam Link controller
PowerA Enhanced Wired Controller for Xbox Series X/S
The PowerA Enhanced Wired Xbox Series X controller is an inexpensive Steam Link-compatible controller. Although PowerA is technically a third-party Xbox controller, it has been licensed and thoroughly tested by Xbox. What gives this controller its low price is its lack of wireless features. Instead, the controller connects to a PC using a Mini-USB cable. The Mini-USB cable gamers choose to use doesn’t matter, but the cable the controller comes with is a solid 10 feet long. Also, anyone looking to give their controller a unique aesthetic will be pleased with this controller since it comes in over 13 different colors and designs.
Additionally, this controller brings the standard features users have come to expect from a PC controller, such as dual rumble. Dual rumble vibrates the controller in relation to what is going on in-game, and it’s all completely compatible with Steam Link. A feature unique to this controller is the headset dial. The headset dial, located on the front side of the controller, can be used to adjust game audio and mute the user’s microphone. It also features two mappable buttons on the backside of the controller to map extra commands.
Best premium Steam Link controller
Sony DualSense
It doesn’t get more premium than the Sony DualSense controller. The DualSense 5 is Sony’s newest iteration of the DualShock. It comes with many of the important features a quality controller needs while bringing superior build quality and new features. Unlike the DualShock 4, the DualSense doesn’t require batteries. Instead, the DualSense charges via a USB-C cable.
Some of the major new features of this controller are its haptic feedback, built-in microphone, and adaptive triggers. Haptic feedback technology is essentially rumble 2.0, giving the controller more advanced vibrations. Unfortunately, haptic feedback isn’t currently supported on Steam Link, but the controller will still function with basic vibrations.
Adaptive triggers are another selling point for the DualSense. Adaptive triggers allow gamers to feel different levels of force when pressing down on the trigger, depending on the game and scenario. For example, slamming the brakes when controlling a car will create tension in the trigger. Like the haptic feedback, the adaptive triggers aren’t currently compatible with Steam Link, but with this controller becoming the new standard, it’s only a matter of time before most games support this feature.
Best Steam Link controller for emulation
Nintendo Switch Pro Controller
The Switch Pro controller is designed for the Nintendo Switch but works great with any PC running Steam Link. The Switch Pro controller connects to devices using Bluetooth or the UBS-C to USB-A cable that comes with it. Unfortunately, this controller doesn’t feature a headphone jack. Not having a headphone jack is specifically annoying with the Steam Link because gamers will have to connect their headset directly into either the TV or their PC.
Because it’s built for the Nintendo Switch, the Switch Pro controller features motion controls. Thankfully, the Switch Pro Controller’s gyroscope, rumble, and motion controls work when connected to Steam Link. This is important as many of these features are needed to fully emulate some previous generation Nintendo Nintendo consoles like the WiiU.
This article includes affiliate links, which may provide small compensation to Dot Esports.
A Guide for the Steam Controller and Bindings
A Guide for the Steam Controller and Bindings
Post by MrFaul » Sun Oct 18, 2015 8:15 am
OK folks the Steam Controller is out and I immediately started playing around with it quite a bit.
Let me tell you this, that thing is a amazing piece of technology but nothing that works out of the box.
(It is plug and play, but to leverage its full potential you have to set up your control scheme which takes an average hour in creating and another in learning to use it)
In short I love it . it has it dark sides too but I don’t want to rant about that here because it’s still WIP.
So for those fortunate people who got theirs already here is what you have to do if you want to play factorio with your Steam Controller :
- 1st. Step: Associate a Factorio Shortcut to your Steam Lib
- 2nd. Step: Launch Steam in Big Picture Mode (I like the ambient sound :- )
- 3rd. Step: Select Factorio
- 4th. Step: Manage Shortcut
- 5th. Step: Configure Controller
- 6th. to infinity-th. Step: Setup the controls to your liking or my suggestion below
- Last Step: Launch game and hf
My Setup:
Setup for standard factorio bindings!
Uses the Keyboard Mouse Template any notation with default means no changes to that
Start (>)= Menu (default);
Select( Note: make sure you set it to mix buttons otherwise you won’t be able to move diagonal!
Wings
Left=Shift, Right=CTRL (default);
RPad
Touch=Mouse (default), Press=E (Use);
DPad
Up=M (Map), Down=F (PickUp), Left=LAlt (adv.Info), Right=P (Production Panel);
A = Fire (default);
B = Q (Discard/SwitchWeapons);
X = C (Alt Fire);
Y = R (Rotate);
I hope that spares you at least a hour tinkering, learning it still will
I don’t know how far you are involved with Valve and their Steam APIs but please:
DON’T USE THE STEAM CONTROLLER API it’s fucking buggy as hell.
(Valves own titles are setting the baddest examples for the controller use and you can’t change that because API)
Instead implement normal joystick or XBox controls those have the most benefit with that thing.
Thanks.


