- ‘)” data-event=”social share” data-info=”Pinterest” aria-label=”Share on Pinterest”>
- ‘)” data-event=”social share” data-info=”Reddit” aria-label=”Share on Reddit”>
- ‘)” data-event=”social share” data-info=”Flipboard” aria-label=”Share on Flipboard”>
Related
- How to Reset All the Passwords on a Toshiba Laptop
- How to Recover Apps From iTunes
- Transferring Photos From a Windows 8 Laptop to an Android Tablet
- How to Put iMusic on a Facebook Profile
- Switching the App Store Back to United States
Windows 8 enables you to create separate user accounts for people who have access to your computer. You can create user accounts to prevent your employees from accessing sensitive sections of the operating system and give them access to your apps. If you choose to share your apps with other users, you should protect your Microsoft account with a password. Other users can’t purchase apps using your account while it’s password-protected.
Sharing Apps With Other Users in Windows 8
To share apps between users, you must install them on the other user’s account. Press “Ctrl-Alt-Delete” and then click “Switch User.” Log into the user account you want to give access to your apps. Click or tap the “Store” tile on the Start screen to launch the Windows Store app. Press “Windows-I” to display the Settings charm and click “Your account.” Click the “Change user” or “Sign in” button and log in using the Microsoft account that contains the apps you want to share. Turn on the “Always ask for your password when buying an app” option to prevent the secondary user from purchasing apps using your account. To install one of your apps on the secondary user account, right-click inside the Windows Store window; choose “Your apps” from the context menu; click the app you want to install and then click “Install.”
Nick Peers has been writing technology-related articles since 2003. His articles have appeared in dozens of technical publications, including MSN UK, CNET, BBC Who Do You Think You Are, LifeHacker UK and TechRadar. He holds a Masters in information technology degree from the University of East London.
Chris Hoffman is Editor-in-Chief of How-To Geek. He’s written about technology for over a decade and was a PCWorld columnist for two years. Chris has written for The New York Times, been interviewed as a technology expert on TV stations like Miami’s NBC 6, and had his work covered by news outlets like the BBC. Since 2011, Chris has written over 2,000 articles that have been read nearly one billion times—and that’s just here at How-To Geek. Read more.
Windows 8 encourages you to set up a separate user account for everyone who uses the computer. However, you might want to buy an app – such as Angry Birds – and allow other people to use it.
By default, you can’t do this. Each user account has their own Windows Store account with their own purchased apps. However, there’s a way to share purchased apps so you don’t have to buy them again for each user.
How It Works
Let’s say you have several accounts on your computer – your account and accounts for your children. You want your children to have the same games and apps you’ve purchased without giving them full access to your account.
You can do this by logging into your children’s accounts and changing their Windows Store account to your Microsoft account. This only changes the account used for the Windows Store on their accounts – other Microsoft apps like Xbox Music and Video will continue using their normal user accounts. All you’ll be sharing is a Windows Store account, which will give you access to the apps you’ve purchased on every local user account.
You can also protect this account with a password to prevent the other users from purchasing apps with your money.
Sharing a Windows Store Account
To do this, you’ll need to have one main Windows Store account where your purchased apps reside – probably your own user account – and several other user accounts. If you haven’t created any user accounts yet, you should create a primary user account for yourself and secondary user accounts for the other people using the computer. These secondary user accounts can either be Microsoft accounts or local accounts.
Once you’ve created the secondary user accounts, log into one of them and launch the Windows Store app.
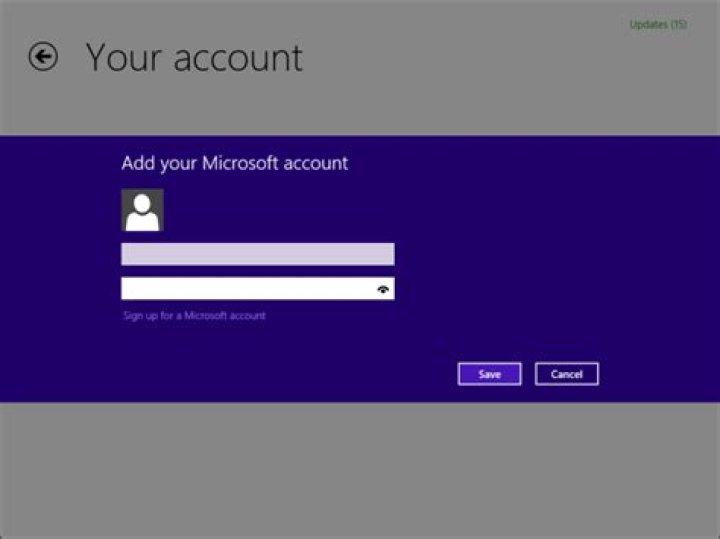
Open the Settings charm (use the WinKey+ I shortcut to quickly open it) and select Your account.
Click the Change user or Sign in button, depending on whether the secondary user account is a Microsoft account or a local account.
Sign into the Windows Store with your primary user account details. The account you provide here only be used for the Windows Store.
To prevent a child or whoever else is using the secondary user account from buying apps with your payment details, you’ll probably want to enable the Always ask for your password when buying an app option.
This trick can be used to share apps across up to five different PCs – you can manage your connected PCs from this screen.
You’re now done. If you have other secondary user accounts, you’ll need to log into each one and repeat the process for each. Unfortunately, each user must install the app from the Windows Store and update it separately, consuming additional disk space. However, they won’t have to purchase the apps separately.
If you have multiple users on the same Windows 8 system, there will be times when you need to share your purchased apps with them. Here’s how to do it.
If you have multiple users on the same Windows 8 system, there will be times when you need to share your purchased apps with them. To share apps between accounts, you need to change the Windows Store account to yours, then install it. The process is easy but can be a bit confusing if you’re just diving into the new Windows OS. Here’s how it’s done.
You need to be the system administrator and use your account to purchase apps. So for instance, if you’re the parent and creating accounts for your kids.
Add a User Account to Windows 8
Before you configure app sharing options, you need to add a user if you haven’t already. You can set them up with their Microsoft Account, or you can create a Local Account.
If it’s your kid’s account, you might want to check the option to turn on Family Safety.
Share Windows 8 Apps
To share the apps, log in to the account you just created, and launch the Windows Store. Once it launches, use the keyboard shortcut WinKey + I to bring up Settings and click Your Account.
Then click the Change User button.
Or if it’s a Local Account click Sign In. Then log in with your Windows Account credentials.
You’ll also want to switch on “Always Ask for your Password when Buying an App” so no apps can be purchased without your password.
Now you can download your apps to the user account you logged into. Hit WinKey + Z then select Your Apps.
Now you can select the Windows 8 apps you want to install from your account, including apps you’ve installed on other systems.
One thing to keep in mind with this is, if you install a new app under your account, it doesn’t sync to the others automatically. So you’ll need to go through the process each time you want to share new apps.
Also, Xbox Apps like Xbox Music, Video, and Games in Windows 8 aren’t connected with Windows Store. Microsoft is continuing to perfect the “One Login Rule them All” model and there’s a lot of opportunity with SkyDrive and all of the new apps and services.
I would like to see the ability to approve another user account under yours, and then any apps you approve for other accounts will be installed automatically. Hopefully someday?
Windows 8 works like other mobile app platforms, where an online account, in this case your Microsoft account, is used to make app and game purchases. But what if you have a shared PC or device and would like to use the same paid apps and games between multiple accounts? Can you do this, or do you need to buy the app multiple times, one for each account?
You can share apps between accounts. But there’s a trick: You need to change the Windows Store account to the account from which you’ve purchased apps. This makes the most sense in a family environment, where you’d like your spouse or kids to have access to the same app collection. And you can configure it securely so that your kids will be prompted for the account password whenever a purchase attempt is made.
First, configure your own account normally, using the Microsoft account you wish to use for app and game purchases.
Then, configure one or more secondary accounts for your children and/or spouse. These accounts can be local accounts or Microsoft accounts, it doesn’t matter.
Sign-in to a secondary account and launch Windows Store. Then, choose Settings (WINKEY + I) and then Your account. In the full-screen interface that launches, click the Change user button (or, if it’s a local account, the Sign in button). Here, you can configure a Microsoft account that will be used only for purchases. Use the Microsoft account you prefer (usually the one you sign in with.)
If the sign-on account is for a child, you should also consider setting the option “Always ask for your password when buying an app” to Yes. That way, your kids can’t make purchases without your permission, and they’ll need to ask you to enter that password to approve those purchases.
A couple of notes about this process.
First, the Microsoft Store account is not connected to the Xbox apps (Xbox Music, Video, and Games) or any of the other apps that come pre-installed with Windows 8. So unless you change the sign-in on those apps, they will continue to use the sign-in account (or, for a local account, will await a separate sign-in).
Second, while using the same account in Windows Store across multiple sign-in accounts on a PC provides access to all of the apps and games you’ve purchased, none are installed automatically. And if you purchase and install an app or game in one account, you will still need to install it in the other accounts separately: They are literally installed in different places on the disk. (You will also need to update them separately, once in each account, going forward.)
To do choose and installed apps and games, visit Windows Store, then choose Your apps from the app bar (WINKEY + Z). This interface provides a list of all purchased and downloaded apps and games, with the most recent titles listed first.
Setting up different user accounts on Windows 8 is a smart thing. You don’t want to share secure accounting information with your kids. Vice versa, you don’t want to see Dora the Explorer cartoons or get a computer virus from your kids! At the same time, if you’ve paid for an app from the Windows Store, why not be able to use it on all accounts? Games and apps should be useable by all.
By default, you are unable to share Windows 8 apps. But, as your Windows 8 expert, I beg to differ and will show you a trick.
Here’s how to share your Windows 8 apps between accounts:
- Keep your user account the same.
- Go to the other user accounts and change the Windows Store accounts to your Microsoft account.
- Protect this account with a password so your kids or others don’t have a shopping spree.
- Buy apps and have them available for all accounts.
Keep in mind that having the same Windows support store account is isolated to just that function of sharing and using apps. Everything else, such as Xbox Music, Video, and other Microsoft non-store apps will work independently on all user accounts.
Managing User Accounts and Parental Controls
Lesson 16: Managing User Accounts and Parental Controls
Managing user accounts and parental controls
A user account allows you to sign in to Windows 8. By default, your computer already has one user account, which you were required to create when setting up Windows 8. If you plan to share your computer, you can create a separate user account for each member of your home or office.
You can also choose to associate any new user account with a Microsoft account. Signing in with a Microsoft account will bring all of your OneDrive files, contacts, and more into the Start screen. You can even sign in to a different computer that has Windows 8, and all of your important files will be there.
In this lesson, you’ll learn how to add, manage, and switch between user accounts. We’ll also talk about how to set parental controls for individual users.
Watch the video to learn how to create accounts and turn on parental controls.
If you don’t already have a Microsoft account, check out our lesson on Creating a Microsoft Account to learn more.
Adding users
It’s easy to add new user accounts to your computer. Connecting users to a Microsoft account will help them get the most out of Windows 8, but you can also add a local user account that exists only on your computer if a user prefers not to create a Microsoft account.
You must be signed in as an Administrator (the first user account created on your computer) to add a new user.
To add a new user (with a Microsoft account):
- From the Start screen, hover the mouse in the lower-right corner to access the Charms bar, then select Settings.
It may take several minutes to configure a user’s settings when logging in with a Microsoft account for the first time.
To add a new local user (without a Microsoft account):
- Navigate to the Userspane from PC Settings. Click Add a user.
- Locate and select Sign in without a Microsoft account.
Switching users
If you have multiple user accounts on your computer, it’s easy to switch between users without signing out or closing your current apps. Switching users will lock the current user, so you won’t need to worry about someone else accessing your account.
- To switch users, click the current user in the upper-right of the Start screen and then select the desired user from the drop-down menu. The user will then need to enter a password to sign in.
You can switch back by selecting the desired user from the drop-down menu. You’ll need to re-enter your password to unlock the account.
Managing user accounts
By default, the user account you created when setting up Windows 8 is an Administrator account. An Administrator account allows you to make top-level changes to the computer, like adding new users or modifying specific settings. Any users you add are automatically assigned to a Standard account, which should meet the everyday needs of most users. You will probably only need one Administrator account on a shared computer, but you have the option to promote any user to an Administrator account if you want.
To change the account type:
- From the Desktop view, hover the mouse in the lower-right corner to access the Charms bar, then select Settings.
Parental controls
Windows 8 offers a variety of parental controls that can help you monitor your children’s activity and protect them from inappropriate content. For example, you can restrict certain apps and websites or limit the amount of time a user can spend on the computer. You’ll need to add an account for each user you wish to monitor.
To set parental controls:
- From the Control Panel, locate and select Set up Family Safety for any user below the User Accounts and Family Safety group.
Click the buttons in the interactive below to learn more about setting the parental controls from the Family Safety settings pane.
View Activity Reports
Click here to view the most recent activity report.
App Restrictions
You can use app restrictions to prevent a user from opening certain applications, like email or messaging.
Windows Store and Game Restrictions
Use the store and game restrictions to limit what kind of apps a user can download from the Windows store.
Time Limits
Time limits allow you to control how much time a user can spend on the computer. You can also set specifc curfews, which restrict when a user can access the computer.
Web Filtering
You can use the web filtering controls to limit the websites that a user can access. You can set general content levels and block specific sites.
Family Safety
Make sure that Family Safety is turned on if you wish to set parental controls for a user.
Activity Reporting
Turn on activity reporting if you wish to see weekly reports on how a user spends their time on the computer, including frequently visited websites, apps, and more.
How do I move programs from one user to another in Windows 10?
- Press Windows + X keys on the keyboard, select Control Panel.
- Select System and Security and then System.
- Click Advanced System Settings.
- Under User Profiles, click Settings.
- Select the profile you want to copy.
- Click Copy to, and then enter the name of, or browse to, the profile you want to overwrite.
Does Windows 10 have Easy Transfer?
However, Microsoft has partnered with Laplink to bring you PCmover Express—a tool for transferring selected files, folders, and more from your old Windows PC to your new Windows 10 PC.
How do I transfer files between user accounts?
If you need to move or transfer files from one user account to another, the simplest way would be to log in with an administrator account, and cut-paste the files from one user account to the personal folders of the other user account. If you do not have access to an admin account, ask your administrator to do it.
How do I transfer apps from one account to another?
From the Admin/Owner account, go to Settings > Users > (user name) > Apps, click the little cog next to the restricted account, and you will see all apps permissions. You can give access to whichever app you like.
Can you transfer data from one Microsoft account to another?
By creating a new user account with your desired Microsoft Account, you may transfer all the data and settings from the old user account to the new user account folder. … When you save all the settings of apps that you have purchased, it is dependent on the Microsoft account that you are using.
How do I transfer everything from my old computer to my new computer Windows 10?
Sign into your new Windows 10 PC with the same Microsoft account you used on your old PC. Then plug the portable hard drive into your new computer.By signing in with your Microsoft account, your settings automatically transfer to your new PC.
How do I transfer everything from one computer to another?
Here are the five most common methods you can try for yourself.
- Cloud storage or web data transfers. …
- SSD and HDD drives via SATA cables. …
- Basic cable transfer. …
- Use software to speed up your data transfer. …
- Transfer your data over WiFi or LAN. …
- Using an external storage device or flash drives.
What is the best way to transfer files from one computer to another?
You can transfer files from one PC to another PC easily using cloud storage services like OneDrive or Dropbox. You can also copy files to an intermediate storage device like a USB flash drive, or external hard drive, then move the device to the other PC and transfer the files to their final destination.
How do I merge Windows accounts?
Follow the steps below for the same:
- Use Windows Explorer to navigate to C:Users to the account you want to COPY.
- Right Click on the Folders (and/or files) and COPY.
- Go to the other account and PASTE where you want to put them.
- Repeat as needed.
How do I share files between users in Windows 10?
You can share the files and folders to other user accounts by following these steps.
- Right-click on the file/folder which you want to share.
- Select Share with option.
- Now select Specific people.
- In the file sharing window select the user accounts with whom you want to share file with and click on Share button.
How do I move files from one OneDrive account to another?
The first way is just dragging the file from one OneDrive to another. Select the file you want to move and press the left mouse button to move it. The second way is that you can select files you want to migrate from your first OneDrive account, right click the blank area and click “Copy to” feature.
How do I transfer apps from one laptop to another?
To transfer programs to a new PC using an external drive, you need either the setup files for your programs (you can’t just drag and drop the . EXE files in most cases) or the physical disc media the software shipped on so you can reinstall it on your new PC. You likely need the activation key on hand, too.
How do I share apps between laptops?
Solution 7. Use a USB Cable to Transfer Data
- Start both computers. …
- Attach the USB cable to a USB port on one laptop. …
- Click the Windows “Start” button, type “windows easy transfer” in the Search field and press “Enter.” Follow the prompts of the Easy Transfer wizard to share files.
How do I share installed apps on my PC?
How to share files between Windows and Android using Your Phone app
- Install the Your Phone app or Windows and Android.
- Feed in your country code and cell phone number in the Windows app. …
- Download the app from Google Play using the link.
- Once installed, click ‘Connect my PC’.
I purchased Adera episode 2 intending to play through it with my son. We each have our own user account on the same PC. When my son logged in, he was prompted to purchase the app which I had already purchased, installed, and played on the same PC.
So I checked the Terms of Use. After selecting an app in the store, there is a Terms of Use link on the left side under the Install button. It is almost impossible to identify it as a link unless you put your mouse over it. The Terms of Use are standard across all apps in the store, not specific to particular apps.
The terms of use indicates that the app may be installed on up to five devices, but says nothing about multiple user accounts on those devices. However, this Microsoft blog article indicates that it is allowed.
Say, for example, that your family has a shared PC. You have previously used your Microsoft account to purchase a game that all your kids like to play. You can install it for each of your kids by having each of them sign in to their Windows accounts on the shared PC, then launch the Store and sign in to the Store using your own Microsoft account. There, you’ll see all your apps and you can re-install the app on your kid’s Windows account. Installing apps on multiple user accounts on a shared PC still only counts as one of the five allowable PCs where you can install apps.
So I have two questions:
- Is it permissible under the Terms of Use to install the app under multiple accounts on the same device?
- If so, how do I do so given that my son has already signed into the store using his own Microsoft account.
Quick Navigation
How Do I Transfer Files from One User to Another in Windows 10/11
“I just changed the settings on my computer so that there can be multiple users on it. My problem is that the new user I created has none of the various files and applications that are on the default user. How do I transfer those files from the default user to the one I created?”
It’s common to see that families or colleagues share the same computer or laptop. To protect the privacy of each independent member, it’s good to make their user account. Only with a login password or granted permission from user A, user B can get free access to user A’s files and installed programs.
However, things can be different. For example, to fix a corrupt user profile, one of the most suggested ways is to create a new account. In this regard, people have to take a further step to move all necessary files and programs from the old user account to the newly created one. But how?
Two Methods about How to Transfer Data from One Account to Another in Windows 10/11
Method 1. Copy and paste data from one user to another.
The simplest way of sharing files between users in Windows 10/11. You can log in with an administrator account, and then copy the targeted files to another account.В
1. Open File Explorer and go to C:\Users.
2. Copy the files and choose the new folder to paste.
To transfer data from one account to another, you must use an administrator account, otherwise copy and paste will be invalid. So if copy and paste don’t work, what should I do? You can turn to Method 2 for copying the user profile in Windows 10/11.
Method 2. Using Control Panel.
1. Enter theВ Control Panel in the search box.
2. Select System on the interface.
3. Click Advanced System Settings.
4. Choose Settings under the User Profiles.
5. Choose the profile you want to copy, and then click Copy to.
6. Select Browse to or enter the folder name, and then click OK.
Now all the data that you have copied from the first user account can be visited on another user account.
These two ways via Copy/Paste and Control Panel are talking about how to transfer files from one user to another on the same computer. However, if you bought a new PC or just want to transfer data to another account on another computer, we recommend a Windows easy transfer tool to move user account, including personal files and programs.
Windows 10/11 Easy User Account Data Transfer Tool
You may wonder to utilize Windows Easy Transfer to transfer data from Windows 10/11 to Windows 10/11. But Microsoft deletes Easy Transfer in Windows 10/11. So, we’d like to bring you an advanced Windows 10/11 easy user account transfer tool, which is called EaseUS Todo PCTrans.
– EaseUS Todo PCTrans –
Your Smart Windows 11 File Transfer
- Transfer Files, Apps, Settings from Old OS to New Windows 11
- 1-Click Product Key Finder for Windows, Office, Adobe apps.
- C Drive Cleaner & Windows 11 Performance Optimizer.
- Rescue Data When Windows 11 Corrupts or Dies.
Advantages
You may wonder why it’s recommended, and answers are here, presenting in full lists.
- Support Windows easy transfer of files and applications across the Windows operating system. For example, from Windows 11 to Windows 11, from Windows 10 to Windows 10, from Windows 7 to Windows 10.
- Support easy transfer both on the same computer and between computers.
- Support two transfer modes: via creating an image file or via the network.
Guide: Transfer Data from One User Account to Another on a Different Windows 10/11 PC
When it comes to user account transfer, including personal files along with programs, it’s better to use the PC to PC mode of EaseUS Todo PCTrans. By using the software to choose the contents of one user account and migrate the data to another pc, you can accomplish the while transfer job perfectly.
Step 1.В Install and launch EaseUS Todo PCTrans on both two devices. On the source PC, select “PC to PC” to continue.
Step 2.В Select the transfer direction – as an Old PC or a New PC.
Make sure the two PCs are on the same LAN. Connect to the target PC via its IP address or adding it manually. Enter the login account and password of the target PC and link two PCs by clicking “Connect”.
Step 3. ClickВ at the “Accounts” section to specify User Accounts and Settings for transferring.
Step 4. Enter the user account and password of the source computer, select the User Account Settings, User Data and other settings that you want to transfer.В
Step 5. After selection, click “Transfer” to start to transfer user accounts and settings.
That’s how you use EaseUS Todo PCTrans to transfer data from one user account to the other user account in all Windows. You can give a try to transfer from PC to PCВ for two user accounts on two different computers.
Windows lets each user create, store and access his or her own files and folders under his User Account. . But there may be times when you may want to transfer files from one user account to another user account, on a Windows PC or laptop. Or maybe you need to share files between the users. If you need to do this, then this post will show you how to share or transfer files & folders between users on Windows 11/10/8/7.
A user with an Administrator account can access files of all other users on his computer system.
Transfer files from one User Account to another
If you need to move or transfer files from one user account to another, the simplest way would be to log in with an administrator account, and cut-paste the files from one user account to the personal folders of the other user account. If you do not have access to an admin account, ask your administrator to do it. If you use our freeware Ultimate Windows Tweaker, you can easily add Move to (or Copy to) to your context menu. Then you need to simply select the files and folders you want to transfer, right-click on them, and select Move to from the context menu. Designate the folder where you want to move them.
Share files between User Accounts
Windows includes a Public folder, located at C:\Users, which is accessible to all users. If you save files in this folder, they can be shared among all the users. If you want to create and save files so that you can share them with other users, you should save them in the Public folder. If you move your existing files and folders to this Public folder, you will be able to share them with all.
The Windows operating system will add the Public folder to Libraries too, where you and others will be able to access easily.
There is one more thing. If you wish, you can even share this Public folder publicly among all on your local network. If you wish to do this, you will have to open Control Panel > > All Control Panel Items > Network and Sharing Center > Advanced sharing settings. You’ll find the Public folder sharing option here.
Check Turn on sharing so anyone with network access can read and write files in the Public folders.
How to disassociate the OneDrive-University of Cambridge folder from a machine’s local user profile.
During the OneDrive installation and/or set-up process, the new OneDrive local folder that is created is automatically assigned to the PC’s existing user profile. In most cases this is what is wanted.
However, if the PC changes ownership, or has been used for testing and OneDrive was installed or configured using a different user profile to that of machine’s local user, you may need to disassociate the OneDrive folder from the PC user’s profile.
- Use the File Explorer to locate the OneDrive – University of Cambridge folder:
Use the upicon to go up one level in the directory structure:
Double-click to open the Control Panel:
Under Adjust your computer’s settings, click User Accounts:
Under Credential Manager, click Manage Windows Credentials:
Under Generic Credentials, click the expand icon beside OneDrive Cached Credential Business – Business 1:
Click Remove:
At the prompt, click Yes:
- Tweet
- Share
- Submit
One of the great things about Windows for many years has been that anyone can easily create a user account to share a computer with other people at home or with colleagues — even now with Windows RT, something that iOS doesn’t natively have and Android is just catching up in version 4.2.
Each account in Windows is different, it has settings and other configurations unique to a person, such as personal files, wallpaper and color scheme, and even applications are associated. A user account also dictate which applications and data an individual can and cannot access, and what changes to the system are permitted or restricted.
Over the years Windows accounts have certainly been improving; one of these improvements in Windows 8 is the introduction of a new way to sign-in with a new type of account that is linked to a Microsoft account — Yup! We are moving away from the “log-in” expression –, which basically means that you can sign-in to your PC using an account that you create with Microsoft using an email address. The benefits are that you’ll be able to download Windows Store apps and you’ll also get PC-to-PC synchronization capabilities. But you can always opt to create a local account, although you’ll still need a MS account to download apps from the Store. Now that you have a foundation, let’s dive into the steps.
Instructions
1. Use the +I keyboard shortcut to bring Settings and click or tap in Change PC settings.
2. In PC settings navigate through Users, scroll down and click or tap Add a user under Other users.
3. For this demonstration we’ll be creating a local account, click the Sign in without a Microsoft account to continue.
4. Click Local account.
5. Enter a user name, password and hint, and click Next.
6. Finally, if this is a new “sign-in” for a young person you can also check the option to turn on Family Safety to get reports of their PC use. Then click Finish.
You’ll see under Other users the newly created account, to test simply go to the Start screen, click your account name in the top-right corner of the screen, click Sign out. When you do this the Lock screen appears, enter the new user credentials and press Enter. You’ll also notice that this being the first time signing in with the new account, Windows will go through the process of configuring all the default settings, including the installation of apps.
Remember, to add multiple accounts just repeat the steps.
Pureinfotech relies on your support. Consider contributing with the button below to keep bringing great content.
We may earn commission for purchases using our links to help keep offering the free content. Privacy policy info.
All content on this site is provided with no warranties, express or implied. Use any information at your own risk. Always backup of your device and files before making any changes. Privacy policy info.
For reasons unknown, Microsoft decided to change the way the Guest account feature in the new Windows 10 operating system works. In previous versions, the Guest account feature allowed you to set up a limited account for other users so they don’t have access to your important documents and settings. Now, the process requires assigning an email to a new account and configuring share settings.
Well, not all hope is lost. In modern versions of Windows, including Windows 10, there is a feature called Assigned Access, otherwise known as Kiosk Mode. Assigned Access configures a user account so that only a single Universal Windows application will run inside that user account. By recreating some of the functionality of the Guest user account, Assigned Access is a pretty valuable feature.
Step 1: Go to the User Accounts Section Inside the Settings App
First thing you’ll need to do is select or create a user account that you want to use for Assigned Access. You can configure an existing account on your PC or you can go ahead and create a new user account.
Go ahead and launch the Settings app and navigate to Accounts, then to the Family & other users section. Alternatively, you can simply search for and launch this section from the Start menu.
Step 2: Select User for Assigned Access
Once you have selected (or created) the user account that you want to use for Assigned Access, it’s time to set up which app you want to assign access to. Click on Set up assigned access to begin the process.
Then on the next screen, choose the user account that you want to use for Assigned Access from the list.
Step 3: Select App for Assigned Access
Now it’s time to choose the app for Assigned Access, but note that if you’re using a new user account, you’ll need to sign in to that account at least one time to be able to select it.
Apps that ship with Windows 10 can actually be configured for Assigned Access, but if you want to use another, just make sure it’s active of the account you’d like to assign it to. Now just choose the app you want from the list—here we are using the stock Weather app.
Restart your computer and you should be good to go. From now on, when signing into the user account configured for Assigned Access, you will be able to only use the single app that you selected.
End an Assigned Access Session
To end an existing Assigned Access user session, simply press the familiar Ctrl + Alt + Delete key combination and you’ll be signed out of the Assigned Access user session.
Turn Off Assigned Access
Disabling Assigned Access is pretty easy. Just go back to the user account selection screen when setting up Assigned Access (Step 2) and choose the Don’t use assigned access option. Restart and you should be all set.
Note that, as of now, Assigned Access is available only on Windows 10 Professional and Enterprise editions. Though the features of Assigned Access are not as extensive as the Guest user account feature, having the ability to configure a single user account so that it runs only a single Windows app can be quite useful, especially when dealing with children. While the Guest user might make a comeback down the road, Assigned Access is a valuable tool of its own.
Make sure to follow Gadget Hacks over on Facebook, Google+, or Twitter to find out more cool things about Window’s latest operating system.
Keep Your Connection Secure Without a Monthly Bill. Get a lifetime subscription to VPN Unlimited for all your devices with a one-time purchase from the new Gadget Hacks Shop, and watch Hulu or Netflix without regional restrictions, increase security when browsing on public networks, and more.
- + Share This
This chapter is from the book
This chapter is from the book
This chapter is from the book
In this chapter you discover how to configure your computer for multiple users.
- → Understanding User Accounts
- → Setting Up a New Account on Your PC
- → Switching Users
Chances are you’re not the only person using your computer; it’s likely that you’ll be sharing your PC with your spouse and maybe even your grandkids. Fortunately, you can configure Windows so that different people using your computer sign on with their own custom settings—and access to their own personal files.
Understanding User Accounts
The best way for multiple people to use a single computer is to assign each person his or her own password-protected user account. For a given person to use the PC and access her own programs and files, she has to sign into the computer with her personal password. If a person doesn’t have an account or the proper password, she can’t use the computer.
Windows 8.1 lets you create two different types of user accounts—online and local. The default is the online account, which comes with some unique benefits.
Sign In Options
When you set up a new user account, you can choose from three different ways to sign into your PC. You can sign into your account with a traditional password, with a personal identification number (PIN), or with something new, called a picture password. Most of us will choose the traditional password option, as it’s easiest to set up and less confusing to use.
Microsoft Accounts
An online account is linked to a new or existing Microsoft Account, and lets you synchronize your account settings between multiple computers. That is, you can sign into another Windows 8.1 computer with your Microsoft Account and see the same Start screen, apps, and favorites you have on your home computer.
In addition, when you use a Microsoft Account on your computer, Windows displays information from other Microsoft sites you use. For example, Windows displays the latest weather conditions in the Weather app, the latest news headlines in the News app, and the latest stock quotes in the Stock app—all based on settings you make when you configure your Microsoft Account. Local accounts cannot access this personalized data.
The good news is that you might already have a Microsoft Account. If you use Outlook.com or Hotmail for email, you have a Microsoft Account. If you use the online version of Microsoft Office, or Microsoft’s SkyDrive online storage, you have a Microsoft Account. If you subscribe to the Xbox Live online gaming service (or, more likely, if your grandkids do), you have a Microsoft Account.
If you don’t yet have a Microsoft Account, it’s easy enough to create one while you’re setting up a new user account on your PC. It’s free, and doesn’t take much time.
Local Accounts
The second type of account is a local account exclusive to your current computer. This is the only type of account you could create in older versions of Windows. In Windows 8.1, you can still use local accounts, even though online accounts are more versatile.
The chief advantage of a local account is privacy. With an online account, all your activities are linked to a central account, which Microsoft stores and manages. With a local account, your offline activities are not transmitted back to Microsoft.
Unfortunately, local accounts cannot provide personalized information for many Windows 8.1 apps. If you want to take full advantage of the News, Weather, Sports, and Stock apps, for example, you don’t want to choose the local account option.
>>>Go Further: Value of Separate Accounts
When you get your PC set up just the way you like, you may be hesitant to let anybody else use it. This goes doubly so for your grandchildren; you love ‘em, but don’t want them to mess up your computer with their games and tweeting and whatnot.
This is where creating separate user accounts has value. Create a user account for each user of your PC—for you, your spouse, and each of your grandkids—and then make everybody sign in under their own personal accounts. Your grandkids can personalize their accounts however they want and there’s nothing they can break, and nothing they can change. The next time you sign in, everything should look just the way you left it—no matter who used your computer in the meantime.
Information Technology Services
- Home
- Services
- Forms
- All Forms
- E-Signature Forms
- Support
- ITS Help Desk
- Information Technology Consultants (ITCs)
- ServiceNow
- FAQs
- Maintenance
- About
- About ITS
- ITS Units
- IT Strategic Plan
- Contact ITS
- Quick Links
- MyCalStateLA ID
- MyCalStateLA Portal
- Office 365 Email
- GET
- HRM
- Canvas
- LinkedIn Learning
- Software for Personal Computers
- MyTools
- Zoom
- ServiceNow
- ITS on Facebook
- ITS on Twitter
- ITS on Instagram
- ITS on YouTube
- Home
- Services
- Forms
- All Forms
- E-Signature Forms
- Support
- ITS Help Desk
- Information Technology Consultants (ITCs)
- ServiceNow
- FAQs
- Maintenance
- About
- About ITS
- ITS Units
- IT Strategic Plan
- Contact ITS
- Quick Links
- MyCalStateLA ID
- MyCalStateLA Portal
- Office 365 Email
- GET
- HRM
- Canvas
- LinkedIn Learning
- Software for Personal Computers
- MyTools
- Zoom
- ServiceNow
Services
- Services
- Accounts and Passwords
- Classrooms
- Computer Labs
- Email and Calendar
- Help and Support
- IT Security and Guidelines
- Multimedia
- Network Access
- Phone and Voicemail
- Remote Access
- Software and Hardware
- Storage and Collaboration
- Training and Tutorials
- Web Development and Hosting
Support
- Call: 323-343-6170
- Email: [email protected]
- Visit: Library Palmer Wing Lobby
- Submit an IT Support Ticket
- Book an Appointment
- Contact Your ITC
You may need to turn off file sharing on Windows7 or setup new file sharing configurations. Those procedures are below.
Turn Off File Sharing
- From Start, clickControl Panel then clickNetwork and Sharing Center
- On the left panel, clickChange advanced sharing settings, then click the arrow on the right for Home or Work (making it current profile).
- Check the following settings:
- Network Discovery: Off
- File and Printer Sharing: Off
- Public Folder Sharing: Off
- File Sharing Connections: Use 128-bit encryption.
- ClickSave Changes.
Even with file sharing and public folder sharing turned off, you can still share folders but with limitations. The next procedures explain
Limit the Permissions for Shared Folders
- From Start, clickControl Panel then clickNetwork and Sharing Center
- On the left panel, clickChange advanced sharing settings, then click the arrow on the right for Home or Work (making it current profile).
- Under Public Folder SharingclickTurn on sharing so anyone with network access can read and write files in the Public Folders.
- ClickSave Changes.
- Request your ITC to set up accounts and passwords for shared folders.
Create a Shared Folder
With password protected sharing is on, access is limited to people who have a user account and password on the computer containing shared files, printers, or Public folders.
- Right-click the folder you want to share.
- SelectShare with then selectSpecific people.
- Click the arrow to select user names.
- ClickSave Changes.
- ClickShare (In the File Sharing box, you’ll see a list of all shared folders.)
- ClickDone.
Guest blog by Dhruba Jyoti Das , Parallels Support Team
Your home may be packed with more than one Mac plus other devices, but if you’re like a lot of other households, you have a central “family” Mac. This is the computer located in a high-traffic area such as the living room, kitchen, etc. Each family member has access to this Mac and uses it for everyday tasks like checking email, having a quick FaceTime chat with a friend or relative, accessing recipes, streaming music to AirPlay devices around the home, and looking things up on the Internet.
Although you can configure this Mac so that it has just a single account, you can make it more enjoyable for each family member to use (and easier for you to control) by creating separate user accounts. When you do that, everyone has a place to save their stuff, keep personal settings, etc.
If you have Parallels Desktop installed on this Mac, you might want to share your virtual machines with the other Mac user accounts. Today I’m going to shed some light on how this sharing process works.
You can share VMs in two different ways.
Method 1
Follow these steps if you want to create a new VM that is accessible from all the user accounts on your Mac:
Click on File → New → Select the type of VM you would like to install → Under Name & Location, check the option “Share with other users of this Mac”. Choose Proceed and follow the rest of the on-screen instructions. Yes, it’s that easy!
The new VM will automatically be created in the /Users/Shared/Parallels directory, and all necessary permissions will be granted to the other users of your Mac.
This VM can also be used by different Mac accounts sequentially. For example, if one user suspends the VM and logs out, the VM will be suspended for the next user, who will have to resume the VM to continue work.
Now, let’s discuss the other way to share a VM.
Method 2
You already have a VM installed, and now you’ve decided to share it with the rest of the user accounts on your Mac.
This process might seem a bit trickier, but it’s not that complex. Check out the steps below:
- Open the Parallels Desktop Control Center, right-click on your VM in the list, and choose “Open in Finder”.
- When the Finder window opens, you need to move the VM’s bundle (.pvm file) to the /Users/Shared/Parallels folder.
- Once the .pvm file is moved to the new location, your VM will appear to be unavailable in the Control Center (It will have a question mark on it). Right-click on it, select Locate, and choose the new path to your .pvm file we talked about above.
In order to give the other users access to the same VM, you need to set the correct permissions. You can choose the exact user accounts to share your VM with (in case you might not want to share it with all the users). To do that:
- Launch Terminal (Applications/Utilities/Terminal) and type in the following command:
- Now, to share the VM, enter the following command (don’t hit Enter yet!):
And drag and drop your VM’s .pvm file from Finder to the Terminal window. The whole command will look similar to this one:
Hit Return, enter your Mac account password when prompted, and press Enter again.
Note: Terminal will not display the actual symbols you’re typing. Just enter the password and hit Return.
- Now if you want to share your VM only with specific user accounts, you just need to execute a similar command in Terminal (wait, don’t hit Return right away):
Let’s say you want to share the VM with your brother, and his Mac user account name is “Rob.” In that case, the command would look like this:
Finally, drag and drop your .pvm file to the Terminal window and hit Return.
You will be asked to type the Mac password. Type it in and hit Return.
You can also create user accounts for Windows if you share a single VM with other people. Each person will have their own Windows account and customize their accounts with their own settings and preferences. To do this, just follow this Microsoft knowledge base article.
We hope you enjoyed this post on sharing your VM with other Mac users. If you find these tips helpful, please share the post with your friends and don’t forget to follow the Parallels Support team on Twitter !
Try Parallels Desktop for free for 14 days!
Ashish Mundhra
29 Sep 2012
Few days back, I discussed how you can manage multiple profiles in Microsoft Office 2013 to integrate SkyDrive and other online services individually to both the accounts. After using the feature for a while it struck me that I haven’t yet talked about adding new user accounts (or profiles) in Windows 8 yet. And that’s how this post happened.
One can use multiple user accounts in Windows 8 for various reasons reasons, like online family safety, multiple users of the computer etc. One of them I was looking for was the ability to use distinct set of Modern Apps and related settings on Windows. So let’s see how we can add and manage multiple accounts in Windows 8
Adding an account
Step 1: We will have to open Windows 8 Modern settings to configure the additional account. Press the Windows+I button to open Charm Settings and click on the option Change PC Settings to open Windows 8 Modern Settings.
Step 2: In Windows 8 Modern Settings, click on the option Users and select the option Add a user located at the bottom.
Step 3: Windows 8 will start the new user creation wizard and will ask you to provide an email address to create a new online Microsoft account for the new user. If you don’t want to go for an online account click on the option Sign in without an email address and continue.
Step 4: If you go for an online account you will have to provide your email address, security questions and other important details like address, date of birth, etc. Local account does not require much of these details and takes just a few minutes to complete the process.
Managing the account
Step 5: After the account is added successfully, you will be able to view it in the User menu. However, you will not be able to configure any of its settings. You will have to log in to the account and enable it. Later you can change the settings from the account itself.
Step 6: To change the user account, open Start Screen and click on the user thumbnail on the top-right corner of the screen and select the user you would like to switch to. Using this option, none of the programs running in the current user will be killed. If you want to end the session before the switch, select the Sign out option.
You can now configure the additional accounts and use it in parallel with your first account. If you have made a Local Account which you would like to change to online account, you can do it from User settings itself.
Conclusion
So that was how you can add multiple user accounts in Windows 8. I use the feature to draw a line between my personal life and professional life. I keep the office profile clean and simple and install apps just to test them. My personal profile on the other hand is my playground where I keep the apps I use for leisure.
Last updated on 8 Feb, 2018
The above article may contain affiliate links which help support Guiding Tech. However, it does not affect our editorial integrity. The content remains unbiased and authentic.
Read Next
Top 7 Ways to Fix the Left Click Mouse Button Not Working on Windows 10
Has your left click # mouse button suddenly stopped working? Here are seven solutions to left click mouse button not working on # Windows 10.
Top 3 Ways to Fix Windows 10 Guest Account Not Appearing on Login Screen
Here are two ways to enable the default guest user account on # Windows 10 and one way to create a new one from scratch using the Command Prompt.
How to Check Screen Time on Different Devices
Mobile devices are central to most people’s lives, but they can also keep you from being productive. Learn how to check screen time on the devices you use.
5 Best Ways to Fix Disk Management Not Loading on Windows 10
Are you experiencing issues when loading disk management? Here’s how you can fix it.
How to Get File Manager Functionality On Your iOS Device With These 7 Apps
Even though # iOS as a platform is beautiful and functional, one common complain is the lack of a file manager. We explore several apps that can do just that.
Microsoft to Boost User Privacy and Give them Control too
The new web-based # privacy dashboard allows users to control their activity data including location, search, browsing and interaction with Cortana.
Manage Multiple Online Backup Accounts (Dropbox, SkyDrive) in Windows 8 Modern UI
Learn How to Manage Multiple Online Backup Accounts (Dropbox, SkyDrive) in # Windows 8 Modern UI Using an App. It Also Lets You Add Multiple # Dropbox Accounts.
How to Manage Family Safety Settings for Windows 8 Online
Here’s How to Manage Family Safety Settings and # Parental Controls for # Windows 8 Online.
Did You Know
Notion, the productivity app, was founded in 2013.
A Microsoft Windows user profile describes the Windows configuration for a specific user, including the user’s environment and preference settings relating to installed applications, desktop icons, and color options. The profile is built in part from System Policy information (e.g., things that a user has access to and things that the user can and cannot change), and in part from permitted, saved changes that a user makes to customize the desktop.
If you have administrative privileges, you can copy one user profile to another; follow the steps below for your operating system.
Note: As copying one profile to another will completely overwrite the target profile, you should back up any important data before copying over a profile. It’s also a good idea to test these steps on a test profile before copying over a profile in use.
Windows 8, 7, and Vista
- In Windows 8, from the Desktop, press Win-c , and choose Settings and then Control Panel .
In Windows 7 and Vista, from the Start menu, click Control Panel .
Windows XP
Note: If this doesn’t match what you see, refer to Get around in Windows.
Windows XP default desktop view and Start menu are different from the Windows Classic View (e.g., in Windows 2000 ). Therefore, navigating to certain items can be different. In the interest of broad applicability, most Knowledge Base instructions assume you are using Classic View. For details about switching views, see
- From the Start menu, select Settings , and then Control Panel . Double-click System .
- Click the Advanced tab, and then, under “User Profiles”, click Settings .
- Click the profile you want to copy, and then click Copy to .
- In the Copy To dialog box, click Browse to select the directory to which you want to copy the profile. This will usually be C:\winnt\profiles\username or C:\Documents and Settings\username , where username is the username of the profile to which you are copying. When you’ve selected the directory, click OK .
- Under “Permitted to Use”, click Change .
- In the field labeled “Enter the object name to select:”, enter the username of the user who needs to have rights to view this profile. Click Check Names to make sure that the user is found. If the user is not found, you may need to click Locations. to select the correct domain (or, if it is a local account, to select the computer name), and then click OK .
- Click OK twice.
- If you are prompted to continue, click Yes . Allow a minute for the system to copy the profile.
- In the User Profiles window, click OK , and then click OK again in the System Properties window.
This is document aidk in the Knowledge Base.
Last modified on 2018-01-18 12:33:22 .
Terry has just bought a laptop running Microsoft Windows 10, and wants to know how to move his photos and data to the new machine
In general, it’s better to re-install programs from scratch, using original media and any product keys required. Photograph: Alamy Stock Photo
In general, it’s better to re-install programs from scratch, using original media and any product keys required. Photograph: Alamy Stock Photo
Last modified on Tue 21 Feb 2017 17.49 GMT
I have just bought a new HP laptop running Windows 10. How can I get my pictures, applications, tax returns etc off the old one and onto the new laptop in the right places? Terry
The answer to this question used to be a free Microsoft utility called Windows Easy Transfer (WET), which was first supplied with Windows Vista. However, when Microsoft released Windows 8, it did a deal with Laplink to provide a free version of its PCmover program instead. Earlier this month, it announced a similar deal for home users of Windows 10.
So, you can now download a version of PCmover Express either via Microsoft’s web page (Move your files, folders, and more, for free) or from Laplink. It’s not hard, but I recommend reading the 19-page illustrated user guide (PDF) before you start.
This “limited time offer” does not apply to business users, who are, I guess, identifiable because their PCs are connected to domains. Commercial users can buy the program for a discounted price of $19.95 or £13.95. Multi-license packs are available.
Alternatives to PCmover
EaseUS has also entered the market with an alternative Windows 10 Easy Transfer Tool, which is also a free download for home users. I haven’t used it, but I have previously recommended EaseUS’s free backup and partition management utilities. (Yes, you should do a backup before you upgrade to Windows 10.)
EaseUS also offers System GoBack Free “to downgrade Windows 10 to Windows 7/8/8.1”. This could be a good idea. The Windows 10 upgrade allows you to go back to your old operating system in a few minutes (go to Settings, Update & Security, and select Recovery), but this relies on a “windows.old” folder that will be deleted after 30 days to save disk space.
Zinstall Easy Transfer is a commercial program that does the same thing for $59. It comes with support, which can be expensive, and a money-back guarantee if you run into a technical problem that the company cannot solve.
For completeness, you can still use Windows Easy Transfer, which may appeal if you’ve used it several times before. A user called champlagne has explained the process on Microsoft’s Answers website. The basic idea is to move the WET files wdscore.dll and MigAutoPlay.exe along with the data migration file.
In theory, you can do the transfer via a cable, a network connection, or DVD or CD-ROM discs, but I recommend using an external USB hard drive. It’s generally the most reliable approach, and means you have a separate backup of your data.
Moving applications
All the easy transfer utilities move personal data and files, not applications. That’s much harder to do. In general, it’s better to re-install programs from scratch, using original media and any product keys required. If you have downloaded programs from the web – including browsers and email programs such as Windows Live Mail – it’s better to redownload the latest versions and do a clean installation. If you have downloaded any apps from the Windows Store, you can easily re-install them by going to My Apps.
However, there are commercial utilities that will move programs from one Windows PC to another. The leading example is Laplink’s PCmover Professional, which costs $29.95 or £20.95 (half price offer). Another is Zinstall’s WinWin ($119). However, EaseUS offers a free version of Todo PCTrans Free 8.0, which will transfer two applications. The unlimited version, Todo PCTrans Professional, costs $49.95. See Transfer data, software and applications to Windows 10.
If all else fails, you may need to go back to your old PC, run the appropriate program, and File/Export the missing data to an external hard drive. You can then connect this to your new PC, and import the data into the program, or its new replacement. This may well include browser bookmarks and passwords. Also, double-check that any offline email files have been copied across.
This is less of a problem than it used to be now that people are using more cloud-based programs and syncing services, and as Windows itself becomes a cloud-based operating system. Nowadays, when I set up a new PC, I just sign in with my Microsoft (outlook.com) account and pick whichever older PC I want it set up like. Windows then installs all the apps, settings and wallpaper for me.
It may also be important to “de-activate” some programs that you have installed on a new PC. This applies to Microsoft Office and Office 365, Adobe Creative Suite, and Apple iTunes, among others.
Active vs permanent data
When setting up a new PC, think about which files you need on a day-to-day basis and which ones could be stored elsewhere. If you’re moving from a PC with a 500GB or terabyte hard drive to one with a 64GB SSD (solid-state drive) or 32GB eMMC Flash drive, you may be forced to think about it.
If you are a typical user, then you’re actively using a relatively small number of documents, spreadsheets, recent photographs and so on. You can probably upload all of them to the OneDrive account that is integrated into Windows 8/8.1/10. OneDrive provides 15GB of free online storage, and – unlike Google Drive – this is separate from your email storage. Of course, you can also use free storage at Dropbox, Flickr, Amazon and other sites.
You may also have a large collection of unchanging media files – photos, music and movies – and old documents that could be stored safely on an external hard drive, a PC server, or a NAS (network-attached storage) device. If you use a PC server or NAS, the files can be shared with multiple PCs and mobile phones.
It takes a very long time to move gigabytes of media with an easy transfer program, and I don’t see the point. For example, I have all my music files in one big, hierarchical directory on an external hard drive, backed up to a second external hard drive. (FreeFileSync on my desktop PC keeps them in sync.) I never copy them from one laptop to another. Instead, I just load any albums I currently want to have as local files – a different selection each time – via network shares.
In fact, we’re just getting to the point where many people could use SD and microSD cards to move data around in bulk. Today, 32GB cards are cheap, 64GB cards are affordable, and larger sizes not out of reach. You can fit 200 to 300 albums on a £10 32GB microSD card and move it between various laptops and mobile phones. However, this is not archival storage, and you should have backup copies on an external hard drive and (if possible) online as well.
Have you got another question for Jack? Email it to [email protected]
This article contains affiliate links, which means we may earn a small commission if a reader clicks through and makes a purchase. All our journalism is independent and is in no way influenced by any advertiser or commercial initiative. By clicking on an affiliate link, you accept that third-party cookies will be set. More information.
You can use the same settings on all your Windows 10 devices or keep each one unique.
Do you own more than one Windows 10 device? If so, you can keep your settings the same on each device or make them distinct.
Either way, Windows 10 offers a way to keep your devices in sync if you wish. You can sync your desktop theme, your web browser settings, certain passwords, your language preferences, and more. Syncing not only ensures that your settings are the same on each PC or tablet but also backs them up so you don’t lose them if one device goes bad. Let’s look at the different settings you can sync and how to sync them.
First, you’ll need to use the same Microsoft account to log into each Windows 10 device that you wish to sync. If you don’t already have a Microsoft account, you can create one at the bottom of this Microsoft account page. Then make sure you log into Windows 10 using your new account.
Click on the Start button > Settings > Accounts > Sync your settings. By default, the option to Sync settings is turned on, but you can turn it off completely or turn it off selectively for each setting. Let’s keep all the settings turned on at this point and go through each one so you can determine which ones you want to sync and which ones you don’t.
- The first setting is Theme. Your theme consists of a desktop background image, display color, sound, and screen saver. The idea here is that instead of selecting individual backgrounds, colors, sounds, and a screen saver, you pick a single theme that incorporates all those element in one shot. To view and apply a theme, click on the Start button > Settings > Personalization > Themes > Theme Settings. You can apply an existing theme from the ones built into Windows 10 or download other themes from Microsoft’s Desktop Themes website.
- The second option is Internet Explorer settings, which syncs your favorites, history list, and other content from the IE browser.
- The Passwords setting syncs credentials from certain websites and Windows apps.
- The fourth setting, for Language Preferences, applies to the spelling dictionary and other settings for the language or languages you use in Windows.
- The fifth setting, for Ease of Access, applies to all the options in the Ease of Access area, which you can see via the Start button > Settings > Ease of Access. From there, you can enable a variety of features designed for people with certain disabilities or limitations. The Narrator can read aloud to you text on the screen, while the Magnifier can zoom into text on the screen to make it easier to read.
- The sixth setting, for Other Windows Settings, sounds vague, but it covers options like list of installed apps, connected printers, and the size and color of your mouse cursor.
A user account is a collection of info and settings that you use to interact with your PC and personalize Windows to work the way you want. With user accounts, several people can easily share a single PC. Each person can have a separate account with their own settings and preferences, like a desktop background or screen saver. User accounts also help control which files and apps each person can access and what changes they can make to the PC.
This tutorial will show you how to create and add a new Microsoft account or local account in Windows 8, Windows RT, Windows 8.1, and Windows RT 8.1.
You must be signed in as an administrator to be able to create a new user account in Windows 8.
You can create two kinds of accounts: a local account for this PC only, or a Microsoft account, which works on all the PCs running Windows 8 that you use.
- Microsoft account is the new name for what used to be called a “Windows Live ID.”
- Your Microsoft account is the combination of an email address and a password that you use to sign in to Windows 8 or services like Hotmail, Messenger/Skype, OneDrive, Windows Phone, Xbox LIVE, Zune, Office Live, and Outlook.com. If you use an email address and password to sign in to these or other services, you already have a Microsoft account—but you can also sign up for a new one at any time.
- When you sign in with a Microsoft account, your PC is connected to the cloud.
- Your friends’ contact info and statuses are automatically up to date from your Hotmail, Facebook, Twitter, LinkedIn, and other accounts.
- You can get to and share your photos, documents, and other files from SkyDrive, Facebook, Flickr, and other accounts without signing in to each one.
- Your personal settings are synced to any PC running Windows 8 that you sign in to, including your themes, language preferences, browser favorites, and apps.
- You can get apps in the Windows Store and use them on any PC running Windows 8 that you sign in to.
- Easily reacquire your Metro style apps on multiple Windows 8 PCs. The app’s settings and last-used state persist across all your Windows 8 PCs.
- You can associate the most commonly used Windows settings to your user account. In this way, the saved settings are available when you sign in to your account on any Windows 8 PC. So your PC will be set up just the way you are used to.
- You can also save time with sign-in credentials, because now the same credentials are available for the different apps and websites you use and you can easily get back into them without having to enter credentials every time.
- You can automatically sign in to apps and services that use Windows Live ID for authentication.
Local account:
- You use a user name (and password if you want one) to sign in to Windows 8 like you did in previous editions of Windows.
- A local user account gives you access to only the PC it’s on. You will need a separate user account created on each PC you use.
- None of your settings will be synced between the PCs you use, and you won’t get the benefits of connecting your PC to the cloud.
When you add new user accounts to your PC, they will be standard accounts by default. You will need to change the account type after creating the new account if you would like it to be a different type instead of “standard”.
There’s no more Share charm, but there is a Share button in File Explorer.
Here’s the scene: You’re browsing through your photos in File Explorer, when you see an adorable picture of your dog that you absolutely must upload to Facebook right now.
If you’re using Windows 8, you can swipe open the Charms bar and click the Share charm. But if you’re using Windows 10, you can share directly from the File Explorer with the new Share button.
Here’s how to share files (including photos, documents and videos) in Windows 10:
Step 1: Find the file you want to share
Open up the File Explorer and navigate to the file or files you want to share. You can share any file type, although you cannot share any file type with any app. (For example, you can’t share DLL files to Facebook — I tried). Select the file you want to share by clicking on it.
Step 2: Open the Sharing menu
While there is a one-click Share button in the File Explorer, it’s actually hidden inside the Sharing menu. Click Share to open up the sharing menu. Depending on what type of file you have selected, different options in the Sharing menu will be available to you. For example, if you’ve selected a folder, and not a file, the Share button will be grayed out and the Zip button will be available. From the Sharing menu, you can also zip, burn, print and fax files, as well as modify network sharing options.
Step 3: Click the Share button
The Share button has the same three-dot-circle icon as the Windows 8 Share charm. Click the Share button to open up the Share sidebar.
Step 4: Choose the program you want to share with
In the Share sidebar, you’ll see a list of apps you can share your file with. Again, depending on the file type you’re trying to share, some apps may not show up. Facebook and Twitter will not show up if you’re trying to share a zipped folder, but Mail will.
Share directly to Facebook from the File Explorer. Screenshot by Sarah Jacobsson Purewal/CNET
Step 5: Configure your Sharing options
By default, the Share sidebar shows the apps you share with most often — to change this and other Sharing options, go to the Settings menu, click on System, and open the Share tab. Here you can toggle the frequently used apps list on and off, choose how many items appear in that list, and turn sharing on and off altogether for certain apps.
Here are some basic differences between two OverDrive apps that are available for Windows.
OverDrive for Windows 8/10
This version of the OverDrive app supports ebooks, audiobooks, and videos and requires a Windows 8 or 10 computer or tablet. You can install it from the Windows Store like other apps.
OverDrive for Windows 8/10 is a complete library experience that allows you to find your library, browse its collection, borrow titles, and enjoy them in the app.
- Ebooks
- Audiobooks
- Streaming videos
OverDrive for Windows (desktop)
The legacy OverDrive app for desktop only supports audiobooks and requires a Windows 7, 8, or 10 computer or tablet. You can install it from
To use OverDrive for Windows (desktop), you’ll need to find your library and borrow an audiobook in your web browser first. Then, once you download the audiobook, it’ll open in this app.
- Transfer audiobooks to MP3 players (including Apple devices)
- Burn audiobooks to CD (with publisher permission)
Can I install both versions?
Yes, if you’re using a Windows 8 or 10 device.
If you have both apps installed, you can find and borrow titles, read ebooks, listen to audiobooks, and watch streaming videos in the Windows 8/10 app, and you can use the desktop app to transfer and burn audiobooks.
A user account is a collection of info and settings that you use to interact with your PC and personalize Windows to work the way you want. With user accounts, several people can easily share a single PC. Each person can have a separate account with their own settings and preferences, like a desktop background or screen saver. User accounts also help control which files and apps each person can access and what changes they can make to the PC.
This tutorial will show you how to create and add a new Microsoft account or local account in Windows 8, Windows RT, Windows 8.1, and Windows RT 8.1.
You must be signed in as an administrator to be able to create a new user account in Windows 8.
You can create two kinds of accounts: a local account for this PC only, or a Microsoft account, which works on all the PCs running Windows 8 that you use.
- Microsoft account is the new name for what used to be called a “Windows Live ID.”
- Your Microsoft account is the combination of an email address and a password that you use to sign in to Windows 8 or services like Hotmail, Messenger/Skype, OneDrive, Windows Phone, Xbox LIVE, Zune, Office Live, and Outlook.com. If you use an email address and password to sign in to these or other services, you already have a Microsoft account—but you can also sign up for a new one at any time.
- When you sign in with a Microsoft account, your PC is connected to the cloud.
- Your friends’ contact info and statuses are automatically up to date from your Hotmail, Facebook, Twitter, LinkedIn, and other accounts.
- You can get to and share your photos, documents, and other files from SkyDrive, Facebook, Flickr, and other accounts without signing in to each one.
- Your personal settings are synced to any PC running Windows 8 that you sign in to, including your themes, language preferences, browser favorites, and apps.
- You can get apps in the Windows Store and use them on any PC running Windows 8 that you sign in to.
- Easily reacquire your Metro style apps on multiple Windows 8 PCs. The app’s settings and last-used state persist across all your Windows 8 PCs.
- You can associate the most commonly used Windows settings to your user account. In this way, the saved settings are available when you sign in to your account on any Windows 8 PC. So your PC will be set up just the way you are used to.
- You can also save time with sign-in credentials, because now the same credentials are available for the different apps and websites you use and you can easily get back into them without having to enter credentials every time.
- You can automatically sign in to apps and services that use Windows Live ID for authentication.
Local account:
- You use a user name (and password if you want one) to sign in to Windows 8 like you did in previous editions of Windows.
- A local user account gives you access to only the PC it’s on. You will need a separate user account created on each PC you use.
- None of your settings will be synced between the PCs you use, and you won’t get the benefits of connecting your PC to the cloud.
When you add new user accounts to your PC, they will be standard accounts by default. You will need to change the account type after creating the new account if you would like it to be a different type instead of “standard”.
- Date: 10/20/2020
- ID: faqp00100003_000
Share your printer in Windows 10/Windows 8/Windows 8.1 (Shared printer)
Follow the instructions below to share your printer.
Screens may differ slightly depending on the version of your OS.
STEP 1: Server PC Settings
- Install the printer driver. (The latest printer driver is available in the [Downloads] section of this website.)
- Open the printer folder. (To learn how to open the printer folder, see “How to open the Devices and Printers window.”)
- Right-click Brother XXXXXX (your model name) and then click Printer properties.
- Open the Sharing tab and check Share this printer. (If you see the Change Sharing Options button, click on it.)
- Click OK.
STEP 2: Client PC Settings
- Open the Control Panel.
- Click Network and Internet. (Windows 10/Windows 8/Windows 8.1 only)
- Click Network and Sharing Center.
- Click Change advanced sharing settings.
- Check Turn on network discovery and Turn on file and printer sharing, click Save changes.
- Open the Control Panel.
- Click Hardware and Sound (Windows 10/Windows 8/Windows 8.1 only) =>Devices and Printers.
- Click Add a printer.
- Choose a printer and click Next.
(If you cannot find the printer you want, click here.) - If the warning message appears, click Install driver.
- Click Next.
- Click Finish.
If you cannot find the printer you want, it’s possible that there is some problem in the network connection. We recommend you run the Ping command in Command Prompt.
- Windows 10:
Right-click the start button and then select Command Prompt.
Windows 8/Windows 8.1:
On the Start screen, click . If is not on the Start screen, right-click somewhere on an empty spot, and then click, All Apps from the bar.
If you confirm that there is no problem in the network connection, try the following:
- Click The printer that I want isn’t listed.
- Choose Select a shared printer by name and enter \\[server PC name]\[server printer name].
- Click Next.
- If the warning message appears, click Install driver.
- Click Next.
- Click Finish.
Follow the steps below to check the Computer name.
- Open the Control Panel.
- Click System and Security (Windows 10/Windows 8/Windows 8.1 only) =>System.
- Click Advanced system settings.
- Click Computer Name tab and check the computer name.


