Chris HoffmanChris Hoffman
Editor-in-Chief
Chris Hoffman is Editor-in-Chief of How-To Geek. He’s written about technology for over a decade and was a PCWorld columnist for two years. Chris has written for The New York Times, been interviewed as a technology expert on TV stations like Miami’s NBC 6, and had his work covered by news outlets like the BBC. Since 2011, Chris has written over 2,000 articles that have been read nearly one billion times—and that’s just here at How-To Geek. Read more.
Windows automatically suspends your USB devices when they aren’t being used. This helps save power, but may cause problems with some USB hardware. Your USB devices will use more power if you disable this feature, but it can fix peripherals that stop working properly after Windows suspends them.
You should only change this setting if you’re having problems with a USB device in Windows. If your USB peripherals work properly, there’s no reason to disable USB suspension.
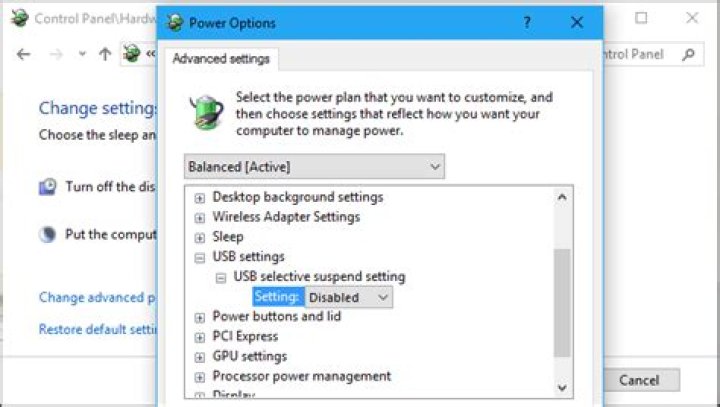
This setting is part of the power plan options on Windows. Whether you’re using Windows 7, 8, or 10, you’ll need to change it from the Control Panel’s power plan window.
Head to Control Panel > Hardware and Sound > Power Options to find these settings.
Click “Change Plan Settings” to the right of the power plan you’re using. Windows uses the Balanced plan by default, and you probably don’t need to change power plans. But, if you are regularly changing power plans, you’ll need to modify this setting for each power plan you use.
Click the “Change advanced power settings” link here to open the advanced settings window.
Scroll down and locate the “USB settings” option in the list of advanced power settings. Expand this section and set “USB selective suspend setting” to “Disabled”.
Click “OK” to save your settings. From now on, Windows won’t automatically suspend any connected USB devices.
If you want to change back to the default settings and have Windows suspend USB devices to save power in the future, just return to this window and set the “USB selective suspend setting” option back to “Enabled”.
- › What Is a ULED TV, and How Is It Different?
- › Why Professionals Will Actually Want a 2021 MacBook Pro
- › How to Add Images to Questions in Google Forms
- › How to Delete Your Photos on Facebook
- › Razer Thinks You Want a PC Gaming Headset That Vibrates
Chris Hoffman
Chris Hoffman is Editor-in-Chief of How-To Geek. He’s written about technology for over a decade and was a PCWorld columnist for two years. Chris has written for The New York Times, been interviewed as a technology expert on TV stations like Miami’s NBC 6, and had his work covered by news outlets like the BBC. Since 2011, Chris has written over 2,000 articles that have been read nearly one billion times—and that’s just here at How-To Geek.
Read Full Bio »
Windows 10 includes the USB selective suspend feature that lets you automatically put USB devices in a very low-power state when they’re not actively in use. It’s an important feature because it helps prolong battery life on your laptop or tablet, but it may also cause problems with certain peripherals connected to your PC.
If a USB device isn’t working correctly, you can try to disable selective suspend on Windows 10. That may cause your computer to draw more power, but it may help to identify and fix the problem as well.
In this Windows 10 guide, we walk you through the steps to prevent the OS from suspending USB devices by changing the power options in the Control Panel.
How to disable USB selective suspend
If you’re having connectivity issues with USB peripherals on Windows 10, use these steps to disable the USB selective suspend feature.
Important: It’s only recommended that you change this particular setting when you’re experiencing problems with a USB device. Otherwise, you should leave the option enabled.
- Open Control Panel.
- Click on Hardware and Sound.
- Click on Power Options.
Under “Preferred plan,” click the Change plan settings link for the plan you’re currently using. (If you change the settings on the power plan that isn’t active, this won’t work.)
Click the Change advanced power settings link.
Select Disabled from the drop-down menu.
If you’re changing the settings on a laptop or tablet, you’ll see two options: On Battery and Plugged in, so make sure to change those settings accordingly.
Once you complete these steps, Windows 10 will no longer power off USB devices connected to your computer, which can fix any problem you may have as a result of this feature.
While this guide focuses on Windows 10, USB selective suspend has been around for a long time, and you can use the same steps on machines running Windows 8.1 and Windows 7.
More Windows 10 resources
For more help articles, coverage, and answers to common questions about Windows 10, visit the following resources:
Here’s everything announced during Minecraft Live 2021
Minecraft Live 2021 just concluded, and featured all the biggest announcements and updates of the year for Mojang Studios and the Minecraft universe. Here’s everything that was announced during Minecraft Live 2021.
Here’s everything we know about ‘The Wild Update’ for Minecraft
The next major update for Minecraft, slated for release in 2022, is ‘The Wild Update.’ This release will focus on the Overworld and survival in Minecraft, as well as adding the Deep Dark biome far underground. Here’s everything we know about ‘The Wild Update’ for Minecraft, including what to expect and when to expect it.
Minecraft Dungeons adds Seasonal Adventures starting with The Cloudy Climb
Minecraft Dungeons heads into the clouds with the all-new Cloudy Climb update, which is the first of many planned Seasonal Adventures for the Diablo-like dungeon crawler.
The NFL is back! Check out these must-have Windows apps for football fans
After months of waiting through the offseason, the NFL is finally back this week. With these Windows 10 apps, you won’t miss a snap of the NFL action.
USB devices still draw power from your laptop, even in sleep mode. Here’s how to change that.
I use my laptop pretty much like a desktop recording studio. It sits in my basement with all manner of USB devices plugged into it, including a USB audio interface, a USB midi controller, and a USB hub that has my mouse plugged into it. One thing that really bugs me about this setup is that all these USB devices remain powered on when I put my laptop to sleep. Realistically, this isn’t a big deal.
How Much Energy?
The amount of electricity it’s using is probably minimal. But it gives me the anxiety to see that USB audio interface with its flashing light, indicating that it’s powered-on but can’t connect to my computer. If this laptop were somewhere other than my basement—say in the family room or a dorm room—I can see how a tabletop full of dumb flashing USB devices could be even more annoying.
Short of shutting down my computer entirely each time I leave the room or unplugging the USB devices, I hadn’t been able to find a fix for this. Keeping USB ports powered while a computer is in sleep mode is the intended Windows 10 behavior.
Long story short, what fixed my problem with the USB devices staying powered was setting up my laptop to hibernate instead of sleep. Not a perfect solution, but it works for me. Read on for more details.
How to Power Off USB Ports when Laptop is in Hibernate
First, let me go over a few things that did not work for me. Several Windows 10 settings seem to relate to how USB ports are powered and when they all ended up being dead ends for me.
In the Advanced Power Options menu, there’s an option that lets you enable or disable USB selective suspend. This option lets your computer put USB ports into a low power state during sleep rather than turning them off completely. Unfortunately, enabling or disabling this feature did not affect me.
In Device Manager, if you go into the properties of a USB device, there’s a Power Management tab with an option that says, “Allow the computer to turn off this device to save power.” It seems promising, but again, changing this setting didn’t help my cause.
I saw some suggestions in forums and Q&A sites about fiddling with BIOS settings, but I wasn’t about to do that (I also heard it doesn’t work).
In the end, what did the trick was changing my laptop’s behavior, so I go into hibernate mode rather than sleep mode when I close the lid.
“But wait,” you might say. “There is no hibernate mode in Windows 10!”
Now, when I close my laptop lid and walk away, all the lights go out on my USB devices. Much better.
Of course, there are some pros and cons of sleep vs. hibernate. But for me, the only pro I care about is getting rid of those annoying, blinking lights.
Do you use sleep or hibernate in Windows 10? Tell me why in the comments.
By Aunindita Bhatia – May 4, 2016 – 1 comment Email article | Print article
Even when there are a lot of power outlets available to keep charging your USB devices, many people have a tendency to charge their USB devices by connecting them to the computer when it is off. Have you ever wondered if it is possible to keep charging your USB devices while your PC is off? Well yes, there is an option for that. Through a little bit of tweaking in Windows’ settings, you can keep charging your USB devices when your PC is off.
What is a USB Port?
USB means Universal Serial Bus. It is a standard cable connection that supports data transfer up to 12Mbps. In a computer, usually there are multiple USB ports and you can connect your USB devices to these ports. A USB cable is used to connect the device to the computer. Devices such as digital cameras, Smartphones, web cameras and external hard drives can be connected to the computer through a USB port. We also use USB ports to connect a mouse and keyboard. Through USB ports, it is easy to charge devices like your Smartphone. The main problem here is that when your system shuts down, charging also stops. By simply tweaking the Windows settings however, you can easily keep charging your USB devices while your PC is off.
Advantages of USB Ports
- High Speed: USB ports run at 12Mbps.
- Multiple Devices: Through a USB port, we can connect multiple devices such as digital cameras, keyboard, mouse, web camera, mobile phone and even laptops for charging.
- Plug and Play: USB ports work on the plug and play principle.
- Hot-swappable: You can connect or remove a USB when your system is working without any issues.
Steps to Tweak Windows to Keep Charging Your USB Devices While Your PC Is Off
Before you tweak anything in Windows Settings to keep charging your USB devices, you need to ensure that when your computer is off, no charge is coming to the USB port. Now, go to “Device Manager” to change the settings. To select Device Manager, you have to go to start and select “Control Panel” and click on “Hardware and Sound” and then click “Device Manager.” From the Device Manager, you have to select the option “Universal Serial Bus Controllers.” Expand the option and look for the option “USB Root HUB (xHCI).” Depending upon the number of USB ports available in your system, you can see one or many “USB Root HUB.” Now select a “USB Root HUB” and right click on it and choose “Properties” and “Power Management” tab. There, you have to uncheck the option “Allow the computer to turn off this device to save power.” Now click on the OK button.
After un-checking the option “Allow the computer to turn off this device to save power,” you can keep charging your USB devices even if your PC is turned off. It is recommended that you don’t change the settings of all the USB ports. Instead, change the settings of only those that are going to be used for charging.
Thus, with a simple tweak in Windows’ settings, you can keep charging your USB devices even if your PC is turned off.
If you have been using the Windows operating system for a while, you might be well aware of a specific sound that comes out while connecting and disconnecting hardware devices. Hardware devices could be anything like a USB device, SD cards, Cameras, Phones, etc.
The connect/disconnect noise is essential for the USB device because it lets users know that Windows has detected external hardware. However, things become spooky when you hear the USB jingles happening for no apparent reason.
We are talking about this issue because recently, we received multiple messages from our users claiming that the computer is making Random USB Connect/Disconnect Noises. What’s interesting is that the USB connect/disconnect noise appears for no apparent reason.
Steps to Stop Random USB Connect/Disconnect Noises in Windows
So, if you are also dealing with the same issue, you have landed on the right web page. This article will discuss a few best methods that could help you stop Random USB Connect/Disconnect Noises from a Windows computer. So, let’s check out the few best methods to fix the issue.
Reconnect the USB Devices
The first thing you should do to stop random USB connection sound is to reinsert the USB devices. Next, you need to remove all USB devices, including the External HDD/SSD, PenDrive, etc.
Once removed, reconnect them to the computer. Sometimes, a simple disconnect and reconnect fixes drivers & installation problems. So, before trying any other method, make sure to reattach all the USB devices.
Device Manager
Whenever you connect a USB device, if any sound or the noise starts to jingle without any reason, this could be the reason for enabling and continuous disabling of a particular device driver.
For that, head to the device manager and then scroll down to the bottom of the window. To open Device Manager, open the Start menu and search for Device Manager. Next, open Device Manager from the list.
On the Device Manager, you need to check the USB Devices for errors. If any USB device is problematic, it will have a yellow exclamation mark behind it.
Don’t forget to see the hidden files, too. Notice that if any driver file is showing an error, this could cause the sound. If you have managed to find any drive, then update that particular driver or uninstall it.
USBDeview
For those who don’t know, USB Device is third-party software widely used to track USB devices more accurately. In addition, the tool is capable enough to tell you about the possible problems which rely on the USB.
This tool will help you track whether or not the USB devices are connected when their drivers were created and the last time the USB devices were plugged in or out of your PC. So, it’s one of the best tools to fix Windows Making Random USB Connect/Disconnect Noises.
Once installed, you will be able to see a list of all USB devices that were currently and previously connected to your PC. You need to check for the ‘Last Plug/Unplug’ date column to find the culprit device.
Once found, you need to uninstall the device from the USBDeview and then unplug your device. Once done, plug it back in, and it will reinstall the driver.
Turn Off USB Notification Sounds
Well, most of the time, those random USB Connect/Disconnect noises are the result of driver clashes or lapses in the device’s power. So, it isn’t a sign of anything severe. So, if any particular device or its drivers are responsible for the sounds, you can disable the USB notification sounds.
To disable USB Notification Sounds, right-click on the Speaker and then click on Sounds. Under the Sounds, click on ‘Program Events’ and select ‘Device Connect.’ Now under the Sounds, you need to select ‘None.’
Similarly, you need to do the same thing for ‘Device Disconnect’ as well. This will disable all USB Notification Sounds on your Windows computer.
So, this is all about how to stop Random USB Connect/Disconnect Noises in Windows computers. I hope this article helped you! Please share it with your friends also. If you have any doubts related to this, let us know in the comment box below.
Windows 10 has a neat feature called power management. Power management is for the various hardware components on your computer. Hardware consumes power and Power management allows them to turn off or run in a low power state. The keyboard and mouse are one example of hardware that’s powered down, but hard disks are also powered down when they aren’t in use. It’s a useful feature but if you need to disable power management for whatever reason, you can. Here’s how.
Disable power management for devices
You can disable power management for devices from the Power Options screen. The quickest way to get to it is to open File Explorer and enter the following in the location bar.
Here, you will see all the power plans that you’ve configured on your system. Power management is disabled on a per-power-plan basis. Click ‘Change plan settings’ for the power plan you want to disable power management on. On the next screen, click ‘Change advanced power settings’.
In the window that opens, you’re going to have to go through several different settings to disable power management for devices. There isn’t a single switch that will do the job. Instead, you can choose on a per-device basis, which device to disable power management for.
The options you see in this window will differ based on the hardware that is installed on your system, and what features it supports. The items you need to go through here are Hard disk, wireless adapter settings, USB selective suspend under USB settings, Platform and thermal framework settings, PCI express, and Processor power management. Check out the settings under these sections and disable anything that limits power.
You should go through all the settings and see if you find anything else for managing power supplied to devices.
We should mention that Windows 10 has power plans that favor better battery and that favor performance. The performance-based plans are power hungry and will likely have many power management options disabled. You can try using it instead of changing the settings for the balanced power plan. You can also create a custom power plan, or you can enable the Ultimate Power Plan on Windows 10.
If some of your devices are still powering down after you’ve disabled all the options under the current power plan, you can check the device’s properties under Device Manager and see if it has a power management option that you can disable.
If you quickly and repeatedly insert and remove a USB device, the USB port may stop responding. When the port is in this state, it no longer recognizes any USB device, and the USB device will not work.
This article helps you fix the problem.
Prerequisites
You must use administrative credentials to log on to Windows to perform some of the troubleshooting methods that are listed in this article. If this is your personal computer, you are likely already logged on with an administrator account. If this is a computer that is part of a network at work, you might have to ask the system administrator for help.
Resolution
To fix this problem, use the following methods in the order in which they are listed. After each method, check the USB device to see whether the problem is fixed. If the problem is not fixed, try the next method.
This article also includes a workaround that you can try if these methods do not work.
Method 1: Use Device Manager to scan for hardware changes
Use Device Manager to scan for hardware changes. After your computer scans for hardware changes, it might recognize the USB device that is connected to the USB port so that you can use the device.
To scan for hardware changes, follow these steps:
Click Start, and then click Run.
Note If you are running Windows Vista, click Start, and then use the Start Search box.
Type devmgmt.msc, and then click OK. Device Manager opens.
In Device Manager, click your computer so that it is highlighted.
Click Action, and then click Scan for hardware changes.
Check the USB device to see whether it is working.
If scanning for hardware changes fixed the problem, you are finished. If this method did not fix the problem, go to Method 2.
Method 2: Restart the computer
If scanning for new hardware did not fix the problem, try restarting the computer. After the computer has restarted, check the USB device to see whether it is working.
If restarting the computer fixed the problem, you are finished. If this method did not fix the problem, go to Method 3.
Method 3: Disable and re-enable the USB controller
Use Device Manager to disable and re-enable all the USB controllers. This lets the controllers recover the USB port from its unresponsive condition. The USB controllers represent the USB ports in Device Manager. If you are not comfortable with advanced troubleshooting, try the steps in the “Workaround” section.
To disable and re-enable the USB controllers, follow these steps:
Click Start, and then click Run.
Note If you are running Windows Vista, click Start, and then use the Start Search box.
Type devmgmt.msc, and then click OK. Device Manager opens.
Expand Universal Serial Bus controllers.
Note You might have to scroll down the list to find this item.
Right-click the first USB controller under Universal Serial Bus controllers, and then click Uninstall to remove it.
Repeat step 4 for each USB controller that is listed under Universal Serial Bus controllers.
Restart the computer. After the computer starts, Windows will automatically scan for hardware changes and reinstall all the USB controllers that you uninstalled.
Check the USB device to see whether it is working.
If the USB port recognizes the device and if you can use the device, you are finished.
If this method fixed the problem, you are finished. If this method did not fix the problem, go to the “Workaround” section.
Workaround
If none of these methods worked for you, you can disable the Selective Suspend feature. However, be aware that when the Selective Suspend feature is disabled, all USB host controller drivers (and therefore all USB ports and connected USB devices) in the system are affected. Therefore, your computer cannot suspend any USB devices that are connected to it, and the USB devices can continue to use power while connected to the computer. Additionally, the Allow the computer to turn off this device to save power check box does not appear on the Power Management tab for the USB Root Hub.
This section is intended for an advanced computer user.
You can disable the USB Selective Suspend feature as a workaround by editing the registry. The USB device may become unresponsive because of a race condition in the Selective Suspend feature. The Selective Suspend feature suspends the USB device to efficiently maintain battery power by enabling the computer to turn off the USB device. However, sometimes this feature may not correctly wake up the USB device. Therefore, the USB device is unresponsive when you try to use it.
You might want to disable this feature for server products where power management is not important or required.
Important This section, method, or task contains steps that tell you how to modify the registry. However, serious problems might occur if you modify the registry incorrectly. Therefore, make sure that you follow these steps carefully. For added protection, back up the registry before you modify it. Then, you can restore the registry if a problem occurs. For more information about how to back up and restore the registry, click the following article number to view the article in the Microsoft Knowledge Base:
322756 How to back up and restore the registry in WindowsTo disable the Selective Suspend feature, follow these steps:
Click Start, and then click Run.
Note If you are running Windows Vista, click Start, and then use the Start Search box.
Type regedit, and then click OK. Registry Editor opens.
Locate and then click the following registry subkey:
HKEY_LOCAL_MACHINE\System\CurrentControlSet\Services\USB
If the DisableSelectiveSuspend registry entry is present, double-click it. If it is not present, create the entry. To create the entry, follow these steps:
On the Edit menu, point to New, and then click DWORD.
Type DisableSelectiveSuspend, and then press ENTER.
On the Edit menu, click Modify.
In the Value data field, type 1 to disable the Selective Suspend feature, and then click OK.
Cause
This problem may occur because of a timing issue that prevents the computer from detecting the USB device.
Microsoft and the hardware vendors that manufacture the chips that are used for USB have investigated the problem. However, the results were inconclusive because of the intermittent nature of the problem.
Status
Microsoft is researching this problem and will post more information in this article when the information becomes available.
If the USB device does not work after your computer has been in extended hibernation, it is likely that Windows has automatically turned off the USB Root hub to save power.
The steps below outline how to configure the USB root hub to stay on during hibernation, to prevent this from happening.
Windows 10 / 8
- On your keyboard, press the Windows key + X and select Control Panel.
- Click Hardware and Sound, then click Power Options.
- Click Change plan settings for the plan you want to change.
- Click Change advanced power settings.
- Click the plus sign (+) next to “USB settings” and “USB selective suspend setting” to expand the options and change the setting to Disabled.
- Click OK to apply the setting.
Note: You may need to disconnect and re-connect your USB device after applying these settings to re-establish the connection.
Windows 7 / Vista
- Click the Start button and select Control Panel.
- Click Hardware and Sound, then click Power Options.
- Click Change plan settings for the plan you want to change.
- Click Change advanced power settings.
- Click the plus sign (+) next to “USB settings” and “USB selective suspend setting” to expand the options and change the setting to Disabled.
- Click OK to apply the setting.
Note: You may need to disconnect and re-connect your USB device after applying these settings to re-establish the connection.
Windows XP
- On your desktop, right-click the My Computer icon and select Properties.
- Click the Device Manager tab.
- Expand Universal Serial Bus controllers by clicking the arrow to the left of it.
- Right-click the first USB Root Hub device and select Properties.
- Click the Power Management tab.
- Clear the box next to Allow the computer to turn off this device to save power.
- Click OK to apply the setting.
- Repeat steps 4-7 for any remaining devices in the Universal Serial Bus Controllers section with “Root Hub” in the name.
Note: You may need to disconnect and re-connect your USB device after applying these settings to re-establish the connection.
Do you know why some of the USB ports stop working all of a sudden? It is actually because of Power surge that occurred in USB ports of your laptop/PC. Power Surge happens when you use the USB device which consume more than the limited power supply assigned to the USB port. When the USB device exceeds its power drawing limit, power surge generates on that particular USB port which indeed causes damage to your laptop eventually. So in order to avoid the power surge, we have listed few fixes in this article which will definitely going to help you.
Table of Contents
Fix 1: Avoid Power Surge on USB Ports using Device Manager
Step 1: Open the Device Manager.
Press Win key on your keyboard and type device manager.
Then, Hit Enter key.
Step 2: In the Device Manager
Go to Universal Serial Bus controllers and Click on it.
Then, Right-Click on USB Root Hub (USB 3.0) and Click Properties from context menu.
Step 3: In the Properties Window
Go to Power Management tab.
Then, Uncheck Allow the computer to turn off this device to save power button as shown in the picture below.
Click OK to close the window.
Step 4: Please go to all the necessary USB/Input device’s Properties listed in Device Manager window and repeat the above step as explained to uncheck in the Power Management tab.
Hope this works for you!
Fix 2: Avoid Power Surge on USB Ports using Edit Power Plan
Step 1: Open Edit Power Plan
Press Win key and type edit power plan as shown below.
Click Edit power plan from the search results.
Step 2: In the Edit plan settings window
Click on Change advanced power settings as shown below.
Step 3: In the Power options window
Go to USB settings > USB selective suspend setting.
Then, Click on Plugged in and select Disabled and do the same for ‘On Battery‘ also.
At last, Click Apply and OK.
NOTE:- If USB settings is missing in the window, you need to make some changes in the Registry Editor as explained below.
- Press Win + R key together and type regedit and press Enter key on your keyboard.
- Copy and Paste the following path in the address bar and hit Enter.
- Then Change the value of Attributes to 2.
- Close the Registry Editor and Restart your system to make changes.
Hope this fixes the issue.
Fix 3: Avoid Power Surge on USB ports by changing power configuration
Step 1: Open Power configuration settings.
Press Win + S on your keyboard and type powercfg.cpl
Click powercfg.cpl which is control panel item from the search results.
Step 2: Choose High performance from the following options given.
Hope this should work!
Fix 4: Reset the USB Device port to avoid Power Surge
Step 1: Remove all the USB device connections from the laptop/PC.
Click on the Power surge on the USB port warning window.
Step 2: In the warning window
Click Reset button which will fix the issue.
Restart your PC/Laptop after it resets.
Hope this article was informative.
Please leave us comments and let us know which fix worked for you.
Thank you for reading!
Hey! I am a software engineer who loves to solve technical issues and guide people in a simple and effective way as possible. Currently writing articles on tech problems is my thing!


