If you’re having problems with your computer and it isn’t behaving correctly in certain situations, then it could be a cause for concern. One of these situations could be when you are performing resource intensive tasks and the system becomes unstable or crashes while being put under stress. This could be a problem such as the CPU overheating and shutting itself down, or even the graphics card running into similar trouble. Or maybe the power supply simply cannot cope anymore with all hardware components running at full intensity…
Whether you’re someone who wants to test their PC components because they suspect a possible fault, or have bought / built your own PC and want to make sure it runs stably and reliably at maximum load, you need a program to be able to put the system under the desired levels of stress for periods of time to monitor the situation. Here are 10 tools (9 of them free) to do just that and put your system under huge amounts of stress to check for faults or problems.
1. HeavyLoad
HeavyLoad is a utility that aims to stress the main component areas of a PC, namely processor, memory, hard drive and graphics. It can also run these tests individually or altogether which is obviously the time maximum stress will be placed of the system hardware and also the power supply. The Disk space and Free memory tests are not really there to put undue stress on those components, but rather continually writes a large file to the drive and allocates / deallocates memory to the system simulating heavy load when all major components are utilized.
There is an option though to add more stress to the hard drive by using Jam software’s other popular included tool Treesize Free to simulate more heavy disc access. HeavyLoad is available as portable and installer versions and is a very useful overall system stability tester to keep in the USB toolkit. Works on Windows XP to Windows 8 32-bit and 64-bit.
2. FurMark
Furmark is a stability and stress testing tool designed especially for graphics cards and runs a very intensive “Fur” rendering algorithm which is very good at pushing the GPU to its absolute limits. There are a few settings that can be changed such as resolution, full screen mode and anti aliasing, and a few presets are available such as running in the HD resolutions of 720 / 1080, or running a burn-in test for 15 minutes. The benchmark’s default run time and an alarm for the maximum allowable temperature for the graphics card is found via the Settings window.
Benchmark scores can be compared or viewed online. FurMark is compatible with Windows XP and above.
3. StressMyPC
This is a simple, tiny and portable utility of around 20KB that can run a stability test on your single, multi core or multi threaded processor. In addition it can also perform a couple of other tests such as a simple GPU graphics test and also one for the hard drive. The “Paint-Stress” GPU test is enabled by default and the “HD-test” and a more aggressive CPU test which will push your processor towards 100% (the standard test used about 60% of a dual core CPU during testing) can be enabled by the buttons at the top of the window. StressMyPC works on all versions of Windows 2000 and above, including 64-bit.
4. System Stability Tester
System Stability Tester works by simply using the well known and famous method of telling the computer to calculate the value of Pi up to 128 million digits. This will completely consume your processor for as long as the test runs and can also be used as a basic benchmarking tool to see how long it takes your CPU to calculate the specified number of digits. The range can be between 128 thousand up to 128 million and can be run continuously up to 50 times using up to 32 threads. There are 2 methods to choose from, Borwein and Gauss-Legendre which is also used by the classic SuperPi tool.
Works on Windows XP and above, portable and installer versions are available.
5. IntelBurnTest
Despite the name, IntelBurnTest actually works fine for testing on AMD processors as well, and is called as such because it makes use of the Intel Linpack libraries which Intel themselves use to stress test CPU’s. Usage is easy and all you have to do is set the number of times to run the test, the number of threads to use and the test stress level. This can be Standard, High, Very High or Maximum and if your available RAM is less than what the test requires, choose Custom and set the amount of memory to use accordingly.
Whether you have a desktop PC or a server, Microsoft’s free Diskspd utility will stress test and benchmark your hard drives. It helps us find which of our hard drives is the fastest, and is it really as fast as the manufacturer promised.
Downloading The Diskspd
Microsoft offers this excellent tool for free, and you can download it from Microsoft Technet. It’s even open source, so you can download and inspect or modify the source code from GitHub.
After downloading it, extract the contents of the .zip file to a folder on your computer. Note that the archive contains three different “diskspd.exe” files.
- The one in the “amd64fre” folder is for 64-bit Windows PCs
- The one in the “x86fre0” folder is for 32-bit Windows PCs.
Diskspd has been tested to work on desktop versions of Windows 7, 8, 8.1, 10, as well as Windows Server 2012, 2012 R2, and 2016 Technical Preview 5.
Why Diskspd Is The Best Choice?
- Diskspd makes an excellent tool to know the IO ability of your drives.
- Diskspd will tell you the maximum capacity a server’s hard drives can handle, or point you at the fastest hard drive you should use for heavy workloads (or just demanding PC gaming) on a desktop PC.
Example : Assume that we have three drives on a server, an F drive, G drive and C drive. If we have our MDF on the F drive, the LDF on the G drive and our OS on our C drive, we can evaluate whether our setup is effective. So if the MDF file is the busiest file with the most reads and writes then we would want it to be on the fastest drive.
So from the above example with the graphs (representing the writes and reads for the OS, LDF and MDF), we would place our MDF file on the fastest drive since our MDF is the busiest. If our Diskspd analysis showed that F was our fastest drive then MDF should be placed on drive F.
Performing The Stress Test
To perform a single test : Simply invoke a Diskspd command from an Administrator-enabled Command Prompt.
- On Windows 10 or 8.1 – Right-click the Start button and select Command Prompt (Admin).
- On Windows 7 – Go to start andtype cmd , right click on cmd and choose Run as administrator
Now use cd to switch to the directory containing the Diskspd.exe you want to use:
Now you can run the Diskspd command with the options you want to use. You will find a complete list of command line options and usage information in the 30-page DiskSpd_Documentation.pdf file included in the Diskspd archive you downloaded.
An Example Command
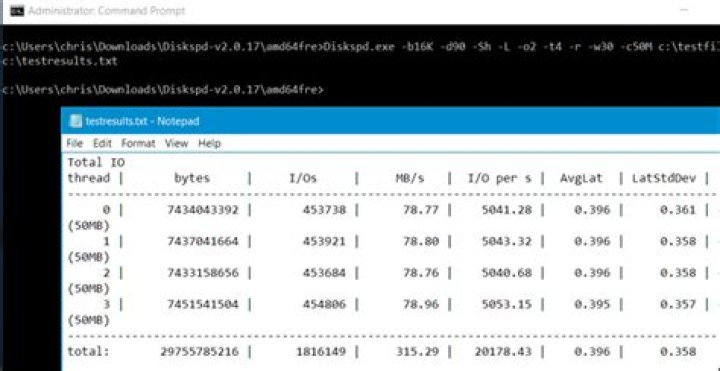
The following command sets the block size to 16K (-b16K), runs a 30 second test (-d90), disables hardware and software cashing (-Sh), measures latency statistics (-L), uses two IO requests per thread (-o2) and four threads (-t4) per target, uses random access rather than sequential writing (-r), performs 30% write operations and 70% read operations (-w30).
It creates a file at c:\testfile.dat of 50 MB in size (-c50M). If you wanted to benchmark your D: drive instead then specifiy it as d:\testfile.dat
After however long you specify the result will display after that time. In the above test–the test results will be printed to the Command Prompt after 90 seconds as specified (-d90) and you can view them.
Consult the results and you will see the average MB/s the drive reached during the test–how many write operations were performed a second, how many read operations were performed a second, and the total amount of input/output (IO) operations per second.
These statistics are most useful when comparing multiple drives to see which is faster for certain operations, but they will also tell you exactly how much IO a hard drive can handle.
With the > operator you can save the result to a text file and view it later. The below command runs the same command as above and places the results in the C:\testresults.txt file.
Now repeat the same procedure for other drives to compare the results and come to a conclusion on which drive has the best performance.
Enthusiasts and Professionals alike can verify the stability of their systems when running at high clock speeds.
Avoid costly downtime, system rebuilds or data loss.
Test the stability of your system after configuration changes or hardware upgrades.
Quickly isolate problematic components in the system and assist with PC troubleshooting and diagnostics.
BurnInTest will bring intermittent or hidden problems to the surface, and dramatically reduce your test times.
Avoid delivering DoA (Dead on Arrival) and faulty hardware to your customers.
Reduce test times with simultaneous testing. Improve QC.
Check parts in PC match pre-defined list of expected parts with built in inventory checking.
Load testing and quality assurance for IoT and embedded systems, with support for ARM platforms.
Automate testing of devices before deployment to reduce downtime in connected environments.
How it works
Simply press the Go button and BurnInTest will thoroughly exercise the hardware in your Windows-based servers, desktops, laptops and tablets* in a condensed short period of time, in the same way that normal applications would be stressing a PC over a long period of time.
This takes advantage of the fact that computer hardware tends to fail either very early in its life or after many thousands of hours of use.
Fully test every I/O port of your system with these optional hardware accessories.
- USB 3.0 and USB 2.0 loopback plugs
- PCIe test cards
- Serial and Parallel loopback plugs
- Test CD, DVD and BD
BurnInTest includes the ability to have multiple test configurations for different hardware and automation can be done via dozens of command line arguments and an inbuilt scripting language. It is also possible to develop your own test modules and integrate them into BurnInTest).
All the test modules can be either run in parallel or individually. Running in parallel increases system load, shortens the burn in period and helps find subtle faults. It is also possible to individual adjust the duty cycle of each test module.
Test results can be outputted in a variety of formats including text and HTML. The software can product test certificates customized by the user, debugging logs and also includes extensive system information such as CPU & GPU temperatures, disk and memory serial numbers.
When we think about a PC in general, most of us give a lot of weight to the CPU, RAM, and GPU when it comes to discussing performance. However, one of the most important components is actually the HDD or the SSD inside as it’s the device that’s responsible for storing all your data such as the operating system, applications, games, and more.
With the increasing prevalence of SSDs in the market, the importance of the storage subsystem has really returned to the spotlight as SSDs have highlighted the effects of having slow storage. For those who own a SSD or have experienced what it’s like to use one, you’ll know that slow storage can easily drag down an entire system even if your system features the latest and greatest Intel Core i7 processor with hundreds of gigabytes of RAM.
As such, testing the performance of your HDD or SSD has become more important than ever not only to figure out if your new drive is actually performing as advertised, but also to diagnose any issues that may prevent the drive from performing at its peak. Do you have the proper drivers installed? Do you have the proper motherboard chipsets drivers installed? Do you have your SATA SSD connected to the right SATA port? These are all questions that can be answered with some simple performance testing.
To help you test the performance of your HDD or SSD, here’s five of the best free tools for testing storage performance.
ATTO Disk Benchmark
ATTO Disk Benchmark is one of the industry’s oldest and most popular benchmarks for testing HDD and now SSD read/write speeds. This benchmarks allows easy read and write testing using predefined block sizes between 512 bytes up to 8MB with test file sizes between 64KB and 2GB and queue depths between 2 and 10, giving us a good idea of read/write speeds with different sized files. By enabling Direct I/O and Overlapped I/O, ATTO Disk Benchmark will also remove any performance benefits from system caching, providing the most accurate results. ATTO Disk Benchmark is typically the benchmark of choice for consumer SSD manufacturers as it tests using simple, highly compressible data, which tends to yield best performance.
Crystal Disk Mark
Crystal Disk Mark is another popular benchmark which allows us to measure both sequential read/write speeds as well as random read/write speeds for a variety of different storage products including HDDs, SSDs, memory cards, networked drives, and more. With this benchmark, tests can be run using both random fill (incompressible data) and 0 fill (compressible data).
AS SSD
AS SSD is a very commonly used benchmark used to measure HDD and SSD performance in sequential, 4K, 4K QD64 and latency. Tests are run using 100% incompressible data. AS SSD also outputs a final score at the conclusion of the test based off the overall performance of the drive. AS SSD also provides several useful tools including a copy benchmark which will allow benchmarking a file copy operation as well as a compression benchmark which shows performance at different levels of file compression.
Anvil Storage Utilities
Anvil Storage Utilities is not only among the most feature filled benchmarks for testing SSDs and HDDs, but it’s also very easy to use. Once open, simply click the big “Run” button which will automatically run both the read and write tests for sequential, 4K, 4K QD4, 4K QD16, 32K, and 128K. After testing, the utility will provide a number of different results such as response time, read/write performance in MB/s and IOPS.
Iometer
Originally developed by Intel and announced at Intel Developer Forum in 1998, Iometer has quickly become one of the most popular storage testing utilities in the industry. Although the interface for the utility isn’t as user friendly as any of the other utilities in our list, Iometer makes up for this with its is ability to be configured for a wide variety of workloads as well as more in-depth testing and reporting capabilities.
Understanding HDD and SSD Benchmarks
So now that you’ve run the benchmark and have the numbers in hand, what the heck do they all mean? Well, be sure to check out our article on understanding storage benchmarks to learn more.
For a quick summary:
Throughput – Throughput is the measure of speed at which data is transferred and is generally measured in KB/s, MB/s or GB/s. As a result, generally speaking the higher the throughput speed, the better. However, when measuring throughput, it’s also important to figure out what file size is being transferred. HDDs for example can perform well when it’s allowed to ramp up speed and access data sequentially, but falls on its face when asked to access small files in a random order.
IOPS – As throughput measures the speed at which data is transferred, IOPS measures the input and output operations per second. This is a much more effective way of testing SSDs which can perform hundreds of thousands of input/output operations per second when working with smaller files such as those that are just 4K and 8K in size. In general, the higher the IOPS, the better.
Latency (ns, ms) – Latency measures how long it takes for an IO operation to go from beginning to end. The lower the latency, the better.
Bart’s Stuff Test 5 (Bst5) is a free portable hard drive stress test tool. You can use a hard drive stress test tool whenever you become worried that a hard drive is not working properly. The tool allows you to select drives or individual folders. You can also test network drives, but this also means that you will “stress-test” your network.
- OpenVPN IPv6 and IPv4 configuration – Mon, Mar 1 2021
- 4sysops author and member competition 2020 – Fri, Jan 1 2021
- Assign an IPv6 address to an EC2 instance (dual stack) – Tue, Dec 15 2020
Bst5 uses the free space on the disk, and if you don’t stop it, it will use almost all available disk space. So better be careful if you run a “hard drive stress test” on a virtual disk that grows dynamically. However, you can configure how much free space Bst5 will leave. If you are afraid that the disk space that contains data is corrupt, Bst5 won’t be of much help.
It makes sense to use Bst5 before you install a new OS on an old disk just to ensure that the hard drive still works reliably. After you format the disk, you can boot Windows PE and launch Bst5 from there.
Bst5 is also helpful if you want to quickly find out how fast a hard drive is since the tool measures the minimum, maximum and average speed for read and write operations. I tested Bst5 5.1.4 on Vista, Windows 7 and Windows PE 3.0.
The commercial edition of Bst5 also supports stress testing on the device levels, without involving the file system. This also allows you to stress test other storage media such as tapes. Prices start at $20 USD.
Bart’s Stuff Test 5 (Bst5) ^
Amazon FSx for Windows file server
This step-by-step guide explains how to create a native Windows file server on AWS using the Amazon FSx service.
Activate SMB compression when copying files over the network
Windows 10 20H2 introduced SMB compression as a new feature, and Server 2022 will also include it. SMB compression.
Windows File Recovery app in Windows 10 2004
Learn about a new native Windows tool that will allow recovery of deleted files. The new Windows File Recovery.
Manage OneDrive caches with Windows Storage Sense
Microsoft’s OneDrive application is making large inroads into enterprises as the Enterprise File Share and Sync (EFSS) tool of.
Managing OneDrive cache in Citrix Virtual Apps and RDSH environments using FSLogix Profile Containers
In Remote Desktop Session Host (RDSH) environments, such as Citrix, VMware Horizon, Parallels, or Windows Virtual Desktop, adopting OneDrive.
Virtualize user profiles with Microsoft’s FSLogix Profile Container
Ever since Microsoft acquired FSLogix, customers with RDS CALs or different Microsoft 365 subscriptions may use Profile Container free.
SolarWinds Serv-U: Fast, easy, and secure file transfers
Easy, flexible, and secure file transfers can be difficult to achieve using standard tools. SolarWinds Serv-U file transfer protocol.
User rights assignment in Windows Server 2016
In my previous post,Windows Server security features and best practices, I introduced the built-in features that can be used.
Power Admin File Sight: Protect and audit file servers
PA File Sight fills the security and auditing void left by Windows File Server. It does this by providing.
FolderSecurityViewer: Analyze and report on effective NTFS permissions
We looked at FolderSecurityViewer early last year, and that article covered all the basics. In this review, I’ll look.
Condusiv Undelete 11: New features
Condusiv Undelete 11 sports a new user interface, cloud integration, and more robust control over the file system resources.
Monitor file changes in Windows with PowerShell and pswatch
Sometimes I have wanted to monitor a directory for any file changes and receive alerts of those changes, for.
Create an Azure file share with PowerShell
Azure file shares allow you to host a plain ol’ Server Message Block (SMB) share in the cloud, and.
Copy files between Hyper-V and a guest VM
Various ways exist to copy data between a Hyper-V host and its guest machines. In this post, I will.
Install Azure File Sync (AFS)
At last year’s Ignite, Microsoft announced the Azure File Sync (AFS) service that lets you sync your on-premises file.
Set and remove the read-only file attribute with PowerShell
Files in Windows can have a read-only attribute set on them to prevent modification. Luckily for us, we can.
Managing disks with PowerShell
In this post you will learn how to perform various disk management tasks with PowerShell. I will explain how.
Managing Windows file shares with PowerShell
You could manage file shares through PowerShell, but before PowerShell 3, it was not the most intuitive process. PowerShell.
Diskeeper 18 Professional new features
With their version 18 release, Condusiv Diskeeper finally solves one of the product’s only historical annoyances–reboot dependency. The user.
Send disk usage reports on “disk full” alerts in SCOM
This article provides a PowerShell script that gathers disk usage and then sends the report. I also describe the.
How to perform stress test on your PC with Heavy load free tool: – Prevention is always better than cure. There are many softwares up for grabs, which can actually put your system under lots of stress and analyze system behavior inorder to predict how it will behave in a heavily-loaded situation. Yes, those softwares are termed stress test tools. Stress test tools often put lots of stress on your system to find faults or problems with system behavior to ensure stability under normal working environment. This is usually done under large scale levels. However, there are some softwares which can be used to stress test your computer system at individual level as well. Some examples for stress test tools are HeavyLoad, FurMark, StressMyPc, System Stability Tester, IntelBurnTest etc
In this article, we are going to explore the functionalities provided by the stress test tool HeavyLoad. It can be used to perform stress tests on Processor, Graphics, Memory and Hard drive. These tests can be performed individually or can be run together as well. If these tests are run together, it will increase the amount of stress on the system. Running the tests for longer intervals will produce more accurate results. Read on to learn everything about this free tool. And wish your system good luck for an ultimate stress test!
STEP 1
- Download the stress test tool HeavyLoad. You can get it from here!.
STEP 2
- Launch HeavyLoad by double clicking on it’s icon.
STEP 3
- Clicking on the start button starts stress testing.
STEP 4
- Similarly, stop button stops stress testing function.
STEP 5
- The CPU button is used to test the CPU of the computer system. It gives CPU 100% load and analyzes how it’s holding up.
STEP 6
- Fourth icon from the left is the button which is used to enable/disable writing a file to a temporary folder.
STEP 7
- The memory button is used to enable/disable allocating physical and virtual memory.
STEP 8
- TreeSize icon is used to analyze your hard drives. Using this button, you can check where your hard drive space is used up.
STEP 9
- This button is used to perform stress tests on the Graphics Processing Unit (GPU).
STEP 10
- Test methods in HeavyLoad can be customized as per your preferences. If you click on the spanner icon, a new window named Options will open up where you can give your preferences.
STEP 11
- Click on the tab named CPU from the Options window to set CPU preferences like how many of the available cores are to be used.
STEP 12
- Under the tab Memory, you can give the Threshold and Intensity values for the memory stress test.
STEP 13
- Under the Test File tab, you can determine the speed at which the test files are to be written on to your hard drive.
STEP 14
- Under Misc tab, miscellaneous preferences can be specified like the Test Duration, Program Settings and the Command Line Options.
HeavyLoad is compatible with all versions of windows and it’s free of cost. Hope the article was found useful.
Learn more about CPUs for desktops, laptops, and mobile devices
“CPU Stress Test Online” or simply “CPU Load Test” is a free processor performance test allowing you to check online your processor at heavy load. Unlike the “CPU Benchmark Online”, here you can manually set the required load, as well as stop or resume testing at any time. However, your results will not be stored in the “CPUs Rank”, and you will not be able to compare your processor to the other ones. On the other hand, here you can find out the limits of your processor’s performance.
Threads
Power
Start CPU Stress Test
What do the indicators mean?
Before starting the CPU stress test, review the indicators below to understand what they are for. Given that not all processors and devices withstand high loads, it is strongly recommended to gradually increase indicator values.
- Speed
The speed measures how fast the processor is, and is measured in the number of hash operations per second. Obviously, a more powerful processor develops a higher speed. However, you need to remember that for maximum speed you need to use the full power of the CPU (that is, specify as many threads and power as possible).
How to run a CPU stability test?
The purpose of a processor stability test is to determine how smoothly the CPU works, even if it is under high load. So, to run a CPU stability test you have to:
- Start the CPU Stress Test at maximum load and wait 30-60 seconds.
- Keeping this tab in the background (don’t close it), switch to other applications or tabs, and do what you do as usual.
- Make sure everything runs smoothly and this “stressful situation” does not affect your usual tasks.
- Monitor the “Speed” and “FPS” indicator and make sure that their values do not drop significantly.
How to test the CPU at maximum load?
If you want to feel the smell of a heated device and hear the sound of the roaring fan, don’t hesitate to burn stress your CPU at heavy load as follows:
- Enter the maximum number of “Threads”: 128.
- Set the full “Power”: 100%.
- Press the “Start CPU Stress Test” button.
- Stay tuned for global warming news.
Why did my system become unstable during testing?
At maximum load, the stress test will try to use the full capacity of your CPU, which in the long term can lead to the fact that other processes will be performed more slowly and slowly, and some will even hang. For this reason, the stability of the system or other applications may be affected during testing. As a rule, modern systems and processors perfectly handle this and you should not experience big performance issues. Given this, you can consider it as a CPU stability test, which will show how well your system is coping with heavy loads. If you are planning to knockout your system by torturing all hardware, consider to use a PC Stress Test.
Why did my device shut down during the stress test?
Most likely your device shuts down to protect its hardware from overheating, which can definitely damage it if the temperature is not dropped or/and device is not de-energized immediately. This is why your device shuts down suddenly without any warning and it reports the reason for shutdown the next time it is turned on (although sometimes devices are silent about it).
This is a common and required behavior, so you should not worry about the fact that your device has turned off. However, you should be worried if your device heats up and shuts down too fast. Most often this happens if cooling system does not work properly (for example, lack of sufficient air flow or faulty heat dissipation). Another common reason might be that your device is not designed for heavy loads or its hardware is misconfigured. Either way, you must find out the cause and fix it before running more stress tests.
What is the difference between a PC Stress Test and CPU Stress Test?
They both are trying to knockout your system, except a CPU Stress Test tortures only the processor, while a PC Stress Test has a richer arsenal to test not only the CPU , but also GPU , RAM , HDD , and other hardware.
What is the best CPU stress test?
First of all, like any software, the best CPU stress testing tool must meet your system requirements. Next, it should be able to really torture your CPU. Finally, useful, but not necessary it should allow you to monitor system performance, measure temperature, create reports, run benchmarks, and provide features that you need.
If someone refers to the CPUX.Net Stress Tool as the best CPU Stress Test, I certainly won’t argue with that, especially if we’re talking about online testing tools 😉 However, if you are planning overclock your CPU, perhaps you may want a better stability tester written in a low-level programming language and it is able to torture all hardware at maximum. That’s why I recommend you to take a look at Prime95, Furmark CPU Burner, MSI Kombustor, Cinebench, CPU-Z, AIDA64, Intel Extreme Tuning Utility (Intel XTU), OCCT Linpack.
What are the system requirements to run the online CPU Stress Test?
Since this is web based CPU stress test, by and large you can run it almost anywhere, such as:
Sometimes, stress testing a computer (despite what operating system it uses) can be a very useful thing. For example, if you have a faulty hardware, say a hard disk drive that is having performance issues, then you can run disk I/O intensive tests to see whether it is stable or not.
Or, if you have just overclocked your hardware (CPU, GPU, RAM …) and want to make sure that it won’t make your computer unstable, before applying those changes permanently, then stress testing is among the best ways of knowing that also (or for evaluating the capability of your PC in general).
Stress testing can also be used to benchmark certain software applications, such as an I/O scheduler or a task scheduler (for instance) as well. If you use Ubuntu and prefer a tool with a GUI, then you can use ‘lbench’. It has a simple user interface and very easy to use, and is primarily a benchmarking tool. But, if you are okay with using the command-line, then you can also try ‘Stress’.
It lets you put stress on your:
*. Disk Drive (only supports write tests).
It can not stress other hardware such as the GPU though. You can also delay the starting of the stress tests and make it automatically exit after running for a certain amount of time (in seconds) as well.
Remember, ‘Stress’ is not actually a benchmarking utility, as it does not give you any speed related outputs (like ‘lbench’ does), but is only a utility that lets you stress your computer. Still, you can use it as a work load generator, for while benchmarking other utilities, such as an I/O scheduler, as mentioned above too.
If interested, you can install it in Ubuntu 12.10 Quantal Quetzal, 13.04, 12.04 Precise Pangolin, 11.10, 10.10 and 10.04 by using the below command in your Terminal window.
How to use it?
You can use ‘Stress’ to stress the above mentioned hardware individually or you can stress them all at the same time too.
Stressing the CPU
If you want only to stress the CPU, then you can use it in the below format (on your Terminal window, of course).
Depending on the type of your CPU, make sure to replace ‘ 1 ‘ accordingly. For example, if you have a CPU with four cores and would like to stress them all, then you should be using the below command.
You can also enter a number, higher than the available CPU cores for adding a lot more stress on the CPU as well. In other words, if I put 50 individual processes to stress my CPU (‘stress -c 50 ‘), rather than using 4 processes, it will make the OS more unstable.
Note: You can cancel (exit) ‘Stress’ anytime by pressing ‘Ctrl’ + ‘c’ keys or by closing the Terminal window.
Stressing the Memory (RAM)
Let’s say that I wanted to stress my 4GB RAM module using three processes, with each about 256MiB in size (by default). Then I’ll use the below command.
You can again replace ‘ 3 ‘ with the number of processes to be used, plus, can also change the size of the processes by using the ‘–vm-bytes …’ attribute.
So if I wanted to use 4 process with each sizing around 300MiB, then I’ll use the below command.
Note: However, for stressing your RAM, the CPU also has to do a lot of work as well. And as a result, if the used processes were more or equal to the available cores, then they will use 100% of your CPU power.
Stressing the Disk Drive
If you want to stress the disk drive only, then use the below command.
‘ 1 ‘ represents the number of processes that will be used to stress your disk drive. Again, you can replace this number accordingly. By default, ‘Stress’ uses 1GB file size for each process (you use the ‘–hdd-bytes’ argument for changing that), so make sure your have enough free space left before running this test.
For stressing my HDD with 2 processes, with each sizing around 512MB, I can use the below command.
Note: Unlike with the RAM stress test, HDD stress test does not require a lot of CPU usages.
Stressing CPU, RAM and HDD simultaneously
If I wanted to stress the CPU, RAM and the HDD at the same time, then I can use it in the below format.
As you can see, in this instance, ‘Stress’ will stress the CPU using four processes, RAM will be stressed using 2 processes (each sizing around 256MiB) and the disk will be stressed with a process that is about 1GB in size.
Setting up a timeout
‘Stress’ also lets you run these tests for a chosen time frame. Let’s say that I wanted to run the above test, only for 40 seconds, then I’ll simply add the ‘-t’ argument and the new command will look like the below one.
After running for 40 seconds, it will exit automatically.
You can also use the ‘-t’ argument while running other individual tests as well. Its manual contains all these details. You can use the below command for reading it.
But please remember that, stressing your hardware unnecessarily is not recommended as it can easily damage them. So use it only, when it is absolutely necessary.
So you’ve got yourself a new rig and want to overclock to get the best performance for your money. Maybe you have malfunctioning hardware and need to perform diagnostics? Stress testing your PC rig, including RAM, CPU and GPU stress tests are a great way to help build a healthy and stable system – performing at its very best. Whatever your particular goal you would like to achieve through stress testing your rig, we have put together a list of useful stress and torture tests to get you started and on your way to a healthy and stable system.
*Before we get into the guide, we want YOU to understand that running your system at its limits poses risks to hardware and you should make sure that you have configured your rig so that it can withstand the stress these programs are going to put on it.*
Before running these torture/stress tests you want to make sure your cooling components are properly installed ie. heatsinks and CPU/GPU blocks are tightened down properly and thermal paste was used during installation. System fans are wired and working. Any overclocking and system parameters are set either at stock or very conservative values for the very first few runs. Monitoring software must be also installed on the system to make sure that components aren’t overheating or pulling too much voltage. Usually, the hardware can protect itself when things go south, but low grade or incorrectly installed/configured components may degrade beyond repair in just minutes.


