A tutorial for using google chrome’s dev tools to take screenshots of a webpage.
Jun 16, 2020 · 4 min read
Being a designer or a frontend developer we deal with this thing daily.
We either want to add content to a web page or edit the content of the page and for that, we use the inspect element tool of chrome.
Once that is done, we take a screenshot of the edited webpage and share it with our colleagues, teams, or clients.
We all do that right? Maybe once a day or maybe more than that.
Generally, for taking sc r eenshots in chrome we use chrome extensions. The thing about extension is that they may have vulnerabilities and they eventually tend to make our browser slow.
What if I told you that you can take screenshots in chrome without using any third-party extension and that too with extra flexibility?
Let’s see how we can achieve it!
We will consider for our example purpose.
Step 1:
Visit the website we want to take the screenshot of.
(In our case it is )
Step 2:
Open the console by right click > inspect.
A dev tools console panel/window will open.
Step 3:
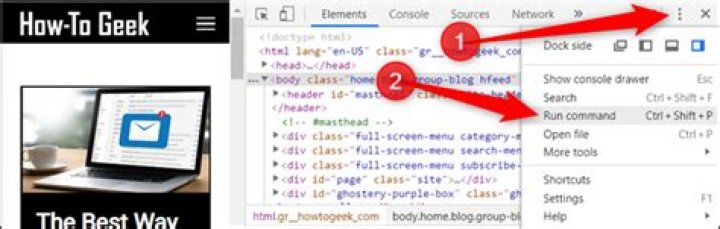
Click on elements tab (or any tab from the dev tools panel) and then click the three vertical dots on the extreme right of the panel for more options, a dropdown will appear which will allow us to choose our option i.e Run command.
You can do this with the keyboard by pressing,
Mac: cmd + shift + p
Windows : ctrl + shift + p
Step 4:
After step 3 is done, a command box will appear and will have to type our command in the command box.
In our case, the command is the word “screenshot”.
Once we type the word “screenshot”, we get 4 results/options out of which we can choose any one option at a time. All of the 4 options can be used for taking screenshots but all four of them have use cases.
The 4 different options are:
i) Capture area screenshot –
This option allows us to select the specific part on the webpage and then take a screenshot of the selected part.
ii) Capture full size screenshot –
As the name suggests, this option allows us to take the full size screenshot of the webpage, i.e. the entire webpage.
Note: In order to take the screenshot of the entire page we will have to first scroll to the bottom of the page as this option takes a screenshot of only the elements that are loaded in the DOM.
iii) Capture node screenshot –
Chrome allows us to select a node by clicking a node in the element tab of the dev tools panel. This option allows us to take a screenshot of only the selected node.
P.S. You can check which node is currently selected by typing $0 inside the console tab of the dev tools panel.
iv) Capture screenshot –
This option allows us to take a screenshot of only the elements which are present in the viewport.
After running any of the commands, Google Chrome will automatically save our screenshot in our device.
(It will where to save the screenshot but only for the first time)
Thank you for reading, please feel free to give your valued feedback.
I’m a frontend developer, looking for opportunities.
If you have an application you are interested in building, a problem that needs solving, or a project that needs rescuing, I’d love to help you with it.
Let’s connect!
If you’d like to take a snapshot of what you’re seeing on your computer screen (screenshot), it’s a simple process that can even help the Google Ads team troubleshoot your questions if you’re having issues with your account. Here’s what you do:
Google Chrome
- Visit the Google Chrome store and Add to Chrome the Save to Google Drive Chrome extension.
- When on the relevant web page in Chrome, launch Save to Google by clicking on its icon.
- You can save a copy of the resulting PNG to your local drive by clicking on the link to the saved copy on Google Drive, and then click the Download icon.
Microsoft Windows
- Bring the browser window to be captured to the foreground.
- Hold the ‘Alt’ key and press the ‘Print Screen’ key (often just labeled ‘Prt Sc’) on your keyboard.
- Open an image editing application such as MS Paint program under Start > Accessories.
- Paste the captured image into the application.
- Save the image as a JPEG (.JPG) file.
macOS
- Bring the browser window to be captured to the foreground.
- Press Command+Shift+3. This will save the image to your desktop as a .PNG file.
You can then keep the image for reference or attach it to an email message.
Google Chrome on Android has never been the most feature-packed browser, unlike many other Google apps for Android. Often, Chrome gets an essential feature so late that users have already found alternatives. Chrome’s long screenshot is one such feature. It’s not enabled by default, so let’s see how to take full-page screenshots in Chrome on Android.
For this to work, you will need to have Chrome 94 and above. You can find the latest version of Chrome on the Play Store. Let’s begin.
Enable Long Screenshot in Chrome on Android
As of right now, the feature is hidden behind a flag, disabled by default. In the future, it may become a part of the regular Chrome experience on Android. In which case, you can skip directly to the next section. For now, though, you’ll need to get your hands dirty.
- Open Chrome on your Android device.
- Use the address bar to go to chrome://flags.
- On the Chrome flags page, type long screenshot in the search field.
- Tap on the drop-down button under Chrome Share Long Screenshots.
- Select Enabled from the available options.
- Relaunch Chrome.
Take Chrome Full Page Screenshot on Android
Now that you have the feature enabled, you can start using it. TL;DR, use the Chrome share menu to take a long screenshot in Chrome.
- Open Chrome on your Android device.
- Head over to the web page that you want to take a screenshot of.
- Tap on the three-dot overflow menu button in the top-right.
- Select Share from the Chrome menu.
- From the Chrome Share sheet, select Long screenshot.
- Select as much of the page as you want to take a screenshot of. To take a full page screenshot in Chrome, select the whole page.
- Tap on the checkmark icon in the bottom-right when done.
- You can then annotate the screenshot if you want, or tap Next in the top-right.
- This will present you with the options to either Share the captured full page screenshot, save it to the device, or delete it.
Most Android smartphones already have some implementation of a scrolling screenshot functionality these days. With the new Android 12 release, long screenshots or scrolling screenshots are baked right into stock Android as well. So, the long screenshot on Chrome is very late to the scene.
However, the built-in Android screenshot tool does not always work great with websites. Sometimes websites don’t load the content until you scroll to the section.
When you try taking a scrolling screenshot, the content might not load up because you haven’t actually scrolled. The result is not what you were expecting. With the feature baked right into the browser, you can now take a better full-page screenshot in Chrome on Android.
Disclosure: Mashtips is supported by its audience. As an Amazon Associate I earn from qualifying purchases.
– Advertisement –
Using the “Long Screenshot” function in Chrome on Android, you can record full-page screenshots to conserve for later or show others. Here’s how to do it.
What You’ll Need
The “Long Screenshot” function is offered with the Chrome 94 upgrade for Android. Since September 2021, you’ll require to allow a covert flag to utilize it. Ultimately, the function might end up being a non-hidden part of a future Chrome release. Any full-page screenshots you catch are conserved in PNG format.
Before we start, ensure you upgrade the Google Chrome app utilizing the Play Store to the current variation on Android.
RELATED: How to Enable Google Chrome Flags to Test Beta Features
How to Enable and Take Full Screen Screenshots in Chrome
To start, open the Chrome app on your Android gadget. Type chrome:// flags in the address bar and struck Enter.
Warning: Chrome keeps some functions as surprise flags because they’re unsteady and may impede the web browser’s efficiency on your gadget. Utilize them at your own danger.
On the “Experiments” page, type “long screenshots” in the search bar.
Under the “Chrome Share Long Screenshots” flag, tap the drop-down menu.
Select “Enabled” in the menu.
Next, relaunch the internet browser. After that, open the page you wish to record. As soon as the page loads, tap the 3 vertical dots in the top-right corner to open the Chrome menu.
Select “Share” in the Chrome menu.
Chrome’s Share menu will open at the bottom. Select “Long Screenshot.”
Chrome will open a white-bordered box with up and down arrows on the leading and bottom and gray out the remainder of the location. Tap and drag the up or down arrows in the particular instructions to catch more locations of the websites.
Once done, struck the check mark button in the bottom-right corner, which will open Chrome’s integrated image editor.
In Chrome’s integrated image editor, you’ll see the “Crop” (for cropping), “Text” (for including text), and “Draw” (for annotations) alternatives at the bottom. Tap “Next” in the top-right corner.
Another Share menu will open with the choices to share the long screenshot or wait to your phone. Tap the choice that fits you finest.
Repeat as frequently as required to record as lots of site images as your Android gadget can deal with. By the method, you can record full-screen screenshots utilizing Chrome on Mac and PC. Have a good time!
RELATED: How to Take Full Page Screenshots in Google Chrome Without Using an Extension
– Advertisement –
There are umpteen ways to capture screenshots of web pages in your Google Chrome browser. You can use the good-old Print Screen key (or Cmd+Shift+4 on a Mac), get a snapshot utility like SnagIt or the Windows Snipping Tool, or even better, get a dedicated Google Chrome extension like Smartshot that lets you capture the screen and annotate it.
What some may not know is that the newer versions of Google Chrome have a built-in screenshot capabilities allowing to perform screen captures without install any extensions. The more interesting part is that you can even add device frames to your captured images for more realistic mobile screenshots.
Did you know you can take screenshots of web pages inside Google Chrome without any extension.
— Amit Agarwal (@labnol) October 18, 2016
How to Screen Capture in Google Chrome
To get started, open any web page inside Google Chrome and choose Settings -> Tools -> Developer Tools. Alternatively, press F12 on Windows or Cmd+Opt+I on a Mac to directly open the Chrome Dev Tools window.
Next, toggle the Device Toolbar button so that it turns blue. Now select any mobile device from the built-in list of device presets. Set the zoom to 100% and click the Rotate icon to change the orientation (default is portrait mode).
The stage is set. Click the 3-dot menu in the right and enable device frame. Next, choose Capture Screenshot from the same menu to save a device screenshot in PNG format.
Capture Screenshots in Firefox
You can capture screenshots of web pages in Firefox as well without installing any add-ons. Unlike Chrome which can only capture visible region, Firefox developer tools can take a snapshot of the entire web page and automatically saves it in your default downloads folder.
Open Web Developer tools inside Firefox and, under Settings, enable the option – Take a screenshot of the entire page. Firefox will add a camera icon to the developer toolbar letting you capture screenshots with one-click.
Microsoft’s Windows and Apple’s macOS come with built-in screenshot capabilities. They work just fine, but if you’re looking for something a bit more advanced, you might need to turn to third-party tools, especially if you’re looking for features like being able to capture full page screenshots of websites you’re reading.
However, if you are using Chrome, don’t worry because there is actually a built-in tool within Chrome itself that helps you snag full page screenshots. It is admittedly very well hidden as we’re not sure that Google planned for it to be a main feature, but if you don’t mind taking a few seconds, here’s how you can snap full page screenshots in Google’s Chrome browser on your computer.
Taking Full Page Screenshots In Chrome
Launch Chrome and click the menu button and go to More tools > Developer tools
Click the three dot icon and select Run command
In the search box, type “screenshot”
- Click on the second option that says “Capture full size screenshot”
- The image will now automatically download to your computer and you should find it in your Chrome’s download folder
Now obviously this is an less than ideal method if you need to take full page screenshots often, which is why if you need to do this often, you’ll have to use a third-party Chrome extension to get the job done.
Taking Full Page Screenshots Using GoFullPage
- Download and install the GoFullPage extension
Click on the extension or press Shift + Alt + P to activate it
- Wait for it to capture and it will load in a new window
Tap the download button to save it to your computer
This will depend from computer to computer. All your screenshots will be automatically downloaded and saved to your Chrome downloads folder.
Unless you’ve changed it, by default it should be saved to \Users\
Take Screenshots in Chrome And Firefox Browsers Without Any Extension And Tools
Have you been looking for ways to capture screenshots from your favorite browsers like Google Chrome and Mozilla Firefox without the help of any of the extensions?
we have got the perfect solution right here for you, all neatly stacked up. Dive into the article to learn how to hack this simple trick.
Take Screenshot In Google Chrome Without Any Extension
Step 1:
Launch Google Chrome and go to the web page that you want to take the screenshot of. Once you are there, hit the more actions icon at the top right corner of the web page Select more toolsfrom menu then choose Developers tools.
Step 2:
A small window for Developer Tools will open up. Click on the Toggle Device Mode button as shown in the screenshot given below to activate it.
Step 3:
Minimize the Developer Tools window. In the web page behind it, you can choose your device type for your screenshot from the device drop down menu and you can also set up the size of your screenshot and its orientation by using the options shown in the following screenshot.
Finally Once everything is done, click on the 3 dots icon at the top right corner. From the options that get expanded out, click on the one that says Capture Full Size screenshot. Well done, you have taken a screenshot right from your Chrome without the help of any of the extensions.
Take Screenshot In Mozilla FireFoxe Without Any Extension
Step 1:
Just like in Chrome, Launch Mozilla Fire Fox and go to the web page that you want to take the screenshot of. Once you are there, hit the Developer Lite icon at the top right corner.
Step 2:
As next, click on Responsive Design Mode View option as shown in the screenshot given below.
Step 3:
Make sure you selected this option as shown in the screenshot given below.
Step 4:
You can set up the size and orientation for your screenshot by using the options given at the top. Once you are all set, hit the Camera icon to capture the screenshot then click on it and image automatically downloaded in your pc.
Taking screenshots of a webpage’s content is a simple way to share it with family and friends. While taking standard screenshots is simple, you may want to capture a full-page scrolling screenshot, which may be difficult on a PC due to the lack of a direct option. Some of you may consider utilizing third-party extensions, but what if I told you that Google Chrome has a hidden feature that allows you to take screenshots of the entire page as it scrolls? Yes, it is achievable, and I will demonstrate this in this essay. Continue reading.
A hidden tool in Google Chrome’s Developer Tools can be used to capture a full-page scrolling snapshot. Simply follow the instructions outlined below to screenshots in google chrome.
Step 1: Launch Google Chrome on your computer, whether it’s running Windows or macOS.
Step 2: Go to the page where you wish to take a full-page scrolling screenshot, and open it. In the top right corner, tap the three-dot menu symbol.
Step 3: Select More Tools from the menu options.
Step 4: Select Developer Tools from the More Tools menu. You can also open Developer tools by pressing Ctrl+Shift+I on Windows or Command+Option+I on Mac.
Step 5: On the following page, beside the settings symbol, press the three-dot menu.
Step 6: From the menu, select the Run command. You can also run the command by pressing Ctrl+Shift+P on Windows or Command+Shift+P on a Mac.
Step 7: On the run command screen, type “screenshot” into the search box. Tap the Capture full-size screenshot option to see a total of four different screenshots.
That is all there is to it. A full-size screenshot of the webpage will be taken and saved in the Downloads folder on your computer. If you’re asked if you want to save the screenshot, say yes by tapping Save.
Capture Full Page Screenshot in Mobile View
Step 1: Follow the procedures outlined in the article to go to the Developers page. Toggle the device toolbar on the developer tools page by tapping the Mobile/Tablet icon. Toggle the device toolbar once you’re on the developer tools page by pressing Ctrl+Shift+M on Windows or Command+Shift+M on Mac.
Step 2: Tapping the Device toggle bar simulates you viewing the webpage on a smartphone. In the corner, look for a three-dot icon and tap it.
Step 3: A menu with a variety of options will appear. Simply select Capture full-size screenshot from the menu.
A full-size screenshot will be stored, and it will appear as if it was taken on a mobile device.
The Alternate Way-Using Extension
You can use third-party extensions to click full-page screenshots on Chrome if you don’t want to use the built-in tool.
While there are other such extensions available on the Chrome Web Store, we found GoFullPage to be the most useful. To capture each area of the page, simply install the extension and then hit its icon in the toolbar.
Final Thoughts
This is how you can take screenshots of a full-page scrolling in Google Chrome. It’s simple to do so by heading to developer options. You may also use the device toolbar to take a full-size screenshot, similar to what you’d do with a smartphone.
Using the “Long Screenshot” feature in Chrome on Android, you can capture full-page screenshots to save for later or share with others. Here’s how to do it.
What You’ll Need
The “Long Screenshot” feature is available with the Chrome 94 update for Android. As of September 2021, you’ll need to enable a hidden flag to use it. Eventually, the feature could become a non-hidden part of a future Chrome release. Any full-page screenshots you capture are saved in PNG format.
Before we begin, make sure you update the Google Chrome app using the Play Store to the latest version on Android.
RELATED: How to Enable Google Chrome Flags to Test Beta Features
How to Enable and Take Full Screen Screenshots in Chrome
To get started, open the Chrome app on your Android device. Type chrome://flags in the address bar and hit Enter.
Warning: Chrome keeps some features as hidden flags since they’re unstable and might hinder the browser’s performance on your device. So use them at your own risk.
On the “Experiments” page, type “long screenshots” in the search bar.
Under the “Chrome Share Long Screenshots” flag, tap the drop-down menu.
Select “Enabled” in the menu.
Next, relaunch the browser. After that, open the page you want to capture. Once the page loads, tap the three vertical dots in the top-right corner to open the Chrome menu.
Select “Share” in the Chrome menu.
Chrome’s Share menu will open at the bottom. Select “Long Screenshot.”
THE BEST TECH NEWSLETTER ANYWHERE
Join 425,000 subscribers and get a daily digest of features, articles, news, and trivia.Sign Me Up!
By submitting your email, you agree to the Terms of Use and Privacy Policy.
Chrome will open a white-bordered box with up and down arrows on the top and bottom and gray out the rest of the area. Tap and drag the up or down arrows in the respective directions to capture more areas of the web page.
Once done, hit the check mark button in the bottom-right corner, which will open Chrome’s built-in image editor.
In Chrome’s built-in image editor, you’ll see the “Crop” (for cropping), “Text” (for adding text), and “Draw” (for annotations) options at the bottom. Tap “Next” in the top-right corner.
Another Share menu will open with the options to share the long screenshot or save it to your phone. Tap the option that suits you best.


