Cameron SummersonCameron Summerson
Editor in Chief/Review Geek
Cameron Summerson is the Editor in Chief of Review Geek and serves as an Editorial Advisor for How-To Geek and LifeSavvy. He’s been covering technology for nearly a decade and has written over 4,000 articles and hundreds of product reviews in that time. He’s been published in print magazines and quoted as a smartphone expert in the New York Times. Read more.
Sometimes it’s necessary to grab a still image of what’s happening on your device’s screen—that’s called a screenshot. While this used to be a hassle on Android (many moons ago), all modern handsets include the capability. Here’s how to do it.
How to Take a Screenshot on Most Android Devices
If you’re using a phone or tablet that was released in the last four years or so, then taking a screenshot is as easy as tapping a couple of buttons. The primary exception here is going to be on Samsung Galaxy devices that predate the S8, but we’ll cover those down below.
For everyone else, just press the Volume Down+Power buttons at the same time. You’ll have to briefly hold this combination, and you’ll be notified that a screenshot was taken by an audible sound, a visual flash, as well as an entry in the notification bar. Easy peasy.
How to Take a Screenshot on Samsung Galaxy Devices
Like I said, if you’re using a Galaxy device that came out before the S8, then the process is slightly different. Instead of pressing volume down + power, you’ll use the Home+Power buttons. This, of course, doesn’t work on the S8, because Samsung ditched the home button. So you’ll use the above method instead.
Again, you’ll know a screenshot was taken by a sound, visual flash on the screen, and a notification in the bar.
How to Share and View Your Screenshots
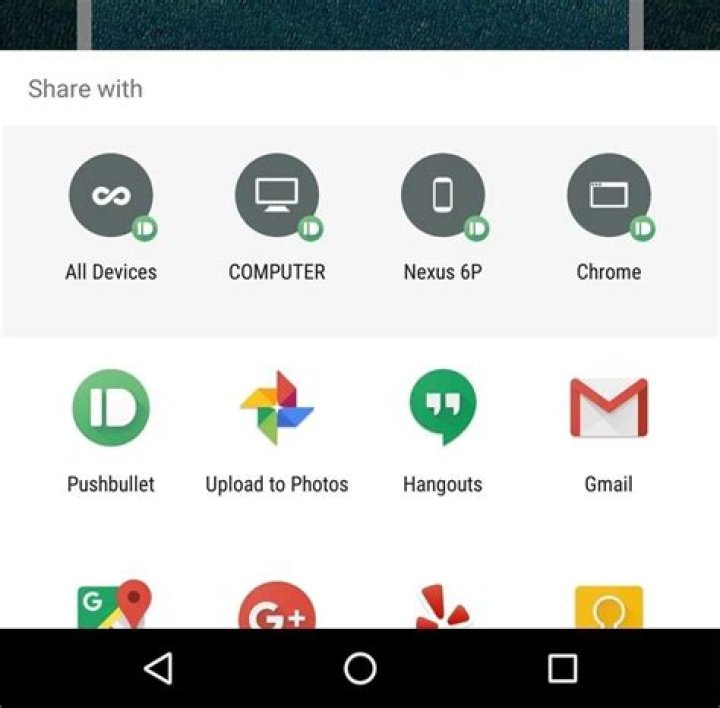
Regardless of phone model, you can interact with the screenshot directly from the notification, where you’ll find options to share, delete, or even edit it.
To view all the screenshots you’ve taken, fire up the photos app, then slide open the menu on the left side of the screen.
Select “Device Folders,” then “Screenshots.” Boom.
Again, the exception here is on Samsung devices, which store screenshots in the default camera images folder. This means they should show up in the main Photos interface alongside any pictures you’ve taken.
- › How to Add Images to Questions in Google Forms
- › How to Delete Your Photos on Facebook
- › Razer Thinks You Want a PC Gaming Headset That Vibrates
- › How to Get a Link to a Photo or Video on Instagram
- › The Fix for Slow AMD Processors on Windows 11 Is Here
Cameron Summerson
Cameron Summerson is the Editor in Chief of Review Geek and serves as an Editorial Advisor for How-To Geek and LifeSavvy. He’s been covering technology for nearly a decade and has written over 4,000 articles and hundreds of product reviews in that time. He’s been published in print magazines and quoted as a smartphone expert in the New York Times.
Read Full Bio »
For many reasons, we will need to take a screenshot on our Android device to make a record. However, things are not always so easy. We cannot take a screenshot directly. In order to get a clear screenshot successfully, we need to download a professional program for help. Here is a very professional one from the internet, the name of the tool is called Wondershare MobileGo for Android (Windows), which enables you to take screenshots on your android phone or tablet device and then save them to your computer in just one click.
As a professional tool, you can easily handle the Wondershare MobileGo for Android tool. If you are still hesitating about the tool, you can now download the free trial version to have a try before you purchase the tool. Then please install it on your computer and then launch it. You can now follow me to finish the process of taking a screenshot on Android. Just have a try now.
Here are both windows version and a Mac version for you. Please choose the suit one according to the system of your computer.
Only two steps to take a screenshot on an Android phone or tablet simply
Besides, for people who would like to figure out How To Screenshot On HP Laptops, switch to read more.
Step 1: Launch MobileGo for Android and connect Android to PC
Now, please connect your Android device to your computer. If you are windows version, you can do the connection via USB cable or Wi-Fi. If you are mac version, please do the connection via a USB cable. The Wondershare MobileGo for Android program will then detect your device immediately and then display it in the starting window.
Step 2: Take a screenshot on Android
Now you can check your files freely. You can find all files including video, apps, music files and even photos in the starting window. To make a screenshot, you need to open your Android device and make sure the screen is what you want. Then please click the button “Screenshot” under the android phone in the starting window to make a screenshot.
After the screenshot, you need to locate a place to save the photoed picture to your computer. By default, the picture will be saved in PNG format. And then you can transfer the screenshot picture to wherever you want or share it with your friends.
If you have many different screenshots to record, please display the picture you want on the Android device and then click the button next to “Screenshot” to fresh the screen. After this work, please click the button “Screenshot” to take the screen picture you want on Android.
In addition to taking screenshots on Android, you can also manage your android device freely. Such as backup & restore contacts, SMS, apps, call log, music, videos, and so on. To find more information, just search our website to find more!
For many reasons, we will need to take a screenshot on our Android device to make a record. However, things are not always so easy. We cannot take a screenshot directly. In order to get a clear screenshot successfully, we need to download a professional program for help. Here is a very professional one from the internet, the name of the tool is called Wondershare MobileGo for Android (Windows), което ви позволява да take screenshots on your android phone or tablet device and then save them to your computer in just one click.
As a professional tool, you can easily handle the Wondershare MobileGo for Android tool. If you are still hesitating about the tool, you can now download the free trial version to have a try before you purchase the tool. Then please install it on your computer and then launch it. You can now follow me to finish the process of taking a screenshot on Android. Just have a try now.
Here are both windows version and a Mac version for you. Please choose the suit one according to the system of your computer.
PS: Here, you can learn more about how to екранна снимка на Snapchat, без те да знаят, how to screenshot on Lenovo, и най -добрите Snapchat Saver за теб също.
Only two steps to take a screenshot on an Android phone or tablet simply
Besides, for people who would like to figure out Как да направите екранна снимка на лаптопи на HP, превключете, за да прочетете повече.
Step 1: Launch MobileGo for Android and connect Android to PC
Now, please connect your Android device to your computer. If you are windows version, you can do the connection via USB cable or Wi-Fi. If you are mac version, please do the connection via a USB cable. The Wondershare MobileGo for Android program will then detect your device immediately and then display it in the starting window.
Step 2: Take a screenshot on Android
Now you can check your files freely. You can find all files including video, apps, music files and even photos in the starting window. To make a screenshot, you need to open your Android device and make sure the screen is what you want. Then please click the button “Screenshot” under the android phone in the starting window to make a screenshot.
After the screenshot, you need to locate a place to save the photoed picture to your computer. By default, the picture will be saved in PNG format. And then you can transfer the screenshot picture to wherever you want or share it with your friends.
If you have many different screenshots to record, please display the picture you want on the Android device and then click the button next to “Screenshot” to fresh the screen. After this work, please click the button “Screenshot” to take the screen picture you want on Android.
В допълнение на taking screenshots on Android, you can also manage your android device freely. Such as backup & restore contacts, SMS, apps, call log, music, videos, and so on. To find more information, just search our website to find more!
Part 1: The need of taking an Android screenshot for the majority of users.
To a number of Android’s customers in particular, as well as the other brands’ customers, the need of taking a screenshot is not so hard to understand, although a lot of people have shown their doubts about this practice. In fact, a screenshot is much more useful than you can ever imagine. Sometimes, it will come to you as a certain request to save and store the information or the data which is apparently displayed on the screen. In those situations, a capscreen will definitely be your best choice.
But on the other hand, to the potential and loyal users of Android devices, this brand of operating system has varied through a lot of lines and brands, as well as a number of different type of mobile devices. As a certain result, knowing how to take a screenshot on Android seems to be quite a complex mission.
The best news for you is, we understand your worries, and here we are to provide you with the latest, informative and detailed guide on how to print screen on your Android devices. Android screen capture has never been so easy to perform!
Part 2: The most tradition way to have an Android print screen.
Although by far, there have been a plenty of methods for Android users to take a screenshot on their phones or tablets, there is always one old, yet effective and common way to have a perfect Android screen cap.
Just follow the steps as provided below and you will soon find yourself have no difficulty getting access to an Android screen shot.
Step 1 Turn on your Android’s smartphones or tablets into the right position. Navigate everything on the display screen as an Android screen snapshot will take a full picture of all the information which is currently on. Planning in advanced will prevent you from having a bad or unwanted screenshot.
Step 2 Locate the position of the Power button as well as the Volume down button.
Step 3 At the same time, hold your fingers tightly on both the buttons.
Step 4 Wait for some seconds (approximately from 1 – 2 only) until you have seen a flash.
Step 5 Now that you have come to this step, you have successfully taken an Android screenshot.
There are, however, some important tips that you should bear in mind in order to avoid any potential errors. Just follow the advice and make sure nothing wrong happen to your screenshot.
· If you hold the Power button too soon for the Volume down button to be caught up, the screen will be switched off.
· On the contrary, if you press the Volume down button too early, all you have done is just simply turn off the volume of your device.
· The key to solve this problem is to practice a little bit. It will take you time to perform thistask smoothly.
Furthermore, check these issues to make sure if you have already taken a successful Android screenshot.
· Check #1: A small copy of your screenshot is displayed into a small frame and then disappears.
· Check #2: You have heard a sound as if your Android’s smartphones or tablets have just taken a photo.
· Check #3: A notification appears in the bar and let you know about the Android phone screen capture.
Part 3: Other different ways for you to take an Android screencap on various devices.
#Way 1:
Step 1 This method can only be applied for Android S6 devices. Make sure to check the version of your operating system before following them.
Step 2 Find the Settings menu with the gear icon in your main menu.
Step 3 Under a bar which is entitled Motion, you will see an option called Motions and gestures. Tap on it to begin your work.
Step 4 A dropdown menu will immediately appear on the screen. Roll down to check all your choices and finally make a move on the Palm swipe to capture. Make sure that this feature has already been turned on.
Step 5 Now that you have done with this, every time you need a screenshot, just swipe your palm through the screen to do it.
#Way 2:
Step 1 This method can only be applied for Experia Z5, so please be carefully before you start.
Step 2 Press the Power button.
Step 3 On the screen that pops up, you will see a lot of choices available included a button allowing you to take a screenshot, and even to record your screen.
#Way 3:
If your devices are working based on Android 4.0 and earlier, then you will need some help from another tool to take a screenshot. We are more than happy to provide you with the list of the 4 best screenshot apps that can be used on Android’ smartphones and tablets.
§ Download link:
§ Overalldescription: Screenshot Ultimate is definitely one of the best solutions for you if you are looking for a free of charge, easy to use and versatile tool to help you take a screen cap. This app offers users with a useful and handy way to work effectively with a plenty of methods available for you to choose!
§ Download link:
§ Overall description: In case you are the type of easy and simple user who does not require a big, complicated app, this tiny yet powerful Super Screenshot will undoubtedly live up to your expectations. Not only does it provides you with the ability to take a screen cap in seconds, but it also gives you a hand in editing the screencap and so on. Marvelous!
§ Download link:
§ Overall description: If taking a screenshot is the only requirement of yours, so Capture Screenshot is without doubt constructed and designed for your needs! It
provides you with simple yet efficient methods of taking a screenshot, along with the function to edit the photo. You do not have to worry about the beauty as well as the perfection of the app. Let Capture Screenshot handle it!
If you ever need help troubleshooting an issue that you’re having with your Android device, one of the most useful tools you have available to you is the screenshot. Essentially, this is an exact copy of everything that is showing on your screen at any point in time, which you could use to capture the issue you’re having, then share the screenshot with your tech support.
- Don’t Miss: More Android Basics for Your New Smartphone
Screenshots can also come in handy if you run across an image that you can’t seem to download, since it would provide an easy way to capture the image and save it for later. Screenshots are also great for sharing that funny or horrific text conversation or the cheesy pick-up line you used (or had used on you) in Tinder. On top of these uses, capturing a screenshot is incredibly easy, so I’ll show you how to do it on most Android devices below.
Taking a Screenshot on Most Android Devices
For almost every Android device, all you have to do to take a screenshot is press and hold the volume down and power buttons simultaneously. It’s a natural-feeling gesture—essentially, all you need to do is squeeze both sides of your phone with your thumb and forefinger.
You’ll know the screenshot was successfully taken when you see an animation that looks like your screen shrinking away for a split-second. At this point, you’ll find the screenshot you just took in your notification tray, where you can use the share menu to send it to another person.
alt=”Android Basics: How to Take a Screenshot on Any Phone or Tablet” width=”532″ height=”532″ />
This button combination works on Amazon Fire devices, Google Nexus devices, Sony Xperias, OnePlus devices, HTC devices, and LG brand devices. On some HTC devices, you can just hold the Power button first, then quickly tap the Home key.
Taking a Screenshot on a Samsung Device
For Samsung devices, you’ll need two hands—one to hold the phone and the other to execute the gesture. With that in mind, simply press and hold the power and home buttons simultaneously to take a screenshot.
For Devices Running Android 6.0 Marshmallow or Higher
There’s a feature in Android Marshmallow called Now on Tap that lets you take a screenshot without having to press any hardware buttons. Just open Now on Tap by long-pressing the Home button, then tap the share icon the lower left. You can choose to save the screenshot to Photos or send it to any other app or service that lets you.
- More Info: How to Take Screenshots with Now on Tap
You can follow Android Hacks over on Facebook and Twitter, or Gadget Hacks over on Facebook, Google+, and Twitter, for more Android tips.
Keep Your Connection Secure Without a Monthly Bill. Get a lifetime subscription to VPN Unlimited for all your devices with a one-time purchase from the new Gadget Hacks Shop, and watch Hulu or Netflix without regional restrictions, increase security when browsing on public networks, and more.
To revist this article, visit My Profile, then View saved stories.
To revist this article, visit My Profile, then View saved stories.
Sometimes you have to capture that crazy text you received, grab proof of your amazing high score in a game, or send the IT department a picture of what’s going wrong on your device. Knowing how to take a screenshot can save you a lot of explaining. Every operating system has a built-in method of capturing the screen. Some even allow you to capture specific portions or grab a scrolling screenshot. We'll explain how.
To capture a screenshot on your iPhone or iPad, press the Sleep/Wake and Volume Up buttons simultaneously. On older devices with a Home button, press the Sleep/Wake and Home buttons simultaneously.
When it works, you will hear a capture sound and see a screenshot preview at the bottom left of the screen, where you can tap on it to edit or share.
Screenshots only capture the visible portion of the screen, but you can capture a whole document or webpage by tapping on the screenshot preview and selecting Full Page at the top right.
To capture a screenshot on an Android phone or tablet, press the Power and Volume Down buttons simultaneously.
When it works, you will hear a capture sound and see a screenshot preview at the bottom left of the screen, where you can tap on it to edit or share.
Some Android phone manufacturers offer a scrolling screenshot feature that can capture a whole webpage or message thread. They all have different names, but each involves taking a screenshot, then tapping on a button when the preview appears. For example, on a Samsung phone, you should press the button with two arrows in a box to use Scroll Capture. Huawei has a similar option called Scrollshot, LG offers an Extended option, and OnePlus has Expanded Screenshot.
If your phone lacks this feature, consider a third-party app like Screen Master.
Windows Snipping Tool
Photograph: Simon Hill
To capture a screenshot on a Windows laptop or desktop computer, press the Print Screen keyboard key (usually abbreviated to Prt Scn or similar). If you only want to grab a screenshot of the active window, press the Alt and Print Screen keys together. Your captured screenshot is copied to the clipboard automatically, and you must open Microsoft Paint, Photoshop, or whatever image software you use, to paste it, so you can edit and save it.
If you just want to capture a portion of the screen in Windows 10 try pressing the Windows, Shift, and S keys together. You can then click and drag to highlight the bit you want and let go to capture it. In earlier versions of Windows, you can do the same thing with the Snipping Tool, which is found by clicking Start and typing “Snipping Tool” in the search bar. Once again, the screenshot is copied to your clipboard for you to paste.
To capture screenshots and automatically save them, press the Windows and Print Screen keys together. Screenshots are saved in a folder titled Screenshots in your Pictures folder.
To capture a screenshot on a Chromebook, press the Control (usually abbreviated to Ctrl) and Show Windows (a rectangle with two lines to the right) keys together.
To capture a portion of the screen, press the Shift, Control, and Show Windows keys, click and drag to highlight the bit you want, then let go to grab the screenshot.
Capturing your screen takes some finesse and a little know-how. See which way you like best.
Taking a screenshot on Android can be done a number of ways.
Taking a screenshot on your Android phone or tablet isn’t as easy as pressing a single button. I wish it were. It can be a frustrating experience, especially when you’re trying to capture a specific scene in motion — like in a video clip or game — or a screen that you worry may quickly disappear. It’s also frustrating if you think you’re taking a screen capture and wind up almost powering down your phone instead.
To complicate the issue, some Android phones have a few different methods that make it quick and painless to capture your screen, unlike newer iPhones , which have only one way to take a screenshot.
We’ll share the standard method that should be available across all Android phones, as well as a breakdown of how to take screenshots on a Samsung or Motorola phone.
Android’s tried-and-true method
Nearly every Android phone or tablet allows you to take a screenshot by briefly holding the volume down and power buttons. Just press them at the same time for a brief moment and when you let go you’ll hear a camera shutter sound, your screen will flash, and you’ll see a thumbnail of your screenshot show up along the bottom of your screen.
Some Android phones require a quick press, while others you’ll need to hold the volume down and power buttons in for a brief second.
Getting the timing down can be tricky at first. Some phones, like the Pixel 4 XL, require you to press both buttons for about a second. Others, like the OnePlus 8 Pro , however, will only take a screenshot if you quickly press the buttons without holding them down at all. If you mistime the button presses, you’ll find yourself staring at your phone waiting for it to do something, and yet nothing happens. Or worse, you may get to the reboot screen, and not know how to get out (just press the home button).
Take a few minutes to try both methods if you’re having a hard time triggering the screenshot functionality on your phone. It will save future you some headaches.
Samsung’s Galaxy phones have several options for taking the perfect screenshot.
Samsung’s long list of screenshot tools
Samsung has three extra options for taking a screenshot on a Galaxy phone like the Galaxy S20 or Galaxy Note 10 .
Swipe to capture: To turn on the palm swipe gesture, you’ll need to go to Settings > Advanced Features > Motions and gestures and slide the switch next to Palm swipe to capture to the On position. With it turned on, slide the edge of your hand from the left edge of the display to the right side to take a screenshot. It may feel a bit weird at first, but it’s a more reliable method for someone who struggles with getting the timing down of pressing the right button combo.
Smart Selection tool: Go to Settings > Display > Edge screen and then tap on Edge Panels (turn the feature on if it isn’t already). Lastly, add the Smart Capture Panel. Going forward, you can slide out your Edge panels and select the Smart Capture panel to take a screenshot, record your screen or create a GIF.
For Galaxy Note phones only: Remove the S-Pen stylus and use the Air Command menu to select Smart Capture and take a screenshot. Not only do you get the extra options that Smart Capture adds, but using the stylus means you can drag the capture window to any part of the screen you want, which can save you from cropping out large portions of it later.
Motorola’s screenshot tool is pretty cool, too.
Motorola’s unique screenshot trick
Own a Motorola phone ? It’s full of special gestures for things like opening the camera with a quick turn of the wrist, or, it turns out, for taking a screenshot.
You’ll need to turn it on by opening the Moto app in your app drawer, then selecting Moto Actions and tapping Three-finger screenshot from the list of options. There’s a quick demo built into the settings section that lets you try it out before turning it on. The process consists of placing three fingers, somewhat spread out, on the screen at the same time until you see a screenshot captured.
If your Android phone has a favorite screenshot method you want to share, leave a comment below and we’ll add it to this post.
With taking a screenshot mastered, take a few minutes to learn all of Android 10’s gestures , its privacy controls, and then dive headfirst into our favorite hidden features .
How to Take a Screenshot on your PC, Phone or Tablet
Taking a screenshot is an important skill for young people and parents to have. This article will show you how to Screenshot an image on your mobile phone, computer and tablet. Not only are screenshots useful for demonstrating computer programs and accessing online resources when you don’t have an internet connection, but they are essential for recording evidence of cyberbullying.
It must be acknowledged that screenshots can be used to instigate bullying, as they allow the taker of the screenshot to copy incriminating photos and messages. However, in order for a young person to be prepared to handle cyberbullying situations, it is crucial that he/she knows how to record evidence of cyberbullying through taking screenshots.
What is a Screenshot?
But first, what exactly is a screenshot? A screenshot or screen capture is a picture taken by a computer, mobile or tablet user, using the device in question, to record the visible items displayed on the screen. The image is stored as a graphics file. Screenshots can be taken using various programs or by using particular keyboard/button shortcuts.
How to Take a Screenshot on a Computer
Windows
- Hit the PrtScn button/ or Print Scrn button, to take a screenshot of the entire screen: When using Windows, pressing the Print Screen button (located in the top right of the keyboard) will take a screenshot of your entire screen. Hitting this button essentially copies an image of the screen to the clipboard. Where does it go? Well, you have to open Word, Paint or some other image editing program to view, edit or save the image. For example, open Word and click Ctrl and v. This is a shortcut instead of right-clicking the mouse and selecting paste. If you’d like to capture only the active window press the Alt and PrtScn buttons together and paste into your document like above.
- Use the Snipping Tool program to take and edit screenshots: If you’re having difficulty locating or using the Print Screen key you might prefer to use Snipping Tool. Snipping Tool is a program that is included for free with Windows 7,
Windows Vista, and a number of other Windows products. It allows you to take screenshots easily by clicking New and then selecting the area that you’d like to screenshot. You can then edit the screenshot, using highlighter and pen tools. Snipping Tool is just one of the numerous tools available to assist you in taking screenshots.
Some laptops, in particular, mightn’t have a PrtScn key. The user manual that came with your machine should have instructions on different key combinations that can be used for taking screenshots.
- Hit the Command, Shift and 3 keys together to take a screenshot of the entire screen: When using Mac, pressing the Command, Shift and 3 buttons together will take a screenshot of your entire screen. This screenshot will be automatically saved to your desktop. Press the Command, Shift and 4 keys together to take a screenshot of a selected area.
- Use the Grab tool to take a screenshot: An alternative to the keyboard shortcuts on Mac is to use the Grab tool. Grab is a program that is included for free with Macs. It allows you to take screenshots easily by clicking Capture and then selecting the type of screenshot that you’d like to take. Grab is just one of the numerous tools available to assist you in taking screenshots.
How to Take a Screenshot on a Smartphone/Tablet
How to take a screenshot on a smartphone or tablet varies depending on the operating system and device used. The easiest way to find out how to screenshot on your individual device is to search online. The following videos, available on Youtube, show how to take screenshots with some of the most popular phones and tablets. Generally speaking, to take a screenshot on a phone or tablet, you press the power key and the home button at the same time. Your screenshot will add itself to your gallery.
How to retrieve screenshots on Android? This article will guide you to recover Android screenshots step by step. If you’re interested in it, please read this post now.
Android Recovery
• Filed to: Android Recovery • Proven solutions
When you’re surfing on the Internet and find something interesting, shocking or resonating, you must be impatient to share with your friends via various communication tools, right? Then, what will you do? I guess lots of users will directly take a screenshot on mobile phone and send it to all people you want to share, right?
Thus, you must have saved lots of screenshots on Android and some of them might make sense for you. Then, it could be a big trouble when you find some of them are disappeared from your device, but fortunately, you can recover screenshots on Android with a simple solution.
- Part 1. How to Recover Screenshots on Android with Few Clicks
- Part 2. How to Take Screenshots on Android Effectively
Part 1. How to Recover Screenshots on Android Phone or Tablet within Few Clicks
In this article we are gonna give you simple tips and some good advice for your data protection. To do it, you need to find a tool as your daily assistant, here we could like to recommend dr.fone – Data Recovery (Android) for your reference. With it, you can easily find your lost screenshots with just few clicks and you can also use it to restore data like photos in gallery, videos, audio, contacts, Whatsapp images, call logs, messages, etc.
dr.fone – Data Recovery (Android)
Key features of dr.fone – Data Recovery(Android)
- Directly access to Android’s internal memory and extract your needed data from broken, damaged or non-responsive Android within few clicks.
- View all data on broken Android without enabling USB debugging.
- The program supports almost 6,000 Android devices on the market, so you can deal with almost all kinds of Android backup and restore issues.
- Simple to use for both beginners and experts.
Steps on How to Recover Screenshots on Android Phone or Tablet within Few Clicks
Step 1. Connect the Android with PC
Launch and run iSkysoft software on your computer and click on “Data Recovery” option. Now, connect the Android device to the computer and enable USB debugging on Android device.
In case the USB debugging is active on your device then the program interface would detect the settings automatically. However, you can follow the onscreen steps to enable it by yourself.
Step 2. Select Gallery for Scanning
The program would scan and analyze the data accordingly with different categories. Now, this is all about recovering the screenshots, so they are stored in photo format in the gallery.
Now, click on Gallery in the category menu or you want to scan the complete data then you can scan the complete device with the options given. After, you are done selecting your screenshots, click on Next to proceed.
Step 3. Preview and Recover Screenshots
The program has all the options to dig deep inside your device for photos or another type of data. The option selected by you would display the results in its format, if you have ONLY selected photos, it would display all the photos on the main window.
This is a hassle free process and you don’t have to check folders for relevant data type. You can now recover and select the screenshots you need. Select the screenshots you need and click on the “Recover” button.
Part 2. How to Take Screenshots on Android Effectively?
Taking a screenshot on Android could be an easy task if you’re familiar with your Android. If you don’t know how to do it, please follow the below steps:
- Locate the screen you want to capture on the device;
- Press the Power button and Volume down button simultaneously;
- When you hear a shutter noise on your phoen and a screenshot preview will appear on your phone.
- Check the screenshot in the gallery.
Obviously, this method are more convenient for users while you’re only need to capture 1 or 2 screenshots. If you wish to capture coherent picture or take screenshots while you’re playing games on Android, the above solution is not easy to handle. Then, you might need to ask help from a professional screen recorder tool, such as Android Screen Recorder.
With it, you can easily and quickly record all activities on Android without any complex operation, and you can also use it to take you needed screenshots on PC as you like. You can download this program on your computer and follow the detailed tutorial to record or take screenshots on Android easily.


