Benj EdwardsBenj Edwards
Associate Editor
Benj Edwards is an Associate Editor for How-To Geek. For over 15 years, he has written about technology and tech history for sites such as The Atlantic, Fast Company, PCMag, PCWorld, Macworld, Ars Technica, and Wired. In 2005, he created Vintage Computing and Gaming, a blog devoted to tech history. He also created The Culture of Tech podcast and regularly contributes to the Retronauts retrogaming podcast. Read more.
Setting up a new surround sound configuration can be daunting with so many speakers to position properly. Luckily, Windows 10 includes a small built-in test program that can help you set it up. Here’s how to access it.
First, right-click the speaker icon in your taskbar and select “Sounds” from the menu that pops up.
(You can also open the Control Panel and click Hardware and Sound > Sound.)
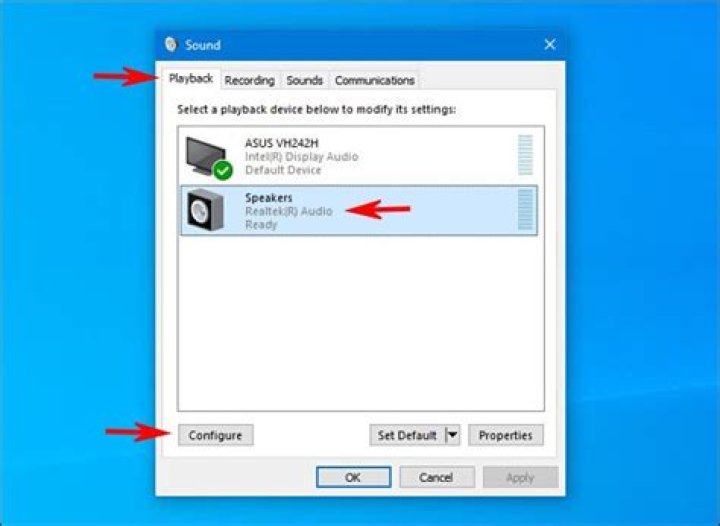
In the window that appears, choose the “Playback” tab, then select the surround sound output device you’d like to test from the list. On many PCs, this will be a device named “Speakers.” Click the “Configure” button to configure your selected device.
(You can also right-click the device in the Playback list and select “Configure [Device Name].”
A “Speaker Setup” window will open. In the list of audio channels, select the configuration you’d like to test. For example, if you have 7.1 surround sound hooked up and want to test that, select “7.1 Surround.”
Next, click the “Test” button just below the channels list. You’ll hear a test chime played one at a time through all of the speakers in the configuration. As each speaker plays, it will be highlighted in the diagram.
If you want to stop the testing process, click the “Test” button again, which will read “Stop” while the chimes are playing.
If you’d like to test individual speakers, click on them in the diagram located in the right side of the window. When you click a speaker, a chime will play through that specific speaker. This can help you figure out if your speakers are positioned correctly.
After that, you’re free to hit “Cancel” or close the window with the “X” button in the corner. Then close “Sound” properties, and you’ll be on your way.
You can also click “Next” and go through the wizard to tell Windows which speakers you don’t have connected, if necessary.
- › How to Add Images to Questions in Google Forms
- › How to Delete Your Photos on Facebook
- › Razer Thinks You Want a PC Gaming Headset That Vibrates
- › How to Get a Link to a Photo or Video on Instagram
- › The Fix for Slow AMD Processors on Windows 11 Is Here
Benj Edwards
Benj Edwards is an Associate Editor for How-To Geek. For over 15 years, he has written about technology and tech history for sites such as The Atlantic, Fast Company, PCMag, PCWorld, Macworld, Ars Technica, and Wired. In 2005, he created Vintage Computing and Gaming, a blog devoted to tech history. He also created The Culture of Tech podcast and regularly contributes to the Retronauts retrogaming podcast.
Read Full Bio »
Prices, specifications, availability and terms of offers may change without notice. Price protection, price matching or price guarantees do not apply to Intra-day, Daily Deals or limited-time promotions. Quantity limits may apply to orders, including orders for discounted and promotional items. Despite our best efforts, a small number of items may contain pricing, typography, or photography errors. Correct prices and promotions are validated at the time your order is placed. These terms apply only to products sold by HP.com; reseller offers may vary. Items sold by HP.com are not for immediate resale. Orders that do not comply with HP.com terms, conditions, and limitations may be cancelled. Contract and volume customers not eligible.
HP’s MSRP is subject to discount. HP’s MSRP price is shown as either a stand-alone price or as a strike-through price with a discounted or promotional price also listed. Discounted or promotional pricing is indicated by the presence of an additional higher MSRP strike-through price
The following applies to HP systems with Intel 6th Gen and other future-generation processors on systems shipping with Windows 7, Windows 8, Windows 8.1 or Windows 10 Pro systems downgraded to Windows 7 Professional, Windows 8 Pro, or Windows 8.1: This version of Windows running with the processor or chipsets used in this system has limited support from Microsoft. For more information about Microsoft’s support, please see Microsoft’s Support Lifecycle FAQ at
Ultrabook, Celeron, Celeron Inside, Core Inside, Intel, Intel Logo, Intel Atom, Intel Atom Inside, Intel Core, Intel Inside, Intel Inside Logo, Intel vPro, Itanium, Itanium Inside, Pentium, Pentium Inside, vPro Inside, Xeon, Xeon Phi, Xeon Inside, and Intel Optane are trademarks of Intel Corporation or its subsidiaries in the U.S. and/or other countries.
In-home warranty is available only on select customizable HP desktop PCs. Need for in-home service is determined by HP support representative. Customer may be required to run system self-test programs or correct reported faults by following advice given over phone. On-site services provided only if issue can't be corrected remotely. Service not available holidays and weekends.
HP will transfer your name and address information, IP address, products ordered and associated costs and other personal information related to processing your application to Bill Me Later®. Bill Me Later will use that data under its privacy policy.
Microsoft Windows 10: Not all features are available in all editions or versions of Windows 10. Systems may require upgraded and/or separately purchased hardware, drivers, software or BIOS update to take full advantage of Windows 10 functionality. Windows 10 is automatically updated, which is always enabled. ISP fees may apply and additional requirements may apply over time for updates. See
HP Rewards qualifying and eligible products/purchases are defined as those from the following categories: Printers, Business PCs (Elite, Pro and Workstation brands), select Business Accessories and select Ink, Toner & Paper.
Easy way to test surround sound speakers on Windows 10!
If you have a 7.1 surround sound system in your home, you might know how difficult it is to configure the speakers. You need to position many speakers in the proper location to get the best sound experience.
Although it’s pretty tricky to set up a new surround sound configuration, Microsoft’s Windows 10 includes a built-in program that eliminates any hassles. In addition, Windows 10 has a small utility that lets you test Surround Sound speakers in easy steps.
Steps to Test Surround Sound Speakers on Windows 10
So, if you are looking for ways to test your surround sound speakers on Windows 10, you are reading the right guide. In this article, we will share a step-by-step tutorial on testing Surround Sound Speakers on Windows 10. Let’s check out.
Step 1. First of all, right-click on the speaker icon on the taskbar and select ‘Sounds.’
Step 2. On the Sound Window, you need to click on the ‘Playback‘ option.
Step 3. Select Speakers on the Playback and click on the ‘Configure‘ button, as shown in the screenshot below.
Step 4. On the Speaker Setup window, you will find audio channels. If you want to test Surround Sound Speaker, select ‘7.1 Surround.’
Step 5. Next, click on the ‘Test‘ button to test your speakers.
Step 6. If you want to test individual speakers, click on the speakers shown on the right side of the Window. As you click on a speaker, a chime will play through that specific speaker.
Step 7. Once done, click on the ‘Next‘ button to complete the speaker configuration.
That’s it! You are done. This is how you can test Surround Sound speakers on Windows 10. Just like Surround Sound, you can configure other Sound configurations like Stereo, Quadraphonic, and 5.1 Surround channels.
The tutorial shared above won’t help you optimize the sound output; it will only help you position the speakers correctly.
So, this article is all about how to test surround sound speakers on Windows 10. I hope this article helped you! Please share it with your friends also. If you have any doubts related to this, let us know in the comment box below.
It is no secret that a surround sound setup can greatly enhance the audio listening and media experience as it offers limitless audio and atmospheric possibilities. However, if you are trying to connect your Windows 10 system to the setup, you might encounter some obstacles.
Apart from meeting the minimum system requirements, the configuration can be a little tricky. In this article, we discuss how to configure and test surround sound on Windows 10.
How can I configure and test surround sound on Windows 10?
Update Sound Card Drivers
- Press Windows Key + R to open Run.
- Devmgmt.msc and click OK to open the Device Manager.
- In the Device Manager, expand the Sound, video and game controllers option.
- Right-click on the sound card to which your surround sound 5.1 setup is connected.
- Select Update Driver.
- Click on Search automatically for updated driver software option.
- Windows will look for any pending driver updates and install them. Once installed, close the Device Manager.
If no updates are found, visit the sound card manufacturer’s website and check for the latest drivers. Updating the sound card is optional, you can proceed even if you don’t find any driver updates.
Did you know that the majority of Windows 10 users have outdated drivers? Be a step ahead using this guide.
Configure surround sound in Windows 10
- Right-click on the speaker icon in the Windows system tray that you can access by clicking the arrow icon in the taskbar.
- Select the Sounds option. This will open the Sound Control Panel.
- If you don’t see the Sounds option, click on Opensound settings.
- Scroll down and click on Sound Control Panel under Related Settings.
- In the Sounds window, open the Playback tab.
- Select the Surround Sound enabled sound card among the list of audio devices and then click the Set Default button.
- Click on the Configure button.
- In the Speaker Setup window, choose 5.1 Surround from the Audio Channels list.
- Click Next to proceed.
- In the Customize your configuration window, check all the boxes for Optional Speakers option.
- Click Next to proceed.
- On the “Select full-range speakers” window, check the box next to the speakers in your setup.
- Click Next and you should see the “Configuration complete” screen.
- Click Finish to save the changes and close the Sound Control Panel.
Test Surround Sound in Windows 10
- Open the Sound Control Panel. Refer to section 1-2 above for steps.
- Open the Playback tab.
- Select the Surround Sound enabled card and click on Configure.
- Make sure the speakers are on and you have set the volume accordingly.
- Click the Test button. Windows will play sounds via the newly set up speakers.
- If everything looks good, open up any video or audio streaming service and check the speakers with your favorite track.
- You can use this YouTube video which can give you a good idea if the speakers are working as they should.
Surround sound audio systems offer immersive gaming and movie-watching experience. By following the steps in this article you can successfully configure and set up your surround sound setup on Windows 10.
If you have any other questions and suggestions, leave them in the comments section below and we’ll check them out.
How to test surround sound headphones in Windows 10 to see whether they are functioning properly or not? We will walk you through all the necessary steps to perform the test. There is also a list of some critical parameters that greatly affect your headphone’s audio quality and performance. Let’s check them out!
Can Headphones Have Surround Sound Qualities?
There are two types of headphones: stereo and surround sound headphones. While they are quite similar in appearance and sound to the untrained eye, they are different from each other. The key difference is how they operate.
Logitech G432 7.1 Surround Sound Headphone
Surround sound is a technique aimed to enhance the depth and fidelity of sound production by placing multiple audio sources at various angles towards listeners. It makes all sounds coming from the source virtually lifelike.
In fact, surround sound headphones are basically two large headphone cups housing several small headphones with different audio sources inside. These discrete headphones are responsible for creating a sensation of virtual reality.
On the other hand, stereo headphones don’t generate a compelling sense of true quality audio. Many headphones with the surround sound mode are often stereo headsets whose audio quality is nowhere near as good as the real ones.
- Turtle Beach Elite Pro 2 + SuperAmp Review : Premium Gaming Headset
- 10 Best Headphones For Electronic Drums That Make Accurate Sound
How To Test Surround Sound Headphones In Windows 10
This section will cover step-by-step instructions on how to test 7.1 surround sound headphones in Windows 10.
Step 1
Access the Control Panel , choose Hardware and Sound , then select Sound . Or right-click the speaker icon in the taskbar and choose Sounds from the pop-up menu.
Choose Sounds
Step 2
Select the tab Playback , and then click on the surround sound headphones you want to test (some PCs will display the name Speakers ). Select the default button Configure to test your speaker configuration.
Select Surround Speakers
Step 3
When the window Speaker Setup opens, choose the surround sound configuration. If you want to check the 7.1 surround sound headphones, choose 7.1 Surround .
Select The Audio Channel You Want To Test
Step 4
Choose the button Test below the list of audio channels. You can hear a chime played one by one through all speakers in this configuration.The diagram will highlight the speaker being played.
The Speaker C Is Highlighted In The Diagram
In case you’d like to stop the process, click the button “Test” again.
For testing individual speakers, select them in the diagram situated on the window’s right side. When you access the speaker, you can hear a chime play through the speaker. As a result, you can figure out whether the speaker is correctly positioned.
Then, you are free to press Cancel or the X button to close the window and then close the properties of Sound .. Also, you can select Next and then go through a wizard to inform the operating system which speaker you do not have connected, if needed.
What Should You Consider For Performance While Testing Headphones?
There are several important factors to keep in mind when testing the headphones as follows.
Frequency Response
The headphone frequency response measures your headset’s ability to generate the sounds of various frequencies. The graph showing the headphone frequency response is better to be a straight line near its origin.
If the graph is leaning towards its left side, your headphones might have high bass. In contrast, if the graph is favorable on the right, the headphones are likely to provide high treble. To test this factor, you had better ensure to play about 250 tunes of a similar voltage.
Isolation Measurement
The measurement of isolation means your headphones’ capacity to isolate your ears from the ambient noise around you. It is a surround sound experience real test as it lets you analyze how well the headset makes it a lifelike experience.
We connect a speaker to audio devices playing white noise or pink noise to perform this measurement. It’s preferred if it’s pink noise. Then we put on the headphones and analyze the level of sound that can be heard.
Most surround sound models available can reduce the surrounding noise to 100Hz.
Impedance Measurement
The impedance means the dynamic resistance that your pair of headphones provide when generating sounds. This factor significantly impacts the headphones’ quality.
Measuring the impedance is relatively simple. You only need to evaluate the drop of voltage before and after your headphones play the sound. Modern models generally come with low impedance to make them easier to reach a higher volume level.
Conclusion
So now you know how to test surround sound headphones in Windows 10. By following our steps, you can set up a new surround sound configuration on your PC properly and check if any speaker has not connected to the system.
One more thing, it is advisable to measure the impedance, isolation, and frequency response when testing your headphones. Anyway, if you have any further questions, please feel free to let us know. Thank you for reading.
Noah Kraft
I'm the founder of Doppler Labs, a company famous for Here One wireless headphones. In this site, I will review the best and most outstanding audio products for you.
Despite all the modern technologies targeting the home cinema world these days, many applications are still stuck on stereo output by default. You set your new 5.1 surround sound system, only to realize that it does not work. It can be confusing, especially if you run Windows 10, which is known to have some incompatibilities with these systems.
On the other hand, if set correctly, the system will add to the cinema feeling with plenty of new sounds, a top-notch atmosphere, and lots of effects. The same rule applies if you are into games – you can turn around and spot enemies based on nothing but the sound. The bad news is that Windows 10 can mislead you and have you set the system wrongly.
So, how to set up 5.1 surround sound on PC Windows 10, and what kind of problems can you experience?
Table of Contents
Update The Sound Card Driver
While not always necessary, updating your sound card driver can prevent many unwanted problems. Here are the steps to do it by the book:
- Right-click on the menu icon the hit Device Manager – one of the top options in the new menu.
- Go to the sound, video, and game controllers option. It will expand with even more options.
- Find the sound card associated with the new 5.1 speakers. Click it, then go to its properties from a new menu.
- Find the driver tab and click on it.
- Click to update the driver. In the new menu, choose the option to search automatically for updated driver software.
- Windows will find the driver and install it.
There is a different way to do it. You can go to the manufacturer’s website and find the latest version. Download it, run it, and install it – pretty straightforward. However, the first option does everything for you, so it is much more comfortable.
No matter which option you choose, you will have to reboot your computer.
How to set up 5.1 surround sound on PC Windows 10
The configuration is just as simple and involves following a few steps. Make sure the 5.1 surround sound system is already installed and hooked in.
- Right-click on the volume button in the tray, then go to sounds.
- Go to the playback tab – it is often the first one and selected by default.
- You will see a list of devices. Choose 5.1 surround sound, then press the button to set the default at the bottom of the window.
- Click the configure button on the left side, and a new window will open.
- See audio channels on the left. It is a list – choose 5.1 surrounds.
- Go next – a customization window will follow up.
- If you have all the speakers – including the subwoofer, check all the boxes. Otherwise, leave the ones you do not have unchecked. This way, according to this article from Appuals, the sound associated with them will be transferred to other channels, only to prevent you from missing any audio.
- Go next, and you will be asked to select full-range speakers. You will have to check the speakers with full range features.
- Click next one more time, and you will get to a screen telling you that the configuration is complete.
- Finish the process, and you are ready to go.
Now, what happens if the surround sound fails to work as you test it? Fortunately, there are a few fixes out there.
How to enable Speaker Fill
The quality might be slightly altered as a result, but at least your 5.1 surround sound system will work.
- Press the Windows key and R simultaneously to open a run window. Type mmsys.cpl and hit enter. The sound properties will pop up.
- Hit the playback tab, select the 5.1 surround sound speakers like when you set the system up, then go to properties.
- One of the top tabs is an enhancement. Go there, and you will see a box to disable all sound effects. It is checked by default. You have to uncheck it.
- You will also see a list right under this option. Look for Speaker Fill in this list and check the box.
- Apply, reboot the computer, and try testing it again.
Change the audio format
Whether the previous method does not work or you cannot enable Dolby Direct Live, these steps can help you change the audio format and fix the issue.
- Go to the sound properties like in the first step above.
- Once in the playback tab, go to the speakers and hit properties.
- Find the advanced tab on top, and you will see a drop-down menu with the default format. Change the format to 24 bit, 96000 Hz (Studio Quality).
- Apply the changes and reboot your computer.
Uninstall the driver
Based on another article from Appuals, uninstalling, the driver will force the operating system to install it again and perhaps a newer version. However, this option is a bit out of the discussion if you update the driver upfront.
- Press the Windows key and X at the same time, then go to the device manager.
- Double click on audio inputs and outputs.
- You will see a list of install devices.
- Right-click each of them and uninstall them.
- Go to the Action tab, and you will find a button to scan for hardware changes.
- When you reboot, Windows will install the driver again by itself.
Conclusion
As a short conclusion, 5.1 systems can be a nightmare at times, especially on Windows 10, which is not compatible with most of them. Luckily, you can learn how to set up 5.1 surround sound on PC Windows 10 in no time.
If you experience any problems, the solutions above represent the most common fixes out there. Try one at a time and test the surround sound again before moving on to the next one.
Surround sound can transform your movie or video game experience. While most people use their gaming console or lounge TV to enjoy surround sound, Windows 10 also has robust support for it. However, it does require some preparation to make it work correctly.
Let’s walk through the process of setting up surround sound on Windows 10.
If You Need to Set Up Surround Hardware
Before you can do the software setup side of surround sound on Windows 10, you need to get your hardware in order. To get help with that, you may want to read How to Set Up a Surround Sound System before reading this guide.
Remember to Update Your Drivers and Software
Surround sound on your Windows computer is dependent on the drivers for the audio device and additional software utilities that come with that hardware. Download the latest version of its driver software from your sound device’s manufacturer page.
Picking the Right Audio Device
Your computer may have multiple audio devices, and not all may support surround sound. The surround sound output will appear as a separate audio device to your regular headphone or stereo speaker output with some sound cards.
For example, your sound card’s digital output to a surround receiver will be a different audio device.
Setting Up and Testing Surround Sound
With the preparation done, it’s time to make sure that you have set your surround sound device as the currently selected audio device. Following that, we’ll choose the proper speaker configuration and then test it.
- Left-click on the speaker icon in the notification area in the Windows taskbar.
- Select the name of the currently active audio device above the volume slider.
- From the pop-up list, choose your surround sound audio device.
The surround sound audio device is now the active audio output for your computer. Any application should now play its audio through that device.
Choosing Your Speaker Configuration
Next, you need to tell your computer what speaker setup you have.
- Right-click the speaker icon in your notification area.
- Select Sounds.
- Switch to the Playback tab.
- Scroll to the surround sound audio device and select it.
- Select the Configure button.
- Use the Speaker setup wizard to tell Windows:
- The speaker setup you have.
- Make sure all speakers are working.
- Under Audio channels, choose the option that corresponds to your actual speaker setup. If you do see the exact configuration, choose it here. If you don’t, it’s still alright. For example, if you have a 5.1 setup but only see the 7.1 option, you can fix that in Step 11 below.
- To the right of the Audio channel selection box (in the picture above), note the representation of your speaker setup.
- Click on any speaker to see if the correct real speaker plays a sound.
- If it doesn’t, double-check that you’ve correctly wired your speakers.
- You can use the Test button to run through all the speakers in sequence quickly.
- Select Next.
- You can now customize your speaker setup. If your physical speaker setup doesn’t have any speakers listed, uncheck them in the list below. If you don’t have a subwoofer, you should remove it from this list.
- Select Next.
- Specify which of your speakers are full range or satellite.
- Full range speakers reproduce bass, mid and treble audio.
- Satellite speakers produce mid and treble sounds, relying on the subwoofer to fill in the rest.
- If Windows confuses a full range speaker for a satellite, you won’t get the most out of those speakers.
- If only your front left and right stereo speakers are full range, check the first box.
- If all your speakers (besides the subwoofer, obviously) are full range, check both boxes.
- Select Next.
- Select Finish, and you’re done!
Activating Virtual Surround Sound With Windows Sonic
Whether you can select surround sound audio channels depends on whether your device supports them or not. For example, in this guide we used a pair of USB surround-sound gaming headphones. Although it doesn’t physically have seven speakers inside it, the built-in sound card reports to Windows that it has 7.1 audio channels and then translates it to virtualized surround in the headphones.
What if you just have a basic set of stereo headphones? Windows has a built-in surround virtualization feature called Windows Sonic.
To activate it, make sure that your stereo headphones are selected as the active audio device:
- Right-click on the speaker icon.
- Select Windows Sonic for Headphones. Your headphones should now provide simulated surround sound.
- To enable the other options, such as Dolby or DTS, you will need to pay a license fee in the Windows Store.
For more detailed information on Windows Sonic, check out How to Set up Windows Sonic for Headphones on Windows 10.
Hopefully, you can now enjoy immersive surround sound on your Windows 10 computer. If you’re looking for surround sound advice for a home theater setup, head over to The Ultimate Smart Home Theater System: How To Set It Up.
Sydney Butler is a social scientist and technology fanatic who tries to understand how people and technology coexist. He has two decades of experience as a freelance computer technician and more than a decade as a technologies researcher and instructor. Sydney has been a professional technology writer for more than five years and covers topics such as VR, Gaming, Cyber security and Transhumanism. Read Sydney’s Full Bio
With so many speakers to position properly, if you’re a PC user with multiple speaker setups, setting up a new surround sound configuration can be daunting. Conveniently enough, Windows 10 includes a small built-in test program that can help you set it up. In this post, we will show you how to test Surround Sound Speakers on Windows 10.
Test Surround Sound Speakers on Windows 10
Once you have enabled Windows Sonic Surround sound, you may want to configure and test surround sound speakers on Windows 10, do the following:
- Press Windows + R key combination to invoke the Run dialog.
- In the Run dialog box, type control mmsys.cpl sounds OR mmsys.cpl and hit Enter to open Sound settings.
- In the window that appears, choose the Playback tab.
- Select the surround sound output device you’d like to test from the list. On many PCs, this will be a device named Speakers.
- Click the Configure button to configure your selected device. You can also right-click the device in the Playback list and select Configure [Device Name].
- A Speaker Setup window will open. In the list of audio channels, select the configuration you’d like to test.
- Next, click the Test button just below the channels list. You’ll hear a test chime played one at a time through all of the speakers in the configuration. As each speaker plays, it will be highlighted in the diagram.
- If you want to stop the testing process while the chimes are playing, click the Stop button.
- If you’d like to test individual speakers, click on them in the diagram located in the right side of the window. When you click a speaker, a chime will play through that specific speaker. This can help you figure out if your speakers are positioned correctly.
You can also click Next and go through the wizard to tell Windows which speakers you don’t have connected, if necessary.
Windows 10 upgrade from prior versions of Windows is free and many users have opted to upgrade, whenever you upgrade there are likely to be conflicts and compatibility issues most commonly with the drivers you previously had that were designed and developed for your previous operating system.
Windows 10 does support most of your previously installed applications and drivers but you may need to upgrade them. The Channel surround sound not working in Windows 10 is one of such issues faced by users who upgraded to Windows 10. Users are getting basic sound from front speakers; however, they are not getting any sound from rear speakers.
Usually, the issue is prevalent in systems having Realtek’s 5.1 sound card. Because the Realtek’s 5.1 sound card is working properly in Windows 7 and 8.x, users are looking towards Microsoft for the solution to this issue. Microsoft support personnel announced that they are working on the issue. However, Microsoft has still not provided a fix.
Update: After more than two years, the surround sound is still partially broken in Windows 10. Even if fixes were implemented on builds 10586.1 and build 10586.3, the issue still partially remains. Right now, the issue only affects surround sound encoded in real-time like games or DTS Live. Pre-recorded surround tracks like the ones found on DVDs and Blu Rays are now working fine under Windows 10. With the new sound technologies like Dolby Atmos and Sonic, Microsoft is unlikely to ever release an official patch for the 5.1 surround issue for Windows 10. Microsoft is once again using planned obsolescence to force consumers into migrating to Sonic and Atmos.
While we wait eagerly for Microsoft to release an official fix for this issue, let’s go over some solutions that have enabled users to fix their channel surround problems on Windows 10. Please follow each method in order until you find a fix that works for you.
Method 1: Enabling Speaker Fill
One solution that seems particularly effective for users struggling with the 5.1 channels issue is to enable enhancements and Speaker Fill. While this will allow you to use all your speakers when running Windows 10, the overall sound quality will be lowered. Instead of getting the full audio spectrum possible through all the channels, the rear speakers will use virtualization to provide a surround-like effect. Here’s what you need to do to enable speaker fill:
- Press Windows key + R and type “mmsys.cpl”. Hit Enter to open the Sound dialog box.
- Go to the Playback tab, select your 5.1 surround speakers and click on Properties.
- In Speaker Properties, go to the Enhancement tab and uncheck the box next to Disable all sound effects. Then, Scroll down to the menu below and check the box next to Speaker Fill. Hit Apply to save your configuration.
- Reboot your device and see whether you can hear sound from your rear speakers. If you have the same issue, move over to the next method.
Method 2: Changing the Audio Format to 24/96
This following method is particularly effective if your audio is outputted through S/PDIF. Some users have successfully enabled the 5.1 surround sound after changing the audio format to 24 bit, 96000 Hz. This also proved to be effective with users who had trouble enabling Dolby Direct Live. Follow the steps down below o change the audio format to 24/96:
- Press Windows key + R and type “mmsys.cpl”. Hit Enter to open the Sound dialog box.
- Go to the Playback tab, select your 5.1 surround speakers and click on Properties.
- Next, go to the Advanced tab and use the drop-down menu below Default Format to change the audio format to 24 bit, 96000 Hz (Studio Quality). Hit Apply to save your modifications.
- Reboot your system and see whether 5.1 channel surround is now working. If nothing changed for the better, move to the next method.
Method 3: Uninstalling Windows Audio Driver
Some users have remedied this issue by uninstalling the sound driver from Device Manager. This will force Windows to reinstall the driver and often time it will automatically install a newer version. Here’s what you need to do:
- Hold the Windows Key and Press X and choose Device Manager.
- Double-click Audio inputs and outputs to show the sub-items. Right-click on the installed devices one by one, and click Uninstall. Click OK in the Confirm Device Uninstall dialog.
- After uninstalling the old device drivers, click on Scan for hardware changes from the Action tab.
Windows 10 will try to automatically install the drivers for your audio devices at the next reboot. If prompted, click Search automatically for updated driver software, and let Windows 10 install the drivers. In most cases, you will be able to get your 5.1 surround sound back after you reinstall the audio drives.
Note: If Windows doesn’t automatically download and install the audio driver, you’ll need to go to your onboard sound card manufacturer website and manually download the driver (for Realtek onboard, download the High Definition Audio Driver from here). After that, check your audio and see if the 5.1 surround sound is working.
If your still not getting signal to the rear speakers, you have little else to do but to buy a speaker with the newest technology (powered by Atmos or Sonic) or buy a dedicated 5.1 sound card that is known to function properly under Windows 10 (there aren’t many). A more desperate solution would be to revert back to Windows 8.1 or Windows 7, to when 5.1 surround channels where fully supported.


