This article shows you how you can tether an iPhone to your PC via Bluetooth. This is necessary if you wish to bond your iPhone’s 4G / LTE or Wi-Fi connection to your PC’s Wi-Fi or Ethernet connection. However, while Bluetooth is a convenient and wireless way to get Internet from your iPhone to your PC, it is limited to 1 Mbps (Bluetooth 4) or 2 Mbps (Bluetooth 5). If you have fast LTE speeds on your iPhone, you might get better results with USB or Wi-Fi tethering.
Hardware requirements: internal Bluetooth adapter, external Bluetooth USB adapter (optional)
Step 1: Turn on the Personal Hotspot feature on your iPhone.
To do this, tap Settings from your home screen and go to Personal Hotspot.
Step 2: Connect (or “tether”) your iPhone to your PC using Bluetooth.
If you’re using an external Bluetooth USB adapter, make sure you install it following the instructions you got with the device. You may need to restart your PC before being able to use it.
On your iPhone, make sure Bluetooth is enabled (Settings > Bluetooth).
On your PC, go to Bluetooth Settings (either from the lower right corner of the taskbar – systray – or by searching for “bluetooth”). Slide the Bluetooth toggle on – this will make your computer visible to other devices.
Click on the “Add Bluetooth of other device” and let your PC detect the iPhone. This may take a while, so give it a couple of minutes. Finish the pairing process following the instructions both on you PC and on your iPhone.
Step 3: Connect your PC to the Internet using the Bluetooth tethered iPhone.
Go to Network Connections (Windows key + X – choose “Network Connections”) and on the right side click on “Change adapter options”.
Look for the “Bluetooth Network Connection”.
If it’s connected – you’re good to go. If it’s not, double click to view Bluetooth devices. If your iPhone doesn’t automatically show up here, click on “Add a device” and add it.
Click on the “Connect using” button above and choose “Access point”. Windows will set up the connection as “Network X” and you will be able to enjoy Internet connectivity.
Вы можете включить Режим модема, чтобы раздавать мобильный интернет со своего iPhone другим устройствам. Когда другие устройства не могут подключиться к интернету по сети Wi-Fi, можно воспользоваться Режимом модема. Instant Hotspot позволяет подключать устройства через Режим модема без ввода пароля.
Вы можете выйти в интернет на своем iPhone, подключившись к iPhone или iPad (модели Wi-Fi + Cellular), который находится в Режиме модема. При этом будут использоваться сотовые данные устройства, которое раздает интернет. См. раздел Подключение к устройству в Режиме модема.
Примечание. Не все мобильные операторы поддерживают Режим модема. Может взиматься дополнительная плата. Количество устройств, которые можно подключить за раз в Режиме модема, зависит от мобильного оператора и модели iPhone. За дополнительными сведениями обращайтесь к своему оператору.
Настройка Режима модема на iPhone
Откройте «Настройки» > «Сотовая связь» > «Режим модема», затем включите параметр «Разрешать другим».
Примечание. Если параметр «Режим модема» отсутствует и параметр «Сотовые данные» включен (в разделе «Сотовая связь» Настроек), обратитесь к мобильному оператору, чтобы добавить Режим модема в Ваш тарифный план сотовой связи.
Инструкции по изменению настроек приведены далее.
Изменение пароля Wi-Fi для Режима модема. Откройте «Настройки» > «Сотовая связь» > «Режим модема» > «Пароль Wi‑Fi».
Изменение имени устройства, доступного в Режиме модема. Откройте «Настройки» > «Основные» > «Об этом устройстве» > «Имя».
Выключение Режима модема и отключение подключенных устройств. Откройте «Настройки» > «Сотовая связь» > «Режим модема», затем выключите параметр «Разрешать другим».
На моделях с двумя SIM-картами в режиме модема используется номер, предназначенный для сотовых данных.
Подключение Mac или ПК к устройству в Режиме модема
Для подключения Mac или ПК к устройству в Режиме модема можно использовать кабель USB, Wi-Fi или Bluetooth. Выполните одно из описанных ниже действий:
Использование USB. Подключение iPhone к компьютеру с помощью кабеля Если отобразился запрос «Доверять этому компьютеру?», коснитесь «Доверять». В сетевых настройках компьютера выберите iPhone, затем задайте параметры сети.
Использование Wi-Fi и Instant Hotspot. На Mac нажмите на значок Wi-Fi в строке меню, чтобы выбрать свой iPhone из списка доступных сетей.
На Mac и iPhone должен быть выполнен вход с одним Apple ID, а также на них должны быть включены Bluetooth и Wi-Fi.
Вместо значка Wi‑Fi в строке меню отображается значок Режима модема , пока Mac подключен к другому устройству в Режиме модема.
Использование Bluetooth. Чтобы проверить, можно ли обнаружить iPhone, откройте Настройки > «Bluetooth» и оставьте раздел настроек отображаться. Затем на Mac или ПК настройте соединение Bluetooth, следуя инструкциям производителя.
Подключение iPad, iPod touch или другого iPhone к Вашему устройству в Режиме модема
На другом устройстве откройте «Настройки» > «Wi-Fi», затем выберите свой iPhone из списка доступных сетей.
Если на подключаемом устройстве запрошен пароль, откройте «Настройки» > «Сотовая связь» > «Режим модема» на Вашем iPhone, чтобы узнать пароль.
Instant Hotspot не запрашивает пароль для подключения другого устройства к iPhone, если соблюдены все условия, указанные далее.
На каждом устройстве включен Bluetooth.
На каждом устройстве включен Wi-Fi.
После подключения вверху экрана iPhone появляется синяя полоса. Значок Режима модема отображается в меню статуса подключенного устройства.
С помощью функции «Семейный доступ» устройство в Режиме модема может раздавать интернет устройствам других членов семьи. Эти устройства могут подключаться автоматически или каждый раз запрашивать разрешение на подключение. См. раздел Настройка Семейного доступа на iPhone.
iPhone в Режиме модема использует мобильный интернет. Чтобы отслеживать трафик мобильного интернета, откройте «Настройки» > «Сотовая связь» > «Статистика». См. раздел Просмотр или изменение настроек сотовых данных на iPhone.
Чтобы узнать больше об использовании Режима модема, обратитесь к статье службы поддержки Apple Если функция «Режим модема» не работает на iPhone или iPad (Wi-Fi + Cellular).
YatriTrivediYatriTrivedi
Writer
Apple, like most companies, doesn’t really offer Linux support, so it’s a great thing when the community can deliver much-desired functionality. By adding a repo and installing a package or two, you can get tethering working via USB or Bluetooth.
Warning!!
You can connect your iPhone to your laptop and share its 3G connection, allowing you to browse the internet in places without WiFi connectivity. This process is called tethering, and you may be required to pay a fee to your carrier to use your data this way. While jailbreak-only apps can enable this kind of functionality without going to your carrier, it remains debatable whether or not your carrier can tell if you are tethering or if this legal. If your mobile carrier finds out, you may be charged extra fees or be switched to a more expense “tethering allowed” data plan. You tether at your own risk; we’re not responsible for any charges you may accrue or other damages that may ensue.
With that being said, I’ve never known anyone personally who was charged for tethering using 3rd-party methods. I, myself, use MyWi to get the job done, and I’m sure to restrict my usage to reasonable amounts. I’ve never had any problems. We just wanted to give you some experience-based information. Again, you’re doing this at your own risk.
On Your iPhone
Be sure you have tethering enabled. You can get this enabled by chatting with a AT&T or Verizon representative and signing up for a plan that supports it.
Alternatively, if you’re jailbroken, you can install apps such as MyWi or iTether that enable this functionality for a nominal fee. One way or the other, you need to able to tether on your iPhone.
In Ubuntu
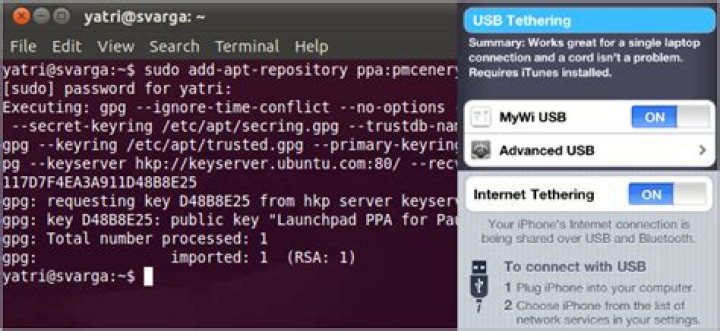
Pop open a terminal and enter the following command:
sudo add-apt-repository ppa:pmcenery/ppa
Hit Enter, let it do its thing, then update:
Now you can download and install the package we need to get things working:
sudo apt-get install ipheth-utils
Restart your computer. This will not work until after a restart.
Tethering
If you’re tethering via Bluetooth, pair your iPhone with your computer before you enable it. If you’re using USB, enable tethering first, and then plug in the cable to your computer.
You’ll see a new wired interface pop up if you’re using USB, and it should automatically connect.
This may not work on its own with some systems. If you tried this method and you’re not getting anywhere, try uninstalling the package and then reinstalling it alongside some related ones:
sudo apt-get remove ipheth-utils
sudo apt-get autoclean
sudo apt-get install gvfs ipheth-dkms ipheth-utils
Want to use your phone’s mobile internet on your Linux PC? Here’s how to use USB mobile tethering on a Linux PC.
Laptops are invariably limited to Wi-Fi only connections; desktop computers never have built-in mobile internet. But what if you need to get your Linux computer online but have no wireless or Ethernet network?
The answer is tethering. With a smartphone you can share your mobile internet with your computer.
As long as your carrier doesn’t limit how you use your data, internet connection sharing (also known as netshare) with a Linux computer is a good option. Wi-Fi tethering is one option—here’s how to use USB tethering on Linux with Android and iPhone.
What Is Tethering?
Tethering is the name given to connecting a mobile device to a computer such in order to share mobile internet.
While some carriers might restrict this activity, these days that is rare. Most smartphones have a data plan which allows tethering, making tethering an attractive way to get online.
Strictly speaking, tethering refers to using a USB cable to share mobile internet. This means that you will need to carry your phone’s USB data cable around if you plan to use tethering.
Wireless tethering is also possible, using Wi-Fi or Bluetooth; this is also known as “wireless hotspot”. In most cases wireless tethering is easier but there are good reasons to use USB tethering:
- For a reliable network connection
- To keep your phone charged
- Avoid wireless interference
- Prevent wireless sniffers intercepting data
If you don’t have a suitable USB cable, here’s how to use your phone as a wireless hotspot. Simply connect your Linux computer to your phone’s hotspot to get online.
Use the Right USB Cable for Tethering
Before proceeding, you need to be sure that you’re using a USB cable that is suitable for tethering. Not all cables will work for this, as some are designed purely for power. The best way to check that your USB cable is suitable for tethering is to plug it into your computer. Connect your phone and wait for either device to detect the other. If some sort of data transfer or file browsing is available, it is suitable for tethering.
If there is a problem with the cable, you should be able to buy a suitable data-ready alternative online.
The following methods all require you to connect the mobile device to your PC via USB cable before activating tethering.
How to Tether Android Phones to Linux
If you have an Android device, tethering is straightforward, thanks in part to both phone and PC being Linux-based.
Sometimes it’s more convenient to use your iPhone’s Internet connection and share it with your PC. This article will show you the steps to connect your PC to an iPhone using a USB cable.
Step 1: Download the latest version of iTunes for Windows on your PC, install the program and run it.
Step 2: Activate the Personal Hotspot on your iPhone.
To do this, tap Settings from your home screen and go to Personal Hotspot.
Step 3: Connect your iPhone to your PC via the USB cable. You should see the iPhone listed on the left side of the iTunes window, under “Devices”.
If your iPhone is not detected, on your PC open Device Manager > Other Devices/Portable Devices > iPhone. Right click on it and choose “Update Driver” > Search Automatically. Windows will install the latest driver.
If after the installation iTunes still doesn’t detect the iPhone, restart your PC and try again.
Step 4: Make sure your PC connected successfully to your tethered iPhone.
On your computer, the tethered connection will appear as a wired connection, having a computer icon in the lower right section of the taskbar (systray). Click on that computer icon and you should see a wired connection named “Network X” which should be connected. That is your tethered iPhone.
Unless disabled by your provider, it is possible to share your iPhone’s mobile data connection over WiFi, USB or Bluetooth:
- WiFi requires no additional configuration provided your computer can connect to wireless networks,
- Instructions for USB and Bluetooth tethering are provided below.
Contents
Tethering over USB
Tethering natively over USB is the optimal choice as it provides a more stable connection and uses less batteries than bluetooth or wifi.
To tether your iPhone over USB, you will need to install libimobiledevice .
Next enable Personal Hotspot on your iPhone and plug it into your computer. At this point you will have a new ethernet device available and should be able to use any network manager to connect to the internet through the new iPhone ethernet device, just like you would any other ethernet connection.
Using systemd-networkd
If systemd-networkd is used for network management, you can easily configure it to connect to the internet through the iPhone, as you would with any other adaptater.
If for example enp0s26u1u2c4i2 is the name of the network device that is created from the iPhone as displayed by networkctl list , create the following .network file:
Troubleshooting
If the iPhone appears in the device list but does not connect, it is possible that you may need to connect your iPhone and pair it with your computer before connecting (iPhones using a PIN unlock?):
Tethering over Bluetooth
Tethering over Bluetooth will drain the batteries relatively quickly, but simultaneous charging from an USB port works well.
Hardware Requirements
- iPhone running OS 3.0 with tethering enabled. See Settings > General > Network and turn on the tethering option.
- Bluetooth adapter or similar, preferably with EDR (Enhanced Data Rate) for acceptable speeds. Tested with a Belkin F8T016NE.
Setup
See the main article Bluetooth and setup the bluetooth daemon.
Gnome/XFCE
Install the Blueman GTK Bluetooth manager.
A Bluetooth icon should appear in your notification area. Note: the icon may not appear if bluetooth was not turned on at startup. Click it, and search for nearby devices, adding your iPhone (note, you may need to have the Bluetooth setting screen up on your iPhone for discovery to work).
Once the iPhone has been added to the devices list, open the Device menu and select pair. This will require the usual entering of a PIN on the computer then the iPhone. Now open the Device menu again, and choose Network Access > Network Access Point. If everything goes well, blueman reports a success and the status bar on your iPhone should glow blue, indicating a successful tether.
Blueman will have created a new network interface, typically bnep0. To connect to it, run the following as root.
netcfg
alt=”Tango-view-refresh-red.png” width=”48″ height=”48″ />This article or section is out of date. alt=”Tango-view-refresh-red.png” width=”48″ height=”48″ />
Alternatively, you can create a netcfg network profile to allow easy tethering from the command line, without requiring Blueman or Gnome. Assuming an already paired iPhone with address ’00:00:DE:AD:BE:EF’, simply create a profile in /etc/network.d called – for example – ‘tether’:
So you got that new shiny iPhone 4, and you got rid of your old device that was so easy to jailbreak and add tethering to? No MyWi? Don’t want to pay the extra “convenience” fee and lose your unlimited data package? We have an answer.
NOTE: this is really not a piece of cake if you have never played with xCode or your network settings before.
NOTE: you need to have a paid developer account or access to a developer who will register your device’s UDID in order to do this. Get creative, and get one. Either from eBay, forums or just get 4 friends and buy a dev account directly from Apple. ( 4 friends + you = 5 people – you do the math. The dev account costs $100 )
So you got that new shiny iPhone 4, and you got rid of your old device that was so easy to jailbreak and add tethering to? No MyWi? Don’t want to pay the extra “convenience” fee and lose your unlimited data package? We have an answer. Now its not a one click gets it done. But it will get it done. You’ll need a couple of things, but not really hard to find things. You either need to have or have access to a paid Developer account so that you can sign a built app and install it on a device. If you’re a developer, you already have xCode, and you know how to deploy an app onto a device. And the actual tethering part we will be showing you on a Mac, but I’m sure its not much different on a PC, we just don’t have one to do it on.
Here we go. Head on over to and download the source code. Build in xCode. I am on an iPhone 4 so I set the base SDK to 4.0, but thats really a moot point.
On the computer you want to tether open your System Preferences/Network Settings.
Click on locations/ edit locations and make a new location called iProxy. Then on locations click on Create Network and name it iProxy.
Now on the iPhone go to Settings/WiFi and choose the iProxy network. Go into those settings and choose static. You should have an IP address like 10.0.1.xx you need to enter that in the System Preferences/Network/Advanced/ TCP/IP tab. Change configure IPv4 to manual and type in the IP address from the iPhone but change the last digit by 1 number sequentially. Now click on the Proxies tab and select SOCKS Proxy and enter the iPhones IP address in the SOCKS Proxy Server Area and port 8888. Click ok, then apply.
Now open the iProxy app on your device and you should be able to connect to the internet on your computer.
Not quite as easy as MyWi or native tethering. But the best you’re gonna get for now. With a little patience, and this tutorial you should be good to go in no time. And the best thing is this will work regardless of firmware or whether or not you have a jailbroken device.
SUPPORT
FSM has no ads or affiliate links. Your support would simply pay for our servers, domain and maintanance. If there’s any leftover change, we’ll get some coffee and a slice of pizza.
This is the most efficient way to tether your iPhone to a PC: it’s fast and it’s wireless. This article shows you the steps to do this.
Hardware requirements: internal Wi-Fi card, external Wi-Fi USB adapter (optional)
Step 1: Purchase Connectify Hotspot PRO or MAX from the Connectify website. While there is a free trial version of Connectify Hotspot, sharing 3G/4G or Ethernet connections as WiFi is only available in the PRO and MAX versions.
Step 2: Make sure you have a Wi-Fi card installed on your PC and it’s on. Go to Network Connections (Windows key + X – select Network Connections) and click on Wi-Fi on the left. If your computer doesn’t have an internal Wi-Fi card, get an external Wi-Fi USB adapter and plug it into a USB port of your PC. Windows will install the appropriate drivers or you may be required to install them – just see the documentation you get with the device. You may need to restart your PC before being able to use the external Wi-Fi USB adapter.
Step 3: Create a Wi-Fi hotspot on your iPhone (Wi-Fi tethering). To do this, go to Settings on your iPhone’s home screen and activate the Personal Hotspot option.
Step 4: Configure the Wi-Fi hotspot on your iPhone. When you go into the Personal Hotspot menu, you can also customize the Wi-Fi hotspot name (SSID) and password used by other devices to connect.
Step 5: Connect your PC to the Wi-Fi network. Click on the computer or Wi-Fi symbol in the lower right corner of the taskbar (systray). Turn on Wi-Fi by clicking on the tile in the lower side of the pop-up menu and select the Wi-Fi hotspot you set up on your iPhone. Enter your password and you’re good to go.
Thanks for the feedback There was a problem submitting your feedback. Please try again later.
Sometimes it’s more convenient to use your iPhone’s Internet connection and share it with your PC. This article will show you the steps to connect your PC to an iPhone using a USB cable. This tutorial will educate you on how to successufully do that.
Step 1: Download the latest version of iTunes for Windows on your PC, install the program and run it.
Step 2: Activate the Personal Hotspot on your iPhone.
To do this, tap Settings from your home screen and go to Personal Hotspot.
Step 3: Connect your iPhone to your PC via the USB cable.
You should see the iPhone listed on the left side of the iTunes window, under “Devices”.
If your iPhone is not detected, on your PC open Device Manager > Other Devices > iPhone. Right click on it and choose “Update Driver” > Search Automatically. Windows will install the latest driver.
If after the installation iTunes still doesn’t detect the iPhone, restart your PC and try again.
Step 4: Make sure your PC connected successfully to your tethered iPhone.
On your computer, the tethered connection will appear as a wired connection, having a computer icon in the lower right section of the taskbar (systray). Click on that computer icon and you should see a wired connection named “Network X” which should be connected. That is your tethered iPhone.
If you still need help, contact us on whatsapp. Like our facebook page. Don’t forget to join our telegram channel.


