I have both Windows 7 and Ubuntu installed on a shared machine. Because a lot of the non-developers use Windows, I’d like to change the boot order to make it easier for them.
Currently the boot order looks like the following:
- Ubuntu 11.10 kernelgeneric *86
- Ubuntu 11.10 kernelgeneric *86 (safe boot)
- Memory test
- Memory test
- Windows 7 on /dev/sda6
How do I change the default order so that Windows 7 is at the top of the list?
- Windows 7 on /dev/sda6
- Ubuntu 11.10 kernelgeneric *86
- Ubuntu 11.10 kernelgeneric *86 (safe boot)
- Memory test
- Memory test
8 Answers 8
You can use an easy-to-use the GUI application called Grub Customizer to make your life a little bit easier. As the name suggests, you can do much more than just reordering GRUB menu entries with it.
You can install it by:
There is an How-To Geek article about it, How to Configure the Linux GRUB 2 Boot Menu the Easy Way. Take a look at it if you’re interested. Also, there is a solved thread on the Ubuntu Forums, Change boot order in GRUB 2 that mentions this tool.
Here are some screenshots:
The Grub Customizer settings may work only from within the latest Linux/Ubuntu installation, the one that installed the Grub.
For example, if somebody has two OS-es installed (Windows and Ubuntu), and then installs a third OS (Manjaro, etc) and then tries to follow the above answer, Grub Customizer changes will not work when made from the second OS (Ubuntu, in the example). The program has to be installed in the thirs OS, as it seems that Grub Customizer can only edit the Grub files created by the installation of the system on which itself is installed.
The files that determine the Grub boot menu come in most cases with the latest system installed on a machine, so Grub Customizer has to be installed and used from that Linux system.
You can also change the grub default boot entry from the command line without having to install any additional tool. This won’t change the order in the list but it will allow a different OS to boot by default, which sounds like what you may want anyway.
First, make a backup copy of /etc/default/grub . In case something goes wrong, you can easily revert to the known-good copy:
Then edit the file using vim or the text editor of your choice:
Find the line that contains
where x is the index of grub menu item to which you would like to boot to by default. Note that the menu items are zero-indexed. That means that the first item in the list is 0 and that the sixth item is actually 5 . So to boot to the sixth item in the list, the line would read:
[SOLVED] How does forcepae continuity work in LM?
[SOLVED] How does forcepae continuity work in LM?
Post by Frankus333 » Sat Jul 26, 2014 11:13 am
Just wondering if someone can tell me the secret to how LM gets the forcepae workaround to persist continuously, which it appears not to in other *buntu distros? (The fix in does not survive reboot, so is required again for each kernal update.)
I am aware of the specific PPA for forcepae continuity for *buntu:
but I see no evidence that this is what LM17 does. (The PPA has not even been updated for Trusty yet, and does not seem to be added to my LM17 installation, and no file named fake-pae or similar is evident.)
Is it just that all kernal updates for LM will have that addition to the grub configuration? Or is that updating grub to have the forcepae attribute will survive any kernal (or other) updates of grub? If the latter is true, would editing the boot script to include forcepae, then updating grub after boot with
be all that *buntu 14.04 distros require?
Just asking, because I don’t know enough to risk trying this on my Kubuntu14.04 installation, and potentially breaking it. I’d like it to handle the pae issue as smoothly as the LM17 KDE installation on my pentium m laptop does.
Re: How does forcepae continuity work in LM?
Post by Mute Ant » Sat Jul 26, 2014 8:03 pm
- GRUB_CMDLINE_LINUX=”forcepae”
Re: How does forcepae continuity work in LM?
Post by Frankus333 » Sat Jul 26, 2014 11:28 pm
Thanks Mute Ant
That line is in the grub file on LM17, but not Ku1404, so this is on the right track I think. However, I am wondering about what happens with kernal updates in LM17. There has been one since initial installation, and it did not seem to break the forcepae, and I don’t remember having to accept any versions of packages/files, except for logind.conf, which doesn’t seem to have anything related to pae mentioned.
Interestingly, running the update/dist-upgrade code this morning on LM17 offered 7 grub and firmware related packages for upgrading, and nothing else (?!) I will hold off on these for the time being until I understand more about updating grub manually. (There seems to be a lot of differing opinions on various posts, including modifying grub.cfg, which is warned against. I am prepared to experiment with updating /etc/default/grub but not /boot/grub/grub.cfg)
Re: How does forcepae continuity work in LM?
Post by Mute Ant » Sun Jul 27, 2014 6:26 am
Re: How does forcepae continuity work in LM?
Post by Frankus333 » Sun Jul 27, 2014 8:54 am
Thanks Mute Ant
My understanding is that support for non-pae kernals will stop in 2017 when LM13 reaches EOL. The fix for LM17 allows the latest kernals to continue to be used on this hardware, up until at least 2019, assuming other complexities don’t prevent the hardware from handling them, even after dropping to a lighter DE such as XFCE. As the fix does work and is stable after kernal update for LM17, I would like to get it to do the same for Kubuntu 14.04 on this machine.
I had lots of messages in the konsole about ownership problems while trying to update the /etc/default/grub file, but managed to get the attribute “forcepae” into both GRUB_CMDLINE_LINUX_DEFAULT and GRUB_CMDLINE_LINUX lines, and this is now also reflected in the /boot/grub/grub.cfg file as well. However, the initial grub boot script won’t retain the forcepae attribute after reboot, so the cpu flag does not get set each time. I presume I have to also run:
after booting with an edited initial grub boot script, to get that change permanently into the initial boot script. I also presume that if this works it would be required for the recovery boot script as well, in a separate reboot, as it seems only one page of the initial boot scripts can be edited per boot.
Playing around with what I presume is the grub information in the MBR (possibly affecting the booting of the LM17 installation) is a step too far for me at this stage, until I can get some more definitive assurance that this is the way LM17 has in fact achieved the forcepae continuity.
I don’t understand much about the complexity of grub in a multiboot situation, and am concerned that if they are all controlled by a single set of grub information in the MBR, that is updated by each installation that has its kernal updated, then updates via one kernal could mess up grub settings for another OS on the machine. Maybe it is not feasible to have two different installations requiring forcepae on the same machine?
Re: How does forcepae continuity work in LM?
Post by Frankus333 » Mon Jul 28, 2014 6:37 am
I have arrived at what appears to be the solution for my Ku 14.04 installation with some help from the Kubuntu forums; posting here for completeness.
It appears that the forcepae attribute has to be written to the initial grub script that controls the machine, and no amount of updating grub in the Kubuntu 14.04 installation touched this, because the LM17 installation was the last to be added, so its grub had control of the booting of the machine for all OSes.
All that apparently had to be done to modify Kubuntu 14.04 was to add forcepae to the Ku 14.04 /etc/default/grub file in the same way as LM17 has it (GRUB_CMDLINE_LINUX=”forcepae”), then update grub (sudo update-grub). This wrote forcepae into all the correct lines in /boot/grub/grub.cfg. These changes didn’t get to the boot grub, which was controlled by LM17.
So, to complete the solution, I booted into LM17, and ran
, without changing anything else in LM17. This apparently rewrote the initial boot grub scripts for Ku 14.04, using the new info, and the forcepae attribute appeared in their initial grub scripts. All Ku 14.04 kernals booted up with the forcepae flag set.
A robust test was to then allow the large Kubuntu update I had been holding back, which included kernal updates. To confirm it held up after Ku 1404 kernal update, I booted into Ku 1404 again, confirmed it came up with the PAE flag set correctly, and selected the updates (long list) and let them run in tty1. All completed without errors. The latest kernal has been installed, and the PAE flag remains set for the main kernal, and the oldest recovery options kernal, when each is booted (didn’t check the middle two kernals in the recovery list, but they have the parameter listed in the recovery initial grub script page, so should also be fine.) The Ku 1404 is now the first listed OS, as its grub now controls the machine. LM17 still boots up with the PAE flag set as normal.
The next test will be when I run the latest offered grub updates in LM17. I expect it will take back the initial grub control, but the changes now made to Ku 1404 should stick, and be written back into the initial grub script that LM17 re-writes; here’s hoping.
[EDIT: Yes; the grub updates in LM17 worked as predicted here. LM17 again controls the boot menu, and all LM17 as well as Kubuntu 14.04 kernels boot normally with PAE flag set.]
As that proved to be the case, I see no need for the fake-pae modification/PPA which was also suggested to me.
Chris HoffmanChris Hoffman
Editor-in-Chief
Chris Hoffman is Editor-in-Chief of How-To Geek. He’s written about technology for over a decade and was a PCWorld columnist for two years. Chris has written for The New York Times, been interviewed as a technology expert on TV stations like Miami’s NBC 6, and had his work covered by news outlets like the BBC. Since 2011, Chris has written over 2,000 articles that have been read nearly one billion times—and that’s just here at How-To Geek. Read more.
New Windows PCs come with UEFI firmware and Secure Boot enabled. Secure Boot prevents operating systems from booting unless they’re signed by a key loaded into UEFI — out of the box, only Microsoft-signed software can boot.
Microsoft mandates that PC vendors allow users to disable Secure Boot, so you can disable Secure Boot or add your own custom key to get around this limitation. Secure Boot can’t be disabled on ARM devices running Windows RT.
How Secure Boot Works
PCs that come with Windows 8 and Windows 8.1 include UEFI firmware instead of the traditional BIOS. By default, the machine’s UEFI firmware will only boot boot loaders signed by a key embedded in the UEFI firmware. This feature is known as “Secure Boot” or “Trusted Boot.” On traditional PCs without this security feature, a rootkit could install itself and become the boot loader. The computer’s BIOS would then load the rootkit at boot time, which would boot and load Windows, hiding itself from the operating system and embedding itself at a deep level.
Secure Boot blocks this — the computer will only boot trusted software, so malicious boot loaders won’t be able to infect the system.
On an Intel x86 PC (not ARM PCs), you have control over Secure Boot. You can choose to disable it or even add your own signing key. Organizations could use their own keys to ensure only approved Linux operating systems could boot, for example.
Options for Installing Linux
You have several options for installing Linux on a PC with Secure Boot:
- Choose a Linux Distribution That Supports Secure Boot: Modern versions of Ubuntu — starting with Ubuntu 12.04.2 LTS and 12.10 — will boot and install normally on most PCs with Secure Boot enabled. This is because Ubuntu’s first-stage EFI boot loader is signed by Microsoft. However, a Ubuntu developer notes that Ubuntu’s boot loader isn’t signed with a key that’s required by Microsoft’s certification process, but simply a key Microsoft says is “recommended.” This means that Ubuntu may not boot on all UEFI PCs. Users may have to disable Secure Boot to to use Ubuntu on some PCs.
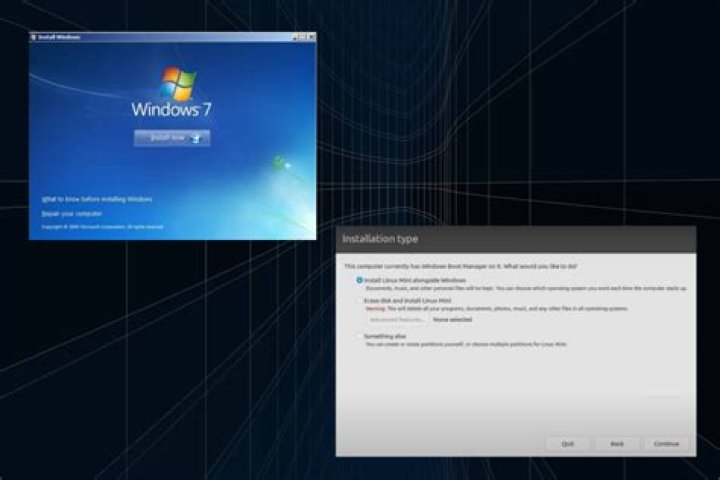
- Disable Secure Boot: Secure Boot can be disabled, which will exchange its security benefits for the ability to have your PC boot anything, just as older PCs with the traditional BIOS do. This is also necessary if you want to install an older version of Windows that wasn’t developed with Secure Boot in mind, such as Windows 7.
- Add a Signing Key to the UEFI Firmware: Some Linux distributions may sign their boot loaders with their own key, which you can add to your UEFI firmware. This doesn’t seem to be a common at the moment.
You should check to see which process your Linux distribution of choice recommends. If you need to boot an older Linux distribution that doesn’t provide any information about this, you’ll just need to disable Secure Boot.
You should be able to install current versions of Ubuntu — either the LTS release or the latest release — without any trouble on most new PCs. See the last section for instructions on booting from a removable device.
How to Disable Secure Boot
You can control Secure Boot from your UEFI Firmware Settings screen. To access this screen, you’ll need to access the boot options menu in Windows 8. To do this, open the Settings charm — press Windows Key + I to open it — click the Power button, then press and hold the Shift key as you click Restart.
Your computer will restart into the advanced boot options screen. Select the Troubleshoot option, select Advanced options, and then select UEFI Settings. (You may not see the UEFI Settings option on a few Windows 8 PCs, even if they come with UEFI — consult your manufacturer’s documentation for information on getting to its UEFI settings screen in this case.)
You’ll be taken to the UEFI Settings screen, where you can choose to disable Secure Boot or add your own key.
Boot From Removable Media
You can boot from removable media by accessing the boot options menu in the same way — hold Shift while you click the Restart option. Insert your boot device of choice, select Use a device, and select the device you want to boot from.
After booting from the removable device, you can install Linux as you normally would or just use the live environment from the removable device without installing it.
Bear in mind that Secure Boot is a useful security feature. You should leave it enabled unless you need to run operating systems that won’t boot with Secure Boot enabled.
- › How to Add Images to Questions in Google Forms
- › How to Delete Your Photos on Facebook
- › Razer Thinks You Want a PC Gaming Headset That Vibrates
- › How to Get a Link to a Photo or Video on Instagram
- › The Fix for Slow AMD Processors on Windows 11 Is Here
Chris Hoffman
Chris Hoffman is Editor-in-Chief of How-To Geek. He’s written about technology for over a decade and was a PCWorld columnist for two years. Chris has written for The New York Times, been interviewed as a technology expert on TV stations like Miami’s NBC 6, and had his work covered by news outlets like the BBC. Since 2011, Chris has written over 2,000 articles that have been read nearly one billion times—and that’s just here at How-To Geek.
Read Full Bio »
Chris HoffmanChris Hoffman
Editor-in-Chief
Chris Hoffman is Editor-in-Chief of How-To Geek. He’s written about technology for over a decade and was a PCWorld columnist for two years. Chris has written for The New York Times, been interviewed as a technology expert on TV stations like Miami’s NBC 6, and had his work covered by news outlets like the BBC. Since 2011, Chris has written over 2,000 articles that have been read nearly one billion times—and that’s just here at How-To Geek. Read more.
If you have installed Linux on its own partition in a dual-boot configuration, there’s usually no easy uninstaller that will remove it for you. Instead, you’ll likely need to delete its partitions and repair the Windows boot loader on your own.
How you uninstall Linux depends on how you’ve installed it. If you installed Linux as your only operating system, you’ll have to reinstall Windows over Linux to get your Windows system back.
If You Installed Linux with Wubi
If you installed Ubuntu or a similar Linux distribution like Linux Mint with Wubi, it’s easy to uninstall. Just boot into Windows and head to Control Panel > Programs and Features.
Find Ubuntu in the list of installed programs, and then uninstall it like you would any other program. The uninstaller automatically removes the Ubuntu files and boot loader entry from your computer.
If You Installed Linux to Its Own Partition
If you installed Linux to its own partition in a dual-boot configuration, uninstalling it requires removing the Linux partitions from your computer and then expanding your Windows partitions to use the now-free hard disk space. You also have to restore the Windows boot loader yourself, since Linux overwrites the Windows boot loader with its own boot loader, known as “GRUB.” After deleting the partitions, the GRUB boot loader won’t boot your computer properly.
Let’s take a closer look at how to get all that done.
Step One: Delete Your Linux Partitions
First, you’ll need to delete the Linux partitions. Start by booting into Windows. Press the Windows key, type “diskmgmt.msc“ into the Start menu search box, and then press Enter to launch the Disk Management app.
In the Disk Management app, locate the Linux partitions, right-click them, and delete them. You can identify the Linux partitions because they have no label under the “File System” column, while Windows partitions will be identified by their “NTFS” file system.
Be careful while deleting partitions here—you wouldn’t want to accidentally delete a partition with important files on it.
Next, locate the Windows partition near the newly available free space, right-click it, and select Extend Volume. Extend the partition so that it takes up all of the available free space. Any free space on your hard drive will remain unusable until you assign it to a partition.
You can also choose to create a new, separate partition instead of expanding your current Windows partition, if you like.
Step Two: Fix the Windows Boot Loader
Linux has now been removed from your computer, but its boot loader persists. We’ll need to use a Windows installer disc to overwrite the Linux boot loader with the Windows boot loader.
If you don’t have a Windows installer disc lying around, you can create a Windows repair disc and use that instead. Follow our instructions to create a system repair disc in Windows 8 or 10 or create one in Windows 7.
Insert the Windows installer or recovery disc into your computer, restart your computer, and let it boot from that disc. You’re going to be accessing the Command Prompt from the recovery environment. We’re covering Windows 10 here, but the instructions will also work for Windows 8. If you have Windows 7, check out our guide for accessing the recovery Command Prompt with a Windows 7 disc.
After booting from your installation or recovery disc, skip the initial languages screen, and then click the “Repair your computer” option on the main install screen.
On the “Choose an option” screen, click the “Troubleshoot” option.
On the “Advanced options” screen, click the “Command Prompt” option.
At the Command Prompt, type the following command and then press Enter:
You can now restart your computer. It will boot from its hard drive, starting Windows normally. All traces of Linux should now be erased.
- › How to Add Images to Questions in Google Forms
- › How to Delete Your Photos on Facebook
- › Razer Thinks You Want a PC Gaming Headset That Vibrates
- › How to Get a Link to a Photo or Video on Instagram
- › The Fix for Slow AMD Processors on Windows 11 Is Here
Chris Hoffman
Chris Hoffman is Editor-in-Chief of How-To Geek. He’s written about technology for over a decade and was a PCWorld columnist for two years. Chris has written for The New York Times, been interviewed as a technology expert on TV stations like Miami’s NBC 6, and had his work covered by news outlets like the BBC. Since 2011, Chris has written over 2,000 articles that have been read nearly one billion times—and that’s just here at How-To Geek.
Read Full Bio »
How to enable hibernation with swap partition on Linux Mint 19
Re: How to enable hibernation with swap partition on Linux Mint 19
Post by rene » Sun Apr 14, 2019 6:30 pm
Re: How to enable hibernation with swap partition on Linux Mint 19
Post by BG405 » Sun Apr 14, 2019 9:06 pm
Re: How to enable hibernation with swap partition on Linux Mint 19
Post by TI58C » Mon Apr 15, 2019 4:57 am
Thanks. Understand the difference now. As for USB-sticks, alway use sync and wait until blinking led stops, then suspend. And do replace them. Just for transport it’s easier if these things are nog “sticking out”. But I like the way I can just close laptop, go somwhere else and have it back up in a few seconds. Could never get that to work reliably on 17.3.
Will read more about hibernation and give it a try
Re: How to enable hibernation with swap partition on Linux Mint 19
Post by rene » Mon Apr 15, 2019 1:30 pm
Re: How to enable hibernation with swap partition on Linux Mint 19
Post by TI58C » Tue Apr 16, 2019 6:42 am
OK, thanks for the “heads up!”
Re: How to enable hibernation with swap partition on Linux Mint 19
Post by ablaszczyk » Tue Apr 23, 2019 2:54 pm
Re: How to enable hibernation with swap partition on Linux Mint 19
Post by since2019 » Sat Nov 16, 2019 2:09 pm
Re: How to enable hibernation with swap partition on Linux Mint 19
Post by pebcak » Fri Dec 27, 2019 12:35 am
Thank you for this tutorial! It worked for me on a Dell Vostro 5471 and Mint 19.3.
Re: How to enable hibernation with swap partition on Linux Mint 19
Post by sergueidob » Sun Feb 02, 2020 1:13 pm
Re: How to enable hibernation with swap partition on Linux Mint 19
Post by Frankus333 » Wed Mar 11, 2020 12:24 am
Thanks everybody for the interesting comments and variations in this thread.
My variation, just based on what I have used to modify settings files in the past in LM19.x, was to create the policy file with:
and paste in the longer form original version of the file content provided by the OP. I then saved the file, and it worked, on three different machines with LM19.3 XFCE (Intel NUC8i3BEH and HP15 laptop, both 64 bit, and a eeePC 1000H, 32bit, all running kernal 5.3.0-40).
Interestingly, on the eeePC, when running kernal 4.15.0-88, it would hibernate, but not resume fully. It would get to the point of reading all segments of the stored image, but either stop, or reboot into a normal restart.
This was initially a concern for the eeePC, is it seemed unable to run with kernal 5.3.0-40 (no networking worked). However, after playing around with re-installing the previously working kernal 5.3.0-28, which was then upgraded to 5.3.0-40 by the Update Manager, and there was a Linux firmware upgrade in there at some point, the 5.3.0-40 kernal now works on this machine, so I have had a good day ultimately! Thanks again.
I edited the grub file using;
Re: How to enable hibernation with swap partition on Linux Mint 19
Post by adarshonline01 » Sat Apr 04, 2020 10:35 am
Re: How to enable hibernation with swap partition on Linux Mint 19
Post by BrunoMiranda » Wed Apr 22, 2020 9:23 pm
I need help on this one on Mint 19.3.
I had everything working (including hibernation to a swap partition) and then tried the method to hibernate to a file. It worked but I want to revert it now into hibernating to a swap partition and it’s not working through the GUI.
I’ve tried the methods described in this post but pressing the hibernation button blinks the screen black for a moment and then it comes back, with no hibernation. Nothing is written in /var/log.
The system can and it is actually hibernating if I run sudo s2disk from the terminal but I also want it to do it from the GUI and configure the power button to make the system hibernate.
So does anyone know how to make the hibernate button call sudo s2disk?
Bye for now,
Bruno
(Always backup before you screw up 🙂
Re: How to enable hibernation with swap partition on Linux Mint 19
Post by bellalistair » Wed Jul 01, 2020 5:14 pm
I see the comment regarding the Grub menu appearing with a 30 sec timeout after resume and the advice to fix by setting GRUB_RECORDFAIL_TIMEOUT=$GRUB_TIMEOUT
Changing the recordfail timeout just stops the grub menu appearing differently in the event of a boot failure, given the default timeout is zero this may be somewhat unwise.
The root cause is a resume script now being in the wrong location.
See
( . bug=959537 will eventually be fixed and work through to Mint.)
/etc/pm/sleep.d/10_grub-common
should now be in
/lib/system/system-sleep/10_grub-common with a slight adjustment to the trigger from thaw to post
This is the script that unsets the fail record in grub in the event of a successful resume and hence avoids the long timeout next boot.
Re: How to enable hibernation with swap partition on Linux Mint 19
Post by quickbeam » Sat Jul 11, 2020 12:22 pm
This procedure also worked for me in LinuxMint 20.
Re: How to enable hibernation with swap partition on Linux Mint 19
Post by MrEen » Thu Aug 06, 2020 9:27 pm
My sound fix tips for Linux Mint
Re: How to enable hibernation with swap partition on Linux Mint 19
Post by mideal » Fri Aug 14, 2020 1:47 pm
Hi & many thanks for this instruction!
With Mint 20 (Cinnamon) hibernation works as a charm after setting as recommend in the opening thread.
As far as I remember it’s the first time it worked with my ecryptfs setting.
Hibernating, restarting (with hardware start-password) and logon takes 32 sec. @ 16GB memory on my Lenovo Yoga 910.
Re: How to enable hibernation with swap partition on Linux Mint 19
Post by juupzz » Mon Feb 08, 2021 4:42 pm
English is not my native language
My specs:
Linux Mint 20.1
RAM 16GB with Swap Partition 16GB
3 drives, all drives using btrfs file system
with Nvidia card
This tutorial works, fresh install with additional steps.
After you did step “sudo update-grub”, restart then you should update intramfs “sudo update-initramfs -u”.
Add hibernate button to shutdown menu, just like #1 post. Then, try to execute hibernate from there.
Linux Mint 18.1 released with long-term support, Developers announced it would receive support & security update till 2021. Now everyone wants to try this Linux Mint project before installing OS entirely on their computer. If you are Linux User, then you know how to install Linux Mint on your computer. But If you are a Windows user and want to try this Linux Mint project & Don’t want to remove your pre-installed Windows 10 then the last option that remains is dual boot Linux Mint and Windows 10. I already have written all steps to Dual Boot Windows 10 with Ubuntu, And half of the process Dual boot Windows 10 alongside Linux Mint is Similar.
What is Linux Mint Operating System?
Linux Mint is a community-driven Linux distribution based on Debian and Ubuntu that strives to be a “Modern and comfortable operating system in terms of UI.” Linux Mint is a very powerful Operating System, and as I mentioned it’s based on Ubuntu, that’s why it’s easy to use.
Why Linux Mint Over Ubuntu?
Linux Mint provides all of the multimedia codecs and Linux software installed by default which means you Don’t need to update or install anything externally, You are up and running slightly quicker than with Ubuntu. There is two versions available of Linux Mint Mate and Cinnamon. And the Best thing is Linux Mint Mate version is somewhat similar to Windows; that’s why Windows user prefers Mate Version. Linux Mint Is More Familiar For Windows Users
Which Linux Mint Version Should I choose Mate or Cinnamon?
Before start choosing any of them to Dual boot with Windows 10, First understand the Difference and Basic knowledge about both versions. Concerning differences between the two, they have slightly different interfaces. The Cinnamon desktop environment has a GNOME3 look means. It provides basic functions like launching applications, switching between windows and it also has a widget engine.
The Mate desktop environment is menu-centric, which Windows users prefer. Mate also has a search bar in its menu like Windows. And visually the Mate menu is more front-and-center than the search. Mate or Cinnamon, Both desktops are tweakable, regarding layout and color. If you are a Windows user, then choose the Mate version, But If you are Linux (Ubuntu) user, then Cinnamon is the better choice for you.
UEFI or BIOS
Before Start Following Dual boot Linux Mint and Windows 10 Guide make sure your computer has Unified Extensible Firmware Version (UEFI). If you are using the BIOS version then this Guide is not for you.
To check your computer has a UEFI over a Standard BIOS, Simply Check System Information and you can find easily which Firmware version your system is using.
Create a Linux Mint USB Drive to Dual boot Linux Mint and Windows 10.
First Download Linux Mint ISO File go to Linux Mint Official Site. If you are Windows User Choose Mate Version.
There is two version of Linux Mint Mate Available for 32-bit Machine and for 64-bit Machine. You Don’t need to confuse you can check your System Version Easily. Right, Click on My Computer/My PC then click on properties. After that, on System Properties Window you can find the version Easily.
Now we need Software to Burn the Linux Mint ISO Files into a USB Drive. I already wrote a Guide on How to Burn ISO to USB Drive.
You can try the above Guide to Burn else Download Win32 Disk Imager & Install it on your computer. The installation Process is Similar to normal windows software Installation. If you are facing any issue while Installing you can comment.
Now Connect your USB Drive and move, All important data into a safe palace, Because the writing process will Erase all your Data. To Format, a USB Drive Right Click on USB Drive click on Format.
Now After completing of Installation and formatting USB Drive, Now select the Linux Mint ISO File and then click on Write. The writing process will take few minutes.
After Creating USB Drive Now Shrink Windows 10 Partition If you want to install Linux Mint with Windows 10. You will get two Choices you can try Linux Mint or you can install it on your computer, for Installation you need a Drive, to Create one Follow this Article.
Turn Off Fast Boot.
If you have a UEFI bootloader then you need to Turn Off Fast Boot to Speed up Boot time. To turn Off Fast Boot Follow these instructions.
Right, Click on Start Button Select power Options.
Now on Power Options Window on Left Side Bar Choose “Choose What Power Button Option Does”
Now on Next Window Click on Choose Settings that are currently Available to Enable Settings. Now under Shutdown settings unmark Turn on Fast Startup then click on Save Changes.
Done you Successfully Turn Off Fast Boot, Now It will Help you in speed up Boot-Time.
Now Create a Backup of Your Computer (Optional but Highly Recommended). Sometimes while Dual boot Linux Mint and Windows 10, the System crash due to some hardware issues.
Dual boot Linux Mint and Windows 10 (UEFI)
After Doing all the Above Process it’s time to Dual boot Linux Mint and Windows 10, To that, so connect your Bootable USB Drive to the Computer that you created using Win32 Disk Imager or Rufus.
[SOLVED] CUPS service not starting and not accessible after printer/scanner install LM19.3XFCE
[SOLVED] CUPS service not starting and not accessible after printer/scanner install LM19.3XFCE
Post by Frankus333 » Fri Jan 24, 2020 6:43 am
On a new installation of LM19.3XFCE I was setting up my printer/scanner (HP PhotoSmart C7280) as usual, and for some reason I looked at the Server->Settings menu item, and selected “Allow users to cancel any job. ” and also changed Advanced Server Settings from “Preserve job history but no files” to “Preserve job files. ” (Normally I don’t adjust these settings here.) I suspect that may have been a bad mistake, because now after reboot, the cups service won’t start, and seems to want me to link to one remotely.
That is, when I select System->Printers in the computer Start menu, the resulting box marked “Printers – localhost” has:
“Printing Service not available. Start the service on this computer, or connect to another server.”, and also “Not Connected” in the bottom left corner. It also has the “+ Add” and “Start Service” options greyed out, and only “Connect”, the refresh circle and the “Filter” options available. Pressing “Connect” brings up a “Connect to CUPS Server” dialogue box.
I tried to check the status of the cups service with the terminal, and the output says it failed, at boot time, as below:
Trying this with sudo produced the same result, but the same info is printed twice (!?)
I tried to run the Troubleshooter in the “Printers – localhost” Help menu, but this suggests as the first step that I “. choose System->Administration->Services from the main menu and look for the ‘cups’ service”, which doesn’t relate to anything I can see (no “Administration” option in “System” menu of computer). The button to move Forward to next step is greyed out, so I can’t do anything else with the troubleshooter.
Can anyone help to decipher what may be going on here, and how I can get back control over my printer/scanner?
Re: CUPS service not starting and not accessible after printer/scanner install LM19.3XFCE
Post by brian_p » Fri Jan 24, 2020 9:13 am
Re: CUPS service not starting and not accessible after printer/scanner install LM19.3XFCE
Post by Tadwyn Tiger » Fri Jan 24, 2020 11:44 am
Re: CUPS service not starting and not accessible after printer/scanner install LM19.3XFCE
Post by brian_p » Fri Jan 24, 2020 12:24 pm
Re: CUPS service not starting and not accessible after printer/scanner install LM19.3XFCE
Post by Frankus333 » Fri Jan 24, 2020 10:37 pm
Thank you Tadwyn Tiger for your timely post. I am reassured by hearing that it worked for you.
Thank you brian_p for your suggestion and subsequent update to it.
This is the second time I am attempting to set up an LM19.3 installation on this machine (one upgrade and one new install), where something has gone wrong, and I am wondering if my decision to change up from 19.2 so early was wise; maybe 19.3 needs more time to settle into stability. Anyway, I have made the jumps, and will continue on with it cautiously for now, in the hope of learning more.
Before attempting any changes to internal setup/config files I am not familiar with, I have done a little more research by videoing the startup text, and found that the cups system made a number of attempts to start, and failed apparently because it could not “. make remote CUPS printers available locally.”. The screenshot shows the last bit of these attempts, including the error messages. (Apoligies for the blur; things happen quickly.) EDIT: Image does open in Drawing.
Does this mean that my adjusting the Server settings during the “add printer” setup (which seemed to have nothing to do with remote printers) has caused the cups service to lock itself into trying only to access printers via the server rather than locally? Or has something else caused the fault in the cups system or whatever else is broken?
My apoligies if I am being overly pedantic or cautious, but these problems have caused a number of wasted days attempting diagnosis and experimenting with adjustments, so I am trying to minimise that.
My main question now is; does this new info confirm the presumed problem diagnosis and the suggested fix? With my limited knowledge, the fix seems easily reversible if needed, but in my experience, permissions etc can make seemingly simple file manipulations more complex than they seem.
Re: CUPS service not starting and not accessible after printer/scanner install LM19.3XFCE
Post by Frankus333 » Mon Jan 27, 2020 10:29 pm
While waiting for a response to my above questions, I have done some more research through the other posts in this forum. I ran the suggested check of the HP system using “hp-check” in the terminal, and this came back with a list of 22 errors noting missing or incompatible packages that were required or optional.
This was not very reassuring, although further reading in the forum gave me the impression that there are varying opinions about whether the error messages amount to much, and about the best way to install printers, and just what packages and plugins are required, and whether they should come from the repos or the manufacturer.
I checked all my other Linux installations, and on 3 different machines, 32 and 64 bits, LM19.3XFCE, LM18.3KDE and Kubuntu 18.04.3 DEs, all came back with from 14 to 17 listed errors, the same as the current installation I am working on setting up. However, they all work properly, printing and scanning. So much for that check.
Rather that wait any longer for a reply, I ran the three lines of code suggested by brian_p, prefaced with “sudo”, and bingo, the problem was fixed; printing and scanning working properly. I re-ran the “hp-check”, and got the same list of errors, [EDIT] but also a lot more lines saying “Cannot adopt OID in. “, which appear in the results for the other installations, but weren’t here in this one until the fault was fixed (. ).
Many thanks for your help brian_p; you “got it in two”.
I still have questions about how this mixup could have occurred during my setup, and whether my adjusting the Server options could have caused it, which I will continue to wonder about.
EDIT:
I am also now curious about why replacing the configuration file with the default did not lead to the requirement to set up my printer again. It was just there in localhost, and worked, without me having to do anything else.
BTW; not sure if this is relevant, but I use some KDE apps, and therefore have the Kubuntu backports set up in software sources, and have both “Launch
I’ve installed fedora 22. I’ve created a partition /biosboot for this. After restarting I found fedora 22 and other two linux distro ( ubuntu and linux mint) but windows 7 disappear. How I get windows 7 along with linux?
1 Answer 1
First, a BIOS Boot Partition is not mounted and so is not referred to as “/biosboot” — the leading slash normally indicates a mounted partition or a directory in the root ( / ) filesystem. This may seem pedantic, but the point is to highlight that I’m making an assumption that you’re talking about a true BIOS Boot Partition and not simply some random partition that you’ve mounted at /biosboot . If you’ve done the latter, all bets are off and the below may not apply.
A BIOS Boot Partition is meaningful only on GUID Partition Table (GPT) disks and is useful only when booting in BIOS/CSM/legacy mode. If you’re booting Windows from a GPT disk, though, Windows must necessarily be booting in EFI/UEFI mode — that’s a Windows limitation. Thus, your question implies that you’ve installed Fedora in BIOS/CSM/legacy mode but have an existing Windows installation in EFI/UEFI mode. (Your Mint and Ubuntu installations were probably also in EFI mode, but they can switch pretty easily and so would still boot in BIOS mode after you installed a BIOS-mode GRUB.) There is one possible flaw in this analysis: You didn’t specify how many disks your computer has. If you’ve got two disks, you might be booting Windows in BIOS mode from an MBR disk and Fedora in BIOS mode from a GPT disk. If this is the case, the below doesn’t apply; but if you’ve got a single disk, or if all your disks use GPT, read on.
The first thing to do is to disable BIOS/CSM/legacy support in your firmware. How to do this varies from one computer to another. On a few systems, it can’t really be controlled by the user, in which case you’ll need to poke around to figure out how to force the computer to boot in EFI/UEFI mode. Knowing the brand and model of your computer (or motherboard, if it’s self-built) may be helpful.
Once you disable BIOS/CSM/legacy mode, the computer should boot using whatever boot loader you’d used before. Chances are you’ll then be able to boot Windows, Mint, and Ubuntu, but not Fedora. You can boot into whatever OS controls GRUB (presumably Mint or Ubuntu) and do a sudo update-grub to get it to detect Fedora.
EDIT: Based on your Boot Info Script output, you appear to have an EFI-mode installation of Windows and a BIOS-mode installation of Ubuntu, Mint, and Fedora. There’s no evidence of an EFI-mode boot loader for Linux, which you must have to boot all your OSes. Here’s how to recover:
- Disable BIOS/CSM/legacy support in your firmware. Using this feature is what got you into the problem in the first place, and disabling it will help you control your boot process in the future. The next step requires booting your computer in EFI mode, which you can do most reliably by disabling the CSM. I can’t provide detailed instructions on how to do this because the details vary from one computer to another. The options appear in the firmware’s setup utility (what most people erroneously call the “BIOS setup utility”), so you’ll have to dig through there. Chances are you manually enabled the CSM, since most modern computers ship with it disabled. (If your computer predates Windows 8, though, it may have shipped with the CSM enabled.) Note that “enabling BIOS/CSM/legacy support” is sometimes phrased as “disabling EFI/UEFI booting,” although this latter phrasing is rare.
- Install an EFI boot loader for Linux. Several are available, but the two that are likely to be easiest to install are:
- My rEFInd — You can do a test using the USB flash drive or CD-R image, available on the rEFInd downloads page. It should show you options for Windows and for both Ubuntu and Mint, although they may be hard to tell apart initially. Also, your Fedora install seems to put the kernel inside an LVM, so you’ll need to split off a separate /boot partition to get it to work, or at least copy your Fedora kernels to the ESP or some other accessible location. (You can tackle that later.) If rEFInd works from a removable media, install its Debian package or PPA from Ubuntu or Mint, then tackle fine-tuning it: Create a /boot partition for Fedora and give the Ubuntu and Mint partitions names of “Ubuntu” and “LinuxMint,” respectively, so that rEFInd will show the correct icons.
- GRUB and Boot Repair — The Boot Repair tool can automatically fix many GRUB problems; however to work in your case it must be run from EFI mode. Also, it’s an automated script that might or might not get everything right in your complex quadruple-boot configuration, and there’s no way to know whether it will do the right thing except by setting it loose on your system, so there’s a risk that it will make things worse. If it works, though, everything will come together immediately.
As a side note, I’d say that it’s probably better to use virtualization (VirtualBox, QEMU, VMware, etc.) rather than try to boot so many OSes on “bare metal.” Multi-boot setups like yours are complex and difficult to maintain, whereas virtualization enables you to isolate each OS in its own container, thus making things much simpler to manage.
- Members
- 1,190 posts
- OFFLINE
- Gender: Female
- Location: Houston
- Local time: 03:27 AM
Okay, I’ve been trying to think this through for hours. Tenforums has step-by-step screens of the ‘upgrade’ using either the media tool or Windows update (icon click in system tray). Then it also has step-by-step screens of the ‘clean install’, which you can only do AFTER the update. (Sorry, I didn’t see equivalents here in BC, so am using their links.)
Upgrade link, here. Clean install link, here. Common Problems and fixes, here. Upshot?
- The installer doesn’t want your input.
- It instead wants to search your old version of Windows for the product key,
- so you aren’t allowed to furnish one:
- you are instead required to UPGRADE IN PLACE, the Win10 atop your current (even if you keep nothing).
- Any key requested is a Windows 10 key, as the installer also handles Win10 purchased installations.
- You won’t have such a key prior to upgrading in place. So you’re never asked for your earlier-version key. Once you update to Windows 10 inplace, you have no key to specify still, as now the Win10 key replaces your old one, and is still embedded in the now-Win10, updated installation.
So I get the following conclusions:
1. Unlike with us Insiders, the official Win10 installation really wipes out the prior version, since you’re only allowed to do an inplace upgrade. Win10 terms in the lifecycle sheet are tied to ‘OEM support’ and mandatory updates. These restrictions are not in prior OS versions. So you just replaced your better old license, with a more restricted license.
2. Potentially, if you wanted UEFI, the installer changes all partitions for clean install, so effectively wrecks your ability to restore your prior version: so the ’30 day’ rollback provision, is nullified.
3. You can’t dual boot with your older version and the Win10: for how can you restore your old version, even if you did a non-UEFI clean install of Win10 to a new partition? You effectively replaced your old version’s license with the Win10 license due to mandatory update in place.


