Your IP address has been temporarily blocked due to a large number of HTTP requests. The most common causes of this issue are:
- If you are using Maxthon or Brave as a browser, or have installed the Ghostery add-on, you should know that these programs send extra traffic to our servers for every page on the site that you browse. Using GameFAQs regularly with these browsers can cause temporary and even permanent IP blocks due to these additional requests.
- Some unofficial phone apps appear to be using GameFAQs as a back-end, but they do not behave like a real web browser does. This triggers our anti-spambot measures, which are designed to stop automated systems from flooding the site with traffic. Continued use of these apps may cause your IP to be blocked indefinitely. There is no official GameFAQs app, and we do not support nor have any contact with the makers of these unofficial apps.
- Using a script or add-on that scans GameFAQs for box and screen images (such as an emulator front-end), while overloading our search engine
- Running a “scraper” or “downloader” program that either does not identify itself or uses fake headers to elude detection
- Using a badly configured (or badly written) browser add-on for blocking content
- Overusing our search engine with a very large number of searches in a very short amount of time
If you promise to stop (by clicking the Agree button below), we’ll unblock your connection for now, but we will immediately re-block it if we detect additional bad behavior.
If you do not understand what is causing this behavior, please contact us here.
There are of course many ways to use or hold a katana in a swordfight, but the truth of the matter is that most people who own a Japanese katana do NOT know how to use it or even hold it properly. We are not talking about the fancy techniques that take a lifetime to master, but even basic techniques and proper ways of gripping the katana seem to evade most people.
The basic gripping and cutting techniques are very easy to learn, and this is very important to learn because if you aren’t using a katana the way it is designed to be used, it simply won’t perform as you expect, or as it should. Makes alot of sense right? The wrong technique is in essence swinging the katana like you would a baseball bat. Doing this makes a great impact instead of utilizing the slicing power of the blade, rendering the technique almost useless.
When holding the Japanese sword the correct way, you will maximize your cutting power and speed of movement. Since mathematically Mass x Speed = power, this is important.
So where do we begin? Let us begin with how to hold or grip a katana.
How to hold or grip a Japanese katana
A right handed person should have his right hand about an inch from the hand guard, or tsuba, holding it in a relaxed yet firm grip primarily with the bottom three fingers of each hand gripping the handle. The strongest part of the grip should be from your little finger to your middle finger. The index fingers should barely be touching and very flexible.
Grip near the bottom and the top of the handle respectively for maximum leverage and control of the katana. Use some time practicing this grip so that you are sure to hold it not too tight and not too loosely. The tighter your hold is the less control you have of the katanas movement, so the hold should be more like the way you would grip a golfclub. You must never ever lose control of a blade when cutting!
Different schools using katanas have different grips
It depends on what school of teaching you are learning from, but the classical grip is, as earlier described, with the left hand as close to the bottom of the hilt as possible without the little
finger going off the end. The reason for this is that you are also able to strike with the hilt when in close proximity to your target. If your hands are held too close together there can be no leverage, which forms the basis power for cutting with a katana.
Two general styles of gripping the katana are widely known. The first is to grip firmly with the little finger, a little less firmly with the next finger and a little less with the next one and not at all with the first finger. This provides a very secure but not too tight grip.
The other grip comes more from Iaijutsu is to hold firmly with the first finger and increasingly less with the other fingers. This is a complete opposite to the first method, and focuses on flexibility rather than power and security which is more suitable for training than actual combat.
Check out the video and read on for a good explanation of how to grip the katana correctly.
Most people don’t know how to use a Katana properly – and if you aren’t using it the way it was designed to be used, it simply won’t perform as you expect.
Bad technique, essentially swinging it like a baseball bat at a target, means that instead of slicing a Katana will simply impact, and I have lost count of the number of times that someone has rejected a perfectly good Katana simply because they aren’t doing it right!
Thankfully, the basic cutting action is not very hard to learn..
Tip #1: Slice, we ain’t playing baseball here..
The basic action of cutting with a Katana is to draw slice it through the target. If you just ‘hit’ with the sword, the edge needs to muscle through the target, and it is more akin to a hack than a cut.
Sure enough, with enough speed and considerable force behind it, it is possible to cut through standard targets this way. But cutting in this way means that you are only really utilizing around 25% of the swords cutting ability – and worst case scenario, you end up baseball batting a water filled bottle across the yard rather than slicing it like a knife through butter..
The way to use a Katana properly is to cast it out like a fishing line and draw cut the blade inwards using the elbows close to the body.
This casting and draw cutting action causes the cutting edge of the blade to SLICE across the target with the curved surface of the blade, and simply by modifying your technique slightly to include an inward draw cut action, the ease of cutting becomes extremely noticeable compared to just striking out – which is certainly NOT the way to use a Katana properly.
It is not a particularly big action (it is actually quite subtle) – but once you have it down you will definitely notice the difference and it will dramatically improve your test cutting results as you maximize the amount of cutting surface that passes over the target.
Tip #2: HOLD it properly, and watch your cutting ,speed and technique improve instantly!
In order to use a Katana properly, you need to hold it the right way – because by gripping it the right way, you will further improve your cutting abilities, as well as move and cut FASTER (and as everyone knows, mass x speed = cutting power).
Thankfully, it is not hard to do – as Darren McNamara writes in our free ebook Japanese Sword Arts 101:
“The grip for a Japanese sword is like that of a tennis racquet, a golf club, or a cricket bat. So ask your local sports teacher, golf-pro, or your Dad for any tips on structuring your grip if one is handy to you.”
For a right handed grip, your right hand should be about an inch from the hand guard, holding it in a relaxed and firm grip primarily with the bottom three fingers of each hand,
Use a Katana Properly by Holding it Properly..
NOTE: Spend a fair amount of time practicing the grip to make sure that you don’t hold it too loosely. It is a cardinal sin to accidentally lose control of a blade when cutting!
The feeling you should have is that the sword is kind of floating – indeed, the more you put a death grip on it, the less control you have. Indeed, one of the best tips I ever got was from a Shihan who watched my videos and suggested I grip the sword more like a paintbrush instead of strangling the thing. I tried this out and immediately noticed much cleaner, easier cutting!
So free up your grip and watch your cutting improve!
Tip #3: Edge Alignment is King!
Even if you manage to fluff up the correct slicing action and strangulate the grip until your knuckles turn white, good edge alignment and enough speed can work wonders..
Conversely, if you use the correct cutting technique and hold it the right way but don’t line up the edge properly with the target, you will either scoop your cut or lose control and completely botch it up (quite possibly bending your blade in the process).
Holding the Katana the right way and holding it correctly goes a long way to ensuring correct edge alignment – but it is something that you should pay attention to and try to improve at every opportunity.
One way of improving your edge alignment is by cutting suspended sheets of paper. This requires PERFECT edge alignment and perfect speed and is best practiced with your sharpest blades..
Putting it all together
For the casual backyard cutter – the three tips presented above – slice properly, hold it firmly but relaxed and ensure correct edge alignment should see you go from struggling to cut ANYTHING (and cussing out the sword in the process) to lopping tatami mats, bamboo and water filled bottles so that it looks almost effortless.
Without a properly qualified and trained Sensei it is pretty difficult to improve to your maximum potential and truly learn how to use a Katana properly – but I have seen some people who have achieved what on the surface at least, looks like pretty good technique from self studying.
One good way of doing that is by watching videos of true sword masters doing their thing and simply try to emulate their stance, relaxed posture and the three basics we talked about above.
Go deeper..
It is probably enough to drill on and remember the three tips we presented above.But once you are mindful of them, you will probably be curious enough to want to dig a little deeper..
So here are some links you should check out if you want to take it to the next level:
The katana (samurai sword) is a weapon that was popular during Feudal Japan. Before katanas, they used a tachi for the cutting edge needed in battle. The signature of this sword was facing the wrong way. With a need to correct this as well as have a quicker draw on the sword in close combat, the katana gave the samurai the edge needed for victory. Also, it was great to use the katana with another sword. Using a shuriken as a concealed, throwing weapon would be great to move in closer. The sword was washed using a technique to rid the metal of impurities. This created a sharpness and strength in which many swords could not compete. The katana is still used in martial arts such as Kendo, Kenjutsu, and Aikido.
1. Basics: Holding Your Katana
Without the foundation, you’ll be wielding your sword incorrectly. This video shows you how to hold your katana properly. It teaches you the correct way to approach the handle keep your sword erect for offensive and defensive purposes. It shows you how to properly hold the sword with two hands and have the wrists facing a certain way with your sword alignment for great strikes. Also, you learn about the different parts of the katana and taking care of it. Later in the video, you’ll find out what are good target areas to aim when striking. Great instructional video.
2. Sword Postures
This is a pivotal first step to getting your technique down to a science. Here are four postures (Kamae) that will help you get the proper leverage for different strikes:
Gedan (Low Level) – Right outside of the body for striking and blocking
Chudan (Mid Level) – 2/5 from center of body
Jodan (Upper Level) – energy from tip and left hand right above forehead.
Hasso (Side) – move to different positions (Chudan, Jodan, and Gedan) for a more aggressive or relaxed system.
These are all great fundamental postures to learn especially when molding the way you strike or setup your defense mechanism.
3. Drawing Cuts
What’s interesting to note is the same way you draw your sword (release it from your sheath) is how you set up your first cut. In a sense, it works as a two for one. Timing and alignment is everything. The left hand is the opener of the sword and the right hand is used to guide it around the handle. The sword is pulled out toward the opponent in a horizontal manner with an intention to strike. The right hand grips and sets up the snap for a great cut.
4. Two Handed Cuts
Kirioroshi is the name for two handed cut. From a 45 degree angle, you want to hold your sword above your head. You want your gripping (mainly your thumbs) to be behind the sword rather than solely on the side. You want to extend your cut upward for a great strike. It’s more or less an elliptical-like motion (up, outward, down). It’s also important to watch your foot positioning for each cut.
5. Flicking The Blade
In times of battles, this was a great way to rid your blade of blood. You always wanted to make sure you thoroughly cleaned your blade because blood and residue would cause your sword to rust. Of course, simply flicking your blade won’t get all your stains out, but it’s a good habit to remind yourself to clean your blade.
6. Returning The Sword
After cleaning your sword, you want to place the sword back into the sheath correctly to not cut yourself. Noto (returning your sword) is all about good left hand placement. The hole is covered by the last three fingers. You use your other hand to create a second hole. Shoden is a rather swift return that actually lets the dull part of your blade touch the back of your hand as you stop and slowly slide the sword back in the sheath.
7. Forms
In the form, Junto Sono Ichi, you step with the right foot and push the sword with the right hand along the center of the body. You step forward and perform a horizontal attack. You can continue this with the left foot and perform a vertical attack. This is just a couple of tactics to build a rather fluid and precise kata. The video goes into good detail of how your position and movement can help you cut enemies along the chest and head areas. This is a great way to prepare you for specific situations.
8. Drills
This is a good training video of a few techniques to help you with a sparring partner. You’ll get great foundation in types of strikes, foot placement, stutter steps, and more. It’s good to view this a few times because they show you how to perform these tactics slow and fast to make it easier to learn. This is a solid video for when you begin sparring and start getting good movement with your moves.
9. Cutting
Building good cutting mats will help you create precise strikes you can use in actual combat. In this video, you’ll learn how to target your cuts by aligning your body and swinging your sword with good extension. Jodan (above the head) is a great place to start. The center line is most important in your cutting range. The video shows you how to adjust your position depending on how you face your target.
Wielding a katana is still effective today especially for reading an attacker’s movements (mainly for your own home self-defense). It also pays homage to a real art form that resonates in the hearts of many descendants of warriors or those with a passion for sword fighting.
Posted by: admin February 22, 2018 Leave a comment
I’ve recently started looking at the new ASP.Net Identity framework and the Katana middleware, there’s a surprising amount of code and documentation out there, but I’m seeing what appears to be a lot of conflicting information, which I guess is a result of the increasing frequency of code updates.
I’m looking to use WsFederation Authentication against an internal ADFS 2 service, but the way the OWIN authentication pipeline works has me a little confused and I’m hoping someone can offer some definitive information.
Specifically, I’m interested in the order in which middleware should be hooked up and which modules are required in various scenarios, I’d like to get rid of anything that doesn’t need to be there and at the same time ensure that the process is as secure as possible.
For example, it would appear that UseWsFederationAuthentication should be used in conjunction with UseCookieAuthentication , but I’m not sure what the correct AuthenticationType would be (this post suggests that it’s just an identifier string, but is it’s value significant?) or even if we still need to use SetDefaultSignInAsAuthenticationType .
I also noticed this thread on the Katana Project discussions board, where Tratcher mentions a common mistake, but isn’t very specific as to which part of the code is in error.
Personally, I’m now using the following (with a custom SAML Token handler to read the token string into a valid XML document), it works for me, but is it optimal?
Many thanks for anything you can offer to help clear up this confusion for me.
As @Tratcher said, the AuthenticationType parameter is used by Microsoft.Owin.Security as a key to do lookups of authentication middleware instances.
The code below will use the following simple helper method to require that all requests are authenticated. In practice you’re more likely to use an [Authorize] attribute on sensitive controllers, but I wanted an example that doesn’t rely on any frameworks:
The context.Authentication.Challenge(authenticationTypes) call will issue an authentication challenge from each of the provided authentication types. We’re just going to provide the one, our WS-Federation authentication type.
So first, here’s an example of the “optimal” Owin Startup configuration for a site that’s simply using WS-Federation, as you are:
Note the use of the “WS-Fed Auth (Primary)” AuthenticationType to uniquely identify the WS-Federation middleware instance we’ve configured. This means that you could, for example, use a “WS-Fed Auth (Secondary)” with a separate WS-Federation server as a fallback, if you had that requirement.
This configuration will do the following:
- First, tell the Owin security pipeline that by default we want to authenticate requests with the default CookeAuthentication AthenticationType value. (That’s just a constant string on that CookieAuthenticationDefaults class, and it’s the default value used by the CookieAuthenticationOptions.AuthenticationType property.)
- Next, register a cookie authentication middleware instance with all default options, so it corresponds to the AuthenticationType key that we set as the default in step 1.
- Next, register a WS-Federation authentication middleware instance with options that we define in the Web.config file, and with a custom AuthenticationType value so we can refer to it later.
- After all the authentication middleware registrations are done, we tell the pipeline to authenticate all requests (via our custom helper method that calls the Microsoft.Owin.Security methods for issuing challenges to any unauthenticated request)
- Finally, if the user has been authenticated, show the welcome page!
So there are a couple ways you can go wrong here.
Not providing a default authentication type
To experiment, I tried doing this, and you’ll see right away what the problem is:
That first call will give you the exception you mentioned in your first comment:
“A default value for SignInAsAuthenticationType was not found in IAppBuilder Properties. This can happen if your authentication middleware are added in the wrong order, or if one is missing.”
Right – because by default the Microsoft.Owin.Security pipeline doesn’t assume anything about the middleware you’re going to use (i.e., Microsoft.Owin.Security.Cookies isn’t even known to be present), so it doesn’t know what should be the default.
Using the wrong default authentication type
This cost me a lot of time today because I didn’t really know what I was doing:
So, that’s going to keep trying to authenticate the caller with WS-Federation on every call. It’s not that that’s super-expensive, it’s that the WS-Federation middleware will actually issue a challenge on every request. So you can’t ever get in, and you see a whole lot of login URLs fly past you. рџ›
I’ve recently started looking at the new ASP.Net Identity framework and the Katana middleware, there’s a surprising amount of code and documentation out there, but I’m seeing what appears to be a lot of conflicting information, which I guess is a result of the increasing frequency of code updates.
I’m looking to use WsFederation Authentication against an internal ADFS 2 service, but the way the OWIN authentication pipeline works has me a little confused and I’m hoping someone can offer some definitive information.
Specifically, I’m interested in the order in which middleware should be hooked up and which modules are required in various scenarios, I’d like to get rid of anything that doesn’t need to be there and at the same time ensure that the process is as secure as possible.
For example, it would appear that UseWsFederationAuthentication should be used in conjunction with UseCookieAuthentication , but I’m not sure what the correct AuthenticationType would be (this post suggests that it’s just an identifier string, but is it’s value significant?) or even if we still need to use SetDefaultSignInAsAuthenticationType .
I also noticed this thread on the Katana Project discussions board, where Tratcher mentions a common mistake, but isn’t very specific as to which part of the code is in error.
Personally, I’m now using the following (with a custom SAML Token handler to read the token string into a valid XML document), it works for me, but is it optimal?
Many thanks for anything you can offer to help clear up this confusion for me.
1 Answer 1
As @Tratcher said, the AuthenticationType parameter is used by Microsoft.Owin.Security as a key to do lookups of authentication middleware instances.
The code below will use the following simple helper method to require that all requests are authenticated. In practice you’re more likely to use an [Authorize] attribute on sensitive controllers, but I wanted an example that doesn’t rely on any frameworks:
The context.Authentication.Challenge(authenticationTypes) call will issue an authentication challenge from each of the provided authentication types. We’re just going to provide the one, our WS-Federation authentication type.
So first, here’s an example of the “optimal” Owin Startup configuration for a site that’s simply using WS-Federation, as you are:
Note the use of the “WS-Fed Auth (Primary)” AuthenticationType to uniquely identify the WS-Federation middleware instance we’ve configured. This means that you could, for example, use a “WS-Fed Auth (Secondary)” with a separate WS-Federation server as a fallback, if you had that requirement.
This configuration will do the following:
- First, tell the Owin security pipeline that by default we want to authenticate requests with the default CookeAuthentication AthenticationType value. (That’s just a constant string on that CookieAuthenticationDefaults class, and it’s the default value used by the CookieAuthenticationOptions.AuthenticationType property.)
- Next, register a cookie authentication middleware instance with all default options, so it corresponds to the AuthenticationType key that we set as the default in step 1.
- Next, register a WS-Federation authentication middleware instance with options that we define in the Web.config file, and with a custom AuthenticationType value so we can refer to it later.
- After all the authentication middleware registrations are done, we tell the pipeline to authenticate all requests (via our custom helper method that calls the Microsoft.Owin.Security methods for issuing challenges to any unauthenticated request)
- Finally, if the user has been authenticated, show the welcome page!
So there are a couple ways you can go wrong here.
Not providing a default authentication type
To experiment, I tried doing this, and you’ll see right away what the problem is:
That first call will give you the exception you mentioned in your first comment:
“A default value for SignInAsAuthenticationType was not found in IAppBuilder Properties. This can happen if your authentication middleware are added in the wrong order, or if one is missing.”
Right – because by default the Microsoft.Owin.Security pipeline doesn’t assume anything about the middleware you’re going to use (i.e., Microsoft.Owin.Security.Cookies isn’t even known to be present), so it doesn’t know what should be the default.
Using the wrong default authentication type
This cost me a lot of time today because I didn’t really know what I was doing:
So, that’s going to keep trying to authenticate the caller with WS-Federation on every call. It’s not that that’s super-expensive, it’s that the WS-Federation middleware will actually issue a challenge on every request. So you can’t ever get in, and you see a whole lot of login URLs fly past you. 😛
Regardless of how active you are in martial arts, your katana will probably spend most of the time on display — and that’s okay. A high-quality katana serves as a focal point, sparking conversation by anyone who sees it. But there are a few things you should know about displaying a katana.
The Katanakake
There are dozens of different display cases and stands in which you can place your katana. One of the most popular, however, is the katanakake. The katanakake is essentially a wooden stand with pairs of hooks that’s designed to hold one or two swords. In feudal Japan, samurai warriors would place their swords on the katanakake before entering buildings, though this type of katanakake featured a slightly different design.
Cutting Edge Facing Up
Traditionally, Japanese swords like the katana are displayed the same manner in which they are worn. Because the katana is worn with the cutting edge facing up, it should also be displayed with the cutting edge facing up.
Some people assume that displaying swords with the cutting edge facing up helps to protect the blade from damage, but this isn’t necessarily true. Displaying the katana with the cutting edge facing up is a means of “respecting” the sword. This dates back hundreds of years to feudal Japan, during which this was the standard way of displaying katanas. Since then, the tradition remains, with martial arts practitioners and sword collectors alike continuing to display their katanas in this manner.
Tsuka on The Left or Right?
From a functional point of view, displaying your katana with the tsuka on the left or right makes no difference. You can display your katana with the tsuka on either side without worrying about it negatively affecting the blade or other components.
With that said, traditional Japanese etiquette says that katanas displayed with the tsuka on the left signals peace, whereas displaying the katana with the tsuka on the right signals combat readiness and ability to fight. Assuming you display your katana in your home, either way is perfectly acceptable. However, if you’re displaying it in a dojo you should ask your sensei for a recommendation.
Regardless of how you display your katana, it’s important to clean, polish and oil it on a regular basis. Over time, dust, debris and moisture will settle on the blade, which can lead to rust. By cleaning and oiling your katana, however, you can protect it from damage such as this.
Everybody knows what a samurai sword is, mostly because they are considered very cool and are today seen more as a symbol than a regular historical bladed weapon. Actually, katana is just one type of sword-type blade that was used by Japanese warriors, who later in history became a cast in the feudal system of this nation.
Before the katana, there was the tachi, a blade worn by samurai before the invention of katana.
Tachi was longer and proportionally lighter than a katana, and it blade had a bigger curvature. In essence, it was a cavalry weapon, used by mounted troops, along the traditional Japanese longbow Yumi.
A few centuries later, samurai dismounted and fought mostly on foot. Soon after that, the katana was born. Katana is a very recognizable weapon. It has a curved blade (but not as curved as the tachi) and a long grip because it was meant to be wielded by both hands (samurai weren’t big on carrying shields).
Frankly, no other bladed weapon is as distinctive as the katana, and its spectacular design, refined by master blacksmiths and forgers, was compared to the simplicity of a single blade of grass that could cut a man in half (and often, it did). Samurai code of conduct called bushido was a very grim belief system, which put all the emphasis on personal honor. In it, the katana isn’t just a weapon.
It represents the embodiment of the samurai steadiness in his beliefs, and is a bond between him and his bushido code. Samurai were disarmed in the 19. Century when they lost the right to carry a katana, but the sword didn’t leave the collective Japanese consciousness. In World War II, Japanese officer carried katanas, and used them in the field of battle (on civilians and prisoner too). Today, it’s still a powerful symbol and a prized object. If you’re thinking about buying a katana, here are some things you have to keep in mind.
1. Katana is a weapon. In modern Japan, Yakuza gangs (partly because of the strict gun laws; discharging a gun may get you a life in prison in Japan) still use katanas with great efficiency and people still lose their heads in Kabukicho district in Tokyo. But, even in your hands, it can be really dangerous, not only to yourself, but to other. Often people try to impress somebody with their katana, and end up chopping of their fingers. Here is an instrucional video on how to safely handle a katana.
2. Don’t try to save money. If you want to own a katana, be prepared to pay the right price. The cheap katanas you can by online in any big retail martial arts store are okay only if you plan to keep them on your wall and never take them out of its scabbard. Do your reading, ask around and buy a katana that is reliably and made by a good standards (quality of steel, the makers brand, quality control and the guarantee you will receive). This means more cash (usually a lot more), but buying a katana isn’t a thing were you should think about saving money.
3. Start training Iaido. Once you by it, learn how to use it. Iaido is a Kendo relative, and it’s a martial art dedicated to the art of katana sword play. There you will learn how katana is drawn, how to strike and cut with it and most importantly, do all this in a safe environment. But, have in mind that you’ll also need an aluminum practice Iaito sword (basically an unsharpened katana replica) in the beginning.
4. Learn how to take care of your katana. Katana is an investment, and you have to know everything about its maintenance (how to treat the blade, the handgrip, etc.). This also includes proper ways of securing it in your home, because you don’t want your kids playing with it.
Buying a katana isn’t a simple process. But, with a right amount of preparation, dedication, reading and most importantly time, you can own and learn how to use this incredible part of Japanese history.
How the katana and wakizashi are worn varies depending on the style of swordsmanship practiced. The following defines the proper way they should be worn in the Konjaku Kioi Toyama Ryu Dojo. The obi should be long enough to wrap around three times. Both the wakizashi and katana are put in the obi on the left side. The dojo store has a Daisho Page where you can see different sets.
- The wakizashi is slipped in under all three layers of the obi. The tsuba of the wakizashi should be in front of the navel. The edge should be up.
- No sageo cord is used on the wakizashi. A sageo may be tied onto the saya.
- One layer of obi is left between the wakizashi and katana. The katana goes between the first and second layer of the obi. The left thumb is used to open up the obi.
Copyright © 2006 by Konjaku Kioi Toyama Ryu Dojo, All rights reserved.
6 Answers
No, it is not kendo. Kendo is a sport derived from use of a Japanese sword, but many of its techniques are not practical or even possible when changing from a 1 pound shinai to a 3 pound katana. That does not mean kendo is not useful in that regard (it teaches many important principles such as maai), but use of a real katana should be based on one of the schools of kenjutsu, such as shinkendo.
I would look for such a school if this is a line of study that interests you.
Lots of Ken martial arts use the bokken as part of their training, it really depends entirely on what you want to learn in the long run.
Some that use the sword that also learn to use the bokken, are Kendo, Kenjutsu, Iaido, Aikido.
As for Katana, it is essentially the same as using a bokken if it is learnt properly, so once again the same Ken martial arts are applied. However in most situations, Katana is only used in Kata situations.
Edited for more information:
In rebuttal to Kobayashi’s response that Kendo uses only shinai that are bamboo swords and Kenjutsu is only real sword technique, I disagree.
While Kendo primarily does use a shinai, which is bamboo, for sparring and striking, in order to advance and learn proper technique, distance, timing, you must learn Kata. Kendo kata at the low levels uses bokken, and at the high levels uses Katana. All you have to do is look at this:
where they use real Katana. While they don’t strike each other, this is the distance, timing and technique should you actually want to strike someone to kill or dismember.
In regards to Iaido, it is no different in that if you look at it, their entire martial art is based on using the Katana, specifically how to use it from drawing it out of the Saya (the scabbard) to strike to defend and attack. Just look at this link which is Iaido Kata using the Katana:
You might ask, Kata? Kata is the “perfect form”. Without Kata, your practical techniques will not be honed.
In regards to Kenjutsu, there is much overlap between Kendo and Iaido. Kenjutsu does have more focus upon kill techniques, but to be honest, you are just as effective using Kendo or Iaido depending on your situation.
In fact, if you look at this link and the information box underneath :
It specifically says:
“Shinbukan Kenjutsu is a modern system of swordsmanship built on elements from Iaido, kendo, kenjutsu and sports chanbara”
About
Now, knives are created from metal. Therefore, there are various types of knives that may be used for various purposes. There are plenty of best quality knives out there which are totally forged. If you prefer sturdy kitchen knives you should stick with the forged lines which provide premium quality. Employing the web, it is simple to discover the sword that fulfills your standards. In regards to samurai swords, there’s quite a little bit of terminology for the new collector to comprehend. Samurai swords in Japan need to be registered with the authorities and they’re extremely expensive.
The next matter to take into account when picking a sword is the kind of steel that the blade is made from. Before this, anyone could have a sword. This sword wasn’t only handy in wars with blade but additionally it have a special appearance that you don’t ever find in any other sword. It doesn’t signify the Japanese sword, that is the typical perception of the name. It’s characterized by means of an intricate basket hilt aimed to defend the wielder’s hand. Swords became popular since they are simpler to use and swing around. This sword is owned by the Viking Era. Both of these swords are traditionally known as daisho” which means large and little. You ought to be permitted to unsheathe the sword. It turned out to be a two-handed sword employed by German mercenaries. 1 way of knowing whether you’re purchasing an authentic Japanese Samurai sword is via the price. There are a number of exact good midrange swords in the marketplace, and even a couple of low range swords worth looking at.
Top Choices of How to Use a Katana for Beginners
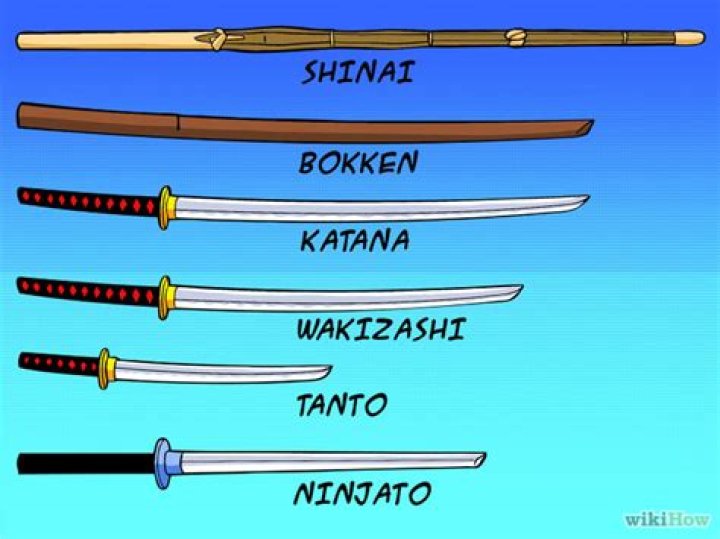
Shinai is employed in Kendo, which is a Japanese type of fencing. A bokken is lighter and simpler to carry, and there’s no danger of cutting oneself once the sword is strapped near the body. Such a bokken has a saya (scabbard) which differs from the conventional bokken. For the time being, the bokken is sufficient for your training sessions. Though a bit pricey to some, remember that in case the normal bokken is taken care of properly, it’s best for many years of usage. You’ll need to buy a very good quality bokken so you can practice even at home. Samurais were permitted to use the wakizashi. Ninjas developed a totally new kind of martial arts to be able to supplement espionage. The ninja gives everything the Black Widow wants, and then some. If a samurai would marry, she’d also come to be a samurai, in addition to their children. He or she were considered to be the greatest warriors in medieval Japan. Warrior isn’t expected to discuss his sword in a fashion which can in 1 way or another seem disrespectful.
Swords are used to spread the word of God in addition to uphold it. There are a number of reasons why the sword couldn’t actually hold this title. If you prefer something between, search for a Samurai sword that has gone via the Lamination and Claying approach.
What Everybody Dislikes About How to Use a Katana for Beginners and Why
If you discover the right sort of steel, you might still have the ability to use the Samurai sword. The blades are really sharp and shiny. In due time, you’ll be in a position to hold an actual blade. If you’re likely to get a blade and do simple sword-fighting, you’ve got two good alternatives that you will exercise. Bear this in mind regardless of what set you purchase, as it is common to all blades made from metal. It’s a thick tip that can be employed to grip slightly big components.
If you think that the samurai tattoo isn’t for or you would like to view more tattoos, please don’t hesitate to follow the links below. Inside this era, samurai tattoos can be worn by women and men, but the samurai tattoo symbols masculinity. There are a few very important things you ought to remember prior to getting your Japanese samurai tattoo or any tattoo. As a result of this, samurai tattoos often consist of cherry blossom flowers. The samurai tattoo has been a favorite alternative for years in Japan, together with surrounding areas. Such tattoos hold an extremely personal, yet distinctive meaning to the wearer, which cannot be described in words. Though it isn’t a major stream tattoo in the united states, the samurai tattoo still has a next. One needs to not compare these sport-related fashions of combat to the actual thing. Samurai tattoo designs are extremely detailed and very colorful. They offer several different options for you to consider. They are quite stunning and perfect for sleeve tattoo designs.
Keyword Analysis
| Keyword | CPC | PCC | Volume | Score | Length of keyword |
|---|---|---|---|---|---|
| use katana | 1.78 | 0.2 | 9505 | 2 | 10 |
| use | 0.71 | 1 | 9341 | 51 | 3 |
| katana | 0.6 | 0.8 | 424 | 15 | 6 |
Keyword Research: People who searched use katana also searched
| Keyword | CPC | PCC | Volume | Score |
|---|---|---|---|---|
| used katana 50 | 1.85 | 0.1 | 6771 | 86 |
| used katana 100 | 0.97 | 0.9 | 5309 | 80 |
| used katana head | 0.78 | 0.5 | 811 | 43 |
| used katana 100 mk2 | 1.6 | 0.2 | 7855 | 83 |
| used katana 50 mkii | 0.87 | 1 | 6733 | 98 |
| used katanas for sale | 0.4 | 0.8 | 8778 | 37 |
| used katana craft for sale | 1.54 | 0.4 | 4929 | 50 |
| us katana | 1.4 | 0.4 | 9242 | 38 |
| usa katana | 1.4 | 0.7 | 968 | 30 |
| used catana 42 for sale | 1.58 | 0.5 | 7736 | 78 |
| used catana catamarans for sale | 0.17 | 1 | 8100 | 4 |
| use katalon offline | 1.7 | 0.9 | 2266 | 96 |
| boss katana 50 used | 1.39 | 0.3 | 6085 | 35 |
| katana 50 used | 1.68 | 0.6 | 8397 | 10 |
| used boss katana 50 sale | 1.17 | 0.8 | 1333 | 69 |
Search Results related to use katana on Search Engine
wikihow.com
How to Use a Katana Properly. A katana is a style of Japanese sword known for its long curved blade that’s able to easily cut through a variety of materials. While it may seem simple to swing a katana, cutting and striking with one.
wikipedia.org
Katana were used by samurai both in the battlefield and for practicing several martial arts, and modern martial artists still use a variety of katana. Martial arts in which training with katana is used include iaijutsu , battōjutsu , iaidō , kenjutsu , kendō , ninjutsu and Tenshin Shōden Katori Shintō-ryū .
grapplinginsider.com
The katana (samurai sword) is a weapon that was popular during Feudal Japan. Before katanas, they used a tachi for the cutting edge needed in battle. The signature of this sword was facing the wrong way. With a need to correct this as well as have a quicker draw on the sword in close combat, the katana gave the samurai the edge needed for victory.
youtube.com
How to Use a Katana Like a REAL Samurai? (Challenges/Tips for the Beginners) In this SPECIAL video We all together gonna learn the Art of cut – Tameshigiri! Basic Techniques,Tips and Challenges .
sword-buyers-guide.com
The way to use a Katana properly is to cast it out like a fishing line and draw cut the blade inwards using the elbows close to the body. 1) Blade is held almost vertical above the head. 2) It is cast out like casting a fishing line and then 3) as it contacts the target, the elbows draw it towards the wielders body and 4) the elbows are used .
foundry.com
Katana 3.6 works as hard as its artists, freeing up time through fundamental UI and workflow updates. Expect innovative, artist-focused snapping functionality and a new Network Material Edit tool that raises the bar on traditional workflows, so artists can be confident they’re creating something a cut above—every single time.
hackingarise.com
katana is a framework written in python for making penetration testing, based on a simple and comprehensive structure for anyone to use, modify and share, the goal is to unify tools serve for professional when making a penetration test or simply as a routine tool, The current version is not completely stable, it’s recommended to update every .
fandom.com
The Katana was one of the traditionally made Japanese swords that were worn by the samurai class of feudal Japan, also commonly referred to as a “Samurai Sword”. The weapon, like the Golf Club, requires a wind-up to increase its damage. The sword can be found on black robed ninjas, during the missions leading up to Mashiro Hayamoto’s assassination. It can not be concealed, and can not be thrown.
quora.com
Hiragana is the basic. We first learn hiragana in school. Technically, you can write all of Japanese in Hiragana (that’s how the first graders write). But it’s not very easy to read. I t l o o k s l i k e t h i s t o j a p a n e s e p e o p l e. B.
You need to reshape your blade’s edge and get it back sharpened when it is dull. Sharpening stone, water stone or whetstone are the tools used for this purpose. They come in a wide range of size, shape and material composition. Also, stones may be of different grades according to the grit size. Sharpening process consists of two processes grinding and honing.
Dull blades waste your valuable time and energy. After Sharpening your blades, it will become new! They will help you in a survival situation when you need them. Sharpening stones are a widely used tool to remove dullness of cutting tools like knives, machetes, scissors, axes, razors and so on. Different techniques have been developed over the centuries. So, let’s learn about the basic sharpening techniques!
Techniques for using a sharpening stone is not very complicated. By following some steps, you can easily sharpen your blades through it. Steps are discussed below:
Step 1
Firstly, you’ve to select the blades/knives that need to be sharpened. Check the blade sharpness. Is it really dull or not? This will help you to choose what types of sharpening stones you need.
Step 2
After determining your blade dullness, it is easier to choose the appropriate sharpening stone. Different types and grit sizes of stones are available. You need to choose between them according to your need.
Different Stones
Water stones are most common. You’ve to dip them in the water for about five to fifteen minutes before you use one of them. Because of this constant soaking and drying, these stones become very brittle.
Oil stones are very durable types as they are made from aluminum oxide or silicon oxide. These stones need splashing of oil on the surface before you use them for sharpening. This type is the cheapest one.
Ceramic stones are the best if you are looking for the long-lasting ones. You don’t need any oil or water to pour on the surface for this type. Careful handling is needed for using one of them. You also need to scrub the ceramic particles from the stones after sharpening is done. That’s why people aren’t used to using them on a large scale.
Diamond stones are undoubtedly the top quality sharpening stones available in the market. Because of their strength and long-lasting abilities, they are the number one product category. Also, they are very expensive, and they’ll last the longest.
Different Grit Sizes
Certainly, you’ve to select the stones which are leveled with various grits on both sides. Basically, there are three types of grits defined based on how fine polish you are going to give your blade. Coarse grit is used for removing chips from a damaged blade. Medium grit is used for smoothing a rough edge into a medium edge. A finer grit is used for polishing an edge for getting a smooth finish.
Use a coarse grit sharpening stone first if your tool is very dull. Then, you can use a finer grit. On the other hand, if your job is less dull then start with medium grit stone followed by a fine grit stone. The more the grit levels used the finer the cutting will be.
Step 3
C-clamp or vice or even a damp cloth or towel needs to be set under the stone so that the stone will not slide. Both stone and cloth/vice are placed on a flat surface.
Step 4
Take the blade and start with the coarse side or medium side of the stone depending on which types of sharpening you want. If necessary, use a lubricant to your stone to make the sharpening process easier. Remember that, you have to choose the appropriate lubricant according to your stone types. Using the manual that comes with the package will help you in this case.
The sharpening angle is very important during any sharpening process. If the blade is straight, then the 22.5-degree angle is appropriate for sharpening. If your blade is very large or thick then larger angle needs to be applied for sharpening.
Step 5
Hold the blade handle with your strong hand. By the other hand apply pressure to the side of the blade. Start drawing the blade forward and backward continuously with a certain angle. Change the grit size when needed. Repeat these actions for the other side.
Step 6
When sharpening is finished, check the edge of the knife. Next, clean both of the stone and blade after the process is over. Keep them in a dry place for further use in the future.
Caution When You Use a Sharpening Stone
Be careful while sharpening your blade like kukris otherwise serious injuries can occur. A dull blade also can cause damage to your hand. So, be careful when you apply pressure during the sharpening process. Always move your hand along the edge of the blade or knife. That will keep your hand safe from getting hurt. Safety is a paramount issue when you are dealing with knife or machetes .
Also, keep an eye on the sharpening stone kit when soaking. If it is soaked for an excessive time, then the brittleness will be an issue. After the process, take care of the sharpening stone set properly. Wipe the stone with a clean cloth so that no residue is there.
Be sure to use the sharpening stone grit chart for the optimum result if you are a novice in sharpening. There are many types of stone out there. Best knife sharpening stone kit is always difficult to discover. Among the top quality types, Japanese sharpening stone, Lansky sharpening stone, the sharp pebble is very well-known. Double-sided diamond sharpening stones are one of the best and also expensive. So, be very cautious about your choice.
You can also use them for sharpening machetes if they are not kukri types. As top-quality machetes need careful handling and different categories are there, be aware of their shape and size while you use a sharpening stone. It can also be used for sharpening your hunting knife too.
Conclusion
Keeping the edge sharper on your blade is important for your own benefit. This will save your energy and precious times. So, pick the right gear and accessories and follow our guidelines accordingly. You won’t become a master of sharpening instantly, but practice will make you perfect one day. Keep practicing and keep enjoying the process. You will find more pleasure in that way.
Danny is an avid hunter and outdoorsman who just love the wilderness. He learned the surviving techniques from his predecessors and became the skilled man of today. He is a family guy who loves his family dearly. From an early age, he became very fascinated with different survival tools among which machete was one of them. This website is for sharing his knowledge and skills for those who feel a close bond with nature just like him.
The Samurai Sword – Katana – Learn about this magnificent weapon – history, makings, studying and more…
The samurai sword also called Katana, Tachi, and Daito. is an amazing sword and is one of the martial arts weapons best. It is part of the Nihonto (Japanese sword) family.
Together with the samurai, gi, training bare foot…it is one of the most recognized symbols of the Japanese martial arts.
It was chosen by the Warriors Project as the martial arts most deadliest weapon, and the arts which teach it are on the “Deadliest style of martial arts” list
The user of the katana as well as its makers are considered master craftsman.
Brief history
Japan has a long history of sword making, dating back even earlier than the 5th century.
However the production of the samurai sword as we know it began around the 12th century. The resemblance of it suggests that its origins come from the Tangs dynasty’s most popular weapon at the time the Tang blade.
However, the Tang blade was not curved. The Katanas curve is said to be of Arabian influence (at that time many merchants from all over the world came to trade inside the Tang Empire). This influence was a welcomed one as it improved the Katanas cutting ability especially in the downward motion.
At the end of the 14th century due to the “Tokugawa shoguns regulations”, the katana was effectively standardized. However the 200 years of fighting before had seen a decline in the quality of the swords made as mass production was more important than the quality.
As a result some of the old methods of sword making were lost. The katanas made in the years to come were never able to surpass the quality of the old swords.
The relatively peaceful times which Japan entered was accompanied by the creation of a higher quality of the katana. They were called Shinto – “new sword”. During the 16th -17th centuries sword smiths tried to rediscover the old techniques as the Shinto blade was stayed inferior to the old Tachi (Koto) blades.
This resulted in the re- introduction of old methods of crafting and the making of the Shinshinto – “new revival sword”.
Though the Shinshinto are considered to be superior to the Shinto they are still regarded as inferior to the Koto.
The Haitorei edict in 1876 which banned the carrying of swords and guns on the streets, caused a mass decline in the needs for swords, and thus many sword smiths were put out of business.
Police, however, were still in need of swords, and later on soldiers in the imperial army were also given one. The swords which they used were called Gunto, and they only resembled the tradition samurai sword by appearance but definitely not by quality.
Nevertheless there were a few sword smiths which produced quality swords which were refered to as Gendaito.
Today
Samurai swords crafted today in traditional method are called Shinsakuto – “newly made swords”.
In Japan the katana is considered as an art object rather than a weapon and as such must have the required documents to be properly owned.
Making
The making of a samurai sword is considered a sacred art and like most complexly crafted objects is constructed by different crafts man.
• Smith to forge the rough shape
• Second smith to fold the metal (usually an apprentice)
• Specialist polisher
Artists for the decorations:
A samurai sword is made from Japanese steel – Tamahagane – using 2 different types of steel – soft and hard, which creates razor sharpness while allowing for an extremly resilient and shock absorbing blade, which can hardly bend or break.
Components and important features
The samurai sword has many components, some are:
• Single edge blade, is curved and slender and is the most important identity of the katana. The blades range in manufacturing methods, shapes, length, sharpness and so on…
• Square or circular guard
• Long grip which allows 2 hands to hold it the same time.
• Exact tip shape
• The Scabbard and all which accompanies it which by themselves are considered a work of art and which we will not go into.
There exist different classifications for the different kind of Japanese sword. These are based on the size of the blade.
Normally the length of a samurai sword is around 60 – 70 cm (23.6 – 28 inches) although depending on the time of making they have been made shorter and longer.
* When purchasing a samurai sword, among other issues we should be ware that the grip is well fixed to the blade.
Usually the tang (the un-edged part of the blade and where the sword smiths signature is on) goes into the grip (the grip is usually longer than the tang) accompanied by a wooden piece which comes out of the tang. This wooden part helps to firmly connect between the blade and the grip.
When buying a replica, which usually looks real, the connection between the grip and the tang is not done properly making the actual use of the sword become extremely dangerous.
Arts which teach the use of the samurai sword
The martial arts which today teach the use of the katana are part of the Kenjitsu family:
Martial arts techniques and evolution
In the martial arts theory article we covered how a martial art builds itself.
It is interesting to understand how the characteristics of the katana influenced the techniques it applies.
One clear example, the fact that upon clashing with another katana blade the blades would often split and or break.
This meant that the blade should not be used for deflection or blocking, but rather only for slashing and stabbing. Another derivative is the wide use of techniques of avoiding instead of deflecting or blocking. Which are often used in the Japanese martial arts
Conclusions
The samurai sword is a craft of its own. Making it is not less of an art than learning it.
It is a weapon so well designed that one must carefully train with it as well as use it.
For more information about the Japanese Swords
Learn more about the Martial Arts Weapons world
Add ambience and save on heating costs by utilizing your fireplace this winter. Here’s all you need to know about the proper technique and safety precautions.
During the colder months, nothing beats warming the house with a crackling fire. But while wood-burning fireplaces should give you long-lasting and evenly burning flames, one simple mistake can fill your living room with smoke—or even spark a dangerous house fire. Here’s the proper technique for how to use a fireplace, with safety precautions every homeowner should know.
STEP 1: Stay Safe
Before bringing out the lighter, it’s vital to understand safety precautions for using a fireplace. First, always double-check that your fire extinguisher, smoke detector, and carbon monoxide detector are each in working order (check those batteries!). Remove anything flammable within three feet of the fireplace in case stray sparks escape the hearth, and use a fireplace screen as well. Make sure the flue isn’t blocked by obstructions like an animal’s nest, especially if this is your first time using the fireplace. If the system hasn’t been recently inspected, hire a chimney sweep certified by the Chimney Safety Institute of America (CSIA) to do the job.
STEP 2: Gather the Kindling
Gather kindling in a variety of sizes (small, medium, and large) for the proper fire-building technique that is outlined below. To emit less smoke and soot, make sure the wood is dry, well-seasoned, and split a minimum of six months ago. You can choose either hardwood or softwood for the fire; while hardwoods like oak or maple burn longer and create more sustained heat, softwoods like cedar or pine start fires easier because they ignite quickly. Whatever you don’t use can return to the firewood rack, best stored outdoors in an elevated and covered location.
Advertisement
Note: Never burn trash, plastic, painted materials, or anything with chemical treatment like scraps of pressure-treated wood—these materials can release harmful chemicals into your home.
STEP 3: Open the Damper
The damper is a movable plate inside the flue. When opened, it allows the smoke and ash to travel safely up the chimney. If you start a fire with a closed damper, however, the smoke will have no escape route and circle back into the house.
Adjust the damper as needed with the handle located inside of the chimney. It will move either front to back, left to right, or in a clockwise or counterclockwise rotation. Check to make sure you opened it properly by sticking your head in the flue and looking upwards, using a flashlight if necessary. You should see up the flue without any obstructions if the damper is open; a closed damper will block your view entirely.
STEP 4: Prime the Flue
Now, gauge the temperature. If you feel a rush of cold air (which usually occurs if the chimney is built on the outside of the house), then you need to prime the flue—in order words, you need to preheat it. Otherwise, the cold draft may cause smoke to blow into the room. Light a roll of newspaper and hold it against the open damper to send warm air into the flue. The draft should reverse after a few minutes, making your fireplace ready for action.
STEP 5: Build the Fire
While there are multiple ways to build a fire, the CSIA recommends the top-down method, which produces less smoke and requires less tending. Start by donning thick fireplace gloves and grabbing a metal poker. Position large pieces of wood in the bottom of the fireplace in one row, perpendicular to the opening of the fireplace. Next, take mid-sized pieces of wood, and stack four or five rows on top of the base layer in alternating directions. Make sure the stack takes up no more than half the height of your fireplace. Now add your smallest pieces of wood, making sure these pieces are very dry. The tiniest bits (which can take the form of wood shavings or bunched-up newspapers) should be at the very top.
Light the top of the stack with a single match. The fire should travel down, igniting the pieces underneath without prompting. Let the fire burn for as long as you’d like. Don’t close the damper until the fire is completely out and all the embers have stopped burning.
STEP 6: Clean the Ashes
The CSIA says you can leave a bed of ashes between one to two inches in the fireplace as an insulating layer, which helps the next fire to burn. But when you need to dispose of ashes, proceed with caution. Coals may take several hours or several days to completely cool, and ash could still be burning during that time. Using a metal shovel, scoop ashes into a metal container with a tight-fitting lid. Store the container outdoors away from the house, and not in garages or on decks.
First time here? Check out the FAQ!
I am struggling with the katana_driver in ROS (hydro) for the 6M180 arm. When I try to launch the Katana node, I get the following error:
process[katana-3]: started with pid [24264] [ INFO] [1414017395.500394067]: trying to connect to katana (serial port: /dev/ttyS0) . [ERROR] [1414017395.500853297]: Exception during initialization: ‘Cannot get/set attributes on ‘/dev/ttyS0”
Does it mean the arm has to be connected serially? Or I will have to use a USB to serial converter because I have connected it via USB. But here is another question, isn’t that USB treated as a network device?
Could anyone please help how to connect the arm to the laptop in order for katana_driver to work properly?
Any comments/suggestions are most welcome.
2 Answers
Here is how to connect to the Katana via USB. These instructions are tested on our Katana 450 6M90a with an internal control board (i.e., a “base” to mount the arm). You are indeed correct that when you connect the Katana via USB, it acts as a USB network device.
- Connect the arm via USB and switch it on.
Since the arm doesn’t have a DHCP server, you need to configure the network manually. Open up NetworkManager and create a new connection for the USB network adapter interface:
- IP address: 192.168.1.* , where * is anything in the range [2-255], e.g. 192.168.1.77
- network mask: 255.255.255.0
- no gateway (0.0.0.0)
The arm should now respond to ping 192.168.1.1 . If it doesn’t, don’t continue and fix this problem first.
If you still have problems, please edit your question and include the following information:
- What Katana arm do you have, exactly? Is it e.g. a Katana 300 6M180? Does it have an internal/external control board or none?
- What ROS version are you using?
- What’s your katana_driver branch? Did you make any local changes?
- What launch files are you starting?
Answers to your reply:
Error when launching katana.launch: which first says “trying to connect to katana (serial port:/dev/ttyS0) and then says cannot get/set attributes on ‘/dev/ttyS0’.
Edit the katana_300_6m180.launch file and remove the line where it says use_serial (or set the param to false).
Error when launching katana_300_6m180.launch: says the parameter katana_type was not set!
You shouldn’t launch that file directly; instead, use katana.launch , then this error doesn’t occur. That file includes katana_300_6m180.launch .
fatal error: armadillo: No such file or directory
Just do the following:
If that doesn’t work, just do the following directly:
Secondary navigation
Condoms are the best way to protect yourself against sexually transmitted infections (STIs) and unwanted pregnancy.
Condoms are a barrier contraceptive made from latex rubber, a synthetic rubber called polyisoprene, or a very thin plastic called polyurethane.
Condoms are available free from:
- contraception clinics
- sexual health or (GUM) genitourinary medicine clinics
- some GP surgeries
- some young people’s services
You can also buy condoms from:
- shops
- pharmacies
- supermarkets
- websites
- mail order catalogues
- vending machines in some public toilets
- some petrol stations
Always buy condoms that carry the British Standards Institution (BSI) kitemark or the European CE symbol as proof of quality.
This means they have been tested to the required safety standards.
Also, check that the expiry date is clearly visible on the packet.
Types of condom
There are 2 basic types of condom available in the UK: male and female.
The female condom is sometimes called a femidom because Femidom is its brand name in the UK.
Male condoms
During sex, male condoms are worn on the penis to prevent semen (sperm) entering the woman’s vagina when the man ejaculates (comes).
The condom should be put on when the penis is erect (hard) and before it comes into contact with your partner’s body.
To use a male condom correctly, follow these steps:
- Carefully open the foil packaging that the condom is wrapped in, taking care not to tear the condom.
- Hold the tip of the condom between your forefinger and thumb to make sure it’s put on the right way round and no air is trapped inside (the condom may split if air is trapped inside).
- Place the condom over the tip of the penis.
- While squeezing the tip of the condom, roll it down over the length of the erect penis.
- If the condom will not unroll, it’s probably on inside out – start again with a new condom as there may be sperm on it.
Make sure that the condom stays in place while you’re having sex. If it comes off, stop and put on a new one.
After ejaculation (when the man has come) and while the penis is still hard, hold the condom in place and carefully withdraw the penis from your partner’s body.
You should only take the condom off the penis when there’s no further contact with your partner’s body.
Wrap the used condom in a tissue and put it in the bin. You should never flush condoms down the toilet as they may block the toilet and can cause environmental damage.
Female condoms
Female condoms allow women to share the responsibility of choosing what type of contraception to use before having sex with their partner.
Female condoms can be inserted at any time before sex, but must always be inserted before the penis touches the genital area.
To use a female condom, follow these steps:
- Carefully remove the female condom from its packaging, taking care not to tear it.
- Place the closed end of the condom into the vagina, holding the soft inner ring between your forefinger or middle finger and thumb.
- Use your other hand to separate the folds of skin (labia) around the vagina, then put the squeezed ring into the vagina.
- Put your index or middle finger or both in the open end of the condom until the inner ring can be felt and push the condom as far up the vagina as possible, with the outer ring lying against the outside of the vagina.
- The outer ring of the condom should rest closely on the outside of the vagina at all times during sex – if the outer ring gets pushed inside the vagina, stop and put it back in the right place.
- Make sure that the penis goes in the condom – take care to make sure that the penis does not go between the condom and the wall of the vagina.
Immediately after sex, slightly twist and pull the end of the condom to remove it, taking care not to spill any sperm inside the vagina.
If this happens, you’ll need to seek advice about emergency contraception from your GP or pharmacist.
Wrap the condom in a tissue and throw it away in a bin, not in the toilet.
Lubricants
Condoms come lubricated to make them easier to use, but you may like to use additional lubricant (lube).
This is particularly advised for anal sex to reduce the chance of the condom splitting.
If you use a lubricant when having sex, make sure it’s water based. Oil-based lubricants, such as lotion or baby oil, can damage latex and polyisoprene condoms, and increase the likelihood that they’ll break.
What to do if your condom splits
If your condom splits while you’re having sex, you should visit your GP or go to your local sexual health or genitourinary medicine (GUM) clinic as soon as possible, as you may need emergency contraception.
Emergency contraception, such as the emergency pill or the intrauterine device (IUD), can be used to prevent pregnancy.
Emergency contraception is available free from contraception clinics, GPs that provide contraception services, Brook clinics, sexual health clinics and some GUM clinics, but not all are able to fit the IUD.
The emergency contraceptive pill Levonelle and ellaOne can be bought from most pharmacies, and some provide it free to young people.
You can find out more about:
Page last reviewed: 13 July 2018
Next review due: 13 July 2021
Cosmoline is helpful because it offers long-term rust prevention, but if you’re a Curios & Relics (C&R) Firearms collector or have ever purchased a gun, you may have what looks to be a mess on your hands. Cosmoline is used to protect the gun against rusting; however, many military surplus rifles were previously submerged in the greasy substance, making its eventual removal seemingly problematic.
Even if your item only has a light coating of older Cosmoline, you might have questions as to how best to remove old coatings. Over time, Cosmoline may have seeped into nooks, crevices, and gaps in the metal but it is actually fairly simple to remove.
Before you start cleaning, here is a list of things you will need:
- Acetone, mineral spirits, or kerosene (but avoid the latter when possible, or when your firearm has been painted or blued).
- Soap and water.
- Shop rags.
- Toothbrush or smaller paintbrush for cleaning small, hard to reach spots in metal. Q-Tips and cotton swabs also work.
- You can also use a heat gun or an older oven to help “melt” the Cosmoline. There are other ways to achieve this same effect, however.
Some things you should avoid when trying to remove Cosmoline:
- Harsh chemical solvents that could strip paint, finishes, or other aesthetic/functional coatings from the gun’s surface.
A note on why you shouldn’t use gasoline: using gasoline to clean a firearm just isn’t practical, especially in the quantity you would need to clean a typical C&R firearm.
How to clean your gun
The cleaning process begins with removing as much of the Cosmoline as possible. This involves two steps:
1. Applying heat to the gun
You can do this by wrapping your firearm in towels and placing it in a black trash bag and leaving it sit out in the sun, or using another heat source—such as a heat gun or older oven—to return the Cosmoline to its liquid state. Attempting to remove the rust-preventive after letting it warm up will turn the Cosmoline into an oilier coating, as opposed to a thicker, wax-like substance. Once you’ve accomplished this, you can move on to the next step.
2. Apply your chemicals
A lot of people swear by mineral spirits as a primary solvent to remove Cosmoline, and you can either apply it with a rag or submerge/dip your gun into it. A sealed PVC tube or large container are both good for soaking guns in mineral spirits, depending on the size of the firearm and container.
You can opt to disassemble your firearm before you start this process or keep your gun intact throughout the cleaning process. Removing all of the Cosmoline will take significant work regardless, so it comes down to a matter of preference. Dissembling can make the process somewhat easier but it isn’t absolutely necessary.
It may take a few dips or baths to get the majority of Cosmoline off. Once you’re satisfied, you can move on to the actual cleaning.
3. Hot water and dish soap
These two things together will help dislodge and remove the remaining traces of Cosmoline, along with a fair amount of elbow grease. Following a wash-rinse cycle will help coax Cosmoline out from all the crevices and grooves, so repeat the process until your water runs clear and you can handle each part without it feeling greasy or oily.
You’ll want to move, rotate, and flex parts to exercise hidden bits of Cosmoline. The more you manipulate, wash, and rinse the firearm, the more you’ll see creep to the surface. At this stage, you may benefit more from dissembling the entire gun or parts of it, like the bolt assembly of a rifle, and letting it soak in mineral spirits.
4. Finishing the job with oil and lube
After hours of scrubbing, you will eventually remove the majority of Cosmoline from the gun—but you can’t stop with that. You have to apply the necessary gun oil, lubrication, and stain (for wooden stocks) to preserve the piece you worked so hard on cleaning up. It’s very important that you get as much of the Cosmoline out of the gun as possible if only to eliminate the risk of having to disassemble the gun to find a hidden chunk of the rust-preventive gunking it up.
The honest-to-goodness proper way to remove Cosmoline from anything, really, is through working at it. Soaking, washing, rinsing, and scrubbing will take hours to complete before you can handle your parts or firearm without the greasy residue covering your hands.
Keyword Analysis
| Keyword | CPC | PCC | Volume | Score | Length of keyword |
|---|---|---|---|---|---|
| use katana | 1.44 | 0.6 | 4451 | 4 | 10 |
| use | 1.27 | 0.5 | 6041 | 26 | 3 |
| katana | 1.19 | 1 | 6434 | 88 | 6 |
Keyword Research: People who searched use katana also searched
| Keyword | CPC | PCC | Volume | Score |
|---|---|---|---|---|
| used katana 50 | 0.71 | 0.7 | 2894 | 6 |
| used katana 100 | 0.13 | 0.4 | 2420 | 73 |
| used katana head | 1.11 | 0.8 | 2187 | 81 |
| used katana 100 mk2 | 1.03 | 0.9 | 8388 | 57 |
| used katana 50 mkii | 0.79 | 1 | 1192 | 4 |
| used katanas for sale | 0.97 | 0.3 | 5437 | 45 |
| used katana craft for sale | 0.51 | 0.4 | 1377 | 33 |
| us katana | 0.25 | 0.2 | 6194 | 9 |
| usa katana | 0.98 | 0.8 | 2808 | 34 |
| used catana 42 for sale | 0.01 | 0.9 | 4322 | 58 |
| used catana catamarans for sale | 0.38 | 0.9 | 2908 | 92 |
| use katalon offline | 1.69 | 0.5 | 8271 | 31 |
| katana 50 used | 1.35 | 1 | 952 | 7 |
| used boss katana 50 sale | 0.45 | 0.8 | 3047 | 78 |
| boss katana 50 used | 1.34 | 0.9 | 4568 | 20 |
Search Results related to use katana on Search Engine
wikihow.com
How to Use a Katana Properly. A katana is a style of Japanese sword known for its long curved blade that’s able to easily cut through a variety of materials. While it may seem simple to swing a katana, cutting and striking with one.
wikipedia.org
Katana were used by samurai both in the battlefield and for practicing several martial arts, and modern martial artists still use a variety of katana. Martial arts in which training with katana is used include iaijutsu , battōjutsu , iaidō , kenjutsu , kendō , ninjutsu and Tenshin Shōden Katori Shintō-ryū .
grapplinginsider.com
The katana (samurai sword) is a weapon that was popular during Feudal Japan. Before katanas, they used a tachi for the cutting edge needed in battle. The signature of this sword was facing the wrong way. With a need to correct this as well as have a quicker draw on the sword in close combat, the katana gave the samurai the edge needed for victory.
youtube.com
How to Use a Katana Like a REAL Samurai? (Challenges/Tips for the Beginners) In this SPECIAL video We all together gonna learn the Art of cut – Tameshigiri! Basic Techniques,Tips and Challenges .
sword-buyers-guide.com
The way to use a Katana properly is to cast it out like a fishing line and draw cut the blade inwards using the elbows close to the body. 1) Blade is held almost vertical above the head. 2) It is cast out like casting a fishing line and then 3) as it contacts the target, the elbows draw it towards the wielders body and 4) the elbows are used .
foundry.com
Katana 3.6 works as hard as its artists, freeing up time through fundamental UI and workflow updates. Expect innovative, artist-focused snapping functionality and a new Network Material Edit tool that raises the bar on traditional workflows, so artists can be confident they’re creating something a cut above—every single time.
hackingarise.com
katana is a framework written in python for making penetration testing, based on a simple and comprehensive structure for anyone to use, modify and share, the goal is to unify tools serve for professional when making a penetration test or simply as a routine tool, The current version is not completely stable, it’s recommended to update every .
fandom.com
The Katana was one of the traditionally made Japanese swords that were worn by the samurai class of feudal Japan, also commonly referred to as a “Samurai Sword”. The weapon, like the Golf Club, requires a wind-up to increase its damage. The sword can be found on black robed ninjas, during the missions leading up to Mashiro Hayamoto’s assassination. It can not be concealed, and can not be thrown.
quora.com
Hiragana is the basic. We first learn hiragana in school. Technically, you can write all of Japanese in Hiragana (that’s how the first graders write). But it’s not very easy to read. I t l o o k s l i k e t h i s t o j a p a n e s e p e o p l e. B.
Joe here. Please note that I created the title above as an intentionally incorrect use of ellipses. I realized while writing it that if I didn’t tell you it was incorrect, Liz might stab me in the eye with her red pen. Anyway, on to the post!
Liz here. Here at the Write Practice, we have love for all punctuation marks: commas, semicolons, question marks. Today we’re discussing that trio of periods that make up the ellipsis.
What’s an ellipsis?
What Is An Ellipsis?
An ellipsis is a trio of periods (…) that serve as a placeholder for text. It’s most commonly used in undergraduate history papers that require copious citations.
For example, the writer Oscar Wilde says in The Picture of Dorian Gray:
“Words! Mere words! How terrible they were! How clear, and vivid, and cruel! One could not escape from them. And yet what a subtle magic there was in them! They seemed to be able to give a plastic form to formless things, and to have a music of their own as sweet as that of viol or of lute. Mere words! Was there anything so real as words?”
If I were editing this quote to be used in newsprint, where type space is precious, I might use an ellipsis to make it read as such:
Words! Mere words! How terrible they were! How clear, and vivid, and cruel! One could not escape from them. And yet what a subtle magic there was in them! … Was there anything so real as words?
The idea of the text is preserved, and space is conserved.
Easy Keyboard Shortcut for… an Ellipsis
By the way, there’s an easy keyboard shortcut for an ellipses too.
Here’s the shortcut for a single-character ellipsis:
I find it especially useful on Twitter when you really can’t afford to spare those two extra characters.
When Ellipses Go Wrong
On occasion, you might see an ellipsis used as an indication of a place where the writer or speaker has paused or lost their train of thought. Such as:
Well yes, Dorian, the retrieval of post-modern socie … is that a bunny?
This is perfectly acceptable, as long as your protagonist isn’t losing their train of thought every other paragraph. Too many ellipses can detract from the effectiveness of the prose (and some readers and writers find it irritating to no end).
In summation, if you’re removing text from a quotation (while keeping the meaning intact, of course), then use the ellipsis.
If you have a mental space cadet for a main character, you might want to tone down your desire to use those dots.
How Many Periods Are There In An Ellipses?
You might wonder just how many dots should be in an ellipsis. The answer is that sometimes there are three! Sometimes there are four!
That’s a lie, actually. There is no such thing as a four-dot ellipsis. A four-dot ellipsis is actually an ellipsis with a period at the end of it. It’s important to remember that you still should punctuate properly even if you’re using an ellipsis.
When using ellipses in conjunction with other punctuation, whether they be commas, semicolons, question marks, or exclamation points, treat the ellipsis as though it was just another word in the sentence.
Ellipsis Examples
For example, if Chuck and Carlton just escaped an encounter with a rabid hamster, and are interviewed by the local paper, a journalist might choose to eliminate some of the more superfluous text.
Chuck might say: “I never expected this! Never in a million years! I can’t believe that I managed to escape with my life. Carlton almost got bitten, right after the thing started turning purple. We’re lucky to be alive.”
The journalist, with precious type space available, cuts it down to this: “I never expected this! … We’re lucky to be alive.”
Note that the exclamation point remains in place, while the ellipsis follows it to replace the omitted words. This would be the same if other portions were eliminated. (“I can’t believe that I managed to escape with my life. … We’re lucky to be alive.”)
Need more grammar help? My favorite tool that helps find grammar problems and even generates reports to help improve my writing is… ProWritingAid. Works with Word, Scrivener, Google Docs, and web browsers. Also, be sure to use my coupon code to get 25 percent off: WritePractice25
How about you? Do you use ellipses in your writing? Let us know in the comments section.
PRACTICE
Write for fifteen minutes about a spacey-yet-brilliant fan of classic literature. Use ellipses properly as your character spouts lines from Wilde, Shakespeare, Emerson, or their preferred writer.
Today’s Best Tech Deals
Picked by PCWorld’s Editors
Top Deals On Great Products
Picked by Techconnect’s Editors
Recently, BoingBoing ran an article about how some librarians in Massachusetts were installing Tor software in all their public PCs to anonymize the browsing habits of their patrons. The librarians are doing this as a stand against passive government surveillance as well as companies that track users online and build dossiers to serve highly-targeted advertising.
It’s an interesting project and a bold stand for user privacy. But the good news is that if you want to browse anonymously, you don’t have to go to the library to use Tor. Connecting to the Tor network from your own PC is quick and painless thanks to the Tor project’s dead simple Tor Browser. (Want even more privacy? Check out the top picks from our VPN reviews.)
What is Tor?
Tor is a computer network run by volunteers worldwide. Each volunteer runs what is called a relay, which is just a computer that runs software allowing users to connect to the Internet via the Tor network.
Before hitting the open Internet, the Tor Browser will connect to several different relays, wiping its tracks each step of the way, making it difficult to figure out where, and who, you really are.
While Tor is gaining a reputation as a tool for buying illicit goods online, the software has numerous legitimate uses. Activists masking their location from oppressive regimes and journalists communicating with anonymous sources are two simple examples.
If, like the librarians in Massachusetts, you don’t have an exotic reason for using Tor, it’s still a good tool to keep your browsing private from your ISP, advertisers, or passive government data collection. But if the NSA or other three-letter agency decided to actively target your browsing habits that’s a whole different ballgame.
Getting started
The easiest way to use Tor is to download the Tor Browser. This is a modified version of Firefox along with a bunch of other software that connects you to the Tor network.
Once you’ve downloaded the installer, you have two options: You can just install the software or you can check the installation file’s GPG signature first. Some people like to check the installation file to make sure they’ve downloaded the proper version of the browser and not something that’s been tampered with.
But checking the GPG signature is not a painless process and requires an additional software download. Nevertheless, if that’s something you’d like to do, the Tor Project has a how-to explaining what’s required.
Installing Tor
Whether or not you’ve checked the GPG signature, the next step is to install the Tor browser itself.
You can install the Tor browser on a USB stick.
For Windows, the Tor Browser comes as an EXE file, so it’s basically like installing any other program. The key difference is that the browser doesn’t have the same default location as most programs. Instead, it offers your desktop as the install location.
The Tor browser does this because it is portable software and doesn’t integrate into a Windows system the way typical programs do. This means you can run the Tor browser from almost anywhere—the Desktop, your documents folder, or even a USB drive.
When you arrive at the Choose install location window Click Browse. and then choose where you’d like to install the browser. As you can see in the image above, I installed it to a USB drive that I tote around on my key chain.
Once you’ve got your location selected, just press Install and Tor takes care of the rest.
Using the Tor Browser
Once the browser is installed, you’ll have a plain old folder called Tor Browser. Open that and inside you’ll see “Start Tor Browser.exe”. Click that file and a new window opens asking whether you’d like to connect directly to the Tor network or if you need to configure proxy settings first.
Most people can simply connect directly to the Tor network to get started. (Click to enlarge.)
For most people, choosing the direct option is best, so choose Connect. A few seconds later a version of Firefox will launch and you are now connected to the Tor network and able to browser in relative anonymity.
To make sure you’re connected to Tor go to whatismyip.com, which will automatically detect your location based on your Internet Protocol address. If your browser shows you coming from a location that is not your own, you are good to go. Just make sure you do all your anonymous browsing from the Tor Browser itself as other programs on your system are not connected to Tor.
But browsing anonymously on Tor isn’t quite as easy as booting up a program. There are also some rules of the road you should observe, such as connecting to every site possible via SSL/TSL encryption (HTTPS). If you don’t, then anything you do online can be observed by the person running your exit node. The browser has the Electronic Frontier Foundation’s HTTPS Everywhere add-on installed by default, which should cover your SSL/TSL needs most of the time.
Also, remember that browsing in anonymity does not make you immune to viruses and other malware. If you are going to the seedier parts of the Internet, Tor cannot protect you from malicious software that could be used to reveal your location.
For the average Internet user, however, the Tor Browser should be enough to stay private online.
Ian is an independent writer based in Israel who has never met a tech subject he didn’t like. He primarily covers Windows, PC and gaming hardware, video and music streaming services, social networks, and browsers. When he’s not covering the news he’s working on how-to tips for PC users, or tuning his eGPU setup.
Keyword Analysis
| Keyword | CPC | PCC | Volume | Score | Length of keyword |
|---|---|---|---|---|---|
| use katana | 1.14 | 0.3 | 9730 | 84 | 10 |
| use | 0.54 | 0.8 | 456 | 24 | 3 |
| katana | 0.15 | 0.2 | 4249 | 8 | 6 |
Keyword Research: People who searched use katana also searched
| Keyword | CPC | PCC | Volume | Score |
|---|---|---|---|---|
| used katana 50 | 0.16 | 0.7 | 1857 | 58 |
| used katana 100 | 1.88 | 0.3 | 3318 | 68 |
| used katana head | 0.82 | 0.9 | 2504 | 26 |
| used katana 100 mk2 | 0.65 | 0.7 | 3040 | 45 |
| used katana 50 mkii | 0.1 | 0.9 | 2644 | 15 |
| used katanas for sale | 1.28 | 0.2 | 1675 | 15 |
| used katana craft for sale | 1.8 | 0.1 | 8903 | 47 |
| us katana | 0.38 | 0.7 | 775 | 33 |
| usa katana | 1.64 | 0.5 | 9181 | 5 |
| used catana 42 for sale | 1.44 | 0.5 | 7249 | 9 |
| used catana catamarans for sale | 1.35 | 0.7 | 9539 | 24 |
| use katalon offline | 0.18 | 0.9 | 7681 | 18 |
| boss katana 50 used | 1.22 | 0.6 | 2268 | 1 |
| katana 50 used | 1.18 | 0.8 | 194 | 83 |
| used boss katana 50 sale | 0.5 | 0.5 | 6601 | 15 |
Search Results related to use katana on Search Engine
wikihow.com
How to Use a Katana Properly. A katana is a style of Japanese sword known for its long curved blade that’s able to easily cut through a variety of materials. While it may seem simple to swing a katana, cutting and striking with one.
wikipedia.org
Katana were used by samurai both in the battlefield and for practicing several martial arts, and modern martial artists still use a variety of katana. Martial arts in which training with katana is used include iaijutsu , battōjutsu , iaidō , kenjutsu , kendō , ninjutsu and Tenshin Shōden Katori Shintō-ryū .
grapplinginsider.com
The katana (samurai sword) is a weapon that was popular during Feudal Japan. Before katanas, they used a tachi for the cutting edge needed in battle. The signature of this sword was facing the wrong way. With a need to correct this as well as have a quicker draw on the sword in close combat, the katana gave the samurai the edge needed for victory.
youtube.com
How to Use a Katana Like a REAL Samurai? (Challenges/Tips for the Beginners) In this SPECIAL video We all together gonna learn the Art of cut – Tameshigiri! Basic Techniques,Tips and Challenges .
sword-buyers-guide.com
The way to use a Katana properly is to cast it out like a fishing line and draw cut the blade inwards using the elbows close to the body. 1) Blade is held almost vertical above the head. 2) It is cast out like casting a fishing line and then 3) as it contacts the target, the elbows draw it towards the wielders body and 4) the elbows are used .
foundry.com
Katana 3.6 works as hard as its artists, freeing up time through fundamental UI and workflow updates. Expect innovative, artist-focused snapping functionality and a new Network Material Edit tool that raises the bar on traditional workflows, so artists can be confident they’re creating something a cut above—every single time.
hackingarise.com
katana is a framework written in python for making penetration testing, based on a simple and comprehensive structure for anyone to use, modify and share, the goal is to unify tools serve for professional when making a penetration test or simply as a routine tool, The current version is not completely stable, it’s recommended to update every .
fandom.com
The Katana was one of the traditionally made Japanese swords that were worn by the samurai class of feudal Japan, also commonly referred to as a “Samurai Sword”. The weapon, like the Golf Club, requires a wind-up to increase its damage. The sword can be found on black robed ninjas, during the missions leading up to Mashiro Hayamoto’s assassination. It can not be concealed, and can not be thrown.
quora.com
Hiragana is the basic. We first learn hiragana in school. Technically, you can write all of Japanese in Hiragana (that’s how the first graders write). But it’s not very easy to read. I t l o o k s l i k e t h i s t o j a p a n e s e p e o p l e. B.
© 2017 Keyworddensitychecker. All rights reserved
Most people will just tell me to take it to a professional to get sharpened so i’ll explain this. Recently a friend of mine sent me a Katana and its not cheap garbage either, it was at first razor sharp but before getting sent to me it was blunted. There are no professionals around these parts to sharpen swords nor am i able to send it away online. So i figured i would do this my self, im just wondering which grit do i use
3 Answers
First, the skill that is needed to sharpen a katana is one that takes years of training to attain. What you an amateur will end up doing is ruin the blade. The blade of a katana is not just one type of steel, but at least 4 different kinds. It takes a very skill sword polisher to be able to do a good job and not damage the blade.
Second, what’s your hurry? From your question, it is obvious that you do not even have the skill to use the katana properly and will probably end up either breaking the sword and/or cutting yourself.
So basically your answer to a blunt katana is to completely ruin it.
Send the katana to me. No I will not sharpen it, no I will not give it back. It’s just simply a waste for you to have it only to destroy it.
How to uninstall Dr.Web KATANA from your computer
Dr.Web KATANA is a Windows application. Read more about how to remove it from your PC. It is written by Doctor Web, Ltd. . Open here where you can read more on Doctor Web, Ltd.. More information about Dr.Web KATANA can be seen at Dr.Web KATANA is commonly set up in the C:Program FilesDrWeb directory, subject to the user’s option. The full command line for removing Dr.Web KATANA is C:ProgramDataDoctor WebSetupdrweb-katanakatana-setup.exe. Keep in mind that if you will type this command in Start / Run Note you may be prompted for administrator rights. drwupsrv.exe is the programs’s main file and it takes close to 6.67 MB (6992624 bytes) on disk.
Dr.Web KATANA installs the following the executables on your PC, occupying about 41.43 MB ( 43446952 bytes) on disk.
- drwupsrv.exe (6.67 MB)
- dwservice.exe (8.53 MB)
- dwsysinfo.exe (12.04 MB)
- spideragent.exe (14.19 MB)
The information on this page is only about version 1.0.5.04050 of Dr.Web KATANA. For other Dr.Web KATANA versions please click below:
Directories found on disk:
- C:Program FilesDrWeb
Usually, the following files remain on disk:
- C:Program FilesDrWebccsdk.dll
- C:Program FilesDrWebdrwupsrv.exe
- C:Program FilesDrWebdwarkapi.dll
- C:Program FilesDrWebdwqrlib64.dll
- C:Program FilesDrWebdwservice.exe
- C:Program FilesDrWebdwsysinfo.dll
- C:Program FilesDrWebdwsysinfo.exe
- C:Program FilesDrWebSL139378284.key
- C:Program FilesDrWebspideragent.exe
- C:ProgramDataDoctor WebSetupdrweb-katanakatana-setup.exe
Use regedit.exe to manually remove from the Windows Registry the data below:
- HKEY_LOCAL_MACHINESoftwareDoctor WebSetupDr.Web KATANA
- HKEY_LOCAL_MACHINESoftwareMicrosoftWindowsCurrentVersionUninstall
Registry values that are not removed from your PC:
- HKEY_LOCAL_MACHINESystemCurrentControlSetServicesDrWebAVServiceImagePath
A way to uninstall Dr.Web KATANA from your PC with the help of Advanced Uninstaller PRO
Dr.Web KATANA is a program by the software company Doctor Web, Ltd.. Sometimes, people choose to uninstall this application. Sometimes this is easier said than done because removing this manually takes some know-how regarding Windows internal functioning. One of the best SIMPLE solution to uninstall Dr.Web KATANA is to use Advanced Uninstaller PRO. Here are some detailed instructions about how to do this:
1. If you don’t have Advanced Uninstaller PRO already installed on your PC, add it. This is good because Advanced Uninstaller PRO is a very efficient uninstaller and general utility to optimize your computer.
- visit Download Link
- download the setup by clicking on the green DOWNLOAD button
- install Advanced Uninstaller PRO
2. Start Advanced Uninstaller PRO. It’s recommended to take some time to admire Advanced Uninstaller PRO’s design and wealth of tools available. Advanced Uninstaller PRO is a powerful Windows tool.
3. Click on the General Tools button
4. Activate the Uninstall Programs feature
5. A list of the programs installed on your computer will be made available to you
6. Navigate the list of programs until you locate Dr.Web KATANA or simply activate the Search field and type in “Dr.Web KATANA”. If it exists on your system the Dr.Web KATANA app will be found automatically. When you click Dr.Web KATANA in the list of applications, some information regarding the program is shown to you:
- Safety rating (in the lower left corner). This explains the opinion other people have regarding Dr.Web KATANA, from “Highly recommended” to “Very dangerous”.
- Reviews by other people – Click on the Read reviews button.
- Technical information regarding the application you wish to uninstall, by clicking on the Properties button.
For instance you can see that for Dr.Web KATANA:
- The web site of the application is:
- The uninstall string is: C:ProgramDataDoctor WebSetupdrweb-katanakatana-setup.exe
7. Press the Uninstall button. A confirmation page will show up. Confirm the removal by pressing the Uninstall button. Advanced Uninstaller PRO will automatically remove Dr.Web KATANA.
8. After uninstalling Dr.Web KATANA, Advanced Uninstaller PRO will offer to run a cleanup. Click Next to perform the cleanup. All the items that belong Dr.Web KATANA that have been left behind will be detected and you will be asked if you want to delete them. By removing Dr.Web KATANA with Advanced Uninstaller PRO, you can be sure that no Windows registry items, files or folders are left behind on your computer.
Your Windows computer will remain clean, speedy and ready to serve you properly.
Disclaimer
This page is not a piece of advice to remove Dr.Web KATANA by Doctor Web, Ltd. from your PC, nor are we saying that Dr.Web KATANA by Doctor Web, Ltd. is not a good application for your PC. This page simply contains detailed info on how to remove Dr.Web KATANA in case you want to. Here you can find registry and disk entries that other software left behind and Advanced Uninstaller PRO stumbled upon and classified as “leftovers” on other users’ PCs.
2018-06-02 / Written by Dan Armano for Advanced Uninstaller PRO
Carlos Guimaraes/EyeEm/Getty Images
Using an Ouija board can be an interesting experience. Some believe it is a doorway to another world and warn against its use, but most people see it as a harmless diversion, especially if it’s not taken too seriously.
Here are some guidelines.
How to Use an Ouija Board
An Ouija board is easy to use, but it not’s meant to be a solo activity.
- It takes two to Ouija: usually, one person is not able to work the Ouija. Get a friend to use it with you. Having a male and a female in the group is usually recommended.
- Timing: most practitioners suggest using the board at night when, they say, less interference is in the atmosphere, but you can use it anytime.
- Create some atmosphere: the Ouija is more fun if you darken the room and light some candles. Turn off the TV and any music to minimize distractions.
- Have a seat: the two users should sit facing each other, with knees touching if possible, with the board on their laps. Don’t use a table.
- Decide on a questioner or medium: even though both people can ask questions—or anyone else in the room can—only one of the users should be the medium (the one to formally ask questions of the board).
- Place your fingers on the planchette: you and your partner should place the fingers of both hands very lightly on the planchette, or pointer.
- Move it: purposely move the planchette around in a circle on the board for a moment or two to get it “warmed up.”
- Attitude: don’t let the board control the session. The medium should begin by announcing that the session will only allow an experience that is positive or toward a higher good and that negative energies are not welcome.
- Begin simply: start with a simple question, one that requires a yes or no answer.
- Be patient: you might not begin to get answers right away. Give the board a chance to “warm up.”
- Be polite: when the board starts working, thank the board or entities for showing up and communicating with you.
- Don’t ask stupid questions: avoid questions such as, “When am I going to die?” If the board answers, “in 6 months,” you might worry about it needlessly because you cannot always trust the board to tell you the truth.
- Don’t ask for physical signs: many experienced users warn against asking for physical signs that the “spirit” is real or present.
- Don’t believe everything the board tells you: just as with any other source of information, don’t accept whatever the board says to be the truth or accurate.
- Close the board: this is an important step. When you’re done with your session, intentionally slide the planchette to “Goodbye” and remove your hands.
- Have someone write down the answers: sometimes the letters spell out very quickly, and it’s difficult to keep track of what’s being said. A third person with paper and pen can write down the message as it comes.
- Play sober: you’ll get better results if you haven’t been drinking or smoking.
- Maintain control: if the board starts giving rude, vulgar, obscene or otherwise disagreeable responses, break off the session immediately by closing the board.
- Don’t take it too seriously: most “bad” or negative Ouija experiences occur because the users take it too seriously or get freaked out by it. Don’t. Just take it in stride.
You can buy “official” Ouija boards, but a printable version works just as well. Enter the game with patience and a sense of humor and enjoy a fun activity. The Charlie Charlie Challenge is a similar, albeit less sophisticated means of “communicating” with the spirit world.
Please select a language:
Date published: 2020-06-06
Related Topics
- DO wear a non-medical mask or face covering to protect others.
- DO ensure the mask is made of at least two layers of tightly woven fabric.
- DO inspect the mask for tears or holes.
- DO ensure the mask or face covering is clean and dry.
- DO wash your hands or use alcohol-based hand sanitizer before and after touching the mask or face covering.
- DO use the ear loops or ties to put on and remove the mask.
- DO ensure your nose and mouth are fully covered.
- DO replace and launder your mask whenever it becomes damp or dirty.
- DO wash your mask with hot, soapy water and let it dry completely before wearing it again.
- DO store re-usable masks in a clean paper bag until you wear it again.
- DO discard masks that cannot be washed in a plastic lined garbage bin after use.
Don’ts
- DON’T reuse masks that are moist, dirty or damaged.
- DON’T wear a loose mask.
- DON’T touch the mask while wearing it.
- DON’T remove the mask to talk to someone.
- DON’T hang mask from your neck or ears.
- DON’T share your mask.
- DON’T leave your used mask within the reach of others.
Remember, wearing a non-medical mask or face covering alone will not prevent the spread of COVID-19. You must also wash your hands often, practise physical distancing and stay home if you are sick.
Do your part. Wear a non-medical mask or face covering to protect others when you can’t maintain a 2 metre distance.
Non-medical masks are not recommended for:
- people who suffer from an illness or disabilities that make it difficult to put on or take off a mask
- those who have difficulty breathing
- children under the age of 2 years
Don’t judge others for not wearing a mask.
Kindness is important as some people may not be able to wear a mask or face covering.
Keyword Analysis
| Keyword | CPC | PCC | Volume | Score | Length of keyword |
|---|---|---|---|---|---|
| use katana | 0.17 | 0.2 | 1823 | 34 | 10 |
| use | 1.14 | 0.6 | 555 | 62 | 3 |
| katana | 1.15 | 0.2 | 7044 | 59 | 6 |
Keyword Research: People who searched use katana also searched
| Keyword | CPC | PCC | Volume | Score |
|---|---|---|---|---|
| used katana 50 | 1.77 | 0.2 | 90 | 44 |
| used katana 100 | 0.24 | 0.7 | 9381 | 60 |
| used katana head | 0.62 | 0.2 | 4497 | 59 |
| used katana 100 mk2 | 1.74 | 0.4 | 5570 | 8 |
| used katana 50 mkii | 0.65 | 1 | 6603 | 36 |
| used katanas for sale | 1.79 | 0.6 | 5015 | 80 |
| used katana craft for sale | 1.32 | 0.2 | 9762 | 11 |
| us katana | 0.96 | 0.3 | 2682 | 49 |
| usa katana | 1.16 | 1 | 1840 | 28 |
| used catana 42 for sale | 0.65 | 0.5 | 722 | 21 |
| used catana catamarans for sale | 0.07 | 0.6 | 8908 | 2 |
| use katalon offline | 0.59 | 0.9 | 4511 | 13 |
| katana 50 used | 1.54 | 0.2 | 6828 | 59 |
| used boss katana 50 sale | 1.76 | 0.6 | 328 | 1 |
| boss katana 50 used | 1.6 | 0.3 | 4894 | 71 |
Search Results related to use katana on Search Engine
wikihow.com
How to Use a Katana Properly. A katana is a style of Japanese sword known for its long curved blade that’s able to easily cut through a variety of materials. While it may seem simple to swing a katana, cutting and striking with one.
wikipedia.org
Katana were used by samurai both in the battlefield and for practicing several martial arts, and modern martial artists still use a variety of katana. Martial arts in which training with katana is used include iaijutsu , battōjutsu , iaidō , kenjutsu , kendō , ninjutsu and Tenshin Shōden Katori Shintō-ryū .
grapplinginsider.com
The katana (samurai sword) is a weapon that was popular during Feudal Japan. Before katanas, they used a tachi for the cutting edge needed in battle. The signature of this sword was facing the wrong way. With a need to correct this as well as have a quicker draw on the sword in close combat, the katana gave the samurai the edge needed for victory.
youtube.com
How to Use a Katana Like a REAL Samurai? (Challenges/Tips for the Beginners) In this SPECIAL video We all together gonna learn the Art of cut – Tameshigiri! Basic Techniques,Tips and Challenges .
sword-buyers-guide.com
The way to use a Katana properly is to cast it out like a fishing line and draw cut the blade inwards using the elbows close to the body. 1) Blade is held almost vertical above the head. 2) It is cast out like casting a fishing line and then 3) as it contacts the target, the elbows draw it towards the wielders body and 4) the elbows are used .
foundry.com
Katana 3.6 works as hard as its artists, freeing up time through fundamental UI and workflow updates. Expect innovative, artist-focused snapping functionality and a new Network Material Edit tool that raises the bar on traditional workflows, so artists can be confident they’re creating something a cut above—every single time.
hackingarise.com
katana is a framework written in python for making penetration testing, based on a simple and comprehensive structure for anyone to use, modify and share, the goal is to unify tools serve for professional when making a penetration test or simply as a routine tool, The current version is not completely stable, it’s recommended to update every .
fandom.com
The Katana was one of the traditionally made Japanese swords that were worn by the samurai class of feudal Japan, also commonly referred to as a “Samurai Sword”. The weapon, like the Golf Club, requires a wind-up to increase its damage. The sword can be found on black robed ninjas, during the missions leading up to Mashiro Hayamoto’s assassination. It can not be concealed, and can not be thrown.
quora.com
Hiragana is the basic. We first learn hiragana in school. Technically, you can write all of Japanese in Hiragana (that’s how the first graders write). But it’s not very easy to read. I t l o o k s l i k e t h i s t o j a p a n e s e p e o p l e. B.


