Get this issue today!” width=”150″ height=”196″ data-recalc-dims=”1″ data-lazy-srcset=”/images/20/understanding-different-soldering-38B2.jpg?w=150&ssl=1 150w, /images/20/understanding-different-soldering-38B2.jpg?resize=90%2C117&ssl=1 90w” data-lazy-sizes=”(max-width: 150px) 100vw, 150px” data-lazy-src=”/images/20/understanding-different-soldering-38B2.jpg?resize=150%2C196&is-pending-load=1#038;ssl=1″ srcset=”data:image/gif;base64,R0lGODlhAQABAIAAAAAAAP///yH5BAEAAAAALAAAAAABAAEAAAIBRAA7″> This article was first published in Make: Vol. 45. Don’t have a copy yet? Get this issue today!
There are hundreds of different soldering iron tip shapes and sizes used in everything from jewelry making to plumbing to even stained glass.
We’ll focus on the 3 most common for electronics work: chisel, conical, and bevel tips.
BEVEL TIP (AKA HOOF TIP)
While not as common as the chisel and conical tips, the bevel tip can be used for solder jobs that require pre-loading the iron with solder. The large flat surface can hold more solder than most other tips, and it’s helpful when soldering small-gauge wires together or dragging solder across surface-mount chips to solder multiple pins at once.
CHISEL TIP
With its broad tip, the chisel tip helps to evenly deliver heat to component leads and pads. This tip is great for soldering wires, through-hole components, large surface-mount components, and for desoldering as well.
 CONICAL TIP
Conical tips are usually used for precision electronics work, though they’re also often used for general soldering. The pointed tip helps deliver heat to small areas, such as tiny surface-mount components.
NOTE: Tips for one brand of soldering iron are often not compatible with others, so be sure to verify that tips are designed for your soldering iron before buying them.
SPECIALIZED TIPS: There are endless varieties of specialized tips designed for specific jobs — even if they aren’t soldering related. For example, this spade tip is used to scrape UV glue off of LCD glass.
Just another WordPress.com site
Here’s a good article on the subject of soldering for beginners. ??It’s even a good refreshers for the more experienced should they have the need to teach some newbies.
How to Use a Soldering Iron: A Beginner. s Guide
One art form that geeks really appreciate is soldering, but not all of us know the proper technique. It. s an easy skill to add to your geek resume, so let. s learn how and some old projects off the shelf.
What Is Soldering?
A soldering iron is a tool with a metal tip that gets really hot. We. re talking like 800 degree Fahrenheit, though you can adjust the temperature on a good iron. Its job is to transfer heat to things like wires, transistor leads, and pads on PCBs. After the appropriate areas are heated properly, solder is applied. If you plan on soldering, then you. re better off spending $30-$40 on a 20-30 Watt iron instead of on a cheap $15 one. You. ll get a longer-lasting tool that will work for a much wider variety of applications and you. ll get proper heat control to boot. There are also soldering guns available, but you should only use these when repairing thick cables and never on PCBs, as the tips have a live voltage running through them that can damage sensitive electronics.
Solder is a thin tube, usually rolled in spools, made of various metal alloys. Its job is to hold the individual components together. The individual components and their quantities can vary, but for computer electronics, you. re usually looking at a 60% tin and 40% lead. Lead-free solder is also available, though it has higher melting temperatures and less . wettability. meaning you may need a better soldering iron to use it and removing it can be more tedious. Lead-free solder is better for the environment and has other benefits, and they function more or less the same way.
The inside of the tube is filled with . flux. a substance that gets rid of oxidation and helps clean the surfaces involved in the fusing process. For electronic use, you want rosin-core/rosin-flux solder. Acid-flux is used in plumbing and the acid can damage the sensitive components on PCBs.
Safety First!
Many who. ve never used a soldering iron are afraid of damaging equipment, but more important is the danger to yourself! Soldering irons get really hot (think, and solder itself is molten metal. Be sure to wear safety glasses, keep loose clothing and hair out of the way, and be careful with your fingers. Better still, use protective gloves. Solder can contain lead, so be sure to wash your hands thoroughly after handling it. It. s also really important to work in a well-ventilated area because the fumes from the rosin can cause damage to your lungs when inhaled. Honestly, it. s more common sense and preparation than anything. Just take proper precautions and you. ll be fine.
Cleaning and Tinning the Tip
In order to conduct heat properly, your soldering iron needs to be free of any old solder. After being exposed to air, it oxidizes and thus insulates against heat. We want heat to conduct so that we can apply everything quickly and efficiently. A dirty tip means that you. ll have to hold the iron on longer and risk heat damage to the PCB, and nobody wants that. Keep a wet sponge handy, and after the soldering iron is fully heated, softly scrape it against the sponge to remove old solder. The tip should be nice and shiny, or at least very close to it.
Next, we. re going to . tin. the tip. This will protect the tip and allow heat to conduct better via the presence of new solder. On the hot iron, carefully apply a small amount of fresh solder and coat the tip. It should still be shiny if you. ve done it right. As soon as you tin the tip you should start soldering your components together. After every few joins, clean and re-tin, and again before putting your iron away into storage. This will really help increase the longevity of your tool. A good soldering iron should easily last years this way.
Joining Parts
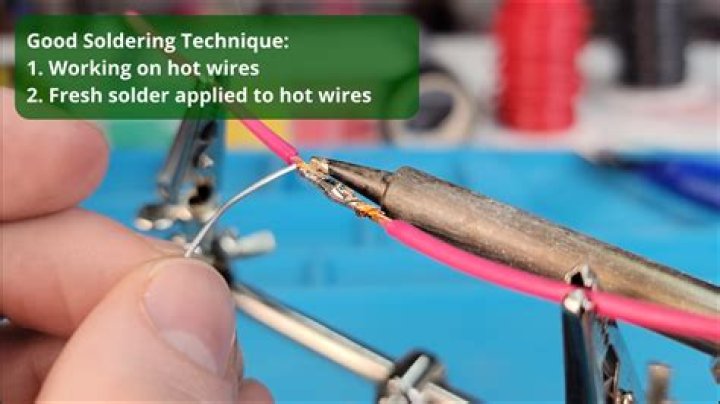
Hold the iron in your dominant hand and a long piece of solder in your other hand. When soldering two components together, you want to touch the area where they join with the soldering iron. Hold it there for about a second, then slide the solder underneath the tip of the iron, sandwiching it to the PCB (refer to above image, cursor points to solder). Hold it for another second or two, feeding in how much solder you need. This amount will vary depending on the project, application, and diameter of the solder, so check your instructions and study the pictures to get a good idea of the end result.
Now, this is really important. Pull away the solder first, and continue holding the iron for another second. This allows the solder to continue to melt and pool, forming a good joint. Then, you can remove the iron. The total process shouldn. t take more than 5 seconds, and usually you. re aiming for 3-4.
Wait a few seconds and don. t disturb the solder. It cools very quickly, but moving or blowing on the joint will cause it to deteriorate. A bad solder connection will look really oxidized, overly dull, and grainy. It also sort of looks like a ball of solder formed on the area. A good connection should be smooth and uniform, and its sides will be concave. It won. t look like a raised ball, it. ll look flat.
Desoldering
When removing a connection or undoing a mistake, you can often resolder over the original and add a touch of new solder. If you want to take the extra step and do it right, you can remove the old solder completely and start with a fresh work area. There are two tools you can use for this, a vacuum-based . solder sucker. or a solder wick.
A solder sucker is essentially a tiny hand-held syringe-like pump. It creates and uses vacuum pressure to suck solder off of whatever it. s on. It. s a great tool to have and works well.
A solder wick is woven copper which the old solder bonds to. It. s more expensive and it. s expendable, so I usually don. t recommend it. Some jobs, however, will greatly benefit from the clean finishing touches that a solder wick provides. Both tools have their strong points, and odds are that in your soldering career you. ll need to use one or the other specifically from time to time. Having a clean working area is really important, as it provides the best results and minimizes risk of damage.
Soldering isn. t particularly difficult. You just need to focus, keep a steady hand, and be safe. A good soldering iron will prove to be a wonderful investment, leading to a much wider arrangement of geek projects at your disposal. Now that you know how, practice so that you. re ready to show off your skills!
Soldering is a useful skill to have – you can quickly fix things around the house instead of calling your handyman and shelling out money. To solder two components you will need to know how to use a soldering iron, some cleaning and maintenance techniques, etc.
In this guide, you will learn what soldering is, what you will need, safety measures, cleaning and maintenance techniques.
How to Solder (Watch Video)
Introduction To Soldering
Soldering is the process through which two or more components can be joined together by melting a bit of metal, called as a filler or solder, at the joint. Once the melted solder cools down, it hardens and acts as a glue joining the components together.
What Can You Solder?
The soldering technique was invented to join metals together. Noble metals such as gold, silver, tin, etc. offer stronger soldered bonds as compared to other metals because of their low reactivity and high melting points. However, noble metals are expensive and hence the most commonly used solder is an alloy made of 60% tin and 40% lead.
The most difficult metals to solder are aluminium, high alloy and stainless steels, titanium and magnesium. These metals can be soldered with some pre-plating and pre-tinning.
Soldering is usually used in the electronic industry to connect wires, fix broken circuits, repair radios, TV sets, antennas, etc. However, soldering can also be used to join plumbing, refrigeration components and even jewelry!
Why Soldering?
Soldering is a technique to attach two components. Would you be better off with an adhesive or would it be best to solder? Find out with the following advantages.
- Low heat impact: The solder is often at a lower melting point than the other components and hence is not impacted by the heat.
- Both permanent and temporary joints: Once the solder hardens, it forms a very strong bond which is not breakable. However, it can be desoldered with no damage to the other components. Both temporary and permanent joints in one!
- Join different materials: Soldering can be used to join different metals as long as the solder has a lower melting point.
- Quick DIY: Soldering is easy to learn and can be mastered by anyone quickly. What’s more, it’s a very quick technique to join stuff together and is great for DIY projects.
What Tools Do You Need?
The following is a simple list of things that you will need for soldering projects.
- Soldering Iron
- Solder
- Soldering Tip
- Soldering Station
- Soldering Stand
- Cleaning Pad
- Safety Glasses
Safety Precautions To Take
Soldering involves the use of extreme temperatures and toxic substances. Hence, safety should be prioritized during the soldering process. Here are some precautions to keep in mind.
- Read all the instructions and guides of the equipment you are using
- Make sure you stay in a well-ventilated area
- Use safety glasses to prevent the fumes from getting into your eyes
- Don’t breathe in the fumes. If necessary, use a fumes extraction device
- Wash your hands after you are done
- Store away the equipment safely
Before Soldering
Now that you know the basics of soldering, here are some things you need to know before you solder.
The first thing that you need to check is whether you have chosen the right tip for the job. Here’s a guide to selecting the right soldering iron tip. The next thing to check is whether the tip is clean.
Many metals react with oxygen and form an oxidation layer. The oxidation layer on the soldering tip would reduce the efficiency of the heat transfer.
To clean this, you will need to rub it against the cleaning pad. If it is very badly oxidized, then you might have to apply a tip reactivator. If the tip appears shiny after cleaning or re-activating, then you can take the next step – tinning.
To ‘tin’ the tip, you have to coat it with a layer of solder. This prevents oxidation and improves heat transfer. Tin the tip immediately before and after soldering; you should also tin the tip after every two joints you solder. This will help in maintaining the longevity of the tip.
Step by Step Instruction Guide To Soldering
- Determine the right temperature for your project which depends on the materials you are soldering and the solder that you are using. As a rule of thumb, choose the lowest temperature possible to get the job done.
- Once the iron is heated to the chosen temperature, hold a piece of the solder in one hand and the soldering iron in another.
- Hold the hot iron to the place where both the components meet for a second. Note that you need to just heat the metals a little bit.
- Now touch the solder to the heated components. The solder will melt and fill in the gap between the two components. The amount of solder you need varies from project to project. If you are a beginner, practice on scrap pieces of metal before you start your project.
- Leave the solder to cool down. A good connection will appear uniform and strong. There shouldn’t be any gaps or big blobs of solder. If there are gaps, you will need to fill in some more solder. If there are blobs, you must desolder to repair the joint.
Desoldering
You may need to desolder to fix certain kinds of joints. Or you may have accidentally applied too much solder! Not to worry, you just need to reheat the iron to the required temperature and melt the solder. You can use a solder sucker, which looks like a syringe, to suck the excess solder. Another device you can use is a desoldering braid.
Finishing Up
Once you are done with the fixing, you will need to clean up and store your equipment away. All you need to do is use a cloth or metal wool to clean and tin the tip as mentioned before. Store it in a sealed container. Likewise, store the soldering iron in a sealed container to prevent oxidation and increase the life of the iron.
We hope you liked this content. Stay tuned for more tips on electronics projects!
If the screwdriver is your bread and butter tool, then the soldering iron is its high powered, electric cousin. But don’t get intimidated. It’s easy to use once you get the hang of it, and by the end of this article, you’ll learn everything you need to know about the basics of a soldering iron.
What Is a Soldering Iron?
CTSI30 Professional Soldering Iron Kit
A soldering iron is a hand-held tool with an insulated handle and a metal tip that gets hot. They’re commonly used for repairs or other assembly work in electronics. What it does is heat up things like wires or transistor leads onto printed circuit boards (PCB’s), after which, solder is applied to hold everything together.
Solder is a thin fusible metal used to make a permanent bond between your metal and your other workpieces. Your usual solder is ordinarily composed of about 60% tin and 40% lead. There are lead-free variants that are more environment-friendly, but it does require a more powerful soldering iron. Either way, most types of solder function in the same way. The most important thing to note about types of solder is that you want a rosin-flux solder as opposed to acid-flux solder as the latter may damage more sensitive components when you’re working.
Soldering Iron Safety Precautions
As with any tool, safety should be your number one priority. Heat is the most dangerous part of a soldering iron, and while the handle is sufficiently insulated, it is in your best interest to always wear protective gloves.
Safety goggles are also a MUST. Keep any loose hair tucked away and loose clothing tucked in tight to minimize fire hazards.
Lastly, since you’re dealing with heat, it’s important to work in a well-ventilated area to make sure you’re not inhaling any dangerous fumes from soldering. Make sure to always wash your hands after working if you’ve been using solder that contains lead. Other than that, make sure to follow all other workshop safety precautions.
Having Fun with your Soldering Iron
Now to the exciting part — putting your soldering iron to use!
After taking all safety precautions and making sure that your soldering iron is working fine, you can follow these next steps:
- Hold the tool with your dominant hand, and in the other, hold a long piece of solder.
- When you have the right amount of solder, pull the solder away, but keep the iron there for another second to allow the solder to melt and join the parts.
- Once you remove the iron, wait a few seconds and let the solder cool, but do not blow on it or move the joint at all because it will mess up the solder. You’ll know it’s done right if the solder is smooth and uniform in texture, and concave rather than convex.
If the solder looks dull and grainy, it may not have cooled properly and oxidized, so you may need to redo it. You can try practicing on spare parts to get a good feel on how much solder to use and how long to leave it to cool. Keep at it and you will master the basic techniques pretty quickly.
Maintaining the Tip of your Soldering Iron
You’ll want to make sure that your soldering iron is performing in tip-top shape every time. To do this, you have to clean it to make sure no old solder elements get built up on the tip. If you let this happen, the old solder oxidizes and inhibits some of the heat being transferred. That means you’ll have to work longer and harder to do what you need to do, and could risk damage to your tools or the PCB.
If you’re cleaning after work, you can wipe the tip gently to get rid of any residue. If there’s too much residue left, you can heat the iron to soften the solder left on the tip. Once it’s fully heated, dab it gently on a wet sponge and scrape off the old solder. You can also buy a tip cleaner to help with the process. It’s a good investment to ensure longevity for your soldering iron.
If you’re looking for the best soldering kit in the market, check out Chandler Tool’s Soldering Kit! The kit includes a soldering iron, lead-free solder wire, hot knife adapter with a replaceable blade, stand, and five nickel-plated bronze tips. Indeed, a top-quality, single-heat iron that will last for years to come! Order yours today!
Soldering is a useful skill to have – you can quickly fix things around the house instead of calling your handyman and shelling out money. To solder two components you will need to know how to use a soldering iron, some cleaning and maintenance techniques, etc.
In this guide, you will learn what soldering is, what you will need, safety measures, cleaning and maintenance techniques.
How to Solder (Watch Video)
Introduction To Soldering
Soldering is the process through which two or more components can be joined together by melting a bit of metal, called as a filler or solder, at the joint. Once the melted solder cools down, it hardens and acts as a glue joining the components together.
What Can You Solder?
The soldering technique was invented to join metals together. Noble metals such as gold, silver, tin, etc. offer stronger soldered bonds as compared to other metals because of their low reactivity and high melting points. However, noble metals are expensive and hence the most commonly used solder is an alloy made of 60% tin and 40% lead.
The most difficult metals to solder are aluminium, high alloy and stainless steels, titanium and magnesium. These metals can be soldered with some pre-plating and pre-tinning.
Soldering is usually used in the electronic industry to connect wires, fix broken circuits, repair radios, TV sets, antennas, etc. However, soldering can also be used to join plumbing, refrigeration components and even jewelry!
Why Soldering?
Soldering is a technique to attach two components. Would you be better off with an adhesive or would it be best to solder? Find out with the following advantages.
- Low heat impact: The solder is often at a lower melting point than the other components and hence is not impacted by the heat.
- Both permanent and temporary joints: Once the solder hardens, it forms a very strong bond which is not breakable. However, it can be desoldered with no damage to the other components. Both temporary and permanent joints in one!
- Join different materials: Soldering can be used to join different metals as long as the solder has a lower melting point.
- Quick DIY: Soldering is easy to learn and can be mastered by anyone quickly. What’s more, it’s a very quick technique to join stuff together and is great for DIY projects.
What Tools Do You Need?
The following is a simple list of things that you will need for soldering projects.
- Soldering Iron
- Solder
- Soldering Tip
- Soldering Station
- Soldering Stand
- Cleaning Pad
- Safety Glasses
Safety Precautions To Take
Soldering involves the use of extreme temperatures and toxic substances. Hence, safety should be prioritized during the soldering process. Here are some precautions to keep in mind.
- Read all the instructions and guides of the equipment you are using
- Make sure you stay in a well-ventilated area
- Use safety glasses to prevent the fumes getting into your eyes
- Don’t breathe in the fumes. If necessary, use a fumes extraction device
- Wash your hands after you are done
- Store away the equipment safely
Before Soldering
Now that you know the basics of soldering, here are some things you need to know before you solder.
The first thing that you need to check is whether you have chosen the right tip for the job. Here’s a guide to selecting the right soldering iron tip. The next thing to check is whether the tip is clean.
Many metals react with oxygen and form an oxidation layer. Oxidation layer on the soldering tip would reduce the efficiency of the heat transfer.
To clean this, you will need to rub it against the cleaning pad. If it is very badly oxidized, then you might have to apply a tip reactivator. If the tip appears shiny after cleaning or re-activating, then you can take the next step – tinning.
To ‘tin’ the tip, you have to coat it with a layer of solder. This prevents oxidation and improves heat transfer. Tin the tip immediately before and after soldering; you should also tin the tip after every two joints you solder. This will help in maintaining the longevity of the tip.
Step by Step Instruction Guide To Soldering
- Determine the right temperature for your project which depends on the materials you are soldering and the solder that you are using. As a rule of thumb, choose the lowest temperature possible to get the job done.
- Once the iron is heated to the chosen temperature, hold a piece of the solder in one hand and the soldering iron in another.
- Hold the hot iron to the place where both the components meet for a second. Note that you need to just heat the metals a little bit.
- Now touch the solder to the heated components. The solder will melt and fill in the gap between the two components. The amount of solder you need varies from project to project. If you are a beginner, practice on scrap pieces of metal before you start your project.
- Leave the solder to cool down. A good connection will appear uniform and strong. There shouldn’t be any gaps or big blobs of solder. If there are gaps, you will need to fill in some more solder. If there are blobs, you must desolder to repair the joint.
Desoldering
You may need to desolder to fix certain kinds of joints. Or you may have accidentally applied too much solder! Not to worry, you just need to reheat the iron to the required temperature and melt the solder. You can use a solder sucker, which looks like a syringe, to suck the excess solder. Another device you can use is a desoldering braid.
Finishing Up
Once you are done with the fixing, you will need to clean up and store your equipment away. All you need to do is use a cloth or metal wool to clean and tin the tip as mentioned before. Store it in a sealed container. Likewise, store the soldering iron in a sealed container to prevent oxidation and increase the life of the iron.
We hope you liked this content. Stay tuned for more tips on electronics projects!
Soldering irons are outstanding tools. Yet they can also possess a sharp learning curve. It’s necessary for new users to know some key pieces of info when it comes to using soldering irons for the first time.
So let’s look now at 5 tips for beginner soldering iron users.
1. Know Their Safety Principles
There’s no question a soldering iron is a versatile and capable tool that comes in a range of types and specifications like these from RS Components. This said, it’s also the case it’s a device that can rise to over 300 degrees celsius (600 degrees fahrenheit) when in use. As a result, knowing how to use a soldering iron safely is crucial. Yet by taking the time to learn beforehand of the safety principles surrounding the use of this tool, it’s possible to minimise the risk of injury or damage, and maximise the effectiveness of the soldering iron when in use.
2. Be Sure to Wear Safety Gear
As well as possessing knowledge of the safety principles regarding soldering irons, it’s also necessary to use suitable safety gear when operating the device. This is applicable even if a user intends to utilise a soldering iron safely. Unfortunately unforeseen events or distractions – for instance a sudden and unexpected loud noise closeby – could distract a user momentarily, and cause a safety risk. But it’s possible to reduce the risk of harm by wearing protective equipment such as a pair of thick thermal safety gloves, and a welding helmet.
3. Understand How to Clean the Tips
Cleaning the tips can help extend their life and help see they operate at optimal condition through the course of it. This is due to the process of removing debris and other contaminants on the tip. There’s a variety of particular tools available for this task, and given the popularity of soldering irons they’re typically easy to obtain.
4. Use Equipment to Help Maintain Visibility
Alongside a well-ventilated workplace forming part of safety principles when it comes to soldering irons, it’s also important for practical purposes. When operating a soldering iron smoke will be emitted, and equipment can assist to clear the air even faster. Many users of soldering irons utilise fume extractors and fans as appropriate to help clear smoke as rapidly as possible.
5. Always Dispose of Soldering Waste Properly
There can be varying procedures in place for disposing of soldering waste. If soldering is being done in a workplace, a worker’s employers should have a defined policy in place for how to deal with discarding waste. If in an environment where soldering is being done by a user who’ll also be tasked with its disposal, then consulting with a hazard waste business prior to soldering is prudent, to establish how to discard of the material in a method that’s safe for the user of the soldering equipment, alongside all others around them.
Getting Down to Work
There’s many important tips and tricks for beginner soldering iron users to keep in mind. These are 5 of the most important. Knowing the safety principles and wearing appropriate safety gear provides a solid foundation for starting use, just as cleaning the tips and looking to clear the area of smoke as rapidly as possible can help increase productivity. Finally, disposing of soldering waste properly will also help assist in keeping a workplace clean and safe for everyone.
If the screwdriver is your bread and butter tool, then the soldering iron is its high powered, electric cousin. But don’t get intimidated. It’s easy to use once you get the hang of it, and by the end of this article, you’ll learn everything you need to know about the basics of a soldering iron.
What Is a Soldering Iron?
CTSI30 Professional Soldering Iron Kit
A soldering iron is a hand-held tool with an insulated handle and a metal tip that gets hot. They’re commonly used for repairs or other assembly work in electronics. What it does is heat up things like wires or transistor leads onto printed circuit boards (PCB’s), after which, solder is applied to hold everything together.
Solder is a thin fusible metal used to make a permanent bond between your metal and your other workpieces. Your usual solder is ordinarily composed of about 60% tin and 40% lead. There are lead-free variants that are more environment-friendly, but it does require a more powerful soldering iron. Either way, most types of solder function in the same way. The most important thing to note about types of solder is that you want a rosin-flux solder as opposed to acid-flux solder as the latter may damage more sensitive components when you’re working.
Soldering Iron Safety Precautions
As with any tool, safety should be your number one priority. Heat is the most dangerous part of a soldering iron, and while the handle is sufficiently insulated, it is in your best interest to always wear protective gloves.
Safety goggles are also a MUST. Keep any loose hair tucked away and loose clothing tucked in tight to minimize fire hazards.
Lastly, since you’re dealing with heat, it’s important to work in a well-ventilated area to make sure you’re not inhaling any dangerous fumes from soldering. Make sure to always wash your hands after working if you’ve been using solder that contains lead. Other than that, make sure to follow all other workshop safety precautions.
Having Fun with your Soldering Iron
Now to the exciting part — putting your soldering iron to use!
After taking all safety precautions and making sure that your soldering iron is working fine, you can follow these next steps:
- Hold the tool with your dominant hand, and in the other, hold a long piece of solder.
- When you have the right amount of solder, pull the solder away, but keep the iron there for another second to allow the solder to melt and join the parts.
- Once you remove the iron, wait a few seconds and let the solder cool, but do not blow on it or move the joint at all because it will mess up the solder. You’ll know it’s done right if the solder is smooth and uniform in texture, and concave rather than convex.
If the solder looks dull and grainy, it may not have cooled properly and oxidized, so you may need to redo it. You can try practicing on spare parts to get a good feel on how much solder to use and how long to leave it to cool. Keep at it and you will master the basic techniques pretty quickly.
Maintaining the Tip of your Soldering Iron
You’ll want to make sure that your soldering iron is performing in tip-top shape every time. To do this, you have to clean it to make sure no old solder elements get built up on the tip. If you let this happen, the old solder oxidizes and inhibits some of the heat being transferred. That means you’ll have to work longer and harder to do what you need to do, and could risk damage to your tools or the PCB.
If you’re cleaning after work, you can wipe the tip gently to get rid of any residue. If there’s too much residue left, you can heat the iron to soften the solder left on the tip. Once it’s fully heated, dab it gently on a wet sponge and scrape off the old solder. You can also buy a tip cleaner to help with the process. It’s a good investment to ensure longevity for your soldering iron.
If you’re looking for the best soldering kit in the market, check out Chandler Tool’s Soldering Kit! The kit includes a soldering iron, lead-free solder wire, hot knife adapter with a replaceable blade, stand, and five nickel-plated bronze tips. Indeed, a top-quality, single-heat iron that will last for years to come! Order yours today!
Introduction: Soldering 101: for the Beginner
In this instructable I will try to teach you the basics of soldering.
I have been soldering for about 14 years. I have soldered everything from 0 gauge wire to the smallest SMD connectors.
Things I will go over
- Things you will need
- Solder irons
- Solder
- Getting your solder iron ready
- Making your first solder connection
- Clean up
Step 1: Things You Will Need
- Soldering iron (Read Step 2)
- Solder (Read Step 3)
- Soldering iron tip cleaner. Some soldering irons come with either a sponge and or a cleaning wire
- Something to solder If you are just starting out I would try to solder some wires (cheap and easy)
Step 2: Soldering Irons
There are may different type out there, I will cover the basics here
20 – 30 Watts for PCB (Printed circuit boards), IC (Integrated circuit).
40 – 60 Watts for Speakers, switches, wires.
70 – 100 Watts when a large heat capacity is needed (Large wires, big connections. )
If you have one or you are buying a soldering iron that is thermostatically controlled you don’t have to worry as much, get at lest a 60 Watt unless you planing on soldering large wires.
A thermostatically controlled soldering iron can be set to a temperature just above the melting point of solder (About 188C 370F) although I have mine set at 350C 662F.
NOTE: If you have a regular soldering iron that is more then 40 Watts you may damage your small delicate parts on a PCB.
Step 3: Solder
Some of the common types of solder
- Lead Based
- Lead Free
- Rosin core/flux core
Solder based on lead was universally used in the past. It was made of
a mixture of tin and lead. Usually a 60/40 (tin/lead) mix, that melts at around 180-190C degrees.
Because lead has some damaging effects to our health, the industry is moving away from lead and towards lead-free solder.
Lead based solder works better in high heat. Example the PS3 red light of death caused from the PS3 over heating and cracking the lead free solder causing a bad connection.
Lead-free solder is solder without lead. EU requires commercially
available electronics to use lead-free solder (RHoS) because of the health hazards of lead.
It has a higher melting point, so it is a bit harder to work with, but usually not a problem.
Comes in many different mixtures.
Rosin core/Flux core
Solder wires usually have a core inside the wire containing flux.
Flux is designed to improve electrical contact and mechanical strength in solder joints.
There are mainly two types of flux cores. Acid core and rosin core. Acid core is used for plumbing and rosin core is used for electronics.
DO NOT USE ACID CORE FOR ELECTRONICS.
I think Rosin core would be the easiest to learn with and Lead free should be your next and only choice.
If you do use lead based solder make sure you have GOOD ventilation. They make special air purifiers to remove lead fumes. Also Make sure you get tested for lead poisoning periodically.
Step 4: Getting Your Soldering Iron Ready and Solder You First Connection.
First thing you will need to do it make a clean area with room to work. You don’t want to burn anything.
Plug in or turn on you soldering iron and want a few minutes or until you soldering iron reaches the set temp.
Once you soldering iron is hot clean your tip either with you sponge or your wire cleaner
Get sponge wet and rub you tip on both sides to remove any solder and or dirt
Stick your soldering tip in the cleaning wire a few times until clean.
Never scrape your tip with sand paper, knife, Etc. This will take the outer layer of the tip off causing dirt to build up and cause performance issues.
When ever possible make a good mechanical connection before soldering. This will make a stronger connection.
Tin you tip, Do this by applying a small amount of solder on the tip of the soldering iron before trying to solder anything. Once you have tinned the tip you will want to make you solder connection as quick as possible. The longer you want the harder it will be to solder. worst comes to worst re clean the tip and tin again. Tinning the tip will increase the surface space and the connectivity allowing more heat to be transferred to the metal you trying to solder. You want to clean and re tin your tip after a few solder connections. You never want to leave your tip untinned. This will cause performance issues and oxidation on the tip. Using a soldering iron with out tinning the tip will ruin the tip.
After you have tinned the tip you want to touch the tip to the metal you trying to solder. As the tip is on the metal you want to slowly add some solder until you see the solder run to the metal. Once you see the solder moving on the metal you can add the solder a little faster until you have a good amount of solder and the connection is made.
Once you have made the solder connection you want to remove the soldering iron and do not move your connection until to solder has hardened. If you move your connection right away you connection will either fall apart or you will cause a cold solder joint. A cold solder joint is a bad connection and you will want to resolder it.
Once you have made a good solder connection and you done with the soldering iron you need to clean up.
Step 5: Cleaning Up
Just like before when you started clean your tip either with your sponge or your wire cleaner
Get sponge wet and rub your tip on both sides to remove any solder and or dirt.
Stick your soldering tip in the cleaning wire a few times until clean.
Then put your soldering iron in the stand.
Turn off the power and or unplug the soldering iron
NOTE: Even though you have turned off and unplugged your soldering iron It will still be hot for some time. Never leave a hot soldering iron unattended.
Once you soldering iron is cool you can either leave it out if you going to be using it often or you can store it in a case.
Be the First to Share
Did you make this project? Share it with us!
Soldering irons are outstanding tools. Yet they can also possess a sharp learning curve. It’s necessary for new users to know some key pieces of info when it comes to using soldering irons for the first time.
So let’s look now at 5 tips for beginner soldering iron users.
1. Know Their Safety Principles
There’s no question a soldering iron is a versatile and capable tool that comes in a range of types and specifications like these from RS Components. This said, it’s also the case it’s a device that can rise to over 300 degrees celsius (600 degrees fahrenheit) when in use. As a result, knowing how to use a soldering iron safely is crucial. Yet by taking the time to learn beforehand of the safety principles surrounding the use of this tool, it’s possible to minimise the risk of injury or damage, and maximise the effectiveness of the soldering iron when in use.
2. Be Sure to Wear Safety Gear
As well as possessing knowledge of the safety principles regarding soldering irons, it’s also necessary to use suitable safety gear when operating the device. This is applicable even if a user intends to utilise a soldering iron safely. Unfortunately unforeseen events or distractions – for instance a sudden and unexpected loud noise closeby – could distract a user momentarily, and cause a safety risk. But it’s possible to reduce the risk of harm by wearing protective equipment such as a pair of thick thermal safety gloves, and a welding helmet.
3. Understand How to Clean the Tips
Cleaning the tips can help extend their life and help see they operate at optimal condition through the course of it. This is due to the process of removing debris and other contaminants on the tip. There’s a variety of particular tools available for this task, and given the popularity of soldering irons they’re typically easy to obtain.
4. Use Equipment to Help Maintain Visibility
Alongside a well-ventilated workplace forming part of safety principles when it comes to soldering irons, it’s also important for practical purposes. When operating a soldering iron smoke will be emitted, and equipment can assist to clear the air even faster. Many users of soldering irons utilise fume extractors and fans as appropriate to help clear smoke as rapidly as possible.
5. Always Dispose of Soldering Waste Properly
There can be varying procedures in place for disposing of soldering waste. If soldering is being done in a workplace, a worker’s employers should have a defined policy in place for how to deal with discarding waste. If in an environment where soldering is being done by a user who’ll also be tasked with its disposal, then consulting with a hazard waste business prior to soldering is prudent, to establish how to discard of the material in a method that’s safe for the user of the soldering equipment, alongside all others around them.
Getting Down to Work
There’s many important tips and tricks for beginner soldering iron users to keep in mind. These are 5 of the most important. Knowing the safety principles and wearing appropriate safety gear provides a solid foundation for starting use, just as cleaning the tips and looking to clear the area of smoke as rapidly as possible can help increase productivity. Finally, disposing of soldering waste properly will also help assist in keeping a workplace clean and safe for everyone.


