Written By Chloe Turner Last updated: December 10, 2020
Technical Writing Specialist who creates different types of articles, from reviews to how-to types of articles for Mac.
Time Machine uses a unique method that mimics complete backups after creating a copy for modified files at hourly intervals. Time Machine runs like clockwork without manual upkeep or fuss. It only duplicates a file if altered, but this generates snapshots for every backup with hard links for each item on the backed-up drive.
But the stark contrast with proprietary backup tools is that it not only mothballs spare duplicates of all files but also memorizes how your Mac looked on any day-so you can walk back in time. But exactly what does time machine backup? At the outset, Time Machine does not back up everything, unlike duplication-centered solutions like MacDaddy.
Part 1. What Is The Scope of Apple’s Time Machine Back Up
About Time Machine
Time Machine uses a hard link that mimics and behaves like a separate clone of a file accessible via the Finder or Terminal. The hard link keeps the file extent uniquely once on a drive. Each instance of the file presents a link to that one special version. They’re removable without purging the original until you remain with one link.
The hard-link system benefits include intuitive navigation via Finder, and also a simple approach of reinstating a snapshot even without extra operations. It also allows you to delete snapshots without banishing data associated with other backups.
In case you inadvertently remove your recovery partition and you want to restore it back, you need to regenerate it. Restore everything, reinstall macOS and then load on everything with Time Machine.
Excluded Files
Contrary to the popular opinion that Time Machine backs up everything, it excludes a variety of files based on ecosystem rules. Accordingly, this nomenclature rules out cache files, log files, junk, and certain app settings.
iMyMac PowerMyMac-The Must-Have Instrument for Cleanup
Unlike Time Machine, cloud services garbage down junk files and eat up precious space. iMyMac PowerMyMac offers thoroughbred cleanup and optimization tools to keep clutter at bay. It zeroes in on system junk like broken links, cache files and vestiges of uninstalled apps.
You only need to run regular scans and farm out all types of redundant content. iCloud’s 5GB storage space will be filled to the brim quickly if you allow junk files to claim gigabytes of room. PowerMyMac is a safe pair of hands and a preventative measure to salvage hard disk space.
It’s the go-to all-in-one system maintenance software to breeze through cleanup and wipe out all types of clutter. It comes with a Free Trial to erase a host of files excluded from Apple’s Time Machine backup. Install it to remove junk that may end up in your backups.
Temporary and system-specific files fall outside Apple’s Time Machine. By default, it does not back up:
- System log files
- Spotlight indexes
- All types of cache files
- Trash contents
- Temporary files
It applies to all lineups of Mac OS X equipped with Time Machine.
Part 2. What Does Time Machine Backup Files?
Time Machine comes in handy for pre-update backup. So how to back up your Mac with Time Machine? Below are the steps:
Step 1. Plug-in An External Storage As Time Machine Backup Disk
Plug in an external storage like a USB or Thunderbolt drive. Check whether you have a backup disk sanctioned by Apple for use with Time Machine.
When you plug in the drive, you should encounter a prompt to use it as your Time Machine backup disk. If you don’t see it, navigate to Apple menu > System Preferences > Time Machine.
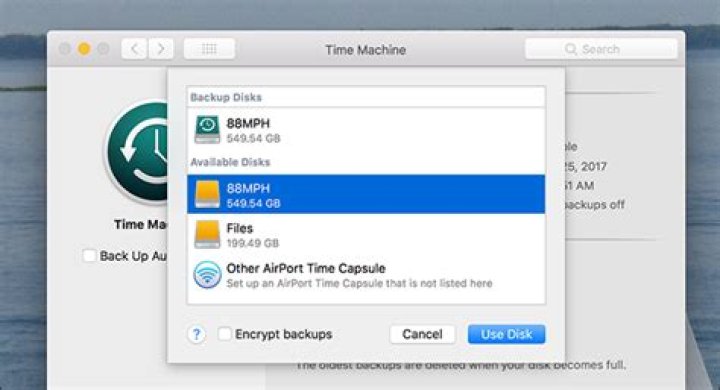
Step 2. Check the Back Up Automatically
Check the Back Up Automatically field. Hit Select Backup Disk.
Step 3. Highlight the Disk You Wish to Use
Highlight the disk you wish to use. To bolster the backup, check the field to Encrypt backups, but it adds the time taken to get the job done. Finally, hit Use Disk. After you configure a backup disk, Time Machine kicks off automatic data back up without diminishing workflow efficiency.
To launch a manual Time Machine backup, go to the menu bar and click the Time Machine icon. Highlight Back Up Now in the menu. Time Machine backs up everything from soups to nuts. For instance, Time Machine will do a fresh install of specific apps, folders, and handpicked files. As long as you know where to find your files on your HDD, you can create a backup.
Part 3. Other Alternatives to Backup Files
Duplication Tools
Duplication-based tools like CCC, MacDaddy, and SuperDuper will back up literally everything. However, these tools lock out some files by default like temporary or system-specific files recommended for exclusion by Apple. Look for a trouble-free experience to create a full backup or clone. They come in handy for generating bootable clones for a backup system. You can create precise copies of your hard drive, Mac OS X startup drive, or Apple iPod.
iCloud
If you have upgraded your iCloud storage, it’s a good option to backup troves of data. You can select Desktop and Documents folder, Mail, Pages, and Numbers. It’s helpful for Mac users with more than one Apple device.
Apart from iCloud, you can use Dropbox, Google Drive, and other cloud backup solutions. They allow you to share files or storing collaborative data but we wouldn’t recommend them to back up all your files. You wouldn’t easily extract a clone on your computer if you lose it. You could have a downloadable disc image of your system in the cloud.
Part 4. Final Thoughts
Apple preinstalls its backup software, Time Machine in macOS. It’s pretty easy to use armed with an external storage source, hard drive, or SSD to do the trick. Time Machine not only backs up your Mac but also generates incremental copies so you can retrieve an earlier version of a file if you need it.
You may want to set up Time Machine on NAS drive to back up wirelessly, but it runs at a snail’s gallop. Alternative backup software with a clever mix of features puts Apple’s tool in the shade because you can use it to boot from another Mac.
I hope you now know the answer to the question-what does time machine backup.
Excellent Thanks for your rating.
Chris Hoffman is Editor-in-Chief of How-To Geek. He’s written about technology for over a decade and was a PCWorld columnist for two years. Chris has written for The New York Times, been interviewed as a technology expert on TV stations like Miami’s NBC 6, and had his work covered by news outlets like the BBC. Since 2011, Chris has written over 2,000 articles that have been read nearly one billion times—and that’s just here at How-To Geek. Read more.
Justin Pot has been writing about technology for over a decade, with work appearing in Digital Trends, The Next Web, Lifehacker, MakeUseOf, and the Zapier Blog. He also runs the Hillsboro Signal, a volunteer-driven local news outlet he founded. Read more.
When you set up Time Machine, your Mac wants to use an entire external drive exclusively for backups. Here’s how you can get around that and use a Time Machine drive both for backups and file storage.
Using a 2 TB external drive for Time Machine backups of a Mac with a 128 GB solid-state drive doesn’t make much sense. Better to put that external drive to use storing video files and other data you might need.
The Quick and Dirty Method: Put Files on the Time Machine Drive
The easiest way to store files on your Time Machine drive is just placing the files on there directly. Plug in your Time Machine drive and open it in the Finder. You’ll see a folder named “Backups.backupdb”. Time Machine stores all its backup files under this folder. Just leave this folder alone and let Time Machine use it normally.
Place personal files and folders outside the Backups.backupdb folder. Don’t place anything inside the Backups.backupdb folder—Time Machine automatically deletes files and folders inside there to free up space, so you may find your personal files deleted if put them there.
Bear in mind that Time Machine requires the drive be formatted with the Mac’s HFS+ file system, which means you won’t be able to easily access these files on Windows PCs or anything else that isn’t a Mac. Time Machine will also work toward filling up the entire drive, not leaving extra room for your files.
A Better Option: Create Separate Partitions for Backups and Files
The ideal way to do this is to create separate partitions on the external drive. Use one for Time Machine backups and another for your personal files. This will ensure your Time Machine backups don’t grow too large, so you’ll always have room for your personal files. You can also make the files partition an ExFAT partition, which means you can use it with Windows PCs and practically any other device you can connect an external drive to.
You’ll need to use the Disk Utility built into your Mac to work with partitions. Press Command+Space, type Disk Utility, and press Enter to open it.
In the Disk Utility window, select the drive you’re using for Time Machine backups and click the Partition button in the toolbar.
If you’ve already set up the drive to work with Time Machine, click the “+” button to create a new partition, then resize it by moving the dial or by typing a specific number.
Choose the ExFAT file system if you plan to use this drive with Windows computers, or Mac OS Extended if you’re just using it with other Macs. Give the new partition a meaningful name—like “Files”—to keep track of which partition is which.
If you’re setting up the drive from scratch, or don’t mind wiping your Time Machine backups and starting over from scratch, you can also do that. Open the Partition tool for the drive, then delete any partitions that exist. Create two clearly labeled partitions, choosing Mac OS Extended (Case-sensitive) for the Time Machine partition and ExFAT for the file storage partition.
Warning: This process will wipe all the files on the drive! You’ll have to start using Time Machine from scratch, so you’ll lose any old backups and personal files that may be stored anywhere on the drive.
If you resized an existing Time Machine partition, Time Machine should automatically keep using it for backups. If you wiped your drive or you’re setting up Time Machine from scratch, you’ll need to point it at that specific partition. Choose the Backups partition in Time Machine’s settings and Time Machine will back up to that specific partition only, not the entire drive.
Every time you connect your drive to your computer, you’ll see two different volumes. These are the two partitions on the drive. You can save files to the files partition, leaving the backups partition for Time Machine alone. Bear in mind that the drive may be slow if you’re reading and writing files while Time Machine is backing up to it.
Files you store on the external drive won’t be backed up by Time Machine, so bear that in mind. If the files are important, you’ll want to have redundant backups. On the other hand, if they’re just videos and other types of data you could download again from the Internet, there’s no need to have multiple redundant copies. You can always just download them again if your drive fails.
Time Machine can back up certain external storage devices connected to your Mac or available on your network.
To use Time Machine to make a backup of your Mac, you need one of these types of storage devices:
External drive connected to your Mac
Time Machine can back up to an external drive connected to a USB, Thunderbolt, or FireWire port on your Mac. If the disk isn’t using the correct format, Time Machine will prompt you to erase it.
Network-attached storage (NAS) device that supports Time Machine over SMB
Many third-party NAS devices support Time Machine over SMB. For details, check the documentation for your NAS device.
Mac shared as a Time Machine backup destination
To use another Mac on your network as a Time Machine backup destination, complete these steps on the other Mac:
- Choose Apple menu > System Preferences, then click Sharing.
- From the list of services on the left, select File Sharing.
- From the Shared Folders list on the right, click the add button (+), then choose a folder to use for Time Machine backups.
- Control-click the folder that you added, then choose Advanced Options from the shortcuts menu that appears.
- From the Advanced Options dialog, select “Share as a Time Machine backup destination.”
When setting up Time Machine on your other Mac computers, you should now be able to select the shared folder as a backup disk.
External drive connected to an AirPort Extreme Base Station (802.11ac) or AirPort Time Capsule
Time Machine can back up to an external USB drive connected to an AirPort Extreme Base Station (802.11ac model) or AirPort Time Capsule.
- Connect the drive directly to your Mac, then use Disk Utility to erase it.
- Connect the drive to a USB port on your AirPort base station, then turn it on.
- Open AirPort Utility, then select your base station and click Edit to view its settings.
- Click the Disks tab in the settings window.
- Select your backup disk from the list of partitions, then select “Enable file sharing”:
- If more than one user on your network will back up to this disk with Time Machine, you can use the Secure Shared Disks pop-up menu to make sure that they can view only their own backups, not yours. Choose “With accounts” from the menu, then click the add button (+) to add users.
- Click Update to restart your base station and apply the settings.
AirPort Time Capsule
Time Machine can back up to the built-in hard disk of an AirPort Time Capsule on your network.
During April, the Rocket Yard focuses on the importance of backups to an overall data security plan. Previously, we discussed how to use the Time Machine app built into OS X to easily and quickly begin backing up data on your Mac, as well as online cloud backup services and their importance to a redundant backup strategy.
We also talked about creating bootable backups as a way to get your Mac up and running quickly in the case of a primary drive failure and provided three ways to back up your iOS devices. For the final post this month about the important topic of backups, we’ll take a look at how one drive can be used for both Time Machine backups and for storing your files.
First, we’ll look at an easy way to do the job, then look at a more complex method that essentially turns your one backup drive into two drives.
The Easy Way
Time Machine saves all of the backups for your Mac in a deceptively innocuous folder on your backup drive named backups.backupdb. That folder contains a folder for each Mac that’s using the drive as a backup drive, so if you’re sharing the drive by connecting it to an Apple AirPort Wi-Fi router, you’ll find multiple folders inside it. For those situations where there’s just one backup drive connected to one Mac, there will be one folder inside backups.backupdb with the name of your Mac on it (i.e., “Bob’s iMac”).
You DO NOT want to put any of your extra file storage into backups.backupdb. Why? Because Time Machine is constantly and voraciously eating space on your backup drive, and it could erase those files if they’re inside backups.backupdb. Instead, you can create a separate folder and give it an original name like “Files” and put it next to the backups.backupdb folder on your drive (see image below).
Now, if you don’t want to store large files on your Mac’s internal drive, just point to the Files folder on the external drive when you’re saving and they’ll be stored on that big drive. There is a downside to this method; Time Machine files tend to grow to fill the space allotted to them, so eventually, your drive may run out of space for those extra files.
Partitioning
We’ve mentioned before just how inexpensive large capacity hard disk drives are getting. For example, the OWC Mercury Elite Pro in a 6TB configuration with fast USB 3.0 connectivity is just $367.99 as of this publication date. If your Mac has even a 2TB drive built-in, you could use all of that spacious drive for Time Machine backups for a long, long time. Or you can consider another idea – using that space for your Time Machine backup and as a place to store all those big video files you’re working on.
The secret word for how to do this is partitioning. Usually, Mac drives come from plants in China, California, or Texas with more than one partition or space – the default drive partition and what’s called a Recovery Partition. The latter is what you can use to restore a bad OS X installation by holding down Command+R while rebooting the Mac. The Recovery Partition is hidden from view, even when you use the Disk Utility (found in the Applications > Utilities folder) app to view what’s on the drive. It doesn’t take up a lot of storage, so partitioning a drive into two or more individual drive spaces doesn’t infringe on the Recovery Partition.
There’s an advantage to partitioning the drive into separate Time Machine and file storage partitions – Time Machine will only expand to fill its partition, leaving plenty of space for file storage in the other partition. That 6TB Mercury Elite Pro drive? Split it up into a 4TB partition for Time Machine and a 2TB place for your big files, and you’ve got it made. Let’s do this!
Launch Disk Utility. There are a couple of ways you can do this; first is to dig around in your Applications folder until you find the Utilities folder, then double-click that Disk Utility icon. The easy way? Type Command-Space to bring up your Spotlight search window, type in Disk Utility, and then press the Return key (see image below)…
As you can see, this Mac has a Fusion Drive (part SSD, part HDD) installed. It also has an external 2TB drive named RAID 1 Media. For both the Internal and External drives, the physical disk name (Fusion Drive, RAID 1 Media) is different from the volume name (Macintosh HD, RAID1). To add our partition, we want to click on the external drive physical disk name – RAID 1 Media. The next step? Click on the Partition button in the Disk Utility toolbar. The following dialog appears:
To add a second partition for data storage, click on the + icon below the circle that represents the total storage available on the drive. Now sadly, this test drive doesn’t have a lot of space available, so we’ll just make a 150GB (.15TB) partition to put files into. To size the drive to the proper capacity, either move the dot around the circumference of the circle until you see the desired capacity in the “Size” field, or type the capacity into that field. Be sure to give the Partition a name – in this example, “My Stuff” – and choose the format, which should usually remain OS X Extended (Journaled).
Now click Apply. Disk Utility verifies the disk and the file system, checks the existing Journaled HFS Plus volume, and then checks the catalog file. This step can take a while if you already have a Time Machine backup on the drive, as there are a huge number of files that are checked. Once the partitioning is complete, Time Machine will continue to back up to the original volume since its name has not been changed.
The process of creating a partitioned Time Machine/data drive can also be done when you’re setting up a new drive and will take a lot less time. Just note that you’ll need to give each partition a name (perhaps “Time Machine” and “Data”), then use the Time Machine System Preference to select the Time Machine partition.
One final comment – now that you’re storing some data on an external drive, you’ll need to back that new data up as well. This is a case where a redundant backup strategy can help, as that data could theoretically find a backup home on another drive or in a cloud backup system.
Keep your data secure
We’ll continue to implore you to do your best in terms of backing up your Mac OS and iOS devices, even as we get out of Backup Month and into the rest of the year. Now that you know that you can use one big drive or array as both a Time Machine backup drive and as a place to store even more data, what are you waiting for? Take a look at all of the external storage OWC has to offer and make an investment in the security of your data.
If you are a Mac user, then you probably know that macOS comes bundled with a critically acclaimed backup program called Time Machine. This is great, but out-of-the-box Time Machine only backs up your data to an external physical drive or a local NAS system that supports the Time Machine protocols.
Good data backup practice, however, follows the golden 3-2-1 rule in which at least three copies of your data are kept to ensure against any form of loss.
The traditional formula is to keep one copy on your device (the original copy), store one copy locally but not attached to your computer (such as on a NAS or external hard drive) safely away from any viruses that might affect your computer, and to store another copy online.
After all, a local drive can be stolen, lost in a fire, damaged by water, or who knows what!
The following Cloud backup services and products support easy and automatic backing up of your Time Machine data to a cloud account in order to provide robust 3-2-1 protection.
You should be aware that it may cause duplication between the data backed up by Time Machine and data you upload to your cloud account in the usual way. To prevent this duplication eating up your precious cloud server space you might therefore want to exclude some folders from being uploaded by either Time Machine or your backup software.
5 Best Time Machine Backups
Below we have listed the five best time machine back ups. For more information about these services, scroll below to read a summary of each service or click through to their website using the links below.
- IDrive – User-friendly | Cost-effective | End-to-end encryption
- IBackup – Mobile apps | Business-focused | End-to-end encryption
- CloudBerry – Hosting options | Freemium | Time Machine support
- DollyDrive – Mac & iOS-focused | DollyClone | User-friendly
- Transmit – Panic Sync | Support for 11 cloud services | Client-side e2e encryption
5 best backups for Time Machine – Summaries
Take a look at the list of the best time machine backup services below, click through to the site for more information about their service.
1. IDrive
IDrive might be reasonably priced, but it doesn’t skimp on features
Pricing
IDrive is a reasonably priced backup provider which uses strong end-to-end client-side encryption. It features online file sync, multiple device backup, file versioning for up to 30 previous versions. We particularity like the fact that IDrive supports Linux cloud backup via a GUI or package of scripts.
In order to prevent duplication of files, IDrive excludes the Time Machine data folder from backups by default. It can be easily included, however, by going to Settings -> Excluded Files/folders from backup -> Files/Folders with partial names, and deselecting the Backups.backupdb folder.
Your Time Machine backup will then be saved to your IDrive storage using the path you have configured in the Time Machine settings on your Mac.
2. IBackup
IBackup primarily focuses on businesses, offering strong e2e encryption and disaster recovery
Pricing
This cloud provider has a strong focus on small business data backup. As such, its feature list includes things like full sever backup, a disaster recovery (DR) plan, multiple sub-accounts, HIPAA, Sarbanes-Oxley, GLBA and SEC / FINRA compliance and more.
IBackup, however, is perfectly usable as a personal backup service, and everyone will find its iOS and Android mobile apps handy. By default, data is encrypted server-side using AES-256, but it is possible to use a private encryption key which is not stored on IBackup’s servers instead.
In order to enable Time Machine backup using your IBackup account, simply open the Mac desktop client, go to Settings, and ensure Time Machine backup is selected.
3. CloudBerry
Cloudberry is entirely customizable, with hosting options and a range of different servers
Pricing
Cloudberry Explorer is freeware software (with a premium Pro version available) that allows you manage and backup files to Amazon S3, Microsoft Azure, Google Cloud, and Openstack accounts. Cloudberry also offers a fully hosted subscription service using your choice of these cloud SaaS providers.
Whether using just its freeware software with your personal cloud service or Cloudberry’s subscription service, Cloudberry supports backing up Time Machine to the cloud.
This requires a little more configuration than with the above two services, but clear instructions are available on the website. It basically just amounts to selecting your Time Machine’s external backup drive’s root Backups.backupdb folder as your Backup Source.
4. DollyDrive
DollyDrive has its own proprietary feature set to backup your entire system – DollyClone
Pricing
DollyDrive is a cloud backup service designed from the ground-up for macOS. It does all the usual stuff you would expect from such a service, and it has an iOS app for accessing and managing your files from anywhere.
More unusually, DollyDrive offers a feature snappily named DollyClone which creates a complete backup of your entire system. Just like Time Machine does, except this backup is saved to the cloud. So, while DollyDrive doesn’t back up your actual Time Machine data to the cloud, it achieves the exact same effect.
You can, of course, use DollyClone alongside Time Machine itself to also backup all your data locally.
5. Transmit
Transmit stands out from the crowd thanks to its Panic Sync feature
Free option
Pricing
Transmit is an FTP client with built-in support for 11 of the most popular cloud service, ranging from consumer-focused services such as Dropbox and Google Drive to SaaS services such as Amazon S3 and Microsoft Azure. There is no iCloud support, however.
With Transmit you can manually backup files – including your Time Machine folder – to the cloud using its Synchronize feature. To do this, open your Time Machine folder on the left pane and a remote folder on a cloud service or FTP server on the right pane. Click the Synchronize button on the toolbar to start the process. Transmit’s two file browser panes can both be local if you prefer, allowing you to use the Synchronize feature to sync the Time Machine folder (or any other local folder) with, say, a locally-attached USB hard drive.
Final Thoughts
You can never have too many copies of your vital data, and Time Machine provides a very high level of protection against disaster by backing up everything on your Mac. The above services and products allow you to save Time Machine’s level of protection to the cloud so that no matter what happens you will be able to do a full-system restore. And that brings a great deal of peace of mind.
I have no idea if this has been brought up before, but I recently subscribed to Microsoft Office 365 Home (5 pack), which gives me and the other household computer-user 1 TB of Microsoft OneDrive cloud storage. I felt that I should explore what I can do with this OneDrive.
I want to make backup copies of all my data so that I have a permanent copy off-site. I want to make a complete backup of my iMac. I wanted to ask this: can I configure Time Machine to start the backup, and maintain it automatically? If not, why not? If Time Machine won’t work for this, what will?
Also: my internet connection is Verizon DSL. Will it be able to handle an upload like that? My user folder is 327 GB.
In addition: I currently have an external hard drive on-site that I use for all Time Machine backups. Is there a way to maintain those backups, and also do a cloud-based backup as well?
iMac, OS X Yosemite (10.10.5), late-2013 Core i5 2.9 GHz, 8GB RAM, 1 TB HD
Posted on Dec 20, 2017 4:59 PM
All replies
Loading page content
Page content loaded
Time Machine was designed to work with external hard drives and not cloud based systems. I suggest you try using a clone backup instead of Time Machine. Clone backups can be configured to run automatically.
Clone – Carbon Copy Cloner ( Often recommended as it has more features than some others)
Dec 20, 2017 5:30 PM
I am wrestling with the exact same thing – I have 1TB for free and I want to use for off-site back-up. I want to ditch CrashPlan because of a recent disappointing experience. I only have about 60GB across 2 machine to back up.
I am experimenting with Carbon Copy Cloner. CCC wants to back up to a network drive. OneDrive can’t be mounted and made to look like a network drive natively under OS X.
Here is some background:
Expandrive or CloudMounter are able to mount OneDrive. I am experimenting with CloudMounter on a trial basis. It seems to work at first blush, but I want to go a few cycles with a small amount of data before I commit to it.
I have been chatting with Carbon Copy Cloner support, and they are skeptical of this approach:
“I’ve seen a few tools out there to mount cloud storage and I consistently see issues with performance. Between upload speed limitations and using a third party tool in the middle it just does not perform well.”
So far I backed up a couple GB and it took 20 minutes, about 10-15Mbps transfer rate I think. Not terrible if you are backing up a differential each day.
I may simply switch to Arq when my CrashPlan subscription expires. It’s $80 per user for lifetime upgrades and unlimited storage. Seems like a good solution. Then I will use a 2TB local drive with 2 partitions, 1 for CCC and the other for Time Machine.
If I partition an external drive to use one partition for file storage and another for time machine, will the partition for time machine be as safe from malware as if it were on a separate drive?
As in if I get a virus on my Mac or on the file storage partition, the will the time machine partition of my external drive be more vulnerable because it on a partition of the same drive?
Both partitions would be setup with the encrypted format.
1 Answer 1
Short answer
Yes. The partition for time machine will be as safe from malware as if it were on a separate drive. However, you still should not use a partition for your Time Machine backup drive.
Long answer
At the risk of oversimplifying things, partitioning a drive basically means you’re splitting your disk so that your operating system sees them as separate drives. So, if you partition the drive into two and use one for your macOS installation and one for your Time Machine backup, then they’re both being seen as two totally distinct drives and in this sense the drive is being dealt with as if it were an external drive.
In fact, doing this can actually offer an additional level of protection against malware because malware will usually infect your boot volume, rather than other drives/partitions. Of course, there is no guarantee against malware, and this does not offer full prevention or provide a cure.
However, you should not partition your drive for Time Machine purposes!
By partitioning a drive so that one partition is being used for Time Machine you’re effectively providing yourself a false sense of security. The idea of a fully working and current backup is to ensure you have a way to restore your data in the event of data loss, and the best way to do this is to have a backup on a totally separate physical drive.
Below is a list of some reasons why using a partition is a bad idea:
- Your Mac is stolen and therefore your backup is also gone – i.e. you have no way of restoring your data now!
- Your main drive starts to fail and since the Time Machine partition is also on the same physical drive, your backup is also at risk – i.e. some or all of your backup data may become unreadable
- Your Mac is damaged and with it your backup is most likely impacted as well.
As a minimum you should be using at least one external drive for Time Machine, preferably one that is 3x the size of your internal drive. External drives do not cost a lot of money and they also provide the added benefit of being able to be stored away from your Mac at times you will not be using it for a while. For example, if you go away for a week you can take your external drive with you, or store it somewhere else, so that if your house burns down or your Mac gets stolen, you have still have your backup.
My recommendation for individual users
Whenever I setup a backup regime I recommend the following approach:
- Purchase two external drives of equal size and at least 3x the capacity of the computer being backed up
- Label these drives differently (e.g. TM Backup HD 1 and TM Backup HD 2)
- Set both of these external drives as Time Machine backup drives
- As both drives are set up with TM they are alternated whenever both drives are available
- Once the initial backups are done, physically remove one of the external drives and take it ‘offsite’ *
- On the same day each week, swap the drives over
- The net result is that both hard drives will have backups in the order of one week on, one week off (but between them there is a full set of backups).
* By offsite I mean your workplace, a shed in the back yard, a family member’s/friend’s place (assuming you trust them!). You could even store it in your car (but this would depend on your climate and where you ‘garage’ your car).
Basically, the idea is that your offsite drive is somewhere that protects your data in the event your house burns down or you get robbed. My strong suggestion would be in a locked drawer at your workplace (unless you work at home). Most people’s workplaces are air-conditioned, secure, and convenient.
IMPORTANT NOTES ABOUT STORAGE
Regardless of the ‘offsite’ location you choose to keep your hard drive, there are some key factors to keep in mind:
- Always keep the drive safe from large magnetic fields!
- Ensure the location has a temperature range between 10 degrees celsius (50 degrees fahrenheit) and 43 degrees celsius (110 degrees fahrenheit). So, keeping it in a car would usually not be a good idea.
Don’t lose your files. Here’s how to regularly back up or restore your Mac using Apple’s handy, built-in Time Machine tool.
It’s a good idea to periodically back up your computer. You want to make sure your documents, photos, and files are protected in case of hardware failure, software glitch, or malware attack. Apple makes this process easy for Mac users with the built-in Time Machine tool that lets you back up your entire system and then restore individual files or the entire drive.
You can trigger manual backups or set them to run automatically. Backups can be stored on an external drive, another Mac, network storage, or an AirPort Time Capsule. Time Machine has not changed in years, so the process is the same no matter which version of macOS you’re running. The initial steps differ based on your backup media, so we’ll cover each type separately.
External Drive
In the case of an external drive, plug it into your Mac and make sure its icon appears on the desktop. Open System Preferences and go to Time Machine > Select Backup Disk, then select the drive and click Use Disk.
If the disk isn’t formatted to support the Mac and Time Machine, you’re asked to erase the disk first. The drive is then prepared for backup.
Another Mac
To use another Mac as your backup destination, you’ll need to create a shared folder on it to serve as the backup location. Apple can walk you through the steps. You then connect the two computers by opening Finder on the Mac you wish to back up and double-clicking the destination Mac listed under Network.
Enter the username and password for the destination Mac and click Connect. You should then see the shared folders on that Mac, including the backup folder you set up.
Open the Time Machine preferences on the Mac you want to back up. Click Select Disk, then choose the backup share on the destination Mac and click Use Disk. You’re then asked by Time Machine to enter the username and password for your destination Mac.
Network Storage
Backing up to a network attached storage device can be tricky because Time Machine works only with certain volume types. If you own a Synology NAS, Synology supports Time Machine and provides a support page on how to use your NAS for backups. For other types of NAS drives and network storage, you may have to contact the vendor to find out if and how it can be used for Time Machine backups.
If you’re able to use your network storage, open the Time Machine preferences on the Mac you want to back up. Click Select Disk and choose the backup share on your NAS or other network device. You’re then asked by Time Machine to enter the username and password for your network share.
Backup Setup
By default, the backups are set to run automatically. Time Machine keeps local backups based on available disk space, hourly backups for 24 hours, daily backups for a month, and weekly backups for all the past months. The oldest backups start to get deleted as you run out of space on your backup media.
If you don’t want the backups to run automatically, uncheck the option for Back Up Automatically. You can also check the box next to Show Time Machine in menu bar for quicker access.
To view and control more settings, click the Options button. Here, you can choose any partitions that you don’t want to include in the backup and decide whether or not your Mac should be backed up when on battery power.
Manual Backup
To perform a manual backup, click the Time Machine’s menu bar icon and select Back Up Now, or hold Ctrl and the icon for your backup drive and select Back Up Now. Your system is then backed up in the background.
Now if you click the Time Machine icon in the menu bar, you can see the progress of the backup. Keep in mind that a backup run over a network will take much longer than a backup to a connected drive. You can stop the backup by selecting Skip This Backup. A notification will appear on the screen when the backup is completed.
Hi everyone! I work in a company that give us a huge amount of space in google drive, bigger than my hard drive! The other day someone tried to break in. Luckily nothing happened but the computer and external hard drive were here! Since then I’ve been wondering some way to do an automatic back up with time machine using google drive account. No matter how long is take but at least i will be an online back up. I couldn’t find anything useful so if there is some that could give a hint or just for to know if this is doable. Any suggestion, thoughts or ideas?
MacBook Pro, OS X Yosemite (10.10.1)
Posted on Jan 21, 2015 7:56 AM
All replies
Loading page content
Page content loaded
Try using a clone.
Clone – Carbon Copy Cloner ( Often recommended as it has more features than some others)
Jan 21, 2015 12:38 PM
I don’t trust any “Cloud” or offsite network storage systems.
Local backups are much better, more reliable and much easier to access in case is of data issues or problems.
Purchase a large storage external hard drive and proceed as Eric Root has suggested to do.
If you are storing data for your company, it may, also, be best to purchase a second large storage external hard drive as a second, redundant backup, as well.
Jan 21, 2015 1:27 PM
Also I think that backing up your computer with Time Machine to Google Drive would be very slow.
I did this once in a way by getting my Mac to back-up to my Time Capsule over the Internet and it was too slow, which is why Apple doesn’t really allow for it. Doing a back-up is slow enough on my local network, especially the initial one.
And I agree with @MichelPM, I would not trust uploading your data to the cloud, especially Google’s. You just don’t know who else will get access to it. The other thing is that you are going to be chewing up a lot of bandwidth to be doing this, something the person paying your work’s Internet bills might not appreciate. Especially if your office’s plan has a cap of some sort.
Drives are cheap, get a big one, store it in a fireproof box that is mounted to the floor or something and you are good as golden.
Jan 21, 2015 1:55 PM
I know this is old, but I have a MacBook air I want to back up to and not have to lug around a hard drive.
I just read/write speed tested backing up to google drive (on top) vs. my thunderbolt drive (below). The speeds aren’t even close. something is either:
A. wrong with my seagate thunderbolt drive
B. wrong with the disk speed test software
C. or Google Drive with native client and my ISP just outperforms it. (unlikely)


