You’re locked out of your account and you don’t have a phone with you to receive the verification code. What do you do?
The first time I got locked out of my email account — because I’d ingeniously decided to turn on two-factor authentication — was when I was in Barcelona. I was surrounded by Wi-Fi, but I didn’t have a phone on me. And my email login page was asking me for a verification code that, for security purposes, could only be sent via text message or phone call.
Naturally, I was panicking — this was a work trip, and I couldn’t access my work email. But after a few minutes of freaking out, I calmed down, figured out how to circumvent the whole “needs to have a phone” issue, and promptly disabled two-factor authentication on all of my accounts (not that you should do this — you should not, two-factor authentication is an important step in making your accounts secure ). Here’s how to use phone-based two-factor authentication when you don’t have a phone.
Sign in to your wireless account online
You probably didn’t know this, but Verizon has a universal messaging system similar to iMessage that lets you send and receive texts from any device — including your PC (there’s even a desktop app you can download).
Sarah Jacobsson Purewal/CNET
To turn this service on, log in to your Verizon account and go to MY PLAN & SERVICES > SEND A MESSAGE.
Sarah Jacobsson Purewal/CNET
You’ll see a splash page for Verizon Messages. Accept the Terms and Conditions and click Continue.
Sarah Jacobsson Purewal/CNET
You will now see a toolbox where you can send and receive messages. You’ll see only new messages (not older messages stored on your device), and iMessages won’t show up. But you should have no problem using your U.S. phone number to receive a two-factor authentication verification code via text.
AT&T also has a universal messaging service called AT&T Messages that lets you send and receive text messages through messages.att.net.
Use Google Voice
If you can’t check your text messages online, you’ll need to go another route. Luckily, there’s an easy one — so long as you’re not trying to get into your Gmail account with two-factor authentication: Google Voice.
Dave Johnson has worked as a tech journalist since the days of the Palm Pilot and Windows 95. He is the author of almost three dozen books about technology, spent 8 years as a content lead at Microsoft, and is the founder of family tech site Techwalla. Read more.
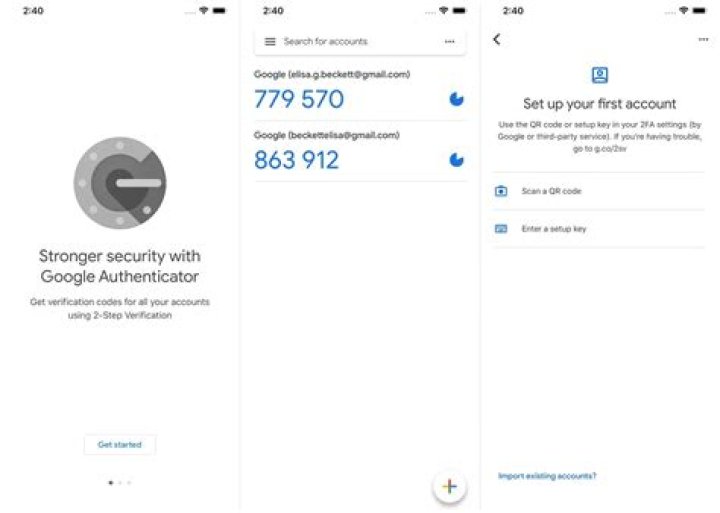
Two-factor authentication has become an essential security precaution for many people, but it can also be a source of anxiety. When you change or upgrade phones, Google Authenticator doesn’t migrate codes automatically—you need to do that manually.
Thankfully, it’s not difficult to move Google Authenticator codes from one phone to another, although, admittedly, it can be somewhat cumbersome and time-consuming. Google intended this, more or less, by design. It shouldn’t be too easy to retrieve authentication codes from anywhere except the device you’re using for your two-factor authentication, or the whole value of 2FA would be moot.
Nonetheless, here’s what you need to know to get Google Authenticator (and all of your authentication codes) from an old phone to a new one. Whether you’re jumping platforms or staying within your iOS or Android universes, the process is the same.
Move Google Authenticator to a New Phone
First of all, don’t do anything to the copy of Google Authenticator on your old phone. Leave it be for now, or else you might get caught without a way to enter 2FA codes before the new phone is set up. Start by installing Google Authenticator on your new device—either Google Authenticator for iPhone or Google Authenticator for Android.
Next, you’ll need your computer. Open Google’s 2-Step Verification page in a browser and log into your Google account when it asks you. In the “Authenticator app” section of the page, click “Change Phone.”
Choose the kind of phone you are migrating to and click “Next.”
You should now see the “Set up Authenticator” screen, complete with barcode. Open Google Authenticator on the new phone and follow the prompts to scan the barcode. Tap “Setup,” and then “Scan a Barcode.”
After the scan, you’ll want to enter the one-time code to verify it’s working.
Transfer Your Google Authenticator Codes for Other Sites
Congrats! You’ve now moved Google’s authentication code to the new phone, but that’s all; the only service you’ve set up is Google. You probably still have a slew of other apps and services connected to Google Authenticator—perhaps Dashlane, Slack, Dropbox, Reddit, or others. You’ll need to migrate each of these, one at a time. This is the time-consuming part we alluded to earlier.
But the overall process is straightforward, even if you need to hunt around a bit for the settings. Pick a site or service that’s listed in your old copy of Google Authenticator (on the old phone) and log into its website or open the app. Find that site’s 2FA setting. It’s probably in the account, password, or security section of the website, although, if the service has a mobile or desktop app, it might be there instead. Case in point: The 2FA settings for Dashlane are found in the desktop app, not the website, while Reddit puts the 2FA controls on the site in the “User Settings” menu, on the “Privacy & Security” tab.
Once you find the right controls, disable 2FA for this site. You’ll probably need to enter the password for the site, or possibly the authentication code, which is why you’ll want to have the old phone and its copy of Google Authenticator handy.
Finally, re-enable 2FA, this time scanning the QR code with Google Authenticator on the new phone. Repeat that process for each site or service listed in your old copy of Google Authenticator.
Enable 2FA on More Than One Device at a Time
In a perfect world, 2FA allows you to confirm your credentials using a mobile phone or some other device that you carry with you all the time, which only you have access to. This makes it very hard for hackers to spoof the system, because (unlike getting codes via SMS, which is not especially secure) there’s no easy way for bad guys to get their hands on a second-factor authorization delivered via a local app that exists only in your pocket.
Here’s what’s happening behind the scenes. When you add a new site or service to Google Authenticator, it uses a secret key to generate a QR code. That, in turn, informs your Google Authenticator app how to generate an unlimited number of time-based, one-time passwords. Once you scan the QR code and close the browser window, that particular QR code can’t be regenerated, and the secret key is stored locally on your phone.
If Google Authenticator were able to sync across multiple devices, then the secret key or its resulting authentication codes would have to live in the cloud somewhere, rendering it vulnerable to hacking. That’s why Google doesn’t let you sync your codes across devices. However, there are two ways to maintain authentication codes on multiple devices at once.
First, when you add a site or service to Google Authenticator, you can scan the QR code onto multiple devices at once. The website that generates the QR code doesn’t know (or care) that you’ve scanned it. You can scan it into any number of additional mobile devices, and every copy of Google Authenticator you scan from the same barcode will generate the same six-digit code.
We don’t recommend doing it this way, though. First of all, you’re proliferating your authentication codes to multiple devices that can be lost or stolen. But, more importantly, since they’re not really in sync, you run the risk of getting the various devices out of sync with each other. If you need to turn off 2FA for a particular service, for example, and then only re-enable it on one device, you may no longer know which device has the most current and correct authentication codes. It’s a disaster waiting to happen.
Use Authy to Make This Easier
It is possible to sync your authentication codes across devices—you just can’t do it with Google Authenticator. If you want the flexibility of having all of your 2FA codes on multiple devices, we recommend Authy. It works with all the sites and services that use Google Authenticator, and it encrypts the codes with a password you provide and stores them in the cloud. This makes multiple devices and migration much easier, and the encrypted cloud-based sync offers a balance of security and convenience.
With Authy, you don’t need to set up two-factor authentication for all your devices every time you move to a new phone. We recommend making the switch from Google Authenticator to Authy to make the new-phone migration process easier in the future.
How to Set up Two-Factor Authentication for your Google Account
Enable Two-Step Verification – Google lets you set up two-factor authentication for your account in two ways. One method is Google Prompt, and another one is setting up two-factor authentication using Google’s Authenticator app.
- Log in to your Google account on myaccount.google.com on your smartphone or PC.
- Click the Security tab on the left.
- Scroll down a bit, and click “2-Step Verification.”
- Click the Get Started button. Now follow the on-screen instructions to set up two-factor authentication.
- Enter your passwords to confirm your identity.
- Click Try it Now
- Add a phone number that Google can send the six-digit verification code to.
- Click Send.
- Verify your phone number by entering the six-digit code Google sent you. Click Next.
- Click Turn On to enable two-factor authentication.
How to use Google Authenticator
Google authenticator is another way to secure your Google account. To use this method, you need to download a free app from the App Store or Google Play Store that’s being used to generate random codes for your two-factor authentication.
- Go to your account’s security preferences, click Authenticator App.
- Choose whether you are using an iPhone or Android smartphone.
- Click Next.
- Scan the QR code from your authenticator app.
- Enter the code shown on the Google Authenticator app on your smartphone
- Click Verify.
- Click Done
Enable Two-Step Verification – 1 Google – 2SV Main
Google 2-Step Verification
It’s easier than you think for someone to steal your password. You are at increased risk if you use the same password on more than one site, download software from the internet, or click links in email messages.
2-Step Verification can help keep bad guys out, even if they have your password. It is used to increase security by requiring you to provide “something you know” (a password) with “something you have” (a mobile phone).
How It Works
Whenever you sign in to Google, you’ll enter your password as usual. Then, a code will be sent to your phone via text, voice call, or Google’s mobile app. To keep things simple, you can choose not to use 2-Step Verification again on that particular computer during sign-in. From then on, that computer will only ask for your password when you sign in. When you or anyone else tries to sign in to your account from another computer, 2-Step Verification will be required.
If Your Phone Is Lost or Stolen
If you no longer have access to your phone, Google has outlined steps to regain access to your account at this site . You can use any backup options, sign in from a previously trusted computer, get a new phone from your carrier with the same phone number or fill in the Account Recovery Form.
2 Google – 2SV Turn ON
Enable 2-Step Verification
You will need to be at your computer with your smartphone nearby.
On Your Computer
- Using your web browser, visit .
- Sign in with your email address and password.
- Enter or select your phone number, then select Next.
On Your Smartphone
- Open your texting app, and view the message Google just sent you. It will have a special verification code for you for the next step.
On Your Computer
- Enter the code you just received on your phone, then select Next.
- Select Turn On to enable 2-Step Verification.
- You’ll be shown your 2-Step Verification options, with a note at the top letting you know 2-Step Verification is ON.
3 Google – 2SV Enable Backup Options?
Enabling Additional Second Steps
- Review your settings on the 2-Step Verification settings page.
- You should set up at least one backup option so that you can sign in even if your other second steps aren’t available.
- Choose an option or stop if you are done.
- The next time you sign in, you’ll receive a text message with a verification code.
Don’t worry, this site is still about Virtual Private Networks! But I also like to talk about things related to privacy. And passwords account for a good chunk of protecting your privacy online. Therefore I’ve decided to add one article about password protection and management. And I’ll focus this time on a review about Google Two Factor authentication software, a.k.a. Google Authenticator.
Table of Contents
Google Authenticator, the software token from the Big G
First of all, let’s start with a word about Google Two-factor authentication (2FA). Or Google Two-step verification to be more accurate. While I’m sure you’ve already got some notifications about it, from one service or another, you may not have set it up yet. Because you don’t know what this is about. Or maybe you think it looks too complicated.
But it’s not. It’s just an additional layer of protection you can implement when you want to sign in to a web service. And it requires a device with the Google Authenticator app that will dynamically generate a 6 digit number that is common to the user and the authentication system. So you use your login credentials (username and login), then you need to input the generated code to log in. That’s it.
The main advantage is that no one can log in without your one-time password, even if the person has successfully stolen your credentials. And the code expires every few seconds for increased protection. Also, using Google Authenticator app ensures that you can connect even when your device is out of the coverage area. Because if you use Two-factor authentication with SMS, this is the main concern…
Google Authenticator: Pricing
As with most of their end-users applications and services, Google 2 factor authentication is free. So you can use it without spending anything, ever. And it doesn’t only cover Google services. But all the websites which have enabled Two-factor authentication!
Summary sheet for Google Authenticator
| Multi-factor authentication | 2-Step Verification |
| Algorithms | RFC 6238 and RFC 4226 |
| Encryption | HMAC-SHA1 |
| Supported devices | Mobiles (Windows, iOS, Android) |
The Google Authenticator app in details
Simple interface
To transform your smartphone into a security token, there’s not much to implement. And the interface is very minimalist, with only the mandatory information and features available.
Settings
They’re almost nonexistent… Indeed, there’s only the Time correction for codes, a troubleshooting feature, if your codes aren’t working.
How to setup Google Authenticator?
The first step is to download and install the Google Authenticator app on your device. And you can find the app either on the Play Store, or on the App Store. Then you need to enable Two-factor authentication on the account you want to add to the app. Among the most popular websites, you can add:
- Apple
- Microsoft
- Amazon
- Yahoo
- Snapchat
And many more. As a rule, you just need to check in your account settings or privacy settings if you can enable Two-factor authentication. Let me show you how I’ve enabled it with Coinbase. I went to the Settings tab. And then I’ve selected the Security tab. First, you need to verify your phone number – this is mandatory on all websites.
And then, in the Two-Factor Authentication section, click on Enable Authenticator. First, you’ll have to verify your phone number, again, by entering the code received by SMS. And click on Verify.
Now you’ve done the hardest part. And you can see a QR code displayed on the page (I’ve hidden mine for obvious reasons):
So take your device with the Google Authenticator app. And open the app. Click on the + icon, at the bottom right of the screen and select Scan a barcode. And the app will launch the camera to scan your barcode. You don’t have anything to do but aim the crosshair on the QR code.
And you’re almost done! You can now see the code the app is generating for your account. As I said, the code expires after a certain amount of time. And you can see its life expectancy on the right side; there’s a countdown timer.
Finally, you need to enter the code from the app on the website, to verify it’s working. And click on Enable. You now have a new 2FA account added in the app. And the next time you connect to Coinbase (or any other website), you’ll need to use your login credentials and the code from the app.
Every minute a new Facebook account is hacked, if you don’t want to be the next victim then use 2-Step Verification on your Facebook account.
From bank accounts to email accounts and from social media accounts to your browsing history nothing is hidden from the eyes of Cybercriminals. A standard level of authentication can expose your device to digital attacks and identity theft, thus to safeguard your confidential information it is imperative to use two-factor authentication.
What Happens When You Activate 2-Step Verification on your Facebook Account?
Setting up the 2FA on your Facebook account prevents any unauthorized access to it:
- Any attempt to login to your account which is done from an unidentified mobile device or computer system will be declined until and unless a special 6 digit code is entered along with the password.
- Apart from this, if anyone else besides the account holder tries to log in to the account, the account holder will receive an alert message that a login attempt has been made.
If you wish to set up two-factor verification for your account, there are two methods that you can use.
- SMS based security message.
- A dedicated app based code generator method. Google Authenticator is one such app that you can utilize in such scenarios.
Experts recommend that the use of Google Authenticator is a more secure method than the SMS based message.
What is Google Authenticator?
Google Authenticator is a dedicated mobile security app. Its working is based on the 2 step verification and is used to check the authenticity of the user before granting them access to the account.
If you want the best two-factor authentication app out there, our pick is Authy. A close second is LastPass Authenticator. If neither of those is to your liking, try Duo Mobile or Microsoft Authenticator. But if you’re fine with missing out on great features, then and only then should you look at using Google Authenticator.
While Google Authenticator is one of the most popular 2FA apps on both mobile markets, it has been living off its good name for a while now. No longer is its well-designed interface enough — the competition has not only caught up, but surpassed Google’s app. For four main reasons, when it comes to two-factor authentication apps, you should look elsewhere.
1. It Hasn’t Been Updated in More Than a Year
While software doesn’t have a lifespan in the same way humans do, it does expire. This expiration date occurs when the developers stop supporting it, a sign that they are moving on to bigger and better things.
It appears Google Authenticator is reaching this period based on its update history. On Android, the app hasn’t been updated since September 2017 — compared to Authy, which received an update the day before I wrote this. And on iOS, Google Authenticator is even, worse with its last update on February 2016.
Without updates, bugs aren’t fixed and vulnerabilities aren’t dealt with. Features aren’t added, and changes to the design and other tweaks are never addressed, despite outcry from the public (see how Google Authenticator looks on an iPhone X, for example). Google Authenticator’s limitations will probably not be addressed anytime soon, leaving it constantly behind the competition.
2. You Can’t Back Up the Database
I personally ditched Google Authenticator after I decided to switch my phone. As I got the new phone ready by transferring all my messages, call history, and other data, I soon learned that all the accounts I set up tokens for couldn’t be transferred to the new phone. A quick Google search revealed to me the sad truth: I had to redo all the accounts on the new phone. After my second phone switch, I decided to switch to Authy, and I have never looked back.
Privacy advocates argue that Google’s avoidance of cloud storage improves security since it can be compromised. However, there are security measures in place (namely encryption) to protect the database, so it’s mostly a moot point. Additionally, the convenience far outweighs the risk potential.
Google could have at least let you save an encrypted backup locally that was transferable and protected using a passcode, but the fact that there is nothing in the form of backup is a poor design choice. If you lose your phone or it is stolen, you can’t access any of the accounts with 2FA protection unless you contact each site’s technical support.
Compare this to 2FA apps such as Authy, Duo Mobile, and LastPass Authenticator which let you save encrypted backups and use them to set up new phones. Authy and LastPass Authenticator even let you sync the database across multiple devices in case you want your database on two or more devices (such as your smartphone and tablet).
3. There’s No Passcode Protection
With 2FA acting as your second line of defense, you would think Google would include some way to protect the database of tokens stored in Authenticator. While phones do come with a lock screen that can be passcode protected, there are lock screen bypass hacks for both Android and iOS out in the wild. Without individual protection for the app, someone could use the unprotected Google Authenticator app to access your accounts (along as they know the account password) and the data within them.
Authy and LastPass Authenticator let you set a PIN code to authenticate the user before the app can be opened. And for convenience, you can also use the fingerprint scanner (Touch ID for iOS) or Face ID (only on iOS) to unlock the database as well. This security measure shows that Google Authenticator’s competition recognizes the importance of these codes and how they need to be protected with the same urgency as your passwords.
4. Authy & Duo Mobile Are Better with 3rd-Party Sites
While Google Authenticator has been considered the standard for 2FA support for years, it is no longer the best. Most of the competition have the same widespread support, being able to provide tokens to any website supported by Google Authenticator. However, Google Authenticator has also been surpassed in some ways as well.
Apps such as Authy and Duo Mobile offer better support for social media websites and third-party services. Combine this with the fact that these two apps support the same sites as Google, and you see how using Google Authenticator makes less sense.
Even though, at the time of this writing, Google Authenticator is the number two free tool on the Play Store, it is undeserving of its popularity. We’ve come to expect more because the reputation of Google and its apps. But Authenticator looks to be on its way out, and right now, you are far better off using Authy, LastPass, or pretty much any other option for your 2FA needs.
Keep Your Connection Secure Without a Monthly Bill. Get a lifetime subscription to VPN Unlimited for all your devices with a one-time purchase from the new Gadget Hacks Shop, and watch Hulu or Netflix without regional restrictions, increase security when browsing on public networks, and more.
Have you have enabled your Google account for two step authentication? If not -I strongly recommend to do so. Do you know the nature of the code generated by Google Authenticator? There are no myths here – this is just an implementation of the RFC6238. And even more – you can add a new level of security to your application very easily without the need to use some 3rd party monstrous security library.
I will use PHP in this article – this means that the server side can use this code to validate the client one. But nothing stops you from implementing an OTP generation algorithm in NodeJS (javaScript) or an
Two-step verification drastically reduces the chances of having personal information in your Google account stolen by someone else. Why? Because hackers would have to not only get your password and your username, they’d have to get your personal key used to generate the six-digit combination.
How is this combination generated? Let’s move through the process:
Assume that the secret code in base32 is GEZDGNBVGY3TQOJQGEZDGNBVGY3TQOJQ (this is actually a base32 encoded secret key 12345678901234567890.
Why is base32 and not base64 used? My guess takes into consideration the following points:
- The resulting character set contains one case (usually represented as uppercase), which can often be beneficial when using a case-insensitive filesystem, spoken speech, or human memory.
- The alphabet was selected to avoid similar-looking pairs of different symbols, so the strings can be accurately transcribed by hand. (For example, the symbol set omits the symbols for 1, 8, and zero, since they could be confused with the letters ‘I’, ‘B’, and ‘O’.)
- The result can be included in a URL without encoding any characters.
In other words, the encoded message is much easier to remember than base 64.
The variance of the code is time (to be more precise, it’s 30 sec intervals). Bearing in mind that not all devices use NTP to synchronize, we might want to check 3-5 sequential codes to be sure that the right code is entered. The more secure your solution is, the less 30sec intervals you might want to check.
Let us take the current Unix Time Stamp:
and calculate the HOTP – onetime password based on HMAC ().
What do we need to calculate the 6 digit code? Take trunc of the value above – 44376117 and convert to hex 2a52035
Pack to a byte string:
If hex string has lesser than 16 characters, pad it from the left using 0 character.
Now calculate sha1 HMAC (Hash-based Message Authentication Code ():
hash_hmac is a commonly available cryptographic function, you may find it in any cryptographic library or toolkit.
Let us convert it to a 6 digit sequence:
And perform a bitwise operator & on mask 0xf – we receive 5 for the current example.
1217895250 and retrieve the modulus of division on 10 pow length of the needed sequence (for 6 it is 1000000).
Let’s divide – we will get 1217.89525, thus modulus is – 895250.
We are finished with our algorithm: this is the result generated, in particular, by Google Authenticator application: 895250.
Let’s use PHP to implement the algorithm above.
Required libraries: to simplify the development and not reinvent the wheel, it is always useful to try to find if someone else has implemented it already. For PHP, I have adopted:
- Base32 implementation for PHP by Bryan Ruiz.
- PHP HMAC hash implementation from community feedbacks on
As a result, a proof of concept implementation of RFC6238 was born: rfc6238.php which contains the helper class TokenAuth6238 with several useful functions.
A secret is used to provide a base for your application and the device generating the code to validate the user’s identity. The secret is important and should be transferred over a secured channel. If the attacker will get access to the secret, it’s possible to generate the verification code and get around the security procedure.
Google provides Android and iPhone applications that generate the verification code for the user.
Install the application and create a new account by entering the code. Name your account as you want and enter the secret generated in the previous step. Choose a time based token.
Now you can see on your smartphone a 6 character long password that allows you to validate the user’s identity.
Now that we have the secret and the smartphone is generating the verification code, let’s try to validate it.
You can also generate the verification code yourself using the library.
You can also generate the image that can be used by the mobile device to configure the authentication program:
When you run such a script and you put in the correct secret and correct verification code, it will print “Code is valid” or “Invalid code” on the standard output.
Using these few simple steps, you can add an additional validation layer into your authentication process in your application and thus provide higher security for your users.
Don’t skip this step on your iPhone or Android phone. Otherwise, you could end up locked out of all your accounts.
Don’t forget to transfer Google’s Authenticator app when you set up a new phone!
Get a new phone for the holidays? Congrats! It’s exciting to get the latest tech, be it in an iPhone 12 , a Galaxy S20 FE or any one of our other top picks in 2020. Don’t get too excited, though. There’s an important step you need to take before discarding your old phone: Make sure to transfer the accounts you have set up in Google Authenticator to your new phone.
Doing so will ensure you can still access your two-factor codes and sign in to those accounts on your new phone. Without those codes, you could very well end up locked out of your online accounts. And thanks to a recent update to the iPhone version of Google Authenticator, you can now easily transfer your accounts from one phone to another, which has been possible on Android for the last few months.
Get more out of your tech
Two-factor authentication adds an extra layer of security to your online accounts by requiring a randomly generated six-digit code after you’ve entered your password. As privacy concerns continue to rise amid breach after breach , two-factor authentication (along with a password manager ) is an important step that can help fortify your online security by making it harder for others to take over your accounts.
Most websites give you the option to receive your 2FA codes through SMS texting or by using a dedicated app such as Google Authenticator, but we don’t recommend using SMS . Hackers have had a lot of success tricking wireless carriers into switching the SIM card associated with a person’s phone number and, in turn, receiving the two-factor codes sent to your phone number. In 2019, Twitter CEO Jack Dorsey’s Twitter account was taken over after his phone’s SIM card was changed.
Getting locked out of your accounts because you skipped this step would be frustrating.
Here’s what you’ll need to do to transfer your accounts from one phone to another. It shouldn’t take too long, but it’s a good idea to set aside some time to make sure it all goes smooth.
Use the import tool to speed up the process
If you’re switching from one Android phone to another, make your life easier by using the app’s transfer tool. Make sure you have the latest version of Authenticator on your old phone by checking for updates in the Play Store on Android or the App Store on iPhone. You’ll need to have Authenticator installed on your new phone, too: Download here for iPhone or Android.
Then follow these steps on your old phone
1. Open Authenticator then tap the three-dot menu icon followed by Transfer accounts.
2. Select Export accounts and enter your PIN code when prompted.
3. Pick the accounts you want to transfer then tap Next.
It’s so much easier to transfer Authenticator now that you can import existing accounts.
On your new phone
1. Open Authenticator, tap Get Started,
2. Tap Import existing accounts? located at the bottom of the screen.
3. Select Scan QR code.
Your old phone may have just one or multiple QR codes for you to scan. Follow the prompts to finish the transfer process. You’ll see a confirmation prompt for each successful transfer.
iPhone users have to take some extra steps.
The old school way still works
If the transfer tool doesn’t work for you, you can still set up Authenticator using the old method of manually transferring your accounts, one by one. Here’s what you’ll need to do to transfer your Google account:
1. Install Authenticator on your new phone.
2. On your computer, visit Google’s two-step verification site and log in to your Google account.
Make sure you have both your old and new phone nearby when moving Google Authenticator.
Screenshot by Jason Cipriani/CNET
3. Click Change Phone in the Authenticator app section. Select the type of phone you’ll be using and follow the prompts. If you want to disable Google Authenticator altogether, click on the trash can icon and confirm your decision. Google will then revert to delivering your 2FA codes via SMS.
4. Open the Authenticator app on your new phone and tap Begin > Scan barcode. Scan the QR code displayed on Google’s website with the Authenticator app, then enter the six-digit code to verify everything is working properly. Once that’s done, the codes on your old device will no longer be valid.
Repeat this process for each service you currently use with Google Authenticator, be it Apple, Facebook, Dropbox or Amazon . Don’t delete the Authenticator app off your old phone until you’ve moved all accounts to your new phone, otherwise you’ll be locked out of those accounts — and nobody wants that.
Now that you’ve transferred Google Authenticator to your new phone, take some time to learn all of the iPhone’s hidden features or master Android’s hidden features . Still trying to figure out what to do with that old phone? We have some suggestions for iPhone and Android alike.
Last updated on July 22nd, 2020 by Robert Abela. Filed under WordPress Security Tutorials & Tips
Whenever you implement a security measure, you should also have some sort of fallback. You do not want to be compromised by the failure of a single component. This is known as defense in depth.
When you manage a WordPress website, one of the most important aspects of security is authentication, a.k.a. how you login to your website. There are several ways how to harden the authentication to improve the defence in depth of your WordPress login mechanism. One of them is to implement two-factor authentication (2FA).
Improving defense in depth with two-factor authentication
2FA uses two factors to login. These factors are often grouped into a number of labels. They are something:
- you know, like a password
- you have, like a key or physical token
- you are (biometrics, e.g. your fingerprint)
- you do like a swipe pattern password on a phone
- somewhere you are like, GPS-based authentication.
Note that 2FA is not as simple as just using any 2 things for authentication. For example, if you use 2 passwords to login, that doesn’t qualify as 2FA. Both fall into the same category of “something you know”.
For more detailed information on how 2FA works refer to how two-factor authentication works on WordPress. In this article we’ll assume that you know what 2FA is, so we can show you how Google Authenticator works. We will also explain how with a two-factor authentication plugin and the Google Authenticator app you can easily setup 2FA on your WordPress website.
NOTE: The WP 2FA plugin for WordPress also supports Authy, FreeOTP and several other 2FA apps. So if you do not want to use Google Authenticator for WordPress 2FA, refer to the list of supported 2FA apps.
The Google Authenticator app: a crash course
Google Authenticator is an app built by Google. In 2FA it acts as something you have. This provides the second factor to the password (the something you know) you use to login to your website.
It does so by using TOTP (Time-based One Time Password). TOTP is a variant of the HOTP (HMAC-based One Time Password) algorithm. Without getting too far into the weeds, HOTP varies from TOTP: in HOTP a password will never expire until used, while a TOTP code or password expires within a certain time frame.
In Google Authenticator the generated passwords lasts about 30 seconds. When you type in the correct password and the one-time code provided by the app you successfully login to your website.
How does your website know it is the correct one-time code?
Both the Google Authentication app and the website start off with a common seed or secret. This secret can be either a string of characters you type in, or an input from your camera, for example by scanning a QR code. From there, the website’s 2FA mechanism and the Google Authenticator app on your phone are in sync with one another.
Therefore to achieve 2FA with Google Authenticator, you must couple it with another factor, typically a password.
IMPORTANT: With 2FA you still need strong passwords
Just because you enable 2FA on your website, it doesn’t mean you can brush off the other factor. Using the Google Authenticator app with a strong password makes it an effective 2FA solution. With a weak password, the 2 nd factor becomes moot, essentially reducing you to one factor. If the one-time code is somehow compromised, or someone uses it within its 30 second window, the second factor can protect you. For a deeper dive on 2FA and strong passwords, check out Why you need both Two-factor Authentication & strong passwords.
How to setup the Google Authenticator app for your WordPress 2FA
First install the Google Authenticator app on your smart device and the two-factor authentication plugin on your WordPress website. The app is available on both Google Play and the Apple Appstore.
As for the plugin, install the WP 2FA, an easy to use two-factor authentication plugin for WordPress. This plugin supports the following 2FA methods:
- Email codes (one-time code is sent over email)
- TOTP (one-time code from Google authenticator app)
- Backup codes
Setting up 2FA on your WordPress with the WP 2FA plugin
Once you install and activate the WordPress plugin WP 2FA, you are presented a wizard that helps you setup two-factor authentication.
From here, select the 1st factor method One-time code generated with the Google Authenticator app. Click Next and follow the instructions. Bascially, all you need to do is launch the Google Authenticator app on your phone. Then tap the add new website icon (the red circle with a white cross), and select Scan a barcode to scan the QR code you are presented with.
Once you scan the QR Code you will be asked to enter the one-time code for the first time. That is it. Now you have 2FA on your WordPress website and can generate one-time codes with the Google Authenticator app. However, don’t forget to generate some 2FA backup codes.
Why do you need the 2FA backup codes?
It’s always good idea to select a secondary option here, otherwise if you ever loose access to your Google Authenticator app, your phone etc you will get locked out of your website.
You can setup email 2FA as backup. However, we recommend generating a list of backup codes, printing it, and storing it in a safe place. You can use one of the backup codes to login to your website in case you cannot get a one-time code from the Google Authenticator app. You can generate the backup codes through the wizard. If you did not:
- navigate to your user profile page,
- scroll down to the WP 2FA settings,
- click on Generate backup codes,
- once the codes are generated download or print the codes.
Logging in to WordPress with 2-factor authentication
That is it! The next time you need to login to your WordPress, after typing in the credentials (always use strong passwords!) you will be asked for a one time code. Simply launch the Google Authenticator app and type in the code.


