If you have several images on a slide, you can align your objects both horizontally and vertically for a more professional look. There are guides and gridlines available to help you align objects manually, and there are options to align objects for you automatically. Let’s see how it’s done.
Manually Aligning Objects
In this example, there are three objects on the slide. Point to the first object and drag upward or downward using your mouse. Once the object is centered either horizontally and vertically, a guideline will display.
You can also use guides and gridlines to help you align your objects. From the “View” tab, click “Guides.” Two dotted lines then show up—one aligned to the horizontal center of the slide and one to the vertical center.
Additionally, you can turn on gridlines that can help you align object elsewhere on your slide. From the “View” tab, click “Gridlines.” More dotted lines then display to help you align your objects. You can drag your objects and use the gridlines to align them accordingly.
In this example, we moved each of the three objects upward to align them using the uppermost horizontal gridline:
Automatically Aligning Objects
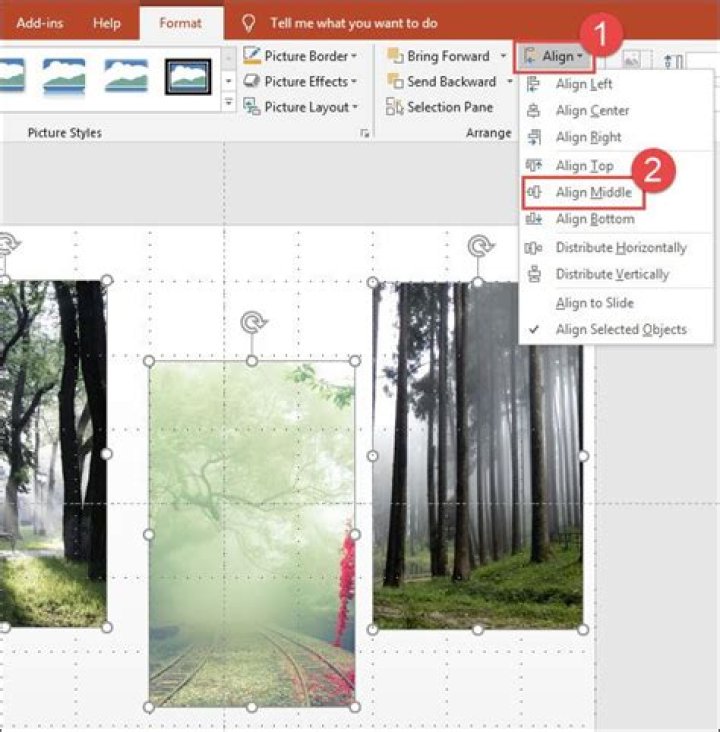
Now, let’s take a look at how to align objects automatically. First, select all the objects to be aligned. If this consists of all objects on your slide, you can press Ctrl+A to select everything. To select specific objects, click on the first object to select it. Then, while holding down the Shift key, click on other objects to select them each in turn. In this example, we have three images selected, and we would like to align all of them both horizontally and vertically.
From the Format tab, click the “Align” button. As you can see, you have commands here for aligning slides horizontally (the top group), vertically (the second group), and for distributing them (which makes them spaced equally apart from one another). Here, we’re aligning our selected object vertically along their middles.
This aligned all the selected objects vertically. Now, we want to make sure they are spaced equally apart, so with all three objects still selected, we’re going back to that menu and choosing the “Distribute Horizontally” command.
Here’s the final result, with all images aligned both horizontally and vertically.
If you have several images on a slide, you can align your objects both horizontally and vertically for a more professional look. There are guides and gridlines available to help you align objects manually, and there are options to align objects for you automatically. Let’s see how it’s done.
Manually Aligning Objects
In this example, there are three objects on the slide. Point to the first object and drag upward or downward using your mouse. Once the object is centered either horizontally and vertically, a guideline will display.
You can also use guides and gridlines to help you align your objects. From the “View” tab, click “Guides.” Two dotted lines then show up—one aligned to the horizontal center of the slide and one to the vertical center.
Additionally, you can turn on gridlines that can help you align object elsewhere on your slide. From the “View” tab, click “Gridlines.” More dotted lines then display to help you align your objects. You can drag your objects and use the gridlines to align them accordingly.
In this example, we moved each of the three objects upward to align them using the uppermost horizontal gridline:
Automatically Aligning Objects
Now, let’s take a look at how to align objects automatically. First, select all the objects to be aligned. If this consists of all objects on your slide, you can press Ctrl+A to select everything. To select specific objects, click on the first object to select it. Then, while holding down the Shift key, click on other objects to select them each in turn. In this example, we have three images selected, and we would like to align all of them both horizontally and vertically.
From the Format tab, click the “Align” button. As you can see, you have commands here for aligning slides horizontally (the top group), vertically (the second group), and for distributing them (which makes them spaced equally apart from one another). Here, we’re aligning our selected object vertically along their middles.
This aligned all the selected objects vertically. Now, we want to make sure they are spaced equally apart, so with all three objects still selected, we’re going back to that menu and choosing the “Distribute Horizontally” command.
Here’s the final result, with all images aligned both horizontally and vertically.
In this course:
- Add pictures
Video - Format pictures
Video - Add a background picture
Video - Create a SmartArt graphic
Video - Group or ungroup objects
Video - Align and arrange objects
Video - Layer objects
Video - Rotate or flip an object
Video
Try it!
As you select and move objects in PowerPoint, guides appear to help you align objects and space them evenly. You can also use the helpful Align options, Guides, and Gridlines to align objects to give your presentation a professional look.
Align objects
Select the objects you want to align.
Press Shift to select multiple objects.
Select Format > Align and select how you want to align them:
Align Left, Align Center, or Align Right
Align Top, Align Middle, or Align Bottom
Distribute Horizontally or Distribute Vertically
Use Guides and Gridlines
Select View > Guides to show the horizontal and vertical center lines.
Select View > Gridlines to show more gridlines.
Use the lines to align your objects.
When you’re done, clear Gridlines and Guides to turn them off.
Gridlines help give you visual cues when you’re formatting in PowerPoint.
The default horizontal and vertical gridlines make a grid of one-inch squares. You can’t change that grid size. You can change the spacing between the dots that comprise each gridline by using the Spacing option. This setting allows you to adjust the precision of object alignment.
Turn on the snap-to options
Select View on the ribbon, and in the Show group, select the dialog-box launcher.
The Grid and Guides dialog box appears.
To position shapes or objects to the closest intersection of the grid, under Snap to, check the Snap objects to grid box.
To see the grid on your screen, under Grid settings, check the Display grid on screen box.
To change the measurement units in PowerPoint, see Change the ruler units from inches to centimeters.
Turn off the snap-to options
Select View, and in the Show group, select the dialog box launcher .
The Grid and Guides dialog box appears.
Clear the Snap objects to grid box.
Make these settings the default for all presentations
If you want the current settings in the Grid and Guides dialog box to be the default settings for all presentations you open, select Set as Default.
Tips about grids and guides
To temporarily override the snap-to options, hold down Alt while you’re dragging an object on the slide.
To show drawing guides on your screen, under Guide settings, check the Display drawing guides on screen box.
Drawing guides are a pair of dotted guidelines, one vertical and one horizontal, that intersect at the center of the slide. When drawing guides are on, objects will snap to these lines when dragged within a threshold of a few pixels.
When Display smart guides . is turned on, guides appear to aid you in aligning and spacing one object in relation to others.
If the Snap objects to grid box is checked, you can draw in straight lines when you draw a freeform shape .
See Also
Turn snap to grid on or off
Select View > Guides > Snap to Grid.
Turn dynamic guides on or off
Select View > Guides > Dynamic Guides.
Tip: For fine control over placement of objects on a slide, hold down Command while dragging.
Add or remove guides
Drawing guides can help you position shapes and objects on slides. Drawing guides can be shown or hidden, and you can add or delete them. When you drag a guide, the distance to the center of the slide is shown next to the pointer. Drawing guides are not visible during a slide show and do not print in a presentation.
(This information about adding/removing guides doesn’t apply to PowerPoint for Mac 2011.)
To show or hide guides, select Guides on the View tab.
To add a guide, Ctrl+click or right-click on your slide, point to Guides, and then select Add Vertical Guide or Add Horizontal Guide.
To remove a guide, Ctrl+click or right-click the guide line, and then select Delete on the menu.
You can change the color of a guide, allowing you to use colors to denote different meanings or just make a guide stand out from the background. Right-click the guide, select Color, and make your selection. (This feature is available in PowerPoint 2019 for Mac and PowerPoint for Microsoft 365 for Mac.)
July 13, 2016 / Blog, PowerPoint Tutorial powerpoint presentation, Powerpoint tips, PowerPoint Tutorials, Rick Enrico, slide objects, SlideGenius
Each slide has its own elements, such as text, charts, images, and shapes—all easy to arrange in PowerPoint. A clean, even layout leaves space that lets the eyes focus on more important slide objects. Simply aligning them with each other provides a great deal of order and sophistication into any layout.
We’ve already learned how to group slide objects to help you rearrange many objects in one go. This enables you to move an entire selection of objects, but you might find it inconvenient having to constantly group and ungroup them to access each element separately.
The ability to align objects is especially vital for comprehensive decks that may contain sales figures, which can end up with lots of elements on screen. There are also several ways you can align your objects so you can speed up your process.
We’ll focus on aligning different objects on your slide deck to save you time in managing your own slide workspace.
Align Slide Objects in PowerPoint 2013
In PowerPoint, there are guides that help you adjust your spacing and keep objects lined up. Luckily, you can simply drag an object around, and a floating guide helps you snap objects in place. The temporary guide usually shows up as an orange dotted line.
This is an already helpful feature in itself. Here’s how you can align objects en masse while still retaining individual control of each element:
1. Select what particular object on the slide you wish to arrange. If you want to select several objects at the same time, hold down Shift and then click on the slide objects.
If you want to align multiple objects, click on an empty slide corner and drag your mouse around the chosen items to select each of them. To make sure you don’t leave any object unselected, you can also use the keyboard shortcut Ctrl+A.
2. Click on the Drawing Tools Format tab that will appear once you select the item or items.
3. Select the Align dropdown menu in the Arrange group and then choose one from the six selections: Align Left, Align Center, Align Right, Align Top, Align Middle, and Align Bottom.
4. You’ll notice that the slide objects selected will be aligned according to your choice.
Specific Alignments
There are other align options, namely Distribute Horizontally, Distribute Vertically, Align to Slide, and Align Selected Objects.
Your slide objects will line up horizontally or vertically as the command implies. However, these alignment behaviors will be different if you pick Align to Slide or Align Selected Objects. When you select the former, all the scattered objects outside the slide area will be distributed within the slide area. As a further example, if you select all your images to Align Center, all the slide objects will be located at the center of the slide.
Choose Align Selected Objects and Align Center and all your slide objects will line up but not at the center of the slide area or within the slide limits.
Control where you want your slide objects to be with the help of the Align function.
Get Organized
You may be thinking that aligning objects is a simple task. It’s indeed simple and easy! PowerPoint just goes the extra mile to make sure that your slide elements are aligned according to your exact needs. Whether you’re working on a deck that requires detailed content, such as graphs, tables, and charts, using this feature can help you accomplish your task with ease.
The Align PowerPoint feature can help you polish your presentation into a more organized and professional-looking layout, keeping you from placing each element randomly and untidily.
To deliver a more dynamic and engaging PowerPoint presentation, SlideGenius experts can assist you and offer you a free quote!
Have you ever worked in PowerPoint and tried to move an image to an exact place it just wouldn’t go? If you could (and sometimes do) spend hours making sure your PowerPoint images are in the perfect spot, try these five tips to get your images exactly where you want them in no time at all.
PowerPoint Tip #1 – Control
Instead of using just the arrow key or moving images around with your cursor, try holding down the CTRL key while using the arrow key. This way, your image will be nudged in the direction you want instead of jumping to a place that’s just a little too far (or not far enough).
PowerPoint Tip #2 – Align
When you want two or more PowerPoint images lined up exactly, use the Align function (below). For example, if your images are aligned vertically on the page, click on one, then hold down the Shift key and click on the other images you’d like lined up with it (select all images). Select the Format tab, then click on Align. Next, click Left, Center, or Right to choose the appropriate alignment.
If your images are horizontal, repeat the same steps, but choose Top, Middle, or Bottom for your alignment options.
PowerPoint Tip #3 – Grid
The grid feature provides another way to align your PowerPoint images. Click on any image, go to the Format tab and select View Gridlines. When the grid appears, you will have a better idea of image alignment and spacing by using the gridlines as your guide.
PowerPoint Tip #4 – Distribute
When you have a bunch of images on a slide, it’s more pleasing to the eye when they are spaced out evenly. This is simple to do.
First, turn on your gridlines. Then, if your images are going horizontally across the slide, place the image on the far left and the image on the far right in the places you want them using the gridlines as your guide. Then select all images, go to the Format tab, click Align and select Distribute Horizontally. You can do the same if your images are vertical on the page by repeating the above steps and clicking Distribute Vertically. Now you have perfectly spaced images.
PowerPoint Tip #5 – Position
You can get really precise using the Position function. Click on an image, select Size and then select Position. Here you can manually change the horizontal and vertical position on the slide by putting your cursor in the text box and typing in a numerical value up to two decimal points.
This is helpful when you want images on different slides to be in the same spot. For instance, if you are creating a case study PowerPoint and each slide has a different logo on it, the position tool works wonders when it comes to getting them all in the same position on different slides.
That’s it! If you follow these simple tips, your PowerPoint images will always be put in their place.
Looking to drive sales productivity at your organization? Learn more about how Brainshark can help.
One of the most annoying and tedious PowerPoint tasks is aligning objects BETWEEN your slides so that stuff isn’t just floating around in your presentation…yes, everyone notices!
So the question is, how can I simplify this common and time consuming task? Good question!
First off, you want to distinguish between two types of unaligned objects.
Type #1 Unaligned objects
These are defined as any PowerPoint object set on your Slide Master (titles, footers, page numbers, content holders, etc.).
Yes, in the diagram below I’ve exaggerated the unaligned objects so that they are glaringly apparent.
Type #2 Unaligned objects
These are basically everything that is not type #1…so just about everything else you build out on your slides in PowerPoint.
And whereas type #1 objects are easily fixed with a click of a button (see tutorial below), type #2 objects are the ones that can drive you crazy.
For example, in the picture above, how often have you wished there was a superfast way to get the boxes on the second slide in the EXACT same position as the boxes on the first slide, WITHOUT having to:
- Duplicate the slide and retype or copy / paste the text;
- Set up the guides within your presentation and manually snap the objects into position;
- Memorize the coordinates of your object and manually retype the coordinates;
- Or even copy and paste the correctly positioned object onto the offending slide, use the alignment tool to position everything, and then delete the object.ure:
And while all of these techniques work (and I’ve used them ALL), they all fall short of a newly discovered add-in (new for me at least) called the Thor Tool.
How cool is the Thor Tool? It can only be expressed with the following picture:
I have multiple objects that I want to animate on a motion path line. They all start off screen and I want them to align in multiple rows at their end location. Once I apply the animation I can only select the objects at their beginning location. Is there away to select the objects at their end location so I can align them in the right pattern?
5 Replies
What if you put some kind of shape or line on the screen while you’re setting up your motion paths so you make sure they end up in the right spot? Then you could remove the line or shape when you’re done creating your motion paths. I agree with you that right now they’re not ideal for set up in terms of selecting the exact end location, and lining up multiple motion paths. You could also consider using the “Grids” “Guides” or “Rulers” that are available in the View tab to help you align your motion paths.
Hope this helps 🙂
- Debbie Amos
- Author
I have tried that and they look exact on my screen when I’m aligning them over the image of them in the finished position but once I play the presentation, I can see they are slightly off in different ways. Plus I have several that the text animation plays off screen to one screen from slide 1 and then slide 2 is supposed to be the same text in the same spot that it ended on the page before.
If I understand your situation correctly, all of these objects start off-screen and you want them to end up aligned. In that case, couldn’t you use the Fly In animation? Put all the objects on your slide in their final positions and use PowerPoint’s Align tool to align them all in exact rows. With the Fly In animation applied to each, they would all fly into their precisely-aligned final positions from off-screen, coming in from whichever direction you choose in the animation.
- Debbie Amos
- Author
Using the Motion Path line. The final location does not show on the screen. You can move the end of the line but can not select the image end location.
Hi Debbie, yes, that’s right: the motion path doesn’t allow you to align the destinations. That’s why I’m suggesting that you don’t use the motion path animation, but instead, use the fly-in animation. You can align the destinations with the fly-in animation. Since it sounds like your motion paths are bringing in objects from off-screen, the fly-in will let you achieve the same effect.
You can have Word align objects—such as pictures, shapes, SmartArt, and charts—in relation to the edges of the page, the margins, or other objects.
Align a picture, shape, text box, SmartArt graphic, or WordArt
Select the objects to align.
To select multiple objects, select the first object, and then press and hold CTRL while you select the other objects.
Do one of the following:
To align a picture, select Picture Format or Picture Tools > Format.
To align a shape, text box, or WordArt, select Shape Format or Drawing Tools > Format.
In the Arrange group, select Align.
Choose of the following:
Important: If Align options are unavailable, you may only have a single item selected.
Align Left To align the edges of the objects to the left.
Align Center To align the objects vertically through their centers.
Align Right To align the edges of the objects to the right.
Align Top To align the top edges of the objects.
Align Middle To align the objects horizontally through their middles.
Align Bottom To align the bottom edges of the objects.
When you align objects relative to each other by their edges, one of the objects remains stationary.
Align Middle aligns objects horizontally through the middles of the objects and Align Center aligns objects vertically through the centers of the objects. When you align objects relative to each other by their middles or centers, the objects are aligned along a horizontal or vertical line that represents the average of their original positions. No object necessarily remains stationary, and all of the objects might move.
Depending on the alignment option, objects might cover another object. If this happens, undo the alignment and move the objects to new positions before aligning again.
Arrange objects equal distances from each other
Select at least three objects to arrange. To select multiple objects, select the first object, and then press and hold CTRL while you select the other objects.
To select objects that are hidden, stacked, or behind text, go to Home > Find and Select > Select Objects, and then draw a box over the objects.
Do one of the following:
To arrange pictures equally, select Picture Format or Picture Tools > Format.
To arrange a group with shapes, text boxes, or WordArt equally, select Shape Format or Drawing Tools > Format.
In the Arrange group, select Align.
Choose one of the following:
Distribute Horizontally To center the objects horizontally.
Distribute Vertically To center the objects vertically.
Word can align objects to the left, center, right, top, middle, and bottom. You select whether you want those positions to be relative to the page, the margins, or other objects.
Note: If text wrapping for an object is set to In Line with Text, Word can only align it in relation to the page or the margins. To change it, Control + Click the object, point to Wrap Text, and then pick something other than In Line with Text. To learn more about text wrapping, see Control text wrapping around objects.
Tip: If you have several objects to position on a page, you might want to use a grid to help you.
Align an object with other objects, the margins, or the page
Hold down Shift and use the mouse or touchpad to select the objects that you want to align.
Select Shape Format or Picture Format.
Select Align. If you don’t see Align on the Shape Format tab, select Arrange, and then choose Align.
Choose one of the following:
Align to Margin
Align Selected Objects
To choose whether the selected objects are aligned to the margins, the page, or relative to each other, select Align, and choose one of the following:
Align to Margin
Align Selected Objects
Select Align again, and then choose the type of alignment from one of the three categories: Horizontal, Vertical, or Distribute.
Tip: After you have objects aligned as you want, you can move them while preserving their relative positions by defining them as a group. For help with using groups, see Group or ungroup shapes, pictures, or other objects.
You can align objects in relation to an anchor, such as the margin, page, and paragraph. You can also enter a precise numeric position for the object in relation to the anchor.
Align an object with other objects, the margins, or the page
Select the object.
Select Format or Format Picture.
To choose whether the selected objects are aligned to the margins, the page, or relative to each other, select Align, and then select one of the following options:
Align to Margin
Align Selected Objects
Select Align again, and then choose the type of alignment that you want.
Align an object in relation to text
Select the object to select it.
Select Format or Format Picture.
Under Arrange, select Wrap Text, and then choose a style other than In Line with Text (for example, Tight ).
In the document, drag the object where you want it.
To fine-tune the picture’s position, under Arrange, select Position, and then choose More Layout Options.
On the Position tab, select the options that you want for your horizontal and vertical anchors.
Note: To make sure that the selected object moves up or down with the paragraph that it’s anchored to, select Move object with text.


