Mac users can enable “Hey Siri” on their computer, allowing for simple voice activation of the virtual assistant. Much like Hey Siri for iPhone and iPad, or Apple Watch, when Hey Siri is enabled on the Mac you can interact with Siri entirely with voice commands and without needing to click or tap on anything to activate it. Just say “Hey Siri” followed by a command, and Siri on the Mac will activate and respond. This walkthrough will show you how to enable Hey Siri on a Mac for voice activation of the digital assistant.
Hey Siri for Mac requires a modern MacOS system software version, and a compatible Mac. While older versions of MacOS may have Siri support, only the latest versions support “Hey Siri” voice activation. Thus if you don’t have the ability to enable Hey Siri on the Mac, it likely means the version of MacOS system software is older. If you have an older Mac but wish to have this ability, you can get Hey Siri on unsupported Macs with this workaround.
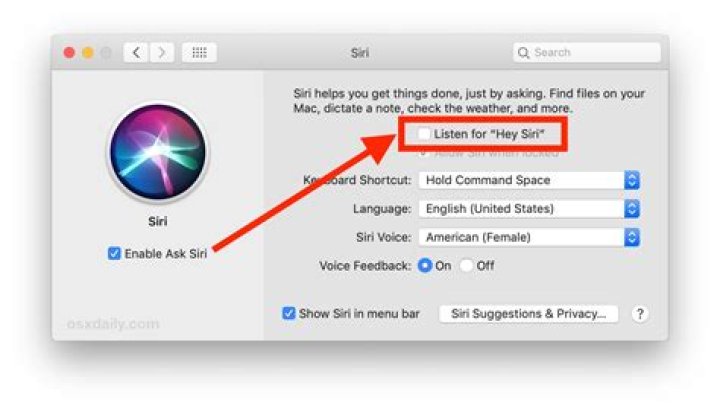
How to Enable “Hey Siri” on Mac
- Go to the Apple menu and choose “System Preferences”
Choose the “Siri” preference panel
Check the box next to ‘Listen for “Hey Siri”‘
Click ‘Continue’ to start the Hey Siri setup process
Go through the verbal setup process by repeating commands shown on screen
When finished with Hey Siri setup click on ‘Done’ and close the System Preferences panel
Now you’re ready to use “Hey Siri” on the Mac, it works just like it does on an iPhone or iPad.
Simply say “Hey Siri” in the proximity of the Mac, and Siri will start listening for your command. You can say something like “Hey Siri, what is the weather” or “Hey Siri, what time is it”, or use anything else from the large Siri commands list for Mac.
You’ll find most of the general Siri commands list for iPhone and iPad work too, though of course anything specific to iOS will not work on Siri for Mac. And yes, even the funny Siri commands work on the Mac with Hey Siri as well, just in case you feel like goofing off with your virtual voice assistant.
While some Mac users will likely not want to use Hey Siri voice activation, others may find it to be quite useful. Voice activation of Siri can be great for many reasons and situations, depending on how you use Siri and where and what the Mac is used for. For example a Touch Bar MacBook Pro user may have removed Siri from the Touch Bar to prevent accidentally activating it, but perhaps they’d want to have the voice activation feature. And of course “Hey Siri” is also an excellent accessibility feature, since it allows for voice engagement with the Mac beyond the other voice functions on the Mac.
Note that if you have “Hey Siri” enabled on the Mac, and also Hey Siri enabled on iPhone or iPad, and Hey Siri on Apple Watch, and they’re all in the same room together when you say ‘Hey Siri’ for voice activation, you will often trigger multiple Siri assistants at the same time. This can be kind of funny, but it could also be kind of annoying, thus you might want to adjust your settings accordingly.
Using Hey Siri is just one of a variety of ways to interact with the digital assistant on the Mac, you an also summon it by clicking on the Siri menu bar item, or with a keyboard shortcut, and another neat trick if you prefer the keyboard approach is to enable and use ‘Type to Siri’ for Mac instead, which turns Siri into a sort of text-based virtual assistant instead of a voice-based assistant. And of course if you don’t use Siri at all you can always disable it entirely, or just turn off voice activation Hey Siri while keeping the feature available aside from that.
If you know of any interesting tips, tricks, or uses of Hey Siri on the Mac, feel free to share them in the comments below.
Justin Pot has been writing about technology for over a decade, with work appearing in Digital Trends, The Next Web, Lifehacker, MakeUseOf, and the Zapier Blog. He also runs the Hillsboro Signal, a volunteer-driven local news outlet he founded. Read more.
Siri is finally on the Mac, but unlike the iPhone version, you can’t launch the virtual assistant with your voice. Sure, there are dock and menu bar icons to click, and you can set a keyboard shortcut, but you can’t just say “Hey Siri” to start giving commands.
Except, with this little trick, you can. We’ve shown you how to control your Mac with your voice, and if you’ve already set that up you can launch Siri with “Start Siri,” a new dictation command added to macOS Sierra. But that means you need to say “Computer, start Siri,” which is a little long-winded.
What if you just could say “Hey Siri,” the same phrase that triggers Siri on the iPhone? With a few tweaks you can use this or any other phrase to launch Apple’s virtual assistant on macOS, and you don’t even need third party software. Here’s how to get that done.
NOTE: If you have “Hey Siri” enabled on your iPhone and it’s nearby, obviously this will launch Siri on both your Mac and your iPhone. This isn’t necessarily ideal, but you can set your computer to whatever phrase you want by following the instructions below. We’re just using Hey Siri since it’s the most commonly known example.
Step One: Set a Custom Keyboard Shortcut For Siri
Before you can begin, you’ll need to set a custom keyboard shortcut for Siri. The Default shortcuts, which require holding keys down, will not work. Open System Preferences > Siri; you’ll find the keyboard shortcut options there.
Click the Keyboard shortcut dropdown, then click “Customize…” to set a custom shortcut. You can use any combination you like; I went with Option+Space.
Step Two: Enable Enhanced Dictation
Next we need to enable Enhanced Dictation on your Mac. In System Preferences, head to Keyboard > Dictation.
Check the box that says “Allow Enhanced Dictation.” If you haven’t enabled this feature before, you will be prompted to download a large file, basically an engine your computer can use in order to recognize spoken language. The English engine takes up around 1.2GB of storage space on my Mac.
Step Three: Enable Dictation Commands
Now it’s time to get the real magic going. In System Preferences, head to Accessibility > Dictation, then make sure that “Enable the dictation keyword phrase” is enabled.
You can choose your own keyword phrase here. If you eventually want “Hey Siri” to launch the virtual assistant, like on the iPhone, use “hey” as the dictation keyword phrase. Otherwise use whatever word you like. The default is “computer,” because…Star Trek?
Once you enable dictation commands, you’ll see a new icon in your menu bar.
From here you can quickly access options for dictation commands.
Step Four: Create a Siri Dictation Command
Staying in the Dictation section of Accessibility in the System Preferences, click the “Dictation Commands” button to bring up a sub-menu.
From here you can add custom commands. Click the “+” button at bottom-left, then use the word “Siri” in the “When I say” section. Leave “Any Application” as the “While Using” option. Finally, next to “Perform,” set the keyboard shortcut you set for launching Siri back in Step One of this tutorial.
Go ahead and close System Preferences, then try out your new launch phrase. Simply say your dictation keyword phrase followed by “Siri”. So if your dictation keyword phrase is “Hey,” you can say “Hey Siri” and this will happen:
As you can see, the word “Siri” appears next to the menu bar icon for Dictation Commands, signifying that your keyword was recognized. As you can also see, Siri launched. You can speak to Siri as soon as the window opens.
You’ve done it! Enjoy launching Siri with your voice. Again, remember that if you use “Hey Siri,” your iPhone and your Mac will probably trigger at the same time. I ended up using “Okay” as my keyword (“Okay, Siri”), which worked well for me, but you can decide for yourself.
macOS Sierra and later brings Siri to your Mac, with new capabilities designed just for your desktop.
Like Siri on your other Apple devices, Siri on Mac is your intelligent personal assistant, helping you multitask and get things done. For example, while you work on a document, you can ask Siri to send a message to your coworker saying that the document is on the way—without having to stop what you’re doing.
Here are some of the many other things you can ask Siri to do. You can also ask Siri, ”What can you do?”
- “Show the PDFs in my Downloads folder.”
- “How much free space do I have on my Mac?”
- “Play the top 40 jazz songs.”
- “What’s the weather in Lake Tahoe?”
- “Find tweets from José Bautista.”
- “Search the web for images of the Eiffel Tower.”
- “Show me all of the files I shared with Cecilia last week.”
- “FaceTime Victoria.”
- “Add Laura to my 10 AM meeting.”
- “Show my photos from yesterday.”
- “What time is it in Monterrey, Mexico?”
- ”Find coffee near me.”
- Starting with macOS Mojave, you can use Siri to play a sound on a device to help you find it. For example, if you turn on Find My iPhone for your devices, you can ask ”Where’s my iPhone?” or ”Where’s my Watch?”
Ask Siri
To ask Siri, take any of these actions, then just say what you need:
- Click in the menu bar, Dock, or Touch Bar.
- If Siri is already open, click or in the Siri window.
- Press and hold the Command (⌘) key and Space bar until Siri responds.
- Say ”Hey Siri” on a Mac that supports “Hey Siri.” On notebook computers that support this feature, the lid must be open.
If Siri doesn’t close automatically, click or swipe right to close.
If Siri doesn’t hear or understand you
- Make sure that you’re using macOS Sierra or later.
- Choose Apple menu > System Preferences, then check your microphone selection in Sound preferences or Siri preferences. Or test with a different mic, such as the mic in your AirPods or Apple Earphones. If you’re using a Mac mini or Mac Pro, you must connect a mic for Siri to hear you.
- If Siri seems to hear you but not understand you, make sure that your language and dialect are selected in Siri preferences.
- If Siri can’t connect to the network or asks you to try again in a little while, check your Internet connection.
Ask Siri to find files on your Mac
Siri makes it easy to find files on your Mac, using various criteria. For example, you can ask Siri to ”search for all the documents I opened this month.” Then show ”just the ones titled lesson.”
Keep Siri results where you can find them
You can keep important information provided by Siri right in Notification Center . So you can easily access sports schedules, Twitter feeds, files that are related to your big project, and much more.
Just click at the top of your Siri results. Your information will stay up to date, so you always know where to find game times, trending topics, or important documents.
Drag Siri results
You can drag some types of information found by Siri into a window or application on your desktop. For example, after asking Siri to find an image on the web, you can drag an image from the results into a Pages document:
Edit your Siri request
To edit your request instead of making a new request, double-click your words in the Siri window, then enter your changes from the keyboard and press Return.
Change Siri preferences
Choose Apple menu > System Preferences, then click Siri. Or just ask Siri to open Siri Preferences. You can adjust settings such as the Siri keyboard shortcut, the gender and dialect Siri uses, and whether Siri gives voice feedback. And if you’re using macOS Catalina or later, you can choose whether to delete Siri and dictation history.
If you’ve ever chatted with Siri on your iPhone, then you’re probably aware that Siri doesn’t work quite the same on Mac.
On iOS, every conversation with Apple’s virtual assistant starts with a “Hey, Siri,” but on macOS no amount of vocal prodding will catch Siri’s attention. By default, Mac users have to launch the Siri app manually, either by selecting it from the menu bar or by using a keyboard shortcut – but it doesn’t have to be that way!
In this article, I’ll show you how get Siri’s attention using a vocal command, ensuring that Siri on macOS functions exactly the same as Siri on iOS.
Upgrade to hands-free Siri
By default, no matter how many times you say “Hey, Siri” to your Mac, Apple’s voice assistant will completely ignore you. However, macOS has been able to respond to voice commands since OS X Mountain Lion, thanks to its Dictation and Accessibility features, so why not use these features to launch Siri?
In this workaround, we’ll be creating a keyboard shortcut that launches Siri, and then use macOS’ Accessibility and Dictation features to associate a phrase with this keyboard shortcut. Every time you speak this phrase, macOS will emulate your keyboard shortcut, which in turn will launch Siri.
We’re going to keep things classic and teach Siri to respond to the “Hey, Siri” vocal command, but you could use any word or phrase – from the polite “Siri, can you please help me?” to something more blunt and to-the-point, such as “Siri, wake up!” or even just “Siri.”
Make sure Siri is active
If you haven’t already, then you’ll need to activate Apple’s miniature assistant:
- Select the “Apple” logo from your Mac’s menu bar.
- Choose “System Preferences…”
- Select the “Siri” pane.
- Make sure the “Enable Ask Siri” checkbox is selected.
Creating a custom keyboard shortcut
Next, you need to create the keyboard shortcut that you’ll use to launch Siri.
You cannot use any keyboard shortcut that’s already reserved for another application or action, so before choosing your shortcut you may want to review the list of keyboard shortcuts already used by macOS.
To create your shortcut:
- Navigate to “System Preferences… > Siri.”
- Open the “Keyboard Shortcut” dropdown, and then select “Customize…”
Press the keys that you want to use as your keyboard shortcut. Your new shortcut should be saved automatically.
Using Enhanced Dictation
- Open your Mac’s “System Preferences…” and select “Keyboard.”
- Select the “Dictation” tab.
- Turn Dictation “On.”
- Select “Use Enhanced Dictation.” Your Mac will now need to download some software in order to support enhanced dictation; this may take a few minutes depending on the speed of your Internet connection.
Teach your Mac to respond to vocal commands
Next, we need to associate a phrase or word with the keyboard shortcut we created for Siri. To achieve this, we need to split the “Hey, Siri” phrase into two parts – the “Hey” will activate macOS’ Dictation system, and the “Siri” will trigger the actual keyboard shortcut.
- Navigate to “System Preferences… > Accessibility.”
- In the left-hand menu, select “Dictation.”
- Select “Enable the Dictation Keyword Phrase.”
- In the accompanying text field, type the phrase that should activate the Dictation system. I’m using “Hey.”
- Click the “Dictation Commands….” button.
- Select “Enable Advanced Commands.”
- Select the little “+” icon that appears.
- In the “When I say” field, enter the word “Siri.”
- Open the “While using” dropdown, and select “Any Application.” This ensures that no matter what you’re currently doing, “Hey, Siri” will always trigger Apple’s personal assistant.
- Open the “Perform” dropdown and select “Press Keyboard Shortcut.”
- Enter your keyboard shortcut.
- Click “Done.”
- Close the “System Preferences….” window.
Using Siri with voice activation
And that’s it! Now whenever you say “Hey Siri,” the “Hey” will activate Apple’s Dictation system, the “Siri” will simulate pressing the keyboard shortcut, and Siri will appear onscreen, ready to help you out!
Before you go
After spending over 20 years working with Macs, both old and new, theres a tool I think would be useful to every Mac owner who is experiencing performance issues.
CleanMyMac is highest rated all-round cleaning app for the Mac, it can quickly diagnose and solve a whole plethora of common (but sometimes tedious to fix) issues at the click of a button. It also just happens to resolve many of the issues covered in the speed up section of this site, so Download CleanMyMac to get your Mac back up to speed today.
To use Siri, Apple’s “personal digital assistant,” on your Mac, you can click on the icon in the upper right corner of your screen to activate it. But wouldn’t it be nice if, like on an iPhone and Apple Watch, you could simply say “Hey, Siri” to fire it up? You can, though it takes a few steps.
With “Hey Siri” enabled, you can interact with the digital assistant entirely with voice commands and without needing to click or tap on anything to activate it. To enable “Hey, Siri” in macOS Catalina:
- Launch System Preferences.
- Click the Siri icon.
When the Siri preferences pane opens, click “Enable Ask Siri” and “Listen for Hey Siri.”
While you’re in the Siri preferences pane:
- You can also allow (or not) Siri to perform when your Mac is locked or asleep. Just say “Hey Siri,” then make your request. (Depending on your request, you may need to unlock your Mac.)
- Set your language of choice.
- Choose which Siri voice you want to be used: American Male, American Female, Australian Male, Australian Female, British Male, British Female, India Male, India Female, Irish Male, Irish Female, South African Male, or South African Female.
Best apps live in Setapp
Siri is feature we all know too well, world-renowned for its and witty ways and skilful shortcuts. But, many Apple users don’t know how to use Siri on a Mac, leading to many missed opportunities to work more efficiently. In fact, app analytics Verto report that whilst it remains the most popular AI assistant, usage has fallen 15% since 2016. Ouch.
Alternative Virtual Assistants
Get alternatives to Hey Siri to do everyday tasks, get quick answers, and more. Best utilities in one pack, give it a go!
Contrastingly, voice-activated technology has rocketed in the past 24 months, with Alexa raising Amazon’s sales by 38% and even Spotify jumping on the bandwagon.
So, with that being said, why do the statistics show a decline in use for the most popular assistant Siri?
Are we too impatient, or is it too complex? Many users would suggest the latter, however, we here at MacPaw believe it’s more to do with the former.
Siri can help you with almost anything on a Mac, you just need to know how to take advantage of the fancy features.
How to set up, secure, and start using Siri
When setting up a new Mac, or updating the macOS version, you will be asked if you wish to Enable Siri. Highlight the tick box labelled ‘Enable Siri’ and click continue.
But, what if I missed this step when I was setting up my Mac?! Don’t fret, Siri’s capabilities haven’t disappeared into the abyss. Simply open ‘System Preferences’, click on ‘Siri’, and select the tick box beside ‘Enable Ask Siri’.
In order to active Siri, there are 5 different ways to get this working:
- Hold down Cmd+Space for around 2 seconds (if you don’t hold them down you will just trigger Spotlight)
*For Siri to appear in the menu bar, you have to change the system settings. To do this, go to ‘System Preferences’, click ‘Siri’, and tick the box that says, ‘Show Siri in menu bar’. This way, Siri’s icon will be readily available for you to click at the top right of your desktop.
On iPhones, many users trigger Hey Siri through voice activation. You can do this too on a Mac, but it’s not a default option.
To do so, it requires modifying the dictation options in Accessibility system preferences, which can be time-consuming and confusing – so we advise just using the keyboard shortcuts or clicking the Siri icon.
To disable Siri, all you need to do is un-select ‘Show Siri in menu bar’ and ‘Enable Ask Siri’.
Customize Siri
The default keyboard shortcut triggers for Hey Siri are Command + Space, however, you can create your own custom keyboard combo by simply;
- Opening Siri’s System Preferences
- Clicking on the arrows beside Keyboard Shortcut and choose ‘customize’
Another way of customizing Siri is to change the voice and language to suit your own preferences. There are male and female voices, each with a choice of different accents. So, if Australian lingo is your thing, G’day! You’re in the right place.
To change Siri’s accent/language:
- Open System Preferences
- Click the Siri icon
- Choose from the Siri Voice dropdown list
What can I ask Siri?
If you’re a procrastinator, look no further.
The things you can ask Siri are never-ending, from useful general knowledge to playful puns. He/she is always there to assist you, be it for functional uses or just a good giggle.
Whether you want to know where Guadalupe is or who invented the telephone, Siri has the answers. It’s like having a real-life assistant there with you, with an added edge of sarcasm and humour.
If you want to hear Siri get sassy, get Siri to rap, sing a song, flirt or tell a joke, it’s simple. Just ask any off-the-wall question and you’ll receive a similarly off-the-wall response.
One hilarious answer that circulated social media recently was Siri swearing in Australian, or her feeble attempts at rapping.
Siri’s Tricks and Hacks
Yes, Siri can search the web for things, read your messages out-loud or engage in some unconventional conversations, but her capabilities stretch far wider than that.
Control System Settings – simply say “turn off Bluetooth”, “Turn on Wi-Fi” or “Make the screen brighter”, and Siri will. Anything you can do using System Preferences can be enabled with Siri, just remember, she can’t function with Airplane Mode on… But she’ll remind you of that should you try.
Gambling – perhaps a more unorthodox feature, Siri can settle disputes virtually. Ask Siri to “flip a coin” or “roll the dice” and he/she’ll do exactly that. Perfect for when you don’t have a coin on hand, and let’s face it, we never do.
Make Reservations –when you ask Siri to “Make a reservation at an Italian restaurant for Sunday at 6pm”, she’ll give you a list of nearby restaurants, along with their rating, distance and available reservations. Click “Make Reservation” for the chosen place and you’ll head right into OpenTable.
Measurement Conversions – euros to dollars, inches to feet, cups to quarts, you name it. She can convert almost anything at the drop of a hat.
The Downsides
It’s clear, you can do almost anything with the help of Siri, making day to day life easier. But, as with any terrific technology, there’s always lousy loopholes.
We’ve all heard of that scenario – repeating the call to action over and over to no avail. Siri, Siri, SIRI! It’s enough to drive the most measured of us into insanity. Inconsistencies in voice recognition have been an everlasting issue with Siri and show no signs of going away.
Furthermore, Siri doesn’t work if you’re not connected to Wi-Fi. This brings about a whole host of problems; what if you need to organize your files or get answers to important questions when on a flight with no internet? Having these access boundaries is annoying, and limits Siri’s powers in many ways.
This is where Setapp steps in.
Imagine a world where each Mac feature had its own assistant, expertly trained to deal with that particular area – with their own savvy systems and brilliant brains to run your Mac as smoothly as possible. Look no further.
Setapp has a store of over 200 specialised apps – from on-the-go translators to automatic file organizers – there’s an app for every job, right on your Mac.
Forget about bad voice recognition and limited access, have a whole host of assistants ready to get to work at your disposal. Try our free 7-day trial today and see how Setapp apps can put the power back into your hands.
MacOS Sierra offers three ways to activate Siri on a Mac, but there’s another way that lets you use the “Hey, Siri” command.
With MacOS Sierra, Apple’s voice assistant made the leap from the iPhone to the Mac.
There are three built-in ways to activate Siri on a Mac, but all require you to click your mouse or the keyboard. If you’d rather say, “Hey, Siri,” the way you can with the iPhone, there’s a workaround.
Before we go through your options for calling up Siri, let’s first make sure you have Siri enabled. When you installed MacOS Sierra, one of the setup screens asked if you wanted to enable Siri, so it’s likely Siri is ready to go on your Mac. If you declined Sierra’s initial Siri offer, go to System Preferences > Siri and make sure the box is checked for Enable Siri.
Matt Elliott/CNET
With Siri enabled, here are the four ways to activate Apple’s voice assistant:
Option 1: The Siri icon in the Dock
Easy-speasy. Click the Siri icon in the Dock and the Siri window will spring forth.
Option 2: The Siri icon in the menu bar
If you don’t see a Siri icon in the menu bar in the upper-right corner of your screen, then go to System Preferences > Siri and check the box for Show Siri in menu bar.
Option 3: Use a keyboard shortcut
The default keyboard shortcut for activating Siri is pressing and holding Command-spacebar. You can set your own keyboard shortcut, however, in System Preferences > Siri.
Option 4: Enable ‘Hey, Siri’
Apple doesn’t offer a switch to enable the “Hey, Siri” command with MacOS Sierra as it does with iOS 10, but there is a workaround that Reddit user jdcampbell found. In a nutshell, you need to create a custom keyboard shortcut for Siri and then set up a dictation command to activate that shortcut.
In detail, here are the steps to create the “Hey, Siri” command:
Step 1: Go to System Preferences > Siri and choose a custom keyboard shortcut. (Dictation doesn’t understand pressing and holding a key, so you need to choose a keyboard shortcut other than Apple’s default shortcut for Siri. And for reasons that escape me, dictation didn’t recognize Apple’s suggested keyboard shortcut of Function-Spacebar.) For my custom Siri shortcut, I chose Command-S.
Step 2: Go to System Preferences > Keyboard and click the Dictation tab. Turn on Dictation and also check the box for Use Enhanced Dictation. (You may need to download and install a file for Enhanced Dictation if you haven’t used it before.)
Step 3: Go to System Preferences > Accessibility. Scroll down in the left panel and click Dictation. On the right panel, check the box for Enable the dictation keyword phrase and then change the phrase from Computer to Hey.
Step 4: Staying on the Accessibility page, click the Dictation Commands button. Check the box for Enable advanced commands and then click the “+” button to add a new command.
For your new command, use these settings:
- When I say: Siri
- While using: Any Application
- Perform: select Press Keyboard Shortcut from the menu and then enter your custom Siri keyboard shortcut (mine is Command-S).
When you are finished, click Done to save your changes.
This workaround didn’t work for me at first, but after I went to System Preferences > Siri and unchecked and then rechecked the box to Enable Siri, I was all set.
One last note: If you are using the “Hey, Siri” command with your Mac, your iPhone may activate Siri if it’s within earshot. You aren’t stuck with the “Hey, Siri” command, however, and can set up a different command to keep your iPhone and Mac from both springing to action on the same command. May I suggest “Yo, Mac” or “Hello, HAL” perhaps?


