By default, an inserted header or footer will be applied to all pages in a Word document. If you want to create different headers or footers in a Word document, the method in this article can help you.
Please do as follows to create different headers or footers in a Word document.
1. Click on the top of a page where you want to start a new header or footer which is different to the original one(here I click on the top of the page 2), click Layout > Breaks > Next Page. See screenshot:
2. Double click the header or footer section in page 2 to enable the header or footer editing mode. Then click to turn off the Link to Previous option under the Design tab.
3. Change the header or footer content to your needs and click the Close Header and Footer button. See screenshot:
4. Repeat the above steps to change all header or footer contents as you need.
Walter Glenn is a former Editorial Director for How-To Geek and its sister sites. He has more than 30 years of experience in the computer industry and over 20 years as a technical writer and editor. He’s written hundreds of articles for How-To Geek and edited thousands. He’s authored or co-authored over 30 computer-related books in more than a dozen languages for publishers like Microsoft Press, O’Reilly, and Osborne/McGraw-Hill. He’s also written hundreds of white papers, articles, user manuals, and courseware over the years. Read more.
Word features a few built-in ways to change up your headers and footers in a document. For example, you can pretty easily have different headers and footers for odd and even pages, or you can have a different header and footer on the first page. To go beyond that, you’ll need to create multiple sections in your document, and learn how to link and unlink headers and footers from the preceding section.
For demonstration purposes, we’ve created a simple document that uses a plain text header with the words “How-To Geek” and a plain text footer with a page number (like in the image at the top of the article).
Note: We’re using Word 2016 for our examples in this article, but the techniques we’re talking about apply to pretty much any version of Word.
Create a Different Header and Footer on the First Page
One typical document convention is having a different header and footer on the first page of a document than shows up in the rest of the document. Perhaps you have a title page where you want no header or footer at all. Or, perhaps you want the first page footer to show some official disclaimer text for your company, and the footer in the rest of the document to show page numbers. Whatever your reason, Word makes this easy.
First, double-click anywhere in either the header or footer region of a page to make those regions active.
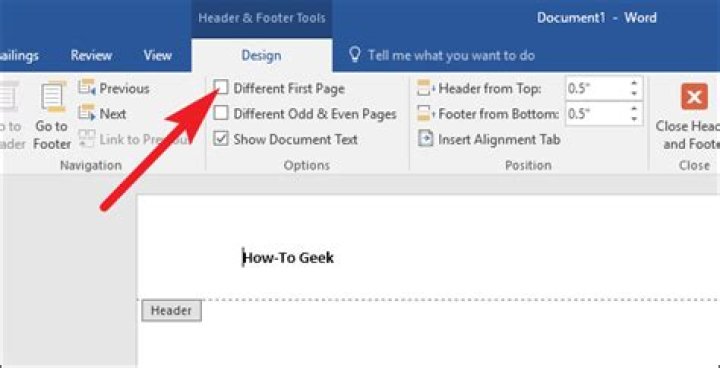
The header/footer region becomes active and you’ll see a new “Design” tab show up on your Ribbon with controls for dealing with headers and footers. On that tab, select the “Different First Page” option.
When you select that option, any text already in the header and footer on the first page is deleted. Also note that the name of the areas on the first page change to “First Page Header” and “First Page Footer.” You can leave them blank, or you can fill the spaces with other text that will not impact the headers and footers on subsequent pages at all.
Create Different Headers and Footers on Odd and Even Pages
Word also has a built-in option for creating different headers and footers for odd and even pages. By far, the most common use of this feature is to have page numbers appear at the outer edges of facing pages—the way you see it done in most books.
To do this, double-click anywhere in either the header or footer region of a page to make those regions active.
The header/footer region becomes active and you’ll see a new “Design” tab show up on your Ribbon with controls for dealing with headers and footers. On that tab, select the “Different Odd & Even Pages” option.
When you select that option, anything you have in the footers of even numbered pages is deleted. You can then put anything you want there, and align it however you like.
Create Different Headers and Footers for Different Sections of Your Document
Unfortunately, that’s where the easy control of headers and footers in Word ends. If you want to change headers and footers within the document any more than we’ve already covered, you’ll have to break your document into sections. There are all kinds of reasons you might want to do this. For example:
- You have some graphics or spreadsheets in your document that you want on landscape-oriented pages, when the rest of the document is portrait-oriented. You still want the headers and footers at the vertical top and bottom of the pages, though.
- You’re creating a long document with multiple chapters and don’t want headers and footers (or want them to look different) on the title pages of each chapter.
- You want to number some pages differently. For example, maybe you want your introduction and table of contents pages numbered with Roman numerals, but the main text of your document numbered with Arabic numerals.
Whatever your reasons, the trick is to create different sections where you want the headers and footers to look different. Personally, I find it easiest to think about the document ahead of time and create all the sections I need before I start populating the document. This often prevents the weird layout glitches you can get (and then have to resolve) when sectioning an already full document. That said, you can still create sections in an existing document, and the process is the same.
Place your cursor wherever you want to create a section break (typically this will be at the end of a page), and then switch to the “Layout” tab on the Ribbon. Click the “Breaks” button, and then choose the type of break you want. Usually, this is going to be a page break, so that’s what we’re using here.
Now, double-click the header or footer area on the page after the break you inserted. On the “Design” tab of the Ribbon, click the “Link to Previous” button to turn that option off. This breaks the link between the header or footer (whatever you have selected) of this section and the previous section. If you want to break the link for both the header and footer, you’ll need to do each one in turn this way.
Unlinking does not delete any existing text or images in the header or footer. You can remove, modify, or replace what’s already in your header or footer, and your changes will not impact the headers and footers in the previous section.
If you decide to reestablish a link to a previous sections header or footer, though, that action is destructive. When you relink sections, the header and footer in the active section is removed and replaced with whatever’s in the previous section. To do it, just double-click the header or footer on the page after the break. On the “Design” tab of the Ribbon, click the “Link to Previous” button to turn that option back on.
Word warns you that you’ll be deleting the current header or footer, and replacing it with the header or footer from the previous section. Click “Yes” to make it happen.
And just like that, your header or footer is reconnected to the previous section. Just remember that you’ll have to link or unlink both the header and footer as separate actions.
A lot of people have asked this question over time, so I don’t know that it has not been answered somewhere, but it seems like such an easy function to add. I have a folder of documents, each with their own header and footer scheme. I want to merge several of those and have the individual headers and footers AND I want it to be editable, so just making a pdf does not seem to be an option for me.
I get the whole section break, insert, blah, blah, blah. If I have 10 files, I just want to pick those 10, add them, batch them, and have one big file with all of my little files. You have written functions for stuff wayyyyyy more complicated than this. This is a feature that there is much discussion about in the forums, but there is no credible fix.
I am officially asking for a fix that works like we all want it to.
1. Add documents
2. Merge documents
3. Merged file has all of the documents that were merged with their own headers and footers.
Thank you in advance for our greatest new feature.
Report abuse
Replies (9)
Please don’t shoot the messenger. I am just one of your fellow users with a fair amount of experience trying to help you get the best out of the products as they exist. I don’t get to make changes and they listen to me the same way they do you. This forum is a user-to-user support forum.
The people who can make changes in Office do not read or see this forum. They generally do not use Word. However, they do read the suggestions posted through the Feedback mechanism and UserVoice. They have made changes based on those suggestions.
The feedback mechanism was a smiley face on the title bar. Now it is on the Help tab and also under File.
Here is UserVoice for Word for Windows:
If there is a suggestion there you support, please vote for it. Please add comments to those you vote for so that they can see you care about this. If there is not already an idea posted about your problem, add one yourself.
I hope this information helps.
Please let me know if you have any more questions or require further help.
Please mark helpful or answered as appropriate to help other users.
Charles Kenyon
Attorney at Law
Madison, Wisconsin
wordfaq[at]addbalance[dot]com
某些 Creative Cloud 应用程序、服务和功能在中国不可用。
Headers, footers, and Bates numbering
Acrobat lets you add a header and footer throughout a PDF . Headers and footers can include a date, automatic page numbering, Bates numbers for legal documents, or the title and author. You can add headers and footers to one or more PDFs .
You can vary the headers and footers within a PDF . For example, you can add a header that displays the page number on the right side of odd-numbered pages, and another header that displays the page number on the left side of even-numbered pages. When adding Bates numbering, you can set the number of digits, the starting number, and the prefix or suffix to be appended to each Bates number.
You can define and save your headers and footers to reuse them later, or you can simply apply a header and footer and forget it. After applying a header and footer, you can edit, replace, or delete it in the PDF . You can also preview headers and footers before applying them and adjust the header and footer margins so that they don’t overlap other page content.
Add headers and footers, with an open document
Open the PDF file to which you want to add the header and footer.
Choose Tools > Edit PDF.
The Edit PDF toolset is displayed in the secondary toolbar.
Formatting and other related options are displayed in the right-hand pane.
In the secondary toolbar, choose Header & Footer > Add.
As needed, specify the Font and Margin values.
The text properties apply to all header and footer entries that are part of this setting definition. You cannot apply different settings to individual header or footer text boxes within the same session in the Add Header And Footer dialog box.
To prevent overlapping, click the Appearance Options link and select Shrink Document To Avoid Overwriting The Document’s Text And Graphics . To prevent resizing or repositioning when printing the PDF in large format, select Keep Position And Size Of Header/Footer Text Constant When Printing On Different Page Sizes .
Type the text in any of the header and footer text boxes. To insert page numbers or the current date, click in a box and then click the corresponding buttons. To select formatting for automatic entries, click Page Number And Date Format .
You can combine text with dates and page numbers. You can also add several lines of text to an entry.
To specify the pages on which the header and footer appear, click Page Range Options . Then specify a page range and choose a Subset option, as needed.
Examine the results in the Preview area, using the Preview Page option to see different pages of the PDF.
(Optional) To save these header and footer settings for future use, click Save Settings at the top of the dialog box.
(Optional) To apply the same settings to additional PDFs, click Apply To Multiple Files . Click Add Files , choose Add Files or Add Open Files , and select the files. Then in the Output Options dialog box, specify your folder and filename preferences, and click OK .
Created a Word Document with 10 over pages with multiple headers and footers. Could “Unlink to Previous” on earlier pages. But unable to “Unlink to Previous” on later pages. Once I clicked “Unlink”, this message would appear “Do you want to delete this header/footer and connect to the header/footer in the previous section. All previous headers or footers on the previous pages would be changed and became similar header and footer message after I click “Yes”. No matter what I did to unlink, this problem remains.
I used both Microsoft Office Home and Business 2016 and Microsoft Office Professional Plus 2007 to check and to try to resolve this issue (Window 7 and 10). Both versions faced similar results of cannot “Unlink to Previous”. Can anyone or someone from Microsoft solve this issue?
FYI, I googled for answers. All solutions stated in google could not work.
Thanks a zillion 🙂
Report abuse
Replies (8)
The “Link to Previous” button is a toggle and there is no “Unlink to Previous” button (if there were, it would be “Unlink from Previous”
If you have a header in a Section and then you click on the button when its toggle state is such that it will link to the previous Section, you are warned that as a result of that action, the existing header will be deleted.
If this does not help you sort it out, if you send me a copy of the document, referencing this thread and describing exactly what you want in the covering email message, I will investigate the issue.
Report abuse
1 person found this reply helpful
Was this reply helpful?
Sorry this didn’t help.
Great! Thanks for your feedback.
How satisfied are you with this reply?
Thanks for your feedback, it helps us improve the site.
How satisfied are you with this reply?
Thanks for your feedback.
The “Link to Previous” button is a toggle and there is no “Unlink to Previous” button (if there were, it would be “Unlink from Previous”
If you have a header in a Section and then you click on the button when its toggle state is such that it will link to the previous Section, you are warned that as a result of that action, the existing header will be deleted.
If this does not help you sort it out, if you send me a copy of the document, referencing this thread and describing exactly what you want in the covering email message, I will investigate the issue.
Thank you for the response to my question.
I have done everything that I can to unlink to previous page for both header and footer. The function in Microsoft Word version 7 and 10 are both “Link to Previous”.
I wanted to show the screen-shot picture for your check that the function in both of my notebooks are “Link to Previous”. Unfortunately, the attachment tab here doesn’t accept screen-shot picture, Word or pptx attachments. I do not know how I can show you the evidence.
There is now another problem. The tab for “Link to Previous” is unable to be bold or highlighted for changes anymore. It is strange that both of my notebooks have the same similar issue now. Are you able to advise on this issue?
You asked for my documents which had difficulty in creating multiple headers and footers. I am unable to share as it is a confidential document. I therefore created another document with multiple headers and footers for your kind checks. However, I also cannot upload this document using the above tab.
Are you from Microsoft office or a kind soul helping another person? If you are from Microsoft office, could you please advise me if it is truly that only paid users to Microsoft office are supported. I was told about this information when I called the Singapore office and Global Support Team. I purchased a licence to use Microsoft Office Home and Business 2016 in July. May I know if there is truly no one can support me on phone?
Suddenly, I face more problems than I originally have. Do help. Thank you.
Report abuse
Was this reply helpful?
Sorry this didn’t help.
Great! Thanks for your feedback.
How satisfied are you with this reply?
Thanks for your feedback, it helps us improve the site.
How satisfied are you with this reply?
Thanks for your feedback.
You can insert screen shots here in JPEG or PNG (and probably GIF) format using the Insert image button on the editor toolbar.
Note that if any sections have multiple headers/footers (because you have enabled Different First Page or Different Odd and Even), those headers/footers are linked only to the corresponding headers/footers in previous and subsequent sections. The First Page Header/Footer, Odd Page (primary) Header/Footer, and Even Page Header/Footer are all independent of each other.
Report abuse
1 person found this reply helpful
Was this reply helpful?
Sorry this didn’t help.
Great! Thanks for your feedback.
How satisfied are you with this reply?
Thanks for your feedback, it helps us improve the site.
How satisfied are you with this reply?
Thanks for your feedback.
You can insert screen shots here in JPEG or PNG (and probably GIF) format using the Insert image button on the editor toolbar.
Note that if any sections have multiple headers/footers (because you have enabled Different First Page or Different Odd and Even), those headers/footers are linked only to the corresponding headers/footers in previous and subsequent sections. The First Page Header/Footer, Odd Page (primary) Header/Footer, and Even Page Header/Footer are all independent of each other.
Thank you for your response. I understand that the tab “insert image’ is to attach documents. As I said earlier, there was great difficulty in attaching printscreen shot, word or pptx documents in reply to Doug to show evidence of the issue I face.
May I post my original issue with Microsoft “Link to Previous” issue again which was posted on 26 Sep 2017?
” Created a Word Document with 10 over pages with multiple headers and footers. Could “Unlink to Previous” on earlier pages. But unable to “Unlink to Previous” on later pages. Once I clicked “Unlink”, this message would appear “Do you want to delete this header/footer and connect to the header/footer in the previous section. All previous headers or footers on the previous pages would be changed and became similar header and footer message after I click “Yes”. No matter what I did to unlink, this problem remains.
I used both Microsoft Office Home and Business 2016 and Microsoft Office Professional Plus 2007 to check and to try to resolve this issue (Window 7 and 10). Both versions faced similar results of cannot “Unlink to Previous”. Can anyone or someone from Microsoft solve this issue?
FYI, I googled for answers. All solutions stated in google could not work.
Thanks a zillion :)”
Can anyone or someone from Microsoft solve this issue?
You may want to add a header or footer to the pages of the IBMВ® NotesВ® documents you print. For example, you use headers or footers to add page numbers to printed documents.
About this task
Header and footer information can apply to all of the documents in an application, or to a particular document. The header and footer you create for an application prints with all documents in the application, unless you set up a different header and footer for the document.
To create a header or footer
About this task
Procedure
- Open a document or an application.
- From the menu, choose File > Document Properties (or File > Application Properties to assign a header or footer for all the documents in the application).
- Click the Printer tab.
Click this button
The page number (‘&P’ in the Header/Footer text field)
The total number of pages (‘&Q’ in the Header/Footer text field)
The date you print the document (‘&D’ in the Header/Footer text field)
The time the document is printed (‘&T’ in the Header/Footer text field)
A tab (‘|’ in the Header/Footer text field)
The document title (‘&W’ in the Header/Footer text field)
Results
Tips for aligning text in headers and footers
About this task
Without them, text is left-aligned.
To center text, insert one tab on each side of the text.
To right-align text, insert two tabs before the text.
To left-align some text and right-align the rest, insert one tab between the text.
To left-align some text, center some text, and right-align the rest, insert two tabs.
- Personal tools
- Log in / create account
- Navigation
- Main page
- Contents
- Glossary
- Categories
- Community portal
- HotDocs Knowledge Base
- Developer Corner
- Problems & Solutions
- HotDocs API
- Document Services
- HotDocs Help
- Learning about HotDocs
- Getting Started
- Toolbox
- What links here
- Related changes
- Special pages
- Printable version
- Permanent link
From HotDocs Wiki
| CAUTION: Starting with HotDocs 2005, a new KEEP header / footer of inserted template option was added to the INSERT Field dialog box. Using this option, you can designate that the headers in the inserted template override the defined header(s) in the parent document. Please see the HotDocs Help for information. |
When using headers, footers, and margins in your inserted RTF templates, you must first determine the purpose of the inserted template—will the inserted text be inline with that of the parent template, or will it be used to create a set of documents contained within a single document file? Following is a discussion of both situations.
In Microsoft Word, every template has a header and footer, even if no text is defined for it. This is especially important to understand as you are working with headers/footers in inserted templates. The Microsoft Word help file contains a lot of important information about inserting headers and footers in your templates and documents. You should read this information before attempting to use headers and footers, particularly when using them in inserted templates.
Contents
Insert “Inline” Documents
An inserted template can merge a section of text so that it is “inline” with the text into which it is being inserted. This is useful if you have an optional paragraph or clause that must be inserted at a specific place within the document.
By default, when you insert a template for this purpose, any headers/footers in the inserted template will be defined by the parent template, and any headers/footers used in the inserted template will be deleted. This is correct.
For instructions on inserting inline text in a template, see the HotDocs Help.
Insert Separate Documents in a Single Document File
An inserted template can also merge a section of text as though it were separate from the document into which it is inserted. For example, you may want to assemble separate documents but keep all these separate documents contained in a single document file. When you insert a template for this purpose, headers and footers specific to each inserted template must remain intact and should not be overwritten by the headers/footers defined for the parent template.
When working with headers and footers in inserted templates, you must think of each inserted template as a section of the main template. This means that if you want inserted template text to have headers/footers that are different from the parent template, you must define section breaks in your inserted template.
To use different headers in your inserted templates
The header/footer text that is used before the section break (on page 1 of the template) will be deleted during assembly. This is correct.
Once you define headers/footers in the inserted template, any text that appears in the main template after the INSERT instruction will use the headers/footers that were defined in the inserted template. You can reset or specify different header/footer text in the main template.
To reset headers and footers after an INSERT instruction
- In each inserted template, define your header/footer text, as explained in the steps above.
- In the parent template, immediately after the INSERT instruction, place a next-page section break.
- In the header/footer field for the new section you just created, specify your header/footer text.
- Clear the Same as Previous option. (To have a section of a template inherit the headers/footers from the previous section, select Same as Previous.)
At times, you may want to create several documents and save them all in the same document file. As such, you may want a cover page for the document that has its own unique header/footer (for example, a notice or disclaimer). For the document to be assembled correctly, you must use a combination of section breaks both in the main template as well as in the inserted templates.
To use a different first-page header in the parent template
When you select the Different odd and even property for headers/footers, this property is assigned for the entire document—not just sections in the document. This means headers/footers in inserted templates must have the same property set in the main template or headers/footers will not be assembled in the main document correctly.
Define Margins in Inserted Templates
When working with margins in inserted templates, it’s once again important to determine the purpose of the inserted template. If you want a portion of text merged as part of the main document, you most likely will want the margin for both sections of text to be the same. However, if your inserted template will produce a separate document within the document file, you may want custom margins.
You can add text to headers and footers in your document by using the Headers property and Footers property of the Section. Each section of a document contains three headers and footers:
The procedures are different for document-level customizations and VSTO Add-ins.
Applies to: The information in this topic applies to document-level projects and VSTO Add-in projects for Word. For more information, see Features available by Office application and project type.
Document-level customizations
To use the following code examples, run them from the ThisDocument class in your project.
To add text to footers in the document
The following code example sets the font of the text to be inserted into the primary footer of each section of the document, and then inserts text into the footer.
To add text to headers in the document
The following code example adds a field to show the page number in each header in the document, and then sets the paragraph alignment so that the text aligns to the right of the header.
VSTO Add-ins
To use the following code examples, run them from the ThisAddIn class in your project.
To add text to footers in a document
The following code example sets the font of the text to be inserted into the primary footer of each section of the document, and then inserts text into the footer. This code example uses the active document.
To add text to headers in the document
The following code example adds a field to show the page number in each header in the document, and then sets the paragraph alignment so that the text aligns to the right of the header. This code example uses the active document.
Working with Headers and Footers
Lesson 19: Working with Headers and Footers
Introduction
You can make your document look professional and polished by utilizing the header and footer sections. The header is a section of the document that appears in the top margin, while the footer is a section of the document that appears in the bottom margin. Headers and footers generally contain information such as the page number, date, and document name.
In this lesson, you will learn how to insert and edit headers and footers.
Headers and footers
Headers and footers can help keep longer documents organized and make them easier to read. Text entered in the header or footer will appear on each page of the document.
To insert a header or footer:
- Select the Insert tab.
- Click either the Header or Footer command. A drop-down menu will appear.
- From the drop-down menu, select Blank to insert a blank header or footer, or choose one of the built-in options.
After you close the header or footer, it will still be visible, but it will be locked. To edit it again, just double-click anywhere on the header or footer, and it will become unlocked.
To insert the date or time into a header or footer:
- Double-click anywhere on the header or footer to unlock it. The Design tab will appear.
- From the Design tab, click the Date & Time command.
To remove content controls:
By default, some of the built-in headers and footers have snippets of text that are called content controls. Content controls can contain information such as the document title or company name, and they allow you to enter this information into a form field.
However, you’ll often just want to type a normal header without any content controls. To do this, you’ll need to remove any content control fields from the header or footer.
- With the header or footer section active, right-click the content control field you want to remove. A drop-down menu will appear.
- Click Remove Content Control. The content control field will disappear.
Other header and footer options
There are many other header and footer options you can use to design these sections of your document. You can review the Header & Footer Tools Design tab to view and explore these options.
Adding page numbers
Word can automatically label each page with a page number and place it in a header, footer, or side margin. You can add page numbers to an existing header or footer, or you can insert page numbers into a new header or footer.
To add page numbers to an existing header or footer:
- Select the header or footer. The Design tab will appear.
- Place the insertion point where you want the page number to be. You can place it anywhere except inside a content control field.
If you’ve already typed information into your header or footer, it’s important to place the page number at the Current Position to avoid losing anything. If you select a page number from Top of Page or Bottom of Page, it will delete anything you’ve already added to the header or footer.
To insert page numbers into a new header or footer:
- From the Insert tab, click Page Number. A drop-down menu will appear.
- Select the desired page number style, and it will appear in your document.
To hide the page number on the first page:
In some documents, you may not want the first page to show the page number. You can hide the first page number without affecting the rest of the pages.
- Select the header or footer that contains the page number.
- From the Design tab, place a check mark next to Different First Page. The header and footer will disappear from the first page. If you want, you can type something new in the header or footer, and it will only affect the first page.
If you’re unable to select Different First Page, it may be because an object within the header or footer is selected. Click in an empty area within the header or footer to make sure nothing is selected.
To format page numbers:
- Select the header or footer that contains the page number.
- From the Design tab, select the Page Number command.
- Click Format Page Numbers.
If you’ve created a page number in the side margin, it’s still considered part of the header or footer. You won’t be able to select the page number unless the header or footer is selected.
An alternative way to modify your page numbering is by using section breaks. To learn how to do this, read our article on Modifying Page Numbers in Word.


