Last updated: Jan 20, 2020
RisingStack’s services:
- Full-Stack Development & Node.js Consulting
- DevOps, SRE & Cloud Consulting
- Kubernetes Consulting
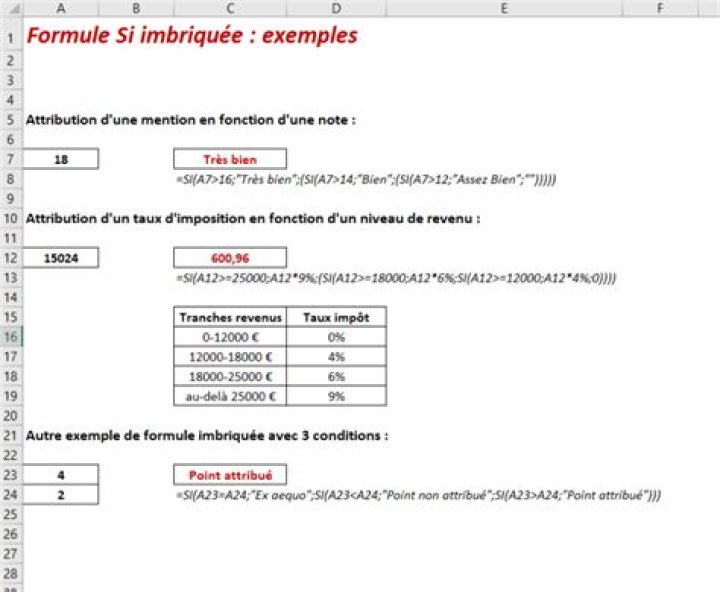
- 24.7 Node.js Support
- Infrastructure Assessment & Code Reviews
Sign up to our newsletter!
Join 150K+ monthly readers.
In-depth articles on Node.js, Microservices, Kubernetes and DevOps.
In this article:
Full-Stack Developer at RisingStack
In this article, I’m going to show how you can quickly generate a static site with Hugo and Netlify in an easy way.
What are static site generators, and why do you need one?
Simply put, a static site generator takes your content, applies it to a template, and generates an HTML based static site. It’s excellent for blogs and landing pages.
- Quick deployment
- Secure (no dynamic content)
- Fast load times
- Simple usage
- Version control
So, what are the popular options in terms of static site generators?
- Gatsby (React/JS)
- Hugo (Go)
- Next.js (React/JS)
- Jekyll (Ruby)
- Gridsome (Vue/JS)
These are the most starred projects on GitHub. I’ve read about Hugo previously, and it seemed fun to try out, so I’m going to stick with Hugo.
What is Hugo?
The official website states that Hugo is the world’s fastest static website engine.
We can confirm that it’s really fast. Hugo is written in Golang. It also comes with a rich theming system and aims to make building websites fun again.
Let’s see what we got here.
Installing Hugo
To verify your install:
Using Hugo
Create a new project:
Add a theme for a quick start. You can find themes here.
Add the theme to the config file.
Add some content.
It should look something like this:
There are lots of options (tags, description, categories, author) you can write to the front matter details.
You can read more about the details here.
Take a look at what we made:
Understanding Hugo’s directory structure
- archetypes: Archetypes are content template files that contain preconfigured front matter (date, title, draft). You can create new archetypes with custom preconfigured front matter fields.
- assets: Assets folder stores all the files, which are processed by Hugo Pipes. (e.g. CSS/Sass files) This directory is not created by default.
- config.toml: Hugo uses the config.toml , config.yaml , or config.json (if found in the site root) as the default site config file. Instead of a single config file, you can use a config directory as well to separate different environments..
- content: This is where all the content files live. Top level folders count as content sections. If you have devops and nodejs sections, then you will have content/devops/first-post.md and content/nodejs/second-post.md directories.
- data: This directory is used to store configuration files that can be used by Hugo when generating your website.
- layouts: Stores templates in the form of .html files. See the Styling section for more information.
- static: Stores all the static content: images, CSS, JavaScript, etc. When Hugo builds your site, all assets inside your static directory are copied over as-is.
- themes: Hugo theme of your choice.
Styling our static site
Remember, we applied a theme before. Now, if we inspect the themes folder, we can see the styling files.
DO NOT EDIT THESE FILES DIRECTLY.
Instead, we will mirror the theme directory structure to the root layouts folder.
Let’s say I want to apply custom CSS to the theme.
The theme has a themes/theme-name/layouts/partials folder, where we can find some HTML templates (header.html, footer.html). Now we will edit the header.html template, so copy the content from this file to layouts/partials/header.html and be careful to create the same directory structure like the theme’s into the root layouts folder.
Create a custom CSS file: static/css/custom-style.css .
Add the custom css file to config.toml :
Add this code inside the tag:
Now you can overwrite CSS classes applied by your theme.
Deploying our static site to Netlify
One of the benefits of a static site is that you can deploy it easily. Netlify or AWS S3 is a very good choice for hosting a static site. Let’s see how to deploy it to Netlify.
- Netlify account
- Github repository
What to do on Netlify
Create a git repository
Create a netlify.toml file into the root of your project with the content below.
Now, if you push your code to Github, Netlify will deploy the site, and blogging shall start.
Connect Netlify and your Git repository
Build and deploy
You can also take a look at the Hugo official Netlify hosting details for further information.
AWS S3 + CI
We will be using Terraform to create an S3 bucket that will host our static site. I assume you have an AWS account.
Create an s3_bucket.tf file in your project and insert the content below to it:
Then, folllow these steps:
execute terraform init
insert the following code snippet
- execute terraform apply
This will create a public readable AWS S3 bucket, which will host the static site.
Now we have to take care of building the static site on our own: we need a CI tool.
Setting up CircleCI for continuous integration
At RisingStack, we’re usually using CircleCI for these kinds of tasks. Let’s set up the build process.
Create the following files in the project root: .circleci/config.yml
Apply the following code to config.yml :
Note: To add AWS credentials, locate the AWS Permissions link under the Permissions section in CircleCI.
Moving forward with Hugo
Hugo offers so much more you should know about. Discover the official documentation here.
LTV Co. Engineering Blog
4 days ago · 5 min read
THIS POST WAS ORIGINALLY PUBLISHED ON OUR OWN BLOG SITE CHECK IT OUT TO SEE MORE POSTS LIKE THIS!
- Who’s Hugo
- A new CMS: Forestry.io
- Additional Performance
- The Final Results
We broke up with WordPress, a painful but necessary process we detailed in a previous post. But this isn’t a story about endings, but rather one about new beginnings — with Hugo, our new CMS. They say that there is always something better waiting for you out there and for us, it was Hugo.
Hugo is a static site generator (SSG) written i n Go. Websites are viewed more often than they are edited and Hugo takes advantage of that by only building pages when the content is created or updated, unlike dynamic systems like WordPress that generate HTML for each user request. Since your HTTP server is serving a static version of your page, there is no need to build on-demand every time a user wants to access your website. The result: better performance. The developers that maintain Hugo claim an average site will build in less than a second!
Hugo takes markdown files and generates HTML files using templates. Markdown is a lightweight markup language that can be used to add formatting elements to plaintext documents. We can add # for headings or wrap words with two asterisks to make the text bold. For example, this section markdown starts with:
One of the things people love about WordPress is its ease-of-use text editor. Markdown is not WYSIWYG, which means you have to add the syntax to your text in order to display different styles. Learning markdown is not hard and nowadays, there are plenty of messaging apps (WhatsApp, Telegram and Slack, to name a few) that make use of this language, but this process might be tedious, especially for people without technical knowledge. Why then, would we remove such a good feature as a built-in text editor? Forestry was our solution.
Forestry.io is a content management system (CMS) built for SSGs such as Hugo, Jekyll or Gatsby. A CMS is an application that helps users create and manage content for their website. This is extremely helpful to people without technical knowledge. Without Forestry.io, every blog contributor would need to download the project from our repository and start “coding” their articles using a markup language. We want this process to be as simple as possible so editors can focus on content creation. Forestry.io has a familiar WYSIWYG interface that allows users to write, save and preview drafts.
The main selling point of Forestry.io for our engineers is that it is entirely backed by Git. All the content and code are version-controlled with Git and saved in Github, with no need for a database or third-party app to store information. This makes the Continuous Integration process easy because all the files we need are stored in a Git repository. Editors can use the Forestry.io interface to generate the markdown files and these get stored as the content that Hugo later uses to build the entire application. At the same time, developers can make changes to any of the templates or add new features to the website and push them to the same repository. The following schema helps illustrate the process:
We previously used a CSS framework and made use of third-party JavaScript libraries, so we wanted to take a look at those to see if there were improvements that could be made. In the case of our CSS, we found that Bootstrap came with a high dependency on jQuery, which slowed us down with the use of unnecessary functions. We also recognized the possibility of future security vulnerabilities with the library and having to keep the library updated to avoid such vulnerabilities. A report from W3Tech found that jQuery is used by 73% of all the websites and, more importantly, 81% of those websites are using version 1, a version no longer supported by the jQuery team. Another report from Snyk showed more than 50% of the vulnerabilities found for jQuery are from this first version. Yet a majority of websites use jQuery as a legacy component, making it an easier target for malicious hackers.
Another issue we encountered using jQuery: it caused our pages to load much slower because of the package size, which then affected our domain’s overall SEO score.
There was no compelling reason to continue using jQuery, so we made the break. Once the decision was made, we used sites such as youmightnotneedjquery.com to search for the vanilla js implementation of any existing jQuery functions we were using. We wanted to keep the handy jQuery selectors and for that, we made use of Cash, a jQuery alternative with jQuery-style syntax that is great for manipulating the DOM. It’s lighter at 32 KB uncompressed compared to jQuery at 271 KB.
To further remove our dependency on jQuery, we started using the Bulma framework, a CSS framework based on flexbox with no dependencies on javascript.
PurgeCSS was another tool that we implemented to help our minimization of CSS. Even though Bulma is modular and lets you pick which components you want in your package, we still found some extra classes included that we never used. PurgeCSS was great to identify unused classes from our content files and helped us further reduce our CSS footprint and consequently make our pages load faster.
The CSS size for the WordPress design was around 57.1KB, more than 3 times our current size with Hugo. Bootstrap 4 itself is 20KB gzipped, while the CSS for the whole blog in Hugo is 16.6 KB file, including all of the Bulma components we used.
At LTV, we commit to making improvements every day. We are always looking for the best tools, the best frameworks and the best people. Every new project is an opportunity to reflect on the past and see what has been done and what can be improved. Regardless of whether you’re working on redoing an old project in a new language or working on an entirely new project, you will typically arrive at this realization: “Hey, I’ve done this before.” Whenever I find myself in this situation, I ask myself if there is any way I can come up with a solution that improves upon what we did before.
Interested in working with us? Have a look at our careers page and reach out to us if you would like to be a part of our team!
Find out how Hugo makes building websites fun again.
Subscribe now
Get the highlights in your inbox every week.
Do you want to start a blog to share your latest adventures with various software frameworks? Do you love a project that is poorly documented and want to fix that? Or do you just want to create a personal website?
Many people who want to start a blog have a significant caveat: lack of knowledge about a content management system (CMS) or time to learn. Well, what if I said you don’t need to spend days learning a new CMS, setting up a basic website, styling it, and hardening it against attackers? What if I said you could create a blog in 30 minutes, start to finish, with Hugo?
hugo_1.png
Hugo is a static site generator written in Go. Why use Hugo, you ask?
- Because there is no database, no plugins requiring any permissions, and no underlying platform running on your server, there’s no added security concern.
- The blog is a set of static websites, which means lightning-fast serve time. Additionally, all pages are rendered at deploy time, so your server’s load is minimal.
- Version control is easy. Some CMS platforms use their own version control system (VCS) or integrate Git into their interface. With Hugo, all your source files can live natively on the VCS of your choice.
- Red Hat Developers Blog
- Programming cheat sheets
- Try for free: Red Hat Learning Subscription
- eBook: An introduction to programming with Bash
- Downloadable guide: 7 essential PyPI libraries and how to use them
- What is an IDE?
Minutes 0-5: Download Hugo and generate a site
To simplify the installation of Hugo, download the binary file. To do so:
- Download the appropriate archive for your operating system.
- Unzip the archive into a directory of your choice, for example C:\hugo_dir or
/hugo_dir ; this path will be referred to as $ For simplicity, I’ll refer to the path to the Hugo binary (including the binary) as hugo . For example, hugo version would translate to C:\hugo_dir\hugo version on your computer. If you get an error message, you may have downloaded the wrong version. Also note there are many possible ways to install Hugo. See the official documentation for more information. Ideally, you put the Hugo binary on PATH. For this quick start, it’s fine to use the full path of the Hugo binary. Congratulations! You have just created your new blog. With Hugo, you can either theme your blog yourself or use one of the beautiful, ready-made themes. I chose Kiera because it is deliciously simple. To install the theme: You have just themed your blog! You can find hundreds of beautiful themes on the official Hugo themes site. Whereas a bowl is most useful when it is empty, this is not the case for a blog. In this step, you’ll add content to your blog. Hugo and the Kiera theme simplify this process. To add your first post: At this point, you can go wild. Notice that your post consists of two sections. The first one is separated by +++ . It contains metadata about your post, such as its title. In Hugo, this is called front matter. After the front matter, the article begins. Create the first post: All you need to do now is start the server: hugo server -D . Open your browser and enter: . What we’ve done is great, but there are still a few niggles to iron out. For example, naming your site is simple: Published: 15 August 2017 | Last updated: 11 September 2017 | Web Over the weekend, I moved my blog from GitHub to GitLab. I now have a fully automated CI build on GitLab that grabs a NodeJS Docker image, downloads Hugo, UglifyCSS and HTMLMinifier via NPM, build and minify pages, and finally publishes to GitLab Pages on every Git merge to master. I have been using Hugo Static Site Generator for over a year. Initially my blog was hosted on Google Firebase. Not long after, I moved to GitHub Pages and been using it for over a year. Be it Firebase or GitHub, they both worked very well for me. If they have been working, why fix what is not broken? TL;DR, to automate chores. For full explanation, let me start by explaining my old chores of composing and publishing a new blog post: I spent the weekend improving the end-to-end process as much as I could. Table below shows comparison among free tier options: *Possible through the use of Docker images for CI builds. See example websites hosted by GitLab Pages. I compared 3 different GitLab CI configurations. Configurations are in YAML format: GitLab’s example uses a very small Docker image, Alpine Linux. The size is just 5MB. The key lines are as follows: The variables need to be configured. They are HUGO_VERSION which is the version to download and HUGO_SHA which is a SHA256 hash of the Hugo release. It will get you going if you need just the bare minimum. Hugo’s example eliminates the need to maintain the YAML file by not needing to update version and SHA256 checksum of Hugo releases. Its Docker image already has Hugo in it. This approach is the most simplified option that I could find. I setup my .gitlab-ci.yml to use NodeJS Alpine Docker image. Undoubtedly more complicated than the other two options but there are reasons. I leveraged on NodeJS NPM Package Manager to install Hugo binary as well as CSS and HTML minifiers. The version of Hugo on NPM is slightly outdated but this is fine by me. The minifiers are used to shrink files after Hugo has generated them. From the YAML file above, the build command that GitLab CI will call is npm run build which in turn runs the command found in my package.json . Read next section. Note: This Docker image does not contain Python. Python is required for Pygments to work. If you have not heard of Pygments, it is a server-side syntax highlighter. To reduce my blog’s dependencies, I chose to replace this with HighlightJS, a client-side alternative. Below is a JSON file that NPM understands. It is placed at root of your Hugo source folder: All that is left is pushing these along with Hugo source files into master branch on GitLab. The CI is triggered automatically upon performing Git push to GitLab. If the build fails, you will receive an email notification almost immediately. Otherwise, the website should be published in about a minute. You can find additional information, i.e. SSL/TLS setup on custom domains under GitLab Pages Getting Started guide. According to its GitHub README, Hugo is a static HTML and CSS website generator written in Go. It is optimized for speed, ease of use, and configurability. Hugo takes a directory with content and templates and renders them into a full HTML website. Hugo relies on Markdown files with front matter for metadata, and you can run Hugo from any directory. This works well for shared hosts and other systems where you don’t have a privileged account. Hugo renders a typical website of moderate size in a fraction of a second. A good rule of thumb is that each piece of content render in around 1 millisecond. Hugo is designed to work well for any kind of website including blogs, tumbles, and docs. At first, I didn’t even know how to build a static website. People on Dotfiles ID recommended me to try to build a website using SSG (Static Site Generator) like Jekyll, Hexo, or Hugo. I didn’t have programming languange knowledge, so I worried it would be hard. But after seeing a beautiful theme list, I felt motivated to try it. After that, I duckduckwent about popular SSG. The big four were I was interested with Hugo, simply because it distributed the *.deb package. I use Debian, so it makes me easier to install it. And even better it doesn’t pull any dependency, not even the Go compiler. So, it keeps my setup simple. The other SSG are based on things I don’t understand, which needs to setup a lot thing like node.js, ruby, and other things I don’t understand. I don’t have a time to learn them. So, Hugo is perfect SSG for me. The unintentional advantage, Hugo is really fast at building website. Well, it’s actually available on Debian repository since Stretch. But the package version is too old. Most of Hugo theme reqires higher version of Hugo. So, I went to its Release Page on GitHub to get the higher package version in *.deb format. Installing package outside the repo is actually unrecommended, but Hugo doesn’t pull any dependencies. So, if something goes wrong, I just need to remove Hugo, other packages will not be affected. Fortunately, until now I never had any issue with the sideloaded Hugo. After I downloaded it, I installed it using dpkg. I hosted my blog on GitHub. So, I made two repositories on GitHub. One to host the generated html. I named the repository addy-dclxvi/addy-dclxvi.github.io. It had to be .github.io, to make it instantly accesible from https:// .github.io. And one more to put the source code to keep the spirit of Open Source. I simply named the repository addy-dclxvi/blog. The repo of generated html had to placed in public folder. The official Hugo guide asked me create git submodules, but I didn’t do it. I didn’t want things to be complicated, I want simplicity. Then I told hugo to create a new website. Then picked a theme from Hugo Themes. I was interested with Jane by Xianmin. So, I installed it. Hugo is a static site generator with lightning fast rendering speed and excellent ease of use. Thanks to all of its content-oriented features, you can always focus on creating content rather than building the environment: In this tutorial, I will show you how to install and use Hugo to build a static blog site on a CentOS-based Vultr LEMP server instance. Login to your instance as a non-root user with sudo permissions. See how to create such a user in this article. Hugo can be installed on almost all of the mainstream platforms. For CentOS, you just need to download the latest program file in a .tar.gz archive and unzip it to a convenient location. At the time of writing, the latest version is 0.15. Test your installation with the following command: With Hugo, you can build your site from within any folder on your server. Here, I built a site in the directory mysite/ under my home directory. Run the following commands to see the site’s architecture: As you see, the site’s current architecture resembles: With another two to-be-created directories, themes/ and public/ , the whole architecture of a Hugo site is compact yet comprehensive. As a starter, know that your content should be stored in the directory content/ . To install all themes from the Hugo repository, run the following commands. These will create a directory named themes/ in your site directory and download all of the themes from the Hugo theme repo. If you just want to install a single theme, visit the Hugo theme repo to determine your favorite theme. Copy its URL and paste it into the git clone command below. The file named config.toml in your site directory contains the global configuration for your Hugo site. Edit the file with a text editor to make some basic configuration changes as listed below. Remember to replace the values according to your specific conditions. In your site directory, input the following command to create a content page in the directory Open the file in a text editor, the format of the file should resemble the following. Between the two lines of +++ lies the meta information about your content page. Here, you can remove the line draft = true and modify the title line as you wish. Under the second +++ line, add the content that you want to display on the web page. Remember to write your content in the Markdown language. After finishing this edit, keep the text editor open for later use. You can use Hugo’s built-in web server to deploy your site, which can instantaneously display your changes on the web page as soon as you modify your content in a text editor. Open another terminal, configure the iptables rules to allow your access to your site on Hugo server’s default port 1313: Launch the Hugo server: Visit your site from a browser: Now, you can try to edit the content of the page file in the previous terminal or add/remove a page file. You will find that any modifications in the content/ directory will be reflected simultaneously on your browser screen. This is a great feature for a busy blogger because you can always immediately see your modifications for better composing experiences. After you finish your edit, press Ctrl+C to stop the Hugo server. Now it is time to publish your site on the web. Run the following commands and Hugo will generate all of the static content suitable for publishing within the public/ directory. Note: Hugo will not delete old files which were generated previously when you run the commands above. In order to avoid unexpected results, you can always delete the public/ directory before you run the hugo command or specify a new output destination as shown in the following command. Since the Nginx web server has already been running on the server, all you need to do is copy the content of the /mysite/public/ directory or other custom destination directories to your web directory /usr/share/nginx/html/ . Delete the original files: Copy your static site files to the web directory: That’s it. Now you can visit your super fast static site from your browser: . To see more details, use the command hugo help or visit the Hugo official website. Site generators are no longer a novel topic. Various programming languages have released their own popular website building frameworks. For example, Python released Pelican , JavaScript released Hexo and PHP released WordPress, which has the largest market share. I have tried all these tools when deploying my personal blog. But when building the official Nebula Graph Site, after evaluation, I chose Hugo, which is written in Golang. To clarify, there is not much difference in the frameworks written in various languages. It is personal preferences and aesthetics that matter, which is not the topic covered in this post. The Nebula Graph team frequently shares technical articles on the company blog. Hugo has a flexible and powerful content management system. You can add various types of content, such as blogs, releases, and technical documents as required. Details will be introduced later. Commonly seen product proliferation pages include a home page, a newsroom page, and a company page, etc. This requires that the Content Management System supports various types of pages. These pages may share the same components such as the navi bar and footer. Details will be covered later as well. Hugo itself is a web framework similar to the service-end template, which supports server-end rendering natively. Nebula Graph serves users worldwide. To ensure quality user experience, the website should support multiple languages. Hugo has us covered. As long as you have the corresponding corpus configuration, you can use the language on your site and manage it easily. Based on Hugo’s powerful template system, the content managers can use it smoothly after the technicians have made custom development on the template. The above is the project structure built with the powerful Hugo template. Personally I think it demonstrates the requirements of different sites intuitively. Refer to Hugo’s official Templates Overview for more information. In addition to the powerful content management system, Hugo provides a lot of useful built-in templates and functions to improve the building efficiency. For example: Share
For example, c:\hugo_dir\hugo version .Minutes 5-10: Theme your blog
hugo_2.png
Minutes 10-20: Add content to your blog
hugo_3.png
Minutes 20-30: Tweak your site
Motivation
What, why and how to automate
One Git repository for both source and published content
Google Cloud Repository GitHub Pages GitLab Pages Storage 1GB 1GB 10GB Bandwidth per month 10GB 100GB Unlimited Private repository Yes No Yes Public repository No Yes Yes Static site generator No Jekyll Any* Which Docker image to use and why
GitLab’s example
Hugo’s example
My approach
My package.json file
Triggering GitLab CI
Additional information
Introduction
Installation
Building A Website
Creating Two Repositories on GitHub
Cloning The Empty Repo
Introduction
Prerequisites
Step 1: Install the Hugo program
Step 2: Build your site
Step 3: Install themes from the Hugo repository
Step 4: Make some basic configuration changes
Step 5: Compose your content
Step 6: Adjust your content with the Hugo server
Step 7: Publish your site
Website Requirements at Nebula Graph
Blog Content Management
Product Proliferation
Multi-Language Support
Easy-to-Manage for Non-Technical Staff
Hugo Feature Highlights
Flexible and Powerful Content Management System
Rich Built-in Tools
Mar 15, 2020 · 4 min read
Hugo is that new hot static site generator written with Go that makes being a webmaster fun again. If you don’t know it yet, you should check it out. I might be writing an article about that anytime soon.
Heroku is certainly not the place of choice to host static websites. In fact, it is meant to be a powerful cloud hosting service for web apps of all sizes.
But let’s say the truth: it is e asy to learn and configure. And its free plan has a wide-range of advantages for hobbyists like me. It is also insanely easy to deploy static websites with just a little trick that involves a simple index.php file and a composer.json .
That’s the reason why Heroku might be your choice to host your Hugo website.
To deploy a Hugo website, a buildpack exists. You can look for it on GitHub. But let’s again say the truth: you ain’t gonna need it. To quote them :
Because Hugo renders static websites, you can host your new Hugo website virtually anywhere.
Anywhere ? I see. Let’s go.
If you’re a good person, your Hugo project is already under source control.
Here’s what you need to deploy a Hugo website on Heroku :
- One more git repository
- Good git understanding
- Basic heroku understanding
- A Heroku Dyno
I also assume your Hugo project is already under git source control. If not, run a simple git init at the root of it.
All right ? Let’s begin.
We will create a small local pipeline that will help us deploy the contents of the public folder, which contains the “compiled” html of our static site.
Plus, every time you are going to compile your site with the hugo command, you will be able to deploy it to heroku.
In order to do that, we will initialize a git submodule that will be just that compiled code, that will be deployed to Heroku. With a few tweaks to make it work with an Heroku app.
At the root of your Hugo project, run the following command:
This will remove the public folder form the index. As we will create a submodule from that folder, we need to take this repository out of the index. This won’t actually remove the files ! 🙂
Go to your favourite online code host (GitHub, Bitbucket…) and create a repository at there. Name the repository my_awesome_website.public , or any other name that fits to you. Create a README.md file in it.
Go back to your Hugo public directory and type the following:
Inside the public folder of the Hugo project, create an index.php file. Put the following code inside of it:
Similarly, create a composer.json file. Put the following code inside of it:
At the root of the Hugo project, type the following:
With a terminal, go to another directory. Somewhere else than your Hugo project. Let’s say for example
Inside this folder, run the following command:
From the my_awesome_website.public repository, create your Heroku app if it does not exist already, or associate your repo to an existing one:
Then, deploy to the Heroku app with:
And voilà ! Your site should be deployed accordingly to that Heroku app.
If you update your site, let’s say you add a blog post or you modify the files in the data folder, and you want do deploy it, you’ll have to run this from the root folder of your Hugo project.
Then, in the other folder that is somewhere else than your Hugo project (In our case
/projects/my_awesome_website.public , do the following:
It should be done !
Also, you would see that the submodule changelog at the root of the Hugo project is gathering changes as soon as you commit new code to it. Like:
It’s your choice to commit them or not :). Personally, I would do it to keep the repository clean.
You could make a script that would take care of compiling the site (with hugo ) that you would run with a git hook’s pre-push scripts.
While developing my showcase website using Hugo, I learned about git submodules.
I see there is a true interest to use them as a dependency resolver, especially when you modify the code of the module, and you want to merge it with updates.
Hugo is a static site generator written in Go. It is optimized for speed, easy use and configurability. Hugo takes a directory with content and templates and renders them into a full html website.
Hugo makes use of markdown files with front matter for meta data.
Written in GoLang for speed, Hugo is significantly faster than most other static site generators.
A typical website of moderate size can be rendered in a fraction of a second. A good rule of thumb is that Hugo takes around 1 millisecond for each piece of content. It’s so fast that it will render the site in less time than it takes to switch to your browser and reload.
Hugo is made to be very flexible. Define your own content types. Define your own indexes. Build your own templates, shortcodes and more. It is written to work well with any kind of website including blogs, tumbles and docs.
Installing Hugo
Hugo is written in GoLang with support for Windows, Linux, FreeBSD and OSX.
The latest release can be found at hugo releases. We currently build for Windows, Linux, FreeBSD and OS X for x64 and 386 architectures.
Installation is very easy. Simply download the appropriate version for your platform from hugo releases. Once downloaded it can be run from anywhere. You don’t need to install it into a global location. This works well for shared hosts and other systems where you don’t have a privileged account.
Ideally you should install it somewhere in your path for easy use. /usr/local/bin is the most probable location.
The Hugo executible has no external dependencies.
Installing from source
Dependencies
- Git
- Go 1.1+
- Mercurial
- Bazaar
Clone locally (for contributors):
Because go expects all of your libraries to be found in either $GOROOT or $GOPATH, it’s helpful to symlink the project to one of the following paths:
- ln -s /path/to/your/hugo $GOPATH/src/
- ln -s /path/to/your/hugo $GOROOT/src/pkg/
Get directly from Github:
If you only want to build from source, it’s even easier.
Building Hugo
Running Hugo
Complete documentation is available at Hugo Documentation.
License
Hugo is released under the Simple Public License. See LICENSE.md.
Thu Jul 4, 2013
400 Words
Read in about 2 Min
- Development
- Blogging
- GoLang
- Development
- golang
- Blogging
About the Author:
Steve Francia is an American Software Engineer, Speaker & Author based in NYC. He has the unique distinction of leadership roles in five of the largest open source projects.
He currently works at Google on the leadership team of the Go language where he is responsible for the strategy and product of the Go project and it’s over 1M users.
He previously held executive roles at Docker, MongoDB where he led engineering, product and open source. He formerly was a director of the Drupal Association.
He is the creator of some of the world’s most popular open source applications and libraries including Hugo, Cobra, Viper, spf13-vim and many more.
Above all of these accomplishments, he is a father of 4. Outside of technology Steve likes travel, skateboarding, punk rock, and dystopian films.
© 2013-19 Steve Francia. Some rights reserved; please attribute properly and link back.
Powered by Hugo.