Oliver Haslam is a professional freelance writer with nearly ten years of experience. His work has been published on Macworld, PCMag, 1Password’s blog, and other websites. He writes about all things Apple. Read more.
Whether you’re recording a voice message as a reminder of that million dollar idea or catching a snippet of a new song you know you’ll forget, the iPhone and iPad’s Voice Memos app is the perfect tool.
The Voice Memos app is free, and it ships with every iPhone and iPad that Apple sells. That makes it the obvious choice for recording audio. Just like Apple’s other first-party apps, the Voice Memos app has just enough power to get the job done without making things complicated. Recording audio and then sharing it is the most common use for the app, and we’re going to show you exactly how to do it.
Recording Audio Using the Voice Memos App
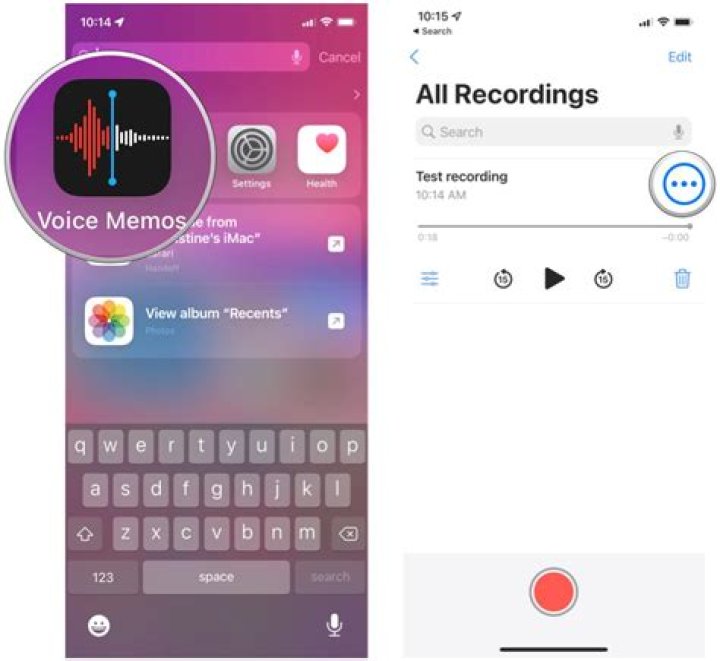
Open the Voice Memos app to get started and then tap the big red “Record” button. You can’t miss it.
To pause the recording, tap the white pill button and then tap the “Pause” button. Once paused, tap the same button to resume your recording. You’ll also see a waveform of your recording in this screen.
Tap the “Done” button when you have completed your recording.
How to Play an Existing Recording
It’s no good recording these things if you never actually listen to them, but thankfully that process only requires a couple of taps. Open the Voice Memos app and tap the recording you want.
Once selected, tap the black “Play” button and the recording will begin playing.
How to Share Recordings
One of the most popular uses for recordings is to share them with other people, and it’s super simple to do that. Get started by opening the Voice Memos app and selecting the recording that you want to share.
Tap the three horizontal dots—otherwise known as the “More” button in iOS—and then tap the “Share” option.
Finally, select how you want to share the recording.
The easiest way to record audio on iPad is to use the Voice Memos app which is pre-installed on the Apple iOS 11. Just like the name implies, the built-in Voice Memos app lets you record any audio you want to save right to your iPhone. It could be a lecture at school, voice-over for a video, an interview for a project, or anything at all.
Part 1: How to Record Audio on iPad
Record audio on iPad is not a very difficult job. This task can be easily done with a few simple operations.
Step 1 Launch Voice Memos app from your Home screen. It may still be in the Utilities folder if you haven’t moved it.
Step 2 Tap record button. It’s the big red circle.
Step 3 Clicking the button in the lower-left corner pauses the recording. After the recording is paused, clicking the button in the center of the bottom of the screen will play the audio that has been recorded but not saved.
Step 4 Click on a time in the timeline or drag the audio waveform, and click on REPLACE to re-record the audio after that point in time.
Tips: If the re-recorded audio exceeds the length of the already recorded audio, recording will continue until the red play button in the lower right corner is pressed.
Step 5 Click RESUME to continue recording the audio you want. Tap Done when you’re finished. Then the recording will now appear in the list above the record tab.
How to listen to an existing Voice Memo on iPad and iPhone?
You can listen to all the recordings you make right in the Voice Memos app.
Step 1 Launch Voice Memos app from your Home screen. It may still be in the Utilities folder if you haven’t moved it.
Step 2 Tap Voice Memo you’d like to listen to.
Step 3 Tap play button.
Part 2: How to Edit the Recorded Audio of Voice Memos on iPad/iPhone
Rename Audio of Voice Memos on iPad and iPhone
If you don’t like the name you gave your original recording or couldn’t come up with one at the time, you can always go back and change it.
Step 1 Launch Voice Memos app from your Home screen’s Utilities folder.
Step 2 Tap the recording you’d like to rename.
Step 3 The file name can be modified by tapping the file name in the upper right corner.
Step 4 Enter a new name. After the input is complete, click the button to close the keyboard or tap anywhere else, the file name will be saved automatically. You can rename any recording, just like this, any time.
Delete Audio of Voice Memos on iPad and iPhone
There are many ways to delete a recording. Here we will show you the quickest way.
Step 1 Launch Voice Memos app from your Home screen.
Step 2 Tap the recording you’d like to delete.
Step 3 Tap Delete button on the upper right corner of the recording. It’s a trash can.
Deleted recordings will appear in the Recently Deleted folder and will remain there for 30 days, so if you delete something by accident, you can recover it there.
You can alternatively delete multiple recordings by tapping Edit on the top right of the screen, selecting recordings, and tapping Delete.
Edit Audio of Voice Memos on iPad and iPhone
In addition to replacing the clips in the recording, we can also delete the entire length of the file or delete an audio segment in the file.
Step 1 Under the Voice Memos column on the left of the screen, tap the recording you wish to edit.
Step 2 Tap Edit button in the top-right corner of the screen.
Step 3 Tap Crop icon in the top-right corner of the Edit screen.
Step 4 Tap and hold either the beginning or end of the recording, and then drag the beginning or end point to the desired location.
Step 5 Tap Trim or Delete button at the bottom of the screen, the selected clip will be saved or deleted.
Step 6 Tap Save then tap Done.
If you want to import the audio files recorded on the iPad into your computer for editing, you can use FoneTrans for iOS.
FoneTrans for iOS is a transferring tool that can transfer all your iPad files to your computer. whether you are using Windows or Mac. You can manage it easily.
With FoneTrans for iOS, you will enjoy freedom to transfer your data from iPhone to computer. You can not only transfer iPhone text messages to computer, but also photos, videos and contacts can be moved to PC easily.
- Transfer photos, videos, contacts, WhatsApp, and more data with ease.
- Preview data before transferring.
- iPhone, iPad and iPod touch are available.
For more detailed file transferring steps, you can refer to transfer music from iPhone to computer.
Of course, you can also transfer the vioce memos from the iphone to your computer, just refer to this article: Transfer voice memos from iPhone to computer.
Voice Memos app in iPhone, iPad, and macOS is one of the potentials but underrated apps. As such, it deserves a much-appreciated makeover. iOS 12 and macOS Mojave brings this transformation. The new update transforms Voice Memos from a simple audio/voice recorder into an audio editor without significantly changing the interface. While it’s not only easy to use Voice Memo, it adds the following:
- 3D Touch support – Force Touch the Voice Memos app icon to instantly start a recording.
- Add shortcut – Now easily add a shortcut to the Control Center to quickly access a Voice Memo when you tap it.
- Light swipe action support – reveals the name of the recording file, displays a timer and an audio waveform.
- Replace and Trim options – Enables editing of previously recorded Voice Memos.
- iCloud syncing – The redesigned app now lets you sync your recordings with iCloud.
How to use Voice Memos in iOS 12 on iPhone, iPad, and macOS
Voice Memos app in iOS 12 and macOS is much more than just a way to record voice snippets. Here’s how to use it!
How to record Voice Memos on an iPhone, iPad, and macOS
- Swipe to locate Voice Memos app. When found tap it to launch the app. On macOS, you may have to use the spotlight to search. The interface is the same on all the devices.
- If this is the first time you are here, it will ask for permission to use your microphone. If you’ve already recorded memos, all of them will be visible to you in a scrollable list.
- To begin recording a memo, press the big red button seen at the bottom of the screen. The action when confirmed will begin recording instantly.
- To stop the recording, press the red button again. If you wish to pause while recording you can do so.
- Once the recording stops, the new memo will appear at the top of your recordings, with the control options to p lay, p ause, s kip/forward 15 seconds, and r ewind 15 seconds. You can also scroll to start listening from any point.
If you want to replace part of recording with something new in the same memo, you can do that. Just pause the recording, and scroll to the part from where you want to replace. Hit the resume button again, and it will overwrite until you pause again. Post this, you can scroll ahead, and then start recording from some other part.
Instantly Start Recording using Voice Memos in iPhone and iPad
On iPhone and iPad, there’s a new Control Center toggle in iOS 12 for Voice Memos. Once activated, you can instantly start recording.
- Go to Settings and find Control Center.
- Navigate to Customize Controls to enable the toggle.
- When done, just 3D Touch the Control to open the Voice Memos popup. From here you can tap on New Recording to directly jump into a new voice recording in the app.
Also, you can choose from the following audio qualities,
The latter supports high-quality audio in your archive.
How to edit Voice memos in iPhone, iPad, and macOS
There are 2 ways via which you can edit voice memos in iOS 12 (iPhone and iPad) and macOS
- Record over something with the ‘Replace’ tool
- Trim the voice profile and insert new audio into the file.
How to Record over something with the ‘Replace’ tool in iPhone, iPad, and macOS
- Access the file list by simply opening the app and choose the desired file.
- Click the More Options menu visible as the three dots in the lower left.
- Here, select Edit Recording option,
- Gently rub through the waveform appearing with the blue marker to get to the point you want to record over.
- Now, hit the Replace button to start recording.
- When you like to stop, press the Pause button to stop recording.
- Now, go back to the original position where you started the replacement and press Play button to see how it works.
- Finally, click Done.
How to Trim audio Voice Memos in iPhone, iPad, and macOS
This feature is particularly useful in situations where you want to hide/remove sensitive information before sharing an audio file. Follow the first 3 steps as highlighted above. Thereafter,
- Select the Trim tool visible as the blue Crop-like tool. On macOS, look for a rectangular tool on the top left to open edit mode.
- Instantly, the waveform interface should be available flanked by yellow arrow marks, pointing outwards.
- When seen, stretch the edges to the point of audio you would like to trim.
- Here, you will have two options will be displayed – Trim or Delete.
- If you choose the former option, apart from the section of audio you selected, everything will be deleted.
- Confirming the latter will delete the complete selection.
- Press Save in the upper right corner.
How to Share Voice Memos from iPhone, iPad, and macOS
- Click on the three dots menu to locate Share option. it can be found just below Duplicate option as shown in the screenshot below. On macOS, you will need to select a voice memo and then click on the share icon on tothe p right corner.
- Select share to share the Voice Memo on WhatsApp, Gmail or other apps.
By default, Voice Memos saves your recording with the name of your location. If you would like to change this default setting, go to Settings -> Voice Memos -> Default Location-based naming and switch the slider to disable it.
On macOS, go to Settings > Security and Privacy > Location Services. Click on the lock icon at the bottom left, and enter your account password. Next, uncheck the box next to Voice Memos.
The easiest way to record audio on iPad is to use the Voice Memos app which is pre-installed on the Apple iOS 11. Just like the name implies, the built-in Voice Memos app lets you record any audio you want to save right to your iPhone. It could be a lecture at school, voice-over for a video, an interview for a project, or anything at all.
Part 1: How to Record Audio on iPad
Record audio on iPad is not a very difficult job. This task can be easily done with a few simple operations.
Step 1 Launch Voice Memos app from your Home screen. It may still be in the Utilities folder if you haven’t moved it.
Step 2 Tap record button. It’s the big red circle.
Step 3 Clicking the button in the lower-left corner pauses the recording. After the recording is paused, clicking the button in the center of the bottom of the screen will play the audio that has been recorded but not saved.
Step 4 Click on a time in the timeline or drag the audio waveform, and click on REPLACE to re-record the audio after that point in time.
Tips: If the re-recorded audio exceeds the length of the already recorded audio, recording will continue until the red play button in the lower right corner is pressed.
Step 5 Click RESUME to continue recording the audio you want. Tap Done when you’re finished. Then the recording will now appear in the list above the record tab.
How to listen to an existing Voice Memo on iPad and iPhone?
You can listen to all the recordings you make right in the Voice Memos app.
Step 1 Launch Voice Memos app from your Home screen. It may still be in the Utilities folder if you haven’t moved it.
Step 2 Tap Voice Memo you’d like to listen to.
Step 3 Tap play button.
Part 2: How to Edit the Recorded Audio of Voice Memos on iPad/iPhone
Rename Audio of Voice Memos on iPad and iPhone
If you don’t like the name you gave your original recording or couldn’t come up with one at the time, you can always go back and change it.
Step 1 Launch Voice Memos app from your Home screen’s Utilities folder.
Step 2 Tap the recording you’d like to rename.
Step 3 The file name can be modified by tapping the file name in the upper right corner.
Step 4 Enter a new name. After the input is complete, click the button to close the keyboard or tap anywhere else, the file name will be saved automatically. You can rename any recording, just like this, any time.
Delete Audio of Voice Memos on iPad and iPhone
There are many ways to delete a recording. Here we will show you the quickest way.
Step 1 Launch Voice Memos app from your Home screen.
Step 2 Tap the recording you’d like to delete.
Step 3 Tap Delete button on the upper right corner of the recording. It’s a trash can.
Deleted recordings will appear in the Recently Deleted folder and will remain there for 30 days, so if you delete something by accident, you can recover it there.
You can alternatively delete multiple recordings by tapping Edit on the top right of the screen, selecting recordings, and tapping Delete.
Edit Audio of Voice Memos on iPad and iPhone
In addition to replacing the clips in the recording, we can also delete the entire length of the file or delete an audio segment in the file.
Step 1 Under the Voice Memos column on the left of the screen, tap the recording you wish to edit.
Step 2 Tap Edit button in the top-right corner of the screen.
Step 3 Tap Crop icon in the top-right corner of the Edit screen.
Step 4 Tap and hold either the beginning or end of the recording, and then drag the beginning or end point to the desired location.
Step 5 Tap Trim or Delete button at the bottom of the screen, the selected clip will be saved or deleted.
Step 6 Tap Save then tap Done.
If you want to import the audio files recorded on the iPad into your computer for editing, you can use FoneTrans for iOS.
FoneTrans for iOS is a transferring tool that can transfer all your iPad files to your computer. whether you are using Windows or Mac. You can manage it easily.
With FoneTrans for iOS, you will enjoy freedom to transfer your data from iPhone to computer. You can not only transfer iPhone text messages to computer, but also photos, videos and contacts can be moved to PC easily.
- Transfer photos, videos, contacts, WhatsApp, and more data with ease.
- Preview data before transferring.
- iPhone, iPad and iPod touch are available.
For more detailed file transferring steps, you can refer to transfer music from iPhone to computer.
Of course, you can also transfer the vioce memos from the iphone to your computer, just refer to this article: Transfer voice memos from iPhone to computer.
How To Combine Voice Memos Apple
How to combine voice memos apple. You will need to upload your recording to a computer and use a audio editing application like audacity i’m not affiliated with the software. Download the free audio editor app for iphone.
Tap the more button on the bottom left of the recording. * send talking photo directly to your friends, family by sms, email, facebook or save.
1 easy to use, with a simple and intuitive interface. Combine voice memos on mac with imovie.
How to record voice memos on mac. In music memos version 1.0.7, you can export your music memos recordings to your voice memos library.
If you have a mac computer, you can use imovie to combine voice memos. How to share voice memos on iphone and ipad.
An iphone with ios 14 or an ipad with ipados 14; Locate and tap on the voice memo you want to transcribe.
Tap the edit button in the upper right corner, then tap to select the voice memos you want to combine. Tap the recording you’d like to share.
You can send recordings via imessage, email, and more! To start a voice recording, just open voice memos from your applications folder and click the big red record button.
Now from here, you may add the voice recording to dropbox, google drive, box, etc. Starting fresh with an empty voice memos.
Drag and drop a voice recording in the timeline to reposition it. Yet with many powerful features as auto send, adjustable playback speed, voice activated recording, audio enhancing filters, volume boost and more.
Need to record a conversation, speech, or note? Here’s how to use the Voice Memos app for iOS, iPadOS, and watchOS devices.
With Apple’s Voice Memos app, you’ve long been able to create voice memos on your iPhone to record conversations, dictation, and other audio notes. With iOS 12, Voice Memos segued to the iPad, and with iOS 13 and watchOS 6, the app is nestled on the Apple Watch.
Creating a voice memo seems simple enough; just tap the record button, right? There’s more to it than that. You can name and save your recordings, edit an audio file, share it via email, save it to an online service, and more.
With iOS 13 and iPadOS 13.1, the app adds more accessible actions to copy and save your recordings to the Files app and Dropbox. The overall process for creating voice memos is similar on an iPhone and iPad, but some steps and tools are different, so we’ll cover each device separately, concluding with the Apple Watch.
Update iPhone or iPad
To take advantage of all the new features in the Voice Memos app, make sure you are running the most up-to-date version of iOS and iPadOS. On iPhone, go to Settings > General > Software Update. If you have iOS 13.1 or higher, you’re good to go. If not, install the latest version.
On iPad, go to Settings > General > Software Update. If you have iPadOS 13.1 or higher, you’re set. If not, install the latest version.
Record on iPhone
Manage Recordings on iPhone
The recording is saved as a voice memo. From here, you can play and pause the recording as well as skip ahead or go back 15 seconds. To give the recording a specific name, tap the default title of New Recording and rename it.
If you don’t want to keep the recording, tap the trash can icon to delete it. If you change your mind and want it back, open the entry for Recently Deleted and tap the recording. Tap Recover and then select Recover Recording. Don’t wait too long, though. By default, any deleted recordings are purged after 30 days.
Replace Audio on iPhone
Maybe you want to keep the recording but would like to edit parts of it. Tap the recording and then tap the ellipsis icon ( ) at the left. From the menu, tap the command to Edit Recording. To replace parts of the recording with new content, move the recording to the area you’d like to replace. Tap the Replace button and record the new audio portion.
After you’ve finished recording the replacement audio, tap Pause to stop the recording. You can then move back to the start of the section you replaced and tap Play to hear the new audio. Tap Done if finished.
Remove Portions of a Recording on iPhone
To remove certain portions of a recording, tap the crop icon in the upper-right corner of the editing screen. You now have two options. Trim removes the sections of the audio before the left yellow marker and after the right yellow marker. Delete removes all the audio within the two yellow markers.
On the lower yellow graph, move the left marker to the starting position and move the right marker to the ending position. Then tap either Trim or Delete, depending on whether you want to remove the sections outside or inside the two markers.
Play the audio to make sure you removed the right section. If not, just tap Cancel on the upper-left corner and try again. If you’re happy with your changes, tap the Save button and then tap Done.
Share Recordings on iPhone
After you’ve finalized the recording, you can copy, share, or duplicate it, and perform other actions. Tap the ellipsis icon ( ) for that recording to see your sharing options. Tap the Copy icon to create an M4A file of your recording and Share to send the recording via email or messaging app.
The file can also be copied to Box, Dropbox, Google Drive, OneDrive, or another storage site. Tap Duplicate to create another copy of the recording. Tap Save to Files to save it to any service set up through the iOS Files app, such as Box, DropBox, OneDrive, or iCloud.
Finally, tap the link to Edit Actions, and you can enable or disable certain actions accessible from the menu, including Save to Files and Save to Dropbox. You can also change the order in which the actions appear. By default, actions tagged as Favorites appear at the top of the list. Add all the actions to your Favorites and then press and hold on its hamburger icon ( ) to raise or lower it in the list.
Here is a complete tutorial on how to record voice memos on iPhone or iPad in lossless audio quality instead of compressed.
Though some might dismiss it a lot, but Voice Memos is a very handy app. You can record your thoughts and ideas on the fly without having to whip out that Apple Pencil or keyboard. Need to record a lecture? You can do that as well. In short, it’s a nice little feature which everyone should make use of one way or the other.
Today we’ll show you how to get even more out of Voice Memos. How? By showing you how to record audio in lossless quality. But why? There a lot of reasons you may want to do this. For example, you are recording a quick guitar riff which has to sound crystal clear when you send it over to someone. Or, you decide to use your iPhone or iPad as a mic for your podcast. The reasons might be endless, but we’ll show you how to jump into action right now.
Note: By default, the Voice Memos app records everything in a compressed format. This saves a lot of space on your iPhone or iPad but while sacrificing audio quality a little.
1. On your iPhone or iPad, launch the Settings app.
2. Scroll down a little and find the Voice Memos entry.
3. Found it? Now tap to open it up.
4. Now tap to open ‘Audio Quality.’
5. Set to Lossless and close the Settings app.
Whenever you record a voice memo from now on, you’ll end up doing it in lossless audio which will sound better, obviously.
Keep one thing in mind and it’s absolutely important that you understand this: recording audio in lossless quality might be great and all but it will eat up your storage faster than the compressed option. If you are still rocking a 16GB or 32GB iPhone or iPad then you might want to refrain from using this feature altogether, until or unless absolutely necessary.
I will encourage users out there to take this feature for a spin and see how it works out for them. It’s a nice way to double up your iOS phone or tablet as a mic for a project that involves a lot of vocals. Who knows, this might even save you a ton of money by skipping on buying a dedicated mic altogether.
The ability to record your voice on your smartphone saves a lot of time in a wide range of scenarios, especially when you need to quickly make a note about something without having to write it down.
But, how do you do it on your iPhone? The process is actually very easy, and comes in handy at the most appropriate moments. The Voice Memos app for the iPhone does exactly what the name suggests.
The Voice Memos program simplifies the process of saving an audio file so that you can use it later. Be it recording an event, a lecture in a classroom or taking voice notes during an official meeting, the app will get the job done.
While the developers at Apple have introduced the AI assistant Siri and the Music Memos app to record your tunes, Voice Memos is the basic app for any kind of voice recording. The app lets you record voice memos, trim it to the necessary size and share it with anyone.
Here’s a step-by-step guide that should help you understand its features.
How to Record Voice Memos?
First and foremost, the most basic feature of them all.
- By default, the Voice Memos app is located in the utilities folder in your home screen. Launch the app.
- The interface is self-explanatory. For those who need assistance, just tap on the big ‘Red’ button in the center.
- Once you tap, the app will start recording any sounds in the surrounding region.
- A continuous sound wave indicates that recording is in progress. If you want to stop recording, tap on the Red button again.
- Click ‘Done’ to proceed to the next step.
- Once the recording has stopped, you can choose to save it as the default new recording or name it.
- Tap in the field that appears to specify a name and click save.
Then that’s it! The audio file is now saved on your iPhone/iPad for you to access anytime you want.
Browse through Previously Saved Voice Memos
Once you record a voice memo, the file can easily be saved on your device. When there are a couple of memos saved in your phone, here’s how you can access them and listen to specific recordings you want.
- Open the Voice Memos app on your iPhone/iPad. The app will be in your Utilities folder or on the home screen, if you are frequent user who wants to readily access the app anytime.
- The list of sounds recorded in the past can be found below the app’s main interface.
- You can touch to scroll through the list and tap on any one of the items to play the audio.
- When you tap on it, the file will open with a Play sign.
- Simply tap again to start playing.
How to Share a Voice Memo?
There are multiples ways to share existing voice memos from your iPhone.
- Open the Voice Memo from your home screen or utilities folder.
- Tap on the recorded file to open it.
- Right below the Play button, there is a share button. It’s a box icon with an upward arrow that indicates sharing.
- Tap on it and it will provide a list of ways to share your file.
- Share recordings via email or message, add it to a note, or do any action as you prefer.
How to Edit/Trim Your Voice Memo on iPhone/iPad?
Most users end up recording an audio clip in a hurry and it’s not always easy to get the perfect sound. Apple devices provide an option to edit and trim your file according to your needs. It helps remove any unwanted portion or provide a crisp output to the recipient.
- Open the Voice Memos app from your home screen/utilities folder, wherever you placed it last.
- Follow the same procedure as playing an audio file. Scroll through the list of recordings available and tap on the file.
- Once the file is open, click on the edit option.
- The option is located right next to the share box icon, in the center of the screen.
- Inside the Edit screen interface, click on the blue square located on the right side.
- Tap and drag the red sliders on both sides of the audio wave.
Once you are satisfied with the results, tap Trim to save the file.
- You can choose to Trim an audio file and overwrite the original. Trim Original is usually the option to go for.
- Alternatively, you can choose to Save as New Recording so that the original file is retained without any alterations.
How to Delete Voice Memos?
- Open the Voice Memos app from your device.
- Scroll through the list of previous recordings.
- Keep scrolling until the red record button is the only thing visible on top of the app.
- Click on the Edit button found on the left hand corner.
- A red circle with a dash icon will appear against all recordings.
- Click all the files you want to delete and click done once you have cleared up the space.
How to Rename & Organize Voice Memos?
When there are so many audio files available on your device, it becomes mandatory to rename some of them so that important recordings don’t get lost in the group. Here’s how you can do it.
- Open the Voice Memo app on your iPhone or iPad.
- Scroll through the files and tap on the recording you would like to edit.
- Click on the Edit button that appears.
- Tap on the name of the file.
- A label will appear where you can type a new name and click ‘Ok.’
- The same audio file will be saved with a different name.
Voice Memos app has become more intuitive and useful than ever before.
With newer versions of iOS for both iPhone and iPad, the Voice Memos app has become more intuitive and useful than ever before. You can request Siri to open it for you and start recording as soon as a meeting begins.
Some of the actions are to be carried out manually so that you don’t delete an important file. Simply follow these simple steps and you can make the most out of the app.
With the option to record, trim and share audio files, Voice Memos is easily one of the top must-try apps for every user who owns an Apple iPhone.