It’s far easier to use a MacBook productively if you take the time to learn a few trackpad gestures. Here are the essentials
By David Price, Editor | 31 Aug 17
There are tonnes of multitouch gestures built into your MacBook’s touchpad. In this article we list the ones you need to know.
Note that not all of these gestures work with every MacBook: you’ll need a multi-touch trackpad. Apple has an archived article listing the laptops equipped with multi-touch here. You’ll also get the full range of gestures if you use one of Apple’s Magic Trackpads.
Finally, note that you can expand and customise your range of gestures more easily by using a third-party tool such as BetterTouchTool, which we explain in a separate article: How to open any Mac app or folder with custom shortcuts.
Basic gestures
These are the ones everyone should know, and are essential to controlling a MacBook via trackpad (as opposed to the occasionally handy USB or wireless mouse option).
Left- and right-click
A trackpad acts like a mouse in most respects, but the trackpads on MacBooks don’t have buttons. Instead, you just tap anywhere on the trackpad with one finger to do a left-click, and tap (or click) with two fingers at once to do a right-click.
You can actually do a click with three fingers at once, which performs the same actions you’d get with a hard-press on a Force Touch trackpad: looking up definitions of words and so on.
Scrolling
You can scroll up and down (in websites, text documents and similar) by swiping up and down with two fingers.
Zooming
You can zoom in and out by pinching and un-inching, just as you would do on an iPhone or an iPad. But there’s also a gesture called smart zoom, performed by double-tapping with two fingers. This zooms right into or right back out of a web page or pdf.
Rotating
In certain apps – photo editing apps and the like – you can rotate images by making a rotating motion with two fingers (or more likely a finger and thumb). Again, this matches the gesture you’ll know from iOS.
Advanced gestures
Without wishing to sound like a clickbait headline, most people don’t know about these gesture controls (you’ll believe number 3!) but they’re incredibly handy tools to add to your repertoire.
Notification Centre
Swipe in from the lefthand edge of the trackpad with two fingers and you’ll make Notification Centre pop up. Make it go away again by swiping back in the opposite direction.
Mission Control & Launchpad
Similarly, you can easily make Mission Control and Launchpad pop up with relatively simple gestures.
Swipe up with four fingers (or occasionally three, depending on the version of macOS you’re using – experiment) to bring up Mission Control.
Launchpad can be summoned by doing a pinching action with your thumb and three fingers.
Exposé and Show desktop
The classic F3 and Cmd-F3 actions most Mac users depend upon can also be conjured up with trackpad gestures.
Activate Exposé – which shows all open windows for ease of navigation – by swiping down with four fingers. Again, in certain versions of macOS three fingers will be enough.
To show the desktop (with all windows whisked temporarily away, so you can easily grab a file from the desktop or drag one to it), do an ‘unpinch’ motion with your thumb and three fingers – have them clumped together on the trackpad and then move them apart.
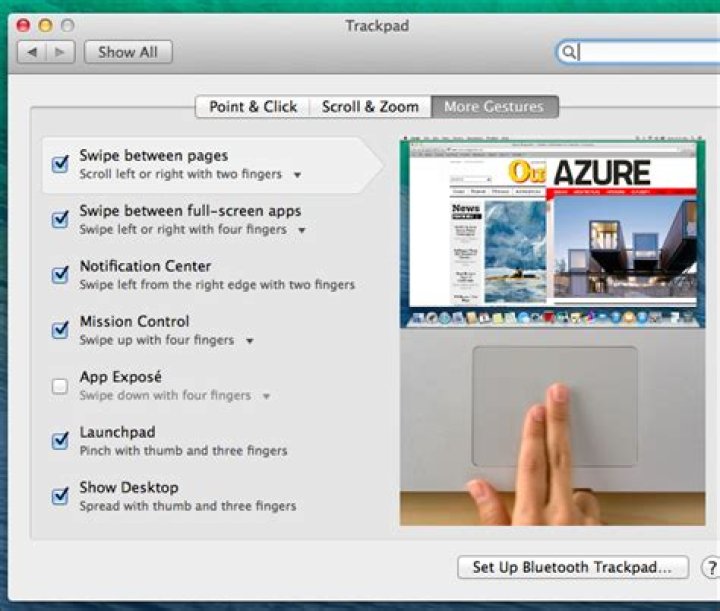
Customising trackpad gestures
Here’s a very important final point: you can customise the way gestures work on your trackpad, and turning some off entirely, by doing some quick tweaks in System Preferences.
Click Trackpad, and then browse through the various controls, ticking or unticking the ones you want to be activated or disabled.
Note: We may earn a commission when you buy through links on our site, at no extra cost to you. This doesn’t affect our editorial independence. Learn more.
Author: David Price, Editor
David has loved the iPhone since covering the original 2007 launch; later his obsession expanded to include iPad and Apple Watch. He offers advice to owners (and prospective owners) of these devices.
- Your MacBook ‘s touchpad has a number of different commands that can let you zoom, rotate images, reveal extra options, and more.
- If you’re using the official Apple Magic Mouse , there are even more commands you can use.
- To change how commands work, or what they do, open the System Preferences app.
Your MacBook’s built-in Multi-Touch trackpad (or external Magic Trackpad) can respond to a number of commands (like tapping, swiping, and pinching) using one or more fingers. Apple’s Magic Mouse can also respond to a variety of commands.
Once you’ve tested out the touchpad or mouse commands, you can then customize them however you like – you can even disable them altogether, if you prefer.
How to perform touchpad commands on a Mac
- Click: Click or tap using one finger to click. This action mimics the left-click on a traditional computer mouse.
- Secondary click: Click or tap using two fingers. This action mimics the right-click on a traditional computer mouse.
- Scroll: Slide two fingers up or down the trackpad to scroll up or down.
- Smart zoom: Double-tap with two fingers to zoom in and out of a webpage or PDF.
- Zoom in and out: Using two fingers, make a pinching motion to zoom in and out.
- Rotate: Move two fingers around each other on the trackpad to rotate an image.
- Swipe between pages: Swipe two fingers left or right to show the previous or next page.
- Show desktop: Spread your thumb and three fingers to show the desktop.
- Swipe between full-screen apps: Swipe four fingers left or right to toggle between full-screen apps.
- Show all active apps: Swipe up with three fingers to zoom out of your current window, and see every app that’s currently open.
For details on additional trackpad gestures, check out this Apple Support page.
How to perform commands on your Mac’s Magic Mouse
- Click: Click the left side of the mouse to click, like you would on any other computer mouse.
- Secondary click: Click the right side of the mouse, like you would on a traditional computer mouse.
- Scroll: Slide one finger up or down the Magic Mouse to scroll up or down.
- Smart zoom: Double-tap with one finger to zoom in and out of a webpage or PDF.
- Swipe between pages: Swipe one finger left or right to show the previous page or next page.
- Swipe between full-screen apps: Swipe two fingers left or right to toggle between full-screen apps.
For details on additional Magic Mouse gestures, check out this Apple Support page.
How to change trackpad or mouse commands
Click the Apple icon at the top of the screen, then click “System Preferences” from the drop-down menu. Click “Trackpad” or “Mouse” to see a list of available gestures.
Here, you can turn gesture-activated commands on or off, or change the gesture for a specific command.
@chrisbhoffman
Mar 22, 2014, 6:40 am EST | 3 min read
MacBooks offer quite a few multi-touch trackpad gestures. These gestures allow you to perform common actions more quickly — the trackpad isn’t for pointing and clicking.
The same gestures will work on a Apple Magic Trackpad, too. We’re focusing on the default gestures here, although they can be customized — if you’ve already customized them, they’ll work differently.
Clicking, Scrolling, Zooming, and Rotating
You can perform a single-finger tap on your trackpad to left-click or a two-finger tap to right-click — no need to actually press down on the trackpad.
The three-finger tap isn’t as obvious. Position your cursor over a word in almost any application and perform a three-finger tap to view a dictionary definition for that word.
Scrolling is simple — place two fingers on your trackpad and move them up, down, left, or right to scroll in any direction.
Zoom in our out in a browser or another document with a pinch-to-zoom gesture. Place two fingers on the trackpad and move them together to zoom in or move them apart to zoom out.
Perform a “smart zoom” by double-tapping with two fingers on the content you want to zoom into. For example, when we double-tap with two fingers on a How-To Geek article, it automatically zooms so that the main content column fills the browser window.
Rotate the current document by placing two fingers on your trackpad and moving them in a circle, like you’re turning a knob. This won’t do anything in a web browser but will work in applications where it’s appropriate. For example, this gesture rotates the current photo when you use it in iPhoto.
Navigation Gestures
Place two fingers on the trackpad and swipe to the left or right to swipe between pages. For example, this gesture goes back or forward a page in Safari or Chrome.
To move between Spaces (multiple desktops) or full-screen applications, place four fingers on the trackpad and swipe to the left or right. To view all these Spaces, full-screen applications, and windows, place four fingers on the trackpad and swipe up. This opens the Mission Control screen. You can also perform a four-finger swipe-down to leave this screen.
To view Launchpad, which shows icons for all your installed applications and allows you to launch them, perform a pinch gesture with your thumb and three fingers.
To view your desktop, perform a “reverse pinch” — place your thumb and three other fingers on the trackpad and spread them apart instead of pinching them together. The windows on your screen will move out of the way, allowing you to see your desktop. To get your windows back, perform a the opposite gesture, pinching your fingers together instead of spreading them apart.
Place two fingers at the right side of your trackpad and swipe them to the left to open the Notification Center. Notifications from applications like email clients, instant messaging programs, Twitter applications, and anything else that creates system notifications will appear here.
Viewing and Customizing Gestures
Apple allows you to customize almost all of these gestures, changing which gesture corresponds to which action, and disable any gestures you don’t want to use. They also provide videos that demonstrate how these gestures work — a welcome change from Windows 8’s trackpad gestures, which weren’t explained anywhere in its interface.
To access this pane, click the Apple icon on the bar at the top of your screen, click System Preferences, and click Trackpad. Here you’ll find settings and videos — hover over a gesture to watch the short video that demonstrates how it works.
A few of the gestures here are disabled by default, but can be enabled. For example, one gesture allows you to move windows around your screen by placing three fingers on your trackpad and moving your fingers. Or, you can enable the App Exposé option and perform a four-finger downward swipe to view all the open windows associated with the current application.
(To view all open windows for all applications, just perform a four-finger swipe upwards to visit Mission Control.)
You probably won’t use every gesture all the time, but they’re very useful for getting around your Mac. They allow you to use fluid finger movements rather than hunting and pecking for the small targets on your screen. Visit the Trackpad panel in System Preferences to review the gestures at any time.
With a Multi-Touch trackpad or Magic Mouse, you can tap, swipe, pinch, or spread one or more fingers to perform useful actions.
Trackpad gestures
For more information about these gestures, choose Apple menu > System Preferences, then click Trackpad. You can turn a gesture off, change the type of gesture, and learn which gestures work with your Mac.
Trackpad gestures require a Magic Trackpad or built-in Multi-Touch trackpad. If your trackpad supports Force Touch, you can also Force click and get haptic feedback.
Tap to click
Tap with one finger to click.
Secondary click (right-click)
Click or tap with two fingers.
Smart zoom
Double-tap with two fingers to zoom in and back out of a webpage or PDF.
Scroll
Slide two fingers up or down to scroll. 1
Zoom in or out
Pinch with two fingers to zoom in or out.
Rotate
Move two fingers around each other to rotate a photo or other item.
Swipe between pages
Swipe left or right with two fingers to show the previous or next page.
Open Notification Center
Swipe left from the right edge with two fingers to show Notification Center.
Three finger drag
Use three fingers to drag items on your screen, then click or tap to drop. Turn on this feature in Accessibility preferences.
Look up and data detectors
Tap with three fingers to look up a word or take actions with dates, addresses, phone numbers, and other data.
Show desktop
Spread your thumb and three fingers apart to show your desktop.
Launchpad
Pinch your thumb and three fingers together to display Launchpad.
Mission Control
Swipe up with four fingers 2 to open Mission Control.
App Exposé
Swipe down with four fingers 2 to see all windows of the app you’re using.
Swipe between full-screen apps
Swipe left or right with four fingers 2 to move between desktops and full-screen apps.
Mouse gestures
For more information about these gestures, choose Apple menu > System Preferences, then click Mouse. There you can turn a gesture off, change the type of gesture, and learn which gestures work with your Mac. Mouse gestures require a Magic Mouse.
Secondary click (right-click)
Click the right side of the mouse.
Scroll
Slide one finger up or down to scroll. 1
Smart zoom
Double-tap with one finger to zoom in and back out of a webpage or PDF.
Mission Control
Double-tap with two fingers to open Mission Control.
Swipe between full-screen apps
Swipe left or right with two fingers to move between desktops and full-screen apps.
Swipe between pages
Swipe left or right with one finger to show the previous or next page.
1. You can turn off trackpad scrolling in Accessibility preferences.
2. In some versions of macOS, this gesture uses three fingers instead of four.
Многие действия на MacBook Air — пролистывание веб-страниц, масштабирование документов, поворот фотографий — можно выполнять простыми жестами на трекпаде. Трекпад Force Touch чувствителен к силе нажатия. Эта его особенность существенно расширяет возможности управления устройством. Трекпад также предоставляет отклик: при переносе или вращении объектов Вы ощущаете легкую вибрацию, которая помогает выполнять действия точнее.
Ниже перечислены основные жесты.
Щелчок: Нажмите в любой точке трекпада. Или просто коснитесь трекпада, если в его настройках включена функция «Нажатие для имитации нажатия мыши».
Нажатие с усилием. Нажмите, затем нажмите глубже. Жест нажатия с усилием можно использовать для поиска информации: нажмите слово, чтобы показать его определение, или нажмите адрес, чтобы посмотреть его местонахождение в приложении «Карты».
Имитация правой кнопки (нажатие правой кнопкой). Нажмите двумя пальцами, чтобы открыть контекстное меню. Если включена функция имитации правой кнопки, можно просто коснуться трекпада двумя пальцами. Удерживая клавишу Control на клавиатуре, нажмите трекпад.
Прокрутка двумя пальцами. Для прокрутки проведите двумя пальцами вверх или вниз.
Масштабирование сведением и разведением пальцев. Для уменьшения или увеличения масштаба фотографий и веб-страниц сведите большой палец с другим пальцем или разведите их.
Навигация смахиванием. Перелистывайте веб-страницы, документы и другие материалы жестом смахивания двумя пальцами назад и вперед.
Запуск Launchpad. Легко запускайте приложения из Launchpad. Для запуска приложения сведите вместе четыре или пять пальцев, затем нажмите на приложении.
Переключение между приложениями смахиванием. Чтобы перейти от одного полноэкранного приложения к другому, выполните жест смахивания влево или вправо тремя или четырьмя пальцами.
Настройте жесты. В Системных настройках нажмите «Трекпад». Вы можете выполнить следующие действия.
Узнать подробнее о каждом жесте.
Установить желаемую силу нажатия.
Задать действия в зависимости от силы нажатия.
Настроить другие функции трекпада.
Совет. Если компьютер распознает Ваше касание как нажатие с усилием, попробуйте настроить силу нажатия в настройках трекпада. Или измените параметр «Поиск и детекторы данных» с варианта по умолчанию «Сильное нажатие одним пальцем» на вариант «Касание тремя пальцами».
Примеры возможностей нажатия с усилием см. в статье службы поддержки Apple Использование трекпада Force Touch.
We’d argue that unless you’re working with Apple products in a professional capacity, your device of choice at home is a MacBook. While the trackpad is efficient combined with swipes and gestures, it’s not the only way to move around macOS. You may want to navigate your Mac without the Trackpad.
In this post, we offer some helpful techniques for navigating sans trackpad. However, first we clear up why it isn’t always the best option for navigation.
Why the Trackpad Isn’t Always the Best Way to Navigate Your Mac
Even on older MacBooks, the trackpad was a novel and sleek way to get around. It was arguably much better than the offerings on Windows-based machines, and a look around any office now will show you laptop users using a mouse as standard compared to MacBook users with a trackpad.
However, while swipes and gestures using the trackpad are a timesaver in some cases, they’re not completely faultless. Many of the best shortcuts aren’t possible using the trackpad alone. An errant swipe can cause havoc in certain applications.
What’s more, your MacBook’s battery sits right underneath the trackpad. Once it begins to fail, this will affect the usage of the trackpad. Jittering cursors are usually down to a bulging battery butting against the trackpad.
Alternatives to the Trackpad to Navigate Your Mac
Overall, for the majority of everyday tasks, the trackpad is great and user-friendly. However, if you’re looking for an alternative, you could consider the Magic Mouse 2.
This peripheral is for those coming from desktop Mac machines and also serves as a gateway for transitioning Windows users. It’s a wireless mouse from Apple that can be recharged – so there’s no need for batteries. What’s more, the multi-touch functionality means you can use gestures as you would with a trackpad but with the feel of a mouse.
If you’re working in digital creative fields such as photography or graphic design, a pen and tablet will likely feel natural in your hand.
Even a small solution such as a cheaper Wacom tablet is good enough to navigate a 15-inch MacBook Pro screen. While you won’t be able to take advantage of macOS gestures, you will be able to flow between apps with a greater consistency. In any case, tablets will often have customizable buttons for you to program.
Tips for Navigating Your Mac without the Trackpad
There are two classic approaches for navigating your Mac without the trackpad:
When it comes to keyboard shortcuts, it’s important to learn by doing. This means your navigation speed will slow to a crawl for the first few days. However, you’ll keep coming across the same shortcuts over and over again.
Most shortcuts will utilize the Command ( CMD ) key, and this directly replaces Control ( CTRL ) from Windows machines. However, the Mac also has a CTRL key, and it’s actually used in the same way as CMD in certain apps (most notably in Linux ports).
If you’re overwhelmed with the number of shortcuts you need to remember, you may want to download a CheatSheet.
It’s a free app that brings up an overlay of relevant shortcuts for an app once you hold the CMD key down for a few seconds. Over time, you may not need it; however, at the beginning of your journey, it’s welcome help.
As for Spotlight, consider it like pulling up a computer-specific search engine whenever you need to find something. In fact, there are plenty of add-ons available to integrate services, such as Google Drive into Spotlight. Regardless, Apple’s own tools – such as dictionaries, calculators, and more – can be accessed through a quick CMD + Space shortcut to bring Spotlight up.
This lets you integrate a raft of services into the traditional Spotlight functionality, such as changing your choice of search engine, adding Spotify search, and more, all from the search bar.
There have been more modern developments, too, such as Siri integration and the introduction of the Touch Bar. However, getting your hands off of the trackpad, utilizing shortcuts, and opening up Spotlight regularly is going to supercharge how you navigate macOS forever.
In Summary
Navigating a smaller form factor device such as a MacBook could bring about a number of problems. However, Apple’s design team have made the trackpad a great way to get around macOS, although it’s not perfect. Keyboard shortcuts and heavy Spotlight usage will help you navigate quicker and more efficiently than practically any other method.
Would you like to navigate your Mac without the trackpad? Share your insights and questions in the comments section below!
Tom Rankin is a quality content writer for WordPress, tech, and small businesses. When he’s not putting fingers to keyboard, he can be found taking photographs, writing music, playing computer games, and talking in the third-person.
Apple updated Boot Camp app to bring support for Windows 10 officially. We had already shared with you two ways to install and use Windows 10 on your Macs but it’s always good to get official support. With this latest support, more OS X users are expected to download and install Windows 10 on their MacBook. Once you are on Windows 10, it would be one awesome treat to get gesture support in Windows that Microsoft offered for devices with Precision Keyboards. Here is how you can bring trackpad gestures in Windows 10 on Mac.
– Recommended: New Windows 10 Activation Rules – All You Need to Know
Enable Windows 10 trackpad gestures on Mac:
You can get some free third-party apps to enable gesture controls in Windows 10 on Mac. Trackpad++ along with Power Plan System (only required for 64-bit systems) help bring gesture support in Windows enabling your trackpad with more controls. While Trackpad++ is the app actually responsible for the task, Power Plan Assistant essentially helps it install, overriding Microsoft’s digital signature enforcement policy. Following is the guide to enable gesture controls in Windows 10 on Mac.
Required files: Download Power Plan Assistant and Trackpad++
- Double click on Trackpad++ to install the app.
- You will receive a warning; click on More Info and check on I understand the risk. and click on Run Anyway.
- Follow the on-screen instructions and allow the app to override Microsoft’s digital enforcement policy.
- Drivers will install now, after which you will be asked to agree to Boot Camp modifications.
- Reboot your Mac.
- Next, double-click on Trackpad++ again followed by clicking on the More Info >Run Anyway.
- Begin installation > finish it and click Yes to install the drivers.
- On the next screen, click on Install this driver software anyway.
- Click on OK when completed.
You will now notice Trackpad++ in the lower-right corner of your task bar. Double-click it to configure the features that you want to try.
Note: The app seems to be a pretty old and a trusted effort that is constantly kept updated. While there doesn’t appear to be any security concern, always proceed with caution when it comes to third-party apps. According to the developer, you will have to update Trackpad++ weekly.
[Trackpad++] requires mandatory weekly update. If the week has passed and Trackpad++ Control Module was not updated, Trackpad++ driver will be using the Boot Camp driver settings, unless the Trackpad++ Control Module is updated.
Recevoir tous les articles sur ce sujet.
Vous suivez désormais les articles en lien avec ce sujet.
Ce thème a bien été retiré de votre compte
- Partager sur Facebook
- Partager sur Twtter
- Partager sur Linkedin
- Copier l’article dans le presse-papier
How to use your Mac’s special touchpad commands, and edit them if you’re not satisfied
Your MacBook’s touchpad has a number of different commands that can let you zoom, rotate images, reveal extra options, and more.
- Your MacBook’s touchpad has a number of different commands that can let you zoom, rotate images, reveal extra options, and more.
- If you’re using the official Apple Magic Mouse, there are even more commands you can use.
- To change how commands work, or what they do, open the System Preferences app.
- Visit Business Insider’s Tech Reference library for more stories.
Your MacBook’s built-in Multi-Touch trackpad (or external Magic Trackpad) can respond to a number of commands (like tapping, swiping, and pinching) using one or more fingers. Apple’s Magic Mouse can also respond to a variety of commands.
Once you’ve tested out the touchpad or mouse commands, you can then customize them however you like – you can even disable them altogether, if you prefer.
How to perform touchpad commands on a Mac
For details on additional trackpad gestures, check out this Apple Support page.
How to perform commands on your Mac’s Magic Mouse
For details on additional Magic Mouse gestures, check out this Apple Support page.
How to change trackpad or mouse commands
Click the Apple icon at the top of the screen, then click “System Preferences” from the drop-down menu. Click “Trackpad” or “Mouse” to see a list of available gestures.
Here, you can turn gesture-activated commands on or off, or change the gesture for a specific command.
MacBook trackpads are excellent in all terms. It comes with great touch response and unique gestures. With Windows 10 Precision touchpad gestures, you can now get a Mac-like experience right on any laptop.
Here’s how to configure Windows 10 touchpad gestures to get Mac-like scrolling on any laptop.
Does Your Laptop Have A Precision Trackpad
Most of the Windows laptops right now comes with the precision trackpad. It supports all the gestures in Windows 10 OS so that you get a unique experience compared to the older laptops. To get a MacBook-like gesture on your laptop, you need to have a precision trackpad.
- Open the Settings app.
- Click on Devices.
- In the left column, select Touchpad.
- If your device has a precision touchpad, you’ll see that on the right.
If your device doesn’t have a precision touchpad, you won’t see any such message. In that case, you can only adjust the trackpad sensitivity on this page and not much else.
Configure Windows 10 Precision Touchpad Gestures
You might have seen the touchpad configuration tool from the manufacturer on older laptops. Microsoft, in fact, now bakes all the precision touchpad gesture settings into Windows 10. It is now easier to set Windows 10 touchpad gestures with precision trackpad laptops.
So, if you do have a precision touchpad, go through the steps below to configure touch gestures.
- Open Settings on Windows 10.
- Go to the Devices menu.
- Click on Touchpad.
- Choose the type of touch gesture and add actions.
The precision touchpad on Windows 10 supports multiple gestures, with two, three, and four-finger support. Read further to find out more about these gestures.
Configure Two-finger Gestures
The one-finger gesture for Windows 10 trackpad gestures are pretty standard. You can click, hold, and drag. At the same time, the two-finger touchpad gestures on Windows 10 is customizable. You can get Mac-like up and down scrolling in Windows 10 with two-finger gestures.
You get options such as Tap with two fingers to right-click under the sensitivity drop-down menu. Under Scroll and zoom, you can enable/disable the two-finger scrolling gesture, adjust the scroll direction, and enable/disable Pinch to zoom.
Configure Three and Four-finger Gestures
By default, the three-finger gesture on Windows is set to Switch apps and show desktop. The four-finger gesture on Windows is set to Switch desktops and show desktop. You can now change and set a custom action for these gestures, which are almost similar to MacBook trackpad gestures.
The following are some of the gesture actions for three and four-finger gestures on Windows 10 laptops.
- None: Disable three/four-finger gestures.
- Switch apps and show desktop: The default three-finger gesture option. Swipe left or right with three-fingers to simulate Alt+Tab and switch between open windows. Swiping up shows the Multitasking view while swiping down minimizes all windows to show the desktop.
- Switch desktops and show desktop: Default four-finger gesture option on Windows 10 to switch virtual desktops. Swipe left or right with four-fingers to simulate Ctrl+Win+Left or Ctrl+Win+Right respectively. Swiping up shows the Multitasking view while swiping down minimizes all windows to show the desktop.
- Change audio and volume: Swipe up or down to increase or decrease volume respectively. Swiping left goes to the previous track while swiping right skips to the next track.
In addition, you can also configure three-finger and four-finger taps. The choices for both are again, the same. Here are some of the cool actions you can set for four-finger touchpad gestures in Windows 10.
- Nothing
- Launch Windows Search
- Action Center
- Play/pause
- Middle mouse button
Configure Touchpad Gestures for Non-Precision Touchpads on Windows 10
The precision touchpad is something new to the Windows laptops. But, if you are using an older laptop (or a cheaper one without a precision trackpad) there is still hope. You can use the manufacturer settings (Synaptics) to set mac-like gestures on your Windows 10 laptop trackpad.
- Open the Settings app.
- Go to Devices.
- In the left column, select Mouse.
- On the right, you click on the Additional mouse options link.
- This will open up the Mouse Properties window. Alternatively, you can simply search for Mouseproperties using Windows search.
- Click on the Settings button to open the touchpad settings from here.
- From the Synaptics control panel window, select actions for each gesture.
Depending on your laptop manufacturer this window may appear different to you. You can then choose the two-finger, three-finger, and even four-finger gestures for the laptop trackpad from Synaptics control panel.
Reset Windows 10 Precision Touchpad Gestures
If you’ve played around with the touchpad gestures and did not work as you expected, go ahead and reset it. This will set the three-finger Windows gesture to switch apps and four-finger gestures to switch virtual desktops, along with other default actions.
- Go to Settings > Devices on Windows 10 laptop.
- Choose Touchpad options.
- Click the Reset button on the window to reset all gestures.
After resetting, you will get the old trackpad gestures you used before. If the trackpad is glitchy and not sure what you just did, we recommend you to reset trackpad settings.
MacBook-like gestures on any other laptop is a good idea. You can set similar gestures and actions on your Windows 10 touchpad gestures within your laptop.


