A lot of people like the iPad Foldify app (and others like the Toyota Scion paper toy car app Paper Shapers) where you can customize your own papercraft toy before printing it and for good reason of course!
It’s fun to be able to quickly make a variety of your own, unique papercraft toys, and the touchscreen of the iPad makes it easy for people to draw on their paper toy free-hand with their fingers, which most people find much easier than using a computer mouse. ;o)
But there are other, older but still neat free papercraft toy generators that you can use on any computer if you don’t have an iPad of course!
One that’s very easy to use is Carnaval Action Cruisers, where you can pick lots of different skin colours, hair styles, facial features, clothes etc. to create your own, personal Carnaval Action Cruiser papercraft toy to print and build!
And then there is Paper Critters, whose aim it is to create a whole colony of customized paper toy critters! It lets you customize just about anything on your papercraft toy, and you can draw on your papercraft toy free-hand, use simple clipart shape stamps or even upload your own personal image!
On Gloo Man, you will find a very simple tool to mix and match a variety of features to create a unique papercraft Gloo Boy or Gloo Girl toy!
And on PaperMe, you can upload a picture of yourself (or of Patrick Stewart ;o) to make a *really* personal papercraft toy, which you can then customize even further with different hairstyles and clothes!
The BuddyPoke was an app on social networksites like Facebook to customize your own, personal 3D avatar of yourself, and if you earned enough “coins”, you could unlock a feature to turn your unique, personal avatar into a paper toy to download, print and build too!
And it isn’t just people of course: on De Zuinigste Rijder, you can customize your own car! (and find out how fuel efficient such a car would be. ;o)
And even a website like Madurodam had a tool that would let you create, print and build your own, personalized Dutch canal house!
So you see, lots of papercraft toy customizing tools for you to play around with, even if you don’t have an iPad. Look around online and you’ll likely find more!
(and of course you can also simply make your very own simple paper toy yourself entirely from scratch, or start with a blank template from paper toy creators like Cubeecraft, Portland Paper City, e440, Boxpunx, or one of the many others nowadays of course! ;o)
A couple of months ago we showed you Foldify, an iOS app that allows you to create your own custom, foldable, 3D papercraft files. Your designs could then be sent to your printer, cut out, and assembled.
Now, 57Digital Ltd has followed the same concept with their new iOS app, Minecraft Papercraft Studio.
Like Foldify, Minecraft Papercraft Studio allows you to browse through thousands (actually, over 300,000!) of Minecraft skins—or import your own skin by entering your Minecraft username.
From there, you can simply send your design to your printer and cut it out and fold. The process is all very simple, requiring only scissors, glue and a steady hand.
If you want to design your own Minecraft skins, you’ll need to additionally download Minecraft Skin Studio. With this app, you’ll be able to fully customize your character, view your creations in 3D, discuss, like or dislike other users skins, and share your creations with your friends on Facebook.
To see how easy it is to use Minecraft Papercraft Studio, just watch their quick tutorial below for printing, cutting, and gluing instructions.
The only downside? All of 57Digital Ltd’s apps cost $2.99 each. Want a free way to download and print out mini Minecraft papercraft skins? Try out Minecraft Papercraft.
Want to master Microsoft Excel and take your work-from-home job prospects to the next level? Jump-start your career with our Premium A-to-Z Microsoft Excel Training Bundle from the new Gadget Hacks Shop and get lifetime access to more than 40 hours of Basic to Advanced instruction on functions, formula, tools, and more.
A collection of the world’s finest Papercraft, Printable Crafts, Arts and Crafts and Paper Models
Monday, August 13, 2007
Create your own Papercraft
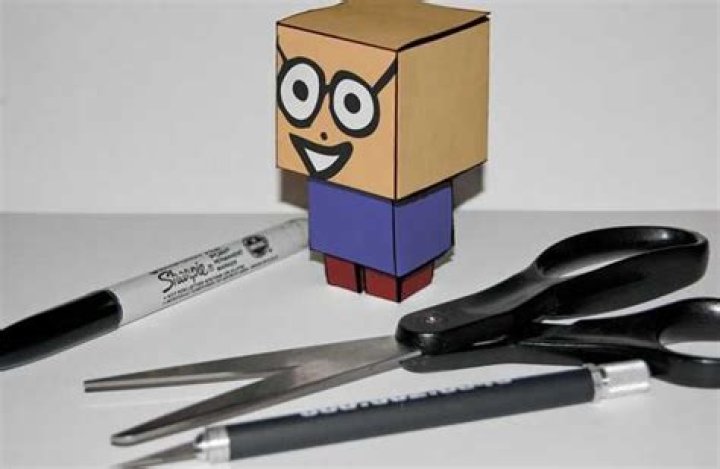
For us mere mortals without the 3d skills (or software) to create personalized papercrafts comes a very cool site; Paper Critters gives you the opportunity to get creative and produce your very own paper models, what a damn cool idea! and who says flash is all bad?
Check it out and dont forget to share your creations!
3 comments:
YAY. Thx for the site. ^__^
Check out these i made.
Bunny:
Pikachu:
Gucci:
Miffy:
LouisVuitton:
Mushroom:
I love the site.
Here’s a few i made.
Lilly:
Hi, I was wondering if you know of a similar site(s) to Paper Critters that also lets you design your own paper toys? There is one in particular that I am looking for, but in addition, every time you design one, it donates money to some cause. It also provides an additional paper strap to insert in the head for you to hang the toy ornament. If there are other sites that you know of, it’ll help me as well. : ) Thanks!
Sex toys are extremely personal items, but people still mostly buy assembly-line stuff. If you’ve graduated beyond the one-size-fits-all sex toy, here’s how you can design the perfect shape for your needs.
The Sex Toy Collective, as noted by Girly Juice , is an organization that encourages “sex toy positivity and reducing stigmas” around the use of dildos, butt plugs, and anything else you might use to get off. to that purpose, they created the Dildo-Sculptor tool , which allows users to design the exact shape and size sex toy they want. You can then download the .STL file that will allow you to have it 3D printed. You can also check out what other people have designed in their gallery for ideas.
Don’t have your own 3D printer? Don’t worry. The STC recommends that you use a printing service like 3Dhubs , which can make prints for between $5 and $20 (depending on size). T hat’s not the end of the process, however —the print itself is not the sex toy. It’s used to make a mold, which then can gets filled with silicone. STC offers these instructions on how to make the mold and buy non-toxic materials for your final piece. But how do you know what they want? In an email to Lifehacker, STC’s editor Ian offered these tips .
Shapes
First of all, where is this thing going to go? Ian writes that the popularity of certain shapes depends on insertion.
The ideal shape depends on how the dildo will be used. For vaginal penetration, a curved shape with a slightly bulbous tip is popular for g-spot stimulation, like this lovely dildo . For anal, that same shape is good for p rostate stimulation and prostate milking.
He adds that for anal, a straight shape is easier for insertion than a curved one . P eople with more anal experience, however, can accommodate more interesting shapes.
A beaded shape “sends waves of pleasure through the body as each bead pops past the sphincter,” according to Ian, and a bigger, longer one is good for “depth fanatics.” He shared this large butt plug as an example of that style. Finally, a spiral shape is good for diagonal stimulation , if you want to hi t every spot.
Check out shapes in person and read reviews
If you live in a metropolitan area, chances are there are sex toy shops where you can get an in-person view of what seems appealing. Ian says that there’s a difference between sex shop boutiques and what he calls “XXX shops,” because the former are generally owned by women. The latter are more oriented towards straight men, and are less likely to have dildos on display that you can touch. STC actually has a map of boutiques if you want to find the one closest to you.
If you can’t reach a shop, Ian recommends reading Amazon reviews of sex toys to get a sense of the design’s benefits and limitations, and how it’s working for real people. Then, when you’re designing your own, you can adhere to an existing pattern with some slight adjustments. There is also a subreddit for sex toys, /r/SexToys , which includes more reviews. Dangerous Lilly is a site where sex toy reviewers list their size and shape preferences, so you know you’re reading the perspective of someone who has similar needs as you.
Common mistakes
The biggest mistakes people make when they’re designing their own dildos is focusing too much on the insertion part; you want to be able to get your toy out, too. Make sure there’s always a flared base on any dildo you make or buy.
Ian adds, “Another mistake is making the design too jagged or having too many crevices, which makes it difficult to clean and could lead to bacteria build-up and infections.”
It might be exciting to have lots of interesting dildo topography, but make sure you’re keeping your sex toy pristine and that it isn’t too rough on you.
Skip the holiday shopping this year. Instead, create something meaningful for your little ones.
POP Projects is a collection of new and classic projects from more than a century of Popular Mechanics. Master skills, get tool recommendations, and, most importantly, build something of your very own.
After my daughter was born, I promised myself I’d build her an heirloom-quality toy—something more lasting than the cheap stuff that fills the stores this time of year. For help creating a toy that I’d be proud to give, I called Brian LaRossa, an award-winning illustrator and senior designer at Scholastic, the children’s media company. He’s also the father of twin boys, making him even more qualified to assist.
We arrived at this wooden dinosaur, which not only looks charming but also invites interaction. Because of the small parts, it’ll be a few years before my daughter gets her hands on this. But when she does, she’ll simply twist the parts to create lifelike poses. Best of all, this toy is easy to build with a few basic tools. And because the materials are affordable and available in bulk, we suggest you build more than one. After all, kids can never have too many friends.
⚠️ This toy has small parts that can be a choking hazard, so we don’t recommend it for children under 3 years of age. As with all handmade toys, don’t leave your child unattended with it—and if it breaks, be sure to scoop up all the parts.
These Tools Will Help
Plans and Materials
Neck, Tail, and Leg Parts
Begin by cutting the dowel stock to the sizes provided in the Parts List on the next page. (For mitered pieces, the dimensions given are for the long side.) Dowels have a tendency to rotate slightly when cut with a miter saw, which can lead to uneven or scorched cuts, so use a cradle that securely holds the workpiece.
We built ours by cutting a V-shaped channel into a scrap piece with a table saw. To cut small parts safely, hold the longer waste side of the dowel and trim off the finished part [1]. Never attempt to cut anything less than 6 inches long as this can cause the blade to launch the workpiece like a missile.
Use a drill press to bore a 5/32-inch hole through the center of each part. Prevent the drill bit from wandering by first marking the center of each part with a center punch. To ensure the part is positioned perpendicular to the drill bit, hold it against the square end of a scrap piece before tightening the hand-screw clamp or drill-press vise [2].
Finish the parts by rounding their edges with sandpaper.
Feet, Head, and Body
Using either a drill press or a cordless drill fitted with a ¾-inch Forstner bit, bore a ⅜-inch-deep hole in four 1⅛-inch balls. To keep the balls from moving as you drill them, clamp them within custom-made cauls fashioned from scrap pieces with ¾-inch holes bored in them [3]. Ease over the edges of the holes to prevent them from marring the ball’s surface.
Make the head in the same way you did the feet, but add another hole for the muzzle. Next, with the part still in the vise, bore a 5/32-inch hole that connects the centers of the two ¾-inch holes. Add ⅛-inch holes for the eyes. For the muzzle, bore a ½-inch hole about ⅛-inch deep into the ¾-inch ball.
Cut two leg sections, each 1½ inches long, from the 2-inch dowel. Mark the centers of the leg sockets, which are positioned halfway along the body sections and about 1½ inches apart from each other. Use a 1-inch Forstner bit to cut each socket ⅛ inch deep. Connect the centers of the leg sockets with a 5/32-inch hole. You’ll need to bore this hole at a steep angle.
Cut the center section at 5-degree bevels on both ends. Next, drill a 5/32-inch hole through the center of each body part. To find the center, take a 1-inch-wide piece of scrap—half the diameter of the dowel—and position it against the toy part. Make a mark, turn the part about 90 degrees, and make an intersecting mark [4].
Ends, Color, and Assembly
Secure a 2-inch split ball in a hand-screw clamp or bench vise. Create the neck socket with a 1-inch Forstner bit. Position the bit so its edge is ⅛ inch from the edge of the part, and cut the hole ⅛ inch deep. Find the center of the flat side of the split ball and bore a 5⁄32-inch hole at an angle so that it exits through the center of the neck socket.
Stain your toy with food coloring, which is nontoxic and can be mixed to create custom shades. Apply with a paintbrush and wipe off any excess with a rag [5]. Note that water-based finishes swell the parts, making them difficult to fit, so let everything dry overnight before assembling. For added luster, wipe on food-grade beeswax with a rag. Avoid waxing areas that will be glued as this will prevent a good bond.
Using a utility knife, cut a piece of elastic cord 8 inches long and knot one end. Pass the cord through one set of leg parts [6], a body section, and the opposite set of leg parts. Pull the cord as tight as it will go, and tie it off. Trim off any excess. Cut another piece of elastic cord 16 inches long, and knot one end. Thread it through the head, the neck parts, the body parts, and the tail parts. Pull it tight and tie it off. Trim excess cord from the head, but leave an inch at the tail.
Drip PVA glue into each foot’s socket and attach the feet to the legs. Glue the muzzle so that its hole is positioned over the knot.
By Caleb Kraft
Caleb Kraft
Senior Editor for Make: I get ridiculously excited seeing people make things. I just want to revel in the creativity of the masses! My favorite thing in the world is sharing the hard work of a maker.
I’d always love to hear about what you’re making, so send me an email any time at [email protected]
@calebkraft
- Like
- Digg
- Del
- Tumblr
- VKontakte
- Flattr
- Buffer
- Love This
- Odnoklassniki
- Meneame
- Blogger
- Amazon
- Yahoo Mail
- Gmail
- AOL
- Newsvine
- HackerNews
- Evernote
- MySpace
- Mail.ru
- Viadeo
- Line
- Comments
- Yummly
- SMS
- Viber
- Telegram
- Subscribe
- Skype
- Facebook Messenger
- Kakao
- LiveJournal
- Yammer
- Edgar
- Fintel
- Mix
- Instapaper
- Copy Link
“Left Shark,” the goofy dancing shark that stole Katy Perry’s half-time show has been exploding all over the web this week. There are devoted Left Shark fans, fan clubs, and memes popping up everywhere. We can’t deny that the adorable shark has some appeal, so we decided to bring Left Shark home.
Now you can have Left Shark on your desk with this quick papercraft project. Simply print, cut along the outermost outline, fold, and glue.
1 of 15
Popsicle sticks do so much more than serve as a vessel for sweet, icy treats. In fact, the slim wooden stick is a focal point in a number of our favorite family-friendly crafts. Adults and kids alike will love making one-of-a-kind creations under the sun, and it all starts with a clean Popsicle stick.
We’re showing you how to transform a simple wooden stick into an architectural find when you build a Popsicle stick house. Gone are the days of ordinary dollhouses thanks to this DIY. Let kids’ imaginations run wild with this craft; it has all the makings to accompany their favorite toys, and you can build it to replicate your own home—like with a chimney or a colorful roof. Top it off with some custom furniture for the lawn, like an outdoor lounge chair, to give it an extra home-y feel.
If you’re planning a small summertime celebration, we have the perfect craft for you. Invite guests to your bash with Popsicle-inspired party invitations that won’t melt away. Popsicle stick crafts even work outdoors, too. Create our Farmhouse Bird Feeder; it’s made of items you already have lying around your house—like a milk carton and paint. You’ll love spending time outdoors watching the birds enjoy their newly minted home that the whole family pieced together. But the crafts don’t stop there. Popsicle stick fun lasts longer than the summer months thanks to our crafty use of the wooden sticks for Christmas ornaments. The seasonal décor will help you ring in the holiday season with ease—just don’t forget the glitter paint for a sparkly, festive finish.
Whether you want to make the most of leftover wooden sticks or are looking for easy and enjoyable DIYs, ahead we’re sharing crafts the whole family will love.
The Best Toys come from Happy Collaborations – and Keeping Fans Top of Mind.
Happy Worker is the toy manufacturer for brands that really care about their fans, collectors, and great design. We have been manufacturing custom toys for ten years, and we absolutely love what we do!
Below we’ll talk about the most popular types of toys and collectibles we make.
If you’re looking for a custom toy maker and you think we could be the right fit, we’ll hope you’ll contact us to learn more about working together.
Happy Workers are amazing. They are creative wizards, enthusiastic, extremely detailed. They definitely exceeded my expectation and their customer service is phenomenal.
Andrea Franklin, Marketing Coordinator
Toronto Argonauts
Happy Worker might be the most fun and focused team to work with; the personality of the company only adds to the quality and professionalism of their work. It is that enthusiasm that breaths life into their work and brings character to your product.
The kinds of toys we love to make include…
Custom Vinyl Toys
Stylized, modern figures and action figures made of vinyl, detail painted, and packaged in custom designed retail packaging.
Custom Action Figures
Traditional poseable and playful action figures custom designed with accessories and retail packaging in the likeness of any person or character.
Custom Plush Toys
Lovingly patterned and crafted with soft plush fabrics, our custom stuffed toys are stylish huggable keepsakes.
Polystone Figurines
Highly detailed figurines that are big on character integrity and value. Made with discerning collectors in mind.
Custom Stress Relievers
Our stress toys are custom designed in the likeness of our clients’ characters, mascots, or products and made to order with your goals in mind.
Custom Capes
Happy Worker has made custom capes for LinkedIn, DreamWorks, and Yahoo. Our capes are made-to-order with premium fabrics.
Tin Lunch boxes
We design and make custom printed and embossed tin lunches for brands looking for a retro collectible that’s both useful and stylish.
Plastic Figures
If action figures, vinyl toys, or resin figurines aren’t perfect for your needs, contact us and we’ll discuss your vision for your plastic figures. Learn more by contacting us.
Army Men
We manufacture classic little green army men plastic toys in new designs just for our clients’ unique needs. Contact us to discuss your army figure project.
Metal Collectibles
If you’re in need of a custom diecast car, metal figurines, or another metal or tin collection, contact us to discuss your project.
Bendy Toys
We manufacturing bendy toys with wires in the arms and legs in the likeness of our clients’ characters, mascots, or products. Give us a call to learn more.
Mini Figures
If your concept is for more of a mini figure than an action figure or vinyl toys, contact us to get further details and to chat about your project. Contact us for details.
Imagineering Service
Occasionally one of our clients wants to manufacture a unique toy that doesn’t exist anywhere else. If that’s you, our Imagineering Service might be a fit. Contact us to learn more.
And More!
If you want to make a custom toy and it’s not on this page, feel free to contact us and we’ll see what we can do!
Shop For Individual Lightsaber Parts
Ready to build your own weapon? Here are all the parts you’ll need to construct your own Ultra Saber custom lightsaber. You can choose to build an Ultra Saber exactly as we do, or you can mix and match custom lightsaber parts to create something specific to you. If you have questions on how to build a lightsaber, please ask on our forums: SaberForum.Com.
The only technical assistance for the “Build Your Own Lightsaber” category will be on Saber Forum, NOT through our email. We highly recommend you create an account and join the Saber Forum community before first attempting to make your own lightsaber! There is also a video tutorial available to help walk you through our custom lightsaber builder checkout process.
Choose a subcategory to see what we have to offer our fellow sabersmiths.
Blades
Shop replacement or spare blades here. Please make sure the blade you order is the proper one for your saber!
Accessories
Check out accessories for your lightsaber here.
Parts and Supplies
Batteries, chargers, blade tips, and more.
Staff Couplers
These parts are used to combine two sabers together to form a staff.
Emitters
Sometimes called a “Blade Holder”, emitters will adorn the top of your hilt and come in many different styles.
Bodies
These are the main body sections for a saber.
Complete Hilts
Our complete, standard lightsaber hilts, are ready for you to assemble and install custom electronics!
Claws
Various claws used on Ultrasaber Emitters.
Pommels
Sometimes called an “End Cap”. These screw on to the bottom of your saber body.
Electronics
Electronics for your lightsaber!
Sound
Supplies for adding sound to your saber.
Lightsabers are one of the most recognizable weapons in the world, and the Star Wars franchise has captured the imagination of an entire generation. In the Star Wars universe, prospective Jedi padawans and Sith apprentices alike are expected to craft their own light sabers to properly complete their training in the use of The Force. Now you can do the same, by building your own customized ultimate lightsaber right here on Ultrasabers.com!
To build your own lightsaber, begin by choosing from our wide inventory of lightsaber components and accessories.
You’ll need all the following parts to complete the process of building your own lightsaber:
Lightsaber Body
The lightsaber body, also known as the grip or handle, is the main housing for your lightsaber electronics, as well as the section you will hold during melee combat. Lightsaber bodies come in a wide variety of styles, colors, and button configurations, so when you build your own lightsaber, make sure to choose a body that provides a comfortable grip for your fingers!
Lightsaber Emitter
In the Star Wars universe, the emitter is the section that produces the plasma blade we all know and love. The lightsaber emitter is the hilt that will hold your blade and guard your fingers against your opponents. Some models of light sabers, such as the War Glaive or Raven will require an additional claw component on the emitter.
Lightsaber Pommel
Also known as the end cap or butt, the pommel is located on the bottom of the housing body and holds the electronics and batteries in place. Most pommels screw off to allow easy replacement of batteries after a long bout of saber combat.
Lightsaber Couplers
Some models of our lightsabers can be fused together, allowing you to build your own lightsaber staff or double bladed light saber. The lightsaber coupler holds two individual lightsabers in place to form a saber staff (not for use with all models of light sabers), and can be easily removed, allowing you to resume dual wielding your sabers.
Lightsaber Electronics
This series of lightsaber electronic components allows you to choose the specific types of battery housing modules, activation buttons, momentary switches, and LED units you want installed in your lightsaber hilt. You’ll also find several types of battery charges to keep your lightsaber ready for action, as well as dummy cells that provide proper weighting without powering your electronics.
Lightsaber Sound Accessories
Exclusively for use with our Sound FX lightsabers, here you’ll find lightsaber sound accessories with options for battery holders and speakers as well as USB cords that allow you to upload sound profiles to your lightsaber sound effects.
To make sure you are fully satisfied with your customized lightsaber, Ultrasabers com provides a comprehensive warranty on all the parts, accessories, and components in this section. If there are any errors on your custom built lightsaber, or if any components are damaged during delivery, we will repair or replace them free of charge! Enjoy your customized lightsaber, and may the force be with you!


